Ezquest B50766 User manual

For the most current PDF Manual visit us online at www.ezq.com

TABLE OF CONTENTS
COBRA CHECKLIST________________________________ 1
SLIM DRIVE CHECKLIST____________________________ 2
PRECAUTIONS __________________________________ 3
HARDWARE INSTALLATION
FIREWIRE 800/ USB 2.0 ____________________________ 4
FIREWIRE ______________________________________ 5
USB 2.0________________________________________ 6
SLIM DRIVE _____________________________________ 7
SOFTWARE INSTALLATION
HARD DISK SPEEDTOOLS MACOS X _____________________ 8
HARD DISK SPEEDTOOLS MACOS 9_____________________ 9
FORMAT
MAC _________________________________________ 10
PC __________________________________________ 11
NOTES ________________________________________ 12

FireWire 800 / USB II
Ext. Kit
Cobra External HD
USB Cable (Cobra)
Mini USB Cable
6-pin / 6-pin FW Cable
9-pin / 9-pin FW Cable
9-pin / 6-pin Converter
Power Cable (Cobra)
USB Slim Power Cable
Hard Drive Utility CD
(includes Hard Disk
Speedtools software,
warranty information,
manuals, and
registration)
Cobra+ FW400 Cobra USB2
Slim USB2
Slim FW/USB2
USB Slim
Power Cable
Mini USB Cable
6-pin / 6-pin
FireWire Cable
9-pin / 9-pin
FireWire Cable
9-pin / 6-pin
Converter Power CablePower Cable
(Cobra)
Hard Drive Utility
CD
-Page 1-
Part description can be found on the label under your drive
USB Cable
(Cobra)
.

Cobra Slim HD
6-pin / 6-pin FW Cable
USB Power Cable
Hard Drive Utility CD
(includes Hard Disk
Speedtools software,
warranty information,
manuals, and
registration)
Slim USB2
Slim FW/USB2
USB Slim Drive
Power Cable
6-pin / 6-pin
FireWire Cable
Hard Drive Utility
CD
-Page 1-
Part description can be found on the label under your drive
SLIM DRIVE CHECKLIST


0AGE4
FIREWIRE 800/USB2.0 HARDWARE INSTALLATION
%.0LUGTHEPINENDOFTHE&IRE7IRECABLEINTOANYAVAILABLE&IRE7IREPORTONYOUR#OBRA$RIVE
&2)NTRODUIRELAUTREEXTRÏMITÏDUCORDONDALIMENTATIONSURUNEPRISESECTEURMURALE
$%3TECKEN3IEEINBELIEBIGES%NDEDES&IRE7IRE+ABELSINEINENFREIEN&IRE7IRE!NSCHLUSS)HRES
#OBRA,AUFWERKS
%.0LUGTHEOTHERENDOFTHE
&IRE7IRECABLEINTOANYAVAILABLE
&IRE7IREPORTONYOURCOMPUTER
&2%NFICHERLAUTREEXTRÏMITÏ
DUCÉBLE&IRE7IRESURLUNDES
PORTS&IRE7IREDISPONIBLESUR
VOTREORDINATEUR
$%3CHLIEEN3IEDASANDERE
%NDEDES&IRE7IRE+ABELSAN
EINEMFREIEN&IRE7IRE!NSCHLUSS
)HRES#OMPUTERSAN
%.)NSERTTHEOTHERENDOF
THEPOWERCORDINTOAWALL
RECEPTACLE
&2)NTRODUIRELAUTREEXTRÏMI
TÏDUCORDONDALIMENTATIONSUR
UNEPRISESECTEURMURALE
$%3TECKEN3IEDASANDERE
%NDEDES3TROMKABELSINEINE
3TECKDOSE
%.)NSERTPOWERPLUGINTOTHEPOWERSOCKETLOCATEDINTHEREAROFTHEDRIVE
&2)NTRODUIRELECONNECTEURDANSLAPRISEDALIMENTATIONSITUÏEËLARRIÒREDUGRAVEUR
$%3CHLIEEN3IEDEN3TROMSTECKERAM3TROMANSCHLUSSAUFDER2àCKSEITEDES
,AUFWERKSAN
%.4URNTHESWITCHTOTHE/.POSITION
&20LACERLINTERRUPTEURSURLAPOSITIONi
/.w-!2#(%
$%"RINGEN3IEDEN3CHALTERINDIE
0OSITION/.
0AGE

0AGE5
%.0LUGEITHERENDOFTHE&IRE7IRECABLEINTOANYAVAILABLE&IRE7IREPORTONYOUR#OBRA$RIVE
&2)NTRODUIRELAUTREEXTRÏMITÏDUCORDONDALIMENTATIONSURUNEPRISESECTEURMURALE
$%3TECKEN3IEEINBELIEBIGES%NDEDES&IRE7IRE+ABELSINEINENFREIEN&IRE7IRE!NSCHLUSS)HRES
#OBRA,AUFWERKS
%.0LUGTHEOTHERENDOFTHE
&IRE7IRECABLEINTOANYAVAILABLE
&IRE7IREPORTONYOURCOMPUTER
&2%NFICHERLAUTREEXTRÏMITÏ
DUCÉBLE&IRE7IRESURLUNDES
PORTS&IRE7IREDISPONIBLESUR
VOTREORDINATEUR
$%3CHLIEEN3IEDASANDERE
%NDEDES&IRE7IRE+ABELSAN
EINEMFREIEN&IRE7IRE!NSCHLUSS
)HRES#OMPUTERSAN
%.)NSERTTHEOTHERENDOF
THEPOWERCORDINTOAWALL
RECEPTACLE
&2)NTRODUIRELAUTREEXTRÏMI
TÏDUCORDONDALIMENTATIONSUR
UNEPRISESECTEURMURALE
$%3TECKEN3IEDASANDERE
%NDEDES3TROMKABELSINEINE
3TECKDOSE
%.)NSERTPOWERPLUGINTOTHEPOWERSOCKETLOCATEDINTHEREAROFTHEDRIVE
&2)NTRODUIRELECONNECTEURDANSLAPRISEDALIMENTATIONSITUÏEËLARRIÒREDUGRAVEUR
$%3CHLIEEN3IEDEN3TROMSTECKERAM3TROMANSCHLUSSAUFDER2àCKSEITEDES
,AUFWERKSAN
%.4URNTHESWITCHTOTHE/.POSITION
&20LACERLINTERRUPTEURSURLAPOSITIONi
/.w-!2#(%
$%"RINGEN3IEDEN3CHALTERINDIE
0OSITION/.

0AGE
0AGE6
%.)NSERTPOWERPLUGINTOTHEPOWERSOCKETLOCATEDINTHEREAROFTHEDRIVE
&2)NTRODUIRELECONNECTEURDANSLAPRISEDALIMENTATIONSITUÏEËLARRIÒREDUGRAVEUR
$%3CHLIEEN3IEDEN3TROMSTECKERAM3TROMANSCHLUSSAUFDER2àCKSEITEDES,AUFWERKSAN
%.)NSERTTHEOTHERENDOFTHE
POWECORDINTOAWALLUNIT
&2)NTRODUIRELAUTREEXTRÏMITÏ
DUCORDONDANSUNEPRISE
SECTEUR
$%3TECKEN3IEDASANDERE
%NDEDES3TROMKABELSIN
EINE3TECKDOSE
%.0LUGTHEFATENDOFTHE53"CABLEINTOTHEBACKOFTHE#OBRA$RIVE
&2%NFICHERLAPARTIEÏPAISSEDUCÉBLE53"DANSLAPRISE53"ËLARRIÒREDUGRAVEUR#OBRA
$%3CHLIEEN3IEDASDICKERE%NDEDES53"+ABELSANDER2àCKSEITEDES#OBRA,AUFWERKSAN
%.4URNTHESWITCHTOTHE/.POSITION
&20LACERLINTERRUPTEURSURLAPOSITIONi/.w-!2#(%
$%"RINGEN3IEDEN3CHALTERINDIE0OSITION/.
%.0LUGTHEOTHERENDOFTHE
53"CABLEINTOA53"PORTINYOUR
COMPUTER
&2%NFICHERLAUTREEXTRÏMITÏDU
CÉBLE53"DANSLEPORT53"DE
VOTREORDINATEUR
$%3TECKEN3IEDASANDERE
%NDEDES53"+ABELSINEINEN
53"!NSCHLUSS)HRES#OMPUTERS

HA
-Page 7-
FIREWIRE/USB 2 COMBO:
USB 2 MODEL:
USB 2.0
PORT
USB 2.0
PORT
FIREWIRE
PORT
POWER
PORT (IF NEEDED)
POWER
PORT (IF NEEDED)
FIREWIRE:
1. Attach Firewire cable to Firewire port on drive
2. Attach other end of Fireiwre cable to port on computer
NOTE: If your computer uses a 4-pin Firewire port you will need a 6-pin to 4-pin Firewire
cable (not included).
If your computer uses a 4-pin Firewire port, or if you system does not supply enough power
through the Firewire port you will need to use an external power supply.
USB 2.0:
1. Attach the Mini port end of the USB 2.0 cable to the USB 2.0 Port on the back of the drive.
2. Attach the 2 standard USB connectors to 2 USB ports on the computer, this will supply
enough power to run the drive off of bus power.
NOTE: If your computer only has 1 USB 2.0 port you will need to use an external power
supply.
If your system does not provide enough bus power to run the
drive, an external power adapter is available from EZQuest.
You can order one through your dealer by email at
SLIM DRIVE HARDWARE INSTALLATION

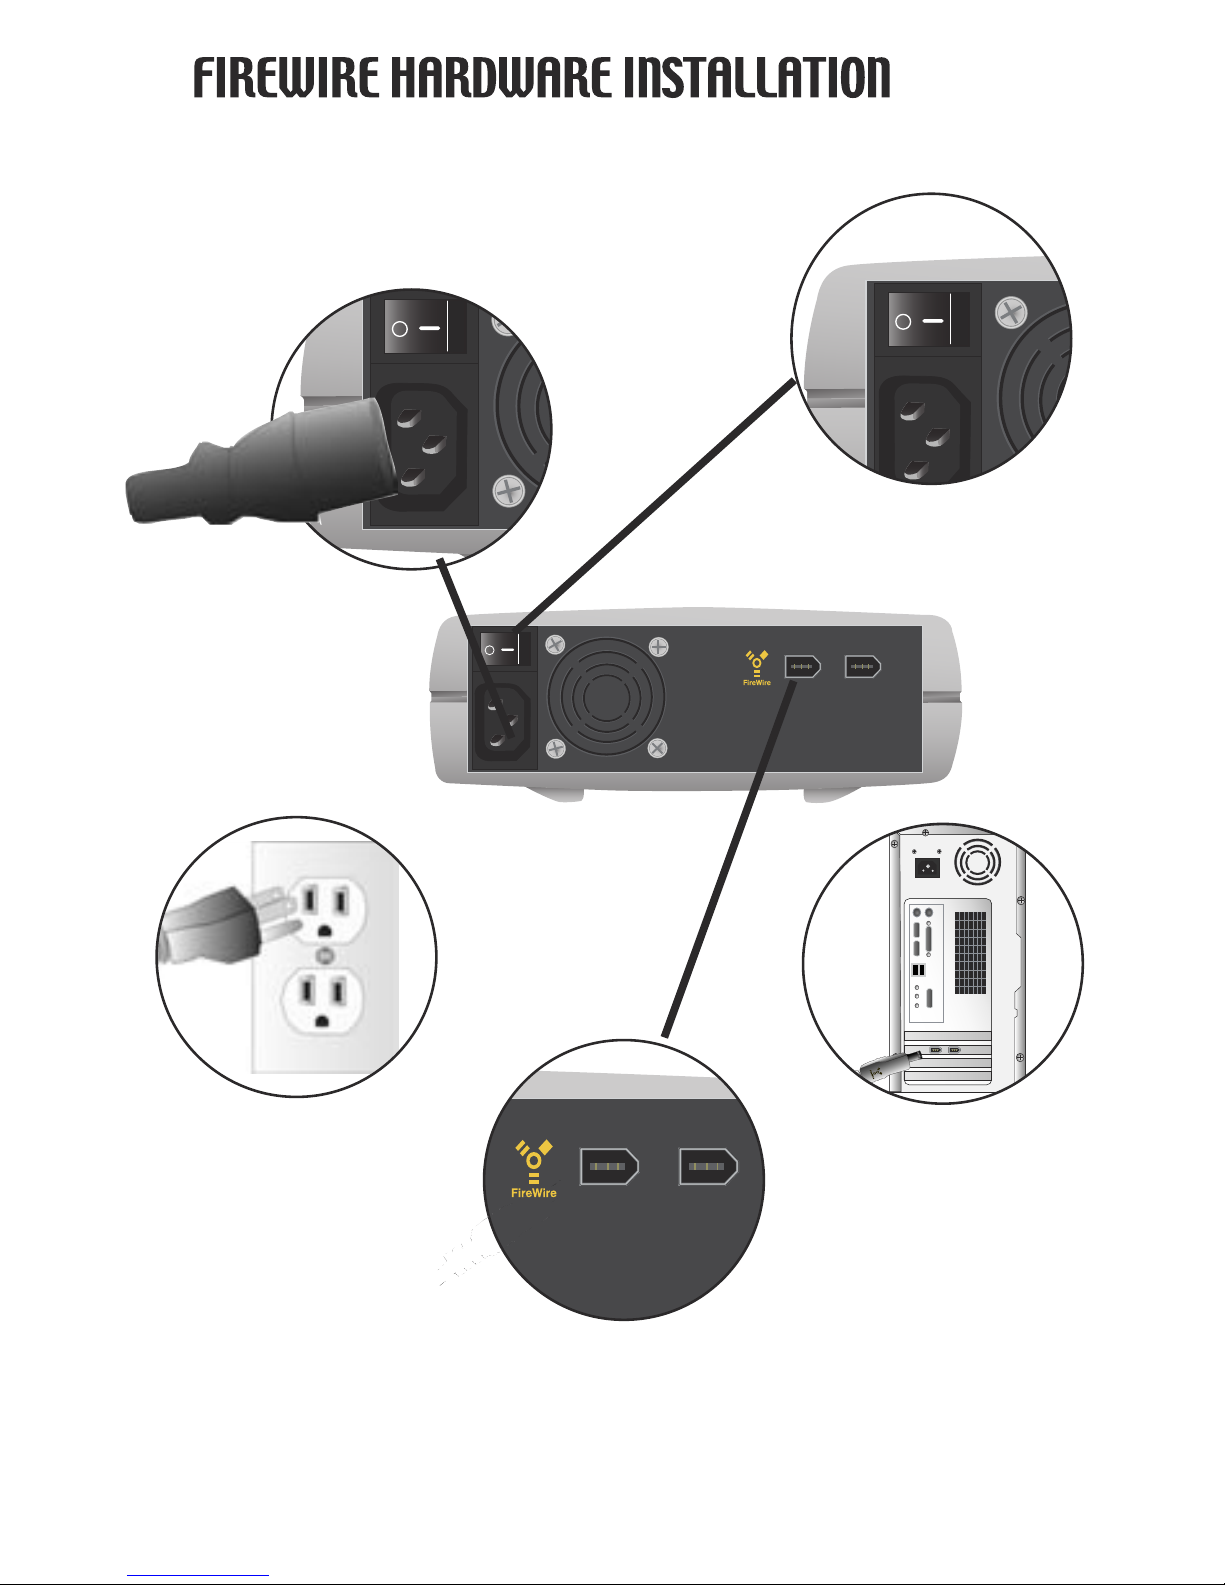
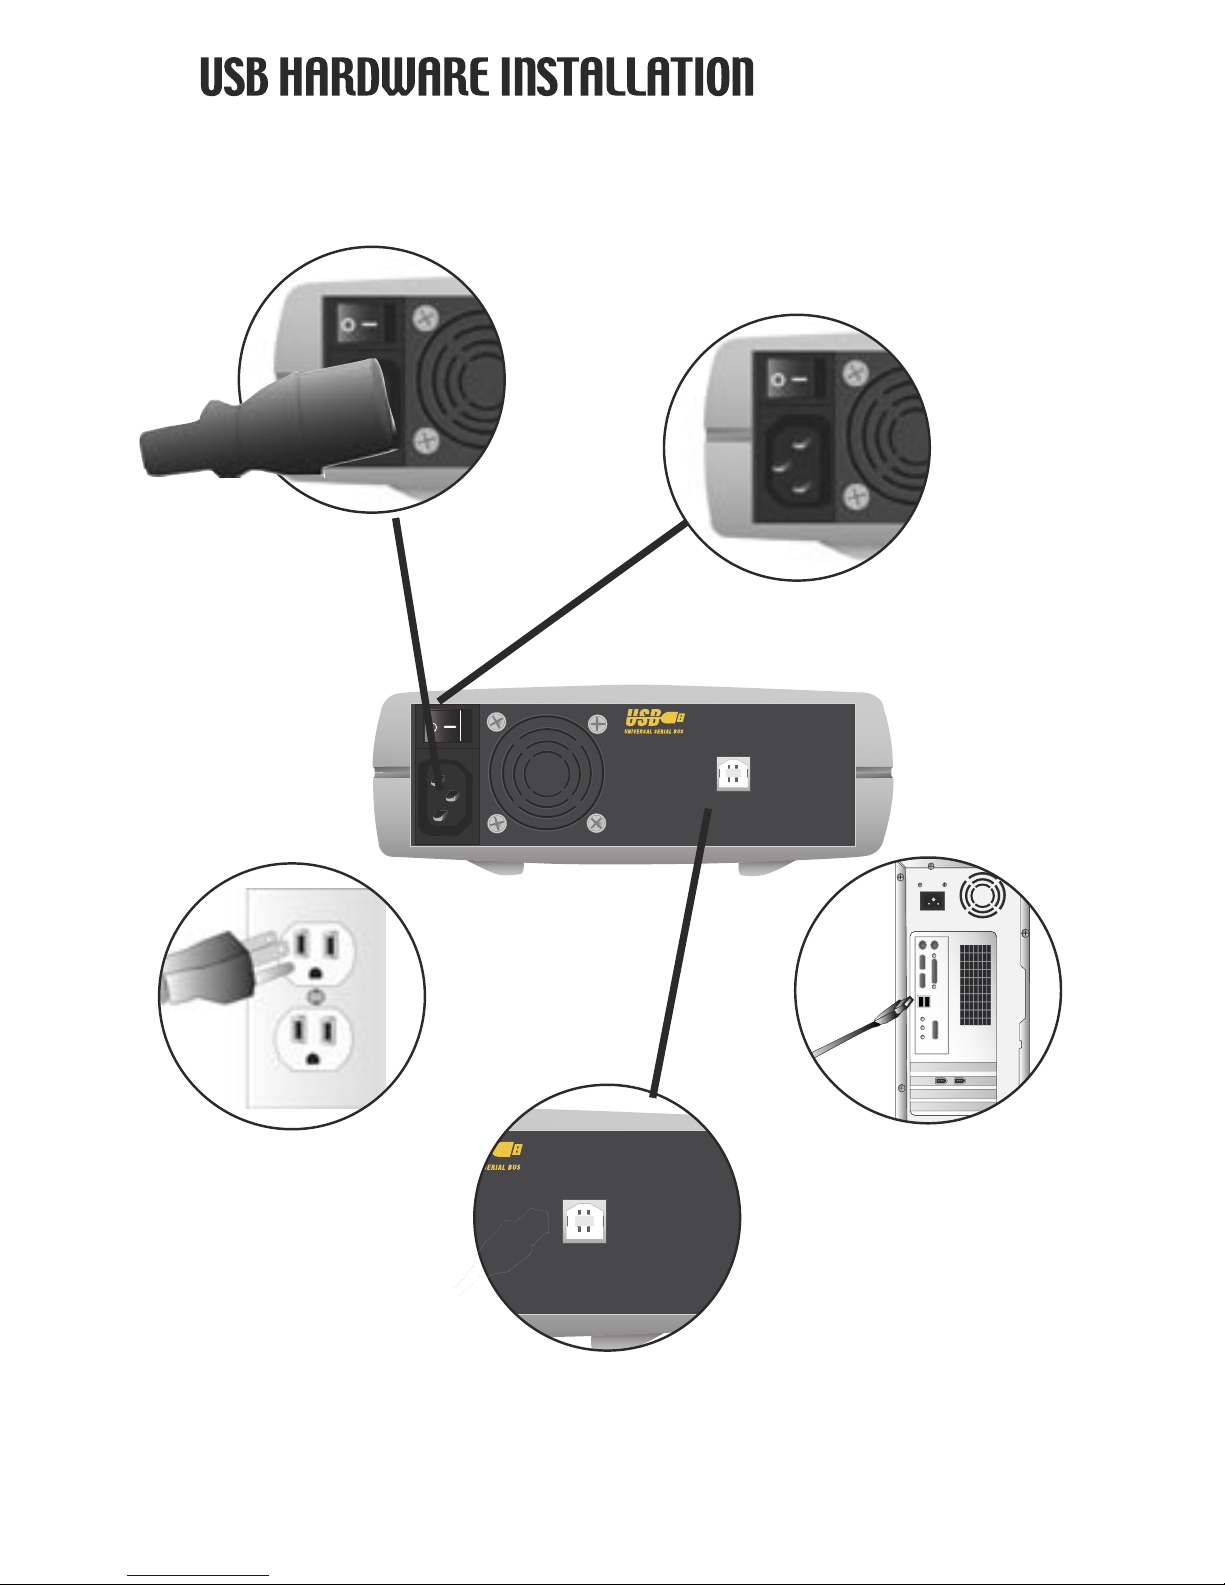
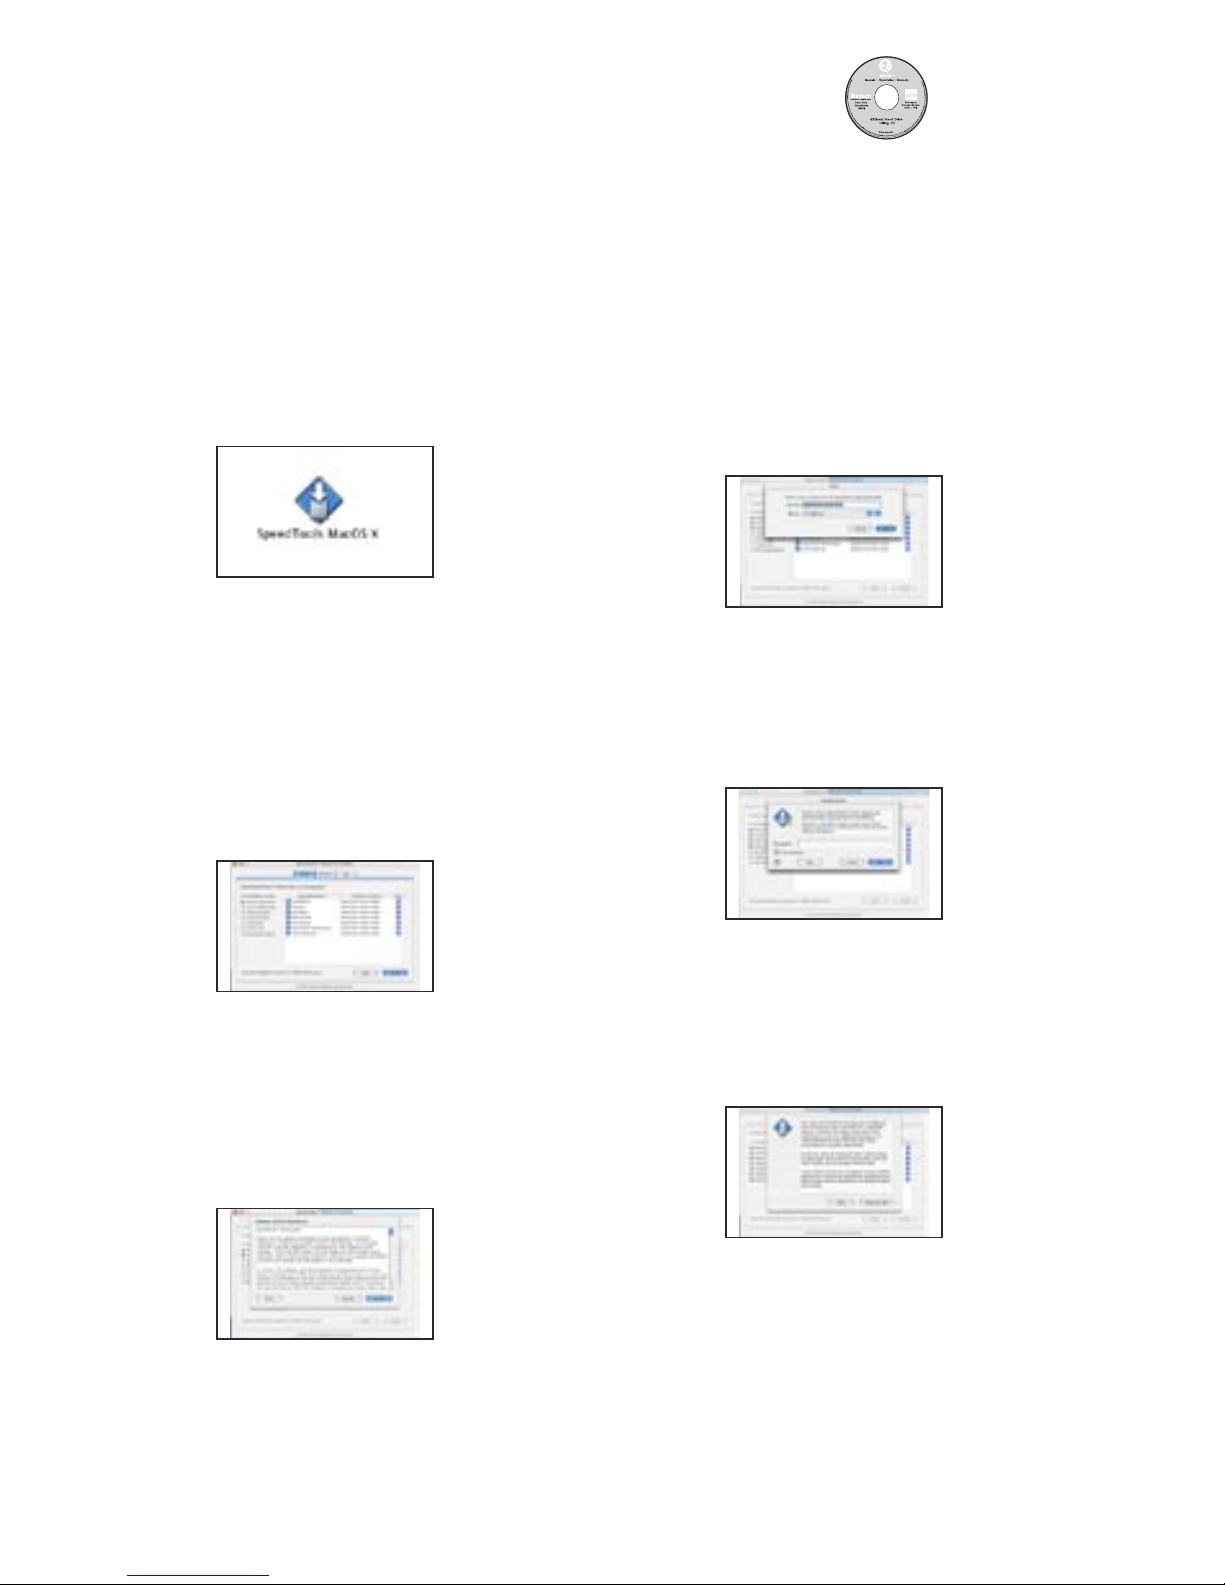
HARD DISK SPEEDTOOLS MAC OS X
%.$OUBLE#LICKONTHEINSTALLER
&2$OUBLECLIQUERSURLINSTALLATEUR
$%$OPPELKLICKEN3IEAUFDAS)NSTALLATIONS
SYMBOL
%.3ELECTTHEFEATURESYOUWOULDLIKETO
INSTALLANDCLICKINSTALL
&23ÏLECTIONNEZLESFONCTIONNALITÏSQUE
VOUSSOUHAITEZINSTALLERPUISCLIQUEZSUR
iINSTALLw;INSTALLER=
$%3ELEKTIEREN3IEDIE-ÚGLICHKEITENDIE
3IEBENÚTIGENUNDKLICKEN3IEDANNAUF
h)NSTALLATIONh
%.2EADTHELICENSEAGREEMENTAND
CLICKv!CCEPTv
&2,IRELE#ONTRATDE,ICENCEETCLIQUERSUR
h!CCEPTv
$%,ESEN3IEDIE,IZENZVEREINBARUNGUND
KLICKEN3IEAUFh!CCEPTv
%.3ELECTTHEFOLDERAND)NSTALL
&2#HOISIRLEDOSSIERETINSTALLER
$%7ÊHLEN3IEDEN/RDNERAUSUNDBEGIN
NEN3IEMITDER)NSTALLATIONUNDBEGINNEN3IE
MITDER)NSTALLATION
%.%NTERYOURADMINISTRATORPASSWORD
&2%NTREZVOTREMOTDEPASSE
DADMINISTRATEUR
$%3ETZEN3IE)HR0ASSWORTEIN
%.9OUMAYNOWREFORMATYOURDRIVE
&26OUSPOUVEZMAINTENANTREFORMATER
VOTREDISQUEDUR
$%&ORMATIEREN3IE)HR,AUFWERKNEU
0AGE8
%.&ORMOREINFORMATIONPLEASEREFERTOTHE0$&MANUALFORTHISSOFTWARE
&20OURDEPLUSAMPLESINFORMATIONSCONSULTEZLEMANUELAUFORMAT0$&DULOGICIEL
$%&àRMEHR)NFORMATIONENLESEN3IEBITTEDAS0$&&ORMULARFàRDIESE3OFTWARE
%.(ARD$ISK3PEEDTOOLSISAFORMATTINGSOFTWARETHATALLOWSYOUTOPARTITIONANDREFORMATYOURDRIVE4OINSTALL(ARD
$ISK3PEEDTOOLSPLEASEFOLLOWTHESEINSTRUCTIONS
&2(ARD$ISK3PEEDTOOLSESTUNLOGICIELDEFORMATAGEQUIVOUSPERMETDEPARTITIONNERETDEREFORMATERVOTREDISQUE
DUR0OURINSTALLER(ARD$ISK3PEEDTOOLSVEUILLEZSUIVRELESINSTRUCTIONSSUIVANTES
$%(ARD$ISK3PEEDTOOLSISTEINE3OFTWAREDIEESIHNENERLAUBT)HR$RIVEZUPARTITIONIERENUNDNEUZUFORMATIEREN:UR
)NSTALLATIONDER3OFTWARE(ARD$ISK3PEEDTOOLSFOLGEN3IEBITTEDER)NSTALLATIONSANWEISUNGWIEFOLGT

0AGE
HARD DISK SPEEDTOOLS MAC OS 9
%.$OUBLE#LICKONTHEINSTALLER
&2$OUBLECLIQUERSURLINSTALLATEUR
$%$OPPELKLICKEN3IEAUFDAS)NSTALLATIONS
SYMBOL
%.3ELECTTHEFEATURESYOUWOULDLIKETO
INSTALLANDCLICKINSTALL
&23ÏLECTIONNEZLESFONCTIONNALITÏSQUEVOUS
SOUHAITEZINSTALLERPUISCLIQUEZSURiINSTALLw
;INSTALLER=
$%3ELEKTIEREN3IEDIE-ÚGLICHKEITENDIE
3IEBENÚTIGENUNDKLICKEN3IEDANNAUF
h)NSTALLATIONh
%.2EADTHELICENSEAGREEMENTAND
CLICKv!CCEPTv
&2,IRELE#ONTRATDE,ICENCEETCLIQUERSUR
h!CCEPTv
$%,ESEN3IEDIE,IZENZVEREINBARUNGUND
KLICKEN3IEAUFh!CCEPTv
%.3ELECTTHEFOLDERAND)NSTALL
&2#HOISIRLEDOSSIERETINSTALLER
$%7ÊHLEN3IEDEN/RDNERAUSUND
BEGINNEN3IEMITDER)NSTALLATION
%.2ESTARTTHECOMPUTERWHENTHE
INSTALLATIONHASlNISHED
&22EDÏMARRERLORDINATEURQUAND
LINSTALLATIONESTTERMINÏE
$%3OBALDDIE)NSTALLATIONABGESCHLOSSEN
ISTFàHREN3IEEINEN.EUSTART)HRES#OMPUTERS
DURCH
%.(ARD$ISK3PEEDTOOLSISAFORMATTINGSOFTWARETHATALLOWSYOUTOPARTITIONANDREFORMATYOURDRIVE4OINSTALL(ARD
$ISK3PEEDTOOLSPLEASEFOLLOWTHESEINSTRUCTIONS
&2(ARD$ISK3PEEDTOOLSESTUNLOGICIELDEFORMATAGEQUIVOUSPERMETDEPARTITIONNERETDEREFORMATERVOTREDISQUEDUR
0OURINSTALLER(ARD$ISK3PEEDTOOLSVEUILLEZSUIVRELESINSTRUCTIONSSUIVANTES
$%(ARD$ISK3PEEDTOOLSISTEINE3OFTWAREDIEESIHNENERLAUBT)HR$RIVEZUPARTITIONIERENUNDNEUZUFORMATIEREN:UR
)NSTALLATIONDER3OFTWARE(ARD$ISK3PEEDTOOLSFOLGEN3IEBITTEDER)NSTALLATIONSANWEISUNGWIEFOLGT
0AGE9
%.&ORMOREINFORMATIONPLEASEREFERTOTHE0$&MANUALFORTHISSOFTWARE
&20OURDEPLUSAMPLESINFORMATIONSCONSULTEZLEMANUELAUFORMAT0$&DULOGICIEL
$%&àRMEHR)NFORMATIONENLESEN3IEBITTEDAS0$&&ORMULARFàRDIESE3OFTWARE

FORMATTING FOR MAC
The firewire & combo drives are pre-formatted for use on OS X and have
OS 9 disk drivers installed so that you can also use the drive on systems
running OS 9, the USB 2.0 drives are pre-formated as FAT32 for Windows,
to use them on Mac systems you should re-format them.
If you need to reformat the drive on OS X:
1. Go to the Applications folder on your system hard drive.
2. Open the Utilities folder.
3. Double click on the Disk Utility Program.
4. Find the drive in the left hand window and select the top line for the drive.
5. Click on the Partition tab.
6. Under Volume Scheme select 1 Partition
7. Type a name for the drive in the box provided.
8. Select MacOS extended under the format options.
9. Leave the default size unless you are creating mutiple partitions.
10. Check the option to install OS 9 disk drivers if you are also going to
use the drive on a system running OS 9.
11. Click on the Partition button.
12. Click on Partition in the Partition dialog box
The drive will be formatted and mounted on the desktop.
If you need to reformat the drive on OS 9:
1. Open the Hard Disk SpeedTool Folder on the system hard drive.
2. Click on Hard Disk SpeedTool icon.
3. Select the firewire drive in the program window.
4. Click on Setup.
5. Click on OK in alert window.
6. Select MacOS Extended option.
The drive will be formatted and mounted on the desktop.
-Page 10-
NOTE: If you wish to use the drive on PC and Mac systems we recommend
leaving the drive formatted as MacOS Extended and installing a program such
as MacDrive (www.mediafour.com) on the PC system so that the PC can read
and work with the MacOS Extended format.

FORMATTING FOR PC
The firewire & combo drives are pre-formatted for use on OS X and have
OS 9 disk drivers installed so that you can also use the drive on systems
running OS 9. To use theses drives on Windows systems you will need to
re-format them. The USB 2.0 drives are pre-formated as FAT32 for Windows
you may want to re-format them as NTFS for use on Win2000 & WinXP
If you need to reformat the drive on Win98 or WinME:
1. Click on Control Panel and then the System Icon.
2. Select Device Manager.
3. Double click on the firewire drive, should be last item under Disk Drives.
4. Select Settings and click on the Removable option, then click OK.
5. The system will ask you to restart, click on yes.
6. After the computer restarts you will need to format the drive.
7. Right click on the new drive's icon in My Computer.
8. Select Full, type a name for drive, click on start, click OK in warning box.
9. Click Close in format results box, click OK to run Scandisk.
10.In Windows help box click on option to run Scandisk or click on X in
upper right hand corner to close box if you do not want to run Scandisk.
11.To run Scandisk select the new drive in window and click start.
12.Click Close on the results box and the Scandisk box
The drive will be formatted and available in My Computer & Windows Explorer.
To format the drive for Win2000 or WinXP:
1. Click on Control Panel, Performance & Maintenance, Admistrative Tools.
2. Click on the Computer Management icon.
3. Click on the Disk Management Icon.
4. Right click on the new drive's icon in the right hand window.
5. Select the Format option, click yes in warning window.
6. Type a name for the drive under volume label.
7. Select perform quick format option.
8. Click OK in format warning box.
The drive will be formatted and available in My Computer & Windows Explorer.
-Page 11-
NOTE: If you wish to use the drive on PC and Mac systems we recommend
leaving the drive formatted as MacOS Extended and installing a program such
as MacDrive (www.mediafour.com) on the PC system so that the PC can read
and work with the MacOS Extended format.

Removing the Drive From the System:
If you’re going to remove your EZQuest Hard Drive before you shut down your
computer, make sure to unmount the EZQuest Hard Drive by dragging the icon into the trash
can. Failure to do this may result in damage to your directory and could result in expensive data
recovery. If you are going to remove the drive on a Windows system click on the removal icon in
the system tray (card with a green arrow) and tell the system to disconnect with the drive before
shutting down.
Drive Does Not Mount or Show Up in System Profiler or Device Manager:
Try resetting the bridge board on the drive by removing the Firewire/USB cable from
the back of the drive, turning the drive off, waiting 10 seconds for the power to drain
from the bridge board, turning the drive back on, waiting 10 seconds for the board to
recharge, and then plugging the cable back into the port on the drive.
For more information, or if you experience problems, please contact EZQuest tech support
-
All hardware and software mentioned is copyrighted with all rights reserved. Any product names mentioned in this manual are
property of their respective owners. EZQuest makes no warranty in regards to the written material in this manual and shall not
held liable for errors in incidental or consequential damage that may occur in translation or use of this manual and/or the prod
described within. EZQuest logo and name are trademarks of EZQuest Inc. Use of the logo for commercial purposes can not be
done without written consent from EZQuest.
NOTES
NOTES
Fan Maintenance:
Over time dust can accumulate on the fan blades and cause the fan to make a buzzing or
humming sound. It can also get into the bearing sleeve and cause a grinding
sound. To prevent this you can occasionally spray some compressed air into the slots
above the letters CE on the back of the fan while the fan is moving. It is also helpful
to occasionally put a couple of drops of a light oil such as 3 in 1 oil or sewing machine
oil into the same slots so that it can trickle down into the bearing sleeve and lubricate
it. This will not harm the drive, but it can prolong the life of the fan.
Directory Problems (Mac):
We strongly recommend that you have a copy of DiskWarrior software from Alsoft
(www.alsoft.com). Ths utility is useful for repairing hard disk directories should problems occur.
Using this utility after a major system freeze, or if the drive refuses to mount, may be able to
help you recover data that otherwise may have been lost.
Digidesign and Final Cut Pro Users (Mac):
If you are using one of these programs and are experiencing data transfer problems we
recommend trying the following steps:
1. Open Hard Disk SpeedTools.
2. Click once on the drive icon
3. Click the "tune" button.
4. Set the max payload size to 512 bytes
5. Restart
-Page 12-

EZQuest Inc.
Please Note: If you encounter any technical issues or diff iculties with your
product, please contact EZQuest Technical Support between 8am - 5pm PST
Technical Support:
Phone: (714) 666-1716
Fax: (714) 666-8861
E-Mail: [email protected]
Website: www.ezq.com
This manual suits for next models
3
Table of contents
Other Ezquest Storage manuals

Ezquest
Ezquest B40160 Manual

Ezquest
Ezquest B04464 User manual

Ezquest
Ezquest Cobra Ultra B03360 User manual

Ezquest
Ezquest B12560 User manual

Ezquest
Ezquest B16568 Instruction Manual

Ezquest
Ezquest B40160 Troubleshooting guide

Ezquest
Ezquest B12568 User manual

Ezquest
Ezquest B12768 Instruction Manual

Ezquest
Ezquest Monsoon B08468 User manual

Ezquest
Ezquest B16768 User manual