FUNZIONI
Collegamento semplice alla propria rete WIFI tramite collegamento Bluetooth (non necessita della procedura di pairing)
Accensione, spegnimento e controllo del livello di luminosità di ogni singolo punto luce
Possibilità di raggruppare e controllare insieme più punti luce con un semplice comando
Creazione e richiamo di scenari luce preferiti
Configurazione Livello di luminosità di avvio (Power On Level)
Configurazione Livello minimo e massimo di luminosità del dispositivo
Gestione dell'impianto da una unica interfaccia utente semplificata
NOTA:
Per il corretto funzionamento il dispositivonecessita di una connessione WIFI di tipo B o G, è quindi necessario
configurare il vostro router o access point per supportare almeno una delle modalità indicate. Esempio: ( Modalità
Consigliate B / BG / BGN Mixed). Il dispositivo necessita inoltre di un servizio DHCP attivo sulla rete. Non collegare a
UPS con uscita diversa da Pure Sine Wave
Tutti i collegamenti devono essere realizzati con apparati non in tensione ed effettuati da personale specializzato
FUNCTIONS
Simple connection to your WIFI network via Bluetooth connection (no pairing procedure required)
Switching on, switching off and controlling the brightness level of each individuallight point
Possibility to group and control several lighting points together with a simple command
Creation and recall of favorite light scenes
Configuration start brightness level (Power On Level)
Configuration minimum and maximum brightness level of the device
Plant management from a single simplified user interface
NOTE:
For correct operation, the device requires a B or G WIFI connection, therefore it is necessary to configure your router or
access point to support at least one of the indicated modes. Example: (Recommended Mode B / BG / BGN Mixed). The
device also requires anactive DHCPservice on the network. Do not connect to a UPS with a different output than Pure
Sine Wave
All connections must be made with devices that are not live and carried out by specialized personnel
FONCTIONS
Connexion simple à votre réseau WIFI via une connexion Bluetooth (aucune procédure d'appairage requise)
Allumer, éteindre et contrôler le niveau de luminosité de chaque point lumineux
Possibilité de grouper et de contrôler plusieurs points d'éclairage avec une simple commande
Création et rappel de scènes de lumière préférées
Niveau de luminosité de démarrage de la configuration (niveau de mise sous tension)
Configuration Niveau de luminosité minimum et maximum de l'appareil
Gestion des installations à partir d'une seule interface utilisateur simplifiée
REMARQUE:
Pour un fonctionnement correct, l'appareil nécessite une connexion WIFI B ou G. Il est donc nécessaire de configurer
votre routeur ou votre point d'accès pour prendre en charge au moins l'un des modes indiqués. Exemple: (Mode
recommandé B / BG / BGN mixte). Le périphérique nécessite également un service DHCPactif sur le réseau. Ne pas
connecter à un UPS avec une sortie différente de Pure Sine Wave
Toutes les connexions doivent être effectuées avec des appareils qui ne sont pas sous tension et effectuées par du
personnel spécialisé.
FUNKTIONEN
Einfache Verbindung zu Ihrem WLAN-Netzwerk über Bluetooth-Verbindung (kein Pairing-Verfahren erforderlich)
Einschalten, Ausschalten und Regeln der Helligkeit jedes einzelnen Lichtpunktes
Möglichkeit, mehrere Lichtpunkte mit einem einfachen Befehl zu gruppieren und zu steuern
Erstellung und Abruf von Lieblingslichtszenen
Konfiguration Starthelligkeitsstufe (Power On Level)
Konfiguration Minimale und maximaleHelligkeit des Geräts
Anlagenverwaltung über eine einzige vereinfachte Benutzeroberfläche
HINWEIS:
Für einen korrekten Betrieb benötigt das Gerät eine B- oder G-WLAN-Verbindung. Daher muss Ihr Router oder
Zugangspunkt so konfiguriert werden, dass mindestens einer der angegebenenVersionen unterstützt wird. Beispiel:
(Empfohlene VersionB / BG / BGN gemischt). Das Gerät benötigt außerdem einen aktiven DHCP-Dienst im Netzwerk.
Schließen Sie keine USV mit einem anderen Ausgang als Pure Sine Wave an
Alle Verbindungen müssen mit Geräten hergestellt werden, die nicht unter Spannung stehen und von Fachpersonal
ausgeführt werden
Tutti i prodotti FABAS LUCE che rientrano nell’ambito di applicazione della direttiva europea compatibilità elettromagnetica
E.M.C. 2014/30/UE e successive modifiche e/o della direttiva europea bassa tensione B.T. 2014/35/UE e successive modifiche,
soddisfano i requisiti richiesti e recano la marcatura “CE”.
All FABAS LUCE products fall within the range of application of the European electromagnetic compatibility E.M.C.directive
2014/30/UE and subsequent amendment and/or the European low voltage directive B.T. 2014/35/UE and subsequent , meet
the required specifications and bear “CE” labelling.
Tous les produits FABAS LUCE appartenant au champ d’application de la directive européenne compatibilité
électromagnétique E.M.C. 2014/30/UE et modifications successives et/ou de la directive européenne basse tension B.T.
2014/35/UE et modification successive remplissent les conditions prévues et portent le marquage “CE”.
Alle Produkte von FABAS LUCE, die unter das Anwendungsgebiet der europäischen Richtlinien der elektromagnetischen
Kompatibilität E.M.C. 2014/30/UE und nachfolgende Änderungen und/oder der europäischen Richtlinie der Niederspannung
B.T. 2014/35/UE und nachfolgende Änderung fallen, entsprechen den erforderlichen Eigenschaften und tragen das “CE” -
Kennzeichen.
Il simbolo indica che l’apparecchio deve essere oggetto di raccolta separata
The symbol indicates that the fixture has to be disposed in separate collection
Le symbole indique que l'appareil doit être écoulé séparément
Dieses Symbol zeigt, dass das Gerät separat gesammelt sein soll
Apparecchio omologato in classe II, con cablaggio a doppio isolamento. Durante l'installazione, tagliare il cavo di terra
Class II certified equipment, with double insulated wiring. During installation, cut earth wire
Appareil homologué en Classe II, avec câblage à double isolation. Pendant l'installation, couper le cable de terre
In Klasse II zugelassene Apparate mit doppelt isolierter Verkabelung. Während der Montage schneiden Sie das Erdekabel
Spiegazione dei simboli Explanation of symbols
Légende des symboles Zeichenerklärungen
SMART LUCE by FABAS LUCE S.p.A.
Via Talamoni, 75 – Brugherio (MB) - ITALY
www.fabasluce.it - Made in Italy
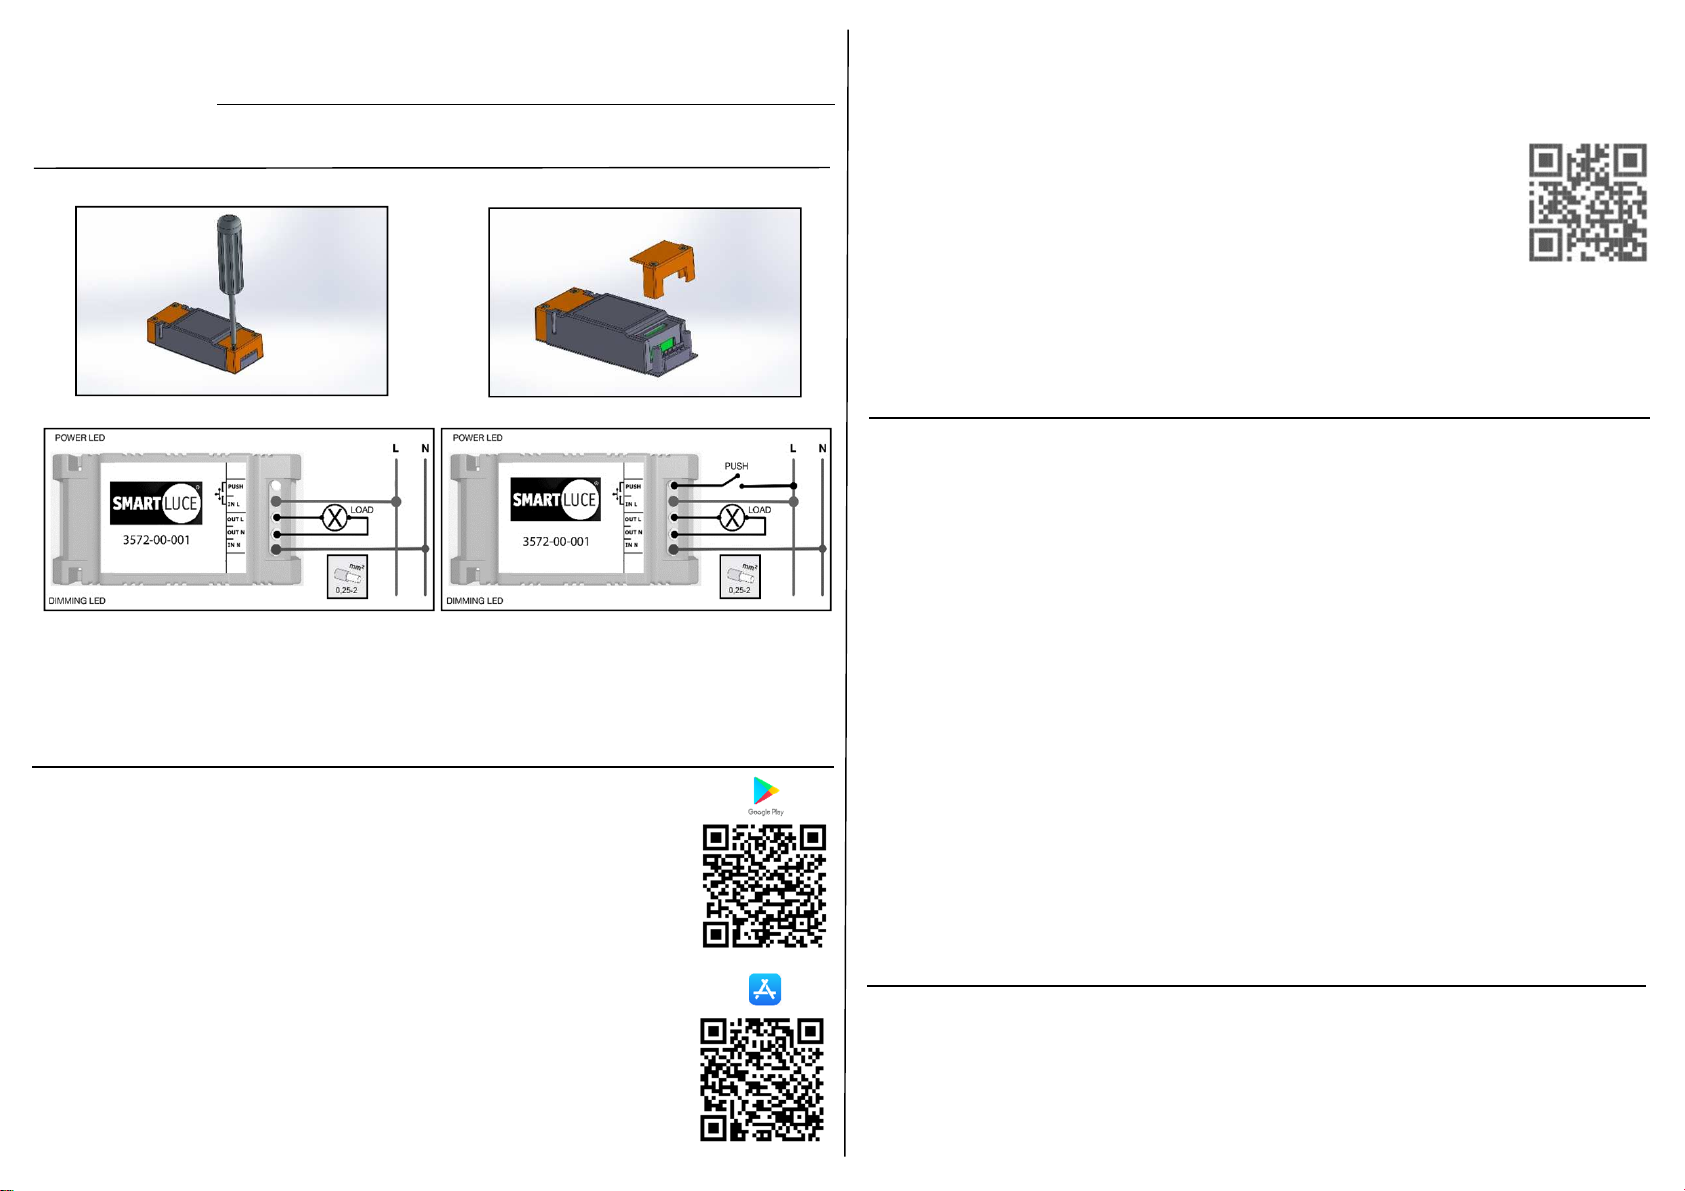
RIPRISTINO IMPOSTAZIONI DI FABBRICA
Per effettuare un ripristino alle impostazioni di fabbrica:
1. Spegnere l’apparecchio
2. Collegare con un cavo elettrico i morsetti PUSH e IN L
3. Accendere l’apparecchio per almeno 20 secondi, fino a quando l’apparecchio si spegne e poi si riaccende
4. Scollegare l'alimentazione e rimuovere il cavo del punto 2
5. Ricollegare l’apparecchio
RESTORING FACTORY SETTINGS
To restore to factory settings:
1. Switch off the appliance
2. Connect the PUSH and IN L terminals with an electric cable
3. Turn on the appliance for at least 20 seconds, until the appliance turns off and then back on again
4. Disconnect the power supply and remove the cable from point 2
5. Reconnect the appliance
RESTAURATION DES PARAMÈTRES D'USINE
Pour restaurer les paramètres d'usine:
1. Éteindre l'appareil
2. Reliez les bornes PUSH et IN L avec un câble électrique
3. Allumez l'appareil pendant au moins 20 secondes.
4. Débranchez l'alimentation électrique et retirez le câble du point 2
5. Rebranchez l'appareil
WERKSEINSTELLUNGEN WIEDERHERSTELLEN
So stellen Sie die Werkseinstellungen wieder her:
1. Gerät ausschalten
2. Verbinden Sie die Klemmen PUSH und IN L mit einem elektrischen Kabel
3. Schalten Sie das Gerät mindestens 20 Sekunden lang ein.
4. Trennen Sie die Stromversorgung und entfernen Sie das Kabel von Punkt 2
5. Schließen Sie das Gerät wieder an