Faber FM 225 User manual

MIXER
INSTRUCTION MANUAL
FM 225
Read this booklet thoroughly before using and save it for future reference

1
IMPORTANT SAFEGUARDS
Before using the electrical appliance, basic precautions should always be followed
including the following:
1. Read all instructions.
2. Make sure that you outlet voltage corresponds to the stated on the rating label of the
mixer.
3. Do not operate Hand/stand mixer with a damaged cord or plug, after the appliance
malfunction, or if it is dropped or damaged in any manner. Return the appliance to the
nearest authorized service center for examination, repair or electrical or mechanical
adjustment.
4. Do not leave mixer unattended while it is operating.
5. Do not let cord hang over edge of table or counter or hot surface.
6. To protect against risk of electrical shock, do not put mixer in water or other
liquid. This may cause personal injury or damage to the product.
7. Avoid contacting with moving parts. Keep hands, clothing, as well as spatulas and
other utensils away from beaters during operation to reduce the risk of injury to
persons, and/or damage to the mixer.
8. Close supervision is necessary when your appliance is being used near children or
infirm persons.
9. Do not place an appliance on or near a hot gas or on a heated oven.
10. Never eject beaters when the appliance is in operation.
11. Unplug from outlet while not in use, before putting on or taking off parts, and before
cleaning.
12. The appliance cannot be used for chopping ice or blending hard and dry substance,
otherwise the blade could be blunted.
13. Do not operate the appliance for other than its intended use.
14. Do not use outdoors.
15. Save these instructions.
HOUSEHOLD USE ONLY

2
KNOW YOUR MIXER
Model: FM 225
Rated Voltage: 220-240VAC 50-60Hz
Rated Power: 200W
Accessories: Beaters, Dough hooks,, Spatula.
2
1
3
4
56 7
8
9
10
11
12
13
14
1.Beater
2.Dough hook
3.Upper body
4.Lower body
5.Ejector bracket
6.Speed selector
7.Turbo button
8.Handle cover
9.Upper base
10.Release button
11.Lower base
12.Base switch
13.Bracket
14.Bowl
Model;FM 225
USING YOUR HAND/STAND MIXER
For the first use, cleaning the beaters, dough hooks and bowl. Before assembling the mixer,
be sure the power cord is unplugged from the power outlet and the speed selector is on the
“0” position.
Fig.1
Fig.2
Fig.3
Fig.4

3
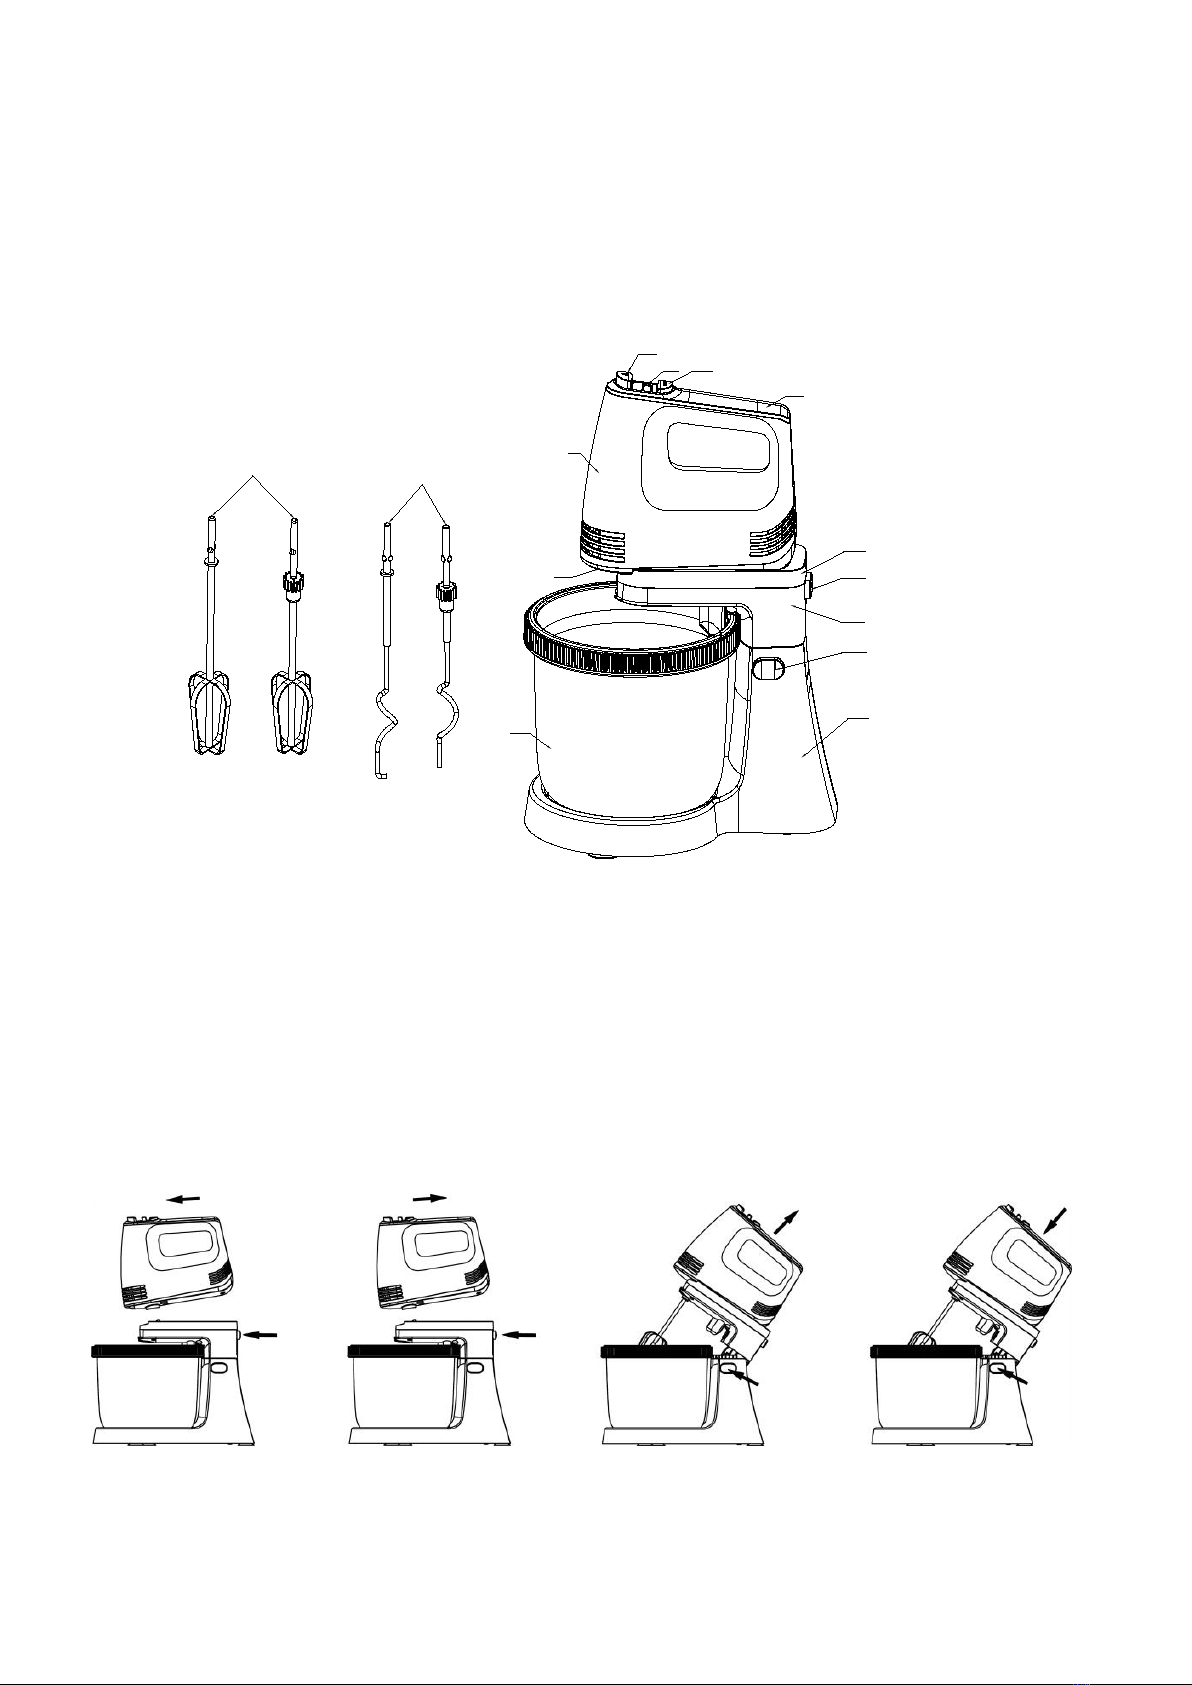
1. Align the hole below the back of the hand mixer with the tuber on top of base,
then press down vertically with a little force. Make sure it is assembled correctly
(Fig.1). For detaching the hand mixer, push the hand mixer in the arrow indicated
direction (Fig.2). Hold the head of mixer to tilt position and pressing the base switch
(Fig.3).
2. Choose the proper attachments based on the task to be performed and assemble it
in position. Beaters are for mixing egg white or mixing other liquid. Dough hooks
are for kneading the dough.
Note: Beaters and dough hooks, the one with gear can only be inserted into the socket
with graphics and the other one can only be inserted into the other socket. The
two beaters and two dough hooks cannot be inserted in reverse.
3. Place the food that need blend into bowl, then place the bowl on position.
4. Lower down the head of mixer and pressing the base switch (Fig.4).
5. Ensure that the unit is at the 0 setting, then connect to power supply.
6. Dial the speed selector to your desired setting and the appliance will start working.
There are 5 settings and the speed will achieve the highest if the turbo button is depressed
at any time.
Warning: Do not place knife, metal spoon, fork and so on into bowl when
operating.
7. The max operation time per time shall not exceed 10 minutes, then have a rest for a
appropriate time until your hand / stand mixer cooling between two consecutive cycles.
When kneading yeast dough, we suggest that the speed selector should be at low speed
firstly and then use high speed to achieve the best results.
Note: During operation you may turn bowl with hand to achieve the best
results.
8. When mixing is completed, turn the speed selector to 0 position, unplug the cord from
power outlet.

4
9. If necessary you can scrape the excess food particles from the beaters or dough hooks
by a spatula.
10. Lift the head of mixer, hold the beaters/dough hooks with one hand and press the
ejector button firmly down with other hand, remove the beaters/dough hooks.
Note: Remove the beaters/dough hooks only at the 0 setting.
11. The hand mixer can be used separately without the base in position.
12. Do not operate the appliance for other than its intended use.
13. Save these instructions.
CLEANING AND MAINTENANCE
1. Unplug the appliance and wait it completely cool down before cleaning.
Caution: the mixer cannot be immersed in water or other liquid.
2. Wipe over the outside surface of the head and Base with a dampened cloth and polish
with a soft dry cloth.
3. Wipe any excess food particles from the power cord.
4. Immerse the mix bowl, beaters and dough hooks in warm soapy water for complete
cleaning. Then rinse under running water and wipe dry. The beaters and dough hooks may
be placed in the dishwasher.
COOKERY TIPS
1. Refrigerated ingredients, such as butter and eggs, them should be at room temperature
before mixing begins. Set these ingredients out ahead of time.
2. To eliminate the possibility of shells or deteriorated-off eggs in your recipe, break eggs
into separate container first, then adding to the mixture.
3. Do not over-beat. Be careful that you only mix/blend mixtures until recommended in
your recipe. Fold into dry ingredients only until just combined. Always use the low speed.
4. Climatic conditions. Seasonal temperature changes, temperature of ingredients and their
texture variation from area to area all play a part in the required mixing time and the

5
results achieved.
5. Always start mixing at lower speed. Gradually increase to the recommended speed as
stated in the recipe.
ENVIRONMENT FRIENDLY DISPOSAL
You can help protect the environment!
Please remember to respect the local
regulations: hand in the non-working electrical
equipments to an appropriate waste disposal
center.
Table of contents
Other Faber Kitchen Appliance manuals