FAHRBIKE ROADSTER73 User manual

OWNER’S MANUAL
FAHRBIKE-ROADSTER73
www.fahrbike.com

Contents
Assembly 07
Handlebars 07
Pedals 10
Seat 11
Front Wheel 08
Bottle Holder 11
Battery Care 13
Battery Charging 13
Removing the Battery 12
Brake Lever Adjustment 11
Disclaimer 04
Product Specification 05
General Information 04
Introduction 01
Safety Check 02
Tire Pressure 09
Rear Wheel 09
Walk Mode 16
Data Mode 16
Cleaning 19
Tips 20
Settings Mode 17
Warranty 22
Legal Requirements 21
Serial Number 21
14
Battery Storage
Power Assist Level 15
LCD Display 15
Switch Power ON / OFF 15
Headlight and Taillight 16
Throttle and Cruise Control 15
Error Code Definition 18
Fender 09
Maintenance 19
12
Luggage carriers
Headlight 12

Congratulations on the purchase of your Fahrbike! You have chosen a bike that will give you an unparalleled
riding experience and you have made a wise choice.
Please read this Owner's Manual carefully before using your new e-bike. It is your reference for assembly,
maintenance, and safety.
If you are not confident in assembling the bike yourself, we strongly recommend that you have your bike
assembled by a qualified bicycle mechanic.
If you have questions or need assistance, please contact us directly.
Official Website: www.fahrbike.com
Email: service@fahrbike.com
Introduction
01 FAHRBIKE-ROADSTER73

Safety Check
02FAHRBIKE-ROADSTER73
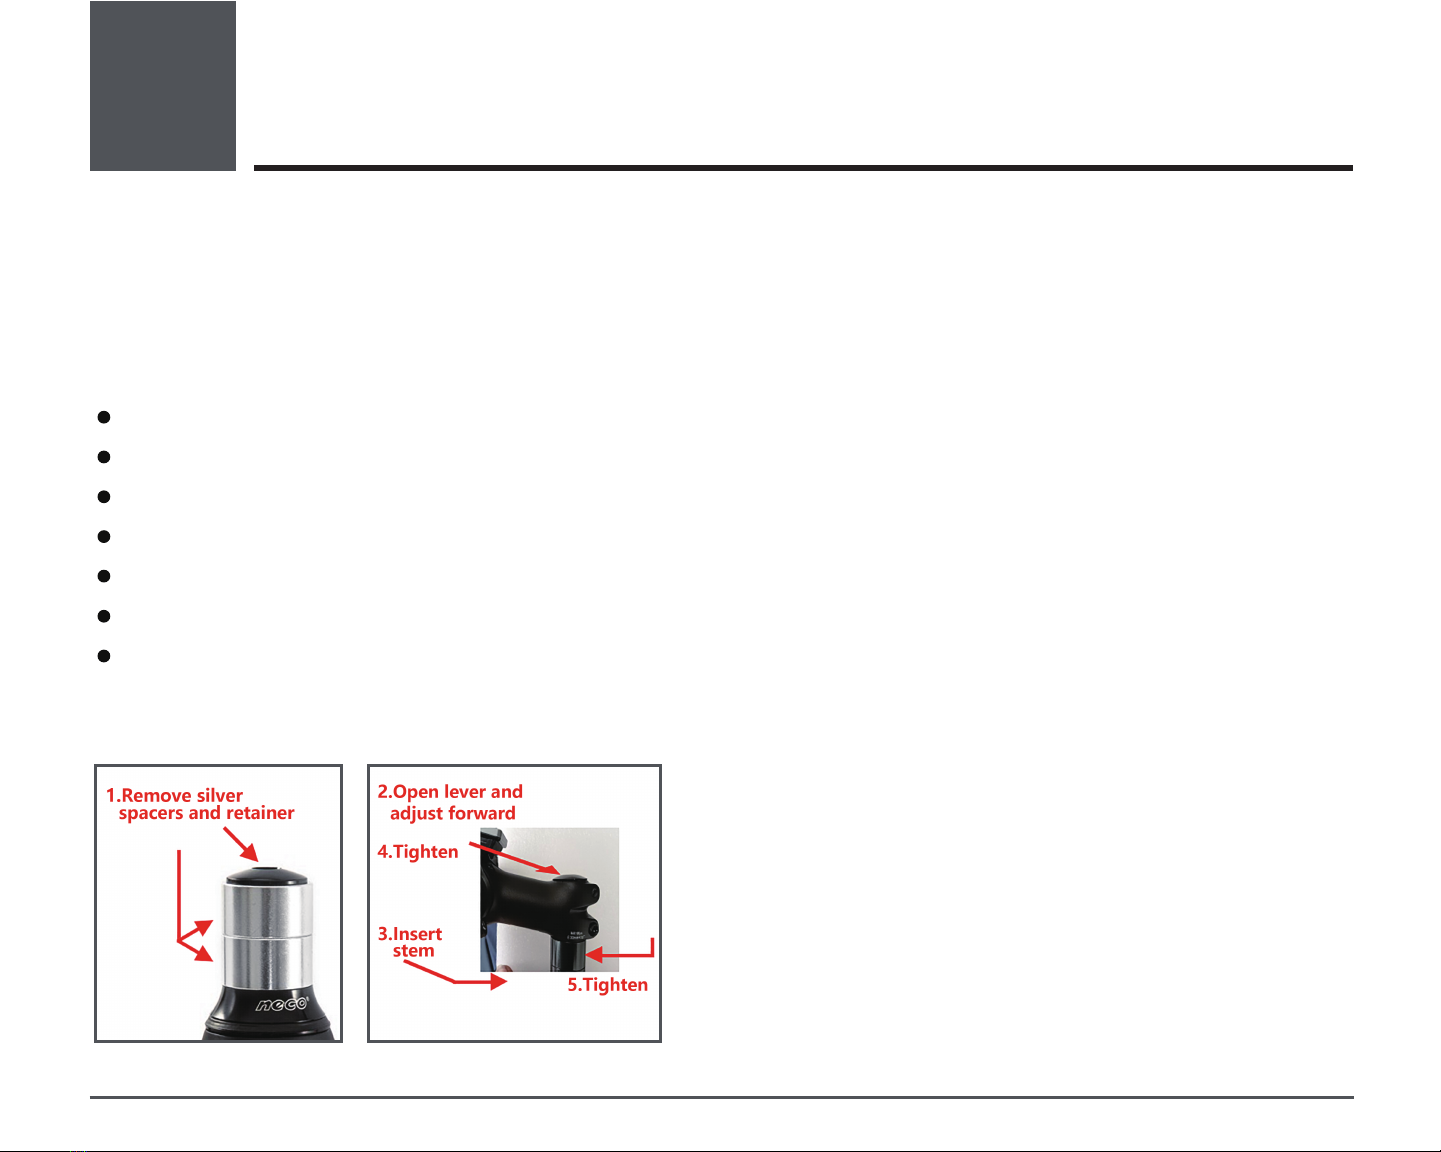
1
Please check the following components: Handlebars, stem, pedals, crank arms, and wheels. Make sure they
are properly assembled and tightened. Even if some of the components are pre-assembled, each part must be
tightened to the specified torque. If you do not notice a loose component, it may come loose during use and
cause serious injury.
It is recommended that the above safety checks be performed every 200 - 300 km (120 - 180 miles) or when
the bicycle has not been used for three weeks.
Wheels: An important part of assembling your bike is attaching the front and rear wheels and checking
that the wheel axle nuts are tight. Properly assembled wheels are essential for the safe use of the bicycle.
Tires: Both tires must be inflated according to the specifications in the manual. Failure to do so will reduce
performance, increase tire wear, and compromise your safety.
Crank and pedals: Make sure the crank arms and pedals are tightened to the specified torque. A required
tool for the crank: 8 mm hex key, recommended tightening torque 30-35 Nm. Required tool for the pedals:
15 mm wrench, recommended torque 35-40 Nm.
Brakes: Make sure the brakes are working properly and are properly secured. When braking, apply the rear
brake first, then the front brake. Incorrect application of the brakes can result in serious injury.
Throttle: The throttle mechanism can be used to partially or fully activate the engine power. Inexperienced
users should be a bit more careful when operating the throttle for the first time. The throttle function is
deactivated when the pedal assistance is set to "0".

03
FAHRBIKE-ROADSTER73
Users must familiarize themselves with the power controls before riding. It is strongly recommended that you
ride your new bike in an open area and set the assist level to "0". Once you become accustomed to operating
your bike, gradually increase the assistance level.
It is a good practice to keep your hands over the brake levers. The brake levers are equipped with motor
protectors that shut off motor power when activated. If you lose control for any reason, immediately apply the
brake levers to shut off motor power. Do not attempt to stop your bike with your feet as this may cause you
to lose your balance.
When walking or carrying your bike, turn off the power to avoid accidentally turning on the motor. If the
motor is accidentally turned on, immediately apply the brakes to cut the power to the motor.
For Your Safety

General Information
04
2
FAHRBIKE-ROADSTER73
The use of an e-bike involves risks, and it is the user's responsibility to understand those risks. You are respon-
sible for your own actions when using an electric bike. Fahrbike is not responsible or liable for any accidents
or injuries (whether caused by you or others) that may occur during use. We recommend that you contact
your insurance company to find out whether or not your current insurance policy covers you in the event of
an accident.
Disclaimer

Product Specification
Battery
Motor
Display
Speed
Pedal
Crankset
Recommended
Rider Heights
48V, 720Wh
750W Geared Brushless Motor
LCD Display
28MPH
Wellgo Aluminum Platform
52T Single Guard
Designed for Riders 5'2" to
6'4" Tall
Suspension Fork with Adjust-
able Lockout
All-terrain 6061 Aluminum
Alloy Frame
Hydraulic Disc Brakes, 180mm
Rotors
Nickel Plated 11-32T 8-Speed
Shimano Rapid Fire Plus
8-Speed
83 lbs
20.0" x 4.0" Kenda Fat Tire
Front Fork
Brake
Bike Frame
Freewheel
Shifter
Tires
Product Weight
05
3
FAHRBIKE-ROADSTER73

06FAHRBIKE-ROADSTER73

Assembly
07
4
FAHRBIKE-ROADSTER73
(A)Handlebars (required tools: 5mm hex key)
Do not carry the bicycle or move the fork while installing the handlebars. The fork must be fully inserted into
the frame.
Unscrew the retainer from the head tube.
Remove the silver spacers from the head tube.
Insert the handlebar stem into the head tube.
Fold the handlebar by opening the lever.
Insert the retainer into the head tube and tighten (recommended tightening torque 8 Nm).
Unfold the handlebar by closing the lever.
Align the handlebar with the front wheel and tighten the two bolts on the side of the stem
(recommended tightening torque 12 Nm).

(B)Front Wheel
Remove the brake pad protector between the brake pads.
Install the wheel by sliding the disk brake rotor between the brake pads and inserting the fork end onto
the wheel axle.
Remove the nut and spring (A) from the quick release.
Insert the quick release with spring (B) facing inward into the right side of the wheel axle.
Insert spring (A) pointing inward into the left side of the quick release skewer and tighten the nut.
Close the quick release lever and tighten it by turning clockwise.
08FAHRBIKE-ROADSTER73

09 FAHRBIKE-ROADSTER73
(C)Rear Wheel (required tools: 18mm wrench, recommended torque 40 Nm)
Ensure the rear wheel is tightened at the recommended torque value.
(D)Tire Pressure
The recommended tire pressure is 5-30 psi. The tire pressure range depends on many variables. So please
consider your weight, your load, the terrain, the temperature, the feeling of traction you have while driving,
and slopes if applicable.
Place the fender hook on the front side of the fork arch at the highest position.
Insert the bolt into the headlight holder and fender hook, and tighten on the
fork arch.
Use the bolts mounted on the fork to tighten the fender stays.
(E)Fender (required tools: 4mm hex key, 5mm hex key, 10mm wrench)
The tires must be inflated with the air pressure indicated on the tire sidewall. The
tires must not be overinflated or underinflated.
!
!
WARNING

10FAHRBIKE-ROADSTER73
(F)Pedals (required tools: 15mm wrench, recommended torque 35-40 N.m)
The right and left pedals are marked with an "R" or "L" at the end of the thread. The right pedal axle has a
smooth surface, while the left pedal axle has grooves.
The pedal and crank threads are designed to engage easily. Tighten the pedals by hand first. It should be easy
for the first few turns. Do not force the pedals if tightening is difficult. If tightening is difficult, stop immedi-
ately as the pedal thread is not aligned, and continuing to tighten will damage the crank arm thread.
Apply a small amount of grease to the pedal axle.
Insert the right pedal into the right crank arm. Carefully and slowly turn the pedal clockwise by hand onto
the crank and then tighten it completely.
Insert the left pedal into the left crank arm. Carefully and slowly turn the pedal counterclockwise by hand
onto the crank and then pull it completely tight.
!Inserting the pedal in the wrong way, installing it at the wrong angle, or improper
tightening will strip the crank arm threads and cause the pedal to come off.
!
WARNING

(G)Seat
Open the seat tube lever, insert the seat post, and close the lever to lock.
Rotate the lever to adjust the lock tightness.
Adjust the seat angle by loosening the bolt underneath the seat. You can tilt
the seat up or down and move it forward or backward to fit your comfort
(required tools: 5mm hex key, recommended torque 25 N.m).
11 FAHRBIKE-ROADSTER73
Do not raise the seat post beyond the minimum insertion point line.
Doing so may cause the seat post or frame to break.
!
!
WARNING
(I)Hydraulic Brake Lever Adjustment (required tools: 2mm hex key)
(H)Bottle Holder (optional)
Use the screws mounted on the frame tube seat to install the bottle holder.
Tighten the indicated bolt to extend the brake lever reach.
Loosen the indicated bolt to shorten the brake lever reach.

12FAHRBIKE-ROADSTER73
(J)Removing the Battery
The battery keys are attached to the handlebars. Insert the key into the keyhole, turn it clockwise, turn the
battery up and pull.
(L) Headlight
(K)Luggage carriers (required tools: 6mm hex key, recommended torque 10 N.m)
Failure to observe assembly, operation, and/or maintenance can result in serious
injury.
!
!
WARNING
Required tools: 12mm wrench, lock screw
Connect the lamp line.

5Battery Care
Make sure the battery is fully charged before the first ride. Connect the charger to the battery first and then
to the power outlet. The charger will show a red light to indicate that the battery is charging. Once the battery
is fully charged, the indicator will turn green.
Remove the charger from the battery when it is fully charged. The charger will automatically stop charging
when the battery is full. However, unnecessary damage to the charging components may occur if the charger
remains connected to the battery and power source.
The battery can be recharged after each use. Charging the battery after short trips will not cause any damage.
Battery Charging
Charge the battery on a non-flammable surface and near a smoke or fire detector. Do not charge the bat-
tery in a wet/damp place or a place exposed to strong sunlight.
Always charge the battery at temperatures between 10 and 25 °C.
Charge the battery using the supplied charger. Do not attempt to use any other charger as this may
damage the battery or cause a fire or explosion.
Do not leave the battery unattended while charging.
13 FAHRBIKE-ROADSTER73

Battery Storage
Keep the battery indoors during extreme weather.
Avoid storing the battery in places of high temperature or high humidity.
Charge the battery to 70% if not used for two months. The battery will slowly discharge over time. When
the battery reaches 20% charge it again to 70%.
14
!Failure to follow proper charging procedures may result in damage to your battery,
charger, and other personal property.
!
WARNING
FAHRBIKE-ROADSTER73

LCD Display
Press and hold the power button for two seconds. The LCD turns on and the bike is
ready to start.
To switch off, press and hold the power button for two seconds.
15 FAHRBIKE-ROADSTER73
6
Switching the Power ON / OFF
The assistance level determines the power of the motor when pedaling.
There are 1-5 assistance levels, with 1 being the lowest and 5 being the highest. If you want to ride without
motor assistance, select 0.
Press the + (up) / - (down) button to select the assistance level.
The throttle is activated as soon as the LCD display is turned on. If you
want to switch off the throttle, and select support level “0”.
To activate cruise control, see LCD advanced settings (option 19).
Power Assist Level
Throttle (Accelerator) and Cruise Control

Switching ON / OFF the Headlight, Taillight Mode
Press and hold the + (up) button for one second to switch on the lights.
Press and hold the + (up) button again to switch off the lights.
Press and hold the - (down) key to start the walk mode. This function runs the motor at a relatively low speed
to help you walk the bike.
Walk Mode
16FAHRBIKE-ROADSTER73
Press the M key briefly to change the data mode display. Press again to change to the next mode. The
sequence of modes:
Odometer > Single trip > Current voltage > Current running > Time
Press the M and + buttons briefly to change the data mode display. Press again to change to the next mode.
The sequence of modes:
Average speed > Maximum speed
Data Mode

Settings Mode
Press + (up) and - (down) to enter the settings mode.
Press the M button to navigate through the settings options.
Press + (up) or (down) buttons to make changes.
To exit the settings mode, press + (up) and - (down).
If there is no action for 8 seconds in settings mode, you will be returned to the home screen.
P01: Backlight brightness (1: darkest; 3: brightest)
P02: Mileage units (0: Km; 1: Miles)
P03: Voltage class 24V / 36V / 48V / 52V
P04: Sleep interval (0: never, other value means show sleep interval;1-60 minutes) Unit: minute
P06: Wheel Diameter Unit: inch
Wheel diameter (16, 20, 24, 26, 27.5) (20F, 26F - for 4" fat tires)
The wheel diameter must be set according to the tire size. Wrong tire size will cause inaccuracy in the
speed and distance readout.
P08: Speed limit (default 32 km / 20 miles)
Set the maximum speed limit. 41=No speed limit
P12: Motor responsiveness (default 2)
Enables you to adjust motor responsiveness from 0 - 3 (gradual to quick response).
17 FAHRBIKE-ROADSTER73

P15: undervoltage (mating controller)
P16: ODO Zero-Out
Long press the up key for 5 seconds and the ODO value will be erased.
P19: Cruise control (0 disabled, 1 enabled)
To start the cruise control, push and hold the throttle at the desired speed for 10 seconds, without pedal-
ing.
When an error is detected, the display LCD will show an error code.
The error codes range from:
Error 01: Controller overheating
Error 07: Motor phase lost
Error 22: Throttle error
Error 24: Motor hall error
Error 30: Controller communication error
Error Code Definition
18FAHRBIKE-ROADSTER73
This manual suits for next models
1
Table of contents
Other FAHRBIKE Bicycle manuals
Popular Bicycle manuals by other brands

Stalhasten
Stalhasten HYBRID 2019 Series user manual

TP
TP Dino Discovery 4in1 TP710 Instructions for assembly, maintenance and safe use

Hercules
Hercules FUTURA SPORT 8.4 26 Translation of the original operating instructions

Douze
Douze G4 instruction manual

Cannondale
Cannondale F-SI owner's manual

KOSTKA
KOSTKA MUSHING user manual