manuals.online logo
Brands
  1. Home
  2. •
  3. Brands
  4. •
  5. FAIRHAVEN HEALTH
  6. •
  7. Thermometer
  8. •
  9. FAIRHAVEN HEALTH ibasal User manual

FAIRHAVEN HEALTH ibasal User manual

/Memo
/Memo
Set/D T
Please read the instructions carefully before you begin use.
ibasal Thermometer Instructions
Set/D T
/Memo
Grph/ck
Mode
START
Del
/
Set/D T
/Memo
Grph/ck
Mode
START
Del
/
Set/D T
/Memo
Grph/ck
Mode
START
Del
/
Button Key: Delete button
Set button/D T
Grph/Ck
Mode
Set/D T
/Memo
START
Del
Graph/Check button
Mode button
Display Window
Start measurement
Reset
button
Temperature
probe
back side
/
Set/D T
/Memo
Grph/ck
Mode
START
Del
/
Set/D T Grph/ck
Mode
START
Del
/
Grph/Ck
Mode
START
Del
/
Left Arrow/Memo button
*
- Page 1 -
Computerized Basal Body Thermometer (BBT)
1. Starting your first cycle
IMPORTANT: You can begin using the ibasal as soon as you receive it to familiarize yourself
with the process. The ibasal considers your first cycle to be a practice cycle and does not
calculate fertility predictions or your average temperature. Please note, however, that you can
still input your basal temperatures at OvaGraph.com during this first cycle and interpret them
manually. To begin taking your temperature, remove the protective film. Set date, time and
alarm so you can begin use the next day.
When you remove the protective film, the ibasal will automatically mark today as
cycle day 1. Please note: it is okay if the cycle day on the ibasal does not correctly
match with your actual cycle day. When you start your next cycle, follow the
instructions in the section called “Starting your second cycle.”
2. Getting ready to use the ibasal
Turn the device over and pull off the battery cover.
Pull and remove the cellophane protection film to turn
on the device. You will hear a beep and the display will
appear in the display window. Once the ibasal is
powered on, it will stay on.
Inserting the battery
If the display does not appear, press the Reset button
or take out the battery once and insert it again.
Remove the
cellophane film
Bar graph blinks
alternately
Slide the battery cover
Take out the battery here
Delete the measurement
Correct the 1st day of
menstruation
Delete the 1st day of
menstruation
1st day of menstruation
Deleting the memo
Setting the alarm
Setting the clock
ibasal Symbols
Heart/Right Arrow button
You must set the clock and alarm before you begin use.
Select with the Set button. The selected symbol will blink.
Set the year, month, day, hour and minute. The year
will blink. Use the left and right arrow buttons to adjust
the year. Once it is correct, press the Set button to save.
It will then move to the next value that you will need to
modify. Continue the same pattern to set the month,
day, hour and minute correctly.
Please note: if you do not press any buttons for
one minute, the screen will return to the original
display. If this occurs, please follow the steps to
proceed to the setting you were adjusting.
Left arrow
Right arrow
1. Setting the time and date 2. Setting the alarm clock
Press the Mode button. Symbols appear in the display.
Select with the Right arrow button. Confirm with the Set button.
Set the alarm hour and minute. First set the alarm
hour using the left and right arrows, and press Set
to save. Follow the same process when settng the
minute.
Only set the alarm once you are ready for use.
Otherwise, keep the alarm set to OFF by
scrolling through the hours until you see OFF
appear on the screen. Press Set. In order to
store data, you must take your reading each
morning when the alarm sounds.
You cannot measure your temperature without setting the alarm.
If you do not take your reading when the alarm sounds, the alarm
will continue for 10 minutes and then shut off for the day.
“Alarm OFF” will blink
“Alarm minute” will blink
“Alarm hour” will blink
The selected symbol will blink
“Year” will blink
“Month” will blink
“Day” will blink
“Hour” will blink
“Minute” will blink
/Memo
/Memo
Grph/Ck
Mode
/Memo
/Memo
Mode
Grph/Ck
Only follow these directions on cycle day 1.

Set/D T
/Memo
START
Del
Set/D T
START
Mode
Grph/Ck
Del
Set/D T
START
Mode
Grph/Ck
Del
Set/D T
START
Del
Grph/Ck
Mode
Set/D T
START
Del
Grph/Ck
Mode
Set/D T
START
Del
3. Starting your second cycle ---

/Memo
Press the Mode button and the symbols
appear.
Select with the Right arrow
button and press the Set button to
confirm.

confirm.

Press the Set button to confirm.
Press the Mode button and the
symbols appear.
Select with the right arrow button and
press the Set button to confirm.
/Memo
Mode
Grph/Ck
4. Forget to start a new cycle?
The 1st day of menstruation will be
recorded automatically if...
You set the bleeding memo to for three
consecutive days and the symbol is displayed.
100 days passed without recording the 1st day of
menstruation. (Max. length of a cycle is 99 days.)
Set/D T
/Memo
START
Del
Set/D T
START
Mode
Grph/Ck
Del
Set/D T
/Memo
START
Mode
Grph/Ck
Del
Press the Mode button to display the symbols.
Please note: You cannot make the first day of
menstruation occur within 10 days of the beginning of
your previous cycle. You also cannot make your 1st day
of menstruation start in the future.
Select with the Right arrow button and
press the Set button to confirm.
Change the date with the arrow buttons to reflect the first day of
your menstruation. Press the Set button to confirm.

 
Under your
tongue!
When the alarm sounds, measure the temperature just as you are, preferably while
you are still lying in bed.
Measured
value
Measured
value
- Page 2 -


under the tongue. DO NOT speak
or open your mouth while taking
your temperature.

Be sure to take your temperature at the alarm time. The temperature will
only be stored if it is taken one hour before/after the alarm time that has
been set.
If you do not take your reading at the sound of your alarm (or before), the
alarm will continue for 10 minutes and then stop.
Once the measured temperature has stabilized, you will hear the first beep. To store
this temperature, remove the probe from your mouth. OR continue taking your
temperature and the ibasal will beep at the 5 minute mark, and save the second
measurement. All other buttons remain inactive fo the entire 5 minutes.

°F °F
°F
To turn off the alarm, press the Start
button. Place the thermometer under
your tongue and press the Start button
again to begin measurement.
Number 1 appears after one minute, 1 2
appears at two minutes, 1 2 3 appears at
three minutes, and so on.
Selected one will blink. The date will blink.
Selected one will blink. 
Selected one will blink. 
/Memo
/Memo
Grph/Ck
Mode

How to delete a memo
Memo Key
Cramps
Sexual
intercourse
Fever
Medication
Cervical
mucus
Bleeding Bleeding during menstruation or spotting
throughout the cycle.
Menstrual cramps and pain
Cervical mucus consistencies
For recording the specific days of intercourse.
If you are sick, mark this memo. Your sickness
could effect your temperature readings.
Mark this memo when you are taking medicine
for a sickness.
Cervical mucus is dry
and sticky.
Cervical mucus is
creamy and thick.
Cervical mucus is
stretchy and clear
(egg-white consistency).
Set/D T
/Memo
START
Mode
Grph/Ck
Del
Set/D T
/Memo
START
Mode
Grph/Ck
Del
Set/D T
/Memo
START
Del
Grph/Ck
Mode
Set/D T
START
Del
Grph/Ck
Mode
Set/D T
START
Del
/Memo
Fertility related symbols Ovulatory phases
BBT graph (displays
the last 10 days of cycle) Current cycle day Clock display (date display)
Set/D T
START
Mode
Grph/Ck
Del
Note: You may record the intercourse memo for previous cycle days.
Select the day you wish to record intercourse (please refer to “How
to check the stored data” below). Press Set and the intercourse
symbol will save. Press Set again to delete the memo.
Press and hold the Set button to
display the current date
/Memo

Set/D T
START
Mode
Grph/ck
Del
/
/Memo
Set/D T
START
Mode
Grph/ck
Del
/
/Memo
Set/D T
START
Mode
Grph/ck
Del
/
Press the Mode button and the
symbols appear.
Press the Memo button to display memo symbols. Select the memo you wish to record with the arrow
buttons. Press the Set button to confirm memo.
Select with the arrow butons
and press the Set button to
confirm.
Press the Mode button and
the symbols will appear.
Set/D T
/Memo
Grph/ck
Mode
START
Del
/
Grph/ck
Mode
Set/D T
/Memo
Grph/ck
Mode
START
Del
/
7. How to view your stored data
Average temp.
High Phase
Low Phase
Set/D T
/Memo
START
Del
/
Set/D T
/Memo
Grph/ck
Mode
START
Del
/

Use the arrows to view the data of each day
in that cycle.
Select the desired cycle you would like
to view using the arrow buttons.
Press the Graph/check button to select.
Select with the Right arrow
button and press the Set button
to confirm.

on the screen. Press the Set button to confirm the
deletion of the stored temperature.
- Page 3 -

°F
°F
°F
°F
°F
Press the Graph/check button once
to display the menstrual cycle
number and average temperature.
The memo(s) that you
selected for the current day

on the screen. Press Set to
delete the memo.
The average temperature is used to detect the high and low phase, which is preprogrammed to 97.7 degrees Fahrenheit until the end of your second cycle. From the third cycle
on, the device begins displaying your actual average temperature, which is calculated from the previous data. The average temperature will vary for all women. When you skip
readings for a few days, or when the difference between the high and the low phase is unclear or too small, the device may not be able to calculate the average temperature.
Please make sure to take your temperature daily.
Temperatures under 93.2 degrees Fahrenheit are not recorded. Temperatures above 99.5 degress Fahrenheit are recorded but disregarded in calculating the average
temperature. This is to avoid mis-calculation of a possible fever or illness. The temperature graph might show the low phase only or the high phase only when the average
temperature is not calculated.
What is the average temperature?
Use the left arrow button to go
back to the 1st day of
menstruation. (The day you are
now viewing will blink.)
* Press and hold the Mode button to display
the 1st day of menstruation in your current
cycle.

Menstrual cycle #
Selected one will blink.
Fertility symbol
Memo
Cycle day
Temperature graph
The data and corresponding
temperature will blink alternately
Selected one will blink.
Selected one will blink. 
You can only delete the temperature for the
current day.

9. Fertility symbols
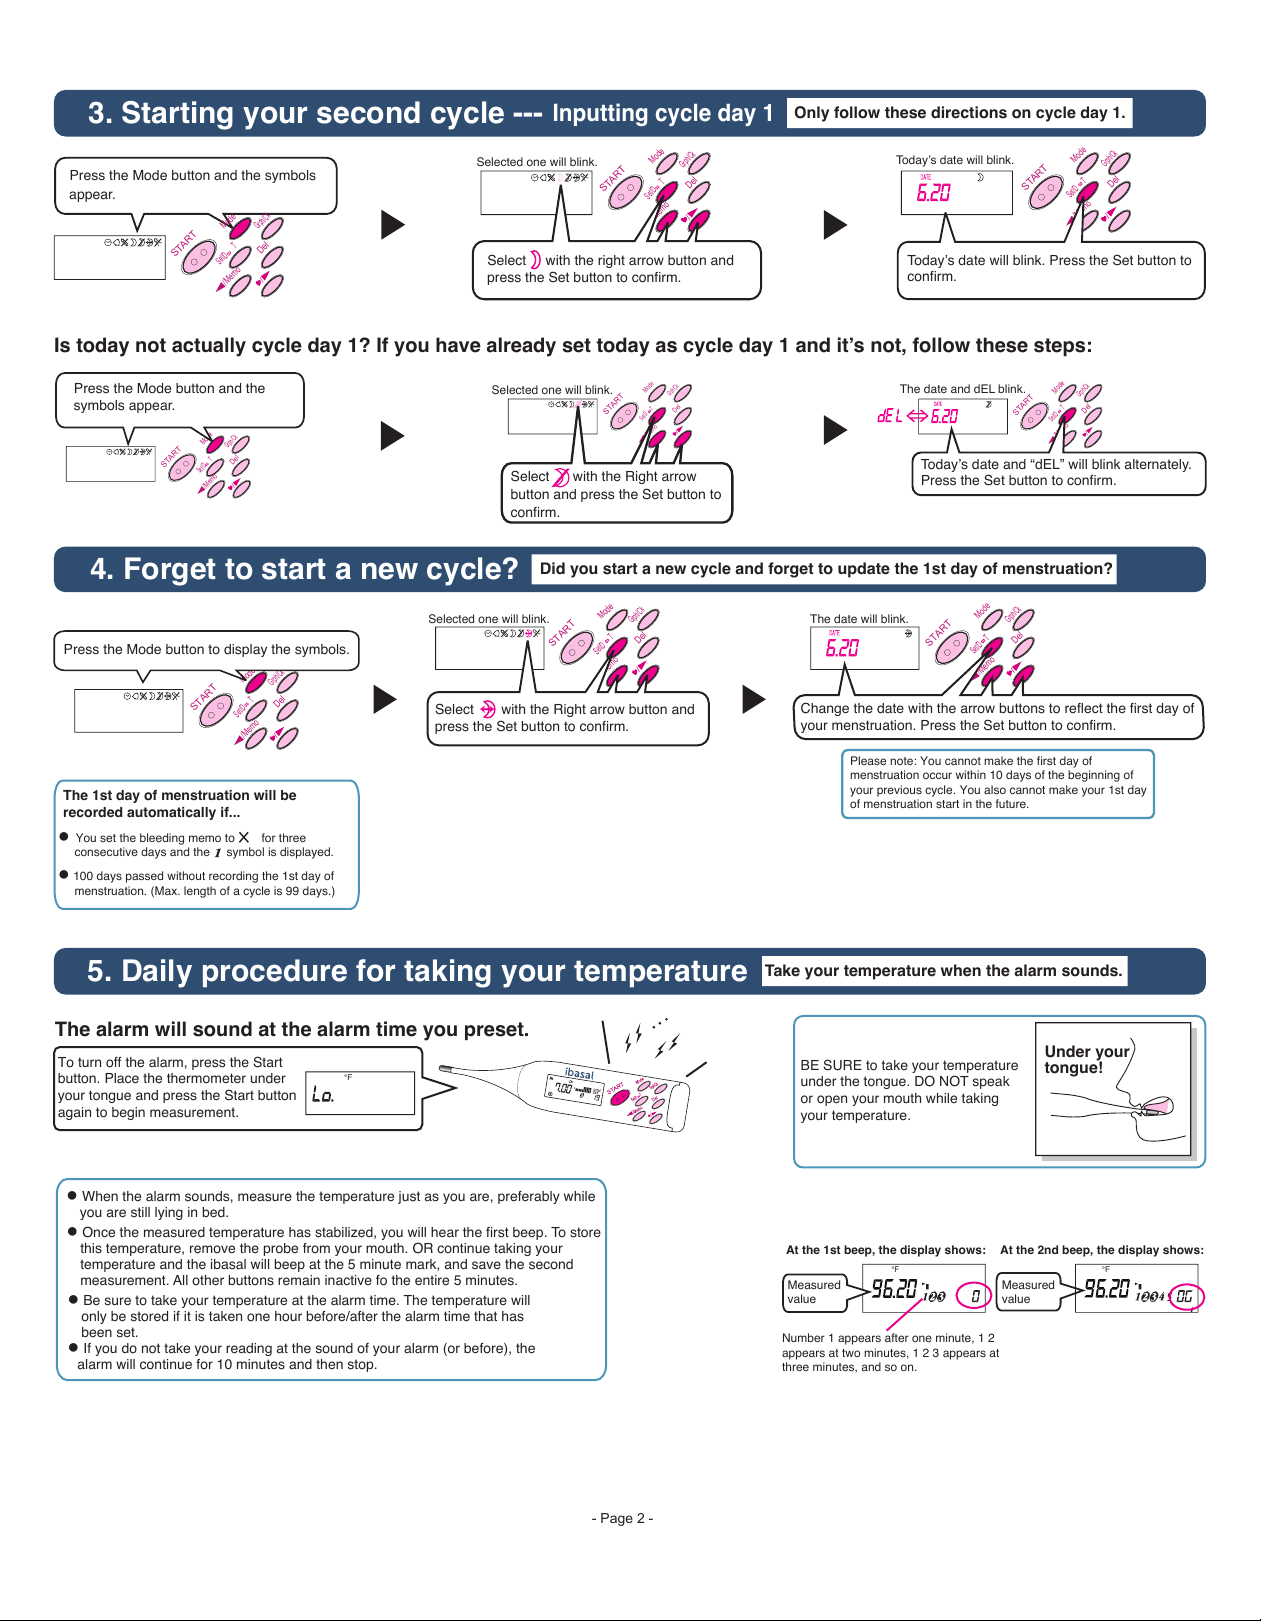
This symbol indicates that you are in
your fertile window.
Fertile symbol
Press and hold the Heart (right arrow) button to display the
number of days you have been in your fertile window.



stored data.

You forget to input the 1st day of menstruation.
Your temperature shift (from low to high phase) is too small.
You do not take your temperature daily.
Grph/ck
Mode
Set/D T
/Memo
START
Del


Possible Pregnancy
The heart symbol can appear beginning with the second cycle.
If you are pregnant, the ibasal will populate a
predicted due date.
Press and hold the Heart button to
display the predicted due date.

trend in your BBT. 
For 3 days after the heart symbol appears.
When bleeding is recorded for over 10 days.
When you set the 1st day of menstruation after fewer than 7 days from the start of
the high phase.
Doctor Symbol
If you set the 1st day of menstruation for a new cycle, the heart symbol will
disappear.
If your BBT data is very irregular, the heart symbol can appear on the days you may
be fertile.
Set/D T
/Memo
START
Mode
Grph/Ck
Del
If the device was not able to detect ovulation (the temperature shift from the low to
high phase was too small or you did not take readings daily), the heart symbol will
not appear even if you are pregnant.
Please note:
If you believe you are pregnant, we highly recommend you take an at-home
pregnancy test and consult with your doctor immediately.


window.
You might be pregnant if the high phase continues for over 21 days. The ibasal
informs you with the heart symbol.
For 3 days to indicate that you might want to consult a doctor based on the stored
data and memo recordings.

the doctor symbol during the first cycle using the ibasal.
When your temperature drops lower than average for 2 days in a row after
the heart symbol appears.
When you record bleeding, cramps or cervical mucus 3 days after your high
phase begins.
If you are concerned when the doctor symbol appears, we would recommend
you consult with your doctor.
- Page 4 -



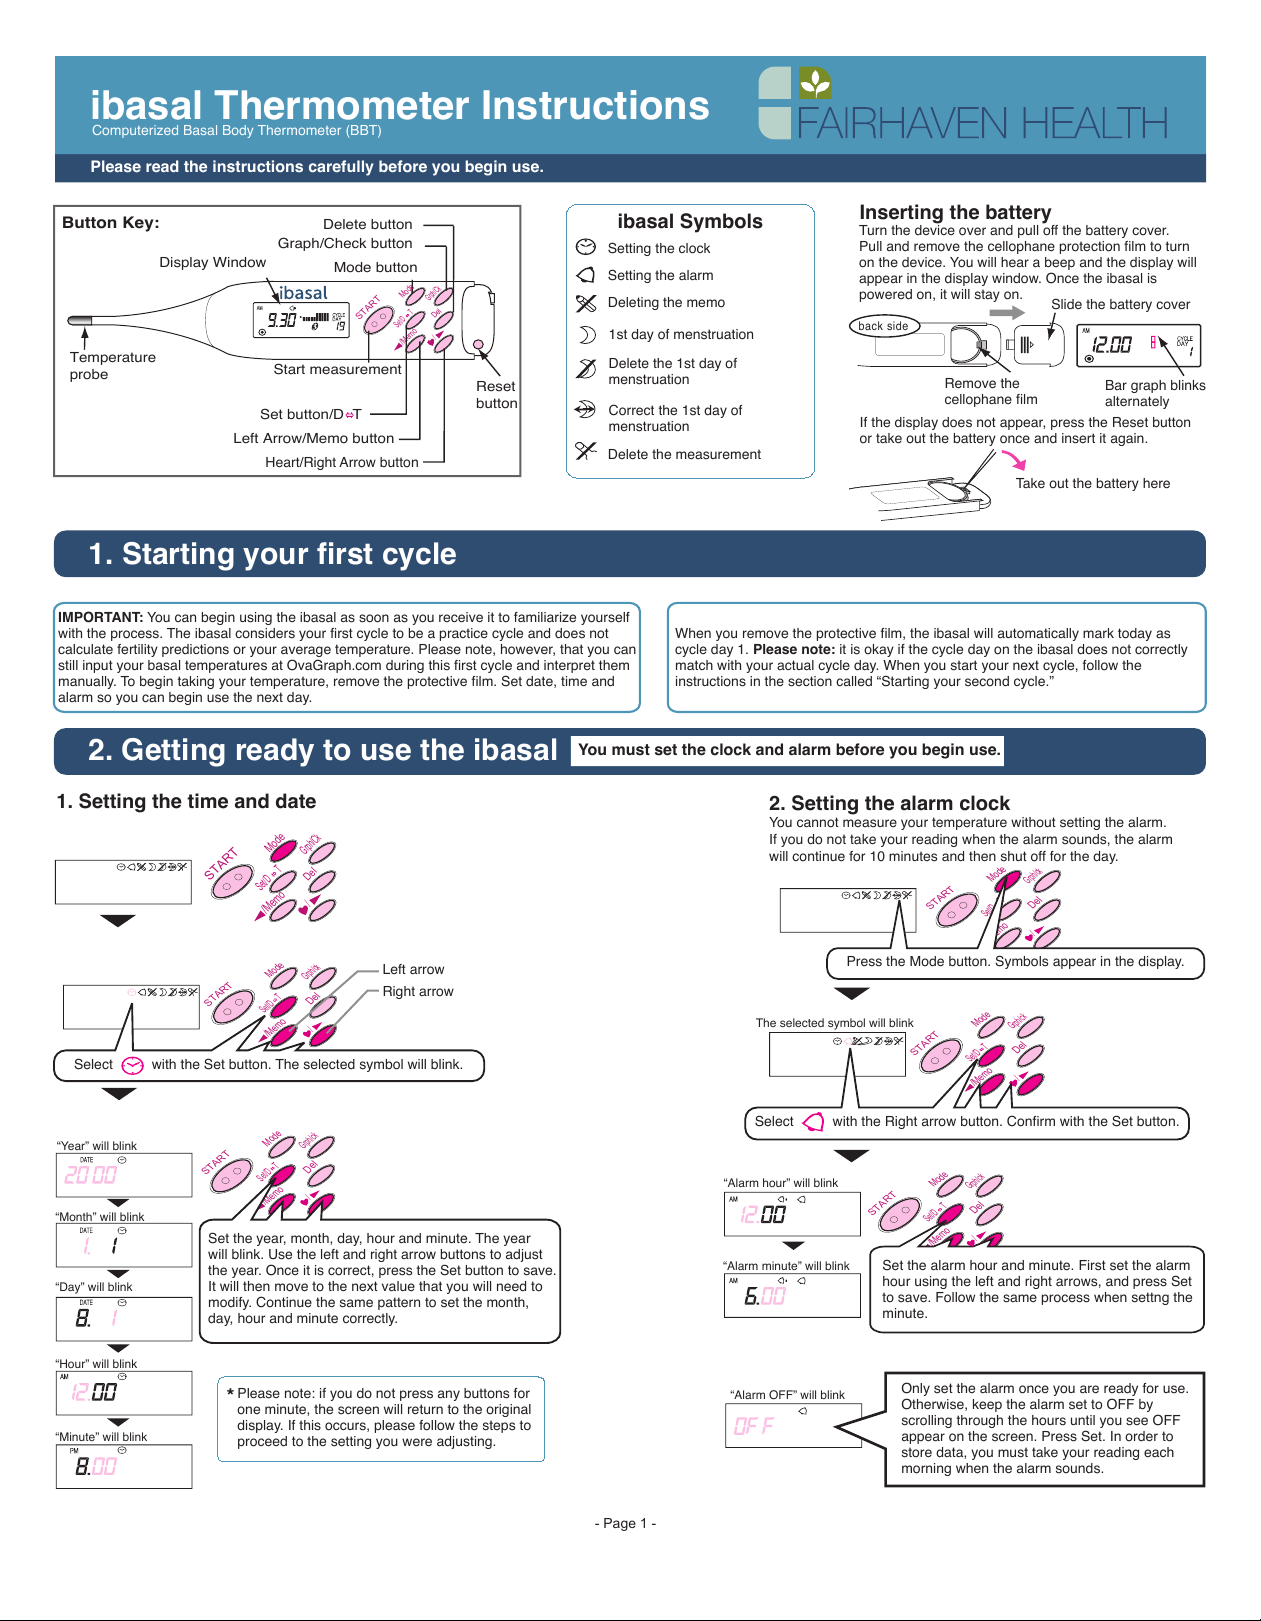
least four hours of sleep and prior to any physical activity, eating, or drinking, etc. During the first
two weeks or so of your menstrual cycle, your BBT remains lower. Just after ovulation, the
increased production of progesterone causes your BBT to increase and this change will typically
last through the duration of the menstrual cycle. By monitoring when this temperature change
occurs, you can determine when ovulation has taken place. In the adjacent graphs, the low phase
refers to before and during ovulation. The high phase refers to your basal temperature rise after
ovulation.

97.50
97.40
97.30
97.20
97.10
97.00

BBT Graph
LOW
HIGH
Average temp
line
Ovulation
Ovulation
LOW Phase
HIGH Phase
Average
temp.
1st day of
menstruation 1st day of
menstruation
ibasal automatically
displays your BBT graph
The ibasal cannot store temperature readings lower than 93.2 degrees
Fahrenheit. You will hear an error beep intermittently. Press the Start button
to retake your measurement.
When the temperature is lower than the average
temperature, the low phase bar in the graph will blink (left
image). When the temperature is higher than average,
both the low and high phase bars will blink (right image).
When you do not save your
temperature, both the low
and high bars will blink
alternately.
1
1
2
2
3
3
4
4
5
5
6
6
7
7
8
8
9
9
10
10
11
11
12
12
13
13
14
14
15
15
16
16
17
17
18
18
19
19
20
20
21
21
22
22
23
23
24
24
25
25
26

27
27
28
28
1
1
2
2
BBT Graph
BBT Graph
Phase
Phase During
menstruation
LOW
LOW
Menstruation
Menstruation
Ovulation
Ovarian
development
Before-after
ovulation
Before-after
ovulation
HIGH
Progesterone
dominance
Before
menstruation
Before
menstruation
cycle
day
cycle
day
10. Phases throughout your cycle
Phases
The phases will appear beginning with your second
cycle. When a possible pregnancy is detected
(heart symbol), the ibasal will not show a phase
number. If the ibasal cannot detect the low and high
phase, number 3 will remain on the display.
The battery lasts for approximately 9 months. When the battery is low, symbol will appear.
/Memo
Slide the battery cover
to remove.
Press the Del button to
stop the procedure.
Select (yes) with the arrow buttons.
Press Set to confirm.
11. Low battery
Grph/Ck
Mode
Set/D T
START
Del
/Memo
Grph/Ck
Mode
Set/D T
START
Del
Press and hold the Set button, and then press
the Reset button with a pointed object.
The ibasal requires a CR2032 battery. Using any other battery may cause a malfunction.
Keep the battery out of the reach of children. If swallowed accidentally, please consult
your doctor immediately. Do not recharge, short-circuit, disassemble, heat or throw the
battery in fire. We are not responsible for deleted data due to a dead battery or other
causes. We recommend that you use the data check function to take note of the data
periodically.
The ibasal will function normally for 4 days after the low battery symbol appears. Only
the clock display will show from the 5th to 8th day. After the 8th day, none of the display
will function properly. Please change the battery within 3 days of the alert. The stored
data does not disappear when you change the battery. The calendar function does stop
when changing the battery - please reset the date and time after replacing the battery.
The battery included has been used for inspection and may not last the full 9 months.
WARNING

This process will delete all your saved data. Once the ibasal is reset, set the clock, date and alarm time to start using the unit.
- Page 5 -
CAUTION
Do not disassemble or drop the device.
Avoid getting the ibasal wet. When cleaning
the unit, rinse only the temperature probe.
Keep ibasal away from humidity, direct
sunlight and sudden changes in temperature.
Insert a new battery within 3 days after the
battery symbol appears.
Keep the device away from children.
This device is intended to measure the basal
body temperature (BBT) only. Never use the
ibasal for any other purpose.
Take your BBT every morning to ensure your
fertility status is accurate.
This device is intended to help you pinpoint
your fertile window. If you suspect you are
pregnant, please consult with your doctor.
13. Handle the ibasal with care
HIGH
- Page 6 -

FertilAid for Women is a fertility
enhancing supplement designed
for trying-to-conceive women. It
helps restore hormonal balance,
supports reproductive wellness,
and optimizes your chances of
conceiving.
FertileCM helps improve the quantity
and quality of your cervical mucus.
The doctor-designed supplement is
also designed to help support a
healthy uterine lining for implantation.
OvaBoost is designed to improve
egg quality and ovarian function.
The all-natural supplement helps
protect egg cells from the damaging
effects of free radicals and helps
eggs produce energy needed for
conception.
FertilAid for Men is a male fertility
enhancing supplement designed to
improve sperm parameters.
Doctor-designed and clinically shown
to increase the total number of motile
sperm.



Chart all of your fertility indicators - basal temperature, ovulation test results, OvaCue
Fertility Monitor readings, cervical mucus, and much more - at OvaGraph.com! Using
OvaGraph, you can easily create a comprehensive chart of all your fertility signs, for
a clearer picture of your fertility status each month.
With your free account at OvaGraph.com, you will receive
access to:
easy-to-use online fertility charting tools
a supportive community of other trying-to-conceive women
the OvaGraph staff of fertility support specialists

Popular Thermometer manuals by other brands

EQUATION EM233B-W instruction manual

EQUATION

EQUATION EM233B-W instruction manual

Fluke 566 user manual

Fluke

Fluke 566 user manual

Oregon Scientific RMR183 user manual

Oregon Scientific

Oregon Scientific RMR183 user manual

Optex PT-3S manual

Optex

Optex PT-3S manual

SK SATO PC-9230 instruction manual

SK

SK SATO PC-9230 instruction manual

Generation Guard GM-200F user manual

Generation Guard

Generation Guard GM-200F user manual

Yacht Devices YDTC-13 user manual

Yacht Devices

Yacht Devices YDTC-13 user manual

Terraillon 14050 quick start guide

Terraillon

Terraillon 14050 quick start guide

T&D DT75 instruction manual

T&D

T&D DT75 instruction manual

MR MESSKO MT-ST TRASY2 operating instructions

MR

MR MESSKO MT-ST TRASY2 operating instructions

TFA 30.1049 instruction manual

TFA

TFA 30.1049 instruction manual

Maiyun HX-YL001 user manual

Maiyun

Maiyun HX-YL001 user manual

Salter Heston Blumental 543 HBSSCR Instructions and guarantee

Salter

Salter Heston Blumental 543 HBSSCR Instructions and guarantee

Oakton InfraPro 3 manual

Oakton

Oakton InfraPro 3 manual

CEM DT-133 instructions

CEM

CEM DT-133 instructions

LaserLiner ThermoMaitre manual

LaserLiner

LaserLiner ThermoMaitre manual

TFA 30.1040 operating instructions

TFA

TFA 30.1040 operating instructions

Klein Tools ET10 user manual

Klein Tools

Klein Tools ET10 user manual

manuals.online logo
manuals.online logoBrands
  • About & Mission
  • Contact us
  • Privacy Policy
  • Terms and Conditions

Copyright 2025 Manuals.Online. All Rights Reserved.