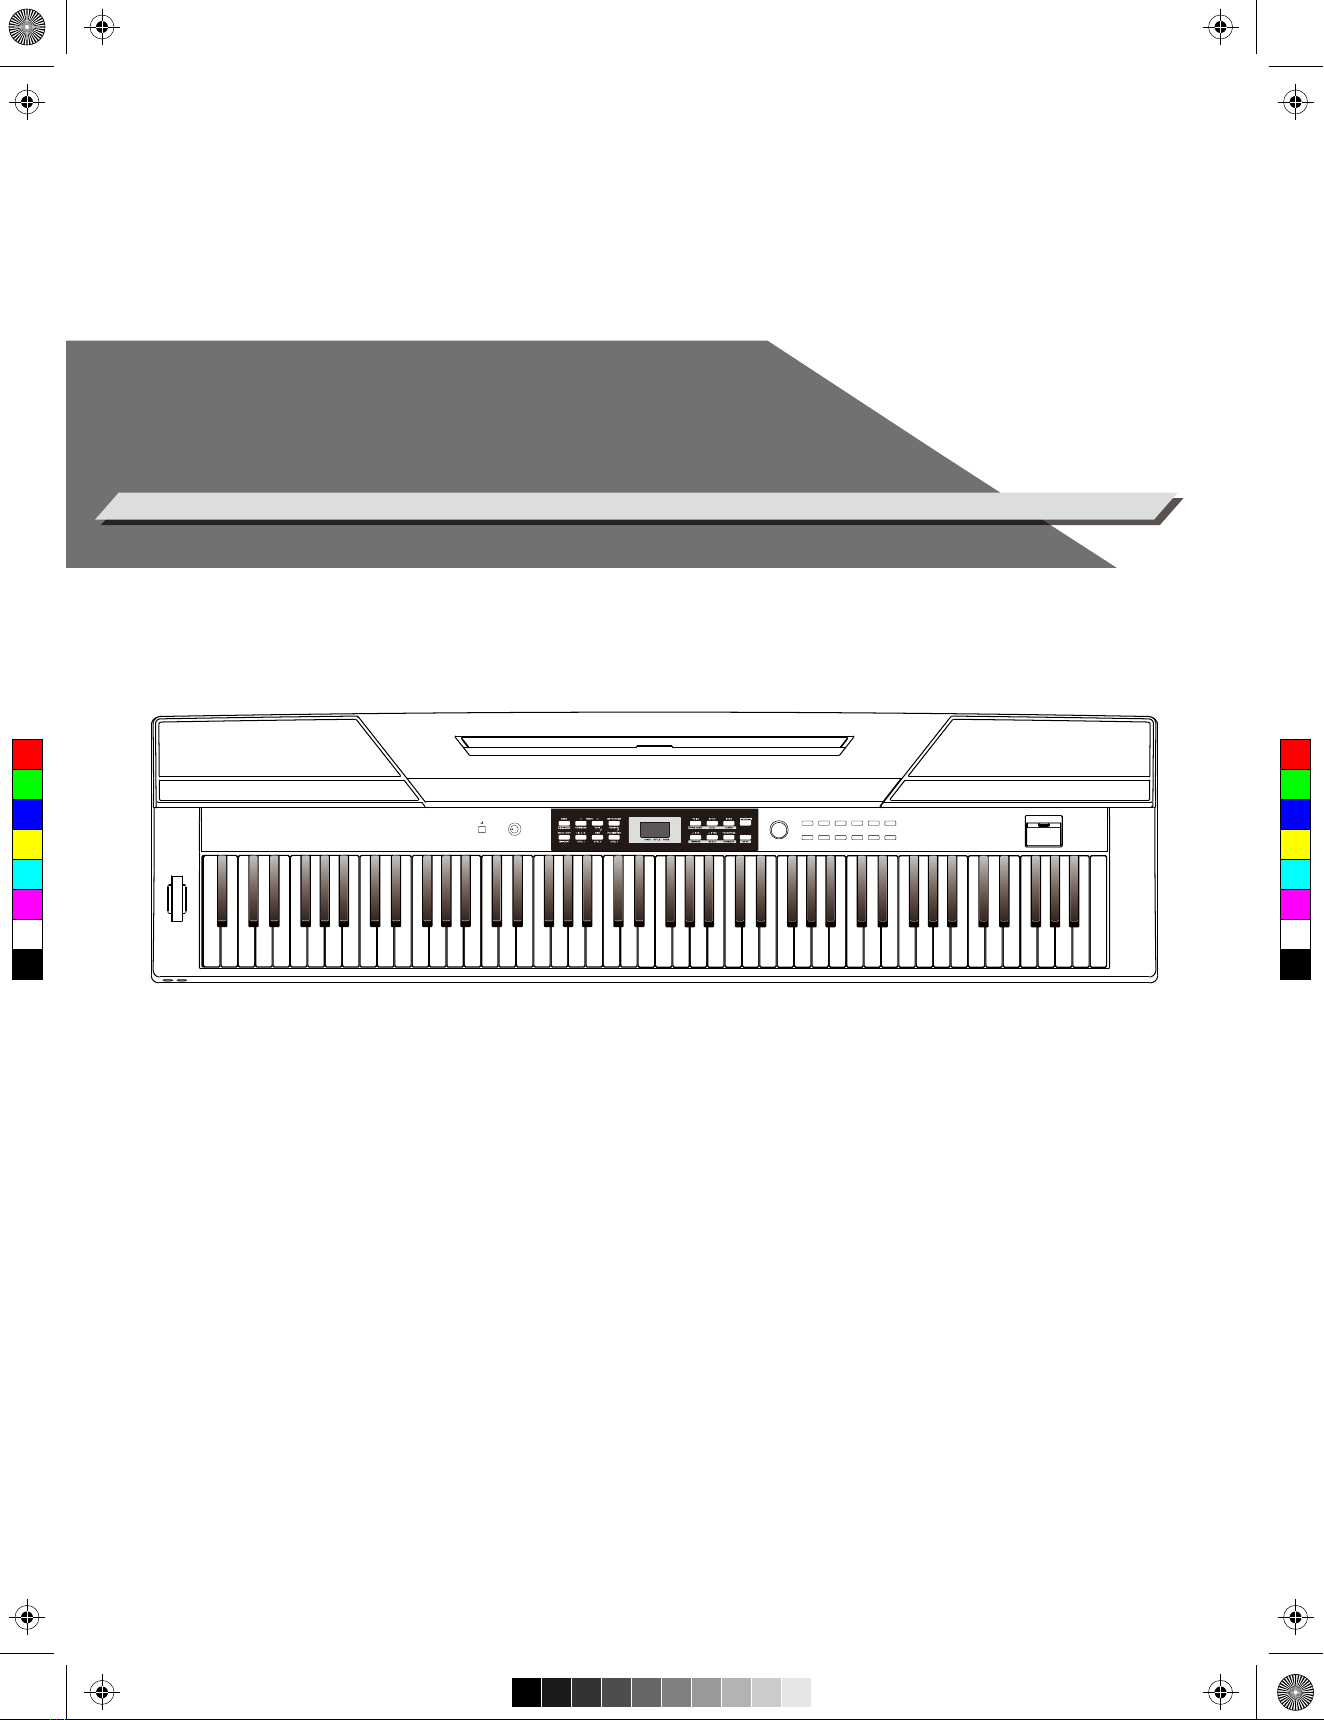
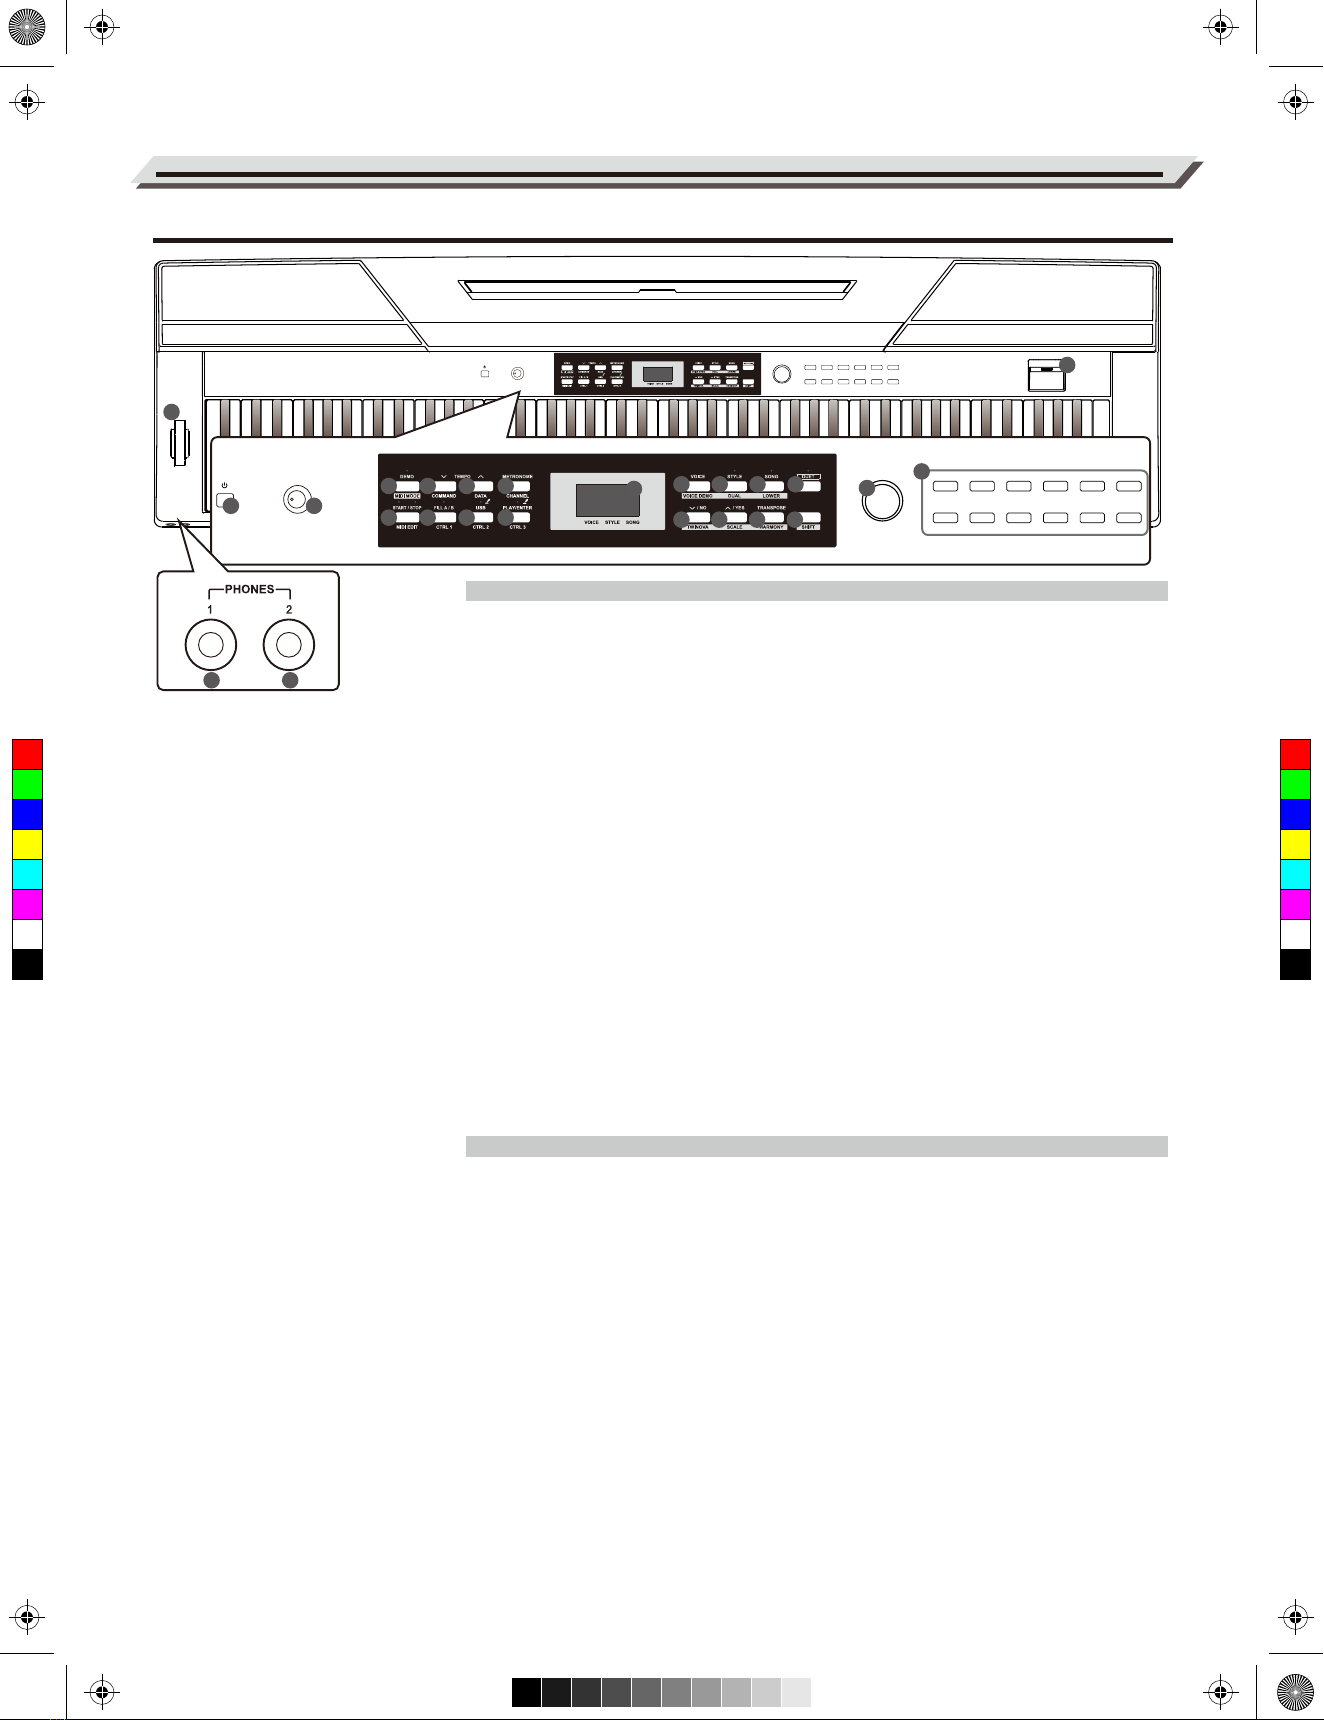
FAME SP-5200 User manual

STAGE PIANO
SAVE REC
01 GrandPno 03 E.Piano 05 E.Piano 3 07 Clavi
02 GrandPn 2
13 RockOrgn 15 Harmnic 17 CleanGtr 19Strings
11 ChurOrgn
12 ReedOrgn
14 Acordion 16 NylonGtr 18FngrBass 20 SynStrs
04 E.Piano 2 06 Harpsi 08 Vibra
09 PercOrgn
10 DrawOrgn
MIN MAX
VOLUME
21 SweetTrp
22 TenorSax
23 SweetFlu
24 PanFlute
C
M
Y
CM
MY
CY
CMY
K
aw_SP5300_Manual_G03_170426.pdf 1 17/4/26 10:16
FAME SP-5200
Owner´s Manual

02
INFORMATION FOR YOUR SAFETY!
THE FCC REGULATION WARNING (for USA)
This equipment has been tested and found to comply with
the limits for a Class B digital device, pursuant to Part 15 of
the FCC Rules.
These limits are designed to provide reasonable protection
against harmful interference in a residential installation. This
equipment generates, uses, and can radiate radio frequency
energy and, if not installed and used in accordance with the
instructions, may cause harmful interference to radio
communications. However, there is no guarantee that
interference will not occur in a particular installation.
If this equipment does cause harmful interference to radio or
television reception, which can be determined by turning the
equipment off and on, the user is encouraged to try to
correct the interference by one or more of the following
measures:
Reorient or relocate the receiving antenna.
Increase the separation between the equipment and
receiver.
Connect the equipment into an outlet on a circuit different
from that to which the receiver is connected.
Consult the dealer or an experienced radio/TV technician
for help.
Unauthorized changes or modification to this system can
void the user's authority to operate this equipment.
PRECAUTIONS
PLEASE READ CAREFULLY BEFORE PROCEEDING
Please keep this manual in a safe place for future reference.
Power Supply
Please connect the designated AC adaptor to an AC outlet
of the correct voltage.
Do not connect it to an AC outlet of voltage other than that
for which your instrument is intended.
Unplug the AC power adaptor when not using the instru-
ment, or during electrical storms.
Connections
Before connecting the instrument to other devices, turn off
the power to all units. This will help prevent malfunction and
/ or damage to other devices.
Location
Do not expose the instrument to the following conditions to
avoid deformation, discoloration, or more serious damage:
Direct sunlight
Extreme temperature or humidity
Excessive dusty or dirty location
Strong vibrations or shocks
Close to magnetic fields
Interference with other electrical devices
Radios and televisions placed nearby may experience
reception interference. Operate this unit at a suitable
distance from radios and televisions.
Cleaning
Clean only with a soft, dry cloth.
Do not use paint thinners, solvents, cleaning fluids, or
chemical-impregnated wiping cloths.
Handling
Do not apply excessive force to the switches or controls.
Do not let paper, metallic, or other objects into the instru-
ment. If this happens, remove the electric plug from the
outlet. Then have the instrument inspected by qualified
service personnel.
Disconnect all cables before moving the instrument.
CAUTION
The normal function of the product may be disturbed
by Strong Electro Magnetic Interference. If so, simply
reset the product to resume normal operation by
following the owner's manual. In case the function
could not resume, please use the product in other
location.
C
M
Y
CM
MY
CY
CMY
K
aw_SP5300_Manual_G03_170426.pdf 2 17/4/26 10:16

Contents
Panel Description
Front Panel..................................................................4
Rear Panel...................................................................5
Setup
Setting a Music Stand..................................................6
Power Supply...............................................................6
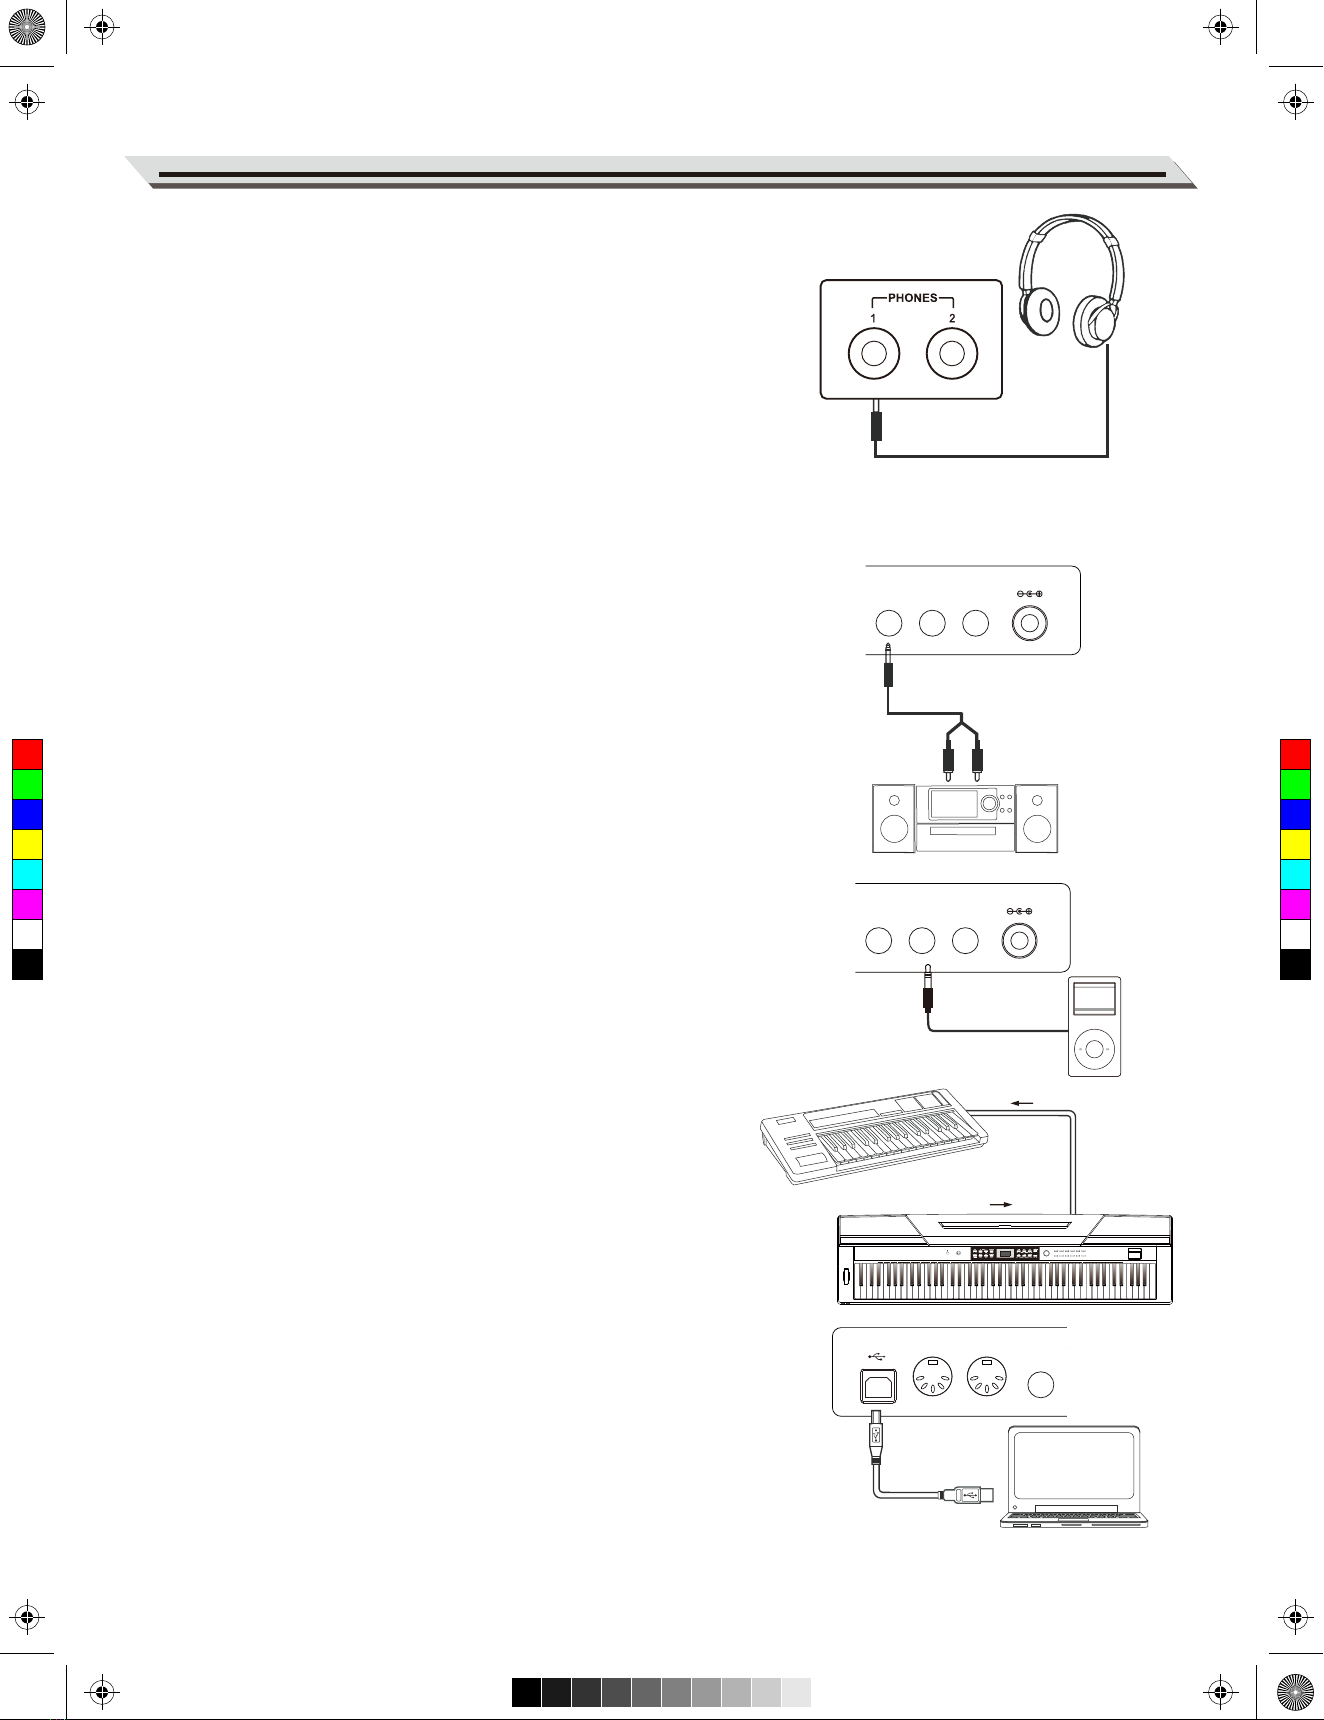
Connections
Connecting a pair of Headphones...............................7
Connecting an Audio Equipment.................................7
Connecting a MP3/CD Player......................................7
Connecting a PC and an MIDI Device..........................7
Connecting a Footswitch..............................................8
Connecting a Unit Pedal..............................................8
Connecting a Microphone............................................8
Quick Start
Power Switch and Master Volume...............................9
Playing Demo Songs...................................................9
Playing Voices.............................................................9
Playing Styles..............................................................9
Playing Songs............................................................10
Record.......................................................................10
Playing Voices
Select and play Upper Voice......................................11
Playing two Voices Simultaneously............................11
Playing Different Voices with Both Hands..................12
Playing Voice Demo..................................................12
Touch Sensitivity........................................................12
Transpose..................................................................13
Tune...........................................................................13
Pedal Resonance......................................................13
Metronome................................................................14
Playing Accompaniment
Selecting a Style........................................................15
Start/Stop Style Playing.............................................15
Fill In A/B...................................................................15
Accompaniment Volume............................................15
Tempo........................................................................16
DSP Effect
Reverb.......................................................................17
Chorus.......................................................................17
EQ.............................................................................17
Listening to the songs
Playing Songs............................................................18
Stop Playing Songs...................................................18
Learning Songs.........................................................18
Record
Prepare Recording....................................................19
Start Recording..........................................................19
Stop Recording..........................................................19
Play Back the User Song...........................................19
Delete the User Song................................................20
Connecting USB Flash Drive………………...............20
Duet..........................................................................22
Harmony.................................................................22
Scale........................................................................23
TWINOVA................................................................24
Beep Tone...............................................................24
MIDI Function
What’s MIDI?.............................................................25
MIDI Terminals...........................................................25
MIDI Controller...........................................................25
Controller Settings.....................................................25
Controller Output.......................................................27
Restore Factory Setting......................................27
Troubleshooting....................................................28
Specification..........................................................29
Appendix
Voice List...................................................................30
Style List....................................................................31
Song List....................................................................32
Demo List..................................................................33
MIDI Implementation Chart........................................34
Scale Tuning System............................................35
03
BEEP PEDAL
RESONANCE
C
M
Y
CM
MY
CY
CMY
K
aw_SP5300_Manual_G03_170426.pdf 3 17/4/26 10:16

SAVE REC
01 GrandPno 03 E.Piano 05 E.Piano 3 07 Clavi
02 GrandPn 2
13 RockOrgn 15 Harmnic 17 CleanGtr 19Strings
11 ChurOrgn
12 ReedOrgn
14 Acordion 16 NylonGtr 18FngrBass 20 SynStrs
04 E.Piano 2 06 Harpsi 08 Vibra
09 PercOrgn
10 DrawOrgn
MIN MAX
VOLUME
21 SweetTrp
22 TenorSax
23 SweetFlu
24 PanFlute
Panel Description
Front Panel
1. [POWER] Switch
Turn the power on or off.
2. [VOLUME] Knob
Adjust the master volume.
3. [DEMO]/[MIDI MODE] Button
Start/Stop demo playback.
Press and hold [shift], then press
[MIDI MODE] to turn MIDI MODE
on or off.
11. The NIXIE TUBE Display
Display all the parameters and
values related to the currently
selected operation and mode of
the piano.
15. [DUET] Button
Turn the duet function on or off.
19. [SHIFT] Button
Press and hold [SHIFT], then
press other button enables you
to execute various commands.
20. Data Dial
Adjust the value.
21. VOICE Select Buttons
Quickly select a preset voice.
22. USB Port
Connect a USB flash drive.
23. [PITCH BEND] Wheel
Roll the wheel upward or downward
to raise or lower the pitch.
51-52. PHONE 1 and PHONE 2
Connect stereo headphones with a
¼” stereo phone plug.
When exit the MIDI controller mode:
4. [TEMPO -] Button
Decrease the tempo value.
5. [TEMPO +] Button
Increase the tempo value.
6. [METRONOME] Button
Turn the metronome on or off.
7. [START/STOP] Button
Start or Stop playing the song or style.
8. [FILL A/B] Button
Fill in variation A/ B section.
9. [USB]/[SAVE] Button
Play the MIDI songs on USB flash drive.
Press and hold the button to save user
song to USB flash drive.
10. [PLAY/ENTER]/[REC] Button
Play back the recorded song.
Press and hold the button to enter
Recording mode.
When enter the MIDI controller mode:
4. [COMMAND] Button
Switch to command edit mode.
5. [DATA] Button
Switch to value edit mode.
6. [CHANNEL] Button
Switch to channel edit mode.
7. [MIDI EDIT] Button
Enter or Exit MIDI controller edit mode.
8. [CTRL 1] Button
Transmit controller 1 data, or switch
to controller 1 edit mode.
9. [CTRL 2] Button
Transmit controller 2 data, or switch
to controller 2 edit mode.
10. [CTRL 3] Button
Transmit controller 3 data, or switch
to controller 3 edit mode.
When the [SHIFT] button is released:
12. [VOICE] Button
Switch to voice mode.
13. [STYLE] Button
Switch to style mode.
14. [SONG] Button
Enter the song mode.
16. [-/NO] Button
Decrease the parameter value or
execute “NO” operation.
17. [+/YES] Button
Increase the parameter value or
execute “YES” operation.
18. [TRANSPOSE] Button
Enter the transpose setting.
When the [SHIFT] button is pressed:
12. [VOICE DEMO] Button
Start or Stop playing voice demo.
13. [DUAL] Button
Turn the dual function on or off.
14. [LOWER] Button
Turn the lower function on or off.
16. [TWINOVA] Button
Turn the TWINOVA function on or off.
17. [SCALE] Button
Turn the scale function on or off.
18. [HARMONY] Button
Turn the harmony function on or off.
04
51 52
ON/OFFTYPE ROOT
REVERB CHORUS
BEEP TOUCH TUNE OCTAVE SCALEPEDAL
RESONANCE ON/OFF
EQ DUET HARMONY
ON/OFFTYPE ROOT
REVERB CHORUS
BEEP TOUCH TUNE OCTAVE SCALEPEDAL
RESONANCE ON/OFF
BEEP TOUCH TUNEPEDAL
RESONANCE
METRONOME ACCOMP
LOFF R
MELODY OFFEQ DUET HARMONY
ON/OFFTYPE ROOT
REVERB CHORUS
BEEP TOUCH TUNE OCTAVE SCALEPEDAL
RESONANCE VOCALON/OFF
METRONOME ACCOMP
0 1 2 3
4
5
TAP
TEMPO
LOFF R
MELODY OFFEQ DUET HARMONY
ON/OFFTYPE ROOT
REVERB CHORUS
TOUCH TUNE OCTAVE SCALE
VOCALON/OFF
22
23
SAVE REC
01 GrandPno 03 E.Piano 05 E.Piano 3 07 Clavi
02 GrandPn 2
13 RockOrgn 15 Harmnic 17 CleanGtr 19 Strings
11 ChurOrgn
12 ReedOrgn
14 Acordion 16 NylonGtr 18 FngrBass 20 SynStrs
04 E.Piano 2 06 Harpsi 08 Vibra
09 PercOrgn
10 DrawOrgn
MIN MAX
VOLUME
21 SweetTrp
22 TenorSax
23 SweetFlu
24 PanFlute
1
56
789
12 13 14 15
16 17
10
11
18 19
2
4
320
21
C
M
Y
CM
MY
CY
CMY
K
aw_SP5300_Manual_G03_170426.pdf 4 17/4/26 10:16

SAVE REC
01 GrandPno 03 E.Piano 05 E.Piano 3 07 Clavi
02 GrandPn 2
13 RockOrgn 15 Harmnic 17 CleanGtr 19Strings
11 ChurOrgn
12 ReedOrgn
14 Acordion 16 NylonGtr 18FngrBass 20 SynStrs
04 E.Piano 2 06 Harpsi 08 Vibra
09 PercOrgn
10 DrawOrgn
MIN MAX
VOLUME
21 SweetTrp
22 TenorSax
23 SweetFlu
24 PanFlute
7 8
METRONOME ACCOMP
0 1 2 3
4
5 6 7 8
TAP 9
TEMPO
1 2 3
4
5 6 7 80 9
STYLE
1 2 3
4
5 6 7 80 9
SONG
0 1 2 3
4
5 6
MIDI
LOFF R
MELODY OFFEQ DUET HARMONY
ON/OFFTYPE ROOT
REVERB CHORUS
BEEP TOUCH TUNE OCTAVE SCALEPEDAL
RESONANCE 9
VOCALON/OFF
Panel Description
Rear Panel
When the [SHIFT] button is pressed:
24. [BEEP] Key
Turn the prompt tone on or off.
25. [PEDAL RESONANCE] Key
Turn the pedal resonance on or off.
26. [TOUCH] Keys
Set an appropriate touch sensitivity level.
27. [TUNE] Keys
Adjust the tune value.
28. [OCTAVE] Keys
In TWINOVA mode, adjust the octave value.
29. [SCALE TYPE] Keys
In SCALE mode, select different scale types.
30. [SCALE ROOT] Keys
In SCALE mode, set the root note of scale.
31. [REVERB] Keys
Turn the reverb effect on/off, or select the
desired reverb effect type.
32. [CHORUS] Keys
Turn the chorus effect on/off, or select the
desired chorus effect type.
33. [EQ] Keys
Select the desired EQ effect type.
34. [DUET] Keys
Select the desired duet effect type.
35. [HARMONY] Keys
Select the desired harmony effect type.
36. [MELODY OFF] Keys
In the SONG mode, press “L”/”R” to mute/
activate left or right-hand part, allowing each
part to be practiced separately.
When the [SHIFT] button is pressed:
37. [METRONOME] Keys
Set the metronome type.
38. [ACCOMP VOLUME] Keys
Set the accompaniment volume value.
39. [TEMPO] Keys
Set the tempo value.
40. [STYLE] Keys
Select the desired style.
41. [SONG] Keys
Select the desired song.
In the MIDI controller edit mode:
42. [MIDI] Keys
In the MIDI edit mode, set parameter value which
related to MIDI controllers.
43. USB Terminal
Connect to a computer.
44. MIDI OUT Jack
Transmit MIDI messages to
an external MIDI device.
45. MIDI IN Jack
Receive MIDI messages
from an external MIDI device.
46. SUSTAIN Jack
Connect a sustain pedal.
47. AUX OUT Jack
Connect an external audio
equipment.
48. AUX IN Jack
Connect an external audio source,
such as an MP3 or CD player.
49. MIC Jack
Connect a microphone with a ¼”
stereo phone plug.
50. DC 12V
Connect DC 12V power adaptor.
05
43 44 45 4746 4948 50
METRONOME
LOFF R
MELODY OFFEQ DUET HARMONY
ON/OFFTYPE ROOT
REVERB
CHORUS
BEEP TOUCH TUNE OCTAVE SCALEPEDAL
RESONANCE
VOCALON/OFF
METRONOME ACCOMP
0 1 2
3
4
5
6 7 8
TAP 9
TEMPO
1 2 3
4
5 6 7 80 9
STYLE
10
LOFF R
MELODY OFFEQ DUET HARMONY
VOCAL
METRONOME ACCOMP
0 1 2 3
4
5 6 7 8
TAP 9
TEMPO
1 2 3
4
5
6 7 80 9
STYLE
1 2 3
4
5 6 7 80 9
SONG
R VOCAL
METRONOME ACCOMP
0 1 2 3
4
5 6 7 8
TAP 9
TEMPO
10
LOFF R
MELODY OFFEQ DUET HARMONY
ON/OFFTYPE ROOT
REVERB
CHORUS
SCALE
VOCALON/OFF
0 1 2 3
4
5 6 7 8 9
TEMPO
1 2 3
4
5 6 7 80 9
STYLE
1 2 3
4
5
6 7 80 9
SONG
0 1 2 3
4
MIDI
7 88 9 1 2 3
4
5 6 7 80 9
STYLE
1 2 3
4
5 6 7 80 9
SONG
0 1 2
3
4
5 6
MIDI
9
41
2726 28 29 30 31
32 33 34 35 36 37 38
25
24
42
39 40
USB MIDI OUT MIDI IN SUSTAIN AUX OUT AUX IN MIC DC IN
C
M
Y
CM
MY
CY
CMY
K
aw_SP5300_Manual_G03_170426.pdf 5 17/4/26 10:16

USB MIDI OUT MIDI IN SUSTAIN AUX OUT AUX IN MIC DC IN
SAVE REC
01GrandPno 03E.Piano 05E.Piano 3 07 Clavi
02GrandPn 2
13RockOrgn 15Harmnic 17CleanGtr 19Strings
11ChurOrgn
12ReedOrgn
14Acordion 16 NylonGtr 18FngrBass 20SynStrs
04E.Piano 2 06 Harpsi 08Vibra
09PercOrgn
10DrawOrgn
MIN MAX
VOLUME
21SweetTrp
22TenorSax
23SweetFlu
24PanFlute
7 8
METRONOME ACCOMP
0 1 2 3
4
5 6 7 8
TAP 9
TEMPO
1 2 3
4
5 6 7 80 9
STYLE
1 2 3
4
5 6 7 80 9
SONG
0 1 2 3
4
5 6
MIDI
LOFF R
MELODYOFFEQ DUET HARMONY
ON/OFFTYPE ROOT
REVERB CHORUS
BEEP TOUCH TUNE OCTAVE SCALEPEDAL
RESONANCE 9
VOCALON/OFF
Setup
This section contains information about setting up your instrument
and preparing to play. Please go through this section carefully
before turning the power on.
Setting a Music Stand
Follow the images on the right, and install the music stand correctly.
A music stand is supplied with the keyboard. You can easily attach
it to the instrument by inserting it into the slots at the rear of the
panel.
Power Supply
1. Make sure that the piano is turned off. Before you switch your
piano on or off, turn down the volume of piano and any
connected audio equipments first.
2. Connect the AC adaptor to the power supply jack of this piano.
3. Plug the AC adaptor into an AC outlet.
4. Press the POWER switch, the nixie tube displays“0.01”, which
indicates the piano is power on.
5. If you are ready to turn off the piano, please long press the
POWER switch.
Note:
1. In order to save energy, we have designed the “Automatic
Shutdown” function to the piano. With this function, the keyboard
will automatically shutdown in 30 minutes later if you do not take
any action on the piano. If you don’t need this feature, just press
and hold the [A0] key (the 1st key) and turn it on.
2. When the piano is not in use or during thunderstorm, please
disconnect the power for safety purpose.
06
ACCOMP
0 1 2 3
4
5 6 7 8
TAP 9
TEMPO
1 2 3
4
5 6 7 80 9
STYLE
1 2 3
4
5 6 7 80 9
SONG
0 1
7 8
4
5 6 7 8 9
SONG
0 1 2 3
4
5 6
MIDI
9
7 80 1 2 3
4
5 6
MIDI
9
7 8
4
5 6 7 8 9
STYLE
1 2 3
4
5 6 7 80 9
SONG
0 1 2 3
4
5 6
MIDI
9
7 8 9
SAVE REC
01GrandPno 03E.Piano 05E.Piano 3 07 Clavi
02GrandPn 2
13RockOrgn 15Harmnic 17CleanGtr 19Strings
11ChurOrgn
12ReedOrgn
14Acordion 16 NylonGtr 18FngrBass 20SynStrs
04E.Piano 2 06 Harpsi 08Vibra
09PercOrgn
10DrawOrgn
MIN MAX
VOLUME
21SweetTrp
22TenorSax
23SweetFlu
24PanFlute
7 8
METRONOME ACCOMP
0 1 2 3
4
5 6 7 8
TAP 9
TEMPO
1 2 3
4
5 6 7 80 9
STYLE
1 2 3
4
5 6 7 80 9
SONG
0 1 2 3
4
5 6
MIDI
LOFF R
MELODYOFFEQ DUET HARMONY
ON/OFFTYPE ROOT
REVERB CHORUS
BEEP TOUCH TUNE OCTAVE SCALEPEDAL
RESONANCE 9
VOCALON/OFF
C
M
Y
CM
MY
CY
CMY
K
aw_SP5300_Manual_G03_170426.pdf 6 17/4/26 10:16

SAVE REC
01GrandPno 03E.Piano 05E.Piano 3 07 Clavi
02GrandPn2
13RockOrgn 15Harmnic 17CleanGtr 19 Strings
11ChurOrgn
12ReedOrgn
14Acordion 16NylonGtr 18FngrBass 20SynStrs
04E.Piano2 06 Harpsi 08Vibra
09PercOrgn
10DrawOrgn
MIN MAX
VOLUME
21SweetTrp
22TenorSax
23SweetFlu
24PanFlute
7 8
METRONOME ACCOMP
0 1 2 3
4
5 6 7 8
TAP 9
TEMPO
1 2 3
4
5 6 7 80 9
STYLE
1 2 3
4
5 6 7 80 9
SONG
0 1 2 3
4
5 6
MIDI
LOFF R
MELODYOFFEQ DUET HARMONY
ON/OFFTYPE ROOT
REVERB CHORUS
BEEP TOUCH TUNE OCTAVE SCALEPEDAL
RESONANCE 9
VOCALON/OFF
Connecting a pair of Headphones
A standard pair of stereo headphones can be plugged in here for
private practice or late-night playing.
Jack1: When a pair of headphones is plugged into the jack 1, the
sound can be heard from both headphones and speakers of the
instrument.
Jack2: When a pair of headphones is plugged into the jack 2, the
internal stereo speaker system is automatically shut off. The sound
can only be heard from headphones.
Note:
To avoid the risk of hearing loss when using headphones,please do
not play the piano with a high volume level for a long time.
Connecting an Audio Equipment
The rear-panel AUX OUT jack delivers the output of the instrument
for connection to a keyboard amplifier, stereo sound system, a
mixing console, or tape recorder.
Use an audio cable to plug into the AUX OUT jack located on the
rear board, then plug the other end of the cord into AUX IN of the
amplifier.
Note:
To avoid damaging the speakers, please ensure that the volume
has been set to the minimum level before connecting the power and
other devices.
Connecting a MP3/CD Player
Connect the audio output of an MP3/CD player or other audio
Source to the stereo AUX IN jack on the rear panel.
The input signal is mixed with the piano signal, allowing you to play
along.
Connecting a PC or an MIDI Device
MIDI OUT Connector
Connect the instrument MIDI OUT terminal to the MIDI IN terminal
of external device via the MIDI cables. All performance data will be
transmitted from this connector to connected PC or MIDI devices.
This instrument will be used as the MIDI controller. Namely the
external sound source can be used through this instrument.
MIDI IN Connector
Connect the MIDI IN terminal to PC or the MIDI OUT terminal of
external device with MIDI cables. In order to be used as a sound
source, all the performance data will be transmitted from other MIDI
devices to the instrument.
USB Connector
By connecting the USB terminal to PC, the data will be transmitted
between the instrument and the PC via the USB cables.
For example, you can save your instrument performance data in the
PC and playback the saved MIDI file by piano.
Note:
Please do not set the USB audio to be input and output simultane-
ously when you are setting the software on the PC. Otherwise the
sound will be overlapped when play the keyboard.
Connections
07
7 8
4
5 6
MIDI
9
MIDI OUTMIDI IN
MIDI OUTMIDI IN
USB MIDI OUT MIDI IN SUSTAIN
AUX OUT AUX IN MIC DC IN
USB MIDI OUT MIDI IN SUSTAIN
AUX OUT AUX IN MIC DC IN
USB MIDI OUT MIDI IN SUSTAIN
AUX OUT AUX IN MIC DC IN
C
M
Y
CM
MY
CY
CMY
K
aw_SP5300_Manual_G03_170426.pdf 7 17/4/26 10:16

USB MIDI OUT MIDI IN SUSTAIN
AUX OUT AUX IN MIC
Connecting a Footswitch
An optional footswitch can be plugged into the sustain jack and be
used to switch sustain on or off. Simply by pressing a sustain
footswitch, you will have a natural sustain as you play.
Note:
1. This instrument supports not only the foot switch we supply, but
also those with other brands.
2. Make sure the power is off when connecting the pedal with other
brand, otherwise the sequence of switch on/off will be reversed
when turning the piano on.
Connecting a Unit Pedal
To simulate the real piano, you can also connect a unit pedal to the
unit pedal jack on the bottom cover, then it contains three functional
pedals: Sustain, Sostenuto, Soft.
Sustain Pedal
When the sustain pedal is pressed, notes sustain longer. Releasing
the pedal immediately stops any sustained notes.
It also supports the half-pedal operation, which makes your sustain
effect more smooth and real when you are performing.
Sostenuto Pedal
When the sostenuto pedal is pressed, the notes played before you
step on the pedal would have a sustain effect.
Soft Pedal
When the soft pedal is pressed, all notes played on the keyboard
will have a softer effect.
Note:
The unit pedal needs to be purchased separately.
Connecting a Microphone
By connecting a microphone, you can enjoy singing along with your
keyboard performance or with Song playback (KARAOKE).
1. Before turning the power on, set the master volume to minimal
value.
2. Plug the microphone into the [MIC] jack at the rear of the
instrument.
3. Turn the power on. Adjust the master volume value while singing
through the microphone.
Connections
08
USB MIDI OUT MIDI IN SUSTAIN
AUX OUT AUX IN MIC DC IN
C
M
Y
CM
MY
CY
CMY
K
aw_SP5300_Manual_G03_170426.pdf 8 17/4/26 10:16

Power Switch and Master Volume
Turn the Power On/Off
1. First, please ensure the correct connection has been made based
on the previous instruction.
2. Press POWER switch, the nixie tube screen lights up, and displays
“0.01”, it indicates the instrument is power on.
Note:
Press the POWER switch, if the nixie tube screen dose not appear,
please check the power supply jack connection are made correctly or not.
Adjust the Master Volume
Rotate the [VOLUME] knob clockwise, the volume increasesand vice
versa.
Note:
If the keyboard is in silent, that means the volume may has been adjust-
ed to its minimum level or the headphone jack has been connected.
Playing Demo Songs
This instrument features several wonderful demo songs, please refer to
the Demo list for details.
1. Press the [DEMO] button, the nixie tube displays “d-1”, meanwhile,
all demo songs start to play in a continuous loop.
2. Use the data dial or [+/Yes]/[-/No] button to select the desired demo
song.
3. Press the [DEMO] or [START/STOP] button to stop playing, and exit
demo mode.
Playing Voices
This instrument features a variety of exceptionally realistic voices, please
refer to the Voice list for details.
1. Press the [VOICE] button.
Enter the voice mode. The nixie tube displays the current voice
number, such as “0.01”.
2. Select a voice.
Use the data dial or [+/Yes]/[-/No] button to select a voice you want to
play. You can also use the VOICE select buttons to select one.
3. Play the voice.
You can play the keyboard and listen to the wonderful voice.
Playing Styles
This instrument features a variety of styles. Try selecting some of the
different styles (Refer to the Style List) and play with the auto accompani-
ment.
1. Press the [STYLE] button.
Enter the style mode. The nixie tube displays the current style
number, such as “00.1”.
2. Select a style.
Use the data dial or [+/Yes]/[-/No] button to select a style you want to
play. You can also press and hold the [SHIFT] button, then press the
style keys marked STYLE 0-9 to select the desired style.
Quick Start
09
METRONOME
LOFF R
MELODY OFFEQ DUET HARMONY
ON/OFFTYPE ROOT
REVERB CHORUS
BEEP TOUCH TUNE OCTAVE SCALEPEDAL
RESONANCE VOCAL
ON/OFF
EQ DUET HARMONY
ON/OFFTYPE ROOT
REVERB CHORUS
BEEP TOUCH TUNE OCTAVE SCALEPEDAL
RESONANCE ON/OFF
C
M
Y
CM
MY
CY
CMY
K
aw_SP5300_Manual_G03_170426.pdf 9 17/4/26 10:16

3. Play the style.
Press the [START/STOP] button and it’s relevant LED indicators are
flashing in red and blue. As soon as you play the keyboard with
your left-hand, the auto accompaniment (piano style) starts.
Note:
If you press key(s) marked STYLE 0-9 to select the desired style,
please press and hold the [SHIFT] button, then tapping 2 consecutive
digits. For example, tapping 0,8 in sequence to select the 08 style.
Playing Songs
This instrument features a variety of preset songs, please refer to the
Song list.
1. Press the [SONG] button.
Enter the song selection mode. The nixie tube displays the current
song number, and it will play all songs circularly.
2. Select a song.
Use the data dial or [+/Yes]/[-/No] button to select a song you want
to play. You can also press and hold the [SHIFT] button, then press
the song keys marked SONG 0-9 to select the desired song.
3. Play the song.
Press the [START/ STOP] button to play the selected song in a
continuous loop.
4. When the selected song has finished, press [VOICE] / [STYLE]
button can exit the song mode.
Note:
If you press key(s) marked SONG 0-9 to select the desired song,
please press and hold the [SHIFT] button, then tapping 2 consecutive
digits. For example, tapping 0,8 in sequence to select the 08 song.
Record
You can record your performance and save it as a user song on the
instrument.
1. Press and hold the [REC] button to enter the user song menu, the
nixie tube displays current user song number.
Use the data dial or [+/Yes]/[-/No] button to select a desired user
song to which the recording will be saved.
2. Press the [PLAY/ENTER] button again, enter recording standby
mode, the LED indicator of [START/ STOP] button will be flashing.
Then you can select desired voice, style or other parameters to
prepare recording.
3. Press the [START/STOP] button or play a key on the keyboard to
start recording. Meanwhile, the LED indicator of [PLAY/ENTER]
button will flash.
4. Press the [PLAY/ENTER] button again to exit the record mode. The
LED indicator of [PLAY/ENTER] button will turn off.
5. If you want to play back the user song, you can press the
[PLAY/ENTER] button to enter the selection interface.
Use the data dial or [+/Yes]/[-/No]button button to select the user
song. Then press the [PLAY/ENTER] button again to play back user
song.
6. While playing back recorded songs, you can press the
[PLAY/ENTER] button to exit.
Quick Start
10
ACCOMP
0 1 2 3
4
5 6 7 8
TAP 9
TEMPO
1 2 3
4
5 6 7 80 9
STYLE
1 2 3
4
5 6 7 80 9
SONG
0 1
METRONOME ACCOMP
0 1 2 3
4
5 6 7 8
TAP 9
TEMPO
1 2 3
4
5 6 7 80 9
STYLE
10
L R
MELODY OFF
VOCAL
REC
REC
REC
C
M
Y
CM
MY
CY
CMY
K
aw_SP5300_Manual_G03_170426.pdf 10 17/4/26 10:16

This instrument features a variety of exceptionally realistic voices.
Please refer to the Voice List for details. The default upper voice
number is 001.
Select and play Upper Voice
1. Press the [VOICE] button or voice direct button to select a voice you
want to play. The “VOICE” icon on the nixie tube lights up, and also
indicates the current upper voice number, such as “0.01”.
2. Select a voice.
Use the data dial or [+/Yes]/[-/No] button, or VOICE select buttons to
select the upper voice you want to play.
3. Play the voice.
You can play the keyboard and listen to the wonderful voice.
Note:
If the dual or lower function is on, repeatedly press the [VOICE] button
to switch between UPPER and DUAL/LOWER voice. The nixie tube
also indicates the current voice number.
Playing two Voices Simultaneously
This stage piano has a dual voice function. This function allows two
sounds to be layered together, creating a more complex sound.
1. Select the upper voice you want to play.
2. Press and hold the [SHIFT] button, then press the [DUAL]button to
turn the dual function on. The LED indicator of [DUAL] button lights
up, meanwhile, the nixie tube displays the dual voice number:
“d.19”.
3. Use the data dial or [+/Yes]/[-/No] button, or VOICE select buttons to
select the dual voice you want to play.
4. Play the keyboard, and then you will hear two different voices to be
layered together. It seems like two different instruments are playing
at the same time.
5. Press and hold the [SHIFT] button, then press the [DUAL] button
again will turn the dual function off.
Note:
While the keyboard has been split, only the right hand area can
respond to the dual voice, the left hand area cannot respond to it.
Playing Voices
11
7 8
4
5 6
MIDI
9
7 8
4
5 6 7 8 9
SONG
0 1 2 3
4
5 6
MIDI
9
01 GrandPno 03 E.Piano 05 E.Piano 3 07 Clavi
02 GrandPn 2
13 RockOrgn 15 Harmnic 17 CleanGtr 19 Strings
11 ChurOrgn
12 ReedOrgn
14 Acordion 16 NylonGtr 18 FngrBass 20 SynStrs
04 E.Piano 2 06 Harpsi 08 Vibra
09 PercOrgn
10 DrawOrgn
21 SweetTrp
22 TenorSax
23 SweetFlu
24 PanFlute
C
M
Y
CM
MY
CY
CMY
K
aw_SP5300_Manual_G03_170426.pdf 11 17/4/26 10:16

Split Point:
The point on the keyboard that separates UPPER or DUAL voice and
LOWER voice is called “split point”.
The default split point is: F#3(34).
1. Press and hold the [LOWER] button, then press any key to set split
point.
2. Release the [LOWER] button, and automatically exit the split point
setting.
Playing Voice Demo
1. In voice mode, press and hold the [SHIFT] button, then press the
[VOICE DEMO] button to start playing back voice demo. While the
voice demo is playing, you can repeat above operations to exit
voice demo mode.
2. Press the [START/ STOP] button to stop playing voice demo mode.
Touch Sensitivity
The keyboard is equipped with a touch response feature that lets you
dynamically and expressively control the level of the voice with your
playing strength – just as on an acoustic instrument. That means the
harder you play the keys, the greater volume comes from the
speakers with fixed master volume. Turn this function off results in a
fixed touch response, or no level change no matter how hard or how
soft you play the keys. There are 3 types of touch setting for this
instrument (Off, 1-3), the default setting is: “2”.
Operation:
Press and hold the [SHIFT] button, then press the key which
represents touch +/- to select an appropriate touch level.
Playing Different Voices with Both Hands
The lower function splits the keyboard into right and left areas to
create two different voices. The left section voice is lower voice. You
can assign a desired spilt point on the keyboard.
1. Select the upper voice you want to play on the right of the split
point.
2. Press and hold the [SHIFT] button, then press the [LOWER] button
to turn lower function on. The LED indicator of [LOWER] button
lights up, meanwhile, the nixie tube displays the lower voice
number: “L.19”.
3. Use the data dial or [+/Yes]/[-/No] button, or VOICE select buttons
to select the lower voice you want to play.
4. Play the keyboard.
You can hear the right and left hand area with different voices.
5. Press and hold the [SHIFT] button, then press the [LOWER] button
again will turn lower function off.
Playing Voices
12
Parameters
OFF
1
2
3
Description
Fixed
Soft
Medium
Hard
Default Split Point:F#3A0
TOUCH
C
M
Y
CM
MY
CY
CMY
K
aw_SP5300_Manual_G03_170426.pdf 12 17/4/26 10:16

Transpose
This function allows the overall pitch of the instrument to be
transposed up or down by a maximum of one octave in semitone
increments.
For example, you have to play a song in G key which you are not
familiar with. So please set the transpose value to be -05 or 07, then
you can easily play this song with C key.
Operation:
1. Press the [TRANSPOSE] button, the nixie tube displays current
transpose value, such as “07”. Use the data dial or [+/Yes]/[-/No]
button to set transpose value, the entire keyboard pitch will be
changed.
2. Press the [+/YES] and [-/NO] buttons simultaneously to recover the
default value: “0”.
Tune
The overall tuning of the instrument can be shifted up or down by a
maximum of 100 cents in 1-cent increments (100 cents = 1 semitone).
Operation:
1. Press and hold the [SHIFT] button, then press the key marked
TUNE +/- to set the tune value. The nixie tube currently displays
tune value.
2. Press the [TUNE +] and [TUNE -] keys simultaneously to recover
default tune value: “00”.
Pedal Resonance
Pedal resonance, is a function to simulate the reverberation of notes
when pressing the sustain pedal on an actual grand piano. With pedal
resonance, it reproduces the rich harmonics and unique sound
characteristics of an actual grand piano when using the sustain pedal.
1. Press and hold the [SHIFT] button, then press the
[PEDAL RESONANCE] key to turn this function on.
2. The default setting of pedal resonance is: “off”, please turn it on if
necessary.
Note:
1. The harmony function is automatically turned off when you set
PEDAL RESONANCE on.
2. It may cause a slight sound paused or noise if you switch pedal
resonance on/ off while you are performing. This is normal
phenomenon to shift function between on and off.
Playing Voices
13
Parameters
Transpose +
Transpose -
Description
Increase entire keyboard pitch in semitone step.
Decrease entire keyboard pitch in semitone step.
Parameters
Tune +
Tune -
Description
Increase entire keyboard pitch in 1 step.
Decrease entire keyboard pitch in 1 step.
TUNE
PEDAL
RESONANCE
C
M
Y
CM
MY
CY
CMY
K
aw_SP5300_Manual_G03_170426.pdf 13 17/4/26 10:16

Metronome
The Metronome function provides a steady beat to aid practicing the
piano at a consistent tempo.
1. Turn the metronome on/ off
Press the [METRONOME] button to turn metronome function on or
off. When metronome is in use, the LED indicator of [START/ STOP]
keeps flashing with current tempo. Red light represents downbeat,
and blue light represents upbeat. The tempo of the metronome can
be freely adjusted. Please refer to “TEMPO” setting for details.
2. Change the metronome time signature
Press and hold the [SHIFT] button, then press the key marked
METRONOME +/- to set time signature. The nixie tube currently
displays the number of beat type, such as:“4”. There are 9 time
signatures can be set: 0, 2-9.
3. Select metronome sound
Press and hold the [SHIFT] button, then press the key marked
VOCAL to change metronome sound: normal sound and human
voice.
Note:
The metronome function is invalid in SONG mode.
Playing Voices
14
METRONOME
VOCAL
EQ DUET HARMONY
ON/OFFTYPE ROOT
REVERB CHORUS
BEEP TOUCH TUNE OCTAVE SCALEPEDAL
RESONANCE ON/OFF
C
M
Y
CM
MY
CY
CMY
K
aw_SP5300_Manual_G03_170426.pdf 14 17/4/26 10:16

This stage piano features a variety of styles. Please refer to the style
list for details. The default style number is: “00.1”.
Selecting a Style
1. Press [STYLE] button to enter style mode.
The nixie tube displays the current style number, such as “00.1”.
2. Use the data dial or [+/Yes]/[-/No] button to select the desired style,
or you can press and hold the [SHIFT] button, then press the style
keys marked 0-9 to select the desired style.
Note:
If you press key(s) marked STYLE 0-9 to select the desired style,
please press and hold the [SHIFT] button, then tapping 2 consecutive
digits. For example, tapping 0,8 in sequence to select the 08 style.
Start/Stop Style Playing
1. In the style mode, press the [START/ STOP] button to enter
standby mode, the “auto bass chord”(A.B.C) function is
automatically turned on, meanwhile its indicators (red and blue) are
flashing. Then play chords on the chord section with left hand, the
style starts playing immediately.
2. Press the [START/ STOP] button again to stop playing the style, at
the mean time, the A.B.C. is automatically turned off.
Fill In A/B
1. As the system default of selected accompaniment is the main A
section of music (the LED indicator lights up), so when the
accompaniment function is in use, pressing the [FILL A/ B] button
plays an appropriate fill-in pattern to spice up the rhythm (the LED
indicator flashes). When the fill-in is complete, it leads smoothly into
the main B section, and the LED indicator goes out.
2. If you are playing the main B section of music (LED indicator goes
out), pressing the [FILL A/ B] button plays an appropriate fill-in
pattern to spice up the rhythm (the LED indicator flashes). When
the fill-in is complete, it leads smoothly into the main A section, and
the LED indicator lights up.
3. If you press and hold the [FILL A/ B] button, it plays the fill-in
pattern circularly, the LED indicator keeps flashing.
Accompaniment Volume
This function is used to change the volume of all tracks of
accompaniment for balancing the volume between accompaniment
part and keyboard voice.
1. Press and hold the [SHIFT] button, then use the [ACCOMP +]/
[ACCOMP -] key to set accompaniment volume, adjustable range:
0~127.
2. Press the [ACCOMP +] and [ACCOMP -] keys simultaneously to
turn off the accompaniment volume, the nixie tube displays “OFF”,
press the [ACCOMP +] and [ACCOMP -] keys simultaneously
again to turn on the accompaniment volume.
Playing Accompaniment
15
ACCOMP
METRONOME ACCOMP
0 1 2 3
4
5 6 7 8
TAP 9
TEMPO
1 2 3
4
5 6 7 80 9
STYLE
10
L R
MELODY OFF
VOCAL
C
M
Y
CM
MY
CY
CMY
K
aw_SP5300_Manual_G03_170426.pdf 15 17/4/26 10:16

Tempo
Each style, song, metronome, and duet of this instrument has been
programmed with a default tempo. However, this can be changed by
the tempo button. Adjustable range: 30~280.
Operation:
1. Press the [TEMPO +]/ [TEMPO -] button to adjust the desired
tempo value, the nixie tube displays current tempo value.
2. Press the [TEMPO +] and [TEMPO -] buttons simultaneously to
restore the default optional tempo for style and song.
3. Press and hold the [SHIFT] button, then press the key(s) marked
TEMPO 0-9 to set the tempo value. For example, press the 2, 1, 4
in sequence, then the tempo value will be: “214”.
4. During style or song playback, press and hold the [SHIFT] button,
then tapping the key marked TAP twice at the desired tempo.
Note:
1. If you press key(s) marked TEMPO 0-9 to select the desired tempo,
please press and hold the [SHIFT] button, then tapping 3 consecu-
tive digits. For example, tapping 0,6,4 in sequence to set the tempo
value 64.
2. When the style is stopped, and the times you have tapping the key
marked [TAP] are same with beat count of metronome type, the
system will automatically turn metronome on, and the tempo value
equals to the interval of your last two taps.
Playing Accompaniment
16
Parameters
TAP
TEMPO +/-
0 ~ 9
Description
Quickly set the desired tempo value.
Increase/ Decrease tempo value in step 1.
Directly set the specified tempo value.
0 1 2 3
4
5
6
TAP
TEMPO
7 83
4
5 6 7 8 9
SONG
0 1 2 3
4
5 6
MIDI
9
C
M
Y
CM
MY
CY
CMY
K
aw_SP5300_Manual_G03_170426.pdf 16 17/4/26 10:16

17
The DSP effect is the sound localization technology for simulating the
sounds in the real environment. With DSP effect, you can add ambi-
ence and depth to your music in a variety of ways. There are 5 reverb
effects, 5 chorus effects, 5 EQ effects built into this instrument.
Reverb
Press and hold the [SHIFT] button, then press the key marked
ON/OFF in the REVERB section to turn reverb effect on/off. Tap the
key marked REVERB +/- which are next to the ON/OFF to select the
desired reverb type.
The default reverb effect setting is: turn on, and REVERB type is: 2
Hall.
Chorus
Press and hold the [SHIFT] button, then press the key marked
ON/OFF in the CHORUS section to turn chorus effect on/off. Tap the
key marked CHORUS +/- which are next to the ON/OFF to select the
desired chorus type.
The default chorus effect setting is: turn off, and chorus type is: 1
Chorus 1.
DSP Effect
Parameter
1
2
3
4
5
Reverb Type
Room
Hall
Church
Delay
Pan Delay
Parameter
1
2
3
4
5
Chorus Type
Chorus 1
Chorus 2
Chorus 3
Flanger
Rotary
EQ
EQ function can control the gain of different frequency band. And
different gain settings can make different sound field effects.
Press and hold the [SHIFT] button, then press the key marked EQ +/-
to select the desired EQ type.
The default EQ type is: 1 Standard.
Parameter
1
2
3
4
5
EQ Type
Standard
Modern
Rock
Classic
Jazz
REVERB
ON/OFF
CHORUS
ON/OFF
EQ
C
M
Y
CM
MY
CY
CMY
K
aw_SP5300_Manual_G03_170426.pdf 17 17/4/26 10:16

Playing Songs
This instrument features a variety of preset songs. Please refer to the
Song List for details.
Playing songs in large cycle:
Press the [SONG] button to enter the song playing mode, the system
will play all preset songs in large cycle. Meanwhile, the nixie tube
displays the current song number, and the “SONG” icon lights up.
Playing songs in small cycle:
While the song is stop playing, press the [START/STOP] button to play
just the song circularly.
Beat indicators:
While the song is playing, the LED indicators of [START/STOP] will
keep flashing corresponding to the current tempo value: Red light
represents downbeat, and blue light represents upbeat.
Selecting a song:
Use the data dial or [+/Yes]/[-/No] button to select the desired song, or
you can press and hold the [SHIFT] button, then press the key(s)
marked SONG 0-9 to directly select a song.
Note:
If you press key(s) marked SONG 0-9 to select the desired song,
please press and hold the [SHIFT] button, then tapping 2 consecutive
digits. For example, tapping 0,8 in sequence to select the 08 song.
Stop Playing Songs
While the song is playing, press the [START/STOP] button or [SONG]
button to stop playing song.
Learning Songs
All preset piano songs have programmed lesson modes.
1. Press and hold the [SHIFT] button, then press the key marked [L] in
MELODY OFF section. With this operation, the left-hand part of the
selected song will be muted, you can practice left hand part corre-
sponding to the right-hand part of melody.
2. In the same way, you can tap the key marked [R] to mute the
right-hand part, and practice the right hand part melody.
3. Press the key marked [OFF] to exit the lesson mode. The song will
recover its normal playing mode.
Listening to the songs
18
1 2 3
4
5 6 7 80 9
SONG
LOFF R
MELODY OFF
C
M
Y
CM
MY
CY
CMY
K
aw_SP5300_Manual_G03_170426.pdf 18 17/4/26 10:16

With the easy-to-use song recording features, you can record your
performance and save it as a user song on the instrument.
Prepare Recording
1. First, select a user song to save the recording song. Press and hold
the [REC] button to enter the user song menu, the nixie tube
displays current user song number: If the nixie tube displays “r-*”, it
means the user song has data. If the nixie tube displays "nF*", it
indicates the user song is empty.
Use the data dial or [+/Yes]/[-/No] button to select a desired user
song.
2. Press the [PLAY/ENTER] button to enter the recording preparation
status, the LED indicator of [START/ STOP] button keeps flashing.
So you can set the desired voice, style, tempo parameters……
Note:
The LOWER function is automatically turned off.
Start Recording
1. Recording begins automatically as soon as you play a note on the
keyboard. The LED indicator of [RECORD] button will flash.
2. Press the [START/STOP] button to start recording while in the
recording preparation status. And the “auto bass chord”(A.B.C)
mode is automatically turned on, but the accompaniment is not
playing and synchronously recorded until you play a note on the
left-hand section.
Note:
If you select the “r-*” (which means there is a user song in this file) for
recording, the original user song you saved will be replaced by the
new data.
Stop Recording
1. During recording, press [PLAY/ENTER] to stop recording, the nixie
tube displays “- - -”, the system saves recording data in internal
memory automatically. The indicator of recording goes out after
finishing the saving operation.
2. When recording is in process, if the memory is full, the recording
will stop and be saved in internal memory automatically. And the
nixie tube displays “FUL”, The indicator of recording goes out after
finishing the saving operation.
Play Back the User Song
1. Press [PLAY/ENTER] button, enter the records playback mode.
If this user song you selected contains no data, the nixie tube
displays “nF*”, such as “nF3”; if this user song you selected
contains data, the nixie tube displays the number of user song
“P-*”, such as “P-2”.
2. Use the data dial or [+/YES]/ [-/NO] button to select a user song.
3. Press the [PLAY/ENTER] button to play your selected user song.
The button indicator will light up.
4. In user song playing status, press the [PLAY/ENTER] button again
to stop playing. The button indicator goes out.
19
Record
Chord Section
F#3A0
REC
C
M
Y
CM
MY
CY
CMY
K
aw_SP5300_Manual_G03_170426.pdf 19 17/4/26 10:16

Delete the User Song
1. Pressing and holding [REC] and [SAVE] buttons together and turn
power on simultaneously, all user songs will be erased.
2. Press [PLAY/ENTER] button to enter the playback mode, then
press and hold [PLAY/ENTER] to enter the Delete menu, and the
nixie tube displays “dEL”.Press the [+/YES] button to confirm the
delete operation; press the [-/ NO] button to cancle the delete
operation and go back to playback mode.
Note:
User song data will not be lost after you turn off the power.
Connecting USB Flash Drive
The instrument recognizes USB flash drives, sizing from 16M to 32G in
the format of FAT16 and FAT32, but does not support multi-partitioned
USB flash drive. We recommend you format the USB flash drive before
using. Do not edit the backup files saved on USB flash drive.
The [USB] button LED will be lit when it enters the USB menu. The LED
will become unlit when it exits the USB menu.
Playing a File
You can play back MIDI files under the root directory of a USB flash
drive.
1. Insert a USB flash drive, wait until the recognition is finished. Then
press the [USB] button to enter the USB song menu. The display will
show the song number, such as “001”.
2. Use the data dial or [+/YES]/[-/NO] button to select a desired song
number.
3. Press the [USB] button to start playing back all MIDI songs in a
continuous loop. Meanwhile, the LED indicator of [USB] button will
flash along with the tempo.
Alternatively, press the [START/STOP] button to loop playing the
selected song.
Notes:
1. The instrument will only play back MIDI files saved under the root
directory. Files saved on sub-directories will not be recognized.
2. The instrument does not support MIDI file with more than 32 tracks.
It will automatically skip such MIDI files when loop playing all songs,
or it will stop playing and display “Err” if you have selected such MIDI
file. When playback stops, use the data dial or [+/YES]/ [-/NO] button
to select another song to play.
20
Record
REC
SAVE
SAVE
C
M
Y
CM
MY
CY
CMY
K
aw_SP5300_Manual_G03_170426.pdf 20 17/4/26 10:16
Table of contents
Other FAME Musical Instrument manuals