Favero ASSIOMA PRO MX User manual

ASSIOMA PRO MX
USER
MANUAL
EN

2
ENGLISH - USER MANUAL
Table of contents
Overview 3
Models 3
Package content 3
Product description 4
How to distinguish the left pedal from the right one 5
Warnings 5
Bike category 6
Installation 6
Installation of the cleats 10
Release force adjustment 11
Turn on 12
Activation 13
Pairing to your training device 13
Crank-arm length 15
Manual and automatic calibration 15
First use 17
Battery charge 17
From single to dual-sided 19
Pedals removal 19
Reinstalling the pedals (swap them between bikes) 20
Sensors’ LEDs behaviour 20
Servicing 20
Spare parts 22
Stack height 23
Technical features 23
Favero Electronics 25
Warranty 25
Copyright 25

3
1. Overview
To use the product it’s necessary to install the Favero
Assioma app, which is available for free on the App Store
and Google Play Store.
When using the product for the rst time, you can nd on
the app an interactive quick start guide with all the steps
necessary for the installation.
Nevertheless, we invite you to read this manual carefully
for the correct use of Assioma PRO MX.
2. Models
ASSIOMA PRO MX-2 Art. 773-10-02
Left and right MTB pedals with power sensors on both
sides.
ASSIOMA PRO MX-1 Art. 773-10-01
Left MTB pedal with power sensor.
Right MTB pedal without power sensor.
3. Package content
GUARANTEE AND
SAFETY MANUALS
Top tray
Bottom box
WELCOME
FLYER
Fig. 1
ASSIOMA PRO MX-1
Power meter with sensor on the left
side only (773-10-01)
1 Micro USB 2-way charging cable
1 Magnetic connector
MTB-compatible SPD® cleats
4 Washers
Greasing tools kit
Guarantee and safety manual
Welcome yer
ASSIOMA PRO MX-2
Power meter with sensors on both
sides (773-10-02)
1 Micro USB 2-way charging cable
2 Magnetic connectors
MTB-compatible SPD® cleats
4 Washers
Greasing tools kit
Guarantee and safety manual
Welcome yer
4
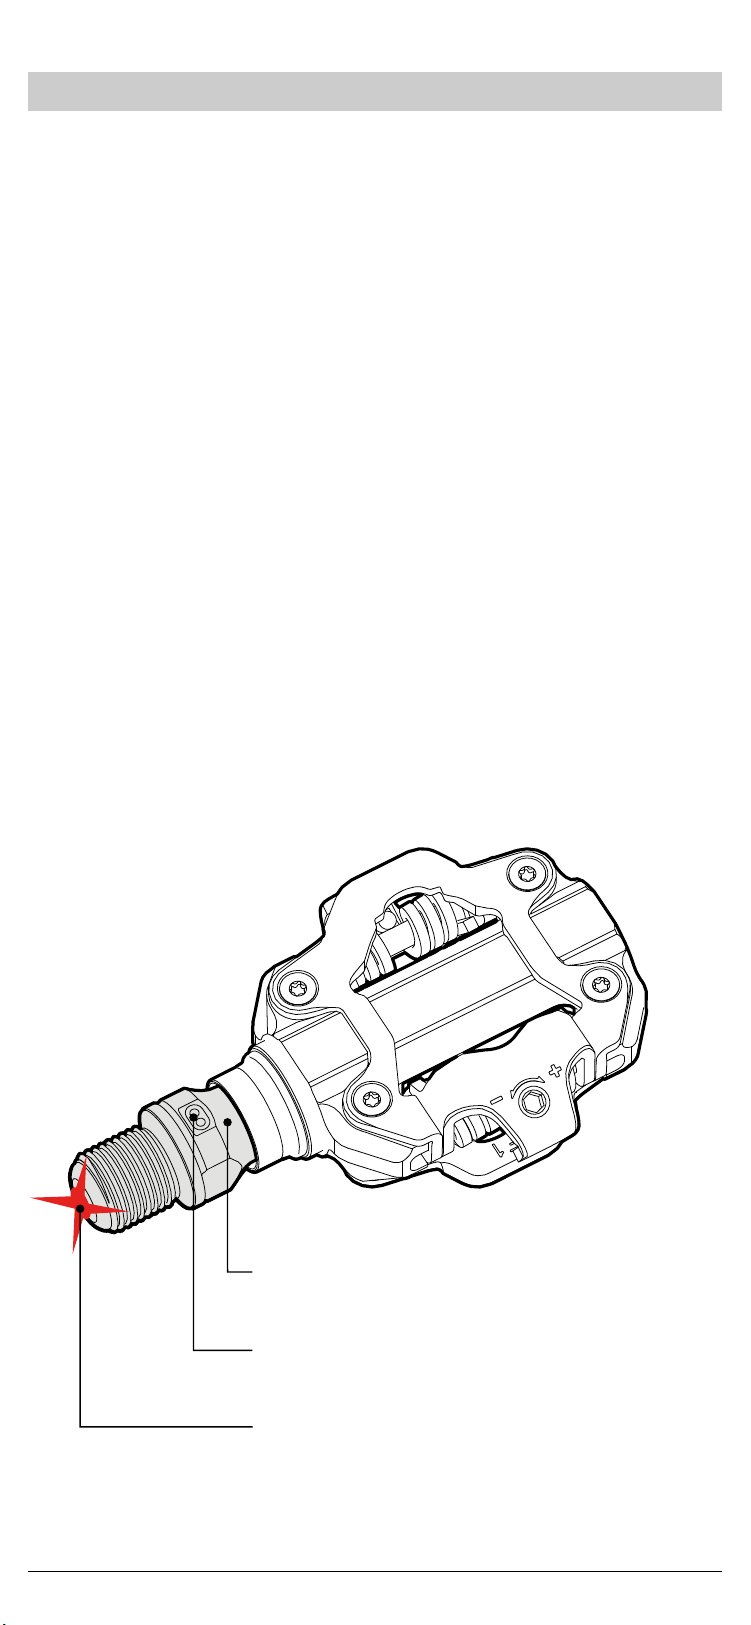
4. Product description
Assioma PRO MX is a clip-less pedal with a sensor
measuring the force applied to the pedal during the
pedal stroke.
Assioma PRO MX is designed to be used in the following
disciplines:
• Mountain Bike (MTB)
• Gravel (GR)
• Ciclocross (CX)
• Cross Country (XC)
It includes the function of cadence meter and calculates
in real time the power output during a pedal stroke to
transmit it to the bike computer or app it is paired with.
It is equipped with a rechargeable battery designed to
guarantee an operating time of at least 60 hours.
Assioma PRO MX is resistant to water, mud and dust
ingress (IP67) due to the housing of all the electronic parts
and the rechargeable battery inside its spindle.
Assioma PRO MX features both ANT+ and Bluetooth
technologies to interact and transmit data to external
devices.
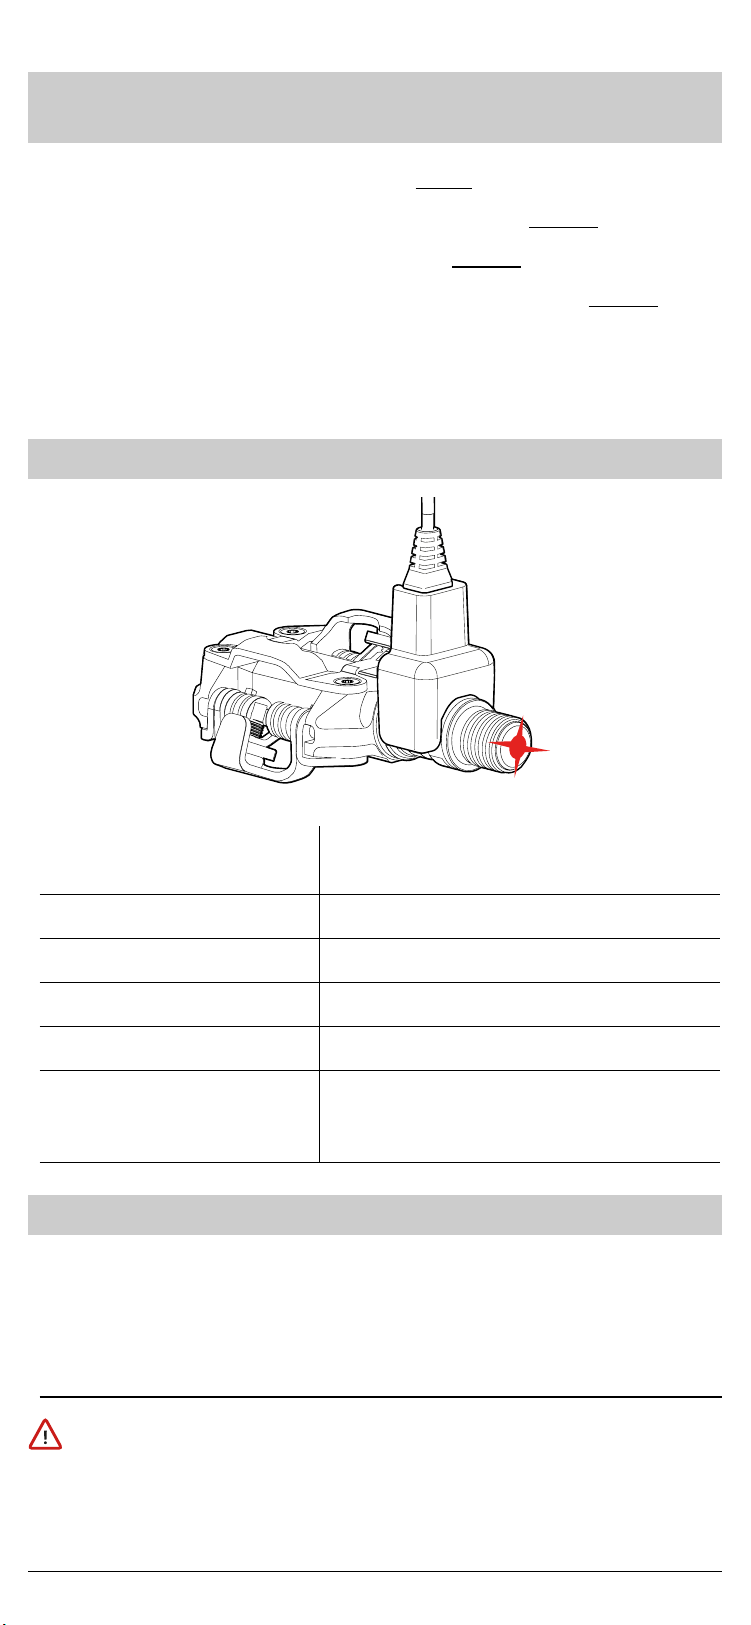
Fig. 2
Sensor housed inside the axle
Led signal
Pins for charging the battery
5
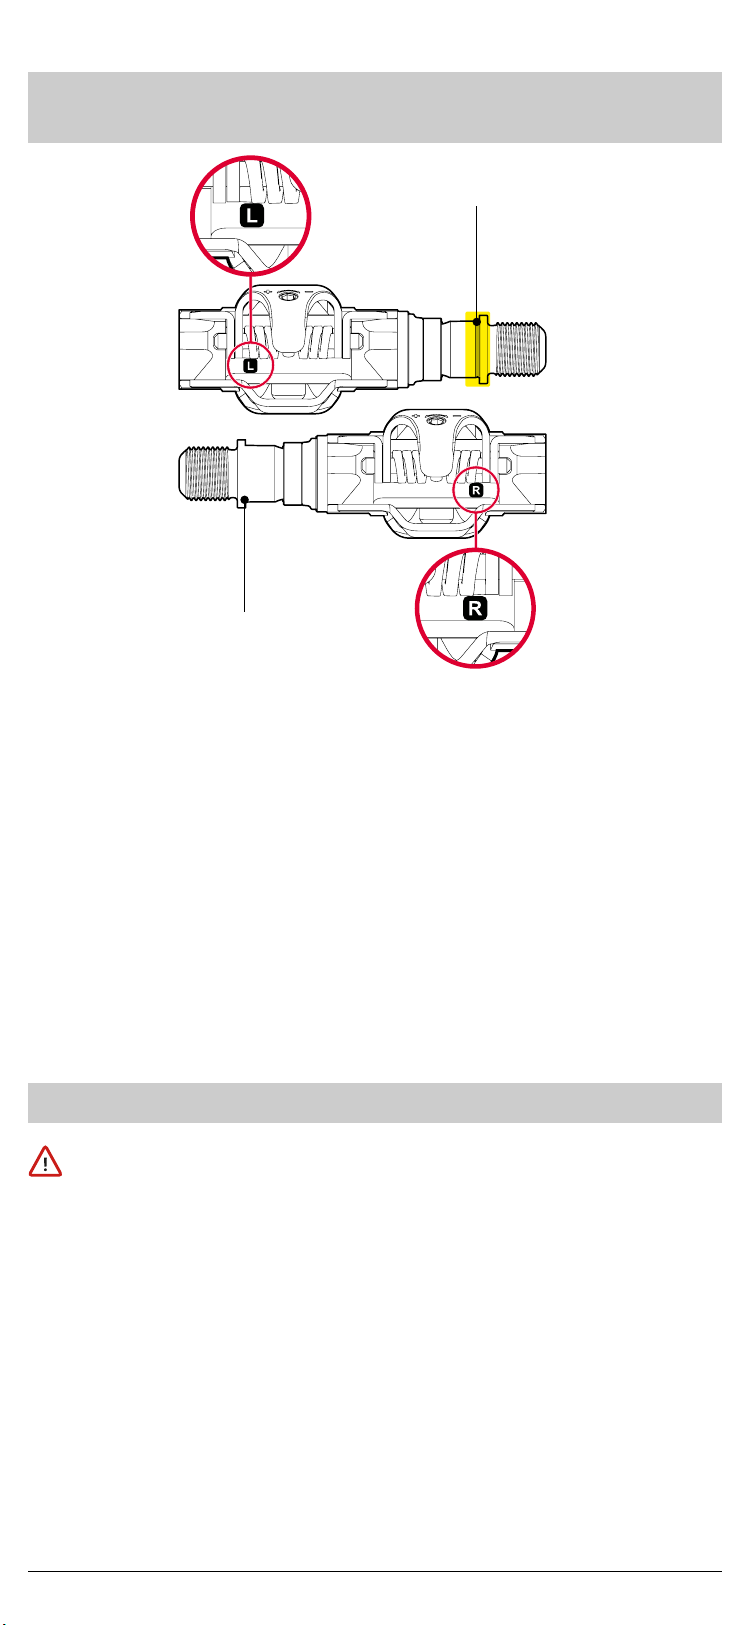
5. How to distinguish the left pedal from the
right one
Left pedal and spindle
• The left pedal is stamped “L” on one internal side of the
clipless system
• The left spindle is marked with a round groove close to
the threads.
Right pedal and spindle
• The right pedal is stamped “R” on one internal side of
the clipless system
• The right spindle, unlike the left one, has no round
groove close to the threads.
6. Warnings
Carefully read the following user manual and the
guarantee and safety manual provided within the box
before installing the product.
A wrong installation and improper use of the product
can cause accidents.
If you have any doubts about your ability to install the
product, we recommend you to ask for the assistance
of a specialized mechanic.
Before start riding, make sure that the force necessary
to release your shoe from the pedal is suited to your
needs.
Fig. 3
Round groove on
the left axle
No round groove
on the right axle
6
7. Bike category
Assioma PRO MX has been designed for paths up to
category 3 (standard ASTM F2043).
It meets the safety standard DIN EN ISO 4210.
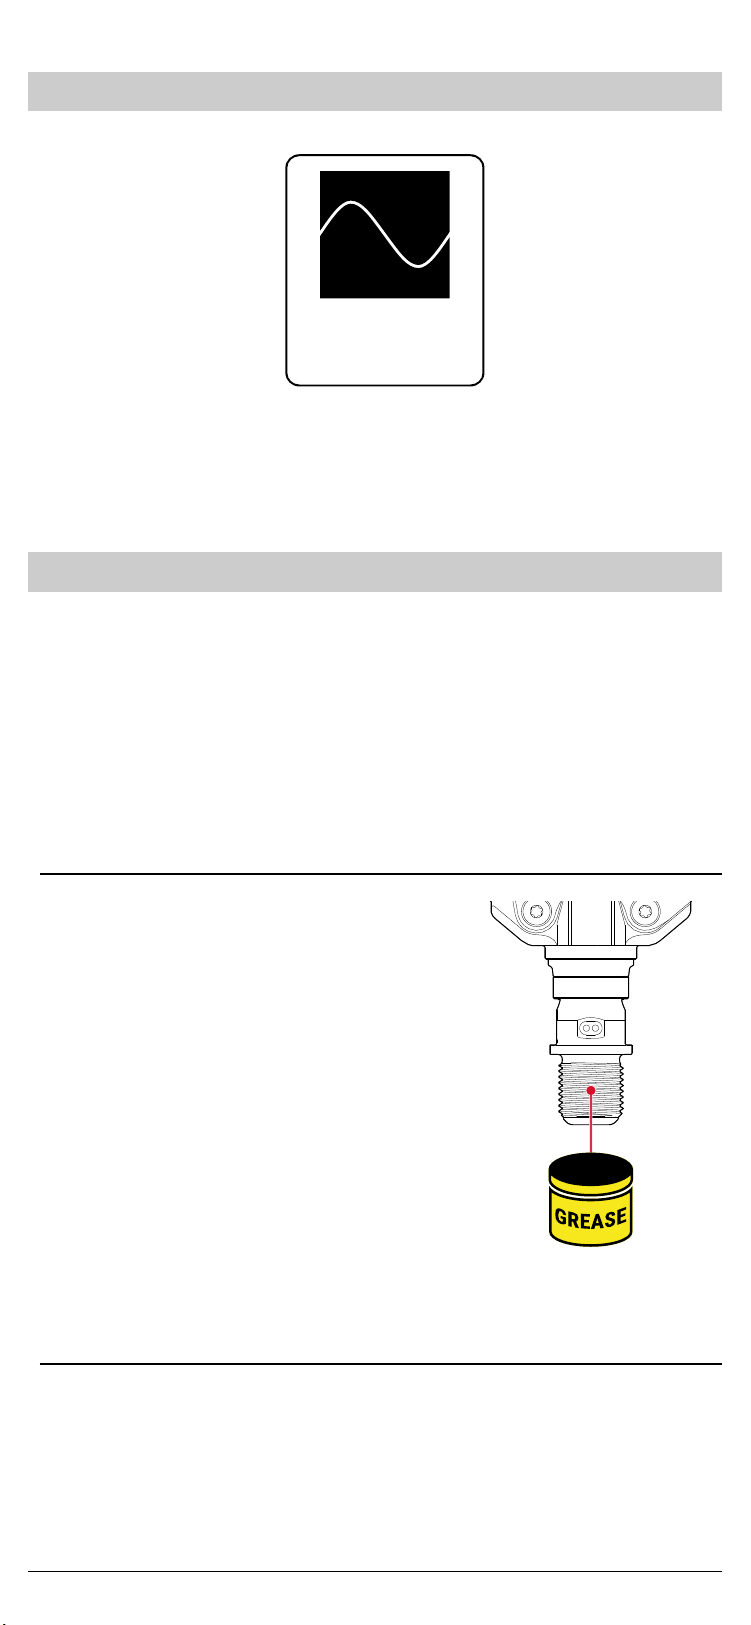
8. Installation
ASSIOMA PRO MX uses needle roller bearings, which offer
a much higher load carrying capacity compared to the
standard ball bearings.
Some cyclists more sensitive to the feeling with their bike
may, however, note a small play in their pedals, which is to
be considered as completely normal with the use of such
bearings.
1. Thread greasing
Apply a thin layer of lithium grease
to the spindle thread to ease
potential future removals.
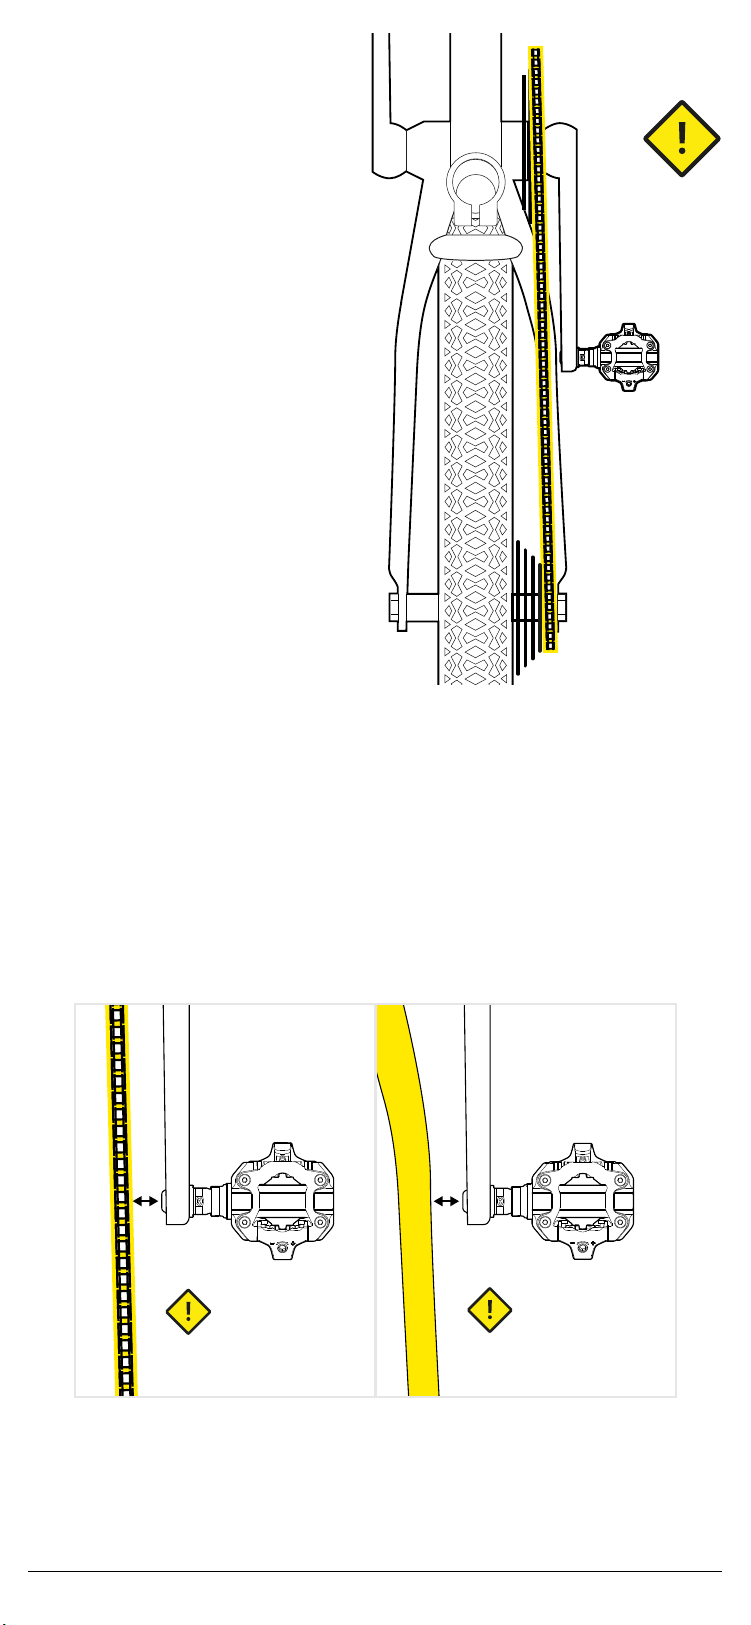
2. Check the distance between pedal and bike chain and
pedal and frame
For the correct installation of the product, it’s important
to have enough space between spindle cap and bike chain
and spindle cap and frame.
Riding on rough
terrain with drops
of less than 61 cm.
3
ASTM F2043
Fig. 4

7
Proceed as described:
1. Screw the spindle into the crank-arm MANUALLY until
complete insertion.
See Fig. 5
Left pedal (L) counter-clockwise
Right pedal (R) clockwise
Fig. 5
Carry out this operation
MANUALLY, without any
tools.
8
2. Make sure to shift the
chain to the largest,
outermost chainring
and the smallest
cassette sprocket.
See Fig. 6
3. Check the distances to avoid any kind of interference
• When stationary, rotate the crank-arm manually until
performing a complete rotation
• The spindle cap must be at a distance bigger than
4mm both from the bike chain and the frame
• If you use crank boots, make sure they don’t interfere
with the bike chain or rear triangle.
See Fig. 7.
Fig. 6
>4mm >4mm
Fig. 7
9
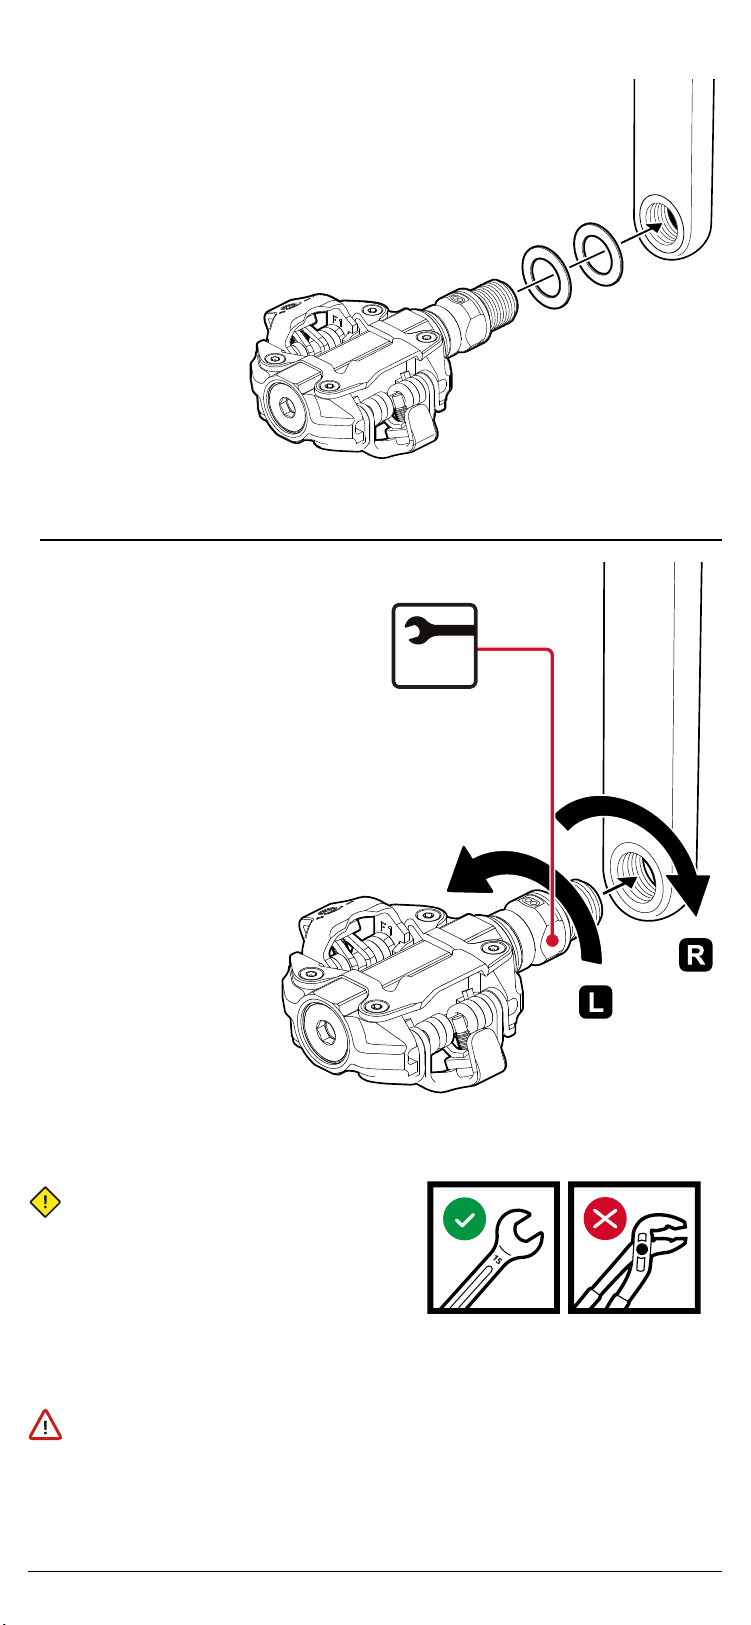
If the distance is inferior
to 4mm, use one or two
washers (A1, A2).
Use only the washers
provided by Favero
Electronics.
See Fig. 8.
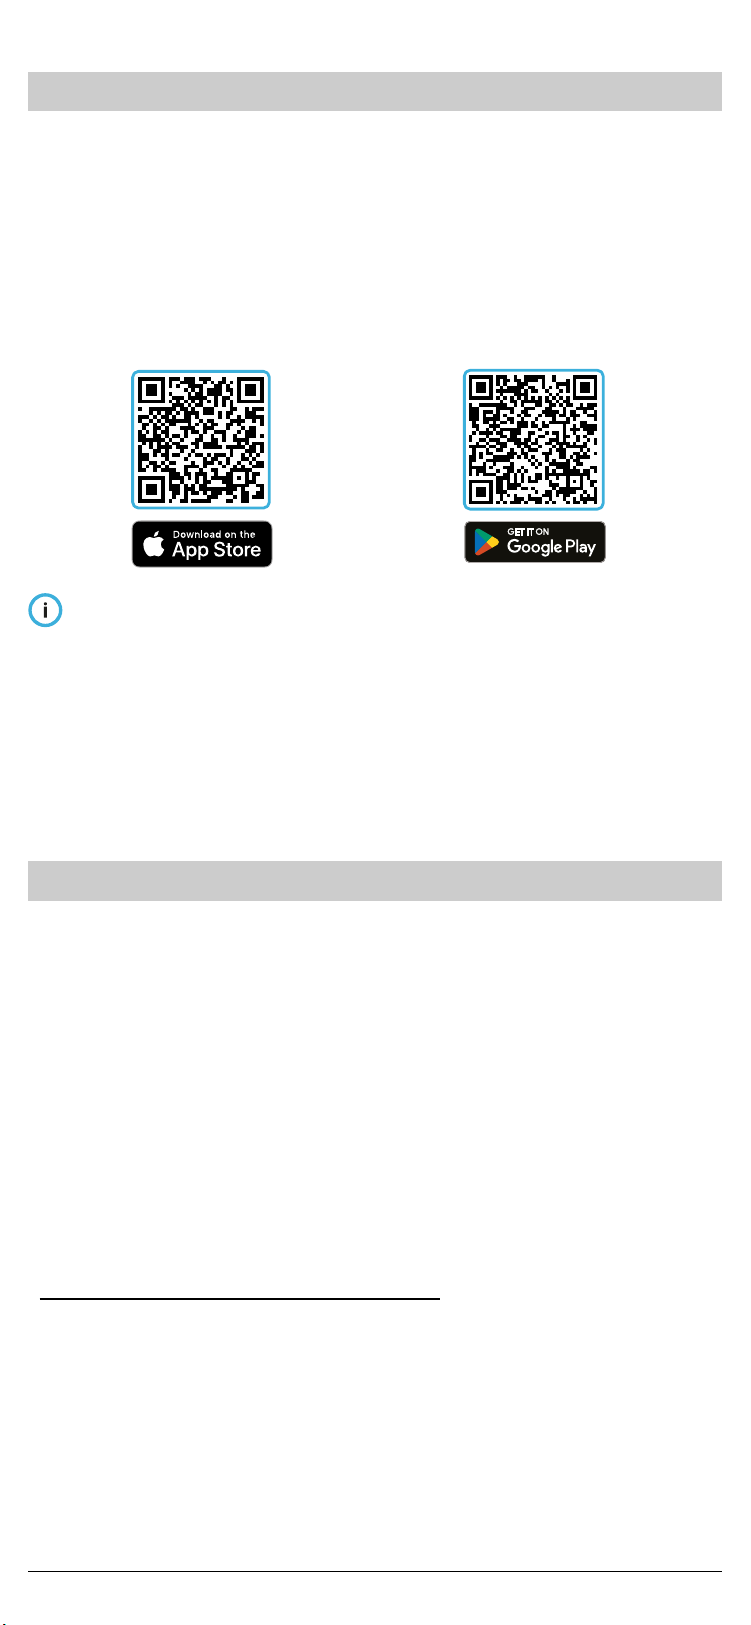
3. Tightening on the crank-arm
Finish tightening with a
torque wrench by applying a
force of 30-40Nm.
Turn counter-clockwise for
the left pedal (L), clockwise
for the right (R).
Make sure the pedal is correctly tightened before use.
Read carefully the information in the guarantee and
security manual provided within the box.
A1
A2
Fig. 8
Fig. 9
30-40Nm
15
Use a 15mm-open-end
wrench.
Don’t use spanners or
adjustable wrenches.

10
9. Installation of the cleats
Use only the cleats provided (SPD®
compatibile) or the original Shimano® SM-
SH51 cleats.
Align the cleats properly according to your
needs and tighten the mounting bolts with
a torque of 4-6Nm.
The use of other types of cleats might not be suitable,
cause potential damage to the product and void the
warranty.
To x the cleats, use the mounting bolts provided with
them.
Tightening torque: 4-6 Nm
Regularly check the status of the cleats
• Check that the holes where the mounting bolts are
screwed in are not damaged/worn out
• Check that the cleats are well tightened to the shoes.
Carefully read the information contained in the
guarantee and safety manual.
Front
A
B
C
4
Mounting bolts
Cleat adapter
Cleat
Fig. 10

11
10. Release force adjustment
Adjust the tension of the spring with a 3mm hex key.
It is possible to check the regulation level by the position
of the adjusting bolt or counting the number of clicks.
Before start pedaling, try to unclip the shoes several
times to ensure that the release force of the pedal
springs is suited to your needs.
If the release tension is too loose, the pedal may release
unexpectedly.
If, on the contrary, it’s too tight, shoe release may be
impossible when needed.
Both conditions may cause accidents and possible
damages to things and/or people.
The correct direction to clip-out is by twisting outward.
Don’t use ball-end hex keys.
Fig. 12
3
MaxMin
Adjusting
bolt
Min
Max
Adjusting bolt
Fig. 13

12
11. Turn on
Assioma PRO MX automatically turns on by manually
rotating the sensor or when you start pedaling, and
automatically turns off after 5 minutes of inactivity to
safeguard the battery duration.
When using Assioma PRO MX for the rst time, you
must turn it on by plugging it into a charger plugged
into a socket.
The same procedure is necessary to exit the “travel
mode” through the Favero Assioma app.
If you don’t see the LEDs blinking, charge the battery as
indicated in Ch.17.
Always clean the golden contacts present both on the
sensors and the magnetic connectors with a damp cloth
before charging to safeguard the correct functioning of
the product.
To learn more about the LEDs’ behaviour, see Ch. 21.
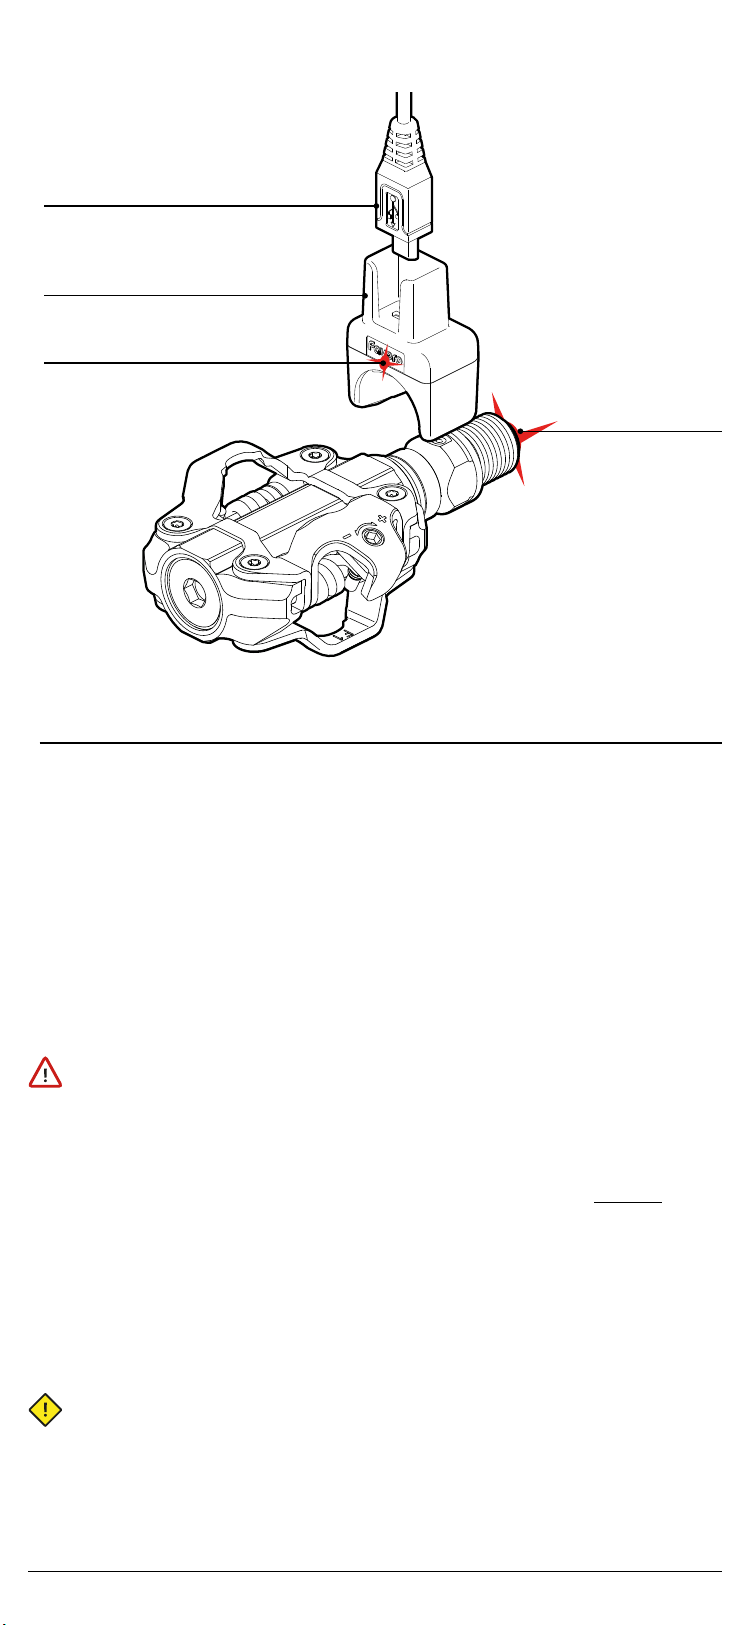
Charging LED
Fig. 14
13
12. Activation
Assioma PRO MX must be activated to start transmitting
power data.
The activation happens through the Favero Assioma app,
which is available for free on the App Store and Google
Play Store.
The activation also determines the start of the warranty
period, and the access to any future software updates.
Click or scan the QR code of the store most suited to
your operating system to download the app.
Open the Favero Assioma app and follow the procedure to
search for your pedals, connect them to your device and
activate them.
If Assioma PRO MX doesn’t appear on the search window,
make sure it’s not already connected via Bluetooth to
another device (e.g. bike computer).
13. Pairing to your training device
Pairing is the procedure that allows you to match Assioma
PRO MX to your training device to be able to register and
read power data.
It can happen through the ANT+ or Bluetooth
communication technologies.
This makes Assioma PRO MX compatible with any bike
computers/smart watches featuring ANT+ with PWR Bike
Power Prole and/or Bluetooth with CPP prole.
Assioma PRO MX can also be paired via Bluetooth to
tablets and smartphones to use third-party training apps.
To see all the certied ANT+ products please browse:
http://www.thisisant.com/directory
(select “Bike Computers” on “Categories”)

14
Both via ANT+ and Bluetooth, you only have to pair the
left sensor to your training device.
Don’t worry: If you use Assioma PRO MX-2 (with sensor on
both sides), the left pedal will automatically transmit also
the data collected by the right pedal it is coupled with.
1. Pairing Assioma PRO MX via ANT+
The data visible via the ANT+ communication channel are:
Power, Cadence, L/R Balance (the latter is only available
with Assioma PRO MX-2), Torque Eciency (TE), Pedal
Smoothness (PS) and the Cycling Dynamics such as PCO,
Power Phase (PP) and Riding Position (RP).
Although the pairing procedure varies depending on the
device you are using, at the end of the chapter we outline
some generic guidelines.
For additional information, please refer to the manual of
your bike computer’s manufacturer.
We remind you that each Assioma has been assigned
a 5-digit identication number (ANT+ ID) visible on the
external side of the package and on the Favero Assioma
app. This number is useful to identify the left sensor
among all the devices available for the pairing via ANT+
with your bike computer.
We recommend you install the latest rmware version
available from the bike computer manufacturer.
2. Pairing of Assioma PRO MX via Bluetooth (BLE)
The data visible via Bluetooth are: power, cadence and L/R
balance (the latter is only available with Assioma PRO MX-
2).
On the Favero Assioma app you can nd some advanced
training metrics, which are available in the “LIVE” section.
These are: Torque Eciency (TE), Pedal Smoothness (PS)
and the Cycling Dynamics, such as PCO and Power Phase
(PP).
Assioma PRO MX allows for the connection of up to 3
Bluetooth devices at the same time.
Should you encounter diculties when pairing via
Bluetooth, we suggest you unpair the pedals from any
surrounding Bluetooth devices and try again.
Although the procedure varies depending on the
device you are using, we outline hereafer some generic
guidelines.

15
3. Guidelines for pairing via ANT+ and Bluetooth
Your training device must be turned on.
1. Manually rotate the crank-arms to activate the pedals
2. Open the “Settings” section on your training device
3. Select “Sensors” and “Add new sensor”
4. A list of the available devices will appear
5. Select the left sensor to proceed with the pairing.
14. Crank-arm length
The crank-arm length has an inuence on power
calculation.
Assioma PRO MX must, therefore, know its value: an
incorrect vaule may result in incorrect power data.
Please, refer to the manual of your bike computer’s
manufacturer to understand how to correctly set the
crank-arm length value.
Should it not be possible to set the crank-arm length on
your bike comuter/third-party app, insert it directly on the
Favero Assioma app.
Do not set the crank-arm length on the Favero Assioma
app but on your bike computer if the latter offers this
feature, otherwise the value inserted on the Favero
Assioma app would be overwritten.
15. Manual and automatic calibration
Each Assioma PRO MX sensor is factory calibrated to
ensure its guaranteed precision under any operating
conditions, including ambient temperature variations,
for which automatic compensation from -10°C to +55°C is
active.
Assioma PRO MX features the automatic calibration
functionality (or zero-offset), a sophisticated algorithm
taking into account different aspects over time and
performing several periodic calibrations of the product.
Store the bike upright (not tilted), with no load applied
on the pedals.
Automatic calibration is independent of the crank
position.
Manual calibration is only required at rst installation
and any time you swap Assioma PRO MX between
bikes.
It is, however, possible to keep on performing manual
calibration on the Favero Assioma app or compatible bike
computers following the procedure described below.

16
By so doing, the values already registered on the last
automatic calibration will be overwritten.
To perform it:
1. Turn on Assioma PRO MX
2. Release the shoes from the
pedals and make sure that no
load is applied
3. Place the bike upright (not
tilted) keeping it as still as
possible. Otherwise, it is not
be possible to complete the
calibration
4. Place the crank-arms in vertical
position
5. Open the Favero Assioma app
or bike computer and proceed
with the calibration.
If Assioma PRO MX is not
found, make sure it’s not
connected via Bluetooth to
another device.
The calibration procedure varies depending on
whether it is performed on the Favero Assioma app or
on your bike computer.
1. On the Favero Assioma app
1. Select “Settings”
2. Select “Manual calibration”
3. Select “Calibrate”
4. Make sure that manual calibration is successful
5. Repeat the operation if an error occurs.
2. On your bike computer (generic procedure which
varies according to the model)
1. Access the power sensors menu
2. Select “Calibrate” o “Zero-offset”
3. Make sure that manual calibration is successful;
normally, a conrmation message or a 0 (zero)
appears on the display
4. Repeat the operation if an error occurs.
Due to potential limitations of bike computers,
sometimes manual calibration is slowed down or
hindered if there are other ANT+ sensors enabled on
the bike computer but not turned on (e.g. heart rate
Fig. 15

17
monitor, cadence meter) as the bike computer keeps on
looking for them but can’t nd them.
In any case, it’s necessary to turn them on or
temporary disable them on the bike computer.
16. First use
At rst installation, Assioma PRO MX will not send any
power data to the bike computer until it has completed an
internal self-calibration.
Assioma PRO MX self-
calibrates after a few dozen
pedal strokes. To speed up
the procedure, it is advisable
to pedal seated, at a uniform
pace and on a leveled road.
Self-calibration can be
considered as complete once
Assioma PRO MX starts
sending power data to your
device.
17. Battery charge
1. Warning for the charge
Assioma PRO MX has an internal rechargeable lithium
battery which allows for at least 60 operating hours.
Always clean the golden contacts present both on the
sensors and the magnetic connectors with a damp
cloth before charging for the correct functioning of the
product.
To learn more about the LED’s behaviour, see Ch. 21.
If you don’t use the product for a long period,
we suggest charging it at least every 3 months to
safeguard the performance of the battery.
When the battery of a pedal runs low, the bike
computer will display a warning. The remaining battery
duration after such warning is of about 8 hours.
Fig. 16
X10
18
2. Charging procedure
To charge the batteries, you just need a standard USB-A
charger or a common powerbank.
Some powerbanks might not charge the battery
completely if they have a minimum charging voltage
superior than what Assioma PRO MX needs.
To charge Assioma PRO MX, insert the magnetic
connectors into a battery charger plugged into a socket
and clip the magnetic ends on to the pedal as shown in the
gure.
Always clean the golden contacts present both on the
sensors and the magnetic connectors with a damp
cloth before charge for the correct functioning of the
product.
To learn more about the LED’s behaviour, see Ch. 21.
The sensors’ LEDs turn on and stay on during the whole
charging process. Once the charge is completed, the LEDs
start blinking every 0,5 sec.
The charging time, if the battery is drained, is of around 4
hours.
Charge in an environment with a recommended
temperature between +10°C and +45°C. Outside this
range, charging may be blocked to preserve the
functionality of the batteries.
LED indicating if voltage is present
Led of the sensor
blinking: IN CHARGE
Fig. 17
Micro-USB connector
Magnetic connector
19
18. From single to dual-sided
Assioma PRO MX-1 measures the power output of the left
leg only and doubles it to offer total power data reading.
Please note that you can always purchase the right power
meter pedal at any time to change from a single to a
double-sided power meter, Assioma PRO MX-2.
To convert Assioma PRO MX-1 into MX-2, once you’ve
bought the product mentioned above, you need to open
the Favero Assioma app and select Settings - From single
to dual-sided.
19. Pedals removal
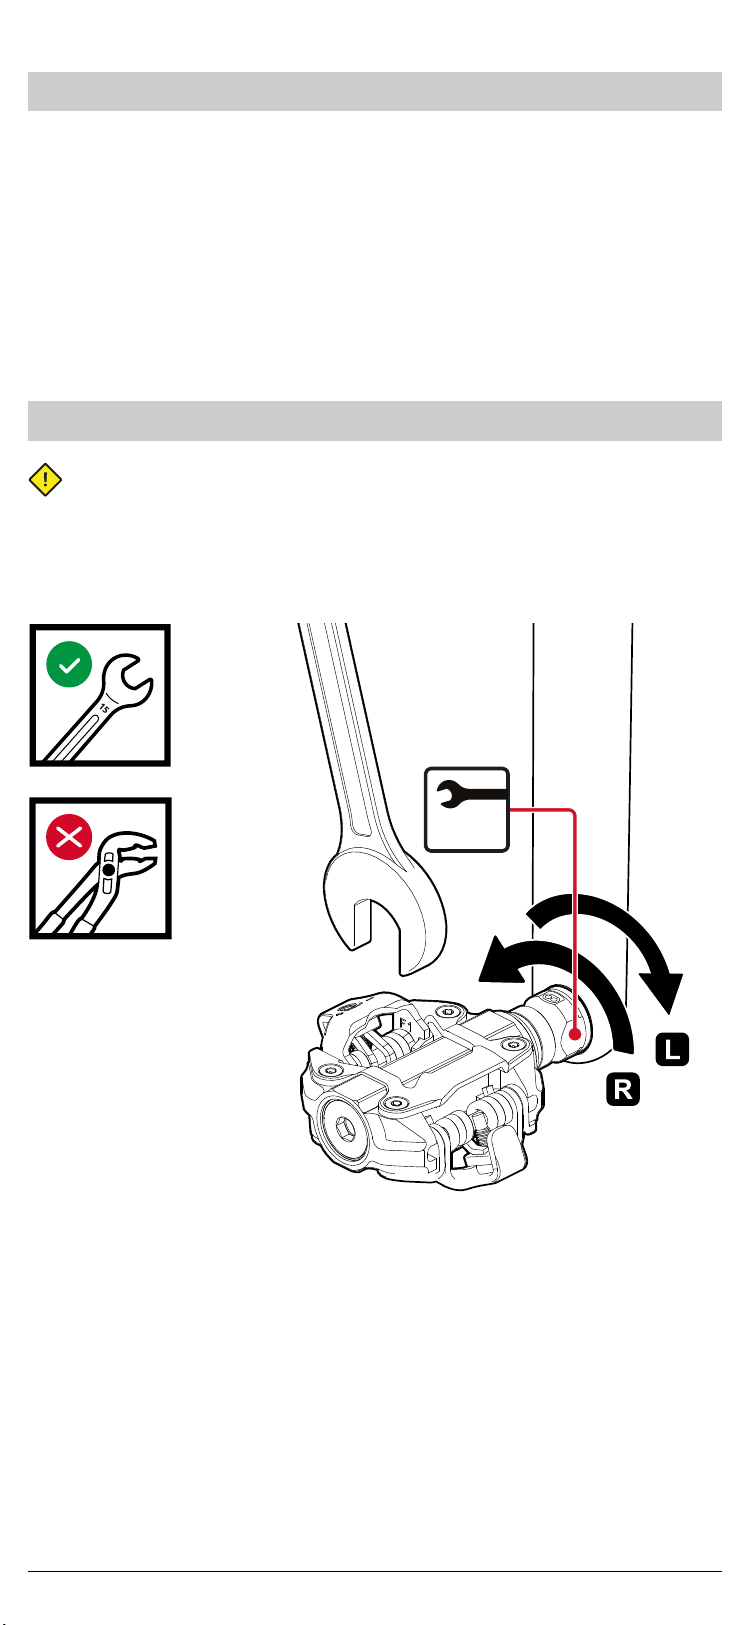
To remove the pedals, use a 15 mm-open-end wrench:
• Unscrew the LEFT pedal CLOCKWISE (facing the pedals)
• Unscrew the RIGHT pedal COUNTER-CLOCKWISE (facing
the pedals
15
Fig. 18
20
20. Reinstalling the pedals (swap them between
bikes)
1. Install the pedals as shown in Ch. 8
2. Correctly set the crank-arm length as in Ch. 14
3. Perform manual calibration as in Ch. 15
4. Start pedaling. As thoroughfully expalined in Ch. 16, the
product needs an initial self-calibration that will happen
during a few dozen pedal strokes.
To speed it up, we suggest you pedal seated, at a
uniform pace and on a leveled road.
21. Sensors’ LEDs behaviour
Fast and continuous blinking for
3 seconds
Assioma PRO MX is being turned on
Short blinking every 3 seconds Assioma PRO MX is turned on
Steady The battery is charging
Short blinking every 0.5 seconds The battery charge is completed
Two ashes every second Search for the associated sensor
Automatic switch o of the LED
while pedaling
While pedaling, the LED is o.
When you stop pedaling, the LED starts blinking
again.
22. Servicing
Carefully read the following user manual and the
guarantee and safety manual provided within the box
before using the product.
1. General check
To ensure the correct functioning of the product and
avoid possible accidents caused by the loosening of
the spindle, it is recommended to check periodically
or, better yet, before every ride, that the spindle is
Table of contents


