Favero COIN TIMER Series User manual


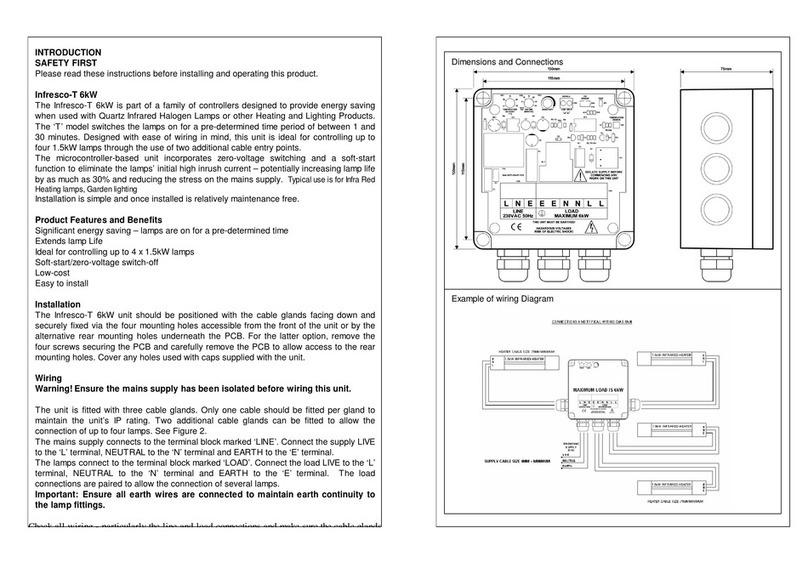
ITALIANO
ENGLISH
DEUTSCH
FRANÇAIS
ESPAÑOL
MANUALE DEL COIN TIMER
MANUAL FOR THE COIN TIMER
HANDBUCH COIN TIMER
LIVRET D'INTRUCTIONS COIN TIMER
MANUAL COIN TIMER
Coin Timer
cod. A704

2
ITALIANO
ENGLISH
DEUTSCH
FRANÇAIS
ESPAÑOL
INDICE
CONTENTS
ISTRUZIONI TECNICHE
INSTALLAZIONE
PROGRAMMAZIONE
FUNZIONAMENTO
DATI TECNICI
CODICI ARTICOLI
6
6
8
9
9
TECHNICAL INSTRUCTIONS
INSTALLATION
PROGRAMMING
OPERATING
TECHNICAL DATA
ARTICLE CODES
10
10
12
13
13
TECHNISCHE ANLEITUNGEN
INHALTSVERZEICHNIS
INSTALLATION
PROGRAMMIERUNG
FUNKTIONSABLAUF
TECHNISCHE DATEN
ARTIKELKODES
14
14
16
17
17
INSTRUCTIONS TECHNIQUES
TABLE DES MATERIES
INSTALLATION
PROGRAMMATION
FONCTIONNEMENT
DONNÉES TECHNIQUES
CODES ARTICLES
18
18
20
21
21
INDICE
INSTRUCCIONES TÉCNICAS
INSTALACIÓN
PROGRAMACIÓN
FUNCIONAMIENTO
DATOS TECNICOS
CÓDIGOS DE ARTÍCULOS
22
22
24
25
25

3
TARIFFA ORARIA
0.10 - 0.20 - 0.50
1.00 - 2.00
"
Coin TimerC o i nTim e r
ELECTRONIC DESIGN
R
Time
-
1:12:
36
-
1:12:
36
TARIFF 1
DISPLAY
TARIFF 3
TARIFF 2
-
-
-
-
-
-
TARIFF 1
DISPLAY
TARIFF 3
TARIFF 2
-
-
-
-
-
-
"
"

Art. 200+E COIN TIMER - with Electronic coin acceptor (accepts 6 different coins)
- con gettoniera elettronica (accetta 6 differenti monete)
4
Art. 200+M COIN TIMER - with Mechanical coin acceptor for only one coin or a toke - to specify it.
- con gettoniera Meccanica (per una sola moneta o gettone (da specificare).

Art. 222 COIN TIMER 22B
Art. 216A COIN TIMER 16B-52
Art. 202 COIN TIMER Ping-Pong
Art. 209 COIN TIMER 9B
Art. 204 COIN TIMER 4B
Art. 203A COIN TIMER 3B/A
Art. 216B COIN TIMER 16B-68
Art. 203 COIN TIMER 3B
5
Art. 216+E COIN TIMER 16B

Per il fissaggio a parete usarei2foriinaltoei4
situati all'interno dell'apparecchio. Nei modelli di
COIN TIMER muniti di BOX (cassetto contenente
le bilie per biliardo), si possono utilizzare anche i 2
fori interni al BOX stesso. Per evitare che gli
utilizzatori possano staccare la spina
dell'alimentazione elettrica, il COIN TIMER è stato
costruito per essere collegato direttamente alla
rete. Pertanto il cavo in dotazione è da
considerarsi utile solo per un test iniziale prima
della definitiva installazione.
I collegamenti devono essere effettuati da
personale qualificato seguendo lo schema di Fig.1.
ATTENZIONE: l'apparecchiatura deve essere
collegata all'impianto di terra.
L'alimentazione elettrica 230Vca deve essere
protetta con interruttore automatico a monte.
Vedere il cap. DATI TECNICI a pag. 8.
Collegare ai morsetti l'alimentazione elettrica
del COIN TIMER: 230Vca, 50-60Hz, 250mA Max.
Collegare il filo di terra al morsetto .
Fra i morsetti è disponibile il contatto a tempo
che viene azionato con l'introduzione
del denaro. Nel caso del COIN TIMER per biliardo
il carico sarà il lampadario e/o
l'eventuale segnapunti elettronico.
Fra i morsetti è disponibile il contatto ,
attraverso il quale va collegata un'eventuale
lampada di allarme. Essa si accenderà all'ultimo
minuto di gioco. Nel caso ci sia il BOX, a tempo
scaduto essa lampeggerà sino a quando non
verranno riposte le bilie nel BOX.
1-4
3
5-6
SERVICE,
SERVICE
7-8 ALARM
6
INSTALLAZIONE
PROGRAMMAZIONE
premere il tasto (vedi Fig. 2). Si potrà, in
seguito, andare ai passi successivi ripremendo
oppure indietreggiare con il tasto
. Dopo l’ultimo passo termina la
programmazione. Il carattere lampeggiante sulla
sinistra del display indica quale passo è attivo
mentre il valore che appare sulla destra potrà
essere modificato. Primo passo:
Dipende dal valore delle monete circolanti nella
PROG
PROG FREE-
PLAY
UNITÁ MONETARIA
COIN TIMER
ISTRUZIONI TECNICHE
TOTAL
+
-
PROG.
F1
LITHIUM BATTERY
FREE
PLAY
Scheda
visualizzatore
Fig. 2 - Pulsanti.
ITALIANO
Scheda interna
COIN TIMER
ALIMENTAZIONE carico :
5A Max, 250Vac Max.
SERVICE ALIMENTAZIONE :
230V, 250mA Max.
COIN TIMER
ALIMENTAZIONE carico :
5A Max, 250Vac Max.
ALARM
5
4
~~
2
76
31
8
2 FUSIBILI:
6,3A F, 250 Vac
carico
SERVICE
carico
ALARM
Fig. 1 - Collegamenti.
78 5
Fus.
Fus.
6
CONNECT
TO METAL
{
{
U0.05U 0.05
Per andare al primo passo di programmazione,

40.504 0.50
8
90.009 0.00
51.005 1.00
62.006 2.00
75.007 5.00
VALORE MONETA 4
con gettoniera
elettronica
con lettore di
banconote
VALORE MONETA 5
VALORE MONETA 6
VALORE BANCONOTA 2
VALORE BANCONOTA 3
VALORE BANCONOTA 4
Il massimo valore programmabile per i passi da 1 a
9 è pari a 250 volte il valore dell'unità monetaria
definita al passo " ". Per variare velocemente,
tenere premuto il tasto ( ) o ( ). Se viene usata
solo la gettoniera o il lettore di banconote, si
consiglia, per maggior chiarezza, di mettere a zero
il valore dei passi non utilizzati.
Per andare al passo successivo premere .
U
+–
PROG
7
10.051 0.05
20.102 0.10
30.203 0.20
VALORE MONETA 1
VALORE MONETA 2
VALORE MONETA 3
nazione. Rappresenta la variazione minima di tutti
gli importi: tutti i valori in denaro programmati in
seguito (monete, banconote, ecc.) saranno multipli
di questa unità monetaria. Indicativamente l'unità
monetaria va programmata in modo che il suo
valore sia uguale a quello della moneta più piccola
che si intende utilizzare.
Con i tasti ( ) e ( ) si può impostare uno dei
seguenti valori: 0,05 - 0,10 - 0,20 - 0,25 - 0,50 - 1 -
2-2,50-5-10-20-25-50-100-200-250.
Esempi:
Per andare al passo successivo premere .
I seguenti passi da1a9definiscono i valori delle
monete e/o banconote accettate a seconda del tipo
di COIN TIMER usato:
viene
utilizzato solo il passo 1.
Mettereazeroipassida2a9.
i passi da
1a6corrispondono alle 6 uscite della gettoniera.
Mettere a zero i passi corrispondenti alle uscite
nonutilizzateedipassi7,8e9.
i passi da 6
a 9 corrispondono alle uscite da1a4dellettore.
Mettereazeroipassida1a5.
ipassida1a6corrispondono alle 6
uscite della gettoniera ed i passi da6a9alle 4
uscite del lettore. Il passo 6 può essere utilizzato
per la gettoniera o il lettore. Mettere a zero i passi
corrispondenti alle uscite non utilizzate.
+–
PROG
COIN TIMER con gettoniera meccanica:
COIN TIMER con gettoniera elettronica:
COIN TIMER con lettore di banconote:
COIN TIMER con gettoniera elettronica e lettore di
banconote:
per l’EURO 0,05, USA 0,10, RUSSIA 1,
GIAPPONE 10.
ITALIANO
a0a0
Le fasce orarie permettono il cambio automatico
della tariffa in determinati orari della giornata o
della settimana. Se le fasce orarie vengono
abilitate, nei passi successivi verranno definiti i
valori delle 3 possibili tariffe (1, 2 e 3) e gli orari di
cambiamento.
Impostare con i tasti ( ) o ( ) uno dei seguenti
valori, ciascuno corrispondente ad un diverso tipo
di funzionamento:
= Sarà sempre attiva la
TARIFFA 1 il cui valore viene definito al passo
successivo.
= Tutti i giorni
della settimana saranno uguali sia per tariffe che
per orari. Quindi, in seguito, basterà programmare
le fascie orarie di un solo giorno.
= Si potranno
programmare delle fasce orarie differenti per i vari
giorni della settimana.
Per andare al passo successivo premere .
(tariffa oraria)
In questo passo viene stabilito il costo, all'ora, del
bene o servizio che si vuole gestire.
Se le fasce orarie sono disabilitate sarà sempre
attiva la TARIFFA 1.
Usare i tasti ( ) e ( ) per impostare la tariffa.
Per andare al passo successivo premere .
Se al passo " " le fasce orarie non sono abilitate, i
passi successivi vengono saltati e la
programmazione termina.
Questa fase viene saltata se al passo " " le fasce
orarie sono disabilitate.
Usare i tasti ( ) e ( ) per impostare la tariffa.
Per andare al passo successivo premere .
Questo fase viene saltata se al passo " " le fasce
orarie sono disabilitate.
Usare i tasti ( ) e ( ) per impostare la tariffa.
Per andare al passo successivo premere .
Questa fase viene saltata se al passo " " le fasce
orarie sono disabilitate. Con i tasti ( ) e ( ) si
percorre, di mezz'ora in mezz'ora, l'arco della
giornata o della settimana, mentre con il tasto
si può scegliere la tariffa in vigore ad ogni orario
fra le 3 disponibili.
ABILITAZIONE FASCE ORARIE
+–
PROG
TARIFFA 1
+–
PROG
TARIFFA 2
+–
PROG
TARIFFA 3
+–
PROG
PROGRAMMAZIONE FASCE
ORARIE
+–
F1
0
1
2
fasce orarie disabilitate.
fasce orarie giornaliere abilitate.
fasce orarie settimanali abilitate.
A
A
A
A
6.00
-
12.00
-
-
-
10.00
-
-
Ore Minuti
Tariffa 1, 2 o 3 ( )
Giorno (1-7)
0
:
0010
:
00
-
10.00

CONTATORE MONETA 1
CONTATORE MONETA 9
8
La visualizzazione del totalizzatore scompare se si
ripreme il tasto oppure automaticamente
dopo un tempo di 12 sec.
Se entro questo tempo si tiene premuto per 5
secondi il tasto , il totalizzatore e tutti i contatori
monete vengono azzerati. Premendo il tasto ( )
mentre è visualizzato il totalizzatore si possono
scorrereinsuccessionei9contatorimonete, il
contatore del tempo trascorso dall'ultimo
azzeramentoei2contatoriantifrode. Tutti sono
contraddistinti dalla cifra lampeggiante sulla
sinistra del display. Con il tasto ( ) si può
retrocedere.
TOTAL,
F1
+
–
Inserendo più monete o banconote, il tempo viene
accumulato in proporzione alla tariffa corrente fino
adunmassimodi9he59min.
Un segnale acustico di un sec. avvisa il giocatore
due volte: rispettivamente a due minutieaun
minuto dalla fine del tempo caricato. Nell'ultimo
minuto, inoltre, avviene la chiusura del contatto
(morsetti ).
Finito il tempo, il contatto si apre
(spegnendo così il carico ad esso collegato). Nel
COIN TIMER munito di BOX inoltre, se tutte le bilie
non sono state richiuse nel BOX, un segnale
acustico suona continuamente ed il contatto
si attiva in modo intermittente, provocando
il lampeggio dell'eventuale lampada ad esso
collegata.
Il tasto permette all'operatore di
mettere in funzionamento gratuito il COIN TIMER.
Per azzerare il tempo caricato nel provare la
gettoniera o il lettore di banconote, premere due
volte il tasto .
Premendo il tasto appare il totale incassato
in denaro. Nel caso si utilizzino monete di valore
ALARM 7-8
SERVICE
ALARM
FREE PLAY
FREE PLAY
TOTALIZZATORI
TOTAL
Nel caso in cui il COIN TIMER incorporasse il
BOX, dopo i contatori precedenti appariranno due
CONTATORI ANTIFRODE.
indica quanto
tempo il BOX è rimasto aperto
con tempo scaduto e in
mancanza di alimentazione elettrica (OFF).
Per azzerarlo premere .
Per andare al passo successivo premere ( ).
TIMER "OFF";
F1
+
Ore Minuti
F:42
F35:42
ITALIANO
Con l'introduzione della prima moneta o banconota
avviene:
1) l'apertura del BOX contenente le bilie, se esso
esiste;
2) il caricamento del tempo corrispondente al
valore della moneta o banconota;
3) la chiusura del contatto (morsetti ).SERVICE 5-6
FUNZIONAMENTO
Ogni contatore monete visualizza fino a 99.999 e
poi riprende da zero.
Per andare al passo successivo premere ( ).
Visualizza il tempo trascorso dall'ultimo
azzeramento dei totalizzatori.
Il conteggio massimo arriva a 999 giorni e 23 ore,
poi riprende da zero.
Per andare al passo successivo premere ( ).
Se il COIN TIMER non ha il BOX bilie, i passi
seguenti vengono saltati e la visualizzazione dei
contatori termina.
+
TEMPO TRASCORSO
DALL'ULTIMO AZZERAMENTO
+
Giorni Ore
305.20
104681 0468
901939 0193
Si inizia dalle ore zero del primo giorno della
settimana e, a seconda della scelta effettuata al
passo " ", sarà neccessario programmare
soltanto il giorno 1 oppure l'intera settimana (dall' 1
al 7).
Si possono programmare un massimo di 28
cambiamenti di tariffa nell'arco della settimana.
Se si dovesse superare tale valore verrà
visualizzata la parola: " ".
Una volta terminato, si potranno controllare le
fasce orarie con il tasto , che permette di
visualizzare l'orario di ogni cambiamento tariffa.
Per andare al passo successivo premere .
Questa fase viene saltata se al passo " " le fasce
orarie non sono abilitate.
In questo passo si può programmare l'orologio
interno. Il valore lampeggiante può essere variato
coi tasti ( ) e ( ). Con il tasto si sceglie quale
valore cambiare.
Premere per terminare la programmazione.
A
FULL
A
TOTAL
PROG
PROGRAMMAZIONE
OROLOGIO INTERNO
+– F1
PROG
Giorno attuale della settimana (da 1 a 7)
Ore Minuti
2:
37
212:
37
_23.500
inferiore all'unità (es. 0,50 - 0,10), le cifre decimali
non vengono visualizzate.
Il totalizzatore arriva a 999.999.999 e poi riprende
da zero.
La visualizzazione può avvenire in 2 tempi, se il
valore supera le 6 cifre (999.999).
Esempio di visualizzazione di 23.500 (in un unico
tempo):
Esempio di visualizzazione di 123.458.000 (in due
tempi):
__123. 458.000
per un
secondo; per tre
secondi.

1) Versione COIN TIMER
Art. 2) Tipo di accettazione denaro
Art. COIN TIMER 16B con gettoniera elettronica.
Art. COIN TIMER 3B con lettore di banconote e gettoniera elettronica.
Il codice articolo è composto di 2 parti: 2xx + y
Largh. Alt. Prof. Peso
216+E
203+T
1) Versioni COIN TIMER:
200 COIN TIMER
202 COIN TIMER Ping-Pong.
203 COIN TIMER 3B.
203A COIN TIMER 3B/A.
204 COIN TIMER 4B.
209 COIN TIMER 9B.
209A COIN TIMER 9B/A.
216 COIN TIMER 16B.
216A COIN TIMER 16B-52.
216B COIN TIMER 16B-68.
222 COIN TIMER 22B.
2) Tipi di accettazione denaro:
+M
+E
+B
+T
Esempi di codice articolo:
(cm) (Kg)
Art. ..... ...... ...... ...... ........................ 21,5 35,5 23,5 6,7
Art. Controllo di 2 racchette + pallina ........... 26 47 26 12,3
Art. Per Internazionale o Carambola (3 bilie Ø61,5 mm). . . 21,5 "" 23,5 10,8
Art. Per Italiana (2 x Ø68 + 1 x Ø59 mm) ............. "" "" "" ""
Art. Per4bilie(4xØ61,5mm)........................ "" "" """"
Art. Per Boccette Internazionali (9 x Ø61,5 mm) ......... "" "" "" ""
Art. Per Boccette Nazionali (8 x Ø59 + 1 x Ø54 mm).... "" "" "" ""
Art. PerPool(16xØ57mm) ........................ 26 "" 26 12,3
Art. PerPoolInglese(16xØ50-52mm)............ "" "" "" 12,7
Art. PerPiramideRussa(16xØ68-69mm)......... 32,5 47,5 32,5 14,8
Art. Per Snooker (22 x Ø52-54mm)................... "" 47 "" ""
Gettoniera meccanica (1 moneta).
Gettoniera elettronica (6 monete, programmabili).
Lettore di banconote (4 banconote, programmabili).
Lettore di banconote e gettoniera elettronica.
Ci riserviamo di modificare le caratteristiche senza preavviso.
Note: 1)
2)
P
Art. 203+BP
al momento dell'ordine specificare la
nazione e il taglio delle monete e/o banconote scelte;
il COIN TIMER può essere fornito senza gettoniera
e/o lettore di banconote, ma è comunque predisposto
all'installazione di uno di essi o di entrambi.
Aggiungere la lettera " " al codice articolo prescelto.
Esempio: = COIN TIMER 3B pre-
disposto al fissaggio del lettore di banconote.
9
CODICI ARTICOLI, misure e pesi:
ITALIANO
COIN TIMER.
SERVICE ALARM
SERVICE ALARM
Alimentazione: 230 Vca, 50 - 60Hz, 250mA MAX.
Carico massimo sui contatti e :
5A, 250 Vca.
Fusibili di protezione circuiti e :
6,3A F, 250Vca.
Batteria interna: Litio 3,6V - 1,9Ah.
La batteria assicura il completo funzionamento del
visualizzatore per più di 7 anni, qualora non venga
alimentato dalla tensione di rete.
DATI TECNICI
Note per la sostituzione della batteria:
ATTENZIONE. Esiste il pericolo di esplosione, se
la batteria non viene sostituita in modo corretto.
Rispettare la polarità. Non surriscaldare. Non
tentare la ricarica. Sostituire la batteria solo con un
tipo uguale o equivalente.
Eliminare la batteria usata, riponendola nei
contenitori appositamente adibiti alla raccolta.
Può essere usata una gettoniera elettronica
standard con riconoscimento di 6 monete e con
relative 6 uscite su connettore a 5+5 pin. Si
possono utilizzare modelli di varie marche (SECI,
NRI, COIN CONTROL, MARS ed altri ancora).
La gettoniera deve poter funzionare con una
tensione di alimentazione di: 12 Vcc ±0,5Vcc.
Il lettore di banconote deve essere il modello
SMILEY (prodotto da Innovative Technology e
distribuito da: Comestero, Suzo, Dinamics, ecc.),
oppure un altro con caratteristiche equivalenti.
Nel caso si usi sia la gettoniera che il lettore,
vengono accettati 5 tipi di monetee4tipidi
banconote.
Gettoniera elettronica.
Lettore di banconote.
Ore Minuti
M:42
M35:42
indica quanto
tempo il BOX è rimasto aperto
con tempo scaduto e in presenza
di alimentazione elettrica (ON).
Per azzerarlo premere .
Il conteggio massimo di entrambi i contatori arriva
e rimane a 99 ore e 59 minuti.
Premere nuovamente ( ) per terminare la
visualizzazione dei contatori.
TIMER "ON";
F1
+
A pagina 26 sono presenti alcune foto degli articoli seguenti.

In order to attach this device to the wall, use the
two holes on top and the four holes located inside
the equipment. In the COIN TIMER models
supplied with BOX (tray containing the balls for
billiard), you can also use the 2 internal holes of
the BOX itself. To avoid that the users can
disconnect the electricity plug, the COIN TIMER
has been constructed to be connected directly to
the supply. Therefore the cable you are equipped
with is to be considered useful only for an initial
test before the definitive installation.
The connections must be carried out by qualified
personnel following the scheme of Fig.1.
WARNING : This equipment must be grounded.
The 230-Vac electrical feed must be protected
with an automatic switch at its source.
See chapter on TECHNICAL DATA on page 8.
Connect the electrical feed of the COIN TIMER to
the terminals : 230Vac, 50-60Hz, 250mA Max.
Connect the earth cable to the terminal .
Between the terminals the time contact
is available, it is operated with the
insertion of money. As for the COIN TIMER for
billiard, the load is the light and/or the
eventual electronic scoreboard.
Between the terminals the contact is
available, through it an eventual alarm light is
connected. It will turn on at the last minute of the
game. In case there is the BOX, once the time is
over it will flash until the balls are replaced into the
BOX itself.
1-4
3
5-6
SERVICE
SERVICE
7-8 ALARM
10
INSTALLATION
PROGRAMMING
PROG.
PROG.
FREE-PLAY
MONETARY UNIT
button (see Fig.2). By pressing again
you can then proceed to the successive
steps, or to go back press the button.
After the last step the programming ends. The
flashing character on the left of the display
indicates which step is active while the number that
appears on the right can be modified.
First step:
This depends on the value of the coins circulating
COIN TIMER
TECHNICAL INSTRUCTIONS
TOTAL
+
-
PROG.
F1
LITHIUM BATTERY
FREE
PLAY
Visualizer
card
Fig. 2 - Push buttons.
ENGLISH
COIN TIMER
internal card
SERVICE load POWER:
5A Max, 250Vac Max. 230V, 250mA Max.
COIN TIMER Power Supply:
ALARM load POWER:
5A Max, 250Vac Max.
5
4
~~
2
76
31
8
2 FUSES:
6.3A F, 250 Vac
load
SERVICE
load
ALARM
Fig. 1 - Connections.
78 5
Fus.
Fus.
6
CONNECT
TO METAL
{
{
To go to the first step of the programming press the
U0.05U 0.05

COIN 4 VALUE
with electronic
coin validator
with banknote
validator
COIN 5 VALUE
COIN 6 VALUE
BANKNOTE 2 VALUE
BANKNOTE 3 VALUE
BANKNOTE 4 VALUE
The maximum programmable value for the steps
from 1 to 9 is 250 times the value of the monetary
unit indicated in the step " ". To vary quickly, keep
the ( ) or ( ) buttons pressed. If only the coin
validator or the banknote validator is used, we
advise you, for more clearness, to set to zero the
value of the step not used.
To proceed to the next step press .
U
+–
PROG
11
COIN 1 VALUE
COIN 2 VALUE
COIN 3 VALUE
in the country. It represents the minimum variation
of all sums: all monetary values set after this
(coins, banknotes, etc.) will be multiples of the
monetary unit. The monetary unit must be
programmed in a way that its value is the same as
the smallest coin that is intended to be used.
One of the following values can be set using the
( ) and ( ) buttons: 0.05 - 0.10 - 0.20 - 0.25 - 0.50 -
1-2-2.50-5-10-20-25-50-100-200-250.
Examples:
Press the button to proceed to the following
step.
The following steps from 1 to 9 define the value of
the coins and/or banknotes accepted according to
the type of COIN TIMER used:
it is
used only for step 1.
Settozeroallstepsfrom2to9.
the
step from 1 to 6 correspond to the 6 outlets of the
coin validator.
Set to zero all the steps corresponding to the not
used outlets and the steps 7, 8 and 9.
the steps
from 6 to 9 correspond to the outlets from 1 to 4 of
the reader.
Settozeroallthestepsfrom1to5.
the steps from 1 to 6 correspond to the 6
outlets of the coin validator and the steps from 6 to
9 correspond to 4 outlets of the reader. Set to zero
all the steps corresponding to the outlets not used.
+–
PROG
COIN TIMER with mechanical coin validator:
COIN TIMER with electronic coin validator:
COIN TIMER with banknote validator:
COIN TIMER with electonic coin and banknote
validator:
for EURO 0,05, USA 0,10, RUSSIA 1, JAPAN 10.
a0a0
The time zones allow the automatic change of the
tariff in certain hours of the day or of the week. If
the time zones are connected, in the successive
steps the values of the 3 possible tariffs (1, 2 and
3) and the times of change will be defined.
Set with the ( ) or ( ) buttons one of the following
values, each one corresponds to a different type of
functioning:
= The TARIFF 1 will
always be active and its value will be defined in the
successive step.
= All the days of the
week will be the same both for rates and times.
Therefore, afterwards, it will be necessary to
programme only the time zones of one day.
= It is possible to
programme different time zones for the various
days of the week.
To proceed to the next step press .
(hourly tariff)
In this step the hourly cost of the goods or services
to control is set.
If the time zones are disconnected the TARIFF 1
will always be active.
Use the ( ) e ( ) buttons to set the tariff.
To proceed to the next step press .
If at the " " step the time zones are not connected,
the successive steps will be skipped and the
programming will be ended.
This stage is to be bypassed if the time zones were
not activated in step " ".
Use the ( ) e ( ) buttons to set the tariff.
To proceed to the next step press .
This stage is to be bypassed if the time zones were
not activated in step " ".
Use the ( ) e ( ) buttons to set the tariff.
To proceed to the next step press .
This stage is to be bypassed if the time zones were
not activated in step " ". With the ( ) and ( )
buttons you advance, in half hourly periods, the
whole day, while with the button you can
choose the tariff in force at each time among the 3
at your disposal.
TIME ZONES CAPACITY
+–
PROG
TARIFF 1
+–
PROG
TARIFF 2
+–
PROG
TARIFF 3
+–
PROG
PROGRAMMING THE
TIME ZONES
+–
F1
0
1
2
disconnected time zones.
connected daily time zones.
connected weekly time zones.
A
A
A
A
Hours Minutes
Tariff1,2or3( )
Day (1-7)
0
:
0010
:
00
-
ENGLISH
40.504 0.50
8
90.009 0.00
51.005 1.00
62.006 2.00
75.007 5.00
10.051 0.05
20.102 0.10
30.203 0.20
10.00
6.00
-
12.00
-
-
-
10.00
-
-

MONEY COUNTER 1
MONEY COUNTER 9
12
The visualization of the totalizer disappears if you
press the button, or automatically after 12
sec.
If the button is kept pressed for 5 seconds
during this time, the totalizer and all the coin
counters will be reset. Pressing the ( ) button while
the totalizer is visualized you can run successively
the 9 money counters, the counter of the time
passed from the last zero setting and the 2 anti-
fraud counters. They are all marked by the flashing
number on the left of the display. With the ( )
button you can go back.
TOTAL
F1
+
–
Inserting more than one coin or banknote, the time
is accumulated in proportion to the current tariff up
to a maximum of 9 h. and 59 min.
An acoustic signal of one sec. warns the player
twice: respectively at two minutes and one minute
before the end of the loaded time. Moreover,
during the last minute the closing of the
contact (terminals ) takes place.
Once the time is over, the contact opens
(closing, in this way, the load which is connected to
it). In the COIN TIMER equipped with the BOX, if
all the balls have not been closed in the BOX, an
acoustic signal sounds continuously and the
contact is activated in an intermittent way,
causing the eventual light connected to it to flash.
The button allows the operator to
make the COIN TIMER operate freely. To set to
zero the time loaded whilst trying the coin validator
or the banknote validator, press twice the
button.
ALARM
7-8
SERVICE
ALARM
FREE PLAY
FREE
PLAY
In case the COIN TIMER incorporates the BOX,
after the former counters two ANTI-FRAUD
COUNTERS will appear.
this indicates for
how long the BOX has been left
open whilst the time was over and
without electricity (OFF). To set it to zero press .
To proceed on to the next step press ( ).
TIMER "OFF";
F1
+
Hours Minutes
F:42
F35:42
With the inserting of the first coin or banknote the
following situations arise:
1) the opening of the BOX containing the balls, if it
exists;
2) the loading of the time corresponding to the
value of the coin or banknote;
3) the closing of the contact (terminals
).
SERVICE
5-6
OPERATING
Each money counter visualizes up to 99.999 and
then restarts from zero.
To proceed to the next step press ( ).
It visualizes the time past from the last zero setting
of the totalizers.
The maximum counting arrives at 999 days and 23
hours, then it restarts from zero.
To proceed on to the next step press ( ).
If the COIN TIMER does not have the balls BOX,
the successive steps are skipped and the
visualizing of the counters ends.
+
TIMEPASTFROM
THE LAST ZERO SETTING
+
Days Hours
305.20
104681 0468
901939 0193
You start from the time zero of the first day of the
week and, according to the choice you have made
at the step " ", it will be necessary to programme
only day 1 or the whole week (from 1 to 7).
You can programme a maximum of 28 tariff
changes during the whole week. If you pass this
value the word " " will be visualized.
Once finished, you can control the different time
zones with the button, which allows you to
visualize the hour of each tariff change.
To proceed to the next step press .
This stage is to be bypassed if the time zones were
not activated in step " ".
In this step you can programme the internal clock.
The flashing value can be changed with the ( ) and
( ) buttons. With the button you choose which
value to change.
Press to end programming.
A
FULL
A
TOTAL
PROG
PROGRAMMING OF THE
INTERNAL CLOCK
+
–F1
PROG
Actual day of the week (from 1 to 7)
Hours Minutes
2:
37
212:
37
_23.500
TOTALIZERS
TOTALPress the button to see the total money
intake. If coins with less than the unit value are
used (eg. 0.50 - 0.10), the decimal figures will not
be shown. The totalizer goes up to 999.999.999
and then starts from zero again.
The visualization can take place in 2 different
times, if the value is more than 6 numbers
(999.999).
Example of visualization of 23.500 (only once):
Example of visualization of 123.458.000 (in two
steps):
__123. 458.000
for one
second; for three
seconds.
ENGLISH

1) COIN TIMER version
Art. 2) Type of money acceptance
Art. COIN TIMER 16B with electronic coin validator.
Art. COIN TIMER 3B with banknote and electronic coin validator.
The article code is composed of 2 parts: 2xx + y
Height Depth Weight
216+E
203+T
Width
1) COIN TIMER versions:
200 COIN TIMER
202 COIN TIMER Ping-Pong.
203 COIN TIMER 3B.
203A COIN TIMER 3B/A.
204 COIN TIMER 4B.
209 COIN TIMER 9B.
209A COIN TIMER 9B/A.
216 COIN TIMER 16B.
216A COIN TIMER 16B-52.
216B COIN TIMER 16B-68.
222 COIN TIMER 22B.
2) Types of money acceptance:
+M
+E
+B
+T
Examples of article code:
(cm) (Kg)
Art. ..... ...... ...... ...... ........................ 21.5 35.5 23.5 6.7
Art. Control of 2 bats + ball ................... 26 47 26 12.3
Art. For Carambole (3 balls Ø61.5 mm). ................ 21.5 "" 23.5 10.8
Art. ForItaliana(2xØ68+1xØ59mm) ............. "" "" "" ""
Art. For 4 balls (4x Ø61.5 mm)........................ "" "" """"
Art. For 9 balls (9 x Ø61.5 mm) ....................... "" "" "" ""
Art. For 9 balls (8 x Ø59 + 1 x Ø54 mm) .............. "" "" "" ""
Art. ForPool(16xØ57mm) ........................ 26 "" 26 12.3
Art. For English Pool (16 x Ø50-52 mm) ............ "" "" "" 12.7
Art. For Russian Pyramid (16 x Ø68-69 mm) ........ 32.5 47.5 32.5 14.8
Art. ForSnooker(22xØ52-54mm)................... "" 47 "" ""
Mechanical coin validator (1 coin).
Electronic coin validator (6 coins, programmable).
Banknote validator (4 banknotes, programmable).
Banknote validator and electronic coin validator.
We reserve the right to carry out changes without prior notice.
Note: 1)
2)
P
Art. 203+BP
at the moment of order you must specify the
country and the details of the chosen coins and/or
banknotes; the COIN TIMER can be supplied
without the coin and/or banknote validator, but it is
however prearranged for the installation of one or
both of them. Add the letter " " to the chosen article
code.
Example: = COIN TIMER 3B pre-
arranged for the setting of the banknote validator.
13
ARTICLE CODES, size and weight:
COIN TIMER
SERVICE ALARM
SERVICE ALARM
Power supply: 230 Vac, 50 - 60Hz, 250mA MAX.
Maximum load on the and
circuits: 5A, 250 Vac.
Protection fuses for the and :
6.3A F, 250Vac.
Internal battery: Lithium 3.6V - 1.9Ah.
The battery ensures the most complete operation
of the visualizer for more than 7 years, if it has not
been connected to the mains supply.
TECHNICAL DATA
Notes for the replacement of the battery:
ATTENTION. There is the danger of explosion if
the battery is not replaced correctly. Respect the
polarity. Do not overheat. Do not try to recharge it.
Replace the battery only with an equal kind or an
equivalent one.
Eliminate the used battery by placing it in the
special containers meant for their disposal.
A standard electronic coin validator which
recognizes 6 coins and with 6 relative outputs on a
5+5 pin connector can be used. Models from
various brands can be used (SECI, NRI, COIN
CONTROL, MARS and others).
The coin validator must be capable of operating
with a power supply of: 12 Vdc ±0.5Vdc.
The banknote validator must be the SMILEY model
(produced by Innovative Technology and
distributed by Comestero, Suzo, Dinamics, etc.) or
another with equivalent characteristics. If both the
coin validator and banknote validator are used, 5
types of coins and 4 types of banknotes will be
accepted.
ELECTRONIC COIN VALIDATOR
BANKNOTE VALIDATOR
Hours Minutes
M:42
M35:42
this indicates for
how long the BOX has been left
open whilst the time was over and
with electricity (ON).
Tosetittozeropress .
The maximum counting of both the counters
arrives and remains at 99 hours and 59 minutes.
Press ( ) again to end the visualization of the
counters.
TIMER "ON";
F1
+
ENGLISH
Photographs of some of the following articles can be seen on page 26.

Zum Befestigen an der Wand nutzen Sie die beiden
oberen Bohrungen und die vier Bohrungen im Inneren
des Gerätes. In den mit BOX (Behälter für Billardkugeln)
versehenen Modellen COIN TIMER können auch die 2
im Inneren der BOX selbst befindlichen Öffnungen
verwendet werden. Um zu vermeiden, daß der Stecker
von den Benutzern von der Netzversorgung abgesteckt
wird, wurde der COIN TIMER konstruiert, um direkt an
das Netz angeschlossen zu werden. Das mitgelieferte
Kabel ist daher nur für einen Anfangstest vor der
endgültigen Installation zu verwenden.
Die Anschlüsse müssen von qualifiziertem
Fachpersonal nach dem Schema Fig.1 vorgenommen
werden.
ACHTUNG: Das Gerät muß mit einem Anschluß an
die Erdung versehen sein. Die ekektrische
Versorgung 230 Vac muß mit einem automatischen
Schalter stromaufwärts gesichert sein.
Siehe Kapitel TECHNISCHE DATEN auf Seite 8.
An die Klemmen die elektrische Versorgung des
COIN TIMERS anschließen:
230Vac, 50-60Hz, 250mA Max.
Die Erdung an Klemme anschließen.
Zwischen den Klemmen befindet sich der
Zeitkontakt , der mit dem Einwerfen des
Geldes eingeschaltet wird. Beim COIN TIMER für
Billardspiele ist die Belastung die Lampe
und/oder der eventuelle elektronische Punktezähler.
Zwischen den Klemmen befindet sich der Kontakt
, über den eine eventuelle ALARMLAMPE
angeschlossen wird. Diese beginnt in der letzten
Spielminute zu leuchten. Wenn eine BOX installiert ist
beginnt die Lampe nach Ablauf der Zeit zu blinken, bis
die Kugeln nicht wieder in die BOX zurückgelegt
wurden.
1-4
3
5-6
SERVICE
SERVICE
7-8
ALARM
14
INSTALLATION
PROGRAMMIERUNG
PROG
PROG
FREE-PLAY
GELDEINHEIT
drücken (siehe Fig.2). Im folgenden kann zu den
nächsten Schritten durch erneutes Drücken der Taste
übergegangen werden oder durch Drücken der
Taste zu dem vorhergehenden Schritt
zurückgegangen werden. Nach dem letzten Schritt
endet die Programmierung. Die blinkende Anzeige auf
der linken Seite des Displays gibt an, welcher Schritt
aktiv ist, währen die Anzeige, die rechts erscheint,
verstellt werden kann. Erster Schritt:
Hängt von dem Wert der Landeswährung ab. Sie
COIN TIMER
TECHNISCHE ANLEITUNGEN
TOTAL
+
-
PROG.
F1
LITHIUM BATTERY
FREE
PLAY
Karte Display
Fig. 2 - Druckknöpfe.
DEUTSCH
Innere Karte
COIN TIMER
:
5A Max, 250Vac Max.
SERVICESPEISUNG Belastung Versorgung :
230V, 250mA Max.
COIN TIMER
SPEISUNG Belastung :
5A Max, 250Vac Max.
ALARM
5
4
~~
2
76
31
8
2 SICHERUNGEN:
6,3A F, 250 Vac
Belastung
SERVICE
Belastung
ALARM
Fig. 1 - Verbindungsschema.
78 5
Fus.
Fus.
6
CONNECT
TO METAL
{
{
Für den ersten Programmierungsschritt die Taste
U0.05U 0.05

WERT MÜNZE 4
mit elektronischem
Münzeinwurf
mit
Geldscheinleser
WERT MÜNZE 5
WERT MÜNZE 6
WERT GELDSCHEIN 2
WERT GELDSCHEIN 3
WERT GELDSCHEIN 4
15
WERT MÜNZE 1
WERT MÜNZE 2
WERT MÜNZE 3
entspricht der Mindesteinheit aller Beträgen: Alle
darauffolgend eingegebenen Geldwerte (Münzen,
Geldscheine, usw.) werden das Mehrfache dieser
Geldeinheit sein. In der Regel wird die Geldeinheit so
programmiert, daß ihr Wert dem der kleinsten Münze
entspricht, die verwendet werden soll.
Durch die Tasten ( ) und (–) kann einer der folgenden
Werte eingegeben werden: 0,05 - 0,10 - 0,20 - 0,25 -
0,50 - 1 - 2 - 2,50 - 5 - 10 - 20 - 25 - 50 - 100 - 200 -
250.
Beispiele:
Um zum nächsten Schritt zu gehen drücken.
Die folgenden Schritte von 1 bis 9 bestimmen den
Wert der Münzen oder Geldscheine, die je nach dem
verwendeten COIN TIMER angenommen werden:
Es
wird nur Schritt 1 angewendet.
Die Schritte von 2 bis 9 auf Null stellen.
Die
Schritte von 1 bis 6 entsprechen den 6 Ausgängen
des Münzeinwurfs. Die Schritte, die den nicht
benutzten Ausgängen entsprechen und die Schritte
7,8 und 9 auf Null stellen.
Die Schritte von 6
bis 9 entsprechen den 4 Ausgängen des Lesers. Die
Schritte von 1 bis 5 auf Null stellen.
Die Schritte von 1 bis 6
entsprechen den 6 Ausgängen des Münzeinwurfs
und die Schritte von 6 bis 9 den 4 Ausgängen des
Lesers. Der Schritt 6 kann für den Münzeinwurf oder
den Leser verwendet werden. Die Schritte, die den
nicht benutzten Ausgängen entsprechen, auf Null
stellen.
+
PROG
COIN TIMER mit mechanischem Münzeinwurf:
COIN TIMER mit elektronischem Münzeinwurf:
COIN TIMER mit Geldscheinleser:
COIN TIMER mit elektronischem Münzeinwurf und
Geldscheinleser:
für EURO 0,05, USA 0,10, RUßLAND 1, JAPAN 10.
DEUTSCH
a0a0
benutzten Schritte auf Null zu stellen.
Um zum nächsten Schritt zu gehen drücken.
Die Tarifzeiten ermöglichen den automatischen
Wechsel der Tarife zu bestimmten Tages-oder
Wochenzeiten. Wenn die Tarifzeiten eingestellt
werden, werden in den darauffolgenden Schritten der
Wert der 3 möglichen Tarife (1,2 und 3) und zu
welcher Uhrzeit gewechselt wird, bestimmt.
Mit den Tasten ( ) oder ( ) einen der folgenden
Werte einstellen, von denen jeder einer
unterschiedlichen Funktionsart entspricht:
= Es gilt immer der
TARIF 1, dessen Wert beim nächsten Schritt
bestimmt wird.
= Alle Tage der
Woche sind gleich, was Tarife und Zeiten betrifft. Im
folgenden müssen daher nur von einem Tag die
Tarifzeiten programmiert werden.
= Für die verschiedenen
Wochentage können unterschiedliche Tarifzeiten
programmiert werden.
Um zum nächsten Schritt zu gehen drücken.
(Stundentarif)
Bei diesem Schritt werden die Kosten pro Stunde der
in Anspruch zu nehmenden Anlage oder Leistung
bestimmt.
Wenn die Tarifzeiten ausgeschaltet sind, gilt immer
TARIF 1. Um den Tarif einzustellen die Tasten ( ) und
( ) benutzen.
Um zum nächsten Schritt zu gehen drücken.
Wenn bei Schritt " " die Tarifzeiten nicht
eingeschaltet sind, werden die folgenden Schritte
übersprungen und die Programmierung ist beendet.
Wenn bei Schritt " " die Tarifzeiten ausgeschaltet
wurden wird dieser Schritt übersprungen. Um den
Tarif einzustellen die Tasten ( ) und ( ) benutzen.
Um zum nächsten Schritt zu gehen drücken.
Dieser Schritt wird übersprungen, wenn bei Schritt
" " keine Zeitausschnitte befähigt wurden. Um den
Tarif einzustellen die Tasten ( ) und ( ) benutzen.
Um zum nächsten Schritt zu gehen drücken.
Dieser Schritt wird übersprungen, wenn bei Schritt
" " keine Zeitausschnitte befähigt wurden.
Mit den Tasten ( ) und ( ) wird in Schritten von je
einer halben Stunde die Spanne eines Tages oder
der Woche durchlaufen, während mit der Taste
PROG
EINSTELLUNG DER
TARIFZEITEN
+–
PROG
TARIF 1
+
–
PROG
TARIF 2
+–
PROG
TARIF 3
+–
PROG
PROGRAMMIERUNG
TARIFZEITEN
+–
F1
0
1
2
A
A
A
A
Tarifzeiten ausgeschaltet.
Tagestarifzeiten eingeschaltet.
Wochentarifzeiten.
Stunden Minuten
Tarif1,2o3( )
Tag (1-7)
0
:
0010
:
00
-
Der maximale Wert, der für die Schritte von 1 bis 9
programmiert werden kann entspricht 250 mal dem
Wert der Geldeinheit, der bei Schritt " " festgesetzt
wurde. Um schnell einzustellen die Tasten ( ) und ( )
gedrückt halten. Wenn nur der Münzeinwurf oder der
Geldscheinleser verwendet werden, wird für eine
bessere Übersicht geraten, die Werte der nicht
U
+–
40.504 0.50
8
90.009 0.00
51.005 1.00
62.006 2.00
75.007 5.00
10.051 0.05
20.102 0.10
30.203 0.20
10.00
6.00
-
12.00
-
-
-
10.00
-
-

MÜNZZÄHLER 1
MÜNZZÄHLER 9
16
Die Anzeige des Totalisators verschwindet, wenn die
Taste erneut gedrückt wird, oder automatisch,
nach einem Zeitraum von 12 Sekunden.
Wenn binnen dieser Frist die Taste 5 Sekunden
lang gedrückt wird, werden sowohl der Totalisator als
auch alle Münzenzähler auf Null gestellt. Wenn die
Taste ( ) gedrückt wird, während der Totalisator
angezeigt ist, können nacheinander die 9
Münzzähler, der Zähler der seit der letzten
Nullstellung vergangenen Zeit und die beiden Zähler
gegen eine mißbräuchliche Verwendung angezeigt
werden. Sie unterscheiden sich alle durch die links
auf dem Display blinkende Ziffer.
Mit der Taste ( ) kann zurückgestellt werden.
TOTAL
F1
+
–
Mit dem Einwerfen der ersten Münze oder
Geldschein erfolgt:
1) Die Öffnung der BOX mit den Kugeln, falls diese
existiert;
2) Die Speicherung der Zeit, entsprechend dem
eingeworfenen Geldwert;
3) Die Schließung des Kontakts
(Klemmen ).
Wenn mehr Münzen oder Geldscheine eingeworfen
werden wird die Zeit bis zu einem Maximum von 9
Stunden und 59 Minuten addiert. Ein akustisches
Signal von einer Sekunde macht den Spieler zwei
mal aufmerksam: jeweils 2 Minuten und 1 Minute vor
Ablauf der Spielzeit. In der letzten Minute erfolgt
außerdem die Schließung des Kontakts
(Klemmen ). Nach Ablauf der Zeit öffnet sich der
Kontakt (und schaltet dadurch die
angeschlossene Anlage aus). Beim COIN TIMER mit
BOX, wenn nicht alle Kugeln wieder in die Box zurück
gelegt wurden, läutet außerdem unaufhörlich ein
akustisches Signal und der Kontakt , der sich
intermittierend einschaltet, läßt die eventuell
angeschlossene Lampe blinken.
Die Taste ermöglicht dem Bediener den
COIN TIMER kostenlos funktionieren zu lassen.
Um die gespeicherte Zeit auf Null zu stellen, während
der Münzeinwurf oder der Geldscheinleser
kontrolliert werden, zwei mal die Taste
drücken.
SERVICE
5-6
ALARM
7-8
SERVICE
ALARM
FREE PLAY
FREE PLAY
FUNKTIONSABLAUF
Jeder Münzzähler zeigt bis 99.999 an und beginnt
dann erneut bei Null.
Um zum nächsten Schritt zu gehen ( ) drücken.
Zeigt die seit der letzten Nullstellung der
Totalisatoren vergangene Zeit an.
Die Zählung geht bis höchstens 999 Tage und 23
Stunden, dann beginnt sie wieder bei Null.
Um zum nächsten Schritt zu gehen ( ) drücken.
Wenn der COIN TIMER keine BOX für die Kugeln
hat, werden die nächsten Schritte übersprungen und
die Anzeige der Zähler endet.
Beim COIN TIMER mit Box erscheinen nach den
vorhergegangenen Zählern zwei ZÄHLER, DIE EINE
MISSBRÄUCHLICHE BENUTZUNG VERHINDERN
SOLLEN
gibt an, wie
lange die BOX nach Ablauf der
Zeit und ohne elektrische
Stromversorgung offen geblieben ist (OFF).
Für die Nullstellung drücken.
Um zum nächsten Schritt zu gehen drücken.
+
SEIT DER LETZTEN NULL-
STELLUNG VERGANGENE ZEIT
+
F1
.
()
TIMER "OFF";
+
Tage Stunden
305.20
104681 0468
901939 0193
der zu jeder der drei verfügbaren Tarifzeiten geltende
Tarif gewählt werden kann.
Es wird um 00 Uhr des ersten Tages der Woche
begonnen und, je nach dem, was bei Schritt " "
gewählt wurde, muß entweder nur der Tag 1
programmiert werden oder die ganze Woche (von 1
bis 7).
Es können pro Woche höchstens 28 Tarifwechsel
programmiert werden. Wenn diese Anzahl
überschritten werden sollte, erscheint auf dem
Display das Wort " ".
Nach Beendigung der Programmierung können die
Tarifzeiten mit der Taste kontrolliert werden,
durch die die Uhrzeit eines jeden Tarifwechsels
angezeigt wird.
Um zum nächsten Schritt zu gehen drücken.
Wenn bei Schritt " " die Tarifzeiten ausgeschaltet
wurden wird dieser Schritt übersprungen.
Bei diesem Schritt kann die Uhr im Inneren
programmiert werden. Der blinkende Wert kann mit
den Tasten ( ) und ( ) verstellt werden. Mit der Taste
wird gewählt, welcher Wert verändert werden soll.
drücken, um die Programmierung zu
beenden.
A
FULL
A
TOTAL
PROG
PROGRAMMIERUNG
DER UHR IM INNEREN
+–
F1
PROG
Laufender Tag der Woche (von 1 bis 7)
Stunden Minuten
2:
37
212:
37
_23.500
TOTALISATOREN
TOTALWenn die Taste gedrückt wird, erscheint der
insgesamt kassierte Wert.
Im Falle daß Münzen, deren Wert niedriger als die
Einheit ist (z.B. 0,50 - 0,10), verwendet werden,
erscheinen die Dezimalziffern nicht auf dem Display.
Der Totalisator zeigt bis 999.999.999 an und beginnt
dann wieder bei Null.
Die Anzeige kann auf zwei mal erfolgen, wenn der
Wert die 6 Ziffern übersteigt (999.999).
Beispiel für die Anzeige von 23.500 (in einem mal):
Anzeigebeispiel von 123.458.000 (in zwei mal):
__123. 458.000
1 Sekunde
lang; 3 Sekunden
lang.
Stunden Minuten
F:42
F35:42
DEUTSCH

1) Version COIN TIMER
Art. 2) Art der Geldannahme
Für
Für Kugeln
Für Kugeln
Für Kugeln
Für
Für
Für
Für
Münze
Münzeinwurf Münzen
Geldscheine
Geldscheinleser und elektronischem Münzeinwurf
Art. COIN TIMER 16B mit elektronischem Münzeinwurf.
Art. COIN TIMER 3B mit Geldscheinleser und elektronischem Münzeinwurf.
Der Artikelkode setzt sich aus zwei Teilen zusammen: 2xx + y
Höhe Tiefe Gewicht
216+E
203+T
Breite
1) Version COIN TIMER:
200 COIN TIMER
202 COIN TIMER Ping-Pong.
203 COIN TIMER 3B.
203A COIN TIMER 3B/A.
204 COIN TIMER 4B.
209 COIN TIMER 9B.
209A COIN TIMER 9B/A.
216 COIN TIMER 16B.
216A COIN TIMER 16B-52.
216B COIN TIMER 16B-68.
222 COIN TIMER 22B.
2) Arten der Geldannahme:
+M
+E
+B
+T
Beispiele für Artikelcodes:
(cm) (Kg)
Art. ..... ...... ...... ...... ........................ 21,5 35,5 23,5 6,7
Art. Kontrolliert 2 Schlägern + Ball ............. 26 47 26 12,3
Art. Für Carambola (3 Kugeln Ø61,5 mm). .............. 21,5 "" 23,5 10,8
Art. Italiana(2xØ68+1xØ59mm) ............. "" "" "" ""
Art. 4 (4xØ61,5mm)...................... "" "" """"
Art. 9 (9xØ61,5mm)..................... "" "" "" ""
Art. 9 (8xØ59+1xØ54mm)............ "" "" "" ""
Art. Pool(16xØ57mm) ........................ 26 "" 26 12,3
Art. English Pool (16 x Ø50-52 mm) ............ "" "" "" 12,7
Art. Russian Pyramid (16 x Ø68-69 mm) ........ 32,5 47,5 32,5 14,8
Art. Snooker(22xØ52-54mm)................... "" 47 "" ""
Mechanischer Münzeinwurf (1 ).
Elektronischem (6 , programm.).
Geldscheinleser (4 , programmierbar).
.
Wir behalten uns das Recht vor, ohne Vorhinweis die Eigenschaften ändern zu Können.
Anmerkung: 1)
2)
P
Art. 203+BP
Bei Bestellung die Währung und die
gewählten Einheiten der Münzen und/oder
Geldscheine angeben; Der COIN TIMER kann
ohne Münzeinwurf und/oder Geldscheinleser geliefert
werden, ist aber in jedem Fall mit einem davon oder
allen beiden ausrüstbar. Den Buchstaben " " zum
gewählten Artikelkode hinzufügen.
Beispiel: = COIN TIMER 3B vorgesehen
für die Installation des Geldscheinlesers.
17
Artikelkodes, Maße und Gewichte:
COIN TIMER.
SERVICE
ALARM
SERVICE ALARM
Speisung: 230 Vac, 50 - 60Hz, 250mA MAX.
Maximale Belastung der Kontakte und
:5A,250Vac.
Schmelzsicherungen und :
6,3A F, 250 Vac.
Batterie im Inneren: Lithium 3,6V - 1,9Ah.
Durch die Batterie ist das Display auch ohne
Netzversorgung für 7 Jahre vollkommen
funktionstüchtig.
TECHNISCHE DATEN
Anmerkungen für den Austausch der Batterie:
ACHTUNG: Die Batterie kann explodieren, wenn sie
nicht korrekt ausgetauscht wird. Die Polung
beachten. Nicht überhitzen. Nicht versuchen, die
Batterie wieder aufzuladen. Nur mit einer gleichen
oder entsprechenden Batterie austauschen.
Die gebrauchte Batterie mit dem Sondermüll für
Batterien entsorgen.
Es kann ein elektronischer Standard-Münzautomat
verwendet werden, der bis zu 6 verschiedene
Münzen erkennt, mit entsprechendem 6-fachen
Ausgang zum 5+5 pin Verbinder.
Es können Modelle verschiedener Hersteller
verwendet werden (SECI, NRI, COIN CONTROL,
MARS und weitere andere).
Der Münzautomat muß mit einer Stromspannung von
12Vdc ±0,5Vdc funktionieren können.
Als Geldscheinzähler muß das Modell SMILEY
(hergestellt von Innovative Technology und vertrieben
durch: Comestero, Suzo, Dinamics, usw.) oder eines
mit entsprechenden Eigenschaften verwendet
werden. Sollten beide, sowohl Münzautomat als auch
Geldscheinzähler verwendet werden, können bis zu 5
unterschiedliche Münzen und 4 Geldscheine
angenommen werden.
ELEKTRONISCHER MÜNZEINWURF.
GELDSCHEINLESER.
Stunden Minuten
M:42
M35:42
gibt an wie lange
die BOX nach Ablauf der Zeit bei
elektrischer Stromversorgung
(ON) offen geblieben ist.
Für die Nullstellung drücken.
Die Zählung der beiden Zähler geht und bleibt bis 99
Stunden und 59 Minuten.
Um die Anzeige der Zähler zu beenden, erneut auf
( ) drücken.
TIMER "ON";
F1
+
DEUTSCH
Auf Seite 26 sind einige der folgenden Artikeln abgebildet.

Pour la fixation au mur, utiliser les deux trous en haut
et les quatre trous situés à l'intérieur de l’appareil.
Dans les modèles de COIN TIMER équipés de BOX
(tiroir contenant les boules pour billard), il est
possible d'utiliser les 2 trous pratiqués à l'intérieur du
BOX. Pour éviter que les utilisateurs ne débranchent
la fiche de l'alimentation électrique, le COIN TIMER a
été conçu de telle façon à pouvoir être branché
directement au réseau. Par conséquent, le câble
fourni en dotation ne sert que pour l'essai initial,
avant la mise en place définitive.
Les branchements doivent être effectués par un
personnel qualifié qui devra suivre le schéma de la
fig. 1.
ATTENTION: l'appareillage doit être branché au
fil de terre. L'alimentation électrique 230 Vac doit
être protégée en amont par un interrupteur
automatique.
Voir chap. DONNÉES TECHNIQUES à la page 8.
Brancher aux bornes l'alimentation électrique du
COIN TIMER: 230Vac, 50-60Hz, 250mA Max.
Brancher le fil de terre à la borne .
Entre les bornes il y a le contact temporisé
qui s'actionne par l'introduction de l'argent.
En cas de COIN TIMER pour table de billard, la
charge sera la lampe et/ou l'éventuel
marqueur électronique.
Entre les bornes il y a le contact , à
travers lequel il est possible de brancher
éventuellement une lampe d'alarme. Celle-ci
s'allumera à la dernière minute de jeu. S'il est équipé
de BOX, elle se mettra à clignoter, dès que le temps
s'est écoulé, jusqu'au moment où toutes les boules
seront remises dans le BOX.
1-4
3
5-6
SERVICE
SERVICE
7-8 ALARME
18
INSTALLATION
PROGRAMMATION
appuyer sur la touche (voir fig. 2). Ensuite, il
sera possible de passer aux étapes suivantes en
réappuyant sur ou de revenir an arrière en
appuyant sur la touche . C'est après la
dernière étape que se termine la programmation. La
lettre clignotante à gauche de l'afficheur indique
l'étape en cours de programmation, la valeur qui
apparaît à droite pourra être modifiée.
Première étape:
Elle dépend de la devise du pays. Elle représente la
PROG
PROG
FREE-PLAY
UNITÉ MONÉTAIRE
COIN TIMER
INSTRUCTIONS TECHNIQUES
TOTAL
+
-
PROG.
F1
PILE AU LITHIUM
FREE
PLAY
Carte afficheur
Fig. 2 - Boutons-poussoirs.
FRANÇAIS
Pour amorcer la première étape de programmation,
Carte interne
COIN TIMER
ALIMENTATION charge :
5A Max, 250Vac Max.
SERVICE ALIMENTATION :
230V, 250mA Max.
COIN TIMER
ALIMENTATION charge :
5A Max, 250Vac Max.
ALARME
5
4
~~
2
76
31
8
2 FUSIBLES:
6,3A F, 250 Vac
charge
SERVICE
charge
ALARME
Fig. 1 - Branchement.
78 5
Fus.
Fus.
6
CONNECT
TO METAL
{
{
U0.05U 0.05

VALEUR de la PIÈCE 4
avec monnayeur
électronique
avec lecteur
de billets
VALEUR de la PIÈCE 5
VALEUR de la PIÈCE 6
VALEUR du BILLET de
BANQUE 2
VALEUR du BILLET de
BANQUE 3
VALEUR du BILLET de
BANQUE 4
La valeur maximum programmable pour les étapes
de1à9est250foislavaleur de l'unité monétaire
établie à l'étape " ". Pour faire défiler rapidement,
appuyer sur la touche ( ) ou ( ). En cas d'utilisation
du seul monnayeur ou du seul lecteur de billets, il est
conseillé, pour simplifier au maximum, de mettre à
zéro la valeur des étapes inutilisées.
Pour passer à l'étape suivante, appuyer sur .
U
+–
PROG
19
VALEUR de la PIÈCE 1
VALEUR de la PIÈCE 2
VALEUR de la PIÈCE 3
variation minimale de toutes les sommes: toutes les
valeurs en argent indiquées ci-après (pièces de
monnaie, billets de banque, etc.) sont des multiples
de cette unité monétaire. L'unité monétaire doit être
programmée de façon que sa valeur corresponde à
celle de la plus petite pièce de monnaie utilisée.
À l'aide des touches ( ) et ( ), il est possible de
programmer une des valeurs suivantes: 0,05 - 0,10 -
0,20 - 0,25 - 0,50 - 1 - 2 - 2,50 - 5 - 10 - 20 - 25 - 50 -
100-200-250.
Par exemple:
Pour passer à l'étape suivante, appuyer sur .
Les étapes suivantes, à savoir de1à9,serventà
définir la valeur des pièces et/ou billets acceptés en
fonction du type de COIN TIMER utilisé:
seule
l'étape 1 sera utilisée.
Mettre à zéro les étapes de2à9.
les
étapes de1à6correspondent aux 6 sorties du
monnayeur.
Mettre à zéro les étapes correspondant aux sorties
inutilisées, ainsi que les étapes 7, 8 et 9.
les étapes de 6
à 9 correspondent aux sorties de1à4dulecteur.
Mettre à zéro les étapes de1à5.
les étapes de1à6correspondent aux 6
sorties du monnayeur et les étapes de6à9aux4
sorties du lecteur. L'étape 6 peut être utilisée pour le
monnayeur ou pour le lecteur.
Mettre à zéro les étapes correspondant aux sorties
inutilisées.
+–
PROG
COIN TIMER avec monnayeur mécanique:
COIN TIMER avec monnayeur électronique:
COIN TIMER avec lecteur de billets:
COIN TIMER avec monnayeur électronique et lecteur
de billets:
pour l'EURO 0.05, USA 0,10, RUSSIE 1, JAPON 10.
a0a0
Les tranches horaires permettent le changement
automatique du tarif à certaines heures de la journée
ou de la semaine. Si les tranches horaires ont été
validées, les étapes suivantes permettront de définir
les valeurs des 3 tarifs possibles (1, 2 et 3) et les
horaires de changement.
Programmer au moyen des touches ( ) ou ( ) une
des valeurs suivantes, chacune correspondant à un
type de fonctionnement différent.
= LeTARIF1est
toutefois activé; sa valeur sera définie à l'étape
suivante.
= Tous les
jours de la semaine ont les mêmes tarifs et les
mêmes horaires. Donc, il suffira de programmer les
tranches horaires d'un seul jour.
=Il
sera possible de programmer des tranches horaires
différentes pour chaque jour de la semaine.
Pour passer à l'étape suivante, appuyer sur .
(tarif horaire)
Cette étape sert à définir le coût à l'heure du bien ou
du service que l'on désire gérer.
Si les tranches horaires sont invalidées, le TARIF 1
est tout de même activé.
Utiliser les touches ( ) et ( ) pour établir le tarif.
Pour passer à l'étape suivante, appuyer sur .
Si à l'étape " " les tranches horaires n'ont pas été
validées, les étapes suivantes son ignorées et la
programmation prend fin.
On passe à l'étape suivante si les tranches horaires
n'ont pas été validées à l'étape " ".
Utiliser les touches ( ) et ( ) pour établir le tarif.
Pour passer à l'étape suivante, appuyer sur .
On passe à l'étape suivante si les tranches horaires
n'ont pas été validées à l'étape " ".
Utiliser les touches ( ) et ( ) pour établir le tarif.
Pour passer à l'étape suivante, appuyer sur .
On passe à l'étape suivante si les tranches horaires
n'ont pas été validées à l'étape " ". Au moyen des
touches ( ) et ( ), il est possible de faire défiler, de
demi-heure à demi-heure, toute la journée ou toute la
semaine et, au moyen de la touche , de
sélectionner le tarif en vigueur pour chacun horaire
disponible.
VALIDATION
TRANCHES HORAIRES
+–
PROG
TARIF 1
+–
PROG
TARIF 2
+–
PROG
TARIF 3
+–
PROG
PROGRAMMATION
TRANCHES HORAIRES
+–
F1
0
1
2
A
A
A
A
tranches horaires invalidées.
tranches horaires journalières validées.
tranches horaires hebdomadaires validées.
Heures Minutes
Tarif 1, 2 ou 3 ( )
Jour (1-7)
0
:
0010
:
00
-
FRANÇAIS
40.504 0.50
8
90.009 0.00
51.005 1.00
62.006 2.00
75.007 5.00
10.051 0.05
20.102 0.10
30.203 0.20
10.00
6.00
-
12.00
-
-
-
10.00
-
-
This manual suits for next models
11
Table of contents
Languages:
Other Favero Timer manuals
