Fbt CLA 406A User manual

I
F
D
UK
ACTIVE COLUMN LINE ARAY
PROCESSED ACTIVE SUBWOOFER

1
3/5
6
7
8/9
10
11/12/13
14/15
16/17
19/20
21
1
3/5
6
7
8/9
10
11/12/13
14/15
16/17
19/20
21
2
4/5
6
7
8/9
10
11/12/13
14/15
16/17
19/20
21
2
4/5
6
7
8/9
10
11/12/13
14/15
16/17
19/20
21
CONFIGURAZIONI CARDIOIDI 18
CARDIOID CONFIGURATIONS 18
CONFIGURATIONS CARDIOÏDES 18
KARDIOIDE KONFIGURATIONEN 18

1

2

Curata nel design e nelle soluzioni acustiche, la nuova serie
VERTUS è pensata per estendere la tecnologia "True line array",
che ha riscosso un successo indiscutibile nel settore dell'audio
professionale, a nuovi campi di impiego sia nel live che
nell'installazione fissa proponendo un sistema a colonna compatto
ed elegante, dal design raffinato e funzionale, dalla qualità senza
compromessi capace di risolvere brillantemente applicazioni nelle
quali sistemi tradizionali esibivano performance inadeguate.
CLA 406A è un cabinet in multistrati di betulla con rinforzi interni
strutturali in metallo, composto da 4 woofer custom da 165mm e un
driver a compressione al neodimio di grande formato da 35mm con
bobina da 64mm per una risposta in frequenza che si estende da
65Hz a 20kHz. La guida d'onda, progettata appositamente per
questo prodotto ed ottimizzata con simulazioni ad elementi finiti
BEM, ha una dispersione orizzontale di 100° e verticale di 25° ed
una bassissima distorsione; la dimensione in altezza della guida
d'onda permette un ottimo controllo verticale in tutto il range di
funzionamento del driver e consente di accoppiare due sistemi in
modo coerente fin oltre i 18kHz.
CLA 406A ha un modulo di amplificazione in pressofusione di
alluminio a convezione naturale da 600W per la sezione LF e 300W
per la sezione HF, in classe D con alimentatore switching.
Il processore DSP a 8 preset con algoritmi di ultima generazione
consente di avere il suono appropriato ad ogni condizione di utlizzo
ed una grande riserva dinamica garantendo la massima affidabilità
dei trasduttori e l'integrità del segnale riprodotto.
Il cabinet è dotato di due maniglie in alluminio con inserti in gomma
e ben 12 punti di ancoraggio.
Tramite hardware opzionale è possibile accoppiare due diffusori
con angoli di 0° / 10° / 20°. Altri accessori permettono la
sospensione del sistema e la sovrapposizione al subwoofer CLA
118SA.
CLA 118SA è un subwoofer in multistrati di betulla con woofer B&C
da 460mm in bass reflex dotato di ampia porta di accordo a flusso
d'aria laminare per ridurre al minimo fenomeni di turbolenza.
Anche per questo modello il modulo di amplificazione è in
pressofusione in alluminio a convezione naturale da 1200W in
Classe D con alimentatore switching; dispone di un processore
DSP con la funzione di filtraggio, equalizzazione e protezione.
Pensato per estendere le performance del CLA 406A soprattutto in
applicazioni live, dove funge da supporto e base per la colonna CLA
406A.
Steeped in classic Italian design and acoustic expertise, VERTUS
has been created with the aim of extending true line array
technology, an undisputed success in the field of professional
audio, into a new range of applications within both the live and fixed
installation fields.
The cabinet of the CLA 406A is constructed in birch plywood with
internal metal bracing to ensure stability. The enclosure comprises
four custom 6.5" woofers and a 1.5" large format neodymium
compression driver with 2.5" voice coil for a frequency response
that extends from 65Hz to 20kHz. The waveguide, specifically
designed for this product and optimized by finite element simulation
BEM, has a horizontal dispersion of 100° and 25° and a vertical low
distortion thanks to the optimal load seen by the diaphragm of the
driver. The height dimension of the waveguide allows an excellent
vertical control throughout the operating range of the driver and
enables the linking of the two systems in a consistent manner to
beyond the 18kHz.
The CLA 406A amplifier module has a die-cast aluminum with
natural convection 600W for LF section and 300W for HF Class D
switching power. Latest generation DSP algorithms offer 8 presets,
ensuring that you will achieve the perfect sound in every
application, plus generous headroom for maximum reliability and
signal integrity. The cabinet is equipped with two aluminum handles
and well 12 anchor points, all of which combine to make the system
extremely versatile. Via optional hardware it is possible to couple
two CLA 406A with angles of 0°/10°/20°. Additional accessories are
available for system suspension as well as flying the accompanying
CLA 118SA subwoofer.
The CLA 118SA is a subwoofer in birch plywood with a 18" woofer
from B&C in a bass reflex port with an extensive laminar airflow,
minimizing turbulence and power compression. The Class D
switchin power amplifier module is constructed in die-cast
aluminum with natural convection and is rated at 1200W. Onboard
DSP also offers functions such as filtering, equalization and
protection.
When you need to extend the performance of the CLA 406A,
especially in live applications, the CLA 118SA acts as a support and
base for the CLA 406A column that can be applied, via optional
hardware, with M20 points positioned on the top of the sub.
3

Grâce à son design et à ses solutions acoustiques, la nouvelle
gamme VERTUS a été conçue dans le but d'étendre la technologie
« True line array », suite à son indéniable succès dans le secteur de
l'audio professionnel, aux nouveaux champs d'emploi aussi bien
lors des performances « live » qu'en installation fixe, en proposant
un système en colonne compact et élégant, au design soigné et
fonctionnel, à la qualité certaine et à même de résoudre de façon
brillante les problèmes liés aux applications où les systèmes
traditionnels montraient des performances inadaptées.
CLA 406A est un boîtier en multicouches de bouleau avec des
renforts structuraux à l'intérieur en métal, formé par 4 woofer
custom de 165mm et un driver à compression au néodyme au
grand format de 35mm avec bobine de 64mm pour une réponse en
fréquence qui va de 65Hz à 20kHz. Conçu spécialement pour ce
produit et optimisé avec des simulations selon la méthode des
éléments finis BEM, le guide d'onde a une dispersion horizontale de
100° et verticale de 25°, ainsi qu'une distorsion très réduite ; sa
dimension en hauteur permet le contrôle parfait vertical de toute la
portée de fonctionnement du driver et permet aussi d'associer deux
systèmes de façon cohérente bien au-delà de 18kHz.
CLA 406A a un module amplificateur sous pression en aluminium à
convection naturelle de 600W pour la section BF et de 300W pour la
section HF, en classe D avec alimentateur de type « switching ».
Le processeur DSP avec 8 presets et des algorithmes dernière
génération permet d'obtenir le son adéquat à toute condition
d'emploi ainsi qu'une grande réserve dynamique, ce qui assure le
plus de fiabilité des transducteurs et l'intégrité du signal reproduit.
Le boîtier est équipé de deux poignées en aluminium avec des
pièces en caoutchouc et 12 points d'ancrage.
On peut coupler deux diffuseurs avec des angles de 0° / 10° / 20°
par le biais d'un matériel en option. D'autres accessoires
permettent la suspension du système et la superposition au
subwoofer CLA 118SA.
CLA 118SA est un subwoofer en multicouches de bouleau avec
woofer B&C de 460mm en bass-reflex, équipé d'un grand évent
d'accord avec écoulement de l'air lamellaire afin de réduire plus que
possible les phénomènes de turbulence.
Pour ce modèle aussi le module amplificateur est sous pression en
aluminium à convection naturelle de 1200W en Classe D avec
alimentateur de type « switching » ; il présente aussi un processeur
DSP avec la fonction de filtrage, égalisation et protection.
Il a été conçu pour élargir les performances du CLA 406A, surtout
en cas de performances « live », où il sert de support et de base
pour la colonne CLA 406A.
Mit ihrem ausgearbeiteten Design und den Akustiklösungen wurde
die neue Serie VERTUS konzipiert, um die "True-Line-Array-
Technologie", welche einen nicht zu bestreitenden Erfolg im
Bereich des professionellen Audios erzielt hat, für neue
Anwendungsbereiche zu erweitern, sowohl in der Live-
Verwendung als in der festen Installation. Angeboten wird ein
kompaktes und elegantes Säulensystem, mit einem raffinierten
und funktionellen Design, einer kompromisslosen Qualität,
welches in der Lage ist, auf brillante Weise Anwendungen zu lösen,
in welchen die traditionellen Systeme unangemessene Leistungen
erbrachten.
CLA 406A ist eine Lautsprecherbox aus Birkenschichtholz mit
internen Konstruktionsverstärkungen aus Metall, bestehend aus 4
165mm-Custom-Woofern und Kompressionstreiber mit
großformatigem 35mm-Neodymmagnet mit 64mm-Spule für ein
Frequenzbereich, welches von 65Hz bis 20kHz reicht. Der
Wellenleiter, eigens für dieses Produkt konzipiert und mit
Simulationen optimiert, mit BEM-Elementen, hat eine horizontale
Streuung von 100° und eine vertikale Streuung von 25° und weist
eine sehr niedrige Verzerrung auf; die Höhenabmessung des
Wellenleiters ermöglicht eine optimale vertikale Kontrolle im
gesamten Funktionsbereich des Treibers und macht es möglich,
zwei Systeme auf kohärente Weise bis über 18kHz miteinander zu
verbinden.
CLA 406A besitzt ein 600W- Verstärkermodul aus Aluminium-
Druckguss mit Eigenkonvektion für den LF-Bereich und mit 300w
für den HF-Bereich, in der D-Klasse mit Switching-Netzgerät.
Der DSP Prozessor mit 8 Presets mit Algorithmen der neuesten
Generation macht es möglich, einen geeigneten Klang unter jeder
Benutzungsbedingung zu erhalten, und gewährleistet eine große
dynamische Reserve, indem er höchste Zuverlässigkeit der
Schallwandler und die Unversehrtheit des reproduzierten Signals
garantiert. Die Lautsprecherbox ist mit zwei Aluminiumgriffen mit
Gummi-Einsätzen und 12 Verankerungspunkten versehen.
Mithilfe der optionalen Hardware können zwei Lautsprecher im
Winkel von 0° / 10° / 20° kombiniert werden. Andere Zubehörteile
ermöglichen die Wandbefestigung des Systems und die
Überlagerung mit dem Subwoofer CLA 118SA.
CLA 118SA ist ein Subwoofer aus Birkenschichtholz mit 460mm-
B&C- Woofer im Bassreflex Design ausgestattet mit einem weiten
gestimmten Tiefenport mit laminarer Luftströmung zur
Reduzierung auf ein Minimum von Turbulenzphänomenen.
Auch bei diesem Modell ist das Verstärkermodul aus Aluminium-
Druckguss mit 1200W-Eigenkonvektion in der D-Klasse mit
Switching -Netzgerät; es verfügt über einen DSP Prozessor mit
Filter-, Equalize- und Schutzfunktion.
Konzipiert zur Erweiterung der Performance von CLA 406A vor
allem bei Live-Anwendungen, wo er als Stütze und Sockel für die
CLA 406A-Säule dient.
4

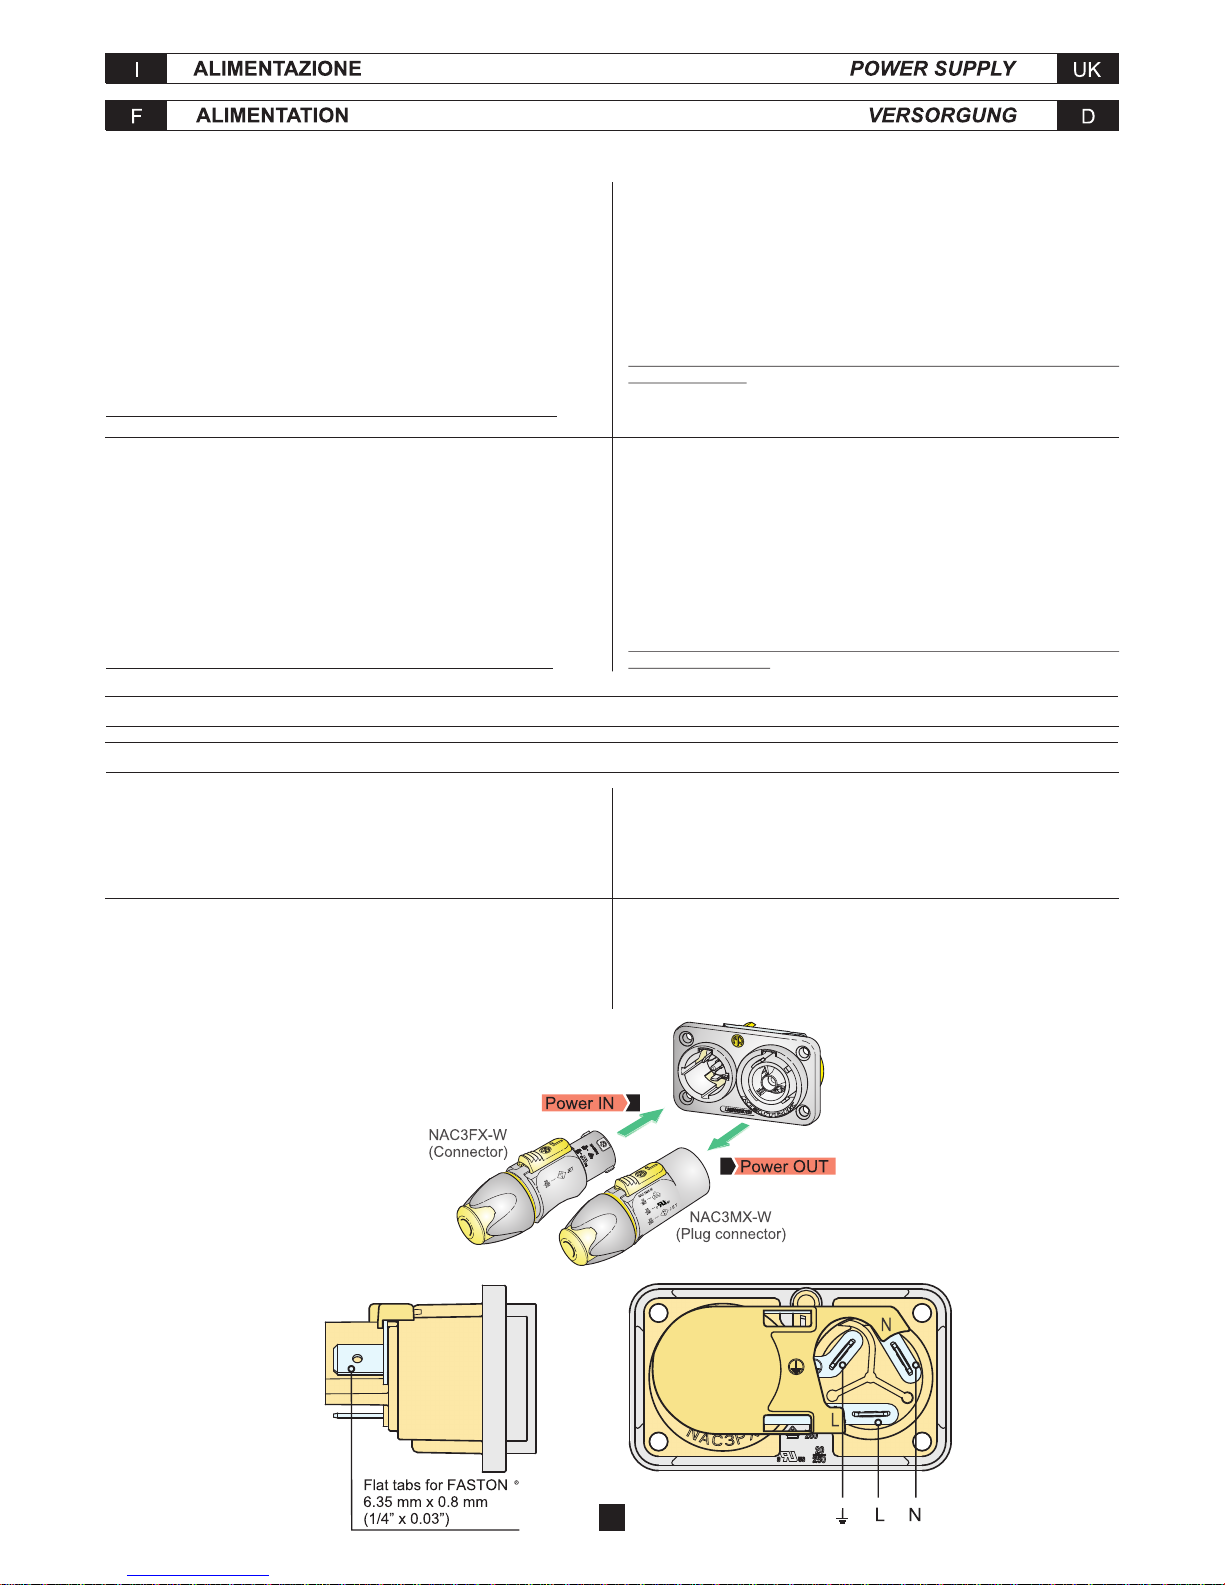
ALIMENTAZIONE 230V:
Per l'alimentazione elettrica il modello VERTUS CLA è fornito di una presa
Neutrik PowerCon cable duplex con ingresso ed uscita.
ATTENZIONE: non sostituire la spina in dotazione del cavo di alimentazione
con un'altra spina, in quanto il cavo di alimentazione è in grado di supportare
una corrente massima di 16A
ALIMENTAZIONE 120V:
Se la richiesta complessiva di corrente è inferiore a 15A utilizzare il cavo di
alimentazione in dotazione. Se la richiesta complessiva di corrente è
superiore a 15A ed inferiore a 20A utilizzare un cavo di alimentazione
AWG12 SJT VW1 con una spina di corrente nominale superiore o uguale a
30A.
IL CAVO E LA SPINA DEVONO ESSERE CERTIFICATI "UL" O "CSA"
POWER SUPPLY 230V:
For power supply VERTUS CLA model features a Neutrik PowerCon cable
duplex with input and output.
CAUTION: never replace the plug of the power cord supplied since the
power cord can only support a maximum current of 16A.
POWER SUPPLY 120V:
If the total current demand does not exceed 15A use the power cable
supplied. If the total current demand is between 15A and 20A user the power
cable
THE CABLE AND THE PLUG MUST HOLD THE "UL" OR "CSA"
CERTIFICATION.
AWG12 SJT VW1 with plug rated current equal or greater than 30A.
ALIMENTATION 230V:
Pour l'alimentation électrique la série VERTUS CLA est équipée de prise
Neutrik PowerCon cable duplex avec entrée et sortie.
ATTENTION: ne pas remplacer la fiche fournie du câble d'alimentation par
une autre fiche, puisque le câble d'alimentation est en mesure de soutenir
un courant maximum de 16A.
ALIMENTATION 120V:
Si la demande totale de courant ne dépasse pas 15A utiliser le câble
d'alimentation fourni. Si la demande totale de courant dépasse 15A mais
elle est inférieure à 20A utiliser un câble d'alimentation
LE CÂBLE ET LA FICHE DOIVENT ÊTRE CERTIFIÉS "UL" O "CSA"
AWG12 SJT VW1
avec une fiche au courant nominal supérieur ou égal à 30A.
STROMVERSORGUNG 230V:
Für die Stromversorgun sind die Modelle VERTUS CLA mit einem Stecker
Neutrik PowerCon cable duplex mit Ein-und Ausgang geliefert.
ACHTUNG: das mitgelieferte Kabel darf nur dann benutzt werden, wenn die
gesamte Stromaufnahme unter 16A liegt.
120V:
Ist die gesamte Stromanfrage unter 15A bitte das mitgelieferte
Versorgungskabel verwenden. Ist die gesamteStromanfrage über 15A aber
unter 20A ein Versorgungskabel
DAS KABEL UND DER STECKER MÜSSEN "UL" ODER "CSA"
ZERTIFIZIERT SEIN.
STROMVERSORGUNG
AWG12 SJT VW1 mit einem Stecker für
Nennstrom über oder gleich 30A verwenden.
OPERATING AND ASSEMBLY INSTRUCTION NAC3PX POWERCONUSO E ISTRUZIONI DI MONTAGGIO POWERCON NAC3PX
INSTALLATIONS-UND HINWEISE NAC3PX POWERCONUTILISATION ET INSTALLATION POWERCON NAC3PX
The "PowerCon True 1" system is certified as connector with breaking
capacity according IEC 60320, VDE 0625. It is intended for use as appliance
couplers and interconnection couplers. It serves to supply power to an
appliance and from an appliance to another equipment. To be installed by
qualified person only.
Il sistema "PowerCon True 1" è certificato come connettore con capacità di
interruzione in conformità alla norma IEC 60320, VDE 0625. È adatto per
collegamento di dispositivi e interconnessioni. Serve ad alimentare un
dispositivo, oppure a fornire alimentazione da un dispositivo ad un'altra
apparecchiatura. Dovrà essere installato esclusivamente da personale
qualificato.
Das System "PowerCon True 1" ist als Schaltnetzteil mit Schaltleistung in
Übereinstimmung mit IEC 60320, VDE 0625 zertifiziert. Es ist für die
Verwendung als Gerätestecker und als Netzweiterverbindung gedacht. Es
dient dazu, ein Gerät mit Strom zu versorgen und auch der
Stromversorgung von einem Gerät zu einer anderen Ausstattung. Es darf
nur von qualifiziertem Personal installiert werden.
Le système « PowerCon True 1 » est certifié comme connecteur avec
pouvoir de coupure selon les normes CEI 60320, VDE 0625. Il a été conçu
pour l'emploi en tant que connecteur d'appareils et connecteur
d'interconnexion. Il sert à alimenter un appareil en courant ou bien il permet
à un appareil d'alimenter un autre équipement. Il ne peut être installé que
par du personnel qualifié.
6

7
10°
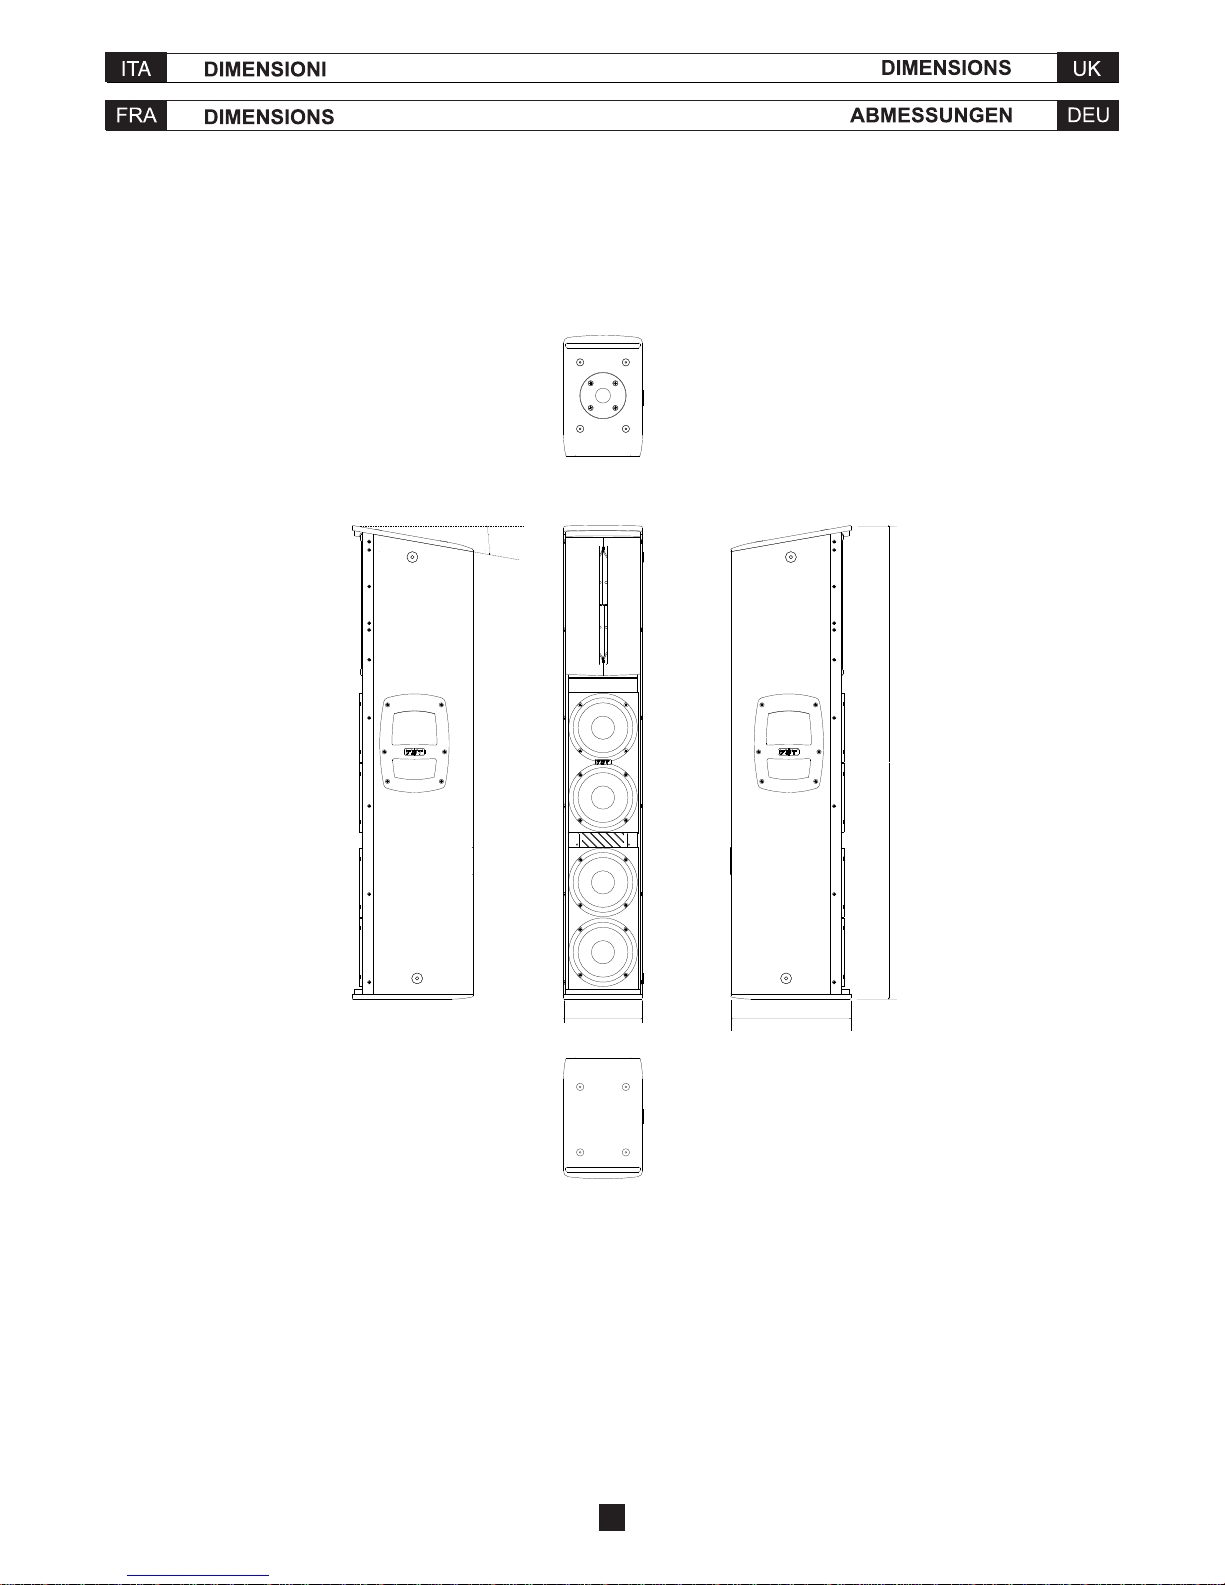
190mm / 7.48" 290mm / 11.41"
1140mm / 44.88"
8

555mm / 21.85"
572mm / 22.51"
555mm / 21.85"
660mm / 25.98"
9

PER LA SOSPENSIONE DEI MODELLI VERTUS UTILIZZARE
ESCLUSIVAMENTE I SUPPORTI DI FISSAGGIO DELLA FBT.
L'UTILIZZO DI ALTRI SUPPORTI DI FISSAGGIO PUÒ CAUSARE UNA
PERICOLOSA INSTABILITÀ CON POSSIBILI DANNI A PERSONE E
COSE.
THE VERTUS SPEAKERS USE ONLY WITH FBT MOUNT FOR WALL
INSTALLATION.
USE WITH OTHER MOUNTS IS CAPABLE OF RESULTING IN
INSTABILITY CAUSING POSSIBLE INJURY
PO UR LE FI XAGE D ES MO DÈL ES VE RTUS U TILIS ER
EXCLUSIVEMENT LES ÉTRIERS DE FBT.
L'USAGE D'AUTRES ÉTRIERS DE FIXATION PEUT PROVOQUER UNE
INSTABILITÉ DANGEREUSE EN CAUSANT D'ÉVENTUELS DÉGÂTS
MATÉRIAUX ET DES BLESSURES CORPORELLES.
FÜ R D IE WAND ISTALL ATION DE R M ODELL E V ERTU S
AUSSCHLIEßLICH DIE FBT-BEFESTIGUNGSBÜGEL.
DIE VERWENDUNG ANDERER BEFESTIGUNGSBÜGEL KANN ZU
EINER GEFÄHRLICHEN INSTABILITÄT MIT MÖGLICHEN PERSONEN
UND SACHSCHÄDEN FÜHREN.
VT-F 406
Flying bar CLA 406A
VT-S 0 406
Speaker stand h 0
VT-J 406
Joint bar CLA 118SA with CLA 406A
VT-S 30 406
Speaker stand h 30cm
KBW-1004S
4 Wheels Kit with brake 100 mm ø
10

L'installazione dei diffusori acustici VERTUS, impiegando gli accessori di
sospensione descritti nel presente manuale e le specifiche istruzioni di
montaggio, dovrà essere eseguita esclusivamente da personale qualificato
nel pieno rispetto delle regole e degli standard di sicurezza in vigore nel
paese in cui avviene l'installazione.
Gli accessori di sospensione sono costruiti per l'uso esclusivo con i sistemi
VERTUS e non sono stati progettati per l'uso in combinazione ad alcun altro
diffusore o dispositivo.
Ogni elemento del soffitto, pavimento o altro supporto in cui venga installato
o appeso un sistema VERTUS deve essere in grado di supportare il carico in
piena sicurezza.
Gli accessori di sospensione utilizzati devono essere agganciati e fissati in
sicurezza sia al diffusore che al soffitto o ad altro supporto. Quando si
montano componenti su soffitti, pavimenti o travi, assicurarsi sempre che
tutti i sistemi di aggancio e di fissaggio siano di dimensioni e di capacità di
carico appropriate.
Tutti i diffusori appesi in teatri, palasport o altri luoghi di lavoro e/o
intrattenimento, oltre al sistema di sospensione principale, devono essere
provvisti di un sistema di sicurezza secondario indipendente e di capacità di
carico adeguata; esclusivamente possono essere usati come sicurezza
secondaria cavi di acciaio e catene di costruzione a capacità di carico
certificata.
VERTUS sound speakers must be installed using the flying accessories
described in this manual and following the special assembly instructions by
qualified staff only, strictly complying with the current regulations and safety
standards in force in the country of installation.
FBT flying accessories are manufactured for their exclusive use with
VERTUS systems and have not been designed for being used with any
other speaker or device.
Any possible elements of the ceiling, floor or further supports where
VERTUS systems are to be installed shall be able to safety bear the load.
The flying accessories in use are to be coupled and secured safety to both
the sound speaker and the ceiling ( or the other support ).
When components are fitted to ceilings, floors or beams, always make sure
that all couplers and fixing elements are properly sized and have an
adequate load capacity.
Besides the main suspension system, all flying speakers in theatres, indoor
stadiums or in several other work and/or leisure facilities shall be provided
with an additional independent safety system with the adequate load
capacity. Only steel cables and chains with certified load capacity can be
used as an additional safety device.
L'installation des diffuseurs acoustiques VERTUS en utilisant les
accessoires de suspension décrits dans ce manuel et les instructions de
montage spécifiques, ne devra être effectuée que par du personnel qualifié
dans le respect des règles et des normes de sécurité en vigueur dans la
pays où cette installation a lieu.
Les accessoires de suspension FBT sont construits pour l'emploi axclusif
avec des systèmes VERTUS et ils n'ont pas été conçus pour l'emploi avec
d'autres diffuseurs ou dispositifs.
Chaque élément du plafond, du sol ou d'autres supports où l'on effectue
l'installation ou la suspension d'un système VERTUS doit être capable de
supporter la charge en toute sécurité.
Les accessoires de suspension utilisés doivent être ancrés et fixés en
sécurité aussi bien au diffuseur acoustique qu'au plafond ou à un autre
support.
Lorsqu'on monte des composants sur des plafonds, des sols ou des
poutres, vérifier toujours que tous les systèmes d'ancrage et de fixage
présentent des dimensions et des capacités de charge adéquates.
En plus du système de suspension principal, tous les diffuseurs suspendus
dans des théâtres, des palais des sports ou dans d'autres endroits de travail
et/ouv de divertissement doivent être équipés d'un système de sécurité
secondaire indépendant et ayant une capacité de charge adéquate. On ne
peut employer que des câbles en acier et des chaÎnes de construction ayant
une capacité de charge certifiée en tant que système de sécurité
secondaire.
Die Installierung der Lautsprecher VERTUS darf nur von fachkundigem
Personal unter uneingeschränkter Wahrung der im Installationsland
geltenden Regeln und Sicherheitsstandards durchgeführt werden, indem
das im Handbuch beschriebene Aufhängezubehör verwendet wird und die
spezifischen Montageanleitungen befolgt werden.
Das Aufhängezubehör FBT ist für die ausschließliche Benutzung mit den
VERTUS Systemen konstruiert und nicht für die Benutzung mit anderen
Lautsprechern oder Vorrichtungen entworfen.
Jedes Element der Decke, des Bodens oder der sonstigen Halterung, wo
ein VERTUS System installiert oder aufgehangen wird, muss geeignet sein,
um die Last bei voller Sicherheit zu tragen. Das benutzte Aufhängezubehör
muss in voller Sicherheit am Lautsprecher, sowohl als auch an der Decke
oder sonstigen Halterung angeklinkt sein.
Ve rg ew is sern Sie sich i mm er, da ss all e Kupplungs-und
Befestigungssysteme angemessene Ausmaße und geeignete
Tragfähigkeit haben, wenn die Komponenten an Decken, Balken oder auf
Böden montiert werden.
Alle Lautsprecher, die in Theater, Sporthallen oder weiteren Arbeits-und
Vergnügungsorten aufgehangen sind, müssen außer mit dem
Haupthängesystem mit angemessener Tragfähigkeit ausgestattet sein. Als
sekundäre Sicherheit dürfen nur Stahldrahtseile un Bauketten mit
bescheinigter Tragfähigkeit angewendet werden.
La FBT elettronica SpA non è responsabile di eventuali
danni a persone o cose in caso di mancato rispetto delle
presenti indicazioni o mancata verifica del fattore di
sicurezza di tutti gli elementi coinvolti nella
sospensione del sistema.
FBT accepts no responsibility for any damage to people
or objects if these instructions are not complied with or
if the safety factor of all elements related to system
suspension are not properly checked.
La FBT n'est responsable d'éventuels dégâts matériaux
ni de blessures corporelles en cas de non respect de ces
indications ou de non vérification du facteur de sécurité
de tous les éléments impliqués dans la suspension du
système.
FBT haftet nicht für etwaige Personen-oder
Sachschaden, falls diese Hinweise nicht beobachtet
werden oder falls die Prüfung des Sicherheitsfaktors für
alle im Hängesystem beteiligten Elemente fehlt.
11
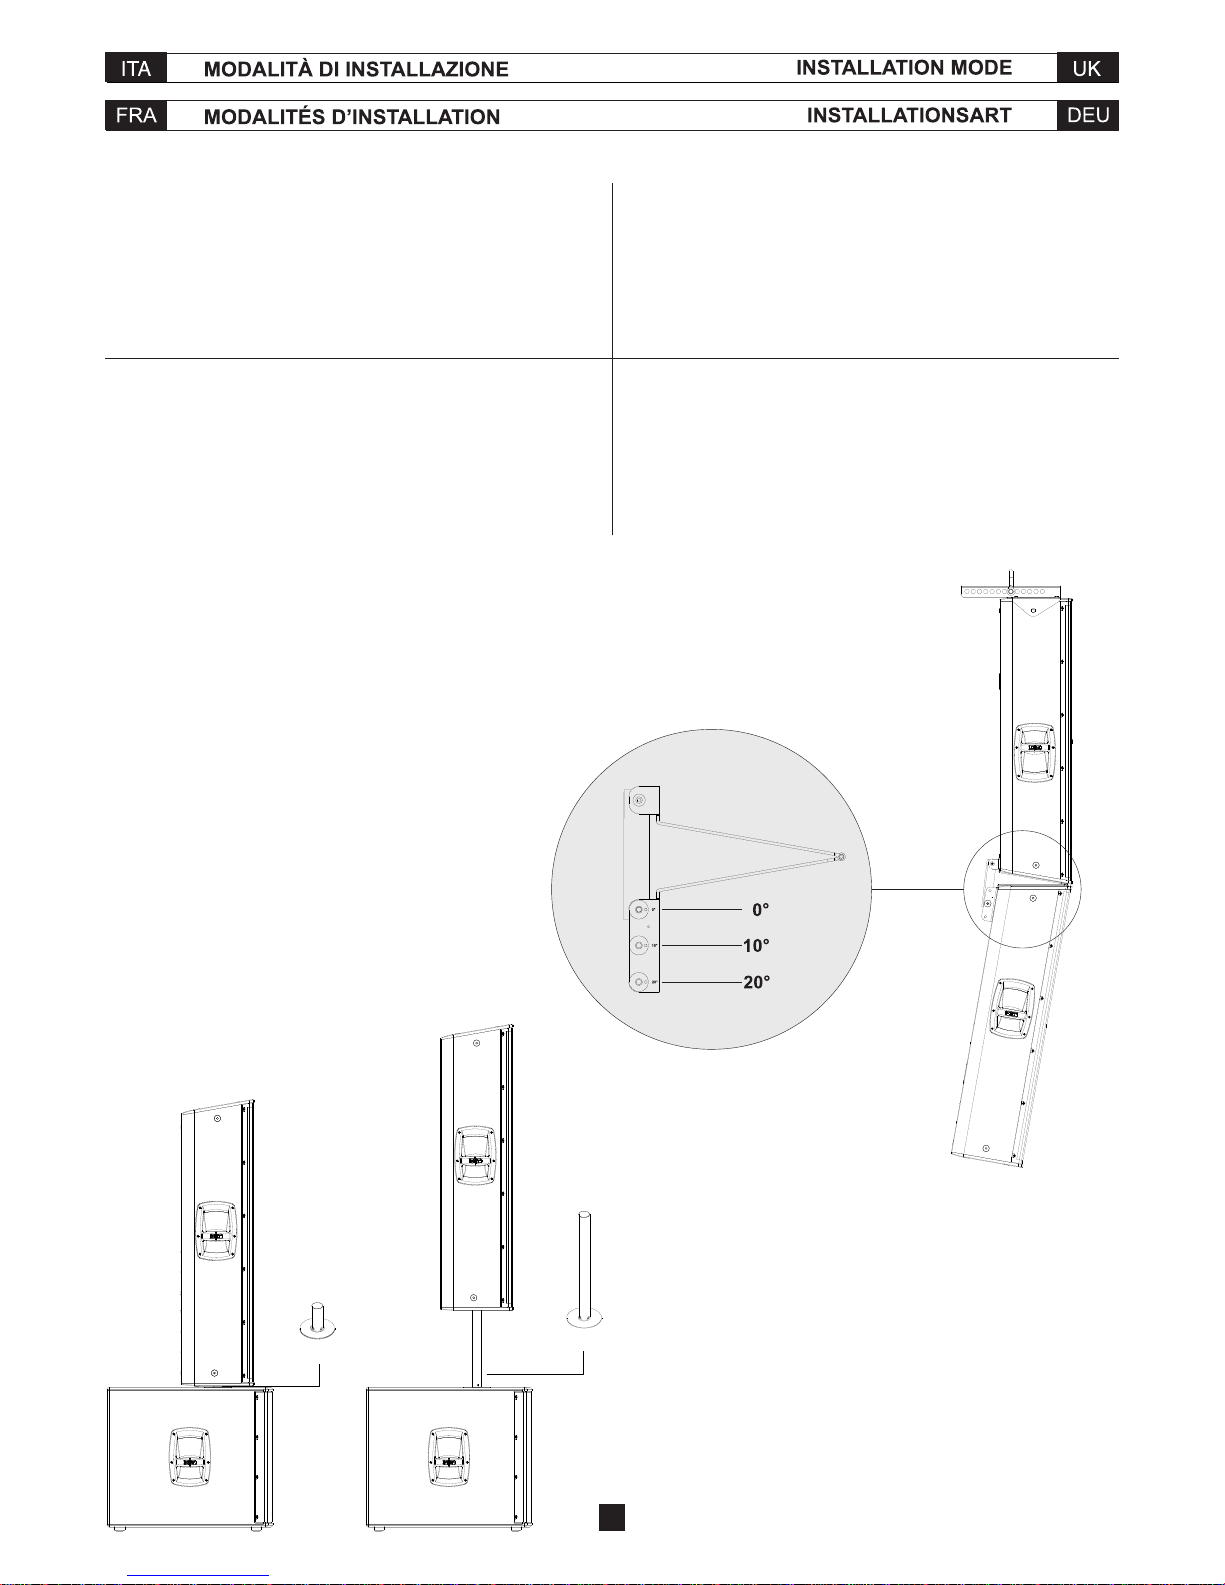
I diffusori della serie VERTUS possono essere installati nei seguenti modi:
- Sospensione in array tramite flying bar
- Posizionamento a stack mediante stativo, con subwoofer a terra e satellite
ATTENZIONE: Selezionare con cura l'area dove installare i diffusori e
assicurarsi che la struttura sia adeguata a supportare il peso dei diffusori.
Nel caso di installazione con subwoofer a terra posizionare il sistema su una
superficie piana e non sdrucciolevole.
The speakers included in VERTUS series can be installed in the following
ways:
- Suspended array installation by flying bar
- Stack installation through pole mounting, with subwoofer on the floor and
satellite
WARNING: Carefully select the area where to install the speakers and make
sure that the structure is adequate to support the weight of boxes. When the
subwoofer is installed on the ground position the system on a flat and non-
slip surface.
Les diffuseurs de la série VERTUS peuvent être installés des façons
suivantes:
- Suspension en array par barre de suspension
- Placement au sol par statif, avec subwoofer par terre et satellite
ATTENTION: Choisir soigneusement l'endroit où installer les haut-parleurs
et s'assurer que la structure est suffisante pour supporter le poids des
boîtes. Dans le cas de l'installation d'un caisson d'extrêmes graves sur le sol
placer le système sur une surface plane et non glissante.
Die Lautsprecher der Serie VERTUS können in den folgenden Arten
installiert werden:
- Aufhängung im Array mittels Fly Bar
- Aufstellung übereinander mit Stativ, mit Subwoofer am Boden und Satellit
ACHTUNG: Den Bereich, wo die Lautsprecher zu installieren sind,
sorgfältig auswählen um und sicherstellen, dass die Struktur geeignet ist,
um das Gewicht der Box zu stützen. Im falle der Installation mit Subwoofer
auf dem Boden, das System auf einer flachen und nicht rutschbaren
Oberfläche positionieren.
VT-J 406
VT-J 406
VT-S 30 406
VT-S 0 406
12

FISSAGGIO DELLA FLYING BAR VT-F 406
FIXATION DE LA BARRE DE SUSPENSION VT-F 406
FISSAGGIO DELLA JOINT BAR VT-J 406
FIXATION DE LA BARRE D'ASSEMBLAGE VT-J 406
INSTALLATION OF FLYING BAR VT-F 406
BEFESTIGUNG DER FLY BAR VT-F 406
INSTALLATION OF JOINT BAR VT-J 406
BEFESTIGUNG DER JOINT BAR VT-J 406
13

IN
LINK
PRESET
LEVEL
GND
LIFT
HP
FILT.
OFF ON
OFF ON PEAK
ON
+6dB
0
0
0
1
2
3
45
6
7
8
DO NOT EXCEED RATED MAX CURRENT DRAW FROM AC LOOP OUTPUT CONNECTOR
POWER
CONSUMPTION: 640W
AC LOOP OUT
220-230V 50/60Hz
13.2A max
AC INPUT
220-230V 50/60Hz
2.8A max
All accessories are
specifically rated in
a g r e e m e n t w i t h
s t r u c t u r a l
computations. Never
use other accessories
when assembling the
cabinets than the ones
provided by FBT; FBT
w i l l d e c l i n e
responsibility over the
entire accessories
range if any component
is purchased from a
different supplier.
MADE IN ITALY
CAUTION
TO PREVENT THE RISK
OF FIRE OR ELECTRIC
SHOCK NEVER EXPOSE
THIS EQUIPMENT
TO RAIN OR MOISTURE
RISK OF ELECTRIC
SHOCK DO NOT OPEN
8
A
M
P
HF LEVEL
LMT
PRT
VERTUS CLA 406A
SINGLE:
1-Ground/Sub Stack
2-Hung
GROUND ARRAY:
3-Straight
4-Curved 10°
5-Curved 20°
HUNG ARRAY:
6-Straight
7-Curved 10°
8-Curved 20°
HF LEVEL: Questo controllo corrisponde ad un filtro
HI-SHALVING ed ha lo scopo di ottenere una risposta
in frequenza dell'intero sistema la più omogenea
possibile in tutta l'area di ascolto. Il controllo HF
LEVEL è molto utile e può essere usato in due modi:
AMPLITUDE SHADING: in genere i diffusori in alto
vengono impostati con HF LEVEL a "+dB", quelli
centrali a "0dB" e quelli in basso (più vicini
all'audience) a "-dB"; questo per compensare
l'attenuazione atmosferica delle onde acustiche che,
ad alta frequenza, è considerevole; ed anche per
evitare di dare disagio agli spettatori più vicini al
sistema con una eccessiva energia delle frequenze
acute.
IN ABBINAMENTO AL PRESET: permette di ottenere
il bilanciamento timbrico desiderato.
LEVEL: regola il livello generale del segnale.
PRESET: seleziona 8 preset ad ognuno dei quali
corrisponde una configurazione del sistema in base
al numero di diffusori impiegati e alla loro
angolazione.
GND LIFT: interruttore per la separazione elettrica tra
il circuito di massa e il circuito di terra, onde evitare
possibili "loop" di massa, causa di fastidiosi ronzii.
ON: indica l'attivazione del sistema.
HP FILTER: interruttore per l'attivazione del
dispositivo di filtro low-cut che lascia passare in uscita
solo le frequenze più alte della "frequenza di taglio".
PEAK: l'accensione del led indica che il livello del
segnale è prossimo alla saturazione.
LMT/PRT: l'accensione del led indica il
malfunzionamento del sistema dovuto ad un guasto
dell'amplificatore interno o all'intervento dei circuiti di
limitazione per evitare sovraccarico termico.
IN-LINK: prese di ingresso/uscita bilanciate; "IN"
consente il collegamento di un segnale
preamplificato come, ad esempio, quello in uscita da
un mixer; "LINK" permette il collegamento di più
diffusori con lo stesso segnale.
HF LEVEL:
LEVEL: It adjusts the signal general level.
PRESET: to choose among 8 presets each one
corresponding to a system configuration according to
the number of speakers in use, and to their angle.
GND LIFT: A switch for the electric separation
between the ground and earth circuits; this can be
useful in order to remove the irritating noises caused
by ground loops.
ON: Indicates that the system is on.
HP FILTER: this switch activates the low-cut filter
which lets only the frequencies above the cut-off
frequency pass at the output
PEAK: When this LED lights up, it indicates that the
signal is reaching saturation.
LMT/PRT: If this LED lights up, there is a system
malfunction due to an internal amplifier failure or to
the intervention of current limiting circuits against
thermal overload.
IN-LINK: Balanced input/output sockets; “IN” allows
to connect a pre-amplified signal such as that coming,
for instance, from mixer output. “LINK” allows to
connect multiple speakers to the same signal.
this control corresponds to a HI
SHELVING filter, aimed to provide the system with a
frequency response as even as possible through the
whole listening area. The HF LEVEL control is
extremely useful and can be used in two ways:
AMPLITUDE SHADING: top speakers are generally
configured with the HF LEVEL set at "+dB", whereas
central ones are generally set at "0dB" and bottom
ones - closer to the audience - at "-dB"; this serves to
compensate for the atmospheric attenuation of
acoustic waves, which is significant at high
frequencies. It is also used to avoid discomfort for
those people in the audience standing close to the
system, which may be due to the extremely high
energy of treble frequencies.
TOGETHER WITH THE PRESET: can adjust the
balance of tones.
HF LEVEL: Questo controllo corrisponde ad un filtro HI-
SHALVING ed ha lo scopo di ottenere una risposta in
frequenza dell'intero sistema la più omogenea possibile
in tutta l'area di ascolto. Il controllo HF LEVEL è molto
utile e può essere usato in due modi:
AMPLITUDE SHADING: in genere i diffusori in alto
vengono impostati con HF LEVEL a "+dB", quelli centrali
a "0dB" e quelli in basso (più vicini all'audience) a "-dB";
questo per compensare l'attenuazione atmosferica delle
onde acustiche che, ad alta frequenza, è considerevole;
ed anche per evitare di dare disagio agli spettatori più
vicini al sistema con una eccessiva energia delle
frequenze acute.
LEVEL: : Il règle le niveau général du signal.
PRESET: on sélectionne 8 presets et chacun d'entre eux crée une
configuration du système selon le nombre de diffuseurs utilisés et leur
angulation.
GND LIFT: : Interrupteur pour la coupure électrique entre le circuit de masse
et le circuit de terre afin d'éviter de possibles « boucles » de masse, qui
causent des bourdonnements ennuyeux.
ON: : Il indique l'activation du système.
HP FILTER: interrupteur pour l'activation du dispositif de filtre "low cut" qui
laisse sortir seulement les fréquences dépassant la " fréquence de coupure
".
PEAK: : L'allumage de cette del indique que le niveau du signal est proche
de la saturation.
LMT/PRT: L'allumage de la del indique le mauvais fonctionnement du
système à cause d'une panne de l'amplificateur interne ou de l'intervention
des circuits de limitations pour éviter une surcharge thermique.
IN-LINK: Prises d'entrée/sortie équilibrées ; « IN » permet la connexion d'un
signal pré-amplifié comme par exemple le signal de sortie d'un mélangeur ;
« LINK » permet la connexion de plusieurs diffuseurs avec le même signal.
HF LEVEL: Questo controllo corrisponde ad un filtro HI-
SHALVING ed ha lo scopo di ottenere una risposta in
frequenza dell'intero sistema la più omogenea possibile
in tutta l'area di ascolto. Il controllo HF LEVEL è molto
utile e può essere usato in due modi:
AMPLITUDE SHADING: in genere i diffusori in alto
vengono impostati con HF LEVEL a "+dB", quelli centrali
a "0dB" e quelli in basso (più vicini all'audience) a "-dB";
questo per compensare l'attenuazione atmosferica delle
onde acustiche che, ad alta frequenza, è considerevole;
ed anche per evitare di dare disagio agli spettatori più
vicini al sistema con una eccessiva energia delle
frequenze acute.
LEVEL: Regelt den allgemeinen Pegel des Signals.
PRESET: wählt 8 Presets aus; jedem von diesen entspricht eine
Systemkonfiguration auf der Grundlage der verwendeten
Lautsprecheranzahl und deren Winkelausrichtung.
GND LIFT: Schalter zur elektrischen Trennung von Masse- und Erdkreis zur
Vermeidung möglicher Masse-LOOPS mit störendem Brummen.
ON: Zeigt die Einschaltung des Systems an.
HP FILTER: Schalter für die Einschaltung des Low-Cut-Filters, der im
Ausgang nur die höchsten Frequenzen der "Trennfrequenz" durchlässt.
PEAK: Das Aufleuchten dieser Led zeigt an, dass sich der Signalpegel der
Sättigung nähert.
LMT/PRT: Das Aufleuchten dieser Led zeigt eine Fehlfunktion des Systems
an, auf Grund eines Ausfalls des internen Verstärkers oder wegen der
Sicherung, um thermische Überladung zu vermeiden.
IN-LINK: Symmetrierte Ein-/Ausgangsbuchsen; „IN“ ermöglicht den
Anschluss eines vorverstärkten Signals, wie das aus einem Mixer; „LINK“
ermöglicht den Anschluss mehrerer Lautsprecher mit demselben Signal.
14

ON
GND
LIFT PHASE
180˚
0˚
+6dB
0
0
0
0
0.5
11.5 22.5
3
3.5
PRESETLEVEL
DELAY
mt.
1
2
3
45
6
7
8
IN LINK
PEAK
OFF
ON
TO PREVENT THE RISK OF FIRE OR ELECTRIC
SHOCK NEVER EXPOSE THIS EQUIPMENT
TO RAIN OR MOISTURE
RISK OF ELECTRIC SHOCK DO NOT OPEN
CAUTION
MADE IN ITALY
8
A
M
P
DO NOT EXCEED RATED MAX CURRENT DRAW FROM AC LOOP OUTPUT CONNECTOR
POWER
CONSUMPTION: 640W
AC LOOP OUT
220-230V 50/60Hz
13.2A max
AC INPUT
220-230V 50/60Hz
2.8A max
All accessories are specifically rated in
agreement with structural computations.
Never use other accessories when
assembling the cabinets than the ones
provided by FBT; FBT will decline
responsibility over the entire accessories
range if any component is purchased from a
different supplier.
LMT
PRT
VERTUS CLA 118SA
2-Deep
3-Punch
4-DJ
CARDIOID REAR:
5-Original
6-Deep
7-Punch
8-DJ
1-Original
DELAY: controllo di una linea di ritardo digitale che agisce sul segnale di
ingresso; in questo modo è possibile compensare il disallineamento sul
piano verticale di sub e satellite. Il delay è espresso in metri e va da 0.5 a 3.5
metri a passo di 50cm.
LEVEL: regola il livello generale del segnale.
PRESET: seleziona 8 preset ad ognuno dei quali corrisponde una
configurazione di diffusori, in base alle preferenze personali e all'acustica
dell'ambiente di ascolto.
GND LIFT: interruttore per la separazione elettrica tra il circuito di massa e il
circuito di terra, onde evitare possibili "loop" di massa, causa di fastidiosi
ronzii.
ON: indica l'attivazione del sistema.
PHASE: il controllo "fase" consente di ottimizzare l'allineamento di fase,
cioè di ottenere una risposta in frequenza uniforme nella zona di incrocio tra
sub e satellite. Nella posizione "0°" l'emissione sonora del sub è in fase con il
segnale di ingresso; nella posizione "180°" l'emissione sonora è in contro-
fase con il segnale di ingresso; questo controllo consente di ottenere
ulteriore flessibilità nella messa a punto del subwoofer ottimizzandone le
prestazioni.
PEAK: l'accensione del led indica che il livello del segnale è prossimo alla
saturazione.
LMT/PRT: l'accensione del led indica il malfunzionamento del sistema
dovuto ad un guasto dell'amplificatore interno o all'intervento dei circuiti di
limitazione per evitare sovraccarico termico.
IN-LINK: prese di ingresso/uscita bilanciate; "IN" consente il collegamento
di un segnale preamplificato come, ad esempio, quello in uscita da un mixer;
"LINK" permette il collegamento di più diffusori con lo stesso segnale.
DELAY:
LEVEL: It adjusts the signal general level.
PRESET: Selects 8 presets, each of whom corresponds to a specific
speaker configuration according to users' personal preferences and to the
acoustics of the listening area
GND LIFT: A switch for the electric separation between the ground and
earth circuits; this can be useful in order to remove the irritating noises
caused by ground loops.
ON: Indicates that the system is on.
PHASE: The Phase control allows to optimize phase alignment, i.e. to
obtain a uniform frequency response in the crossover area between the sub
and the satellite. When it is set at 0°, the sound emission is in phase with the
input signal; when it is set at 180° the sound emission is in counterphase
with the input signal; thanks to this control, subwoofer adjustment will be
even more flexible with a consequent performance optimization.
PEAK: When this LED lights up, it indicates that the signal is reaching
saturation.
LMT/PRT: If this LED lights up, there is a system malfunction due to an
internal amplifier failure or to the intervention of current limiting circuits
against thermal overload.
IN-LINK: Balanced input/output sockets; “IN” allows to connect a pre-
amplified signal such as that coming, for instance, from mixer output. “LINK”
allows to connect multiple speakers to the same signal.
Control of a digital delay line acting on the input signal; in this way it
is possible to make up for the vertical misalignment of sub and satellite. The
Delay is expressed in metres and goes from 0.5 to 3.5 m with 50cm steps.
DELAY: Contrôle d'une ligne de retard numérique qui agit sur le signal
d'entrée ; de cette façon on peut compenser le désalignement sur le plan
vertical du sub et du satellite. Le délai est indiqué en mètres et va de 0,5 à
3,5 mètres à pas de 50cm.
LEVEL: : Il règle le niveau général du signal.
PRESET: Il sélectionne 8 presets, dont chacun correspond à une
configuration de diffuseurs spécifique, selon les préférences personnelles
et l'acoustique de l'environnement d'écoute
GND LIFT: : Interrupteur pour la coupure électrique entre le circuit de masse
et le circuit de terre afin d'éviter de possibles « boucles » de masse, qui
causent des bourdonnements ennuyeux.
ON: : Il indique l'activation du système.
PHASE: Le contrôle Phase permet d'optimiser l'alignement de phase, c'est-
à-dire d'obtenir une réponse en fréquence uniforme dans la zone de
croisement entre sub et satellite. Dans la position 0° l'émission sonore du
sub est en phase avec le signal d'entrée ; dans la position 180° l'émission
sonore est en opposition de phase avec le signal d'entrée ; ce contrôle
permet d'obtenir plus de flexibilité dans la mise au point du subwoofer en
optimisant ses performances.
PEAK: : L'allumage de cette del indique que le niveau du signal est proche
de la saturation.
LMT/PRT: L'allumage de la del indique le mauvais fonctionnement du
système à cause d'une panne de l'amplificateur interne ou de l'intervention
des circuits de limitations pour éviter une surcharge thermique.
IN-LINK: Prises d'entrée/sortie équilibrées ; « IN » permet la connexion d'un
signal pré-amplifié comme par exemple le signal de sortie d'un mélangeur ;
« LINK » permet la connexion de plusieurs diffuseurs avec le même signal.
DELAY:
LEVEL: Regelt den allgemeinen Pegel des Signals.
PRESET: : Zur Auswahl der 8 Voreinstellungen, die jeweils einer
Lautsprecherkonfiguration entsprechen, bezüglich der individuellen
Vorlieben und der Akustik des Hörbereichs
GND LIFT: Schalter zur elektrischen Trennung von Masse- und Erdkreis zur
Vermeidung möglicher Masse-LOOPS mit störendem Brummen.
ON: Zeigt die Einschaltung des Systems an.
PHASE: Die Phasenkontrolle erlaubt, die Phasensteuerung zu optimieren,
d.h., eine einheitliche Frequenzantwort im Kreuzungsbereich zwischen Sub
und Satellit zu erhalten. Auf 0°-Stellung findet die Schallemission des
Subwoofers gleichphasig zum Eingangssignal statt; auf 180° findet die
Schallemission gegenphasig zum Eingangssignal statt. Diese Regelung
ermöglicht noch mehr Flexibilität beim Einregulieren des Subwoofers und
somit optimierte Leistungen.
PEAK: Das Aufleuchten dieser Led zeigt an, dass sich der Signalpegel der
Sättigung nähert.
LMT/PRT: Das Aufleuchten dieser Led zeigt eine Fehlfunktion des Systems
an, auf Grund eines Ausfalls des internen Verstärkers oder wegen der
Sicherung, um thermische Überladung zu vermeiden.
IN-LINK: Symmetrierte Ein-/Ausgangsbuchsen; „IN“ ermöglicht den
Anschluss eines vorverstärkten Signals, wie das aus einem Mixer; „LINK“
ermöglicht den Anschluss mehrerer Lautsprecher mit demselben Signal.
Für die Kontrolle einer digitalen Verzögerungsleitung, die auf das
Eingangssignal wirkt; auf diese Weise ist es möglich, die Sub-Satellite-
Abweichung in der vertikalen Ebene zu kompensieren. Das Delay ist in
Metern angegeben und reicht von 0.5 bis 3.5 Metern in 50 cm-Schritten.
15

Per la scelta dei preset è essenziale conoscere il numero dei diffusori da
configurare ed il tipo di installazione. Al crescere degli elementi dell'array le
frequenze basse si sommano in qualsiasi direzione essendo i singoli moduli
poco direzionali a queste frequenze. A frequenze alte invece il singolo
diffusore è molto direttivo e di fatto l'interazione tra i diffusori è molto bassa.
Ogni preset corrisponde ad una diversa curva di equalizzazione allo scopo
di ottenere sempre una risposta in frequenza neutra e bilanciata
all'aumentare dei diffusori presenti nell'array, compensando questo
fenomeno.
Ovviamente ad ogni configurazione del sistema dovrebbe corrispondere
una precisa curva di equalizzazione per avere esattamente la stessa
risposta nel punto di ascolto.
Ad ogni gruppo di configurazioni è associato un preset; essendo i preset in
numero limitato ciò inevitabilmente introduce delle zone di confine dove
entrambi i preset adiacenti possono essere impostati per avere il massimo
dalle prestazioni del sistema.
Per questo l'utilizzatore deve considerare il settaggio del preset un
suggerimento del produttore, un punto di partenza, senza limitare la
sperimentazione. Dato che le configurazioni possibili del sistema e gli
ambienti da sonorizzare sono infiniti, sta sempre all'utilizzatore la scelta del
preset più opportuno.
Il settaggio del preset può essere utilizzato anche come una sorta di
controllo di tono con qualsiasi configurazione utilizzata, in modo che se il
bilanciamento tonale del diffusore sembra inadeguato con il preset
suggerito, è consigliabile provare tutti i preset in abbinamento ad HF LEVEL
per trovare il miglior risultato.
For preset choice users must know the number of speakers to be
configured. As the number of array elements increases, bass frequencies
add up in all directions, since single modules are not directional at these
frequencies. At high frequencies, instead, each speaker is extremely
directional and, actually, there is poor interaction between speakers.
Each preset corresponds to a different equalisation curve in order to obtain a
constantly flat and balanced frequency response as the number of speakers
included in the array increases, compensating for this change.
Obviously, each system configuration should correspond to a specific
equalisation curve in order to obtain the same response in a certain listening
point.
Since the number of presets is limited, each group of configurations is
associated to a preset.This necessarily creates a border zone where both
adjacent presets can be set to obtain the best system performance.
This is why users shall consider preset settings as a suggestion by the
manufacturer, a starting point, not a limit to their experiments. Since there
are infinite possible system configurations and environments where sound
can be spread, choosing the best preset will be the responsibility of the user.
Presets can also be used for tone control, whichever the actual
configuration: if loudspeaker tone balance is not correct for the suggested
preset, try all presets related to the HF LEVEL to obtain the best result.
Pour le choix des presets, il faut connaître le nombre de diffuseurs à
configurer et le type d'installation. Si les éléments de l'array augmentent, les
fréquences basses s'ajoutent dans n'importe quelle direction puisque
chaque module n'est que peu lié à ces fréquences. En cas de fréquences
hautes, par contre, chaque diffuseur est très directionnel et donc
l'interaction entre les diffuseurs est très basse.
Chaque preset correspond à une courbe d'égalisation différente afin de
toujours obtenir une réponse en fréquence neutre et équilibrée par rapport à
l'augmentation des diffuseurs dans l'array, en compensant ce phénomène.
C'est évident qu'à chaque configuration du système on devrait avoir une
courbe d'égalisation précise afin d'obtenir exactement la même réponse au
point d'écoute.
Puisque le nombre des presets est limité, un preset a été associé à chaque
groupe de configurations. Cela implique qu'il y a des zones de frontière où
les deux presets proches peuvent être réglés pour obtenir le plus de
performance du système.
Pour cette raison, l'utilisateur doit tenir compte de la configuration du preset
en tant que conseil du producteur, point de départ, sans aucune limitation de
l'expérimentation. Étant donné que les configurations possibles du système
et les environnements à sonoriser sont infinis, c'est toujours l'utilisateur qui
doit choisir le preset le plus adéquat.
La configuration du preset peut être utilisée aussi en tant que moyen de
contrôle de tonalité pour tout genre de configuration, et donc si le
balancement de la tonalité du diffuseur semble inadéquat au preset
conseillé, on recommande de tester tous les presets associés à HF LEVEL
pour trouver le résultat meilleur.
Bei der Auswahl der Presets ist es von wesentlicher Bedeutung, dass man
die Anzahl der zu konfigurierenden Lautsprecher und die Installationsart
kennt. Bei Zunahme der Array-Elemente summieren sich die niedrigen
Frequenzen in jeder Richtung, da die einzelnen Module bei diesen
Frequenzen wenig gerichtet sind. Bei hohen Frequenzen ist der einzelne
Lautsprecher sehr gerichtet und in der Tat ist die Wechselwirkung zwischen
den Lautsprechern sehr niedrig.
Jede Preset entspricht einer unterschiedlichen Entzerrungskurve, damit
immer ein neutraler und ausgewogener Frequenzbereich erreicht wird im
Falle der Zunahme der im Array vorhandenen Lautsprecher, wodurch
dieses Phänomen kompensiert wird.
Natürlich müsste jeder Systemkonfiguration eine präzise Entzerrungskurve
entsprechen, damit man dieselbe Rückgabe im Hörbereich erzielt.
Da die Presets in begrenzter Anzahl vorhanden sind, wurde jeder
Konfigurationsgruppe ein Preset zugeordnet. Dies führt unvermeidlich in
die Grenzbereiche, wo beide aneinandergrenzenden Presets eingestellt
werden, um ein Maximum der Systemleistungen zu erzielen.
Aus diesem Grund hat der Benutzer die Einstellungen der Presets als eine
Empfehlung des Herstellers, als einen Ausgangspunkt zu betrachten, ohne
sich bei m Experimentieren einschränken zu lassen. Angesichts dessen,
dass die möglichen Systemkonfigurationen und die zu vertonenden
Umgebungen unendlich viele sind, liegt die angebrachteste Auswahl der
Presets stets beim Benutzer.Die Einstellung der Presets kann auch als eine
Art von Tonsteuerung bei jeder verwendeten Konfiguration benutzt werden,
so dass, sollte der Tonausgleich des Lautsprechers mit der empfohlenen
Preset inadäquat zu sein scheint , es sich empfiehlt, alle Presets in
Kombination mit HF LEVEL auszuprobieren, um das beste Ergebnis zu
finden.
10
8
6
4
2
0
-2
-4
-6
-8
-10
dBR
100 Hz 200 500 1k 2k 5k 10k 20k
PRESET FREQUENCY RESPONSE (Ref. to preset 1)
18
15
12
9
6
3
0
-3
-6
-9
-12
-15
-18
dBSPL
200 Hz 500 1k 2k 5k 10k 20k
HF LEVEL FREQUENCY RESPONSE
HF 0dB
16

VERTUS
CLA 406A
SINGLE:
1-Ground/Sub Stack
2-Hung
GROUND ARRAY:
3-Straight
4-Curved 10°
5-Curved 20°
HUNG ARRAY:
6-Straight
7-Curved 10°
8-Curved 20°
VERTUS
CLA 118SA
2-Deep
3-Punch
4-DJ
CARDIOID REAR:
5-Original
6-Deep
7-Punch
8-DJ
1-Original
17

con 2 sub;
FRONT
REAR
FRONT
REAR
FRONT FRONT REAR FRONT
18
Preset
CARDIOID REAR
ORIGINAL (5)
Preset
ORIGINAL (1)
CONFIGURAZIONI CARDIOIDI CARDIOID CONFIGURATIONS
CONFIGURATIONS CARDIOÏDES KARDIOIDE KONFIGURATIONEN
This manual suits for next models
1
Other Fbt Speakers manuals


Fbt
Fbt X PRO 115 A User manual

Fbt
Fbt Maxx 4a User manual

Fbt
Fbt HiMaxX 40 User manual

Fbt
Fbt Audio Contractor Studio Pro 9 B User manual

Fbt
Fbt PSR 230 User manual

Fbt
Fbt rhox CS4100/EN Series User manual

Fbt
Fbt Maxx 6a User manual

Fbt
Fbt STUDIO 2 BT User manual

Fbt
Fbt PSR 212m User manual

Fbt
Fbt Canto 8CA User manual


