FEC PP-9635 User manual

Service Manual
Model: PP-9635
Last Modified: 2017/1/13

1
This document is copyrighted, © 2017. All rights are reserved. Firich Enterprises
Co., Ltd. reserves the right to make changes to the product described in this
manual at any time without notice. No part of this manual may be reproduced,
copied, translated, or transmitted in any form or by any means without the prior
written permission from Firich Enterprise Co., Ltd. Information provided in this
manual is intended to be accurate and reliable. Firich Enterprise Co., Ltd. assumes
no responsibility for its use, nor for any infringements upon the rights of third parties,
which may result from its use.
Revision
Date
Name
Description
1.1
01-13-2017
Yu-Ting Kao
Initial Release

2
Table of Contents
Basic Information 3-4
Technical Support 3
Regulatory 4
Safety Precautions 4
Quick Start Guide 5-6
Package opening 5
Accessory Box (Standard) 6
System Specifications 7-10
Overview 7
Physical 8
System Specifications 9
I/O Interface & Options 10
Setting Up 11-27
Installing Windows 10 Enterprise 11
Installation Sequence for Windows 10 Enterprise 11
Intel J1900 Chipset Utilities 12
Audio Driver 13
Realtek LAN Driver 14
Intel Graphic Driver 15
Intel TXE Driver 16
Intel TXE Update 17
USB 3.0 Driver 18
ELO TouchKit Tools Installation 19-23
EETI TouchKit 24-25
EETI TouchKit Control Panel 26
Wireless LAN Driver for Windows 27
How to Guide 28-37
How to Install the Base 28
How to Replace the Storage Device 29
How to Install the Cable Cover 30
How to Open the PPC 31
How to Remove the Motherboard 32
How to Adjust Display Brightness 33
How to Install an ID Device (MSR / iButton / RFID / FingerPrint) 34
How to Install the Integrated Customer Display (VFD & LCM) 35
How to Install the 2nd Display 36
How to Setup the Cash Drawer 37
Motherboard Specification & BIOS Guide 38
Motherboard Specification 43-44
Motherboard Connectors 45-50
BIOS Guide 61-82
BIOS UI Introduction 61-79
Update BIOS Version Instructions 80-81
BIOS Setting Requirements 82
Troubleshooting 83-88
Service Parts List 89-103
Service Parts List by Category 104-116
LED Panel 104
Touch 105
Touch & Panel 106-107
IO 108-111
Stand 112-113
Packing 114-115
3
Basic Information
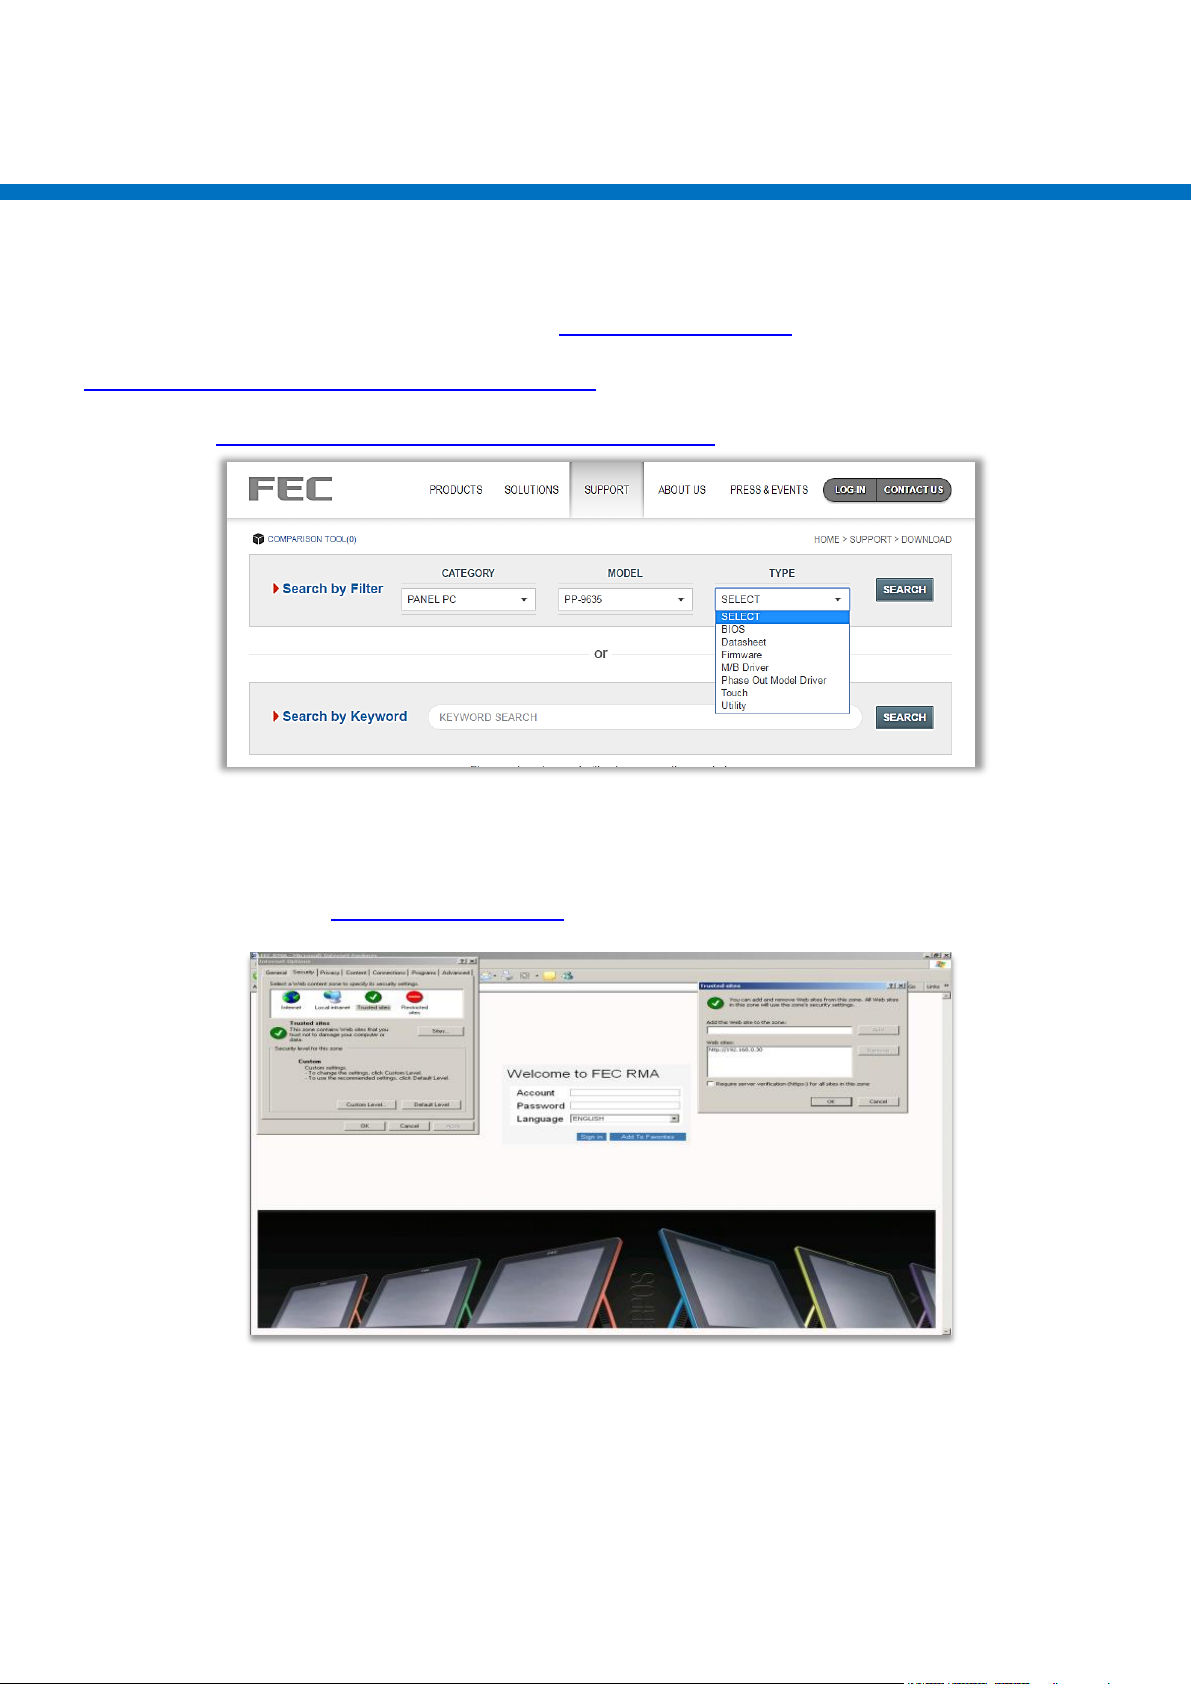
Technical Support
Locate the latest support items on our website:
http://www.fecpos.com/en-global/ams/Download
If you are a partner of FEC, you will be able to obtain an login and password to access more
information: http://www.fecpos.com/en-global/member/login
RMA
If you are an FEC direct partner and you do NOT have a eRMA account, send an email to our

4
Regulatory
Standard(s)
EN 55022: 2010 +AC: 2011 Class B
AS/NZS CISPR 22:2009+A1:2010Class B
CISPR 22:2008Class B
EN55024: 2010
EN61000-3-2: 2006 +A1: 2009 +A2: 2009 Class D
EN 61000-3-3: 2013
Authorized under Declaration of Conformity according to 47 CFR, Part 2 and Part 15 of the FCC Rules. The product
listed in the follows was (were) tested in the BTL EMC Laboratory to comply with the criteria limits Class B of
conducted and radiated emissions of the Technical Standards FCC Part 15, Subpart B, established by the FCC, USA.
Standard(s)
FCC Part 15, Subpart B: 2013
ANSI C63.4-2009
ICES-003 Issue 5: 2012
CISPR 22: 2008
CAN/CSA-CISPR 22-10
Safety Precautions
1. Disconnect the equipment from AC outlet before cleaning.
Use only moist cloth (with water). Do not use detergent.
2. Power outlet must be easily accessible and near the equipment.
3. Keep the equipment away from humid and dusty environment.
4. Place the equipment on a stable surface during installation and operation.
5. Do not place any load on the power cord.
6. All cautions and warnings on the equipment should be noted.
7. When the equipment is not in use, disconnect it from the power source to avoid damage by
transient over-voltage.
8. Liquid into the equipment may cause fire or electrical shock.
9. Only qualified service personnel should be allowed to open the equipment.
10. If any of the following situations arises, ask service personnel to check the equipment:
A. Power cord / plug is damaged
B. Liquid penetrates into the equipment
C. The equipment does not function properly and/or cannot work according to the User Manual
D. The equipment has been dropped
E. The equipment shows signs of damage
11. Temperature below -20°C (-4°F) or above 60°C (140°F) may damage the equipment
5
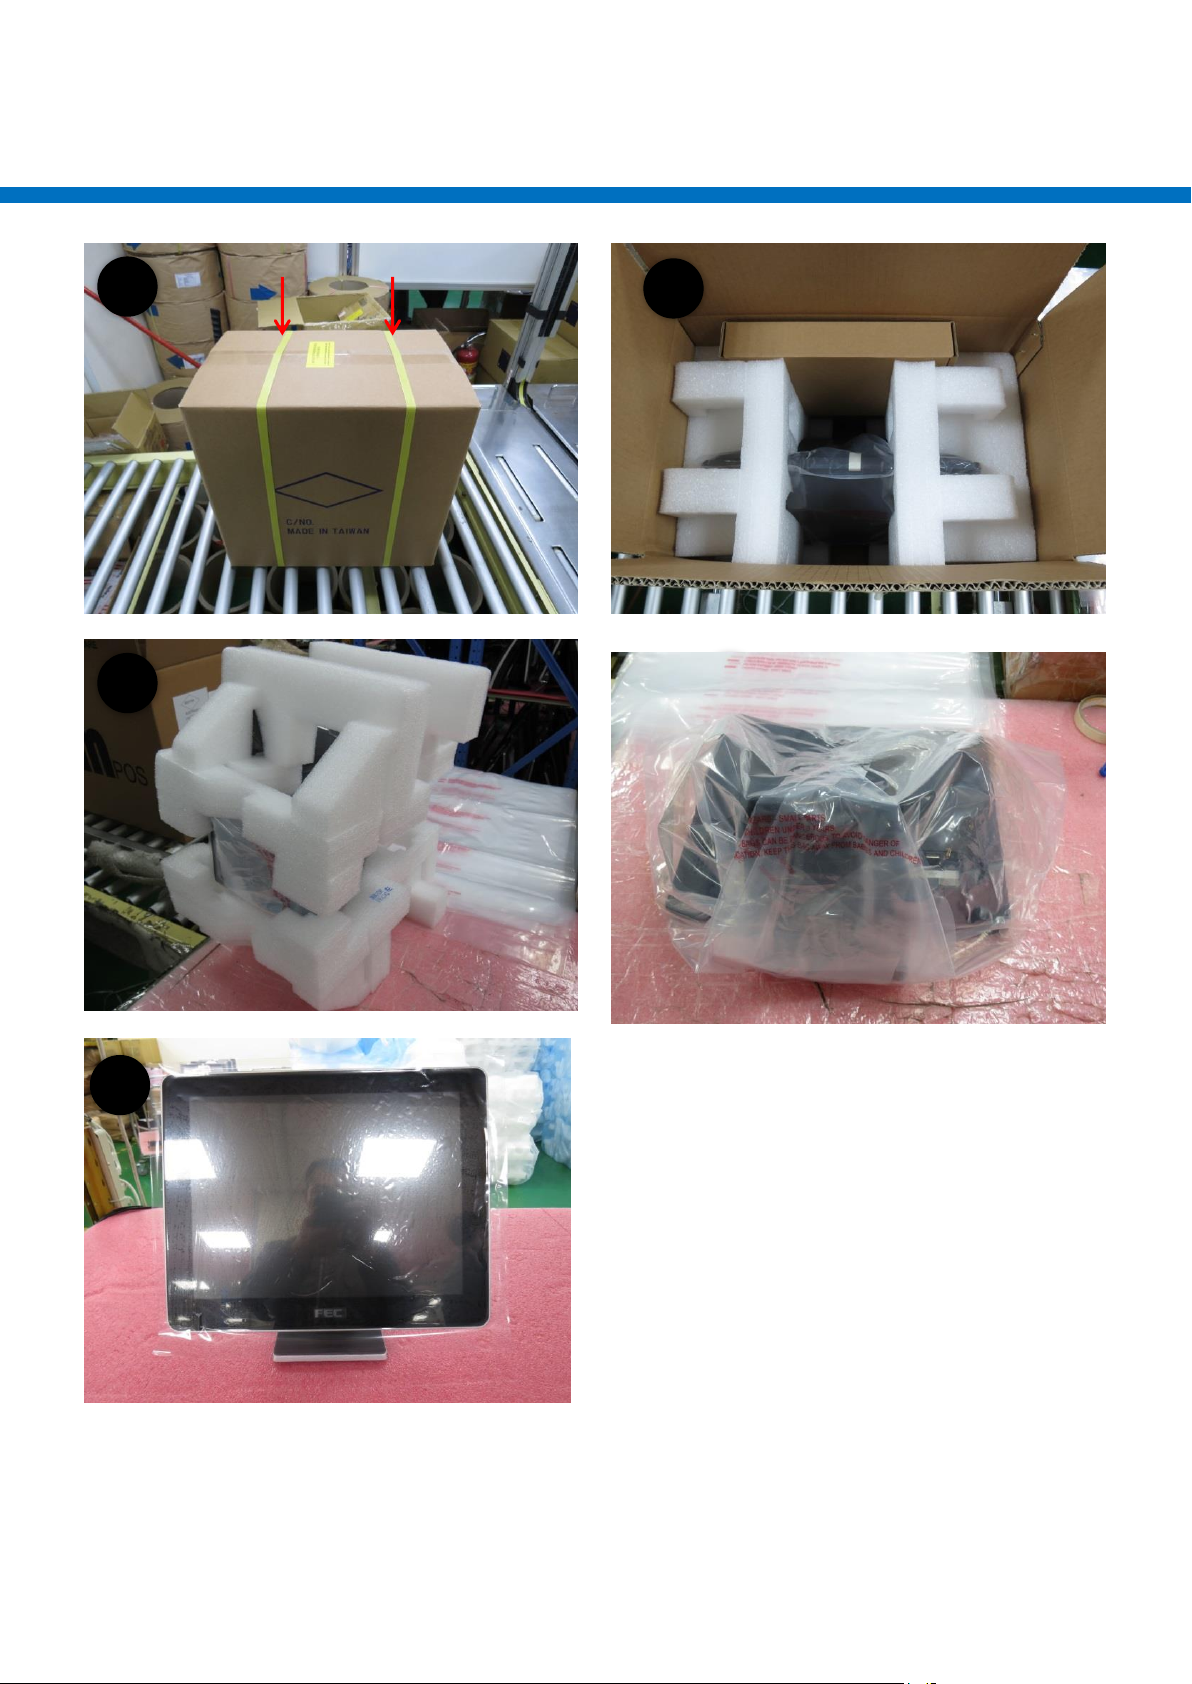
Package Opening
Tools Needed: Utility knife or Scissors
1. Cut the packaging tape and bands
2. Locate the accessory box and remove it
from the package
3. Place PP-9635 on a flat cushioned surface
and remove the styrofoam
4. Place PP-9635 face down; cut through the
tape and remove it from the bag
5. Remove the screen protector
4
5
2
1
3
5
6
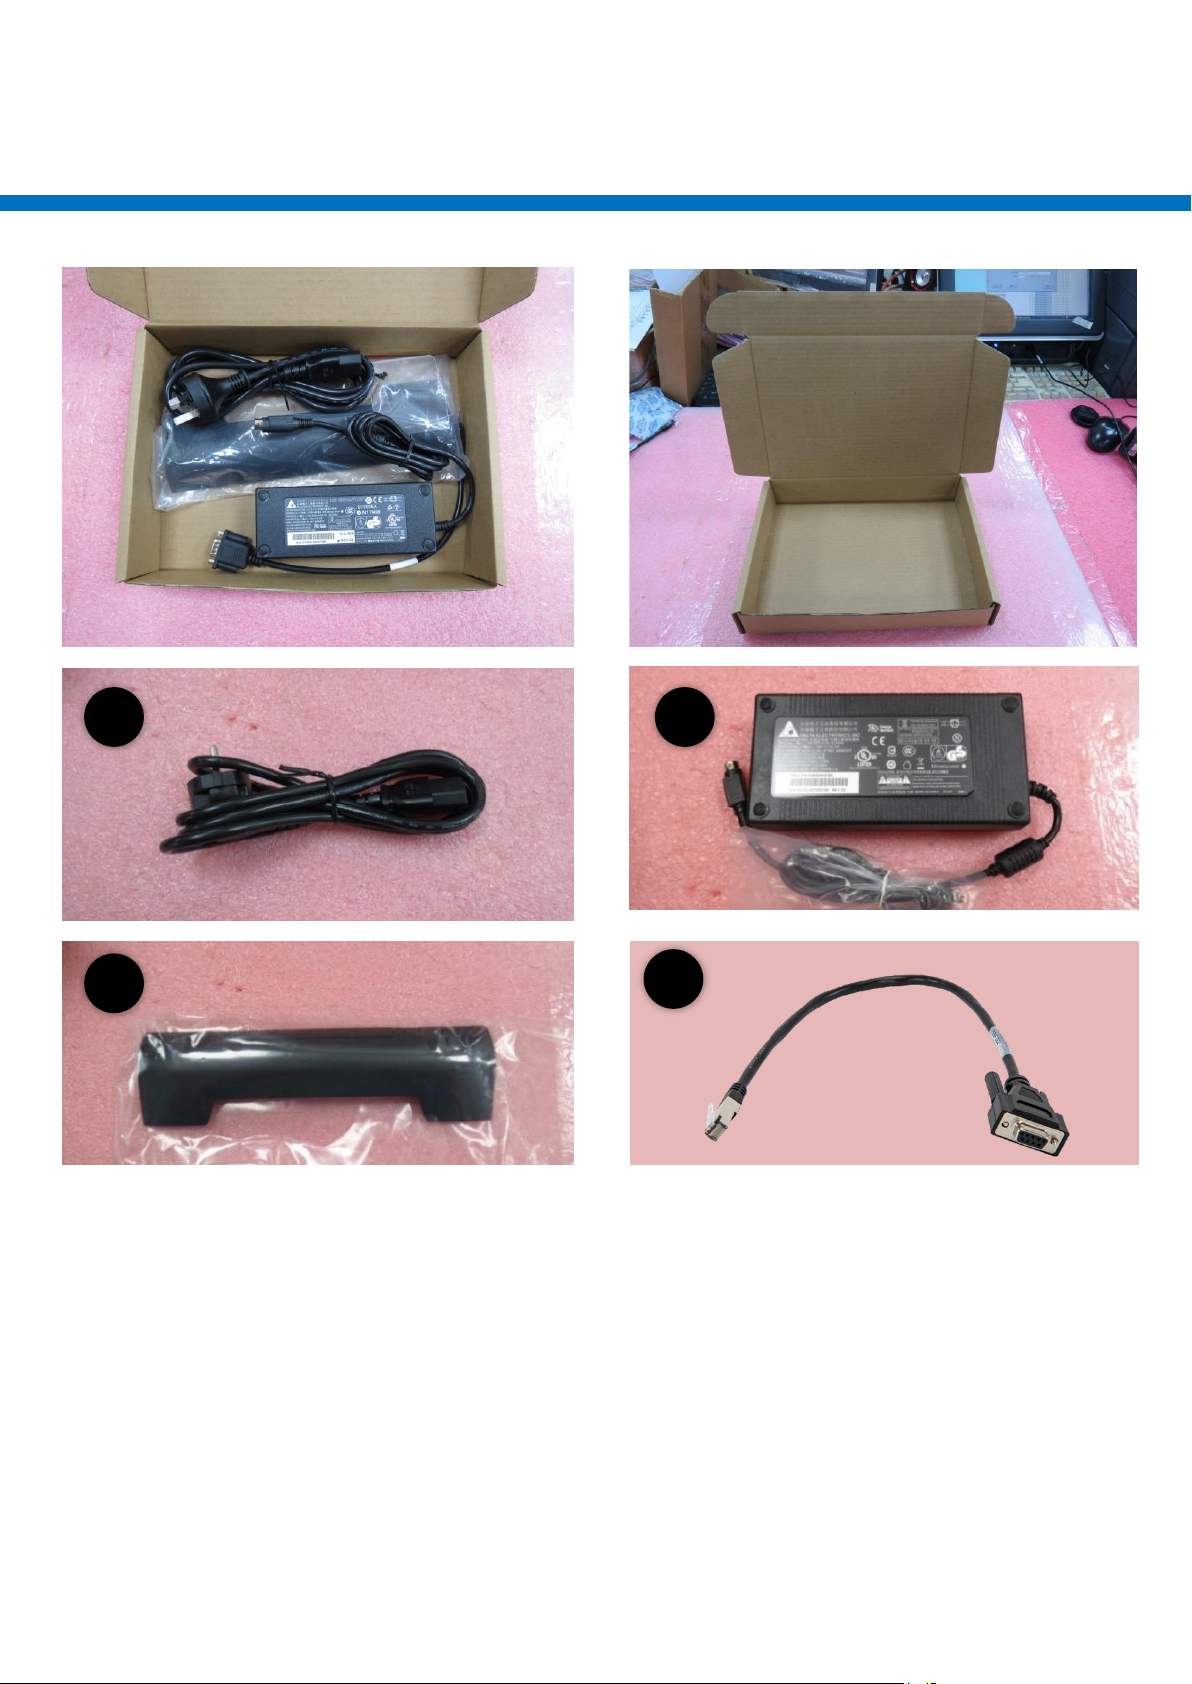
Accessory Box (Standard)
Standard items included in the accessory box includes:
1. Power Cord x 1
2. Adaptor x 1
3. Cable Cover x 1
4. RJ45 to DB9 Cable x 1
1
2
3
4

7
Overview
Power Switch (LED)
HDD Indicator
15inch PCAP
Touch Display
Integrated Customer
Display
2.5” SATA Storage
Stand
Speaker
Add-on Device
MSR, iButton,
Fingerprint
Reader

8
Physical
Dimension
Display Tilt Angle
70°
90°

9
System Specifications
PP-9635
Platform
Processor
Intel Celeron Quad Core J1900 CPU 2.0~2.4Ghz
Memory
1 x 2GB 204-pin DDR3L Standard ; Maximum 8GB
Power Supply
90W / 150W
Display
15” (4 : 3)
Brightness / MTBF
300nits / 50,000 Hours (Based on 25°C Environment)
Touch
Display
Resistive w/ Bezel, Resistive w/o Bezel, P-CAP w/o Bezel
Storage
1 x 2.5” SATA HDD slot
Power
90 / 150W
Stand (Optional)
Standard Stand (Single Hinge)
Stand (Dual Hinge)
Speaker
Internal Speakers 2W x 2
VFD
20 x 2 (9mm / 12v / character mode)
LCM
20 x 2 (9mm / 12v / character mode)
240 x 64 (9mm / 12v / graphic mode)
20 x 2 (5mm / 5v / character mode)
Second Display
15” Pole type or Integrated type
Other Options
MSR reader, RFID reader, Fingerprint scanner, I-button Reader
Table of contents
Other FEC Touch Panel manuals

Popular Touch Panel manuals by other brands


IBASE Technology
IBASE Technology ASTUT-152-RE1S user manual

YASKAWA
YASKAWA TP 610C manual

B&R
B&R Power Panel C Series user manual

Beijer Electronics
Beijer Electronics X2 control Hardware and installation manual

AXIOMTEK
AXIOMTEK GOT321W-521 user manual

TRIDONIC.ATCO
TRIDONIC.ATCO x-touchBOX Operation manual


