Feider Machines FSP182A User manual

1
ORIGINAL INSTRUCTIONS
MINI CIRCULAR SAW CORDLESS
FSP182A
INSTRUCTION MANUAL
BUILDER SAS
32, rue Aristide Bergès -ZI 31270 Cugnaux –France
IMPORTANT: Please read the instruction manual before using.

2
ORIGINAL INSTRUCTIONS
Technical Data
Rated Voltage
20V d.c.
No-load Speed
4500/min ±10%
Max. Cutting
Capacity
@ 90o
42.8mm (1-11/16”)
@ 45o
28mm (1-1/8”)
Saw Blade Diameter
115mm (4-1/2”)
Sound power level
LWA: 97 dB(A) KWA:3 dB(A)
Sound pressure level
LpA:86 dB(A) KpA:3 dB(A)
Vibration
ahW=4,03 m/s² K = 1,5 m/s²
Information:
- That the declared vibration total value(s) and the declared noise emission
value(s) have been measured in accordance with a standard test method
and may be used for comparing one tool with another;
- That the declared vibration total value(s) and the declared noise emission
value(s) may also be used in a preliminary assessment of exposure.
Warning
- That the vibration and noise emissions during actual use of the power tool
can differ from the declared values depending on the ways in which the tool
is used especially what kind of workpiece is processed; and

3
ORIGINAL INSTRUCTIONS
-of the need to identify safety measures to protect the operator that are
based on an estimation of exposure in the actual conditions of use (taking
account of all parts of the operating cycle such as the times when the tool is
switched off and when it is running idle in addition to the trigger time).
General power tool safety warnings
WARNING Read all safety warnings, instructions, illustrations and
specifications provided with this power tool. Failure to follow all instructions
listed below may result in electric shock, fire and/or serious injury.
Save all warnings and instructions for future reference.
The term "power tool" in the warnings refers to your mains-operated (corded) power
tool or battery-operated (cordless) power tool.
1) Work area safety
a) Keep work area clean and well lit.Cluttered or dark areas invite accidents.
b) Do not operate power tools in explosive atmospheres, such as in the
presence of flammable liquids, gases or dust. Power tools create sparks which
may ignite the dust or fumes.
c) Keep children and bystanders away while operating a power tool.
Distractions can cause you to lose control.
2) Electrical safety

4
ORIGINAL INSTRUCTIONS
a) Power tool plugs must match the outlet. Never modify the plug in any way.
Do not use any adapter plugs with earthed (grounded) power tools.
Unmodified plugs and matching outlets will reduce risk of electric shock.
b) Avoid body contact with earthed or grounded surfaces, such as pipes,
radiators, ranges and refrigerators. There is an increased risk of electric shock if
your body is earthed or grounded.
c) Do not expose power tools to rain or wet conditions. Water entering a power
tool will increase the risk of electric shock.
d) Do not abuse the cord. Never use the cord for carrying, pulling or
unplugging the power tool. Keep cord away from heat, oil, sharp edges or
moving parts. Damaged or entangled cords increase the risk of electric shock.
e) When operating a power tool outdoors, use an extension cord suitable for
outdoor use. Use of a cord suitable for outdoor use reduces the risk of electric
shock.
f) If operating a power tool in a damp location is unavoidable, use a residual
current device (RCD) protected supply. Use of an RCD reduces the risk of
electric shock.
3) Personal safety
a) Stay alert, watch what you are doing and use common sense when
operating a power tool. Do not use a power tool while you are tired or under
the influence of drugs, alcohol or medication. A moment of inattention while
operating power tools may result in serious personal injury.

5
ORIGINAL INSTRUCTIONS
b) Use personal protective equipment. Always wear eye protection. Protective
equipment such as a dust mask, non-skid safety shoes, hard hat or hearing
protection used for appropriate conditions will reduce personal injuries.
c) Prevent unintentional starting. Ensure the switch is in the off-position
before connecting to power source and/or battery pack, picking up or
carrying the tool. Carrying power tools with your finger on the switch or energising
power tools that have the switch on invites accidents.
d) Remove any adjusting key or wrench before turning the power tool on. A
wrench or a key left attached to a rotating part of the power tool may result in
personal injury.
e) Do not overreach. Keep proper footing and balance at all times. This
enables better control of the power tool in unexpected situations.
f) Dress properly. Do not wear loose clothing or jewellery. Keep your hair and
clothing away from moving parts. Loose clothes, jewellery or long hair can be
caught in moving parts.
g) If devices are provided for the connection of dust extraction and collection
facilities, ensure these are connected and properly used. Use of dust collection
can reduce dust-related hazards.
h) Do not let familiarity gained from frequent use of tools allow you to become
complacent and ignore tool safety principles. A careless action can cause
severe injury within a fraction of a second.
4) Power tool use and care

6
ORIGINAL INSTRUCTIONS
a) Do not force the power tool. Use the correct power tool for your application.
The correct power tool will do the job better and safer at the rate for which it was
designed.
b) Do not use the power tool if the switch does not turn it on and off. Any
power tool that cannot be controlled with the switch is dangerous and must be
repaired.
c) Disconnect the plug from the power source and/or remove the battery pack,
if detachable, from the power tool before making any adjustments, changing
accessories, or storing power tools. Such preventive safety measures reduce
the risk of starting the power tool accidentally.
d) Store idle power tools out of the reach of children and do not allow persons
unfamiliar with the power tool or these instructions to operate the power tool.
Power tools are dangerous in the hands of untrained users.
e) Maintain power tools and accessories. Check for misalignment or binding
of moving parts, breakage of parts and any other condition that may affect
the power tool’s operation. If damaged, have the power tool repaired before
use. Many accidents are caused by poorly maintained power tools.
f) Keep cutting tools sharp and clean. Properly maintained cutting tools with
sharp cutting edges are less likely to bind and are easier to control.
g) Use the power tool, accessories and tool bits etc. in accordance with these
instructions, taking into account the working conditions and the work to be
performed. Use of the power tool for operations different from those intended could
result in a hazardous situation.

7
ORIGINAL INSTRUCTIONS
h) Keep handles and grasping surfaces dry, clean and free from oil and
grease. Slippery handles and grasping surfaces do not allow for safe handling and
control of the tool in unexpected situations.
5) Battery tool use and care
a) Recharge only with the charger specified by the manufacturer.A charger
that is suitable for one type of battery pack may create a risk of fire when used with
another battery pack.
b) Use power tools only with specifically designated battery packs. Use of any
other battery packs may create a risk of injury and fire.
c) When battery pack is not in use, keep it away from other metal objects, like
paper clips, coins, keys, nails, screws or other small metal objects, that can
make a connection from one terminal to another.Shorting the battery terminals
together may cause burns or a fire.
d) Under abusive conditions, liquid may be ejected from the battery; avoid
contact. If contact accidentally occurs, flush with water. If liquid contacts
eyes, additionally seek medical help.Liquid ejected from the battery may cause
irritation or burns.
e) Do not use a battery pack or tool that is damaged or modified.Damaged or
modified batteries may exhibit unpredictable behaviour resulting in fire, explosion or
risk of injury.
f) Do not expose a battery pack or tool to fire or excessive temperature.
Exposure to fire or temperature above 130 °C may cause explosion.
NOTE the temperature „130 °C“can be replaced by the temperature „265 °F“.

8
ORIGINAL INSTRUCTIONS
g) Follow all charging instructions and do not charge the battery pack or tool
outside the temperature range specified in the instructions. Charging
improperly or at temperatures outside the specified range may damage the battery
and increase the risk of fire.
6) Service
a) Have your power tool serviced by a qualified repair person using only
identical replacement parts. This will ensure that the safety of the power tool is
maintained.
b) Never service damaged battery packs. Service of battery packs should only be
performed by the manufacturer or authorized service providers.
Safety instructions for all saws
Cutting procedures
a) DANGER: Keep hands away from cutting area and the blade. Keep your
second hand on auxiliary handle, or motor housing. If both hands are holding
the saw, they cannot be cut by the blade.
b) Do not reach underneath the workpiece. The guard cannot protect you from
the blade below the workpiece.
c) Adjust the cutting depth to the thickness of the workpiece. Less than a full
tooth of the blade teeth should be visible below the workpiece.
d) Never hold the workpiece in your hands or across your leg while cutting.
Secure the workpiece to a stable platform. It is important to support the work
properly to minimise body exposure, blade binding, or loss of control.

9
ORIGINAL INSTRUCTIONS
e) Hold the power tool by insulated gripping surfaces, when performing an
operation where the cutting tool may contact hidden wiring or its own cord.
Contact with a "live" wire will also make exposed metal parts of the power tool "live"
and could give the operator an electric shock.
f) When ripping, always use a rip fence or straight edge guide. This improves
the accuracy of cut and reduces the chance of blade binding.
g) Always use blades with correct size and shape (diamond versus round) of
arbour holes. Blades that do not match the mounting hardware of the saw will run
off-centre, causing loss of control.
h) Never use damaged or incorrect blade washers or bolt. The blade washers
and bolt were specially designed for your saw, for optimum performance and safety
of operation.
Further safety instructions for all saws
Kickback causes and related warnings
-kickback is a sudden reaction to a pinched, jammed or misaligned saw blade,
causing an uncontrolled saw to lift up and out of the workpiece toward the
operator;
-when the blade is pinched or jammed tightly by the kerf closing down, the blade
stalls and the motor reaction drives the unit rapidly back toward the operator;

10
ORIGINAL INSTRUCTIONS
-If the blade becomes twisted or misaligned in the cut, the teeth at the back
edge of the blade can dig into the top surface of the wood causing the blade to
climb out of the kerf and jump back toward the operator.
Kickback is the result of saw misuse and/or incorrect operating procedures or
conditions and can be avoided by taking proper precautions as given below.
a) Maintain a firm grip with both hands on the saw and position your arms to
resist kickback forces. Position your body to either side of the blade, but not
in line with the blade. Kickback could cause the saw to jump backwards, but
kickback forces can be controlled by the operator, if proper precautions are taken.
b) When blade is binding, or when interrupting a cut for any reason, release
the trigger and hold the saw motionless in the material until the blade comes
to a complete stop. Never attempt to remove the saw from the work or pull the
saw backward while the blade is in motion or kickback may occur. Investigate
and take corrective actions to eliminate the cause of blade binding.
c) When restarting a saw in the workpiece, centre the saw blade in the kerf so
that the saw teeth are not engaged into the material. If a saw blade binds, it may
walk up or kickback from the workpiece as the saw is restarted.
d) Support large panels to minimise the risk of blade pinching and kickback.
Large panels tend to sag under their own weight. Supports must be placed under
the panel on both sides, near the line of cut and near the edge of the panel.
e) Do not use dull or damaged blades. Unsharpened or improperly set blades
produce narrow kerf causing excessive friction, blade binding and kickback.

11
ORIGINAL INSTRUCTIONS
f) Blade depth and bevel adjusting locking levers must be tight and secure
before making the cut. If blade adjustment shifts while cutting, it may cause
binding and kickback.
g) Use extra caution when sawing into existing walls or other blind areas. The
protruding blade may cut objects that can cause kickback.
Safety instructions for saws with pendulum guard and saws with tow guard
Lower guard function
a) Check the lower guard for proper closing before each use. Do not operate
the saw if the lower guard does not move freely and close instantly. Never
clamp or tie the lower guard into the open position. If the saw is accidentally
dropped, the lower guard may be bent. Raise the lower guard with the retracting
handle and make sure it moves freely and does not touch the blade or any other
part, in all angles and depths of cut.
b) Check the operation of the lower guard spring. If the guard and the spring
are not operating properly, they must be serviced before use. Lower guard
may operate sluggishly due to damaged parts, gummy deposits, or a build-up of
debris.
c) The lower guard may be retracted manually only for special cuts such as
"plunge cuts" and "compound cuts". Raise the lower guard by the retracting
handle and as soon as the blade enters the material, the lower guard must be
released. For all other sawing, the lower guard should operate automatically.

12
ORIGINAL INSTRUCTIONS
d) Always observe that the lower guard is covering the blade before placing
the saw down on bench or floor. An unprotected, coasting blade will cause the
saw to walk backwards, cutting whatever is in its path. Be aware of the time it takes
for the blade to stop after switch is released.
-Never use the saw when transported to another location. The blade guard can
be opened and can cause serious injury.
-If the switch does not turn on or off the saw properly, stop using it immediately
and have the saw switch repaired.
-Always allow the saw to reach full speed before starting the cut.
-Never use the side of the blade to cut. When making horizontal cuts, make sure
that the weight of the tool does not force the side of the blade to be cut. This will
reduce the risk of rebound.
-Make sure there are no nails or foreign objects in the area of the
workpiece.
-Never put the workpiece on hard surfaces such as concrete, stone, etc. A
protruding blade can blow the tool.
-DANGER: To prevent accidental starting, always remove the plug from the
power source before making any adjustments and before installing or removing
a saw blade.
-After changing a blade or making adjustments, make sure that the blade
clamping screw is tight because a loose blade can be thrown violently.

13
ORIGINAL INSTRUCTIONS
-Never touch the blade during or immediately after use. After use, the blade is
too hot to be touched with bare hands.
-Use only blade diameters in accordance with the markings. Installing an
incorrect blade can result in injury and poor cutting.
-Use the correct saw blade for the material to be cut;
-Use only saw blades that are marked with a speed equal or higher than the
speed marked on the tool.
-Check every time the function of all blades guards operations. To do this, check
to see if the protective cover covers the blade properly and can be opened
without any problem by using the lever.
-Work only wood, PVC, aluminum, ceramic tile and cement slabs by using the
appropriate disc.
-Do not use abrasive wheels.
-Avoid overheating the blade tips.
-Always use a dust collection system.
-Wear a dust mask.
-Use only saw blades recommended by the manufacturer, which conform to EN
847-1.
WEAR A DUST MASK THAT IS DESIGNED TO BE USED WHEN
OPERATING A POWER TOOL IN A DUSTY ENVIRONMENT.
WARNING: Dust that is created by power sanding, sawing, grinding,

14
ORIGINAL INSTRUCTIONS
drilling, and other construction activities may contain chemicals that are
known to cause cancer, birth defects, or other genetic abnormalities.
These chemicals include:
-Lead from lead-based paint
-Crystalline silica from bricks, cement, and other masonry products
-Arsenic and chromium from chemically treated lumber
The level of risk from exposure to these chemicals varies, according to how often
this type of work is performed. In order to reduce exposure to these chemicals,
work in a well-ventilated area, and use approved safety equipment, such as a
dust mask that is specifically designed to filter out microscopic particles.
SAFETY INSTRUCTIONS FOR BATTERY
CHARGER
This charger can be used by children aged
from 8 years and above and persons with
reduced physical, sensory or mental
capabilities or lack of experience and
knowledge if they have been given

15
ORIGINAL INSTRUCTIONS
supervision or instruction concerning use of
the appliance in a safe way and understand
the hazards involved. Children shall not play
with the appliance. Cleaning and user
maintenance shall not be made by children
without supervision.
If the supply cord is damaged, it must be
replaced by the manufacturer, its service
agent or similarly qualified persons in order to
avoid a hazard.
CAUTION – Do not recharge non-rechargeable batteries
Symbols
Read instructions manual

16
ORIGINAL INSTRUCTIONS
Wear eyes protection
LASER RADIATION - DO NOT STARE
INTO BEAM - CLASS 2 LASER PRODUC
Function Description
The numbering of the products features refers to the illustration of the machine on the
graphics page.
1.
Lock-Off / Plunge Release
Button
9.
Cutting Depth Scale
2.
ON/OFF Trigger Switch
10.
Rip Guide
3.
Laser
11.
Rip Guide Locking Screw
4.
Retractable Lower
Blade Guard
12.
Spindle Lock
5.
Saw Blade
13.
Dust Extraction Nozzle
6.
Base Plate
14.
Battery
7.
Soft Grip
15.
Cutting Depth Clamp
8.
Cutting Angle Clamp
16.
Cutting Depth Scale

17
ORIGINAL INSTRUCTIONS
.
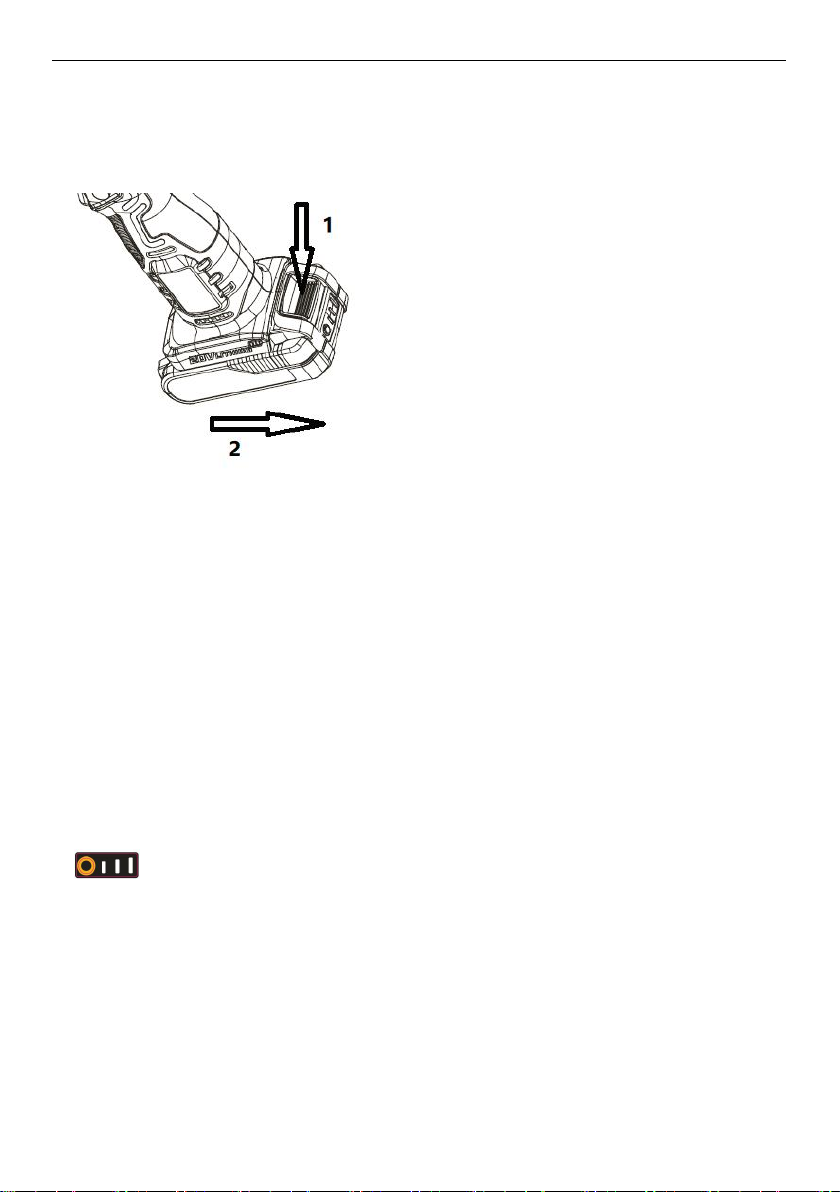
Inserting the battery
• Press the button of the charged battery.
• Push it completely into the base.
CAUTION
Use only original lithium ion batteries with the voltage listed on the nameplate of
18
ORIGINAL INSTRUCTIONS
your power tool. Using other batteries can lead to injuries and pose a fire hazard.
Removing the Battery
• The battery is equipped with two locking levels that should prevent the battery from
falling out when pushing the battery unlocking button unintentionally. As long as the
battery is inserted in the power tool, it is held in position by means of a spring.
• To remove the battery, press the battery unlocking button and pull the battery out of the
power tool toward the rear. Do not exert any force.
BATTERY ELECTRIC INDICATOR
The electric energy is divided into 3 grades, if you want to check the electric energy
of battery; you need to press down the electric indicator button.
•All LEDs on indicates the battery pack is fully charged.

19
ORIGINAL INSTRUCTIONS
Battery Charging
1. If fitted, remove any battery charger.
2. Insert the battery charger mains plug into a suitable mains socket.
•Only a steady RED Light indicates the charger has been plugged in.
•A steady RED Light and a Flashing GREEN light (with battery inserted) indicate the
battery is charging.
•A steady RED Light and A steady GREEN light (with battery inserted) indicate the
battery is completely charged.

20
ORIGINAL INSTRUCTIONS
•Only a Flashing RED Light (with battery inserted) indicates the battery pack is too hot.
You should let the battery pack cool down for approximately 30 minutes before attempting to
recharge.
•A RED and A GREEN light flashing alternatively (with battery inserted) indicate the
battery pack is defective and needs to be replaced. Please contact authorized service
personnel or dispose of the defective battery in the method explained in this manual.
WARING: Use this charger ONLY to charge the supplied battery or additional purchased
batteries that are specifically designed for this tool.
WARNING: Failure to follow the correct procedure when charging batteries will result in
permanent damage.
Note: Normal charging time is approximately 35minutes for a recently discharged 2.0Ah
capacity battery.
However, if the Battery has been left in a discharged state for some time, it may take
Additional time to charge.
Note: Make sure the Battery and Battery Charger are lined up correctly. If the Battery does
not slide on to the Battery Charger easily, don’t force it. Instead, remove the battery; check
the top of Battery and the Battery Charger slot are clean and undamaged and that the
contacts are not bent.
IMPORTANT: When a low charge level is indicated, the tool may stop operating while in use,
which is dangerous when operating a circular saw. Always ensure the battery pack has a
good charge level.
When the battery is full charged, the battery charger will stop charging (switch to stand by).
Table of contents
Other Feider Machines Saw manuals

Feider Machines
Feider Machines FSOR254S2L User manual

Feider Machines
Feider Machines FSC1485 User manual

Feider Machines
Feider Machines FSOR20255 User manual

Feider Machines
Feider Machines FSOR20V-U User manual

Feider Machines
Feider Machines FSO20254 User manual

Feider Machines
Feider Machines FSC1485-B User manual

Feider Machines
Feider Machines F405SC3F User manual

Feider Machines
Feider Machines FSC20235 User manual

Feider Machines
Feider Machines FDL125 User manual

Feider Machines
Feider Machines FSSAB20V-B User manual


