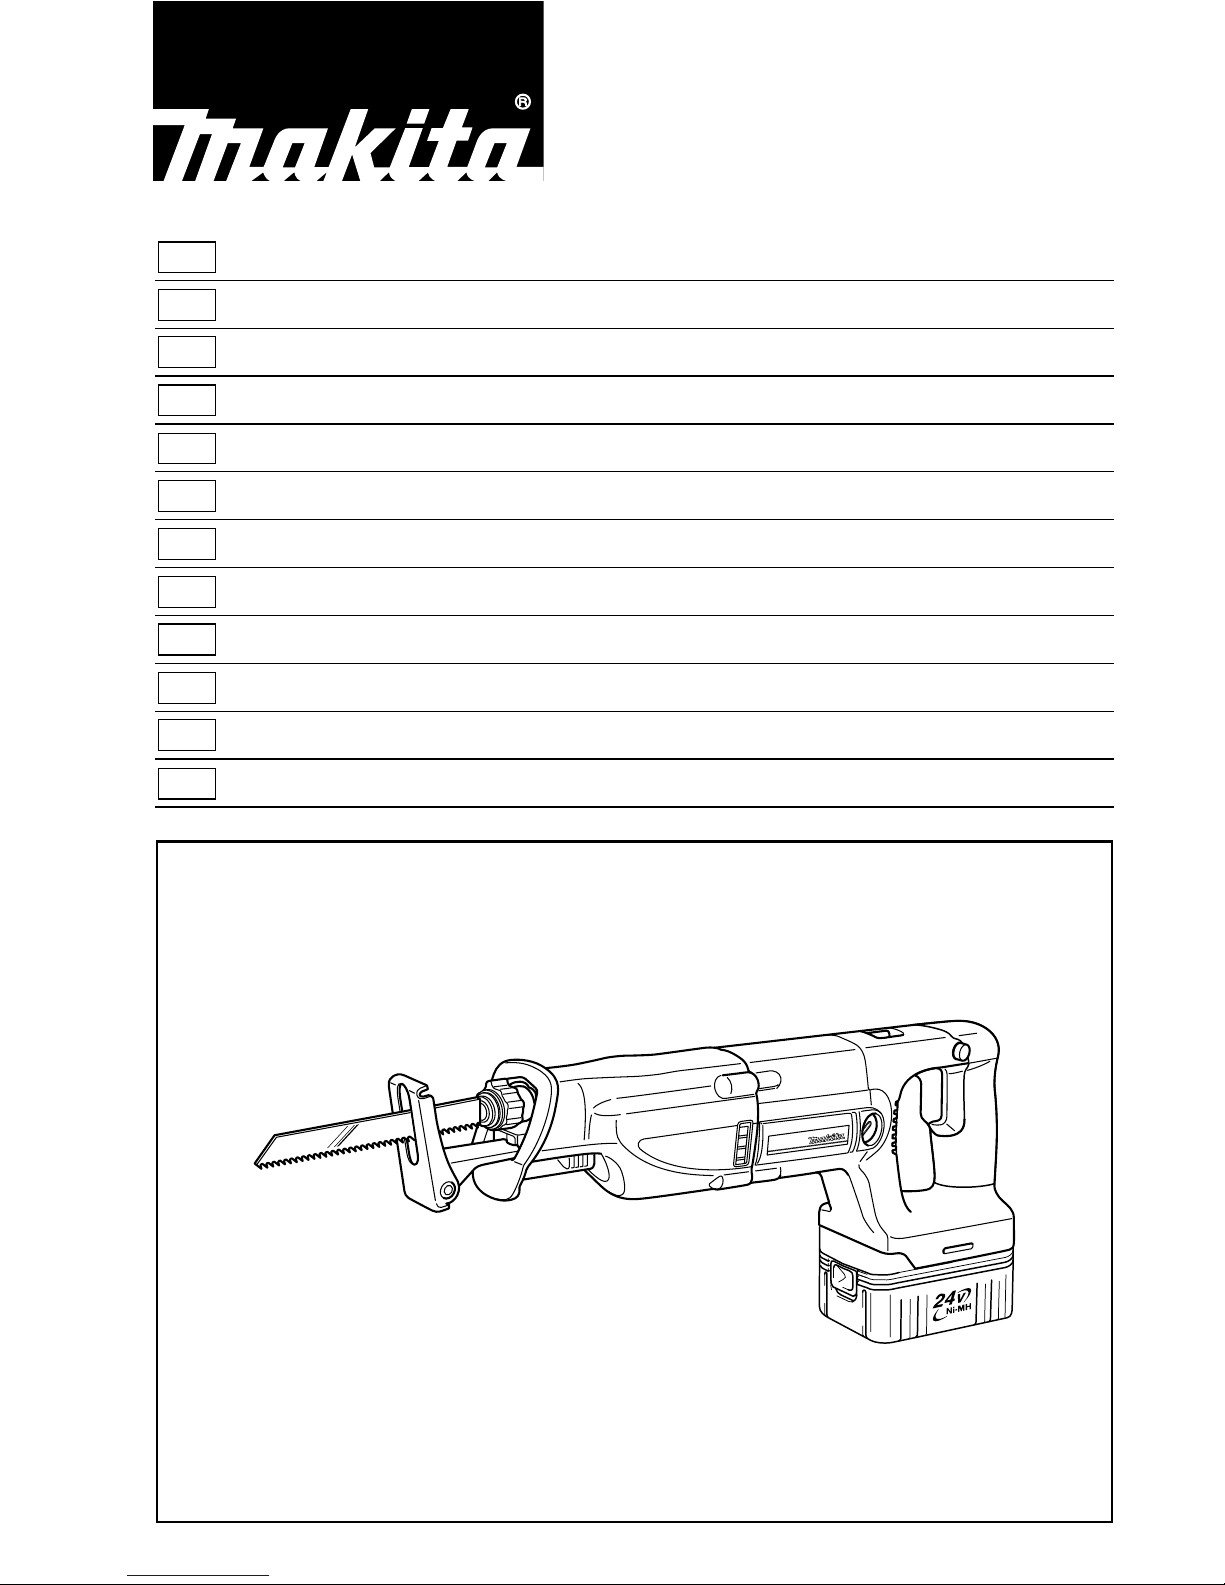
Makita BJR240 User manual

GB
Cordless Recipro Saw Instruction Manual
F
Scie recipro sans fil Manuel d’instructions
D
Akku-Reciprosäge Betriebsanleitung
I
Seghetto diritto a batteria Istruzioni per l’uso
NL
Snoerloze reciprozaag Gebruiksaanwijzing
E
Sierra de sable a batería Manual de instrucciones
P
Serra de sabre a bateria Manual de instruções
DK
Akku bajonet sav Brugsanvisning
S
Sladdlös rak sticksåg Bruksanvisning
N
Accu bajonettsag Bruksanvisning
SF
Akkupuukkosaha Käyttöohje
GR
Φορητ
παλινδροµικ πρινι Οδηγίες χρήσεως
BJR240

2
1
2
3
4
3
5
6
7
810
9
BA
11 14
12 13
15 14
12
34
56
78

3
16
17
18
910
11

4
ENGLISH
Explanation of general view
1 Red part
2Button
3 Battery cartridge
4 Terminal cover
5 Charging lights
6 Battery charger
7Lever
8Shoe
9 Lock-off button
10 Switch trigger
11 Speed change lever
12 Released position
13 Fixed position
14 Blade clamp sleeve
15 Blade
16 Limit mark
17 Brush holder cap
18 Screwdriver
SPECIFICATIONS
Model BJR240
Length of stroke..................................................... 32 mm
Strokes per minute ........................ High speed: 0 – 2,700
Low speed: 0 – 2,300
Overall length ...................................................... 469 mm
Net weight .............................................................. 4.4 kg
Rated voltage ...................................................... D.C.24V
• Due to our continuing programme of research and
development, the specifications herein are subject to
change without notice.
• Note: Specifications may differ from country to country.
Safety hints
For your own safety, please refer to the enclosed safety
instructions.
IMPORTANT SAFETY INSTRUCTIONS FOR
CHARGER & BATTERY CARTRIDGE
ENC002-3
1. SAVE THESE INSTRUCTIONS — This manual
contains important safety and operating instruc-
tions for battery charger.
2. Before using battery charger, read all instruc-
tions and cautionary markings on (1) battery
charger, (2) battery, and (3) product using bat-
tery.
3. CAUTION — To reduce risk of injury, charge only
MAKITA type rechargeable batteries. Other types
of batteries may burst causing personal injury
and damage.
4. Do not expose charger to rain or snow.
5. Use of an attachment not recommended or sold
by the battery charger manufacturer may result
in a risk of fire, electric shock, or injury to per-
sons.
6. To reduce risk of damage to electric plug and
cord, pull by plug rather than cord when discon-
necting charger.
7. Make sure cord is located so that it will not be
stepped on, tripped over, or otherwise subjected
to damage or stress.
8. Do not operate charger with damaged cord or
plug — replace them immediately.
9. Do not operate charger if it has received a sharp
blow, been dropped, or otherwise damaged in
any way; take it to a qualified serviceman.
10. Do not disassemble charger or battery cartridge;
take it to a qualified serviceman when service or
repair is required. Incorrect reassembly may
result in a risk of electric shock or fire.
11. To reduce risk of electric shock, unplug charger
from outlet before attempting any maintenance
or cleaning. Turning off controls will not reduce
this risk.
12. The battery charger is not intended for use by
young children or infirm persons without super-
vision.
13. Young children should be supervised to ensure
that they do not play with the battery charger.
14. If operating time has become excessively
shorter, stop operating immediately. It may result
in a risk of overheating, possible burns and even
an explosion.
15. If electrolyte gets into your eyes, rinse them out
with clear water and seek medical attention right
away. It may result in loss of your eyesight.
ADDITIONAL SAFETY RULES FOR CHARGER
& BATTERY CARTRIDGE
1. Do not charge Battery Cartridge when tempera-
ture is BELOW 10°C (50°F) or ABOVE 40°C
(104°F).
2. Do not attempt to use a step-up transformer, an
engine generator or DC power receptacle.
3. Do not allow anything to cover or clog the
charger vents.
4. Do not short the battery cartridge:
(1) Do not touch the terminals with any conduc-
tive material.
(2) Avoid storing battery cartridge in a container
with other metal objects such as nails, coins,
etc.
(3) Do not expose battery cartridge to water or
rain.
A battery short can cause a large current flow,
overheating, possible burns and even a break-
down.
5. Do not store the tool and battery cartridge in
locations where the temperature may reach or
exceed 50°C (122°F).
6. Do not incinerate the battery cartridge even if it
is severely damaged or is completely worn out.
The battery cartridge can explode in a fire.
7. Be careful not to drop, shake or strike battery.
8. Do not charge inside a box or container of any
kind. The battery must be placed in a well venti-
lated area during charging.
ADDITIONAL SAFETY RULES FOR TOOL
ENB029-1
1. Be aware that this tool is always in an operating
condition, because it does not have to be
plugged into an electrical outlet.
2. Hold tool by insulated gripping surfaces when
performing an operation where the cutting tool
may contact hidden wiring. Contact with a "live"
wire will make exposed metal parts of the tool "live"
and shock the operator.

5
3. Avoid cutting nails. Inspect workpiece for any
nails and remove them before operation.
4. Do not cut oversize workpiece.
5. Check for the proper clearance beyond the work-
piece before cutting so that the blade will not
strike the floor, workbench, etc.
6. Hold the tool firmly.
7. Make sure the blade is not contacting the work-
piece before the switch is turned on.
8. Keep hands away from moving parts.
9. Always switch off and wait for the blade to come
to a complete stop before removing the blade
from the workpiece.
10. Do not touch the blade or the workpiece immedi-
ately after operation; they may be extremely hot
and could burn your skin.
SAVE THESE INSTRUCTIONS.
OPERATING INSTRUCTIONS
Installing or removing battery cartridge (Fig. 1)
• Always switch off the tool before insertion or removal of
the battery cartridge.
• To remove the battery cartridge, withdraw it from the
tool while sliding the button on the side of the cartridge.
• To insert the battery cartridge, align the tongue on the
battery cartridge with the groove in the housing and slip
it into place. Always insert it all the way until it locks in
place with a little click. If you can see the red part on
the upper side of the button, it is not locked completely.
Insert it fully until the red part cannot be seen. If not, it
may accidentally fall out of the tool, causing injury to
you or someone around you.
• Do not use force when inserting the battery cartridge. If
the cartridge does not slide in easily, it is not being
inserted correctly.
Charging (Fig. 2)
1. Plug the battery charger into your power source. Two charging lights will flash in green color repeatedly.
2. Insert the battery cartridge into charger until it stops adjusting to the guide of charger. Terminal cover of charger
can be opened with inserting and closed with pulling out the battery cartridge.
3. When the battery cartridge is inserted, the charging light color will change from green to red and charging will
begin. The charging light will keep lighting up lit steadily during charging. One red charging light indicates charged
condition in 0 – 80% and two red ones indicates 80 – 100%.
4. With finish of charge, the charging lights will change from two red ones to two green ones.
5. If you leave the battery cartridge in the charger after the charging cycle is complete, the charger will switch into its
‘‘trickle charge (maintenance charge)’’ mode which will last approximately 24 hours.
6. After charging, unplug the charger from the power source.
NOTE:
• The battery charger is for charging Makita-battery cartridge. Never use it for other purposes or for other manufac-
turer’s batteries.
• When you charge a new battery cartridge or a battery cartridge which has not been used for a long period of time, it
may not accept a full charge. This is a normal condition and does not indicate a problem. You can recharge the bat-
tery cartridge fully after discharging it completely and recharging a couple of times.
• If you charge a battery cartridge from a just-operated tool or battery cartridge which has been left in a location
exposed to direct sunlight for a long time, the charging light may flash in red color. If this occurs, wait for a while.
Charging will begin after the battery cartridge is cooled by the cooling fan installed in the charger. When the temper-
ature on battery is more than approx. 70°C, two charging lights may flash in red color, and when approx. 50°C –
70°C, one charging light in red color.
• If the charging light flashes alternately in green and red color, charging is not possible. The terminals on the charger
or battery cartridge are clogged with dust or the battery cartridge is worn out or damaged.
Cooling system
• This charger is equipped with cooling fan for heated battery in order to enable the battery to prove its own perfor-
mance. Sound of cooling air comes out during cooling, which means no trouble on the charger.
• Yellow light will flash for warning in the following cases.
–Trouble on cooling fan
–Incomplete cool down of battery, such as, being clogged with dust
The battery can be charged in spite of the yellow warning light. But the charging time will be longer than usual in this
case.
• Check the sound of cooling fan, vent on the charger and battery, which can be sometime clogged with dust.
• The cooling system is in order although no sound of cooling fan comes out, if the yellow warning light will not flash.
• Always keep clean the vent on charger and battery for cooling.
• The products should be sent to repair or maintenance, if the yellow warning light will frequently flash.
Battery type Capacity (mAh) Number of cells Charging time
B2417 1700 20 approx. 30 minutes
B2430 3000 20 approx. 60 minutes
Other manuals for BJR240
3
Table of contents
Languages:
Other Makita Saw manuals

Makita
Makita M4500 User manual

Makita
Makita DUA251 User manual

Makita
Makita LS1214 User manual

Makita
Makita DSD180 User manual

Makita
Makita 2414B User manual

Makita
Makita XCU12 User manual

Makita
Makita DLS713 User manual

Makita
Makita DCS550 Manual

Makita
Makita Makstar BSS610 User manual

Makita
Makita RJ03 User manual