Feider Machines FHNV1800 User manual

ORIGINAL INSTRUCTIONS >EN
STEAM CLEANER
FHNV1800
USER GUIDE
CAUTION: READ THE INSTRUCTIONS BEFORE USING THE MACHINE!

CONTENTS
1. INTENDED USE 3
2. SAFETY INSTRUCTIONS 3
3. THE PRODUCT 8
4. OPERATION 9
5. USE 11
6. STORAGE 12
7. MAINTENANCE AND CLEANING 12
8. DISPOSAL 13
9. TROUBLESHOOTING 14
10. DELARATION OF CONFORMITY 15
11. WARRANTY 16
12. PRODUCT FAILURE 17
13. WARRANTY EXCLUSIONS 18
02

1. INTENDED USE
This device is intended for home use. Do not use in any
other way than described in this leaflet. This device can
be used outdoors. Protection class: IPX4. It should
not be stored outdoors, and should not be exposed to
rain, moisture or dew.
2. SAFETY INSTRUCTIONS
2.1 GENERAL SAFETY WARNINGS
This electrical appliance produces hot steam from
pressurized water. There are several dangers in
case of misuse. To prevent these dangers and to
use the device safely, it is necessary to observe the
instructions given in this manual.
Attention: Danger
•Never touch or point the steam to yourself or others!
•If excessive steam comes out of the filler cap, turn off
the power and disconnect immediately. Stop using the
device. For repair, contact a qualified technician.
•Never use the device without water in the tank.
•The fill port must not be opened during use.
•Never operate the appliance without tightening the filler
cap securely.
•Fill the device only with water. Do not overfill the water
tank. The recommended maximum capacity of Steamer
is 1.3 L of water.
•Excessive filling of the water tank may cause
malfunctions, property damage or injury.
•Never return or tilt the Steamer more than 45° when it is
energized or if it still produces steam.
•The device does not contain any user-serviceable
parts.
03

•Do not attempt any repairs. Steamer must only be
repaired by qualified electricians. If the supply cord is
damaged, it must be replaced by the manufacturer, its
service agent or similarly qualified persons in order to
avoid a hazard.
• Do not use in the pool containing water.
• The device must not be submerged in water.
WARNING: Danger of burning by hot liquid and
steam.
•The temperature of the steam is above 100 ° C;
therefore, never direct it to people, animals or electrical
appliances. Never place your hand in front of the steam
outlet of an accessory to check temperature, proper
operation or any other reason.
•Appliances can be used by persons with reduced
physical, sensory or mental capabilities or lack of
experience and knowledge if they have been given
supervision or instruction concerning use of the
appliance in a safe way and if they understand the
hazards involved. Children shall not play with the
appliance.
•This appliance should not be used by children. Keep
the device and its cable out of the reach of children.
Cleaning and maintenance should not be done by
children.
•Steamer is not a toy and should never be used by
children.
•Keep hair, loose clothing, fingers, feet, and all body
parts away from the jet of steam.
•Do not use Steamer barefoot or with open shoes or
sandals.
•The appliance must not be left unattended when
04
connected to the mains. Keep the appliance out of
reach of children when it is energized or cooling down.
• The appliance has to be unplugged after use and
before carrying out user maintenance on the appliance.
• Remove all packing materials before using the
appliance. Keep packaging materials out of the reach
of children, as these materials can be dangerous.
CAUTION HOT SURFACE.
The surfaces of the body may become hot during use.
•Please use the handle provided for transport.
•Do not touch the hose that conducts the steam, it
becomes hot during use.
DANGER OF ELECTRIC SHOCK.
•Check the condition (wear and defects) of the parts and
electrical cable of the Steamer before each use.
•Check that the supply voltage indicated on the
nameplate corresponds to the voltage of your home.
•Plug the Steamer into a grounded mains socket.
•The plug must be removed from the socket-outlet
before cleaning or maintaining the device.
•Do not turn on the Steamer if it is damaged. The
appliance is not to be used if it has been dropped, if
there are visible signs of damage or if it is leaking.
•Do not pull or carry Steamer through its electrical cable;
do not use the power cable as a handle; do not close a
door on the power cable or pulling on sharp edges or
corners.
•Do not expose Steamer, its electrical cable or plug to
rain, or immerse in water or other liquid.
•Do not unplug by pulling on the power cable. To unplug,
05

always grasp the plug, not the power cable.
•Never use the appliance with a damaged electrical
cable.
•Never handle the plug or appliance with wet hands. Do
not immerse the device in water.
•Never use Steamer to clean electrical appliances.
•The liquid or steam must not be directed towards
equipment containing electrical components, such as
the interior of ovens.
2.2 OTHER PRECAUTIONS
•Keep the power cable away from heated surfaces.
•Do not store or use near flammable materials.
•Do not place Steamer on or under insulation such as
blankets, towels or papers.
•Always store Steamer in a dry place.
•Do not expose Steamer to frost.
•Use only the original Steamer accessories. There is a
danger when using incompatible accessories.
•Store the product indoors, out of reach of children.
•Do not clean this product with water jet. Use a dry or
dampened cloth with soap if necessary.
•Do not use to heat a room.
•Do not put heavy weight on power cord.
•Let the appliance cool before change, replace or
remove any parts.
•During production, each appliance is tested to ensure
the quality of the finished product. It is therefore
possible that there is water residue inside the device.
Risk of serious injury and material damage.
06

WATER
The recommend maximum capacity of the water tank
is 1.3 L of water. Do not overfill. The steam production
time is about 25 minutes under normal conditions of
use. The heating time is about ten minutes for a full
tank.
STORAGE
Empty the water tank after each use. Do not store
Steamer with water in the tank. Empty, clean and dry
before storing. Do not expose to frost.
FABRICS AND FINISHES
CAUTION: Some fabrics and finishes are not
compatible with steam. Do not use steam on leather,
waxed floors, synthetic fabrics, velvet and other fragile
materials. When using steam appliances, always refer to
the manufacturer’s instructions for use and pre-test at a
non-visible location.
GLASS / MIRRORS
WARNING: Never apply steam to windows or mirrors
with a temperature below 0 ° C. Thermal shock
resulting from extreme temperature deviations can
break windows and mirrors in case of contact.
2.3 SYMBOLS
Wear ocular protection.
Wear non-slip, heavy duty gloves.
Read and understand all instructions before operating the product, follow all warnings and
safety instructions.
07
3. THE PRODUCT
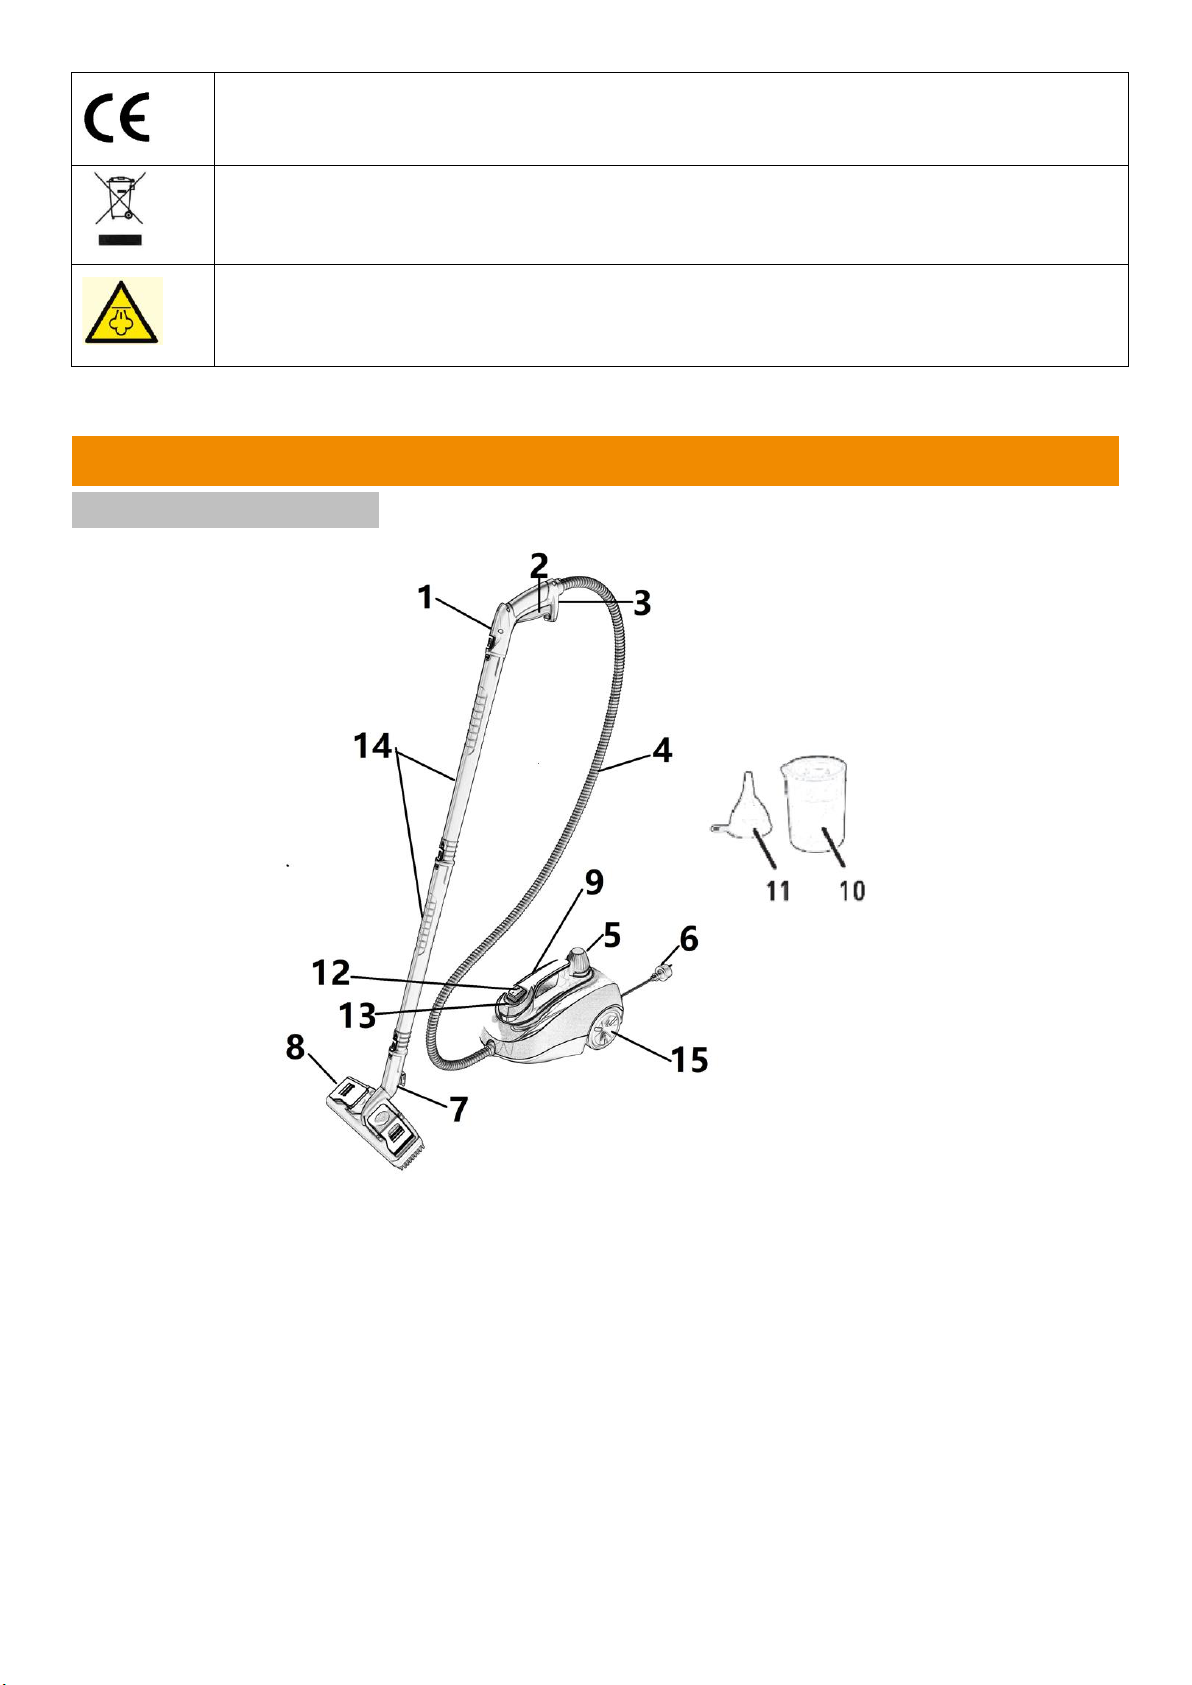
3.1 DESCRIPTION
1. Steam handle
2. Steam trigger
3. Steam trigger lock latch
4. Steam hose
5. Tank filler cap
6. Plug
7. Brush holder
8. Floor scrub brush
9. Carry handle
10. Measuring glass
11. Funnel
12. ON / OFF switch
13. Heat light
14. Extension tubes
15. Wheel
Conforms to all regulatory standards in the country in the EU where the product is
purchased.
Waste electrical products should not be disposed of with household waste.
Please recycle where facilities exist. Check with your local authority or retailer for recycling
advice.
Caution! Danger of scalding.
08
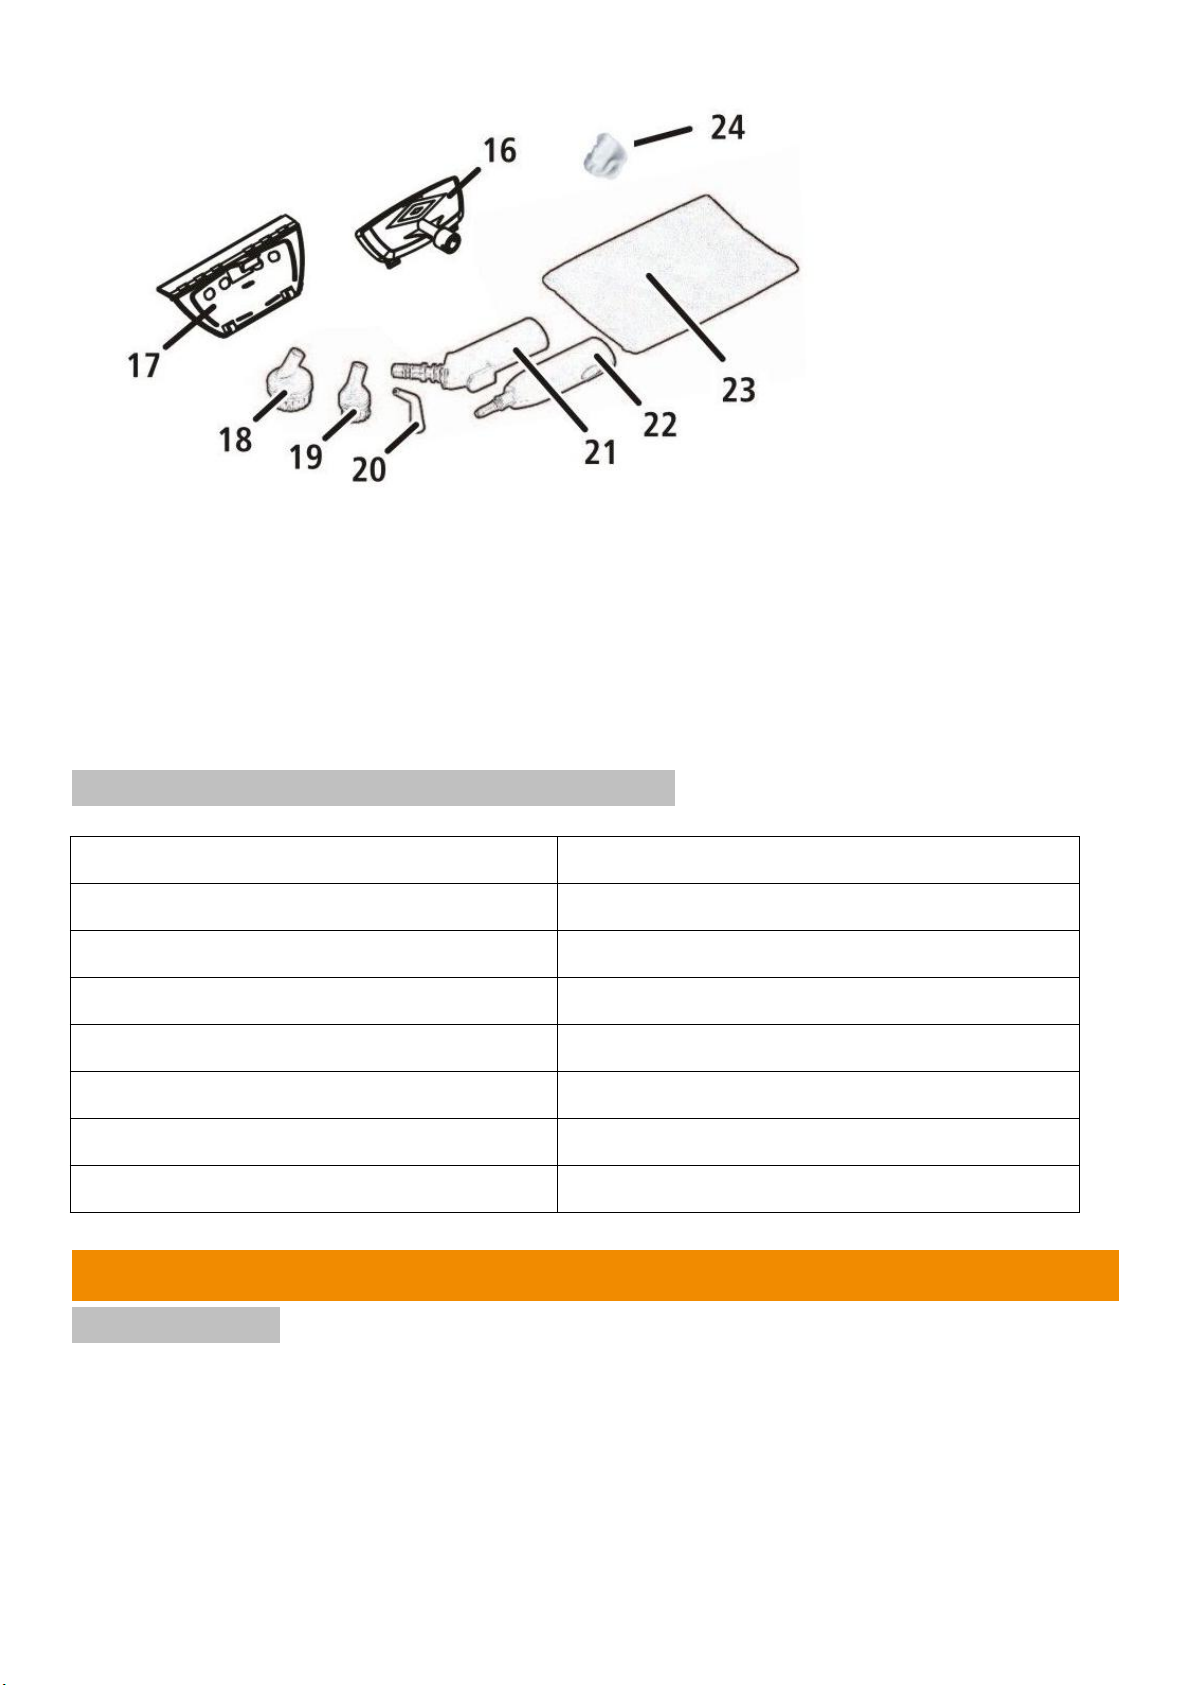
Accessories:
16.Textile Iron
17.Window squeegee
18. Round bristle brush-large
19. Round bristle brush-small
20. Power jet top-angled
21. Floor scrub brush adapter
22. Small tip adapter
23. Floor scrub brush cleaning cloth
24.Cloth for textile iron
3.2 TECHNICAL CHARACTERISTICS
4. OPERATION
4.1 FILLING
1Remove the filler cap by turning counterclockwise.
2Fill the water tank using the funnel and measuring cup provided. The recommend maximum capacity of
the tank is 1.3 L. Tip: Do not overfill the tank.
3Replace the filler cap by turning clockwise until a good seal is achieved.
09
Steam compartment Stainless steel
Voltage 220-240V, 50-60Hz
Power consumption 1800W
Degree of protection IPX4
Temp. Max 160℃
Working pressure. Max 0.5Mpa
Water tank Max 1,5L( (Recommend water capacity 1,3L))
Net weight with accessories (empty tank)4.4 kg
Before filling the Steamer with water, turn it off and unplug it. Make sure there is no more steam by unlocking
the steam trigger in the “on” position. Always cool Steamer for 10 minutes before adding water.
CAUTION: If the filler cap is opened too quickly, without taking the necessary precautions, there is a
very high risk of injury. The metal parts can be extremely hot; avoid contact with the skin. Risk of burns.
NOTE: The filler cap will not unscrew with pressure.
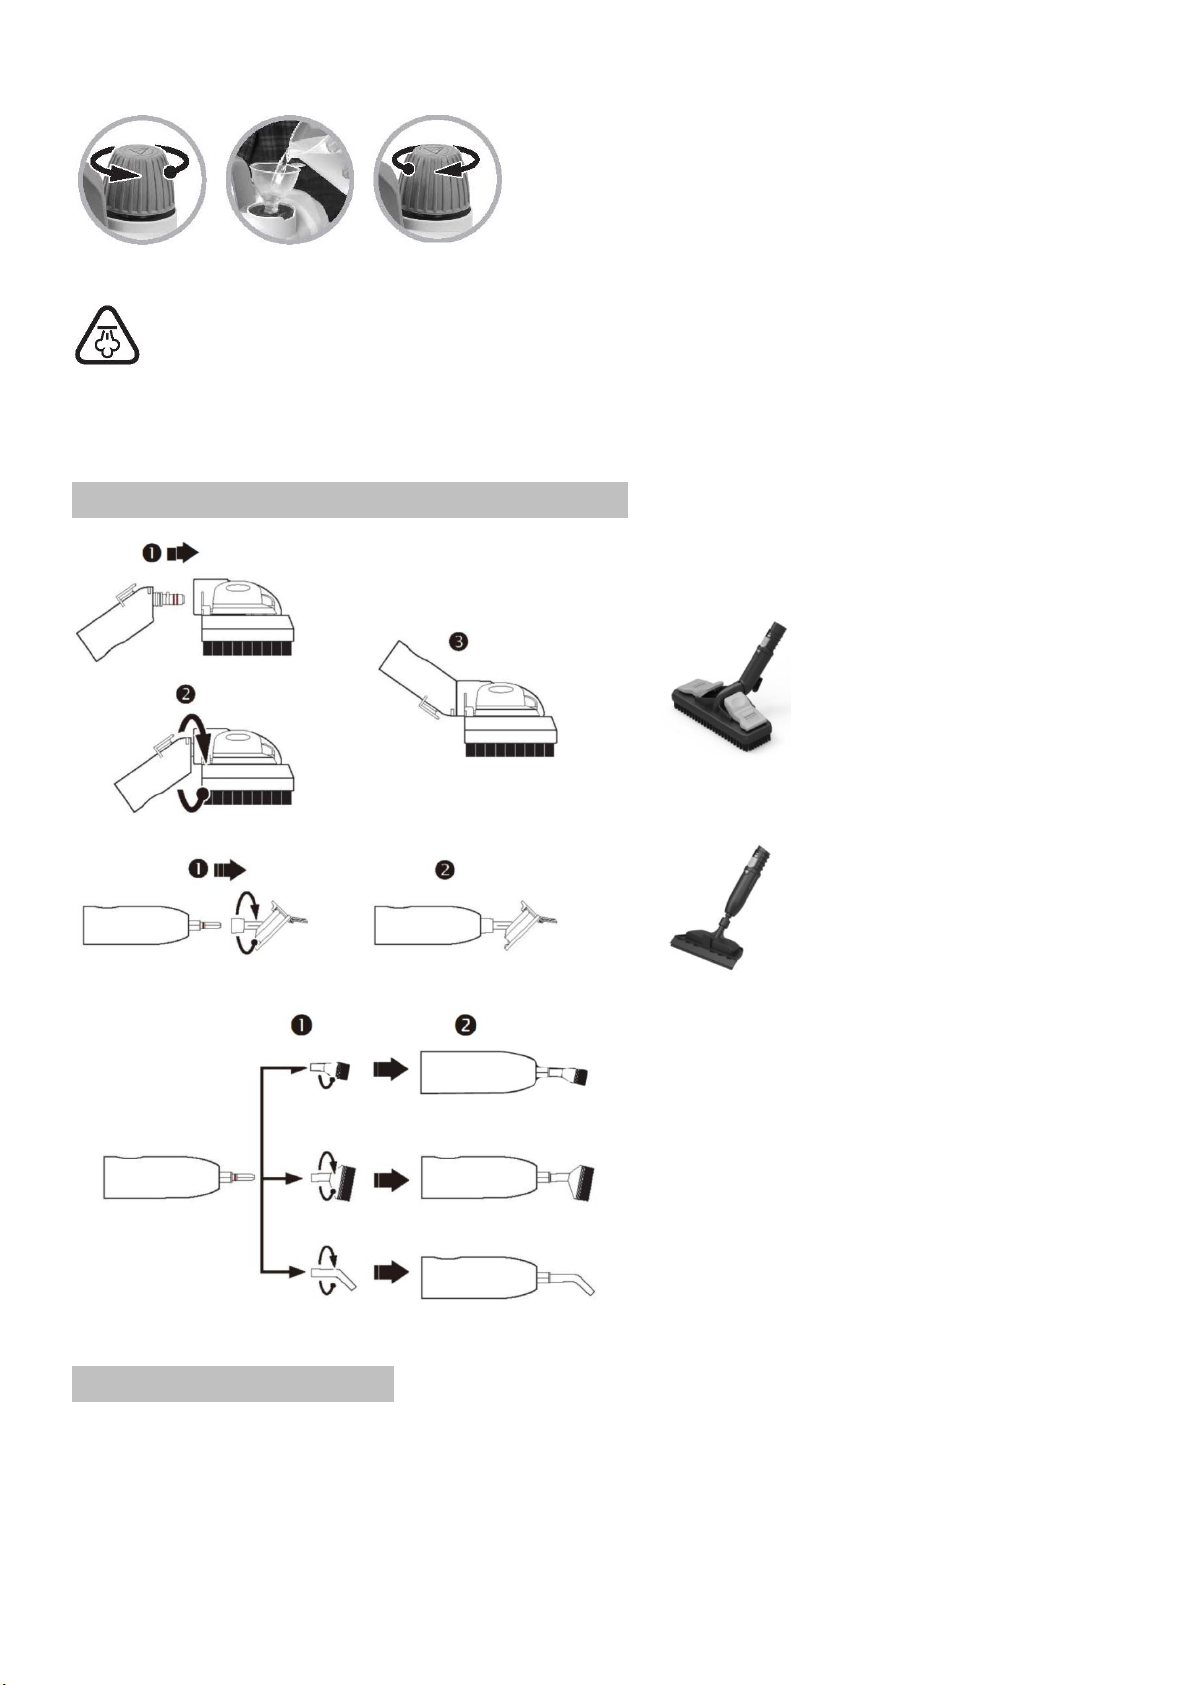
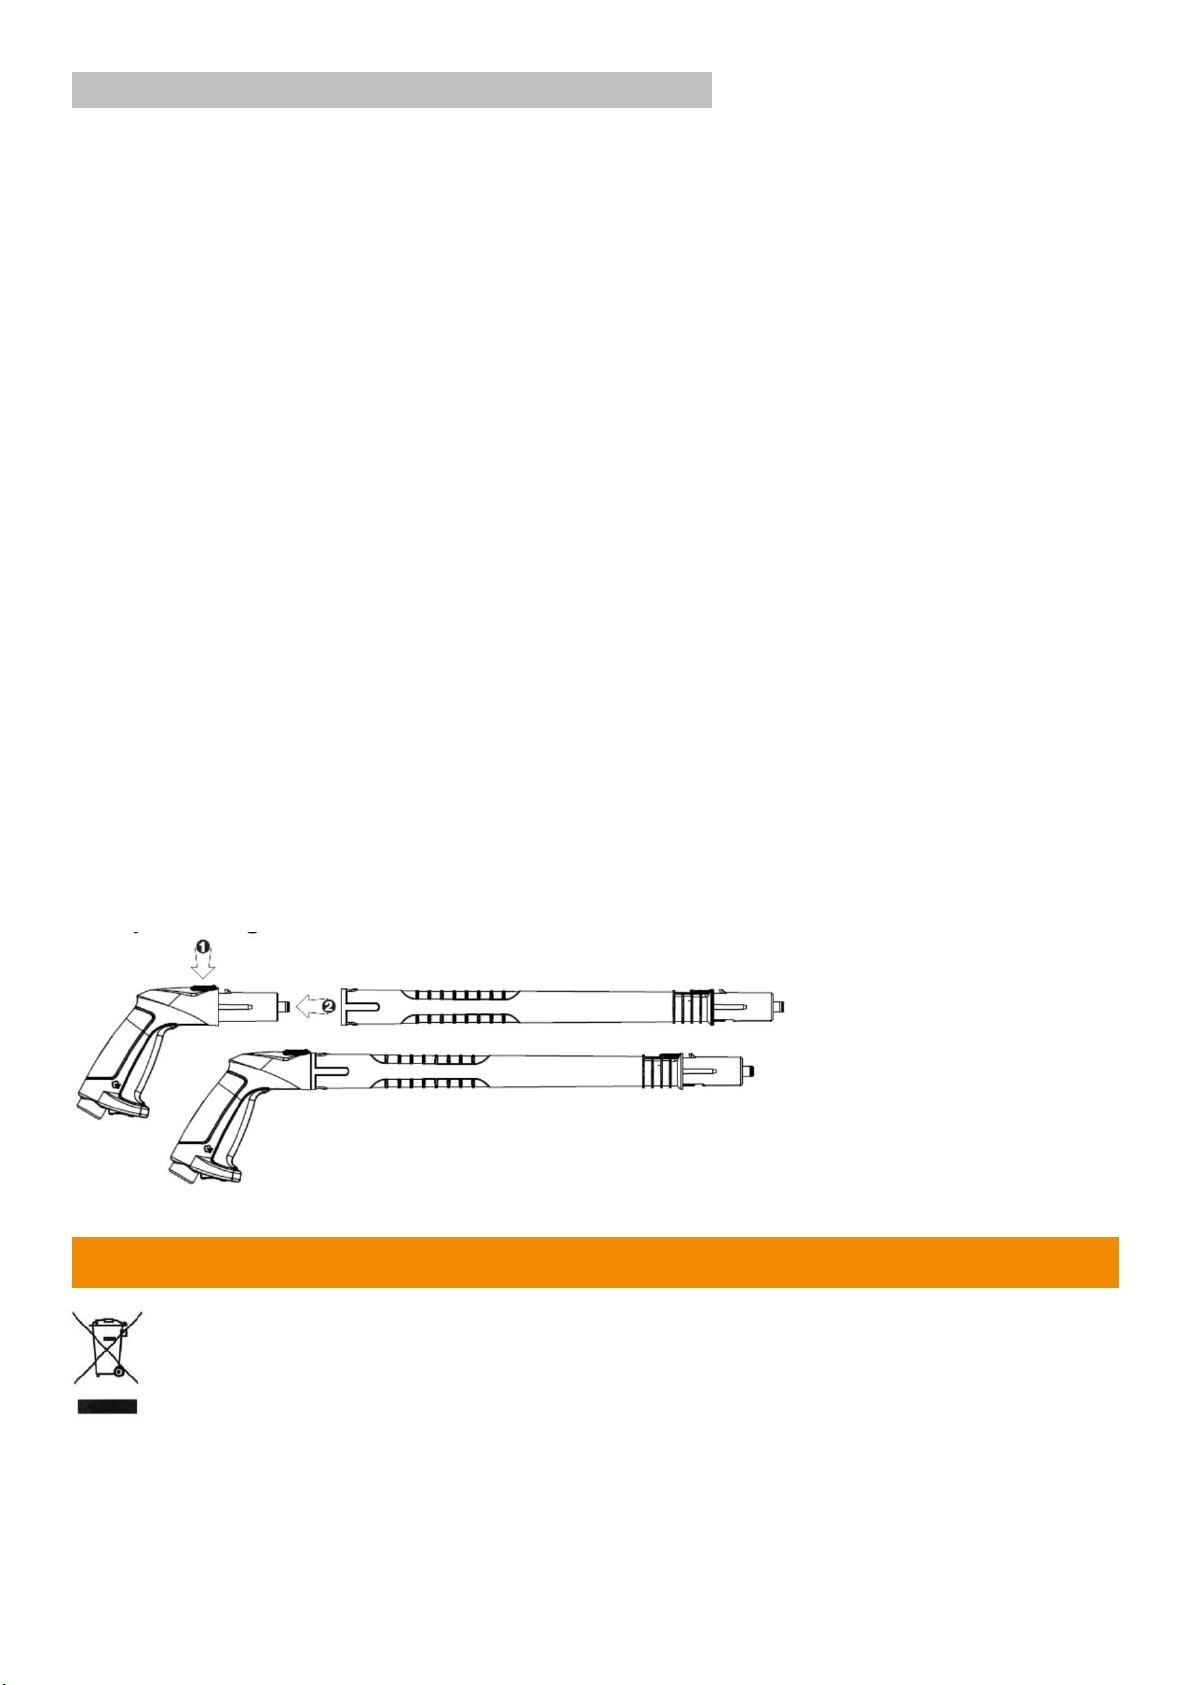
4.2 ASSEMBLY OF ACCESSORIES
4.3 PRESENTATION
1. Handle Operation.
The steam trigger (2) is located in the handle and the steam trigger lock latch (3) is located under the handl
e. The lock has two positions: LOCK OFF and ON / OPERATION.
Pressing forward the lock latch (3) to “LOCKED OFF” position(A), then the trigger locked, can’t be pulled up
to release the steam.
10

2. Releasing Steam.
When the heating light (13)power off, the Steamer is ready for use (maximum pressure of 5 bar). Press the
steam trigger lock latch (3) to the ON position (B) and press the steam trigger (C) to obtain a steam jet.
Release the trigger to stop the jet of steam.
5. USE
1) Make sure the Steamer is unplugged and the switch in the OFF position (12).
2) Unscrew the tank filler cap (5) by turning counterclockwise.
3) Using the measuring cup (10) and the funnel (11), fill the Steamer with 1.3L of water. (This will produce
about 25 minutes of steam.)
4) Replace the filler cap by screwing it clockwise.
5) Attach the extension tubes to the steam handle (1) to obtain a steam mop or attach the accessory adapter
(22).
6) Connect the appliance and press the switch (12) to the ON position.
7) Two lights come on. The indicator light of switch (12) comes on to indicate that the power is turned on.
The steam light (13) comes on to indicate a rise in steam pressure in the appliance.
8) The appliance is ready for use when the steam indicator light (13) goes out and the pressure reaches
between 4 and 5 bar depending on the water level in the tank.
9) During use, the orange steam indicator light (13) may turn on again. This indicates that the steam
pressure may not be large enough. In this case, release the steam trigger (2) a few moments. When the
steam indicator light (13) goes off again, you can resume using steam.
10) When activating the steam trigger (2), water may appear. This is quite normal because at the beginning,
the steam takes a little time to arrive and the water condenses in the hose and the extension tubes.
After a few moments the water will turn into steam and there will be no more coulure.
“LOCKED OFF” POSITION
“ON/OPERATING” POSITION
11
3. After use.
Lock the steam trigger in the OFF position (A) to prevent accidental operation.
11) When activating the steam trigger (2), a lot of water can flow. This may be due to a residue of steam from
the previous use that has turned into water. Empty this water by operating the steam trigger over a bucket or
sink. Once this water has passed, you can use your device quietly.
12) When using the accessories, the surface you are cleaning may be wet. This is due to the steam that
turns into water in contact with this surface. Provide a sponge or cloth to wipe this surface.
13) After use, press the switch (12) in the OFF position and disconnect.
Be careful, never direct steam on yourself or anyone else as it may cause burns.
6. STORAGE
Always empty the Steamer after use. Never leave water in the tank when storing the unit.
1Turn off the power by unplugging the Steamer.
2Empty all remaining tank pressure by pressing the steam trigger(2).
3Allow the unit to cool completely (10 minutes minimum).
4When the appliance is cold, lock the steam trigger and remove the accessories.
5Empty all remaining water from the tank by tilting the unit to one end. Never leave water in the tank when
the unit is not in use or stored.
6Replace the filler cap and store the Steamer in a safe and dry place.
WARNING: Do not expose Steamer to frost.
7. MAINTENANCE AND CLEANING
7.1 DO YOU HAVE HARD WATER?
If the tap water used is very calcareous, it is recommended to use distilled or demineralized water in the
Steamer.
If the use of very calcareous water is unavoidable, it is recommended to clean the water tank regularly.
7.2 HOW TO CLEAN THE WATER TANK?
To clean the water tank and descale, proceed as follows.
Do not use detergent to clean the tank.
1. Mix a 50/50 solution of 250 ml of white vinegar and 250 ml of water. You can use the measuring cup.
2. Pour the solution into the unheated cold tank using the funnel.
3. Leave the solution in the tank for about 30 minutes.
4. After 30 minutes, empty the tank.
5. Repeat steps 1 to 4, if necessary.
6. Rinse well with water.
7. Replace the tank filler cap and store in a safe and dry place.
WARNING: Never clean the water tank while it is still hot. Always turn off and unplug Steamer
before cleaning.
12
7.3 FREQUENTLY ASKED QUESTIONS
Why does water come out of the nozzle?
Steamer generates a large amount of steam that can condense in water in the hose and extension tubes
after a period of no use or cooling of the unit. Empty this water by operating the steam trigger over a bucket
or sink. Once this water has drained, you can use your device normally.
No Steam Is Coming Out?
Check that the hose is not bent or bent and, if necessary, retension. Make sure that the water tank is not
empty.
I cannot remove the fill cap?
Make sure the Steamer is completely depressurized. The filler cap is designed so that it can not be removed
while the unit is still under pressure. To do this, empty all residual pressure from the tank by pressing the
steam trigger (2). The steam trigger can be unlocked by engaging the steam trigger lock latch (3) in the ON
position. Once the pressure is discharged from the tank, the filler cap of the tank can be opened.
The steam flow is irregular, the appliance “coughs”.
Slight blockage caused by soil or other foreign matter that can prevent the flow of steam from arriving
continuously. Clean the water tank as shown on page 12.
Can I use boiled water from my tea kettle?
No. Boiled water concentrates the minerals that form the tartar.
Never use pre-soaked water in Steamer.
Can I leave water in the Steamer?
No. Water left in the water tank for a prolonged period may deteriorate the mechanics of Steamer and
deposit limescale. Never leave water in the Steamer; always empty it after use. If the tap water used is very
hard, it is recommended to use distilled water to prolong the service life and increase the performance of
Steamer.
How do I attach the accessories?
Press the blue button on the handle (1) and insert the extension tubes or accessories. Make sure the button
goes back up to lock the accessory in position before use. You should normally hear a light click.
8. DISPOSAL
Electrical products should not be discarded with household products. According to the
European Directive 2012/19/EU on waste electrical and electronic equipment and its
implementation into national law, electrical products used must be collected separately
and disposed of at collection points provided for this purpose. Talk with your local
authorities or dealer for advice on recycling.
13

9. TROUBLESHOOTING
PROBLEM
POSSIBLE REASONS
SOLUTIONS
The device does not heat
up.(In the ON position,the
power switch does not light ).
The device is not connected.
Check the plug/socket.
The device is damaged.
Disconnect and contact steam cleaner
technical support.
The unit does not heat
up.(The light does not come
on and the power switch is
on).
The steam cleaner is empty.
Add water by following the instructions
on page 9.
Tartar has accumulated in the
water tank.
Clean the tank by following the
instructions on page 12.
The device is damaged.
Disconnect and contact steam cleaner
technical support.
The steam flow is irregular,
the appliance”coughs”.
First use after filling the tank.
Release the condensed water by
pressing the steam trigger(3) page 10.
The level is slow.
Add water by following the instructions
on page 9
The steam hose is bent/folded.
Tighten the hose.
Tartar is accumulated in the
tank.
Clean the tank according to the
instructions on page 12.
Water comes out of the
accessories or the head of
the broom, but no steam.
Steam condensed in the hose.
Direct the tip towards the bucket and
unload.
The water has not heated
enough.
Wait for the rise of steam pressure.
The water tank is too full.
Turn off the power, allow the unit to cool
down and drain the water from the tank.
Steam cleaner generators a large amount of steam that can
condense water in the hose, and the extension tubes after a
cooling period or of use of the device.
Empty this water by operating the steam
trigger over a bucket or sink.
The broom head dose not stay
attached to the extension
tubes.
The adapter(22) is not
inserted on the button of the
tubes.
Make sure that the spring button is fully
engaged in the hole in the tip.
The handle(1) becomes hot.
When hot steam passes
through the handle,it warms
up.
In case of discomfort, you can use a
glove.
14

10. DECLARATION OF CONFORMITY
BUILDER SAS
32, rue Aristide Bergès - ZI 31270 Cugnaux – France
Declares that the machine indicated below:
Designation: Steam cleaner
Model: FHNV1800
Serial number: 20220149016-20220149115
Is in conformity with the European Directives:
LVD Directive 2014/35/EU
EMC Directive 2014/30/EU
ROHS Directive: (EU) 2015/863 amending 2011/65/EU
This product is also in conformity with the following standards:
EN 60335-1: 2012+A11:2014+A13:2017+A1:2019+A14:2019+A2:2019
EN 60335-2-54: 2008+A11:2012+A1:2015
EN 60335-2-10:2003+A1:2008
EN 62233:2008
EN 55014-1:2017+A11: 2020 EN 55014-2:2015
EN IEC61000-3-2:2019 EN 61000-3-3:2013+A1:2019
Philippe MARIE / PDG
Cugnaux, le 29/11/2021
15

WARRANTY
The manufacturer guarantees the product against defects in material and workmanship for a period of 2
years from the date of the original purchase. The warranty only applies if the product is for household use.
The warranty does not cover breakdowns due to normal wear and tear.
The manufacturer agrees to replace parts identifed as defective by the designated distributor. The
manufacturer does not accept responsibility for the replacement of the machine, in whole or in part , and/or
ensuing damage.
The warranty does not cover breakdowns due to:
• insufcient maintenance.
• abnormal assembly, adjustment or operations of the product.
• parts subject to normal wear and tear.
The warranty does not extend to:
• shipping and packaging costs.
• using the tool for a purpose other than that for which it was designed.
• the use and maintenance of the machine done in a manner not described in the user manual.
Due to our policy of continuous product improvement, we reserve the right to alter or change specifcations
without notice. Consequently, the product may be diferent from the information contained therein, but a
modifcation will be undertaken without notice if it is recognized as an improvement of the preceding
characteristic.
READ THE MANUAL CAREFULLY BEFORE USING THE MACHINE.
When ordering spare parts, please indicate the part number or code, you can fnd this in the spare parts list
in this manual. Keep the purchase receipt; without it, the warranty is invalid. To help you with your product,
we invite you to contact us by phone or via our website:
• +33 (0)9.70.75.30.30
• https://services.swap-europe.com/contact
You must create a "ticket" via the web platform.
• Register or create your account.
• Indicate the reference of the tool.
• Choose the subject of your request.
• Describe your problem.
• Attach these fles: invoice or sales receipt, photo
of the identifcation plate (serial number), photo
of the part you need (for example: pins on the
transformer plug which are broken).
11. WARRANTY
16

WHAT TO DO IF MY MACHINE BREAKS DOWN?
the repairer will refuse the machine.
Go to the store with the complete machine and with the receipt or invoice.
the repairer will refuse the machine.
c) Create a SWAP-Europe service ticket on the site: https://services.swap-europe.com When making the
request on SWAP-Europe, you must attach the invoice and the photo of the nameplate (serial number).
d) Contact the repair station to make sure it is available before dropping of the machine.
Go to the repair station with the complete machine packed, accompanied by the purchase invoice and the
station support sheet downloadable after the service request is completed on the SWAP-Europe site
For machines with engine failure from manufacturers BRIGGS & STRATTON, HONDA and RATO, please
refer to the following instructions.
Repairs will be done by approved engine manufacturers of these manufacturers, see their site:
• http://www.briggsandstratton.com/eu/fr
• http://www.honda-engines-eu.com/fr/service-network-page;jsessionid=5EE8456CF39CD572AA2AEEDFD
290CDAE
• https://www.rato-europe.com/it/service-network
Please keep your original packaging to allow for after-sales service returns or pack your machine
with a similar cardboard box of the same dimensions.
For any question concerning our after-sales service you can make a request on our website https://
services.swap-europe.com
Our hotline remains available at +33 (9) 70 75 30 30.
If you bought your product on a website:
a) Empty the fuel tank if your product has one.
b) Make sure that your machine is complete with all accessories supplied, and clean! If this is not the case,
If you bought your product in a store:
a) Empty the fuel tank if your product has one.
b) Make sure that your machine is complete with all accessories supplied, and clean! If this is not the case,
12. PRODUCT FAILURE
17

THE WARRANTY DOES NOT COVER:
• Start-up and setting up of the product.
• Damage resulting from normal wear and tear of the product.
• Damage resulting from improper use of the product.
• Damage resulting from assembly or start-up not in accordance with the user manual.
• Breakdowns related to carburetion beyond 90 days and fouling of carburetors.
• Periodic and standard maintenance events.
• Actions of modifcation and dismantling that directly void the warranty.
• Products whose original authentication marking (brand, serial number) has been degraded, altered or
withdrawn.
• Replacement of consumables.
• The use of non-original parts.
• Breakage of parts following impacts or projections.
• Accessories breakdowns.
• Defects and their consequences linked to any external cause.
• Loss of components and loss due to insufcient screwing.
• Cutting components and any damage related to the loosening of parts.
• Overload or overheating.
• Poor power supply quality: faulty voltage, voltage error, etc.
• Damages resulting from the deprivation of enjoyment of the product during the time necessary for repairs
and more generally the costs related to the immobilization of the product.
• The costs of a second opinion established by a third party following an estimate by a SWAP-Europe repair
station
• The use of a product which would show a defect or a breakage which was not the subject of an immediate
report and/or repair with the services of SWAP-Europe.
• Deterioration linked to transport and storage*.
• Launchers beyond 90 days.
• Oil, petrol, grease.
• Damages related to the use of non-compliant fuels or lubricants.
* In accordance with transport legislation, damage related to transport must be declared to carriers within 48
hours maximum after observation by registered letter with acknowledgement of receipt.
This document is a supplement to your notice, a non-exhaustive list.
Attention: all orders must be checked in the presence of the delivery person. In case of refusal by the
delivery person, it you must simply refuse the delivery and notify your refusal.
Reminder: the reserves do not exclude the notifcation by registered letter with acknowledgement within 72
hours.
Information:
Thermal devices must be wintered each season (service available on the SWAP-Europe site). Batteries must
be charged before being stored.
13. WARRANTY EXCLUSIONS
18

BUILDER SAS
32, rue Aristide Bergès - ZI 31270 Cugnaux - France
MADE IN PRC
Table of contents
Other Feider Machines Steam Cleaner manuals


