Ferguson FTV21F2 User manual

- 1 -
Contents
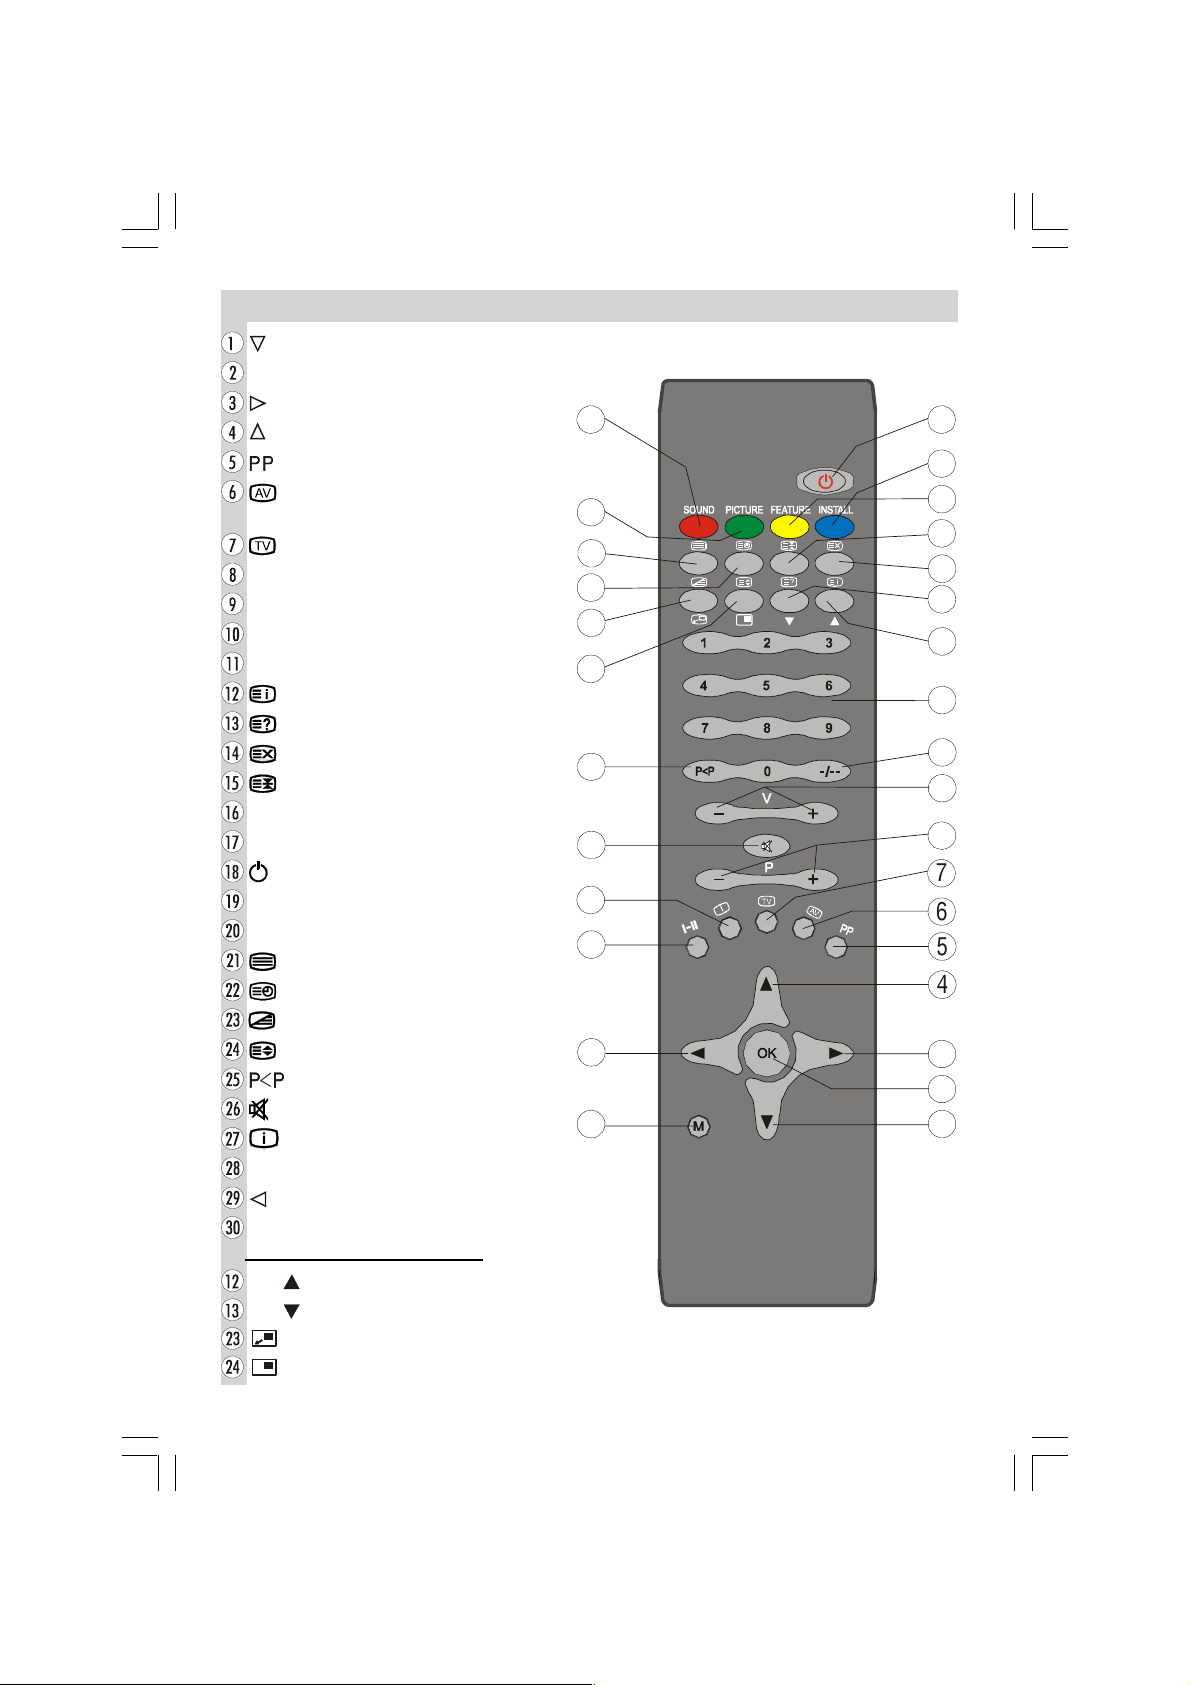
Remote Control Buttons ......................... 2
Control Panel Buttons ............................ 3
Antenna Connections ............................. 3
Preparation ............................................. 4
Safety Precautions ................................. 4
Before Switching on your TV .................
Power connection ................................ 6
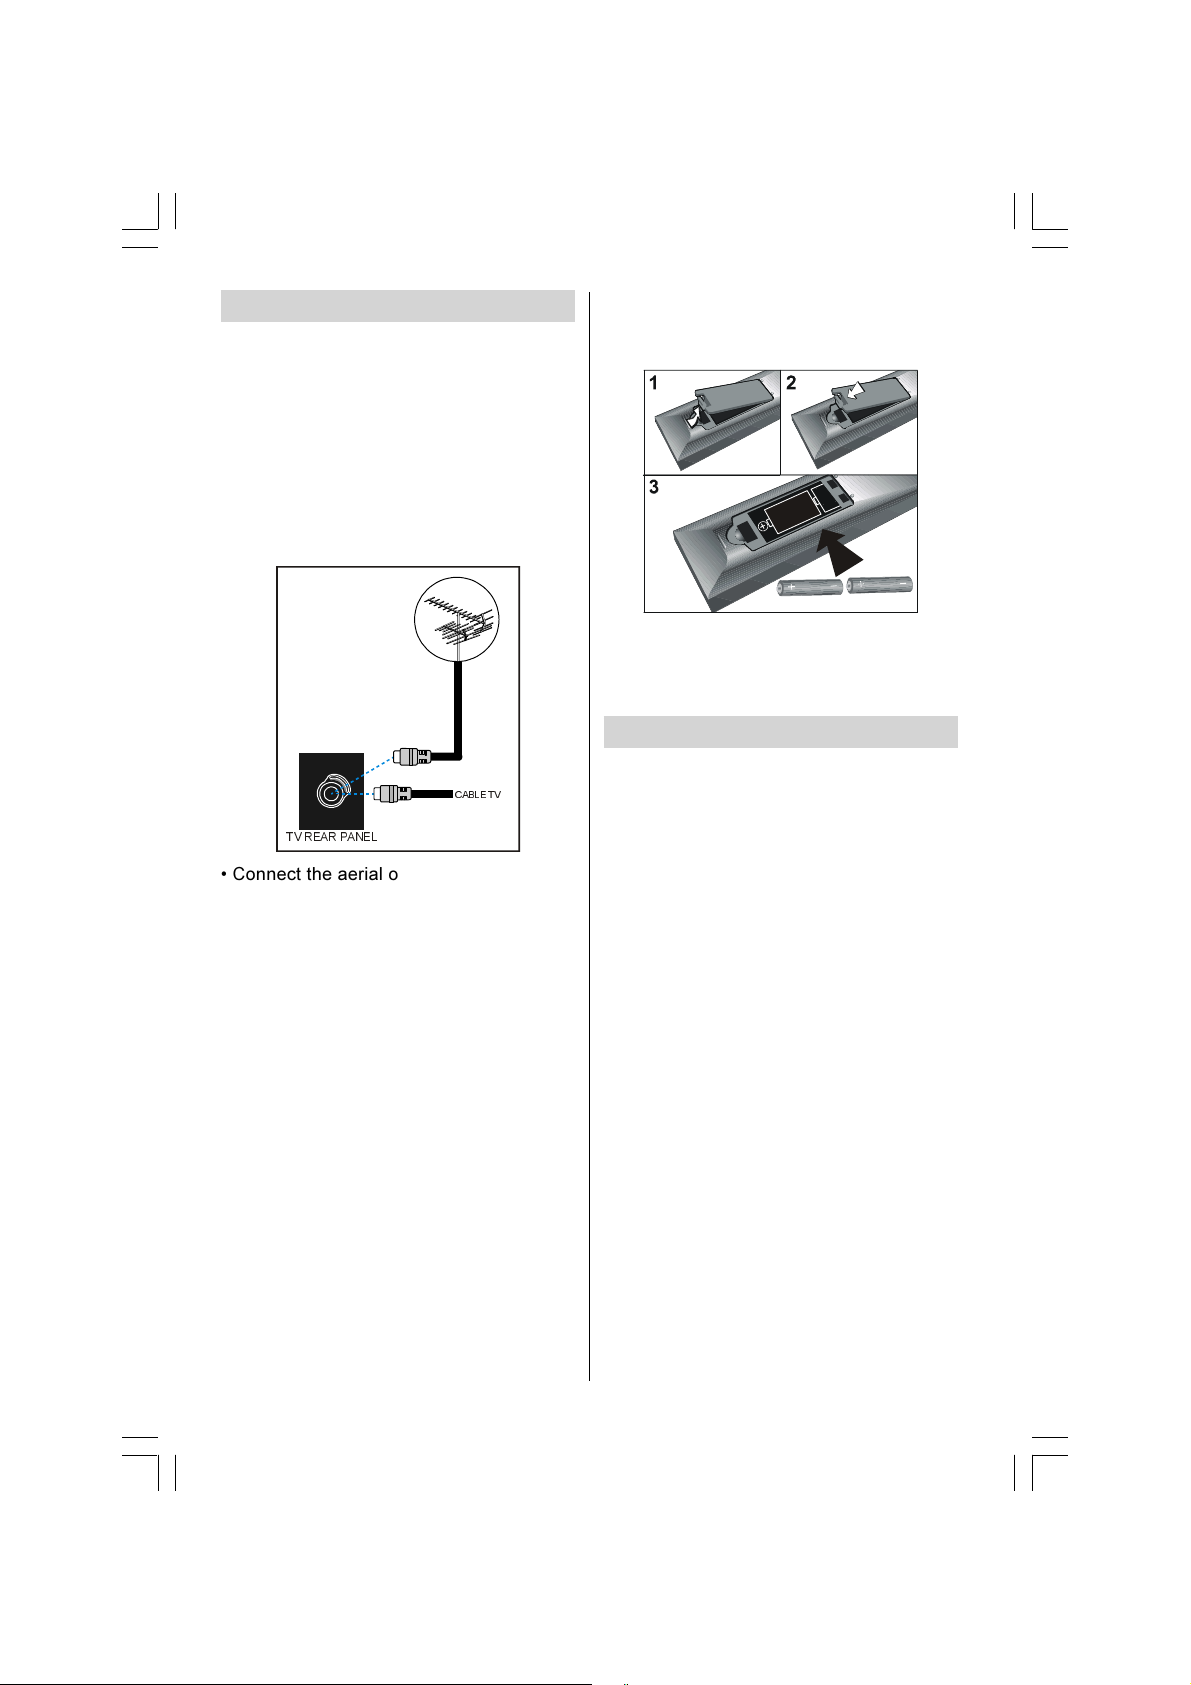
Connections to the RF input socket .... 6
How to connect other devices .............. 6
Inserting batteries in the remote control
handset ................................................ 6
Switching the TV ON/OFF .......................
o switch the V on .............................. 6
o switch the V off .............................. 6
Operating the TV ..................................... 7
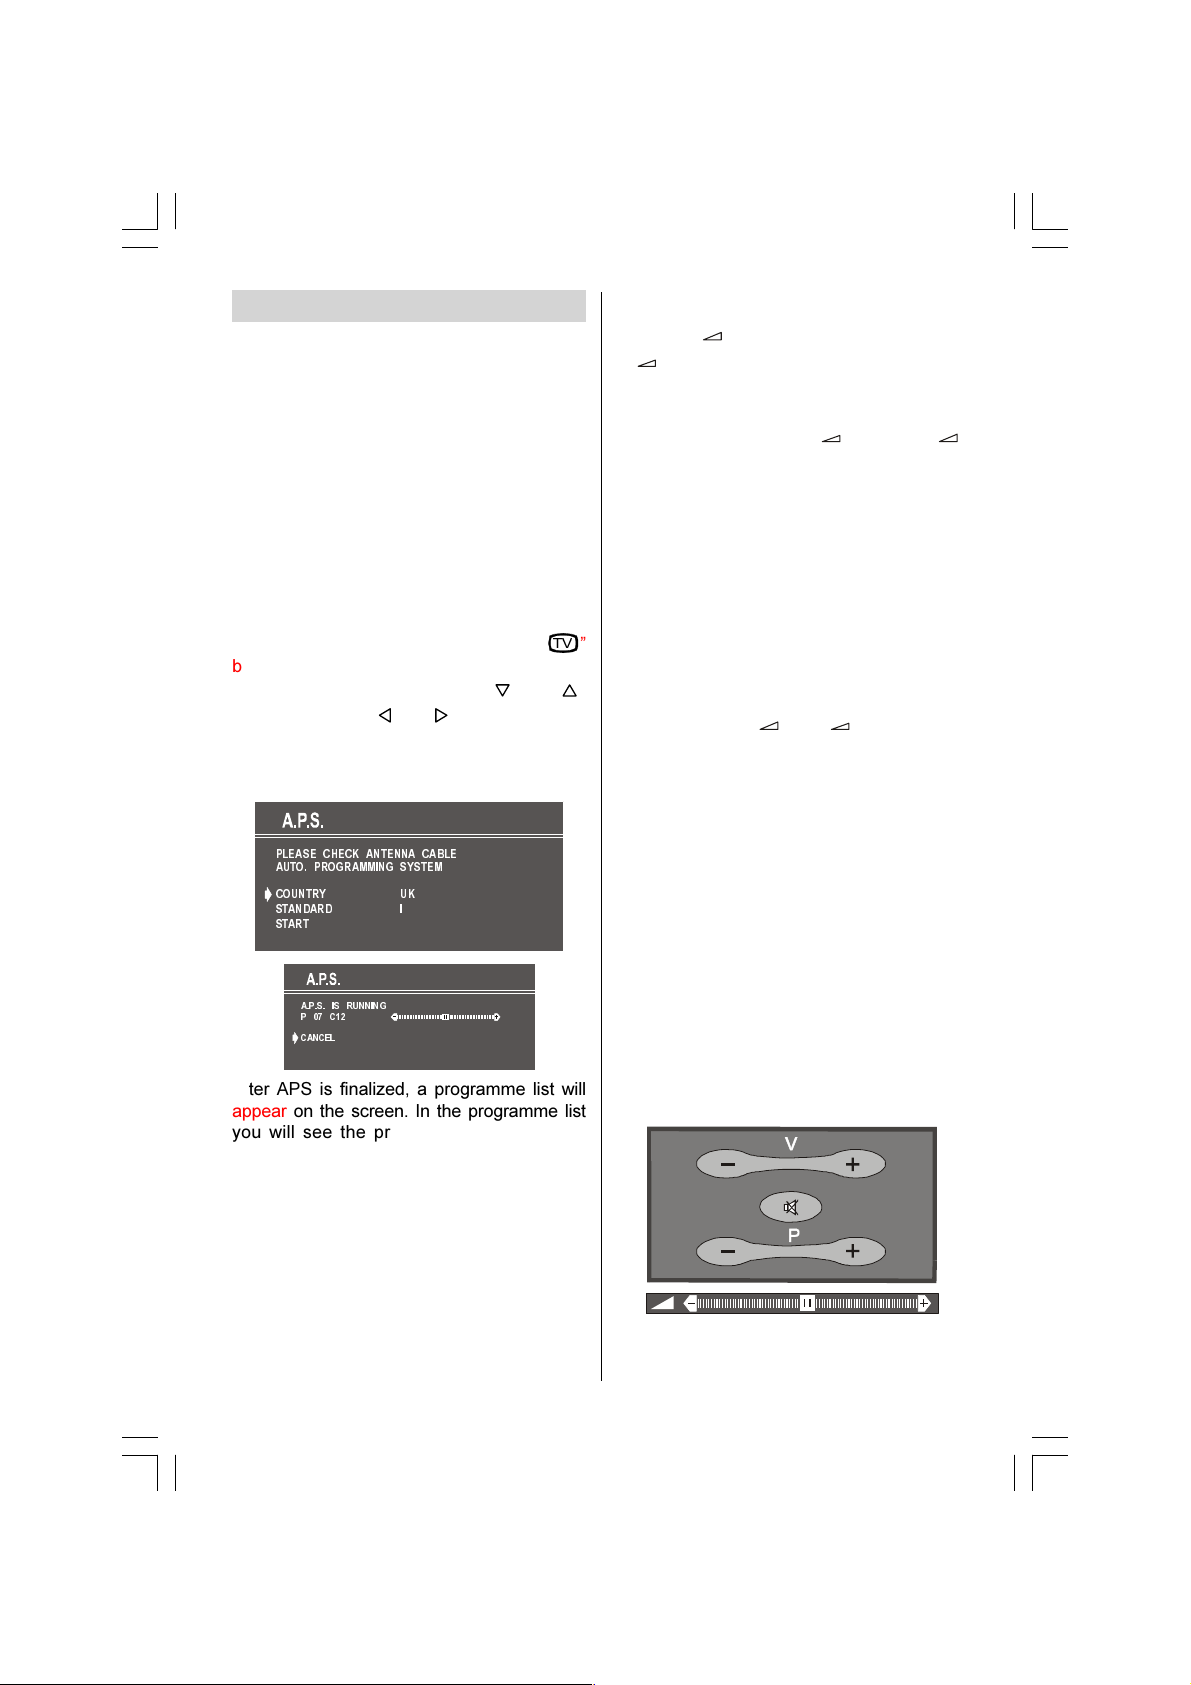
A.P.S. (optional)
(Automatic Programming System) ...... 7
Operating with the buttons on the
V set ................................................... 7
Operating with Remote Control ........... 7
Menu System .......................................... 8
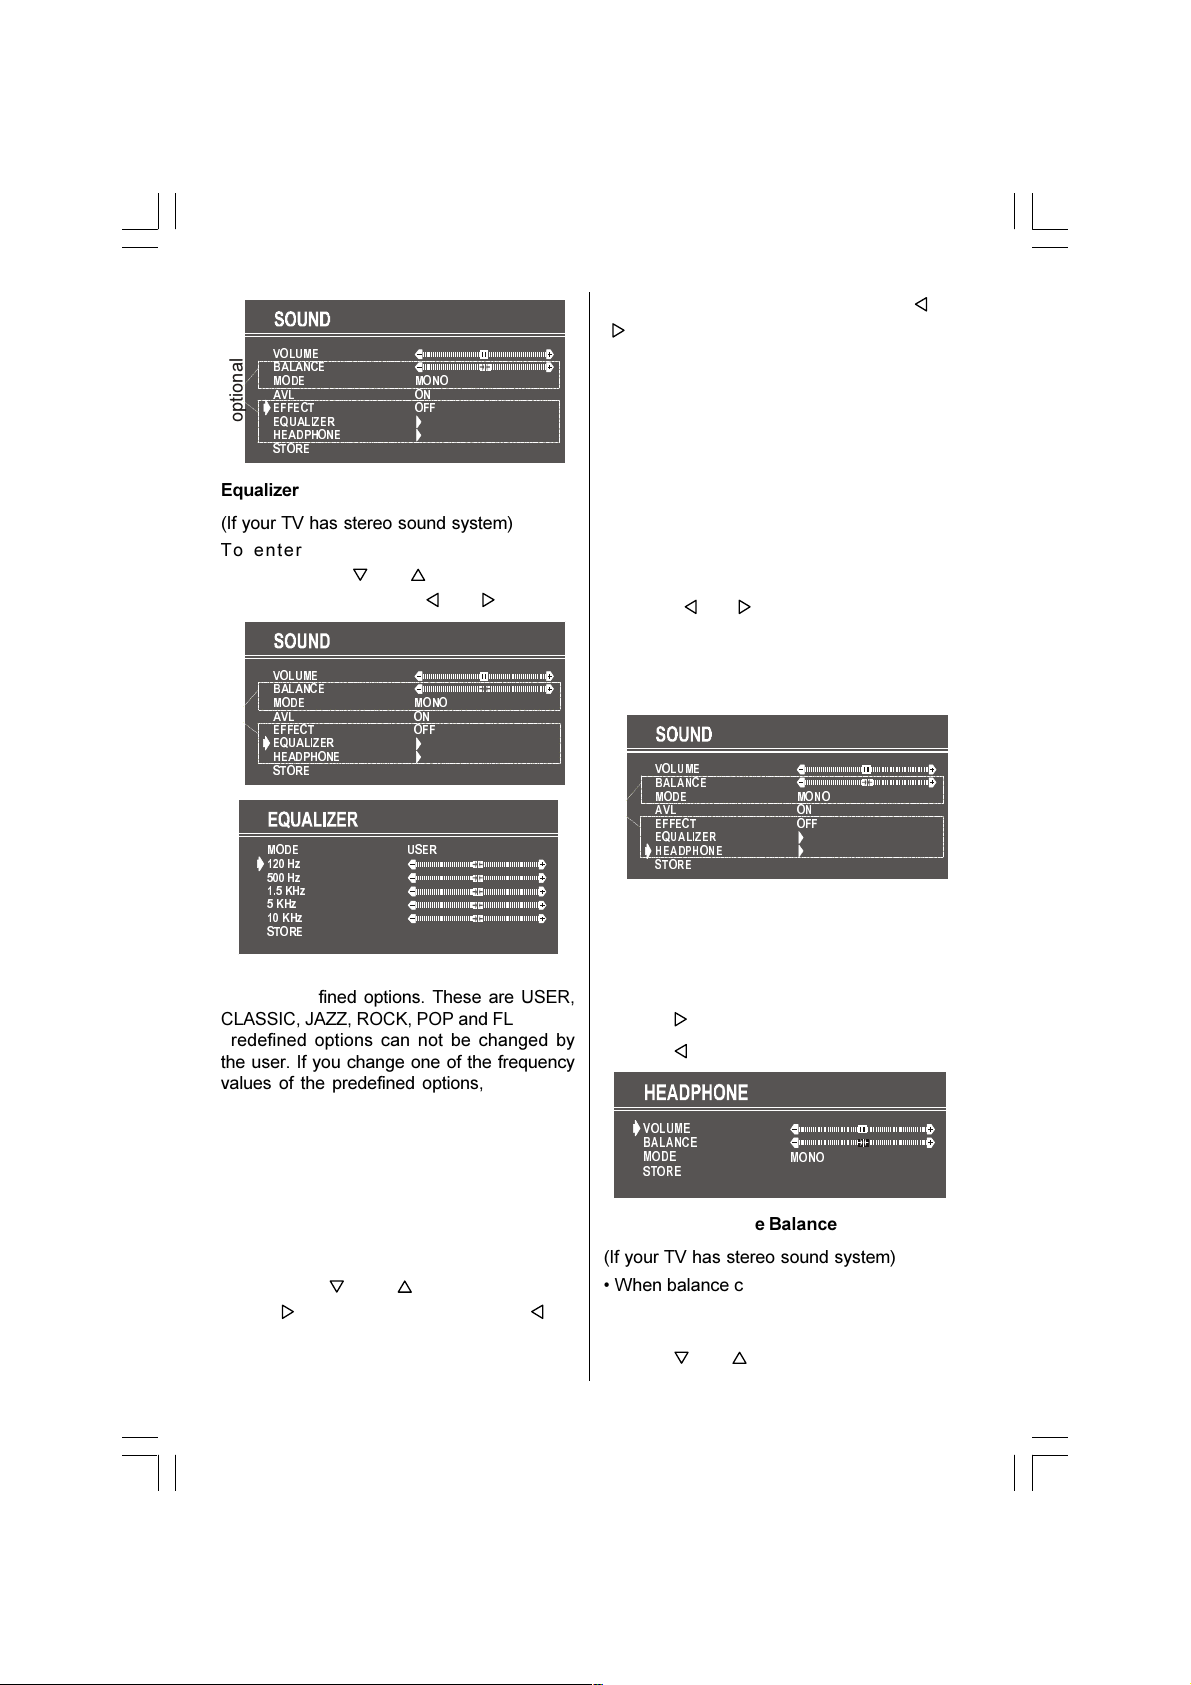
Sound Menu ......................................... 8
Picture Menu ...................................... 11
Feature Menu ..................................... 13
Install Menu ........................................ 14
Programme Menu .............................. 15
Other Features ...................................... 1
V Status ............................................ 16
Programme Swap (P<P) ................... 16
Double-digit (- / - -) ............................. 16
Personal Preferences (PP) ................ 16
Sound Indicator (optional) ................. 16
Picture Mode ...................................... 17
Sleep imer Last Minute Indicator ..... 17
Mute Indicator ..................................... 17
No-Signal ........................................... 17
Blue Background During No-Signal .. 17
Volume Bar ......................................... 17
AV Modes (optional) ........................... 17
Teletext .................................................. 18
o operate eletext ............................. 18
o select a page of eletext ................ 18
o Select Index Page ......................... 18
o Select eletext with a V
Programme ........................................ 18
Searching for a page while watching
V ....................................................... 18
o Select Double Height ext ............. 18
o Reveal concealed Information .... 18
o Stop Automatic Page Change ....... 19
o Select a Subcode Page ................ 19
Fastext (optional) ............................... 19
o exit eletext .................................... 19
o Display the ime ........................... 19
Connect Peripheral Equipment ........... 20
Via the Euroconnector ........................ 20
Via Ant Input ........................................ 20
Decoder.............................................. 20
V and Video Recorder ...................... 20
Playback N SC (Optional) ................. 20
Copy Facility (Optional) ...................... 20
Search for and store the test signal
of the video recorder .......................... 20
Camera and Camcorder ................... 21
o connect to Front-AV input (FAV)
(optional): ........................................... 21
o connect to Back-AV (BAV) input /
output (optional): ................................ 21
o connect to S-VHS input
(optional): ........................................... 21
Connect the decoder to the video
recorder .............................................. 21
Connecting Headphones (Optional) . 21
Connecting External Speakers
(optional) ............................................ 21
Connect Peripheral Equipment ........... 22
Tips ........................................................ 23
Care of the Screen ............................. 23
Poor Picture ........................................ 23
No Picture ........................................... 23
Sound ................................................. 23
Remote Control .................................. 23
No solution: ........................................ 23
Specifications ....................................... 24
ENG-21005-1080UK-CIFT SCART-ST7P-T3X.p65 26.09.2005, 13:181

- 2 -
Remote Control Buttons
= Cursor Down
OK = OK (No Function)
= Cursor Right
= Cursor Up
= Personal Preferences
= External Source (optional)
(AV-1, AV-2, F-AV / B-AV, RGB, S-VHS )
= V / Quit Menu
P + / - = Programme Up / Down
V + / - = Volume Up / Down
-/- - = Double Digit
0 - 9 = Direct Program
= Index Page
= Reveal
= Update
= Hold
Yellow (FEATURE) = Feature Menu
Blue (INSTALL) = Installation Menu
= Stand By
Red (SOUND) = Sound Menu
Green (PICTURE) = Picture Menu
= eletext
= ime
= Mix
= Expand
=Previous Programme
= Mute
= Info (Program Menu)
I-II = Mono/Stereo - Dual I-II (optional)
= Cursor Left
0
= Menu
PIP BUTTONS (No Function)
PIP = No Function
PIP = No Function
= No Function
= No Function
ENG-21005-1080UK-CIFT SCART-ST7P-T3X.p65 26.09.2005, 13:182

- 3 -
Control Panel Buttons
9+)8+)
9+)8+)
Ω
Ω
9+)8+)DQWHQQD
9+)DQWHQQD 5RXQGRKPFRD[LDOFDEOH
5RXQGRKPFRD[LDOFDEOH
)ODWRKPWZLQOHDGFDEOH
5HDURI79
5HDURI79
2XWGRRU$QWHQQD&RQQHFWLRQV
Antenna Connections
)5217$9
&21752/
3$1(/
%877216
$XGLR,QSXW
7HUPLQDO
9LGHR,QSXW
7HUPLQDO
+HDGSKRQH
0HQX
3URJUDP
9ROXPH
3RZHU
ENG-21005-1080UK-CIFT SCART-ST7P-T3X.p65 26.09.2005, 13:183

- 4 -
Preparation
For ventilation, leave a space of at least 10
cm free all around the set. o prevent any
fault and unsafe situations, please do not
place any objects on top of the set.
Safety Precautions
1. Power Source
he receiver should be operated only from a
220-240V AC, 50 Hz outlet. Ensure you
select the correct voltage setting for your
convenience.
2. Power Cord
he power supply cord should be placed so
that it is not likely to be walked on or pinched
by items placed upon them or against it. Pay
particular attention to cord where it enters
the plug, power outlet, and the point where it
exits from the receiver.
3. Moisture and Water
Do not use this equipment in a humid and
damp place (avoid the bathroom, the sink in
the kitchen, and near the washing machine).
Do not expose this equipment to rain or
water, as this may be dangerous and do not
place objects filled with liquids on top. Avoid
from dripping or splashing.
4. Cleaning
Before cleaning, unplug the receiver from
the main supply, outlet. Do not use liquid or
aerosol cleaners. Use soft and dry cloth.
5. Ventilation
he slots and openings on the receiver are
intended for ventilation and to ensure
reliable operation. o prevent overheating,
these openings must not be blocked or
covered in anyway.
6. Lightning
In case of storm and lightning or when
going on holiday, disconnect the power cord
from the wall outlet.
7. eplacement Part
When replacement parts are required, be
sure the service technician has used
replacement parts which are specified by
the manufacturer or have the same
specifications as the original one.
Unauthorised substitutions may result in
fire, electrical shock, or other hazards.
8. Servicing
Please refer all servicing to qualified
personnel. Do not remove cover as this may
result in electric shock.
9. X-rays
he x-rays generated in this television are
shielded sufficiently.
10. Naked Flame Sources
Do not place naked flame sources on the
apparatus.
Warning!
Any intervention contrary to regulations, in
particular, any modification of high voltage
or a replacement of the picture tube may
lead to an increased concentration of x-rays.
Any television modified in this way no longer
complies with license and must not be
operated.
Instructions for waste disposal:
Packaging and packaging aids are recy-
clable and should principally be recycled.
Packaging materials, such as foil bag, must
be kept away from children.
Batteries, including those which are heavy
metal-free, should not be disposed of with
household waste. Please dispose of used
batteries in an environmentally sound man-
ner. ind out about the legal regulations
which apply in your area.
ENG-21005-1080UK-CIFT SCART-ST7P-T3X.p65 26.09.2005, 13:184

- 5 -
he lightning flash with arrowhead symbol, within an equilateral
triangle, is intended to alert the user to the presence of uninsulated
"dangerous voltage" within the product's enclosure that may be of
sufficient magnitude to constitute a risk of electric shock of persons.
he exclamation point within an equilateral triangle is intended to alert
the user to the presence of important operating and maintenance
(servicing) instructions in the literature accompanying the appliance.
RISK OF ELECTRIC SHOCK
CAUTION
DO NOT LEAVE YOUR TV AT STAND-BY OR OPERATING WHEN YOU LEAVE YOUR HOUSE
ENG-21005-1080UK-CIFT SCART-ST7P-T3X.p65 26.09.2005, 13:185

- 6 -
Before Switching on your TV
Power connection
IMPORTANT: he V set is designed to
operate on 220-240V AC, 50 Hz.
After unpacking, allow the V set to reach the
ambient room temperature before you
connect the set to the mains.
Connections to the F input
socket
VHF/UHF
75
Ω
795($53$1(/
&$%/(79
Connect the aerial or cable V plug to the
RF input socket located at the back of the V
and connect the cable plug coming out from
the V out socket located at the devices
(VCR, DVB etc.) to this socket as well.
How to connect other devices
IMPORTANT: Switch off the V before
connecting any external device.
Sockets for external connections are at the
back and front of the V (optional). For
connection of other devices via
Euroconnector refer to the manuals of the
related devices.
Inserting batteries in the remote
control handset
Place the batteries in the right directions as
seen below.
Remove the battery cover located on the
back of the handset by gently pulling
upwards from the indicated part.
Insert two UM- 4 AAA or equivalent type bat-
teries inside.
Replace the battery cover.
NOTE: Remove batteries from remote
control handset when it is not to be used for
a long period.Otherwise it can be damaged
due to any leakage of batteries.
Switching the TV ON/OFF
To switch the TV on
Your V will switch on in two steps:
1- Press the power button located on the front
of the V. hen the V switches itself to
standby mode and the LED located below
becomes BLUE.
2- o switch on the V from stand-by mode
either:
Press a digit button on the remote control so
that a programme number is selected,
or,
Press Programme Up or Down buttons on
the front of the V or on the remote control,
so that last switched off programme is
selected.
By either ways the V will switch on and the
LED will turn off.
To switch the TV off
Press the stand-by button on the remote
control, so the V will switch to stand-by
mode and the LED will become Blue,
or,
Press the power button located on the front
of the V, so the V will switch off.
ENG-21005-1080UK-CIFT SCART-ST7P-T3X.p65 26.09.2005, 13:186

- 7 -
Operating the TV
You can operate your TV both using the
remote control handset and onset
buttons
A.P.S. (optional)
(Automatic Programming System)
"PLEASE, CHECK ANTENNA CABLE. AUTO
PROGRAMMING SYSTEM" message will be
displayed when you turn on your V for the
first time. APS, searches and sorts all
channels and stores them automatically on
your V, according to the transmission of
programme systems in your area.
o cancel APS before starting, press
79
button. his will effect the sort process in
APS. o select START use or
button and press or button. Your V
will no tune in all available channels.
Please be patient, this may take a few
minutes.
3/($6( &+(&. $17(11$ &$%/(
$872 352*5$00,1* 6<67(0
&28175<
67$1'$5'
67$57
8.
,
$36 ,6 5811,1*
3 &
&$1&(/
After APS is finalized, a programme list will
appear on the screen. In the programme list
you will see the programme numbers and
names assigned to the programmes.
If you do not accept the locations and / or the
programme names, you can change them
in Programme menu.
Operating with the buttons on the
TV set
Volume setting and programme selection
can be made using the buttons on the front
panel.
Volume Setting
Press
button to decrease volume or
button to increase volume, so a
volume level scale (slider) will be displayed
at the middle of the bottom on the screen.
By pressing both the
and
buttons at the same time you can enter Main
menu.
Programme Selecting
Press P/CH+ button to select the next
programme or -P/CH button to select the
previous programme.
Entering Main Menu (optional)
Press "MENU" button to enter Main menu. In
the Main menu select sub-menu using -P/
CH or P/CH+ button and enter the sub-
menu using
or
button. o
learn the usage of the menus, refer to the
Menu System section.
Operating with emote Control
he remote control handset of your V is
designed to control all the functions of the
model you selected. he functions will be
described in accordance with the menu
system of your V.
Functions of the menu system are
described in Menu System section.
Volume Setting
Press V+ button to increase volume. Press
-V button to decrease volume. A volume
level scale (slider) will be displayed at the
middle of the bottom on the screen.
Programme Selecting
(Previous or next programme)
ENG-21005-1080UK-CIFT SCART-ST7P-T3X.p65 26.09.2005, 13:187

- 8 -
Press P+ button to select the previous pro-
gramme.
Press -P button to select the next programme.
Programme Selecting (direct access):
Press digit buttons on the remote control
handset to select programmes between 0
and 9. V will switch to the selected program-
me. o select programmes between 10 - 99,
you must use the double digit button "- /- -".
this OSD is displayed at the left
hand upper on the screen.
After then, press the digit buttons
consecutively which programme you want to
select (eg. for programme 27, first press 2
and then 7). When it is late to press any digit
button this function will be ignored and the
display will be erased. In the same way it
must not be late to press any digit button
after entering the first digit. he limit of the
delay time is 3 seconds.
Press directly the programme number to
reselect single digit programmes.
Programme Swapping
Press "P<P" (programme swap) button to
select the last selected programme. his
button provides swapping between last two
selected programmes. For example, select
programme 8, then select programme 2.
Now, if you press "P<P" button, programme
8 will be selected. If you press the same
button again, programme 2 will be selected
and so on.
enu System
Your V has been designed with a menu
system, to provide an easy manipulation of a
multi-function system. he V is controlled
by choosing the commands, which are
displayed on the screen.
Press the M button. he Main menu will be
displayed at the middle on the screen.
All the selected items in this menu system
is indicated with CYAN characters and with
an arrow on the leftside of items.
6281'
3,&785(
)($785(
,167$//
352*5$0
o select a sub-menu use or but-
ton, and press or button. Each op-
tion can also be selected with the coloured
button and button on the remote
control.
MAIN MENU
he menu system is described below.
he short way in order to enter the menus,
press :
M Button, Main Menu.
Red Button, Sound Menu.
Green Button, Picture Menu.
Yellow Button, Feature Menu.
Blue Button, Install Menu.
Button, Programme Menu.
Menu button has two functions; first is
opening or closing the "MAIN MENU", and
the second is closing the sub-menu and
then opening its parent menu.
Sound Menu
To change sound settings
Enter the Sound Menu directly, pressing the
Red button or,
ENG-21005-1080UK-CIFT SCART-ST7P-T3X.p65 26.09.2005, 13:188

- 9 -
As you enter the main menu, sound will be
the first selected option. In the main menu,
select SOUND using or button,
then enter the sound menu pressing
or button.
Setting Volume:
As you enter the sound menu, Volume will
be the first selected option.
Press button to increase volume.
Press button to decrease volume.
Or you can directly change the volume
settings using V+ (to increase) or
-V (to decrease) button.
92/80(
%$/$1&(
())(&7
6725(
02'(
$9/
(48$/,=(5
+($'3+21(
0212
21
2))
RSWLRQDO
Setting Balance
(If your V has stereo sound system)
It allows adjusting the distribution between
the left and right speakers.
Using or button select Balance.
Press button to change balance
rightward.
Press button to change balance leftward.
When balance control is in mid position, the
cursor is displayed with the two reciprocal
arrows.
92/80(
%$/$1&(
$9/
())(&7
+($'3+21(
6725(
02'(
(48$/,=(5
0212
21
2))
R
S
W
L
R
Q
D
O
Selecting Mode
(If your V has stereo sound system)
Using or button select Mode.
Press or button to change Mode.
You can choose MONO, STEREO or DUAL
(I-II) mode, only if the selected channel
supports that mode.
You can also change sound mode directly
pressing I-II button on your remote control.
92/80(
%$/$1&(
$9/
())(&7
+($'3+21(
6725(
02'(
(48$/,=(5
0212
21
2))
RSWLRQDO
In case of bilingual broadcast (Dual Sound),
you can select original or dubbed language
using mode option.
Setting AVL
Automatic Volume Limiting (AVL) function
normalises sound to obtain fixed output
level between programs, having different
sound levels. Pressing or button
will turn on and off this feature.
92/80(
%$/$1&(
$9/
())(&7
+($'3+21(
6725(
02'(
(48$/,=(5
0212
21
2))
RSWLRQDO
Setting Effect
(If your V has stereo sound system)
You can use this feature to switch the sound
effect on and off. Pressing or button
will turn on and off this feature. If the current
sound system is MONO and the sound
effect is set ON, then the sound will be heard
as if it is STEREO. If the current sound
system is STEREO, switching this effect on
will make the sound deeper. Switching it off
will make no change in MONO and STEREO.
ENG-21005-1080UK-CIFT SCART-ST7P-T3X.p65 26.09.2005, 13:189

- 10 -
92/80(
%$/$1&(
$9/
())(&7
+($'3+21(
6725(
02'(
(48$/,=(5
0212
21
2))
RSWLRQDO
Equalizer
(If your V has stereo sound system)
o enter Equalizer sub-menu, select
Equalizer using or button, then enter
Equalizer menu pressing or button.
92/80(
%$/$1&(
$9/
())(&7
+($'3+21(
6725(
02'(
(48$/,=(5
0212
21
2))
RSWLRQDO
02'(86(5
+]
+]
.+]
.+]
.+]
6725(
In MODE item there are five predefined and
one user defined options. hese are USER,
CLASSIC, JAZZ, ROCK, POP and FLA . he
predefined options can not be changed by
the user. If you change one of the frequency
values of the predefined options, the MODE
is switched automatically to USER option.
he USER option may be adjusted by the
user.
he 5 items below the MODE are available
to adjust the sound settings in
5 frequency values: 120 Hz, 500 Hz, 1.5 kHz,
5 kHz and 10 kHz. o change the values of
5 frequency options, select one of the
options by or button, and then
press to increase the value, or to
decrease the value. In mid position, cursor
is displayed with the two reciprocal arrows.
o store the Equalizer settings, press or
button on STORE option.
During the store process all the items are
stored, moreover, the USER mode
information would not be lost. In other
words, when the user mode is selected
again, after storing the MODE with one of the
predefined options, the user definde
frequency values would be set.
To Change Headphone Sound Settings
(If your V has stereo sound system)
(optional)
Pressing or button on HEADPHONE,
enter the Headphone menu. his is a sub-
menu of Sound menu, and all options in this
menu are working as the same in the
Sound menu.
92/80(
%$/$1&(
$9/
())(&7
+($'3+21(
6725(
02'(
(48$/,=(5
0212
21
2))
RSWLRQDO
Setting Headphone Volume
(If your V has stereo sound system)
As you enter the Headphone sound menu,
Volume will be the first selected option.
Press button to increase volume.
Press button to decrease volume.
92/80(
%$/$1&(
02'(
6725( 0212
Setting Headphone Balance
(If your V has stereo sound system)
When balance control is in mid position, the
cursor is displayed with the two reciprocal
arrows.
Using or button select Balance.
ENG-21005-1080UK-CIFT SCART-ST7P-T3X.p65 26.09.2005, 13:1810

- 11 -
Press button to change balance
rightwards.
Press button to change balance
leftwards.
Setting Headphone Mode
(If your V has stereo sound system)
Using or button select Mode.
Pressing or button will change the
current sound mode. (e.g.: If the current
sound mode is stereo, it will be stereo or
visa versa).
In case of bilingual broadcast, you can
select original or dubbed language again
using mode menu. So when somebody
listens to the original language from the
loudspeakers, somebody else can listen to
the dubbed language from headphone.
To Store the Settings
Using or button select Store. Press
or button to store current
headphone volume and balance. he
stored values will be valid for all the
programmes.
To Store the Settings
Press or button on STORE option
to store Sound menu settings.
92/80(
%$/$1&(
$9/
())(&7
+($'3+21(
6725(
02'(
(48$/,=(5
0212
21
2))
R
S
W
L
R
Q
D
O
Picture Menu
o enter the Picture menu directly, press the
GREEN button, or
Press M button, now you are in Main
menu. In the Main menu, select PICTURE
using or button, then enter the Pic-
ture menu pressing or button.
6281'
3,&785(
)($785(
,167$//
352*5$0
Setting Brightness
As you enter the picture menu, Brightness
will be the first selected option.
Press button to increase brightness.
Press button to decrease brightness.
%5,*+71(66
&2175$67
&2/285
6+$531(66
02'(
6725(
Setting Contrast
Using or button select Contrast.
Press button to increase contrast level.
Press button to decrease contrast level.
%5,*+71(66
&2175$67
&2/285
6+$531(66
02'(
6725(
Setting Colour
Using or button select Colour.
Press button to increase colour level.
Press button to decrease colour level.
%5,*+71(66
&2175$67
&2/285
6+$531(66
02'(
6725(
ENG-21005-1080UK-CIFT SCART-ST7P-T3X.p65 26.09.2005, 13:1811

- 12 -
Setting Sharpness
Using or button select Sharpness.
Press button to increase peaking level.
Press button to decrease peaking level.
%5,*+71(66
&2175$67
&2/285
6+$531(66
02'(
6725(
Setting Hue
(During Playback N SC system, this will
appear in AV mode only when N SC video
source is applied. Otherwise, HUE option is
invisible in Picture menu.): (optional)
Using or button select Hue.
Press button to increase hue level.
Press button to decrease hue level.
Center value is indicated with the two
reciprocal arrows.
%5,*+71(66
&2175$67
&2/285
6+$531(66
+8(
02'(
6725(
Mode
his item is used to change the picture size.
By pressing or button you may
choose one of these options: 4:3, 16:9,
14:9(optional), Cinema(optional),
Subtitle (optional) and AU O. It is also
possible to change picture modes directly by
pressing button on your remote control.
4:3 his option forces the picture ratio to 4:3
mode.
1 :9 his option forces the picture ratio to
16:9 mode.
14:9 (optional) his option forces the picture
ratio to 14:9 mode.
Cinema (optional) his option forces the
picture ratio to Cinema mode.
Subtitle (optional) his option forces the
picture ratio to Subtitle mode.
AUTO his allows to change the picture
mode automatically, according to the
transmission of the selected channel. For
example, your V is 4:3 mode, but the
transmission of that channel is in 16:9
mode. If you select the AU O mode, the V
is switched to 16:9 mode automatically. If the
V is in 4:3 mode and the picture ratio of the
channel is also 4:3, there will be no affect
selecting the picture mode to AU O mode.
WSS feature is only used in V and FAV /
BAV modes. For the Picture Mode selection
in AV1 and AV2 the pin 8 (of Scart) value is
used. In RGB and S-VHS modes the Picture
Mode can be 4:3, 16:9, 14:9 (optional),
Cinema (optional), Subtitle (optional). (Auto
mode is not available.).
When the menu appears on screen, picture
mode will automatically change to its default
tube mode (4:3 or 16:9) but it will turned to
its stored mode when the menu disappears.
%5,*+71(66
&2175$67
&2/285
6+$531(66
02'(
6725(
To Store the Settings
Press or button on STORE option to
store Picture menu settings.
he stored picture mode setting will be valid
only in current program. However, the other
stored values in Picture Menu will be valid
for all the programmes.
%5,*+71(66
&2175$67
&2/285
6+$531(66
02'(
6725(
2.
ENG-21005-1080UK-CIFT SCART-ST7P-T3X.p65 26.09.2005, 13:1812

- 13 -
Feature Menu
o enter the Feature menu directly, press the
YELLOW button, or
Press M button, now you are in Main
menu. In the Main menu, select FEATURE
using or button. hen enter the
Feature menu pressing or button.
6281'
3,&785(
)($785(
,167$//
352*5$0
Sleep Timer
As you enter the Feature menu, SLEEP
TIMER will be the first selected option. Use
or button to change the Sleep imer
values between OFF, 0:15:00, 0:30:00,
0:45:00, 1:00:00, 1:15:00, 1:30:00, 1:45:00
and 2:00:00.
It is displayed on the upper right of the
screen. If sleep timer is activated it is
displayed with the V status and erased with
it after 3 seconds.
6/((37,0(5
&+,/'/2&.
/$1*8$*(
$9287387
2))
2))
(1*/,6+
79
RSWLRQDO
If there is left only one minute of the down
counting of the timer, it is displayed
automatically on the upper right of the
screen, and stayed there until finishing.
hen V goes automatically to stand-by.
Child Lock
You can use this feature to prevent children
turning on V or changing programs or
adjustments etc. without remote control.
he CHILD LOCK feature can be set by
or button to either ON or OFF. When OFF
is selected, there will be no difference in the
operation of your V. When ON is selected,
the V can only be controlled by the remote
control handset. In this case, the front panel
buttons (except the Switch On/Off button) will
not work.
6/((37,0(5
&+,/'/2&.
/$1*8$*(
$9287387
2))
2))
(1*/,6+
79
RSWLRQDO
Selecting Menu Language
Menu language can be chosen by pressing
or button on LANGUAGE item.
6/((37,0(5
&+,/'/2&.
/$1*8$*(
$9287387
2))
2))
(1*/,6+
79
RSWLRQDO
AV-2 OUTPUT (optional)
(It is valid only in stereo option.)
From AV-2 Output, either V or AV-1 can be
given. V or AV-1 can be chosen by pressing
or button on "AV-2 OUTPUT".
6/((37,0(5
&+,/'/2&.
/$1*8$*(
$9287387
2))
2))
(1*/,6+
79
RSWLRQDO
To Store Settings
In Feature menu all settings are stored
automatically.
ENG-21005-1080UK-CIFT SCART-ST7P-T3X.p65 26.09.2005, 13:1813

- 14 -
Install Menu
o enter the Install menu directly, press the
BLUE button, or
Press M button, now you are in Main
menu. In the Main menu, select INSTALL.
Using or button. hen enter the In-
stall menu pressing or button.
6281'
3,&785(
)($785(
,167$//
352*5$0
Selecting Programme
o select programme number, you can use
or button, Digit Buttons or he
Double Digit button with digit buttons.
Selecting Band
BAND, can be chosen either,
VHF1, VHF3 or UHF (in Frequency option) by
or button.
C or S (in Channel option).
Selecting Frequency (optional)
he frequency value is,
044 - 890 MHz for band VHF1 - VHF3 - UHF.
352*5$00(
%$1'
)5(48(1&<
67$1'$5'
6($5&+
),1(781,1*
6725(
9+)
,
RSWLRQDO
FREQUENCY can be changed by or
button, by the Digit buttons or by the Double
Digit button with digit buttons.
he decimal value in frequency can not be
changed by the digit buttons, it can be
changed only by the or button. he
value can be 00, 25, 50 and 75. Also
changing Fine uning changes the decimal
part.
Standard
he "Standard" setting is fixed to "I". You
cannot change this item's setting.
Selecting Channel (optional)
CHANNEL can be changed by or
button, by Digit Buttons or by the Double
Digit button with digit buttons.
352*5$00(
%$1'
&+$11(/
&+$11(/7$%/(
67$1'$5'
6($5&+
),1(781,1*
6725(
&
:(67(8523(
,
R
S
W
L
R
Q
D
O
For band C,
01 - 83, WEST EUROPE.
01 - 12, 21 - 69, EAST EUROPE .
01 - 17, 21 - 73, UK.
01 - 76, RANCE.
04 - 09, RANCE 2.
For band S,
01 - 41, for all channel tables.
Selecting Channel Table (optional)
CHANNEL TABLE is valid only for Channel
option, and can be either,
WEST EUROPE
EAST EUROPE
UK
FRANCE
FRANCE 2
by using or button.
Selecting Standard (optional)
Using or button on STANDARD, you
can change the standard to B/G, D/K, I/I', L/L'.
Selecting Search
o start the search process, press
button for forward search or button for
backward search. SEARCH item blinks
during search process, since the process is
stopped or signal is found. During search
ENG-21005-1080UK-CIFT SCART-ST7P-T3X.p65 26.09.2005, 13:1814

- 15 -
process the semi-transparent menu
background becomes "BLUE". o stop the
search process or button must be
pressed again.
Selecting Fine Tuning
You can use the Fine uning process for
fine adjustment (after coarse adjustment), if
you are not happy about the image on the
screen.
Use or button on FINE TUNING item,
until getting the best image on the screen.
In Channel option, normally the Fine uning
cursor is placed at the middle on the slider,
and this is indicated with the two reciprocal
arrows.
To Store Settings
Press or button on STORE option to
store Install menu settings.
Programme Menu
When your V is tuned in for the first time
using the APS tuning system (see page 7)
the programme menu will automatically
appear on the V screen.
his menu list all of the V programmes that
have been found during the tuning process.
You may choose to relocate these
programmes to different positions or to
rename or delete them so that for example
BBC1 is allocated to position1, BBC to
position 2 and so on.
NOTE: If the programme menu is not on your
V screen access it by pressing the M
button to open the main menu. Press
button to highlight programme and to
select.
6281'
3,&785(
)($785(
,167$//
352*5$0
Whilst in the programme menu
&
&
&
&
&
&
$8726725(,16(57 '(/(7(1$0(
1) Use the / navigation buttons to
highlight the programme you want to move.
2) Press the insert button (GREEN) button.
3) Press the / buttons to highlight
the position in which you want to place your
chosen programme.
4) Press the insert (GREEN) button again to
relocate your programme.
5) Repeat steps 1-4 to complete your
programme list.
6) Press M (Menu) button twice to exit
screen.
Changing Programme Name
In the programme menu
1) Press / buttons to highlight the
programme name you want to change.
2) Press NAME (RED) button. he
programme name will now be highlighted
in red.
3) Use the / buttons to scroll across
the name, and the / buttons to
change each character highlighted.
4) Press S ORE (RED) button to confirm
the new name.
Deleting a Programme
In the programme menu
1) Press / buttons to highlight the
programme you want to delete.
2) Press DELE E (YELLOW) button to
highlight and press (YELLOW) button once
more to confirm deletion. he programme
will now be deleted from the menu.
ENG-21005-1080UK-CIFT SCART-ST7P-T3X.p65 26.09.2005, 13:1815

- 16 -
Autostore
If at any time you wish to re-tune your V e.g.
if you move house to a new reception area,
press the Autostore (BLUE) button from
within the programme menu.
he APS (Automatic Programming System)
menu will appear.
3/($6( &+(&. $17(11$ &$%/(
$872 352*5$00,1* 6<67(0
&28175<
67$1'$5'
67$57
8.
,
$36 ,6 5811,1*
3 &
&$1&(/
Follow the instructions on page 7 to tune in
your V.
Other Features
TV Status
Programme Number, Programme Name
(or AV), (they are displayed on the upper left
of the screen) and Sleep Timer (shows the
time left on the upper right screen if
enabled). In stereo options the sound
indicator is displayed with them too. hey
are displayed after programme change
during 3 seconds.
Programme Number
Programme Name (5 characters)
hese OSDs are displayed when a new
programme is entered by digit button, by
pressing P<P button, or by P+ or P- but-
ton, or by
79
button.
Programme Swap (P<P)
his button is used to reenter to the
preceding entered programme again.
Pressing "P<P" consecutively allows to
swap into two last entered programmes.
Double-digit (- / - -)
his OSD is displayed when the "Double-
Digit" button pressed in place of the
programme number indicator.
After then, in order to enter a programme it
must be pressed to two digit consecutively.
When it is late to press any digit button this
function will be ignored and the display will
be erased. In the same way it must not be
late to press any digit button after entering
the first digit. he limit of the delay time is 3
seconds.
Personal Preferences (PP)
All the preset values will be restored, when
pressing "PP".
Sound Indicator (optional)
his is a stereo option. he alternatives of
the indicator are Mono, Stereo, Dual I and
Dual II. his indicator is displayed under the
programme number indicator on the screen.
"I-II" button is used to select Mono or Stereo,
or Dual I or Dual II.
In Mono broadcast or in forced-mono (for
stereo broadcast).
In Stereo broadcast.
If dual broadcast detected. Dual I is selected
in default and also can be selected after
Dual II by Remote Control.
If Dual II selected by Remote Control.
ENG-21005-1080UK-CIFT SCART-ST7P-T3X.p65 26.09.2005, 13:1816

- 17 -
Picture Mode
he picture mode OSD is displayed below
the sound indicator, by V Status OSDs.
According to the WSS data, inside of the
OSD box 4:3 or 16:9 or 14:9 (optional) or
Cinema (optional) or Subtitle (optional) or
Auto is written.
By pressing ( X _UPDA E) button
(if eletext is not active) the picture mode
can be switched into 4:3, 16:9, 14:9
(optional), Cinema (optional), Subtitle
(optional) or Auto Mode.
Sleep Timer Last Minute Indicator
It is displayed on the upper right of the
screen. If sleep timer is activated it is
displayed with the V status and erased with
it after 3 seconds.
If there is left only one minute of the down
counting of the timer, it is displayed
automatically on the upper left of the screen,
and stayed there until finishing. hen V
goes automatically to stand-by.
Mute Indicator
It is placed in the upper middle of the screen
when enabled, and it stays there until it is
disabled.
o cancel mute, there is two alternative; the
first one is pressing to " " button, thus
volume is set to the preceding value, and the
second one is increasing the volume level,
thus it starts at the minimum level to
increase. By decreasing the volume level in
mute state, mute will not be ignored, only the
volume level will decrease. If mute canceled
after decreasing the volume level, the
volume will valid with the decreased level.
No-Signal
No-Signal Timer Indicator
It is displayed in the middle of the screen
when no valid signal detected. It shows the
remained time for the switching to the
Stand-By mode (it takes 5 minutes when
any signal detected or no any Remote
Control command is accessed). he
indicator is displayed in 3 seconds when
there is no valid signal.
After an Remote Control command (if No-
Signal imer is active) the timer stops and if
no signal detected again the timer is
initialized to 5 minutes and starts 3 seconds
later again to count down.
It is not valid in AV mode.
Blue Background During No-Signal
In case, no valid signal is detected (in
V(optional) or AV mode) Blue Background is
activated.During search process Blue
Background is not active. But instead of it
there is another feature given; the semi-
transparent menu background is made blue.
Volume Bar
It is displayed in the lower middle of the
screen. When a volume command is
received (pressing V+ or -V by Remote
Control or Front panel) and no menu is
active, it stays on the screen for 3 seconds,
after the last volume command or until
another command is received in between.
AV Modes (optional)
By pressing the
$9
button you can switch
your V to AV modes (except being in
eletext). Pressing this button will
consecutively switch the V in one of the
optional AV modes: AV1, AV2, RGB, SVHS or
FAV / BAV (Front AV / Back AV). AV1 supports
the RGB mode and AV2 supports SVHS
mode unless there is an SVHS socket. If
your V has SVHS socket, you have to use
this socket for SVHS input.
In order to quit the AV mode press the
79
,
digit buttons or P+ / P- .
ENG-21005-1080UK-CIFT SCART-ST7P-T3X.p65 26.09.2005, 13:1817

- 18 -
Teletext
eletext is an information system that
displays text on your V screen. Using the
eletext information system you can view a
page of information on a subject that is
available in the list of contents (index).
On screen display is not available in text
mode.
Contrast, brightness or colour control is not
available, but volume control is available in
text mode.
To operate Teletext
Select a V station on which eletext is being
transmitted.
Press ( ELE EX ) button. Usually the
list of contents (index) is displayed on the
screen.
To select a page of Teletext
Press the appropriate digit buttons for the
required eletext page number.
he selected page number is displayed at
the top left corner of the screen. he eletext
page counter searches until the selected
page number is located, so that the desired
page is displayed on the screen.
Press P+ button to move the eletext
screen forward one page at a time.
Press -P button to move the eletext
screen backward one page at a time.
To Select Index Page
o select the page number of the index
(generally page 100), press button.
To Select Teletext with a TV
Programme
Press button. he text is now
superimposed over the programme on the
screen.
Press button again to return to the
eletext page.
Searching for a page while
watching TV
While eletext Mode is on, pressing will
change the mode to V, one more press to
will change the mode from V to the
latest eletext page we left. In the V mode
enter a page number using digit keys. As
you enter digits first line of teletext page will
appear on top screen and will remain there
until the requested page is found. hen
teletext line will be replaced by page number
to indicate that page has been found. Now
you can display this teletext page pressing
button.
To Select Double Height Text
Press button for the top half of the
information page to be displayed in double
height text.
Press button again for the bottom half
of the information page to be displayed in
double height text.
Press button once more for the full
page of normal height text.
To eveal concealed
Information
Pressing button once will reveal
answers on a quiz or games page.
ENG-21005-1080UK-CIFT SCART-ST7P-T3X.p65 26.09.2005, 13:1818

- 19 -
Pressing button again will conceal the
revealed answers.
To Stop Automatic Page Change
he teletext page you have selected may
contain more information than what is on the
screen; the rest of the information will be
displayed after a period of time.
Press button to stop the automatic
page change.
Press button again to allow the next
page to be displayed.
To Select a Subcode Page
Subcode pages are subsections of long
eletext pages that can only be displayed on
the screen one section at a time.
Select the required eletext page.
Press button.
Select the required subcode page number
by pressing four digit buttons (e.g. 0001).
If the selected subcode page is not displayed
in a short time, press button. V
programme will be displayed on the screen.
eletext page number will be displayed on
the upper left corner of the screen when the
selected page is found.
Press button to display the selected
eletext page.
Fastext (optional)
( his is applicable if your V is equipped
with FAS EX feature) (optional)
Your C V supports the 7 page eletext sys-
tem. When the page number of any of the 7
pages in memory is entered, the system will
not search for the requested page; instead it
will display the page automatically.
Press P+ button to move the eletext
screen forward one page at a time.
Press P- button to move the eletext
screen backward one page at a time.
For Fastext
he subject-heading for the information may
have a particular colour.
Press an appropriate RED, GREEN, YELLOW
or BLUE button in order to reach the relevant
page quickly.
To exit Teletext
Press
79
button. he screen will switch
to V mode.
To Display the Time
While watching a V programme with
eletext transmission press button. he
current time information, captured from
eletext will be displayed at the upper
middle of the screen.
If the programme being watched does not
have eletext transmission, no iformation
will be displayed.
ENG-21005-1080UK-CIFT SCART-ST7P-T3X.p65 26.09.2005, 13:1819

- 20 -
Connect Peripheral
Equipment
here is a wide range of audio and video
equipment that can be connected to your V.
he following connection diagrams show
you where the different (Optional) equipment
should be connected at the back or the front
side of the V.
Via the Euroconnector
Your V set has one or two Euroconnector
socket. If you want to connect peripherals
(e.g. video, decoder, etc.) which have
Euroconnectors, to your V, use optional
SCART1 and SCAR 2 inputs.
If an external device is connected via
Euroconnector sockets V is switched to
AV mode automatically. If the signal is RGB
then the RGB OSD indicator is displayed
on the screen.
In AV mode if you press the button the
V status OSD is displayed on the screen.
Via Ant Input
If you want to connect to your V, peripherals
like video recorders or decoders, but the
device you want to connect does not have
Euroconnector, you should connect it to the
AN input of your V set.
If the VCR is connected via antenna input
it is suggested to use the Programme 0
Decoder
Cable V offers you a wide choice of programs.
Most of them are free, others are to be paid
for by the viewer. his means that you will
need to subscribe to the broadcasting
organisation whose programmes you wish
to receive. his organisation will supply you
a corresponding decoder unit to allow the
programmes to be unscrambled.
For further information ask your dealer. See
also the booklet supplied with your decoder.
Connect a decoder with an aerial socket
to the TV
Connect the aerial cable.
Connect a decoder without an aerial
socket to the TV
Connect the decoder to your V with a
eurocable (RCA Jack Cable) to EXTERNAL1
or EXTERNAL 2 (RCA Jack) (optional).
When your decoder has a Euroconnector /
RCA Jack you can obtain better picture
quality if you connect a eurocable (RCA Jack
Cable) to EXTERNAL (RCA Jack) (optional).
TV and Video ecorder
Connect the aerial cables.
Better picture quality can be obtained if you
also connect a eurocable to EXTERNAL
sockets (optional).
Playback NTSC (Optional)
Connect N SC VCR player to Euroconnector
at the back of the V.
Connect N SC VCR player to RCA Jacke at
the front of the V (optional).
hen, press
$9
button to select AV1 or
AV2 or FAV / BAV.
Copy Facility (Optional)
Source selection for VCR recording.
Select Features Menu in the Main Menu.
Select AV-2 OUTPUT source pressing or
button.
Search for and store the test signal
of the video recorder
Unplug the aerial cable from the aerial
socket ANT of your video recorder.
Switch on your V and put the video recorder
on the test signal. (See the handbook for
your video recorder.)
Enter the uning menu via the Install menu.
Search for the test signal of your video
recorder in the same way as you searched
for and stored the V signals. See uning,
Search and Store V channels. Store the
test signal under programme number 0.
Replace the aerial cable in the aerial
socket ANT of your video recorder once
you have stored the test signal.
ENG-21005-1080UK-CIFT SCART-ST7P-T3X.p65 26.09.2005, 13:1820
Other manuals for FTV21F2
1
Table of contents
Other Ferguson TV manuals

Ferguson
Ferguson Ferguson T 7025 UD User manual

Ferguson
Ferguson FTV21F2 User manual

Ferguson
Ferguson V32125L User manual

Ferguson
Ferguson GTV69 User manual

Ferguson
Ferguson V22134LW User manual

Ferguson
Ferguson PHT-1008 User manual

Ferguson
Ferguson T5173GF User manual

Ferguson
Ferguson FL32WX2 User manual

Ferguson
Ferguson FTV28DFW5 User manual

Ferguson
Ferguson V22134L User manual