Ferno F2 User manual

F2 LOCKING DEVICE
Users’ Manual
September 2020, ver. 02
Pub. No. 0378-0003_D_02
Ferno Slovakia s.r.o.
913 07 Bosaca 893 Slovak Republic
Tel: + 421 (0) 32 7708 010, sales@ferno.sk
Fax: + 421 (0) 32 7708 011

This user manual contains general information for the use, the management
and the maintenance of the fastener. This guide holds the entire parts needed for the adequate use of
this product. The security and the adequate use of this device depend on the precautions taken by
the user. The information related to the security is put at the disposal of the user. All other measures
of security taken by the user have to be taken, considering the applicable rules for this type of
device. It is essential to undertake training, appropriate to the device, before using it in an actual
situation.
Keep this manual for future consultations. It may be conveyed to new users. Copies of this manual
are available at the Customer Service of your distributor, Ferno.
Legal Information
The information contained in this manual is the property of FERNO Slovakia s.r.o. , Bošáca 893,
913 07, Slovakia. Ferno-Slovakia reserves all rights to the industrial property, the concept,
manufacture, reproduction and sales of this material. These rights refer to all legal articles that have
explicit reference, except those articles expressly agreed upon as not being applicable, among those
which apply to the seller.
Complementary instructions in relation to the F2 LOCKING DEVICE:
Manual for the F2 LOCKING DEVICE
FERNO Slovakia s.r.o., Bošáca 893
913 07, Slovakia
Telephone (international) ……………………………………………… + 421 (0) 32 7708 010
Fax (international) ………………………………………………........... + 421 (0) 32 7708 011
Internet ……………………………………………………………......... www.ferno.com
© Ferno-Slovakia

Index
1 – Security Information . . . . . . . . . . . . . . . . . . . . . . . . . . . . . . . . . . . . . . . . . . . . .4
2 –Everything you should know concerning the fastening. . . . . . . . . . . . . . . . . . . . . . . . . . . . . . . .
. . . . . . .4 - 5
2.2. Description of the fastening. . . . . . . . . . . . . . . . . . . . . . . . . . . . . . . . . . . . . . . . . . . 4
2.2. Fastening of the carrier or of the stretcher. . . . . . . . . . . . . . . . . . . . . . . . . . . . . . . . . . . . .4
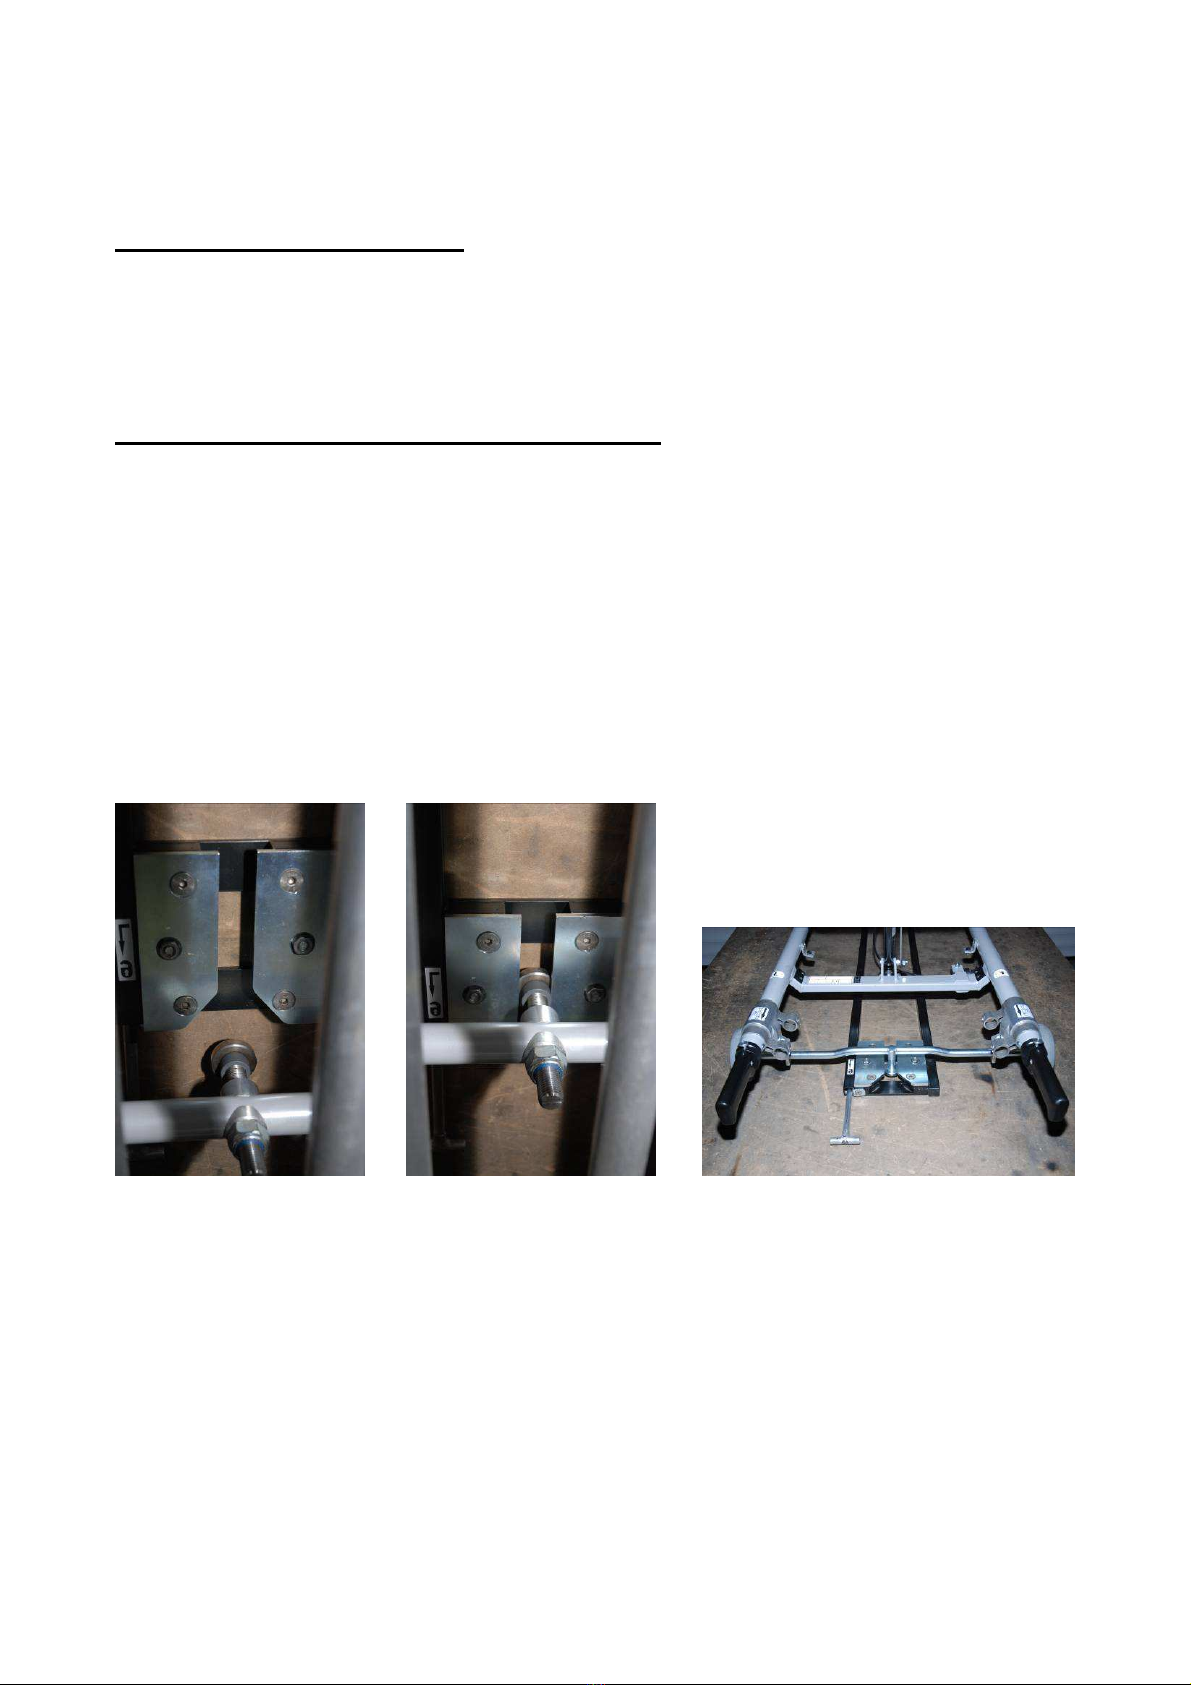
2.3. Components. . . . . . . . . . . . . . . . . . . . . . . . . . . . . . . . . . . . . . . . . . . . . . . . . . . . .5
3- Demonstration. . . . . . . . . . . . . . . . . . . . . . . . . . . . . . . . . . . . . . . . . . . . . . . . . .6
3.1. Practice . . . . . . . . . . . . . . . . . . . . . . . . . . . . . . . . . . . . . . . . . . . . . . . . . . . . . .6
3.2. Training. . . . . . . . . . . . . . . . . . . . . . . . . . . . . . . . . . . . . . . . . . . . . . . . . . . .6
4.- Use of the fastener. . . . . . . . . . . . . . . . . . . . . . . . . . . . . . . . . . . . . .6 - 7 - 8
4.1. Before setting up the fastener. . . . . . . . . . . . . . . . . . . . . . . . . . . . . . . . . . .6
4.2. Fixing the carrier or the stretcher in the fastener. . . . . . . . . . . . . . . . . . . . . . . . . . . . .7
4.3. Releasing the carrier or the stretcher from the fastener. . . . . . . . . . . . . . . . . . . . . . . . . . . .8
5.- Maintenance of the fastener. . . . . . . . . . . . . . . . . . . . . . . . . . . . . . . . . . . . . . . . .8 - 9
5.1. Regular maintenance. . . . . . . . . . . . . . . . . . . . . . . . . . . . . . . . . . . . . . . . . . . . . . .8
5.2. Disinfecting the fastener. . . . . . . . . . . . . . . . . . . . . . . . . . . . . . . . . . . . . . . . . . . . . .9
5.3. Cleansing the fastener. . . . . . . . . . . . . . . . . . . . . . . . . . . . . . . . . . . . . . . . . . . . . . . .9
5.4. Checking the fastener. . . . . . . . . . . . . . . . . . . . . . . . . . . . . . . . . . . . . . . . . . . . . . . . .9
6.- Pieces and services. . . . . . . . . . . . . . . . . . . . . . . . . . . . . . . . . . . . . . . . . . . . . . . .9
7. Installing the fixation. . . . . . . . . . . . . . . . . . . . . . . . . . . . . . . . . . . . . . . . . .10 - 11
7.1. Installation. . . . . . . . . . . . . . . . . . . . . . . . . . . . . . . . . . . . . . . . . . . . . . . . . . . . .10
7.2. Vehicle. . . . . . . . . . . . . . . . . . . . . . . . . . . . . . . . . . . . . . . . . . . . . . . . . . . . . .10
7.3. Included pieces . . . . . . . . . . . . . . . . . . . . . . . . . . . . . . . . . . . . . . . . . . . . . . . . .10
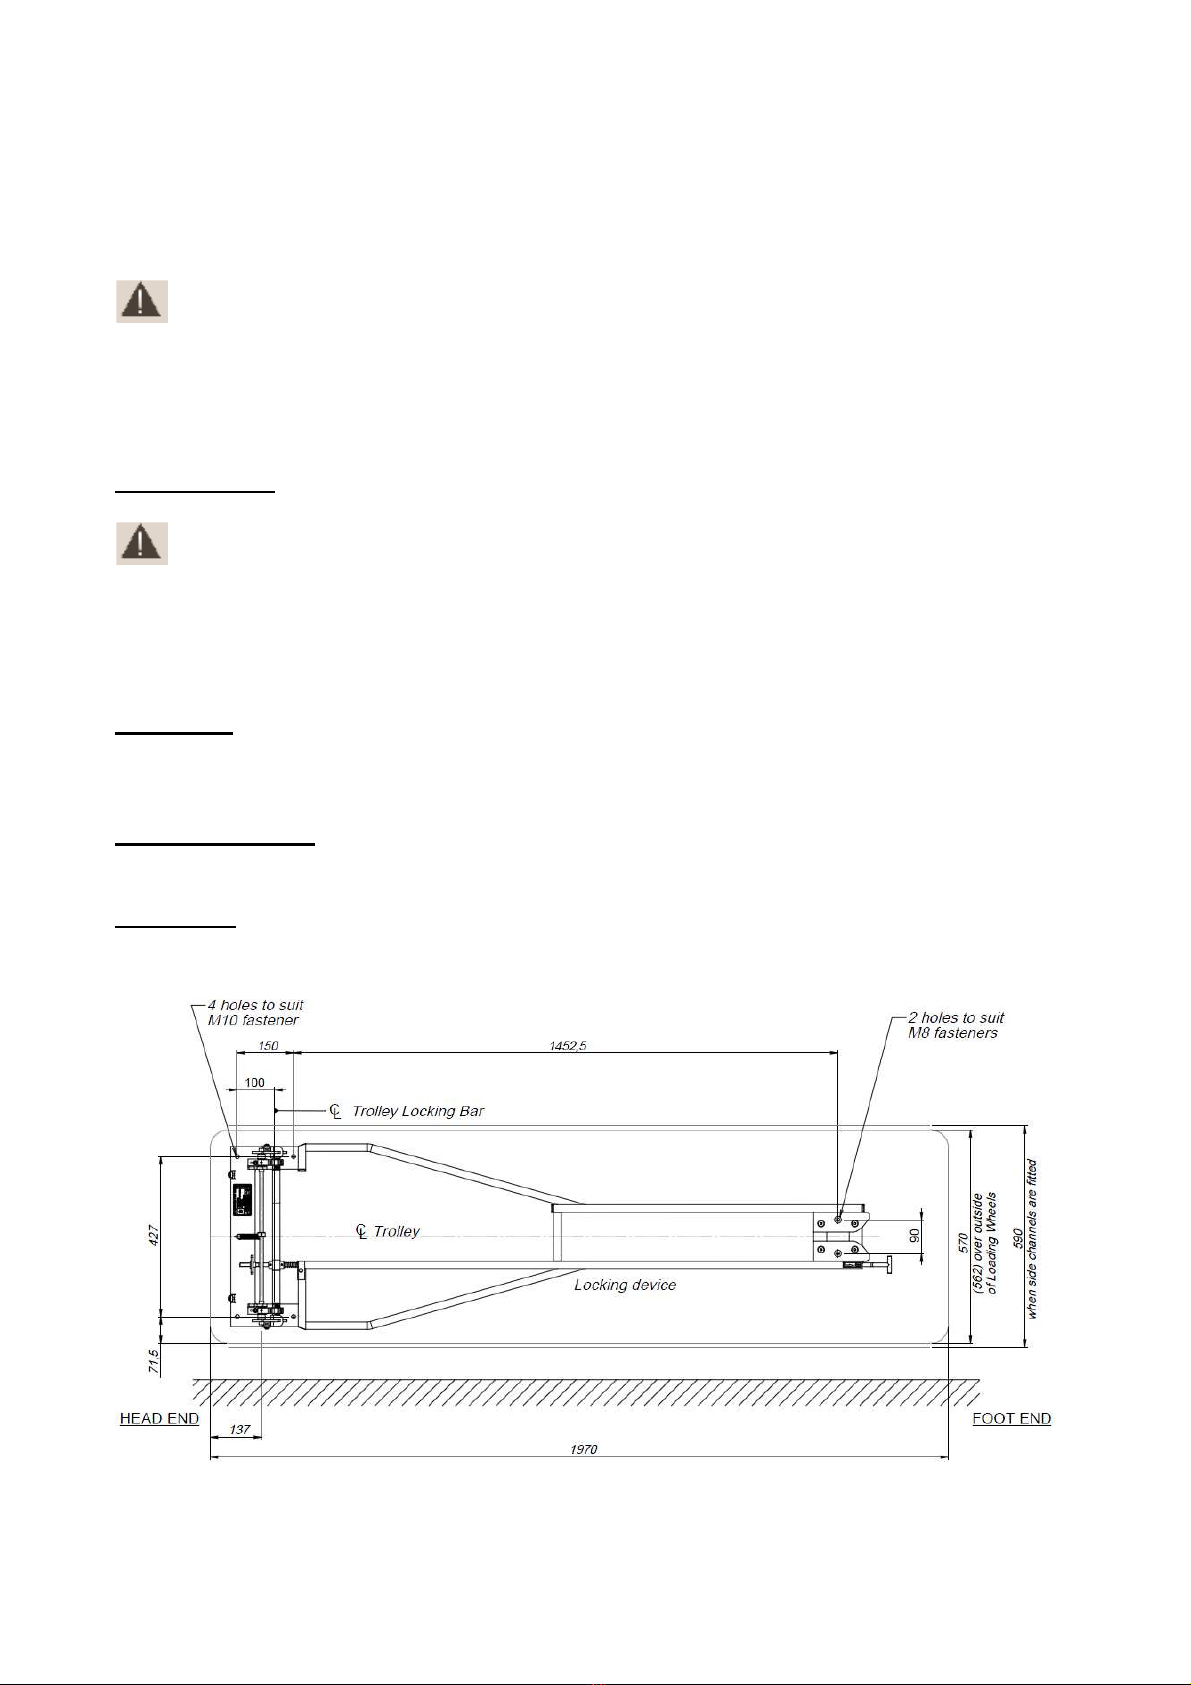
7.4. Scheme. . . . . . . . . . . . . . . . . . . . . . . . . . . . . . . . . . . . . . . . . . . . . . . . . . . . . . .10
7.5. Installation Procedure . . . . . . . . . . . . . . . . . . . . . . . . . . . . . . . . . . . . . . . . . . .11
8. – Client Service. . . . . . . . . . . . . . . . . . . . . . . . . . . . . . . . . . . . . . . . . . . . . . . . . . .11
9.- Limited guarantee. . . . . . . . . . . . . . . . . . . . . . . . . . . . . . . . . . . . . . . . . . . . . . . .11
Training Register . . . . . . . . . . . . . . . . . . . . . . . . . . . . . . . . . . . . . . . . . . . . . . .12
Maintenance Register . . . . . . . . . . . . . . . . . . . . . . . . . . . . . . . . . . . . . . . . . . . .13

1.- Information and security
1.1. Warning
- Wrong use may cause damage. Only use the fastener as described in this manual.
- People without experience may cause injury or be injured. Only trained and informed personnel
are authorised to handle the F2 fastener.
- Erroneous maintenance may injure. Keep the fastener as described in this manual.
1.2. Important
The texts in bold and underlined, hereunder, hold important information.
IMPORTANT
Do not use high pressure devices or steam wash to cleanse the fastener. These types of method
can result in corrosion.

2.– Everything one should know concerning the F1-fastener.
2.1. Description of the fastener.
The F2fastener is a method of fastening to the ground, helps to maintain stretcher models in
an ambulance.
The fastener is destined for professional use and for experienced people.
It consists of a double lock at the head and has an accommodation at the feet, eliminating any
movement (lateral, longitudinal or vertical).
IMPORTANT
Wrong use of the fastener may cause injury. Use the fastener as described in this manual.
2.2. Fastening of the carrier or of the stretcher.
Ferno fasteners have been designed to be used with Ferno carriers or stretchers.
No guarantee is given for usage with other carriers or stretchers than those of Ferno.
2.3. Components.
These precautions show you potentially dangerous situations which, if
not avoided, may cause severe and even fatal physical damage.
Accommodation handle*
Feet side
Head side
Double
unlocking
Locking of the fastener
Accommodation, eliminating any lateral, longitudinal or vertical movement.
The EFX stretcher only is reversible on the fastener.

3.- Demonstration.
3.1. Practice
- Users using the fasteners need to have knowledge of emergency procedures when transporting a
patient.
- Competent care of a patient.
Good comprehension of the procedures as described in this manual.
3.2. Training.
The people should:
- follow the prescribed training programme
- read this manual
- practise using this product before using it in real situations
- be tested on the comprehension of the functioning of the product
- record information regarding the training
ATTENTION
People without experience may cause injury or get hurt. Only
trained personnel are allowed to handle the fastener.

4.- Use of the fastener.
4.1. Before setting up the fastener.
1. All personnel liable to use the fastener have to read this manual and those of the carrier and of
the stretcher ( which will be used with the fastener).
2. The fastener has to be installed by professional personnel («see installation»)
3. Check that the fastener works correctly. Follow the instructions of the paragraph (“Checking the
fastener”).
4.2. Fixing the carrier or the stretcher in the fastener.
1. Read the manuals of the carrier and of the stretcher for the loading instructions
2. Guide the carrier or the stretcher into the ambulance, lining it with the sleeper for the entering
wheels with the fastener. Line up the stud under the carrier in the insert conduit.
Back the unit onto the fastener
Fastener at the head side of the carrier.
Fastener at the head or foot side of the stretcher
3. Make the carrier or the stretcher slide completely into the fastener allowing the stud to be
inserted into the insert conduit. The sleeper for the entering wheels of the carrier or the sleeper of
the wheels of the stretcher has to be securely engaged with the 2 hooks at the front section of the
fastener.

4.3. Releasing the carrier or the stretcher from the fastener.
1. Read the manual of the carrier or of the stretcher for the instructions concerning its unloading.
2. Push the unlocking handle firmly to the front meanwhile exerting a light forward pressure on the
carrier or the stretcher.
3. Both hooks of the front section of the fastener will automatically release from the bottom and
release the entering wheels sleeper.
4. Withdraw the carrier or the stretcher by moving it back to the back of the vehicle.

5.- Maintenance of the fastener.
5.1. Regular maintenance.
The fastener requires regular maintenance. Follow the maintenance instructions as indicated here
under.
Each use In due case Each cleansing
Disinfecting X
Cleansing X
Inspecting X X.
Lubricating X X
When you using maintenance products, follow the instructions of the manufacturer and read the
manuals.
Contact your Ferno distributor to order cleaners and disinfectants.
ATTENTION
- Erroneous maintenance may cause injury. Maintain the fastening as described in this
manual.
5.2. Disinfecting the fastener.
Dry all surfaces with a disinfectant. Follow the instructions of the manufacturer of the disinfectant.
After disinfection, Ferno recommends you to carefully inspect the fastener.
5.3. Cleaning the fastener.
IMPORTANT
High pressure water jets for the joints, can eliminate the lubricant and can cause corrosion.
Do not use high pressure water or steam wash to cleanse the fastener.
Wash all parts of the fastener by hand with hot water and a light detergent.
Use a bristle brush or a light solvent to eliminate stains. Dry in open air or with a cloth.
5.4. Checking the fastener.
Your technical service should check the following points:
-If all components are present
- The stud should be correctly entered in the insert conduit of the back fastener
- The entering wheels sleeper of the carrier has to be lodged in the hooks of the front part
- The fastener has to be solidly fixed in the ambulance
- The fastener may not be tightened, cracked or be damaged.
If inspection shows any defect or excessive deterioration, withdraw the stretcher from the service
until the fastener is repaired.

6.- Pieces and services.
To order spare parts or for any technical repairs to this product, contact your distributor, Ferno.
They are the only agent authorised by Ferno to manage and repair Ferno products.
ATTENTION
Spare parts and services that are not in accordance with Ferno specifications may cause
injury. Only use original Ferno parts for this fastener.
7. Installing the fastener.
7.1. Installation.
Installation of the fastener requires the competence of a professional who develops ambulances.
ATTENTION
The fastener was created to be installed with a steel backing sheet with a minimum
measurement of at least 6.4 mm, under the installed surface (bottom of ambulance, floating
table or tray).
If the vehicle in which you install the fastener does not have the backing sheet that is
required, it must be installed by a qualified professional.
7.2. Vehicle.
If you assemble the fastener on the floor of an ambulance, check the side under the ambulance to
avoid oxygen leaks into the petrol tank and into any other installation.
Always install a new fastener when an ambulance is equipped.
7.3. Included pieces
The total fastener set including the front part and back part linked together.
The logo “Push” must be placed in front of the unlocking handle of the F1 fastener
7.4. Scheme.
Serial Number

7.5. Procedure of installation.
Put the fastener on the bottom of the ambulance or on the table or on the tray that has to receive it.
Use the supplied template with the fastener in order to execute the placement and the piercing.
8.– Client Service .
The client service and the manual are essential for the good use of Ferno products.
For additional explanations, contact your Ferno distributor.
Please note the serial number of your Ferno product when calling and communicate it in all
correspondence.
9.- Limited guarantee
General conditions of guarantee
Ferno-Washington, Inc. (Ferno) warrants that their products do not present any manufacturing
default (parts, manpower and transportation) for a period of two years,
except:
(A)The external finish (coating, painting, etc.) are guaranteed for 90 days.
(B) The additional articles (straps, tissue, foam, etc,..) are guaranteed for 90 days.
( C) Repairs and additional services are guaranteed for 90 days or till the end of the period
mentioned above.
This limited guarantee is applied when you use and maintain the material correctly. However in any
other case the guarantee is not applicable.
The period of guarantee becomes effective on the date of invoicing or on the day of receipt of the
device if one has proof of the delivery date. Return costs are at the expense of the client. Ferno is
not responsible for any damage caused during the transportation or for any damage occurred when
using the product.
Limited commitment of guarantee
If a device or part of a device is defective, Ferno will repair it in its workshops or will substitute the
device or will credit the client with the price of the invoice, all other indemnities being excluded.
These are the general conditions of the guarantee. These are limited.
These guarantee clauses and conditions are available by calling France on:
00 33 (0)4 74 46 13 00
CE Autorizovanýzástupca Ferno Slovakia
Sídlo spoločnosti:
FERNO Slovakia s.r.o.
Bošáca 893, 913 07, Slovensko
Tel: + 421 (0) 32 7708 010, Fax: + 421 (0) 32
7708 011
e-mail: [email protected]
Kontinuálny vývoj predstavuje jednu z našich
zásad. Z tohto dôvodu si FERNO Slovakia s.r.o.
vyhradzuje právo na zmenu špecifikácií bez
predošlého upozornenia.
Other manuals for F2
1
Table of contents
Popular Lock manuals by other brands

Kwikset
Kwikset Smartcode 914 installation guide

Stanley
Stanley Omnilock 9KOM Installation

Waferlock
Waferlock C-700 Series Modular Assembly Manual

Lathem
Lathem LX100 user guide

Chatsworth Products
Chatsworth Products Communications Module 16147-010 Product application

Sylvan
Sylvan SL38E installation instructions

Simons Voss Technologies
Simons Voss Technologies Z4.PL quick guide

Lockly
Lockly VISION ELITE installation guide

BELLEVUE
BELLEVUE ELB-45 Fittings guide

Assa Abloy
Assa Abloy Yale YDM7116A user manual

Assa Abloy
Assa Abloy Cabinet Lock Series installation instructions

SALICE
SALICE F70 Clips installation instructions