Fertility Focus OvuSense User manual

OvuSense
™
Realtime Fertility Monitor
User Manual

OvuSense
™
User Manual
Thank you for choosing OvuSense
OvuSense provides a full picture of your own personal
ovulation and fertility, with more certainty and less effort than
any other method.
OvuSense predicts the onset of ovulation, detects exact
ovulation date; all in real time, from your first cycle onwards.
After your first cycle, OvuSense will then use the detection
of ovulation date to predict the fertile window – the best time
to attempt conception each cycle. OvuSense will continue
to predict onset, detect ovulation date and predict the fertile
window for each following cycle. It will also tell you if ovulation
is not detected. This key information gives you the best
possible chance of successful conception.
OvuSense has been rigorously developed and tested in
extensive clinical trials against “gold standard” ultrasound
follicle measurement. It is 99% accurate1, comfortable, and
easy to use2.
We wish you all the best in your fertility journey.
The team at Fertility Focus
www.ovusense.com

Contents
1.0 Important Notes 1
1.1 Indications For Use 1
1.2 Device Components List 1
1.3 Warnings and Precautions 1
2.0 Overview 4
2.1 Switching the Reader On and Off 5
2.2 Cleaning the Sensor 5
2.3 Inserting Your Sensor 6
2.4 Removing Your Sensor 7
2.5 Sexual intercourse and the Sensor 8
2.6 Sensor Life 8
3.0 Daily Use 9
3.1 Each New Cycle 9
3.2 At Night10
3.3 In The Morning11
4.0 Your Information 12
4.1 Current Cycle 12
4.2 Previous Cycle 15
4.3 Compare cycles 16
4.4 Trying For A Baby 17
4.5 Understanding Your Cycle 18
5.0 System Functions 19
5.1 Your Health: what to do if you have a fever 19

0088
C
M Manufacturer
Fertility Focus Ltd
Unit 19D
University of Warwick Science Park
Warwick Innovation Centre
Warwick Technology Park
Gallows Hill, Warwick
CV34 6UW, United Kingdom
FCCID: Z8YM009-V1. This device complies with part 15 of the
FCC Rules. Operation is subject to the following two conditions:
1. This device may not cause harmful interference, and, 2.
This device must accept any interference received, including
interference that may cause undesired operation.
5.2 Set Up (Set Date and Set Time) 20
5.3 Battery Indicator and Charging 23
6.0 Messages 24
6.1 Fertility information Messages 24
6.2 System Messages 25
7.0 Frequently Asked Questions 28
8.0 Reference Information 35
© Fertility Focus Limited 2014

Page 1
OvuSense™User Manual
Important Notes
1.0 Important Notes
1.1 Indications For Use
The Fertility Focus OvuSense Fertility Monitor (which includes
OvuSense Reader M010-EN and OvuSense personal Sensor
M011) is intended for measuring and recording basal body
temperature (BBT) as an aid in ovulation prediction to aid in
conception (not to be used for contraception).
1.2 Device Components List
This user manual covers the following components:
OvuSense Reader M010-EN
OvuSense Sensor M011
1.3 Warnings and Precautions
THIS PRODUCT IS
NOT FOR CONTRACEPTIVE USE
As with the use of tampons, there may be a small risk of toxic
shock syndrome – a rare condition caused by the bacterium
Staphylococcus aureus growing on blood or fluids in the vagina.
If you feel ill or have a high temperature (above 39˚C or 102˚F),
muscular pains, headaches, vomiting, diarrhoea, or if a skin
rash appears, STOP using the Sensor immediately and see your
doctor.
DO NOT use the Sensor during your menstrual bleed. Should
‘spotting’ occur, or an unexpected bleed begin, STOP using
your Sensor until this bleeding stops. The Sensor will not
produce valid fertility monitoring results during menstruation.

Page 2
OvuSense™User Manual
Important Notes
The Sensor is for your personal use. DO NOT share it with other
women, as this may present a risk of infection, and invalidate
your personal results.
DO NOT insert the Sensor anywhere other than your vagina.
DO NOT leave the device in place in the vagina during sex, as
this may present a risk to you and your partner.
If you experience repeated difficulty or discomfort during
insertion; or discomfort, irritation or a vaginal discharge during
use of the Sensor, DO NOT continue use. Consult your doctor.
Use of any hormonal contraceptive or intrauterine device at
the same time as OvuSense may invalidate the data collected.
Electrical Safety & Compliance
The charger is a mains isolating device. Make sure the charger
is accessible during use, so the plug can be easily removed
from the mains socket if necessary.
WARNING:No serviceable parts are contained inside the
Reader, Sensor or the charger. Modification, repair or change
of this equipment is not possible and is expressly forbidden
by the manufacturer. Damaged or defective units must be
returned within two years of purchase for assessment by the
manufacturer at the address identified in the User Assistance
Section on the back page of this manual.
The OvuSense Sensor is a B-type applied part,
according to the classifications defined in IEC 60601-1.

Page 3
OvuSense™User Manual
Important Notes
The data port on the back of the Reader is for manufacturer
use only. DO NOT attempt to plug in any cables.
Handling
The surface of the Reader and the Sensor cradle should be
regularly wiped with fresh paper tissue to keep it clean.
Care must be taken not to drop the Sensor. If dropped,
check the seal around the centre ring for signs of cracking or
breakage. If found, STOP use of the Sensor immediately. DO
NOT use the Sensor if any damage to the coating occurs, or if
the tail is broken. In all cases of damage, REPLACE the Sensor
with a new one by contacting Service using the address in the
User Assistance Section on the back page of this manual.
If you lose or damage your Sensor during a cycle, you can
simply place a new Sensor on the Reader, and press the Start
key to activate it. Recordings from the previous Sensor will
remain in the memory of the Reader.
Care must be taken not to drop the OvuSense Reader, or
immerse it in liquids. If this does happen, you should check
the unit is still working: Disconnect from the mains supply.
Then switch it on. If the Reader doesn't start or a warning
message is displayed, contact Service using the address in the
User Assistance Section on the back page of this manual.
DO NOT clean the Sensor in disinfectants or alcohol, or with
antibacterial or disinfectant wipes.
DO NOT subject your Sensor to temperatures above 50°C (or
122°F), e.g. by boiling or microwaving, as this will damage it.
Page 4
OvuSense™User Manual
Overview
Your Information
Cancel
Ca
nce
l
New Cycle
Your Health
Set Up
Y
ou
r In
fo
rm
a
ti
on
Main Menu
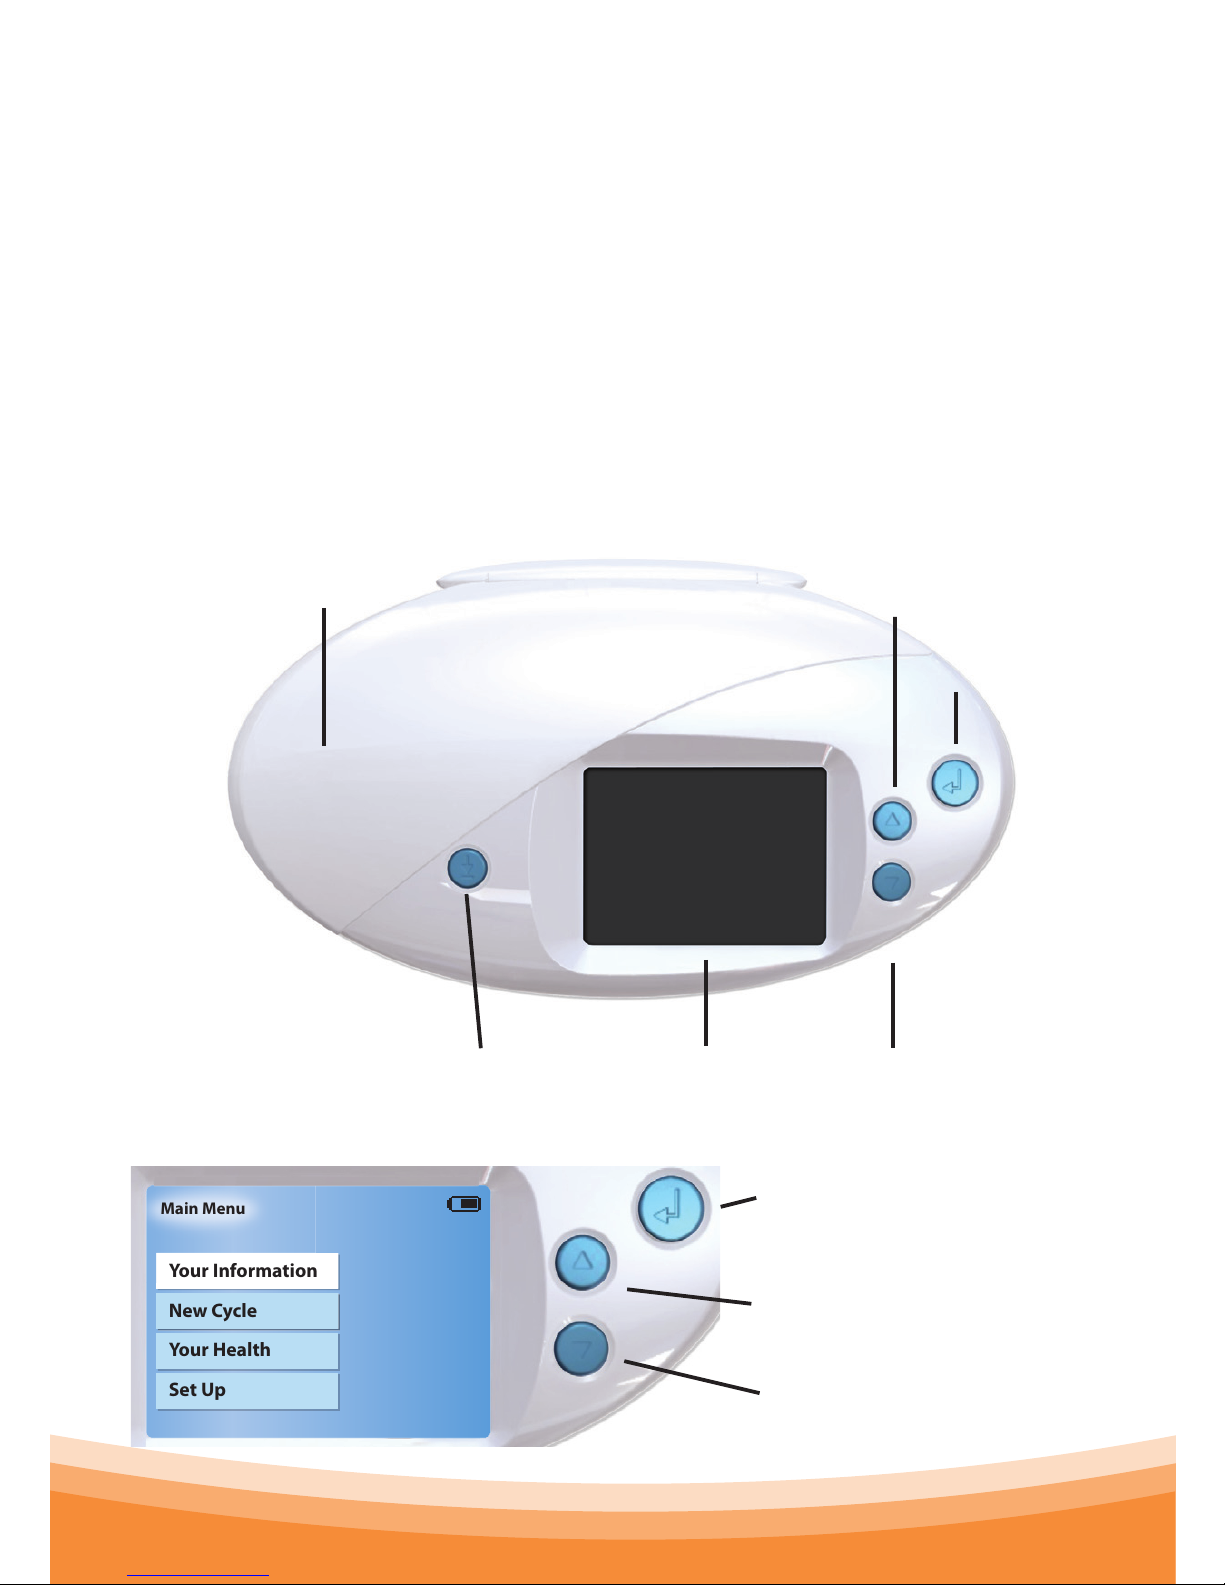
2.0 Overview
OvuSense has two parts – a personal Sensor shaped like
a small tampon, and a Reader. When you first unpack the
Reader it will need to be charged overnight. When using your
OvuSense Reader for the first time, you will be automatically
prompted to set up the date and time as indicated in
Section 5.2
The Reader
Personal Sensor Cover
Conrm
Select / Up
Select / DownDownload LCD Display
Operating Keys
Conrm key, referred to in this
manual with the symbol
Up key, referred to in this
manual with the symbol
Down key, referred to in this
manual with the symbol
Page 5
OvuSense™User Manual
Overview
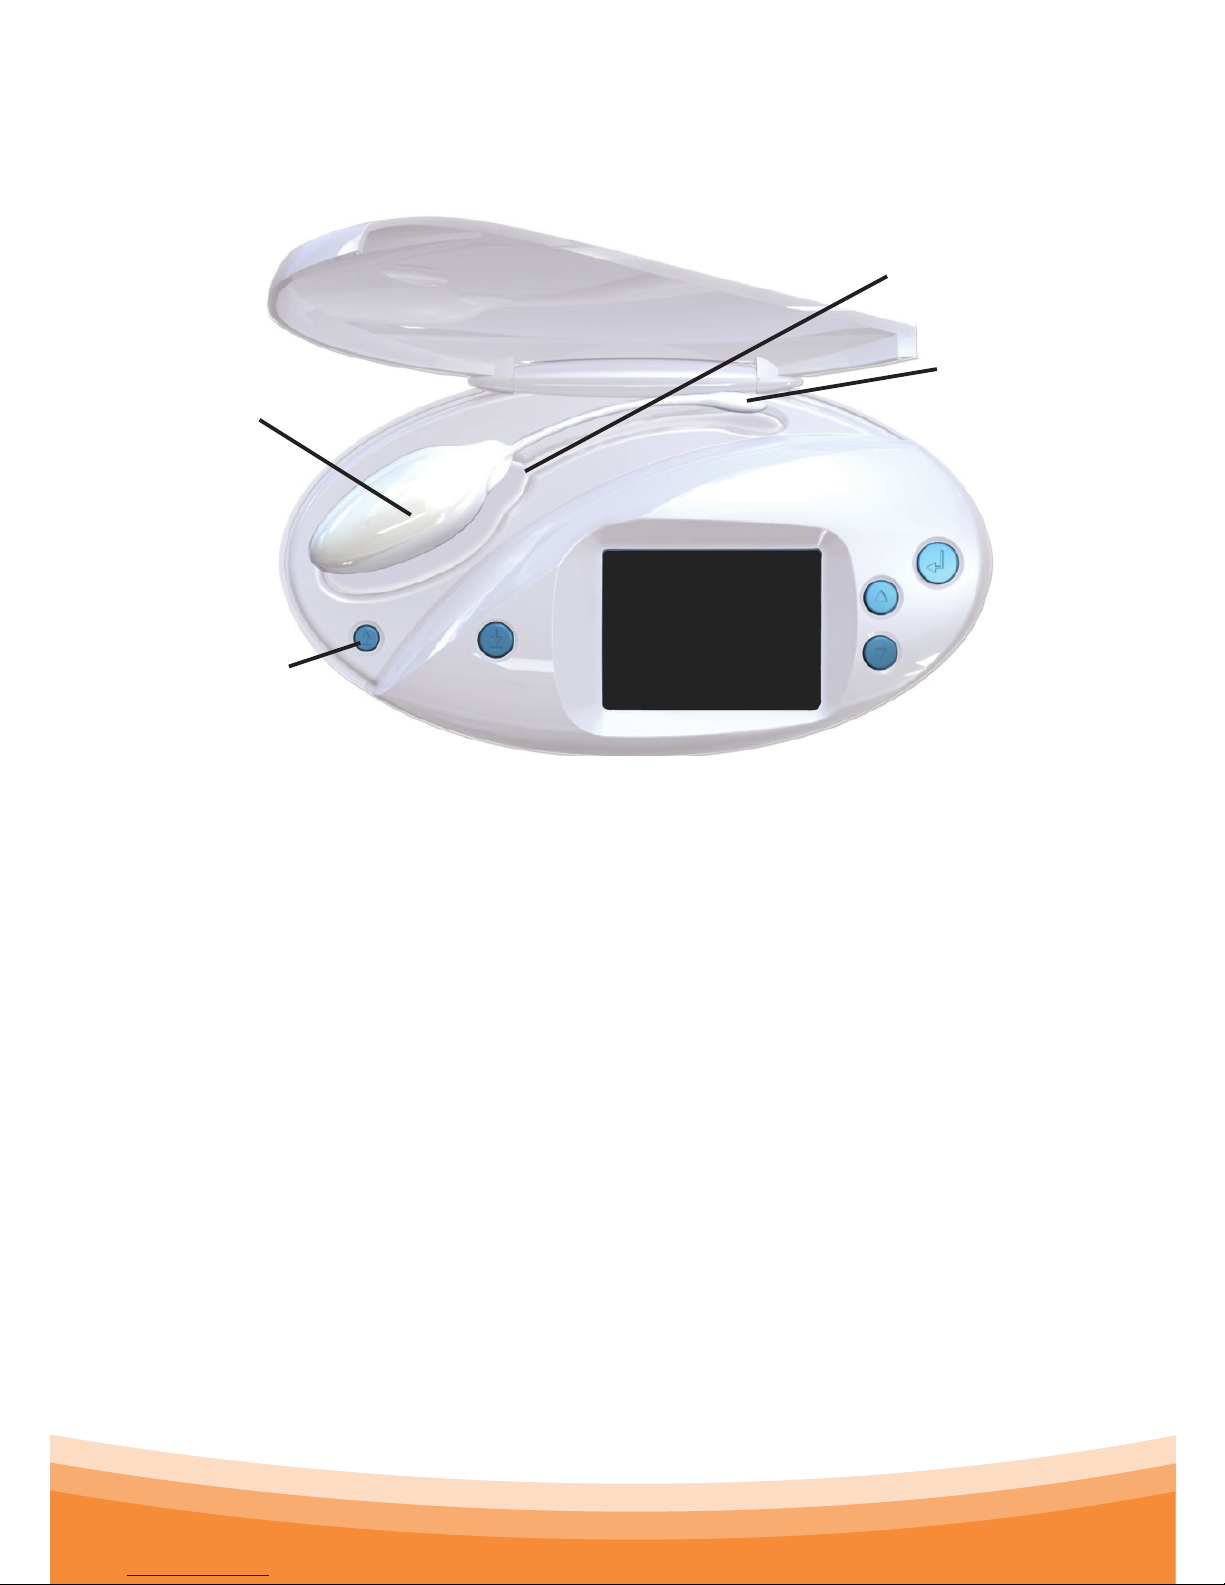
The Sensor
Personal Sensor
over cradle on Reader
Start
Sensor Record
Personal Sensor ns must be
neatly aligned in cradle
Sensor tail
2.1 Switching the Reader On and Off
Switch ON: Press any key and hold it down for 3 seconds. The
screen will light up with the OvuSense logo, and then display
the Main menu.
Switch OFF: Press the Confirm key and hold down for 3 seconds
and release. If no key is pressed for 3 minutes, the Reader will
automatically turn itself off.
2.2 Cleaning the Sensor
Before and after use, the Sensor should be thoroughly cleaned
by washing it with soap in hand-hot water. Make sure that you
wash all parts of the Sensor, including all of the tail and the
area where the tail joins the main part of the Sensor.

Page 6
OvuSense™User Manual
Overview
You will need to clean your Sensor twice each day:
1st time: before you insert it for overnight use.
2nd time: after you have used it overnight so that it is clean
when you place it on the Reader.
When you are not using the Sensor, clean it and store it in its
cradle on the Reader with the lid closed – this will keep it clean
and secure.
2.3 Inserting Your Sensor
The Sensor is shaped like a tampon and made of a special
medical grade material.
This material is naturally slippery, but if you find that the
Sensor is ‘dry’ to insert, apply a very small amount of standard
water-based lubricant gel approved for vaginal use, such as
K-Y Jelly®, Durex Play® Feel®, or Sensilube®. DO NOT use gels
with "flavour", "warming" or "cooling" additives.
1. Clean the Sensor as outlined in Section 2.2. Then wash
your hands.
2. Hold the Sensor where the tail joins the main body.
3. Get into a comfortable position.
4. The Sensor is inserted just as you would a tampon (4a and
4b)
5. The Sensor tail is designed to hang outside of your body.
If you feel any discomfort, the Sensor may not be placed
far enough inside. If this happens, gently remove and try
again.

Page 7
OvuSense™User Manual
Overview
123
4a 4b 5
2.4 Removing Your Sensor
The Sensor tail is designed so that it cannot be inserted "too
high" in the vagina. To remove:
1. First wash your hands with soap and warm water.
2. Then check carefully with your fingers to see if you can
feel the tail portion of the Sensor.
3. Remove the Sensor by gently grasping and pulling on the
tail.
If you cannot locate the tail:
4. Get into a similar comfortable position as for insertion. It
is much easier to remove if you are squatting and relaxed.
5. Then try to find the tail with one finger. Once you have

Page 8
OvuSense™User Manual
Overview
located it, use your finger and thumb to hold the Sensor
tail and pull it out.
If you still have a problem, then seek medical advice.
You should remove your Sensor after each night's sleep. If you
forget to take your Sensor out when you first get up, don’t
worry, simply take it out when you can, and clean and dry it.
2.5 Sexual intercourse and the Sensor
The use of the Sensor should not prevent you from having
sex as frequently as you wish. Having sex will not affect that
night's temperature recordings. Remove your Sensor before
sex. Clean it and re-insert it afterwards.
2.6 Sensor Life
Each Sensor has a life of one year and has a unique code.
After you have used your Sensor for 330 days, a message will
let you know that a new Sensor will be required for the next
cycle.
If you need to continue using OvuSense after the first year,
then you can simply purchase an additional Sensor.
The Reader will store data for each cycle that you use the
Sensor, and will carry on doing so when a new Sensor is used.

Page 9
OvuSense™User Manual
Daily Use
Cancel
Ca
nce
l
Your Information
Your Health
Set Up
Y
ou
r In
fo
rm
a
ti
on
Main Menu
New Cycle
New Cycle
Accept
Cancel
Please enter the rst day
of your menstruation.
5 days ago
3.0 Daily Use
3.1 Each New Cycle
On the first day on which your full menstrual bleeding occurs,
including the first cycle of use, you should tell the Reader that
you have started your cycle. Do not include days before this on
which minor blood spotting occurs.
Using the up and
downkeys on the Main
menu, navigate to the
New Cycle option, then
press the Confirm key.
Enter the first day of your menstrual cycle. Pressing the
down key, steps you through the options.
today
yesterday
2 days ago
3 days ago
4 days ago
5 days ago
........
20 days ago
Select the day and press Confirm . Then select Accept, and
press Confirm . Alternatively select Cancel and press
Confirm to go back to the Main menu without setting the
first day of your cycle.

Page 10
OvuSense™User Manual
Daily Use
Activate sensor?
When activated, please
use as soon as possible.
Accept
Cancel
A
ct
iv
ate
se
n
so
r
?
W
h
i
d
l
Information and Alerts
3.2 At Night
The Sensor is designed to be placed in the vagina overnight for
the complete night. If you wish to have sex, remove the Sensor
and thoroughly wash it
before reinserting it.
If you forget to insert the
Sensor on one night, do
not worry, continue to use
the Sensor on subsequent
nights.
If your Sensor is not already
placed in the Sensor cradle
on your Reader, place it
with the fins neatly aligned.
Press the Startkey to
activate the Sensor. You see
this screen: Choose Accept
to continue.
Once your Sensor has been
successfully activated, you
will see this screen:
Remove the Sensor from
the cradle. Thoroughly
wash and dry it. Insert the
Sensor into your vagina
before you go to bed.
Activate sensor? When
activated, please use as
soon as possible.
A
ct
iv
ate
se
n
so
r
?
W
Information and Alerts
Accept
Cancel
Your sensor has been
successfully activated.
Exit
Sensor Nr: 000123
Information and Alerts
3. Start
1. Press
a key
2. Place
Sensor
in cradle
Page 11
OvuSense™User Manual
Daily Use
Your Information
Cancel
Ca
nce
l
New Cycle
Your Health
Set Up
Your Informati
on
Main Menu
3. Download
2. Place
Sensor
in cradle
1. Press
a key
3.3 In The Morning
Remove the Sensor in the morning, thoroughly wash it, and
dry it.
Then place the Sensor in
the cradle on the Reader
with the fins neatly aligned
and press the Download
key.
Once the data download
has started, you will see
this screen:
Wait until the data
downloads.
As soon as the data
download is complete, you
will see this screen:
You can now leave your
Sensor in the cradle on
the Reader until you use
it again. Begin each night
with the At Night step
outlined on the previous
page.
Sensor No: 000123
Data is being transferred,
please wait.
Information and Alerts
Sensor No: 000123
Data transfer has been
successful.
Exit
Information and Alerts

Page 12
OvuSense™User Manual
Your Information
Your Information
Cancel
Ca
nce
l
New Cycle
Your Health
Set Up
Y
ou
r In
fo
rm
a
ti
on
Main Menu
Your Information
Compare
Exit
Previous
Ovulation not yet detected in
this cycle. Please continue to
use your sensor.
4.0 Your Information
The "Your Information" screen can be used to monitor your
current and previous cycles.
4.1 Current Cycle
The "Your Information"
screen allows you to review
the information collected
in your current cycle. The
display will update at each
point when sufficient data
has been collected, but not
necessarily each day.
Using the up and down arrows, and the Confirm key,
you can navigate up and down between Previous cycle and
Compare cycles.
As your cycle progresses, OvuSense will inform you about your
current fertility status.
OvuSense starts
monitoring temperature
immediately.
In the first days of your
first cycle of use the
OvuSense Reader will tell
you ovulation is not yet
detected.

Page 13
OvuSense™User Manual
Your Information
Your Information
Compare
Exit
Previous
You are now in your
ovulation window.
Your Information
Compare
Exit
Previous
You are now in your
ovulation window. Ovulation:
today.
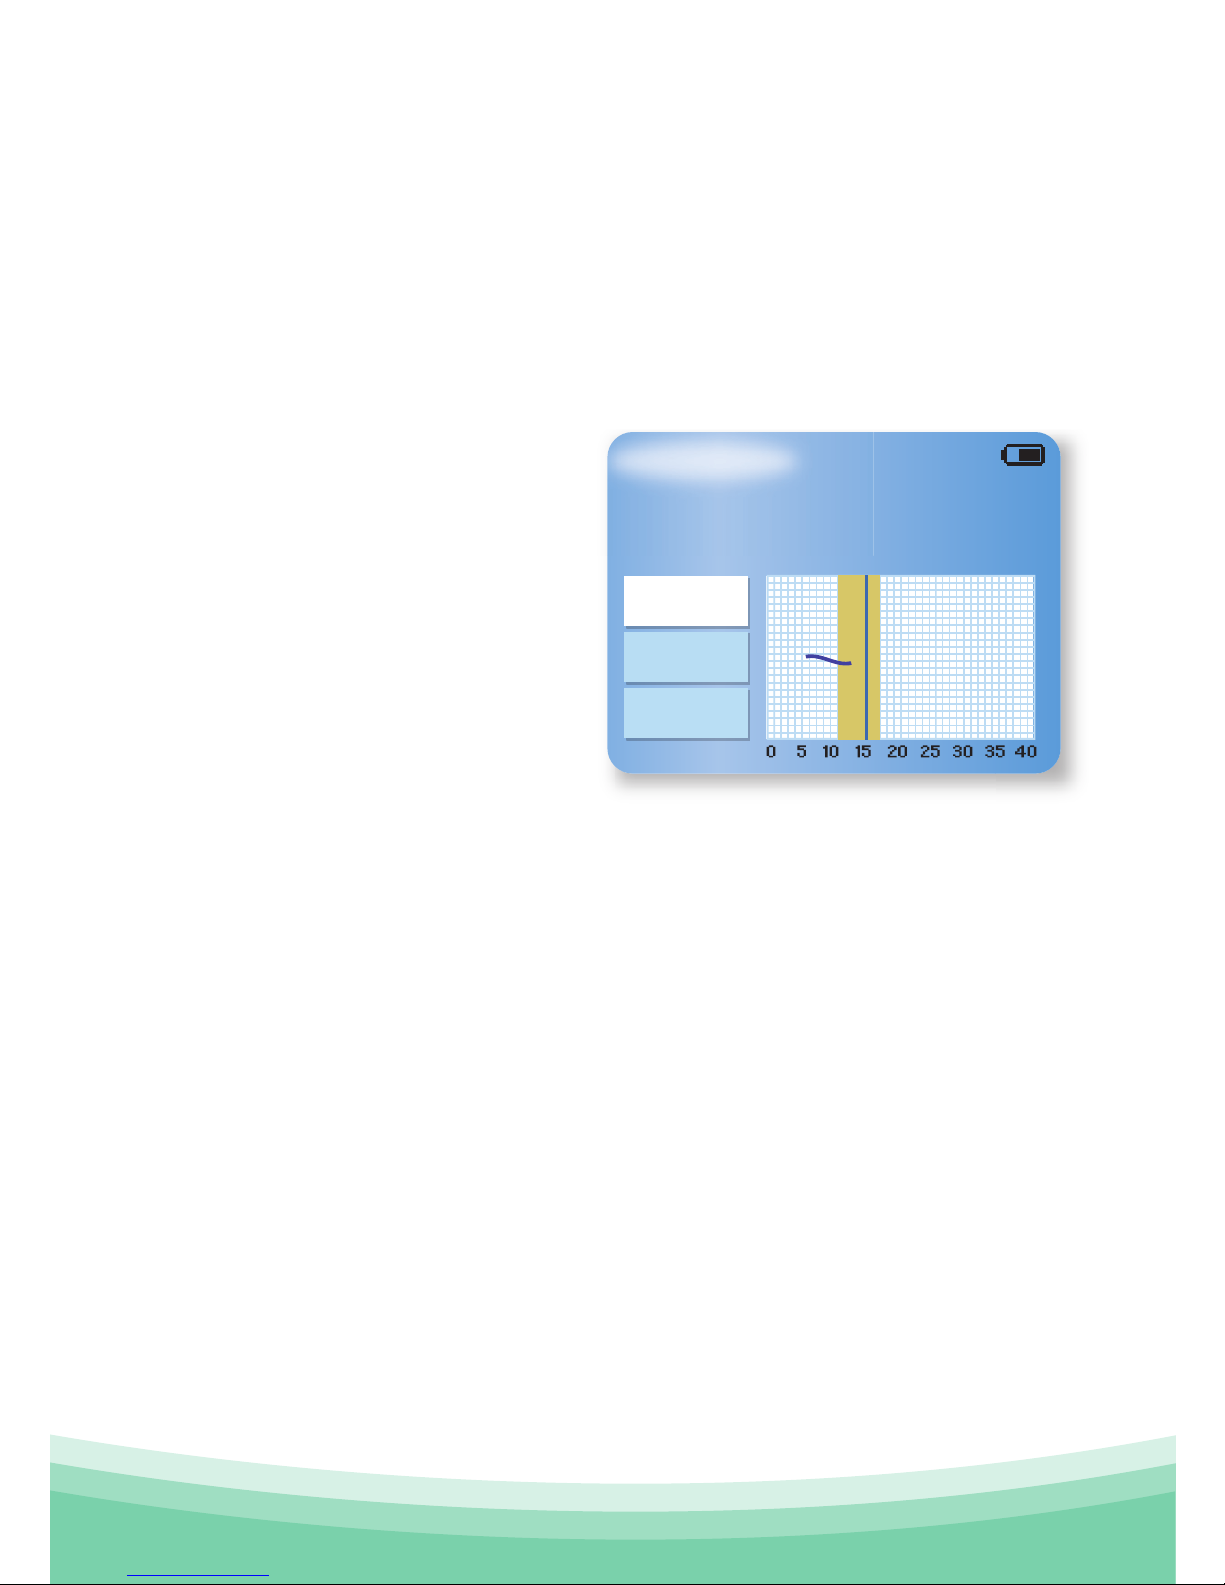
As you move towards your
"ovulation window", it will
start to predict the onset of
ovulation.
The ovulation window is
the four days immediately
around ovulation, from one
day before until two days
after ovulation. OvuSense
displays the ovulation
window with a light green
shaded area, and the
predicted date of ovulation
with a blue vertical line.
OvuSense uses a number
of methods to predict
ovulation. Sometimes
it will predict "ovulation
tomorrow". Sometimes,
"ovulation today". It may
just say "you are now in
your ovulation window".
You may see all of these
notifications, or just one or
two of them, depending on
what OvuSense has "seen"
in your temperature curves.
This is the vital information
you need to help you
then, or
then, or
Your Information
Compare
Exit
Previous
You are now in your
ovulation window. Ovulation:
tomorrow.
understand your personal cycle pattern.

Page 14
OvuSense™User Manual
Your Information
Your Information
Compare
Exit
Previous
Ovulation not yet detected in
this cycle. Please continue to
use your sensor.
Your Information
Compare
Exit
Previous
Your fertile window will start
on Thu 12 Jun 2014
Three days after you have
ovulated, you will receive
a message telling you the
date of ovulation. You can
now stop using the Sensor
during the current cycle
if you wish. Simply keep
OvuSense on charge, then
input the start of your next
cycle on the first day your
bleed begins again.
If you fail to ovulate around
the expected time during
a particular cycle you'll
need to continue using
the Sensor to ensure that
ovulation is detected if it
does occur late.
Once you begin your
second cycle, and for each
successive cycle, OvuSense
will predict the start of
your "fertile window" for
that coming cycle.
The fertile window is the
eight days when you are
most likely to be able to
conceive, from five days
before ovulation until two
days after ovulation.
or
Your Information
Compare
Exit
Previous
You ovulated on Wed 14 May
2014. You can stop using
OvuSense for this cycle.
Page 15
OvuSense™User Manual
Your Information
If ovulation wasn't detected in any of the previous measured
cycles, then OvuSense will simply tell you ovulation is not yet
detected.
If the fertile window is predicted, OvuSense will continue
to indicate your fertile window start day, until you pass that
day and enter the fertile window itself. The screen will then
indicate you are in your
fertile window
This is when you should
start to have sex as often as
possible to maximize your
chances of conception.
You will then enter your
ovulation window, and
the screens will continue to appear in succession as outlined
above.
Please note that OvuSense uses a fixed scale on the
temperature graphs. The curve will change as the cycle
progresses and the temperature values are averaged out. This
"smoothing" helps you read and understand the graph.
4.2 Previous Cycle
If you select this menu option, the screen will show you a
graph of the information from your last cycle with information
about when ovulation occurred, or if it wasn't detected.
Your Information
Compare
Exit
Previous
You are now in your fertile
window.

Page 16
OvuSense™User Manual
Your Information
4.3 Compare cycles
The Reader enables you to review your previous cycles. If you
select this menu option, the screen will show you a graph of
the information from your last three recorded cycles.
Upper Graph: Your last full
cycle recorded
Middle Graph: The graph for
two cycles ago
Lower Graph: The graph for
three cycles ago
Press Confirm to Exit to
Main menu.
If ovulation occurred in
the last cycle, a thick blue
vertical line indicates the
day on which you ovulated.
Press Confirm to Exit to
Main menu.
Compare Cycles
Exit
Exit
Previous Cycle
Table of contents


