FF Europe BGR01 User manual

DE FR EN IT
ROLLGERÜST ALU-LEITER / ÉCHELLE D‘ÉCHAFAUDAGE EN ALUMINIUM / ROLLER
SCAFFOLD ALUMINIUM LADDER / SCALA PONTEGGIO IN ALLUMINIO CON
ROTELLE
BGR01
BEDIENUNGSANLEITUNG / MANUEL D‘INSTRUCTION / INSTRUCTION MANUAL / MANUALE DI
ISTRUZIONI
LIEBE KUNDIN, LIEBER KUNDE,
danke, dass Sie sich für unser Produkt entschieden haben. Bitte lesen Sie die Bedienungsanleitung
aufmerksam durch, bevor Sie das Produkt montieren oder benutzen, um Schäden durch nicht
sachgemäßen Gebrauch zu vermeiden. Sollten Sie dieses Produkt an Dritte weitergeben, muss diese
Bedienungsanleitung mit ausgehändigt werden.
CHÈRES CLIENTES, CHERS CLIENTS,
Nous vous remercions d´avoir choisi notre produit. Nous vous prions de bien vouloir lire le mode d
´emploi attentivement avant de monter ou d´utiliser le produit afin d´éviter des dommages causés par
une utilisation non conforme. Si vous souhaitez donner ce produit à une tierce personne, veuillez y
joindre cette notice d´utilisation.
DEAR CUSTOMER,
Thank you for choosing our product. Please read this manual carefully before assembling or using the
product, to avoid damage caused by improper use. If the product is passed on to third parties,
this manual has to be passed on along with the product.
GENTILE CLIENTE,
La ringraziamo per aver scelto un nostro prodotto. La preghiamo di leggere attentamente questo
manuale prima del montaggio o utilizzo del prodotto, per evitare i danni causati da un uso improprio. Se
il prodotto viene trasferito ai terzi, questo manuale deve essere trasmesso insieme al prodotto.
1

DE
22
•Achtung! Metall leitet Elektrizität! Lassen Sie dieses Gerüst oder eines seiner Teile keine
stromführenden elektrischen Kabel berühren.
•Überprüfen Sie, ob der Boden eben ist und das Gerüst tragen kann.
•Die maximale Belastbarkeit der Arbeitsplattform beträgt 150 kg. Berücksichtigen Sie immer das
Gewicht der Materialien und Werkzeuge, um die Plattform nicht zu überlasten.
•Die maximale horizontale Kraft an der Plattform beträgt 200 N (Newton). Springen Sie nicht auf die
Plattform.
•Es sollte immer nur eine Person das Gerüst benutzen.
•Verbinden Sie das Gerüst nicht mit Gebäuden mit Brettern usw. Das Gerüst kann nicht als Treppe für
Geräte verwendet werden.
•Verwenden Sie keine Leitern, Kisten oder andere Geräte, um die Höhe des Gerüsts zu vergrößern.
Stellen Sie die Leiter niemals auf eine rutschige Oberfläche.
•Stellen Sie immer sicher, dass alle Gummifüße der Leiter fest sitzen.
•Überprüfen Sie, ob alle Teile vollständig und unbeschädigt sind.
•Versuchen Sie niemals, eine beschädigte Leiter / ein beschädigtes Gerüst zusammenzubauen.
•Die Leiter kann beschädigt werden, wenn sie übermäßiger Hitze (wie Hausbränden) oder ätzenden
Stoffen (wie Säuren oder Laugen) ausgesetzt wird.
•Seien Sie äußerst vorsichtig, wenn Sie das Gerüst bei Wind, Regen oder auf gefrorenen Oberflächen
benutzen.
•Seien Sie immer vorsichtig beim Auf- und Absteigen vom Gerüst.
•Verwenden Sie die Leiter niemals unter dem Einfluss von Alkohol oder Drogen. Der Benutzer sollte sich
in einem guten physischen Zustand befinden.
•Wenn Sie auf der Leiter oder dem Gerüst etwas drücken oder ziehen, kann dies dazu führen, dass Sie
von der Leiter fallen. Seien Sie äußerst vorsichtig, wenn Sie etwas von der Leiter drücken oder ziehen
müssen.
•Verwenden Sie dieses Gerüst nur für den vorgesehenen Zweck.
•Dieses Gerüst ist kein Spielzeug. Halten Sie Kinder vom Gerüst fern. Lassen Sie das Gerüst niemals
unbeaufsichtigt.
•Stellen Sie die Leiter immer auf einer ebenen, stabilen und trockenen Oberfläche auf. Treten Sie
niemals auf das Gerüst, wenn diese Bedingungen nicht erfüllt sind. Sie könnten das Gleichgewicht
verlieren und fallen.
•Montieren Sie das Gerüst nur wie in dieser Bedienungsanleitung beschrieben.
•Tragen Sie immer Schuhen mit guten rutschfesten Sohlen, wenn Sie das Produkt verwenden.
Vermeiden Sie lose Kleidung, die baumeln und sich verfangen könnte.
•Halten Sie die Leiter immer trocken, sauber und frei von Schmutz und Fremdkörpern. Nach jedem
Gebrauch reinigen.
•Stellen Sie vor und während der Verwendung des Gerüsts sicher, dass keine Umweltveränderungen die
Sicherheit des Gerüsts beeinträchtigen.
•Achten Sie vor dem Bewegen des Gerüsts auf Überkopfhindernisse, insbesondere Stromkabel.
•Beachten und befolgen Sie immer die örtlichen Vorschriften, die von der örtlichen Regierung
veröffentlicht wurden.
SICHERHEITSHINWEIS

DE
33
sicheRheitshinweis
PFLEGE UND WARTUNG
AUFBAU
•Alle Teile des Gerüsts sollten regelmäßig gewartet werden.
• JJedes beschädigte Teil sollte sofort ersetzt werden.
•Eine Reparatur des Gerüsts ist nur nach Rücksprache mit dem Hersteller oder qualifiziertem Personal
zulässig.
•Schmieren Sie alle beweglichen Teile mit handelsüblichem Öl.
•Das Gerüst muss vor Unwettern geschützt werden. Wenn möglich, liegend aufbewahren.
•Das Gerüst muss bei jedem Transport gegen Rutschen, Stoßen oder Herunterfallen gesichert werden.
WARNUNG: Um schwere oder tödliche Verletzungen durch Gerüstinstabilität oder
Komponentenversagen zu vermeiden:
•Verwenden Sie nur die vom Hersteller gelieferten
Originalteile.
VOR DEM ZUSAMMENBAU:
•Identifizieren Sie alle erforderlichen Komponenten.
•Wenn Komponenten fehlen oder beschädigt sind, wenden Sie sich bitte an den Verkäufer.
VORSICHT: Ziehen Sie die Schrauben nicht zu fest an. Gerüst und Komponenten können beschädigt werden.
teile:
●Kontermutter (8 Stk.)
●Stützstange (2 Stk.)
●Geländer (1 Stück)
•Kopfschraube (8 Stk.)
•Fuß (2 Stück)
•Plattform (1 Stück)

DE
44
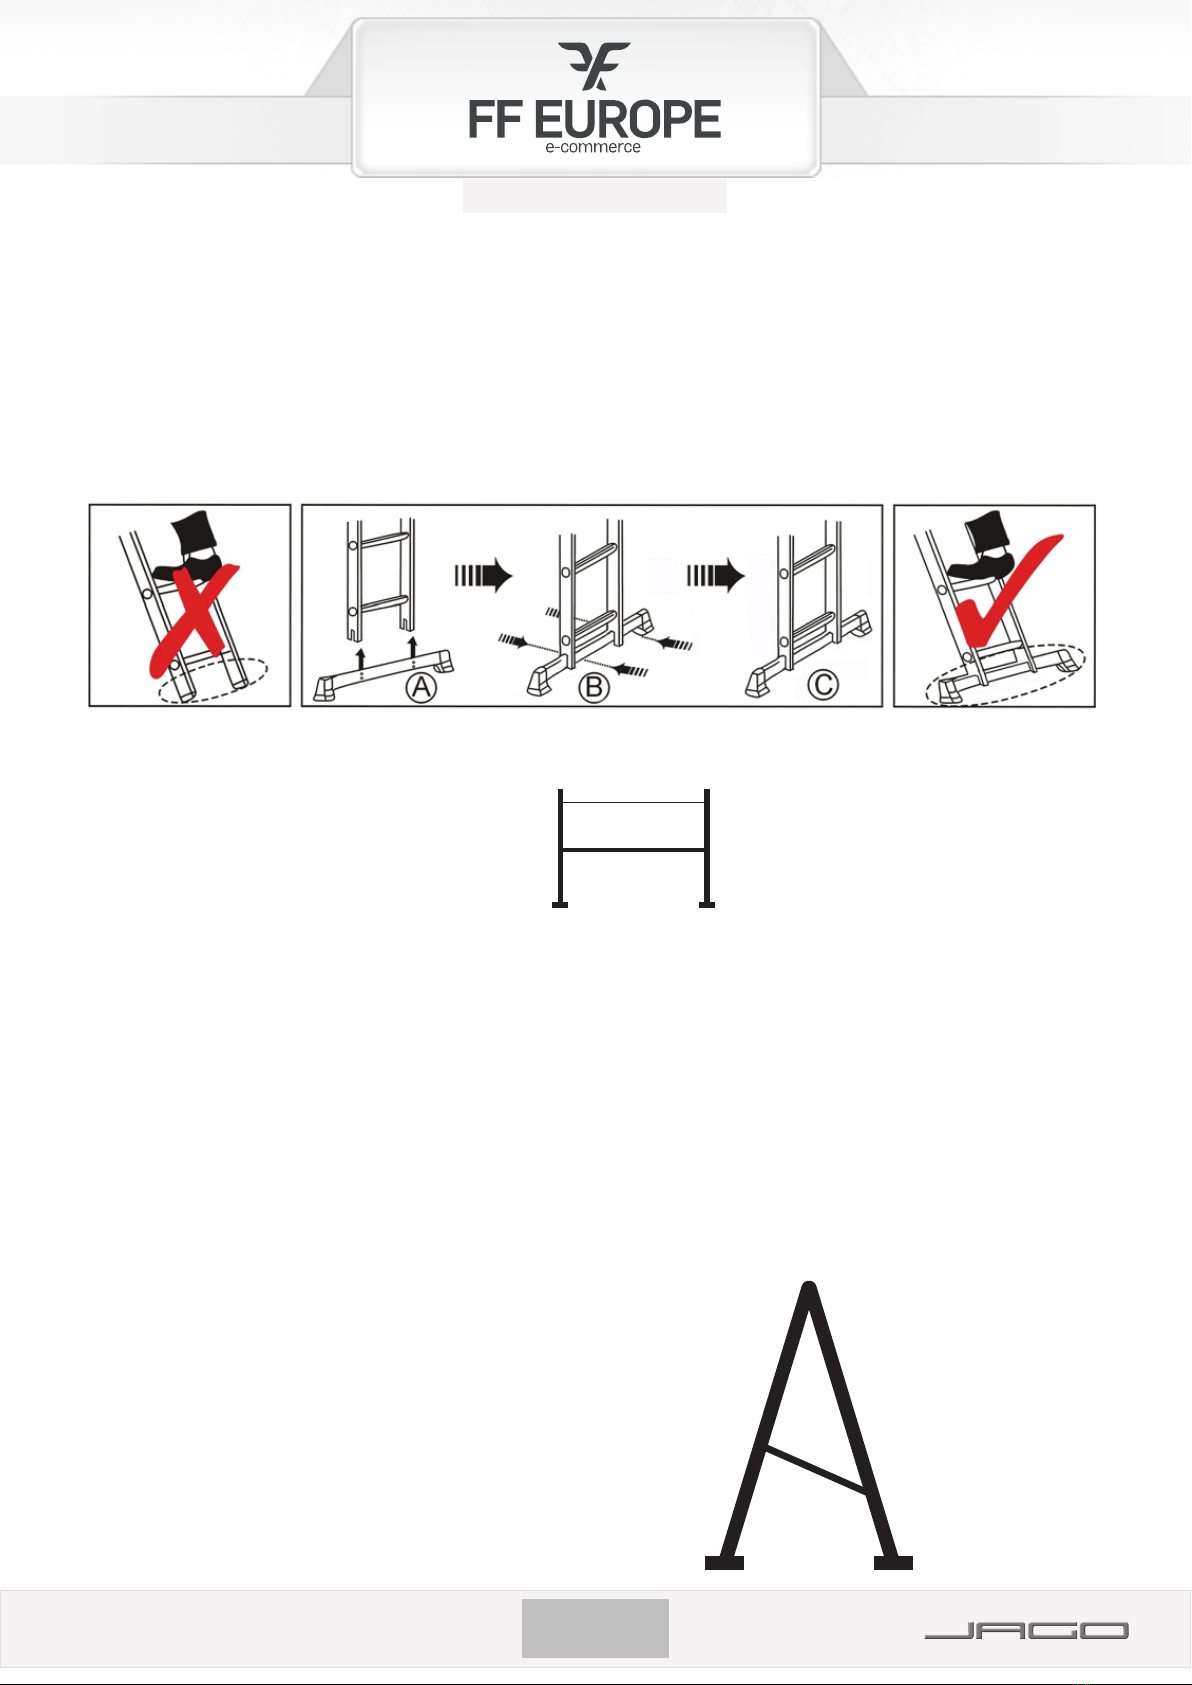
ZUSAMMENBAU DER FÜSSE:
1. Stecken Sie die Füße in die vorgesehene Öffnung an der Unterseite der Leitern hinein. Zentrieren Sie
die Löcher von Leiter und Fuß, damit Sie die Schrauben einsetzen können.
2. Ziehen Sie die Kontermutter fest. Achten Sie darauf, dass die Kontermutter richtig angezogen ist. Die
Muttern sollten nach außen zeigen, wenn das Gerüst vollständig gefaltet ist.
3. Wiederholen Sie diesen Vorgang mit jedem Loch.
MONTAGE ALS GERÜST:
1. Hängen Sie die Plattform an die Sprossen der beiden Leitern.
2. Setzen Sie die Stützstangen in die angegebenen Löcher auf jeder Seite der Plattform ein. Stecken Sie
die dicke Seite der Stützstange in ein passendes Loch an der Seite der Leitern. Sichern Sie es mit dem
Sicherheitsverschluss.
3. Befestigen Sie das Geländer mit den restlichen Schrauben und Muttern auf der linken und rechten
Oberseite jeder Leiter.
4. Um das Gerüst zu bewegen, kippen Sie es mit den Rollen an einer Seite zur Seite.
VORSICHT: Achten Sie darauf, dass sich beim Bewegen keine Person oder Ausrüstung auf dem Gerüst
befindet! Wenn möglich, lassen Sie sich von einer anderen Person helfen, um Verletzungen und
Schäden am Produkt zu vermeiden.
MONTAGE ALS SCHRITTLEITER:
1. Verbinden Sie beide Leitern, indem Sie die obere
Sprosse einer Leiter in die Aufhängung der anderen
Leiter hängen.
2. Setzen Sie die Stützstangen in die kleinen Löcher an
der Seite der Leiter ein. Stecken Sie die dicke Seite
der Stützstange in ein passendes Loch auf der
anderen Leiter und sichern Sie sie mit einem
Sicherheitsverschluss.

DE
55
MONTAGE ALS STURMLEITER:
1. Verbinden Sie beide Leitern, indem Sie die
Sprossen einer Leiter in die Aufhängungen der
zweiten Leiter hängen.
2. Sichern Sie diese Konstruktion, indem Sie die
Sicherheitsaufhängung ordnungsgemäß
abdichten.
Hergestellt für: FF Europe E-Commerce GmbH, Dr.-Robert-Murjahn-Str. 7, 64372 Ober-Ramstadt / Deutschland
Details zum Lieferumfang : Artikel wird in 1 Paket geliefert

FR
66
•Danger ! Le métal conduit l'électricité ! Ne laissez pas cet échafaudage ou l'une de ses parties entrer
en contact avec des fils électriques sous tension.
•Vérifiez si le sol est plat et suffisamment solide pour supporter l'échafaudage.
•La charge maximale de la plateforme de travail est 150 kg. Tenez toujours compte du poids des
matériaux et des outils afin de ne pas surcharger la plateforme.
•La force horizontale maximale sur la plate-forme est 200 N (newton). Ne sautez pas sur la plate-forme.
•Une seule personne doit utiliser l'échafaudage à la fois.
•Ne connectez pas l'échafaudage aux bâtiments avec des planches, etc. L'échafaudage ne peut pas être
utilisé comme escalier pour l'équipement.
•N'utilisez pas d'échelles, de boîtes ou d'autres dispositifs pour augmenter la hauteur de l'échafaudage.
Ne placez jamais l'échelle sur une surface glissante.
•Assurez-vous toujours que tous les pieds en caoutchouc de l'échelle sont fermemen supportés.
•Vérifiez si toutes les pièces sont complètes et en bon état.
•N'essayez jamais d'assembler une échelle ou un échafaudage endommagé.
•L'échelle peut être endommagée si elle est exposée à une chaleur excessive (comme les incendies
domestiques) ou à des agents corrosifs (comme les acides ou les alcalis).
•Soyez extrêmement attentif lorsque vous utilisez l'échafaudage en cas de vent, de pluie ou de glace.
•Soyez toujours attentif lorsque vous montez ou descendez de l'échafaudage.
•N'utilisez jamais l'échelle sous l'influence de l'alcool ou de drogues. L'utilisateur doit être en bon état
physique.
•Si vous poussez ou tirez quelque chose sur l'échelle ou l'échafaudage, vous risquez de tomber. Soyez
extrêmement attentif si vous devez pousser ou tirer quelque chose de l'échelle.
•N'utilisez cet échafaudage que pour l'usage auquel il est destiné.
•Cet échafaudage n'est pas un jouet. Gardez les enfants hors de portée de l'échafaudage. Ne laissez
jamais l'échafaudage sans surveillance.
•Installez toujours l'échelle sur une surface plane, stable et sèche. Ne marchez jamais sur l'échafaudage
si ces conditions ne sont pas respectées. Vous pourriez perdre l'équilibre et tomber.
•Ne montez l'échafaudage que de la manière décrite dans ce manuel.
•Portez toujours des chaussures qui ont une bonne adhérence lors de l'utilisation du produit. Évitez de
porter des vêtements amples qui pourraient pendre.
•Gardez toujours l'échelle sèche, propre et sans aucun débris ou corps étranger. Nettoyez-la après
chaque utilisation.
•Avant et pendant l'utilisation de l'échafaudage, assurez-vous qu'aucun changement dans
l'environnement ne peut affecter la sécurité de l'échafaudage.
•Faites attention aux éventuels obstacles, en particulier les câbles électriques, avant de déplacer
l'échafaudage.
•Observez et respectez toujours les règlements publiés par le gouvernement local.
INSTRUCTIONS DE SÉCURITÉ

FR
77
instRuctions de sÉcuRitÉ
NETTOYAGE ET ENTRETIEN
MONTAGE
•Toutes les parties de l'échafaudage doivent être régulièrement entretenues.
•Chaque pièce endommagée doit être immédiatement remplacée.
•La réparation de l'échafaudage par vous-même n'est autorisée qu'après consultation du fabricant ou
du personnel qualifié.
•Lubrifier toutes les pièces mobiles avec une huile commerciale standard.
•L'échafaudage doit être protégé des conditions climatiques difficiles. Si possible, rangez-le dans la
position horizontale.
•L'échafaudage doit être protégé contre le glissement, les chocs ou les chutes lors de chaque
transport.
AVERTISSEMENT: Pour éviter les blessures graves ou la mort causées par l'instabilité de l'échafaudage ou la
défaillance d'un composant :
•Utilisez uniquement les pièces originales,
fournies par le fabricant.
AVANT L’ASSEMBLAGE :
•Identifiez tous les éléments requis.
•Si des composants sont manquants ou endommagés, veuillez contacter le vendeur.
ATTENTION:Ne serrez pas trop les vis. L'échafaudage et les composants pourraient être endommagés.
PIÈCES:
●Contre-écrou (8 pièces)
●Barre de support (2 pièces)
●Balustrade (1 pièce)
•Vis à métaux (8 pièces)
•Pied (2 pièces)
•Plateforme (1 pièce)

FR
88
ASSEMBLAGE DES PIEDS :
1. Placez les pieds dans l'ouverture prévue en bas des échelles. Centrez les trous pour les vis de l'échelle
et du pied.
2. Serrez le contre-écrou. Veillez à ce que le contre-écrou soit correctement serré. Les écrous doivent
être tournés vers l'extérieur lorsque l'échafaudage est complètement plié.
3. Répétez ce processus avec chaque trou.
ASSEMBLAGE EN TANT QU’ÉCHAFAUDAGE :
1. Accrochez la plateforme aux barreaux des deux échelles.
2. Placez les barres de support dans les trous indiqués de chaque côté de la plateforme. Placez le côté
épais de la barre de support dans un trou approprié sur le côté des échelles. Fixez-la avec le loquet
de sécurité.
3. Fixez la balustrade avec les vis et les écrous restants sur le côté supérieur gauche et droit de chaque
échelle.
4. Pour déplacer l'échafaudage, basculez-le sur le côté avec les rouleaux d'un côté des échelles.
Attention : Faites attention à ce qu'aucune personne ou équipement ne se trouve sur l'échafaudage
lors de son déplacement! Si possible, demandez une assistance à une autre personne pour éviter les
blessures et les dommages au produit.
ASSEMBLAGE EN TANT QU’ESCALIER :
1. Reliez les deux échelles en accrochant l'échelon
supérieur d'une échelle à la suspension de l'autre.
2. Placez les barres de support dans les petits trous sur
le côté de l'échelle. Placez le côté épais de la barre
de support dans un trou approprié sur l'autre
échelle, puis fixez-la avec le loquet de sécurité.

FR
99
Fabriqué pour: FF Europe E-Commerce GmbH, Dr.-Robert-Murjahn-Str. 7, 64372 Ober-Ramstadt / Allemagne
Détails d‘emballage: Cet article sera livré en 1 paquet
ASSEMBLAGE EN TANT QU’ÉCHELLE À CROCHETS
1. Reliez les deux échelles en accrochant les
échelons d'une échelle à la suspension de
l'autre.
2. Fixez cette construction en scellant
correctement la suspension de sécurité.

EN
1010
•Danger! Metal conducts electricity! Do not let this scaffold or any of its parts contact live electrical
wires.
•Check if the ground is level, even and capable of supporting the scaffold.
•The maximum capacity of the working platform is 150kg. Always take the weight of the materials and
tools into consideration so as not to overload the platform.
•The maximum horizontal force at the platform is 200N (newton). Do not jump on the platform.
•Only one person should be using the scaffold at a time.
•Do not connect the scaffold to buildings with planks etc. The scaffold can not be used as a staircase for
equipment.
•Do not use ladders, boxes or other devices to increase the height of the scaffold. Never place the
ladder on a slippery surface.
•Always make sure all the rubber feet of the ladder are firmly supported.
•Check if all the parts are complete and undamaged.
•Never try to assemble a damaged ladder/scaffold.
•The ladder can be damaged if exposed to excessive heat (such as house fires) or corrosive agents (like
acids or alkalis).
•Use extreme caution when using the scaffold in windy, rainy, or icy conditions.
•Always be cautious with getting on or off the scaffold.
•Never use the ladder while under the influence of alcohol or drugs of any kind. The user should be in a
good physical state.
•Pushing or pulling anything while on the ladder or scaffold may cause you to fall. Be extremely cautious
if you must push or pull from the ladder.
•Only use this scaffold for its intended purpose.
•This scaffold is not a toy. Keep children out of the reach from the scaffold. Never leave the scaffold
unattended.
•Always set up the ladder on a surface that is level, stable and dry. Never step on the scaffold if these
conditions are not met. You could lose your balance and fall.
•Only mount the scaffold as described in this manual.
•Always wear shoes that have a good grip while using the product. Avoid wearing loose clothing that
could dangle and get caught.
•Always keep the ladder dry, clean, and free of debris and foreign materials. Clean after each use.
•Before and while using the scaffold, make sure that there are no environmental changes influencing
the safety of the scaffold.
•Beware of overhead obstructions, especially power cables, before moving the scaffold.
•Always observe and comply with the concerning local regulations published by the local government.
SAFETY INSTRUCTIONS

EN
1111
safety instRuctions
CARE AND MAINTENANCE
ASSEMBLY
•All parts of the scaffold should be regularly maintained.
•Every damaged part should be immediately replaced.
•Repairing the scaffold on your own is only allowed after consulting the manufacturer or qualified
personnel.
•Lubricate all moving parts with standard commercial oil.
•The scaffold must be protected from severe weather conditions. Store it in a lying position if
possible.
•The scaffold must be secured against sliding, impacting, or falling off during every transport.
WARNING: To avoid serious injury or death caused by scaffold instability or component failure:
•Only use the original parts, supplied from
manufacturer.
BEFORE ASSEMBLING:
•Identify all of the required components.
•If any components are missing or damaged, please contact the seller.
CAUTION: Do not over-tighten the screws. Scaffold and components could be damaged.
PARTS:
●Locknut (8 pcs)
●Support bar (2 pcs)
●Railing (1pcs)
•Machine screw (8 pcs)
•Foot (2pcs)
•Platform (1 pcs)
EN
1212
ASSEMBLING THE FEET:
1. Put the feet into the intended opening at the bottom side of the ladders. Center the holes for the
screws of ladder and foot.
2. Tighten the lock nut. Take care the lock nut is properly tightened. The nuts should face outwards
when the scaffold is completely folded.
3. Repeat this process with each hole.
ASSEMBLING AS SCAFFOLD:
1. Hang platform onto the rungs of the two ladders.
2. Put the support bars into the indicated holes on each side of the platform. Put the thick side of the
support bar into a suiting hole at the side of the ladders. Secure it with the safety catch.
3. Fix the railing with the remaining screws and nuts on the left and the right upper side of each
ladder.
4. To move the scaffold tip it over to the side with the rollers at one side of the ladders.
CAUTION: Take care no person or equipment is on the scaffold when moving it! If possible get the
help of another person to avoid injury and damage to the product.
ASSEMBLING AS STEPLADDER:
1. Connect both ladders by hanging the upper rung of
one ladder into the suspension on the other.
2. Put the supporting bars into the small holes at the
side of the ladder. Put the thick side of the support
bar into a fitting hole on the other ladder, secure
with a safety catch.
EN
1313
Packaging details: This item is shipped in 1 package
Produced for: FF Europe E-Commerce GmbH, Dr.-Robert-Murjahn-Str. 7, 64372 Ober-Ramstadt / Germany
ASSEMBLING AS SCALING LADDER:
1. Connect both ladders by hanging the
rungs of one ladder into the suspensions
of the second
2. Secure this construction by properly
sealing the safety suspension.

IT
14
•Pericolo! Il metallo conduce elettricità! Non lasciare che questo ponteggio o una delle sue parti entrino
in contatto con cavi elettrici sotto tensione.
•Controllare se il terreno è piano, uniforme e in grado di sostenere il ponteggio.
•La capacità massima del trabattello è 150 kg. Tenere sempre in considerazione il peso dei materiali e
degli strumenti per non sovraccaricare il trabattello.
•La forza orizzontale massima sulla piattaforma è 200N (Newton). Non saltare sul ponteggio.
•Solo una persona deve utilizzare il ponteggio alla volta.
•Non collegare il ponteggio ad edifici con assi ecc. Non può essere utilizzato come scala.
•Non utilizzare scale, scatole o altri dispositivi per aumentare l'altezza del ponteggio. Non posizionare
mai la scala su una superficie scivolosa.
•Accertarsi sempre che tutti i piedini di gomma del ponteggio siano saldamente fissati.
•Controllare se tutte le parti sono complete e integre.
•Non tentare mai di montare il ponteggio se è danneggiato.
•Il ponteggio può essere danneggiato se è esposto a calore eccessivo (come incendi domestici) o agenti
corrosivi (come acidi o alcali).
•Usare estrema cautela quando si utilizza il trabattello in condizioni di vento, pioggia o ghiaccio.
•Prestare sempre attenzione quando si sale sul o scende dal ponteggio.
•Non usare mai il ponteggio quando si è sotto l'effetto di alcol o droghe di qualsiasi tipo. L'utente
dovrebbe essere in un buono stato fisico.
•Spingere o tirare qualsiasi cosa mentre si è sul ponteggio o sulla scala può causare la caduta. Essere
estremamente cauti se si deve spingere o tirare qualcosa dalla scala.
•Utilizzare questo ponteggio solo per lo scopo previsto.
•Questo ponteggio non è un giocattolo. Tenere i bambini fuori dalla portata del ponteggio. Non lasciarlo
mai incustodito.
•Posizionare sempre la scala su una superficie piana, stabile e asciutta. Non salire mai sul ponteggio se
queste condizioni non sono soddisfatte. Si può perdere l'equilibrio e cadere.
•Montare il ponteggio solo come descritto nel manuale.
•Indossare sempre scarpe da lavoro durante l'utilizzo del prodotto. Evitare di indossare abiti larghi che
potrebbero impigliarsi.
•Mantenere sempre il ponteggio asciutto, pulito e privo di detriti e materiali estranei. Pulire dopo ogni
utilizzo.
•Prima e durante l'utilizzo, assicurarsi che non vi siano cambiamenti ambientali che influenzano la
sicurezza.
•Prestare attenzione agli ostacoli sopra la testa, in particolare ai cavi di alimentazione, prima di
spostare il ponteggio.
•Rispettare sempre le normative locali in materia, pubblicate dal governo locale.
ISTRUZIONI DI SICUREZZA

IT
15
CURA E MANUTENZIONE
MONTAGGIO
•Tutte le parti del ponteggio devono essere mantenute regolarmente.
•Ogni parte danneggiata deve essere immediatamente sostituita.
•La riparazione del ponteggio da soli è consentita solo dopo aver consultato il produttore o il
personale qualificato.
•Lubrificare tutte le parti mobili con olio commerciale standard.
•Il ponteggio deve essere protetto da condizioni meteorologiche avverse. Conservarlo in posizione
sdraiata, se possibile.
•Deve essere protetto da scivolamento, urti o caduta durante ogni trasporto.
AVVERTENZA: Per evitare lesioni gravi o morte causata da instabilità del ponteggio o guasti dei componenti:
•Utilizzare solo le parti originali, fornite
dal produttore.
PRIMA DI ASSEMBLARE:
•Identificare tutti i componenti richiesti.
•In caso di componenti mancanti o danneggiati, contattare il
venditore.
ATTENZIONE: Non serrare eccessivamente le viti. Il ponteggio e i componenti potrebbero essere danneggiati.
PARTI:
●Controdado (8 pezzi)
●Barra di supporto (2 pezzi)
●Ringhiera (1 pz)
•Viti (8 pezzi)
•Piedini (2 pezzi)
•Piattaforma (1 pz)

IT
16
ASSEMBLAGGIO DEI PIEDI:
1. Posizionare i piedini nell'apertura prevista sul lato inferiore delle scale. Centrare i fori per le viti
della scala e del piede.
2. Stringere il controdado. Accertarsi che il controdado sia serrato correttamente. I dadi devono
essere rivolti verso l'esterno quando il ponteggio è completamente piegato.
3. Ripetere questo processo con ogni foro.
MONTAGGIO COME PONTEGGIO:
1. Appendere la piattaforma sui gradini delle due scale.
2. Inserire le barre di supporto nei fori indicati su ciascun lato della piattaforma. Inserire il lato spesso
della barra di supporto in un foro adatto sul lato delle scale. Fissarlo con un fermo di sicurezza.
3. Fissare la ringhiera con le viti e dadi restanti sul lato superiore sinistro e destro di ciascuna scala.
4. Per spostare il ponteggio, inclinarlo sul lato delle scale che ha rotelle.
ATTENZIONE: Fare attenzione che nessuna persona o attrezzatura si trovi sul ponteggio durante lo
spostamento! Se possibile, ottenere l'aiuto di un'altra persona per evitare lesioni e danni al
prodotto.
MONTAGGIO COME SCALA DOPPIA:
1. Collegare le scale appendendo il gradino superiore
di una scala sui ganci dell’altra.
2. Inserire le barre di supporto nei piccoli fori sul lato
della scala. Inserire il lato spesso della barra di
supporto in un foro adatto sul lato delle scale.
Fissarlo con un fermo di sicurezza.

IT
17
Detagli di consegna: Il prodotto sarà spedito in 1 pacco Prodotto per: FF Europe E-Commerce GmbH,
Dr.-Robert-Murjahn-Str. 7, 64372 Ober-Ramstadt / Germania
ASSEMBLAGGIO COME SCALETTA TELESCOPICA:
1. Collegare le scale appendendo i gradini
di una scala sui ganci dell’altra per fare
una scala lunga.
2. Fissare questa costruzione sigillando
correttamente la sospensione di
sicurezza.
Table of contents
Languages:
Popular Ladder manuals by other brands


Probuilder
Probuilder 57650 instruction manual

Ocean Blue
Ocean Blue 400201 Assembly and installation manual

Vestil
Vestil COL-4-36-33 instruction manual

Grizzly
Grizzly 511 Series instruction manual

Atwood
Atwood MHL2227 Installation operation & maintenance

Vestil
Vestil Tip-N-Roll LAD-TRN-FDA Series instruction manual

KRAUSE
KRAUSE STABILO Professional Series Instructions for assembly

HSS Hire
HSS Hire 80880 quick start guide

TP Toys
TP Toys active fun 8ft Trampoline Ladder Instructions for assembly maintenance and use

GIERRE
GIERRE EASY 200 quick start guide

Lippert Components
Lippert Components Victory Step installation manual

Kogan
Kogan KALADTLF5M2A user guide