FH Group W-3 User manual

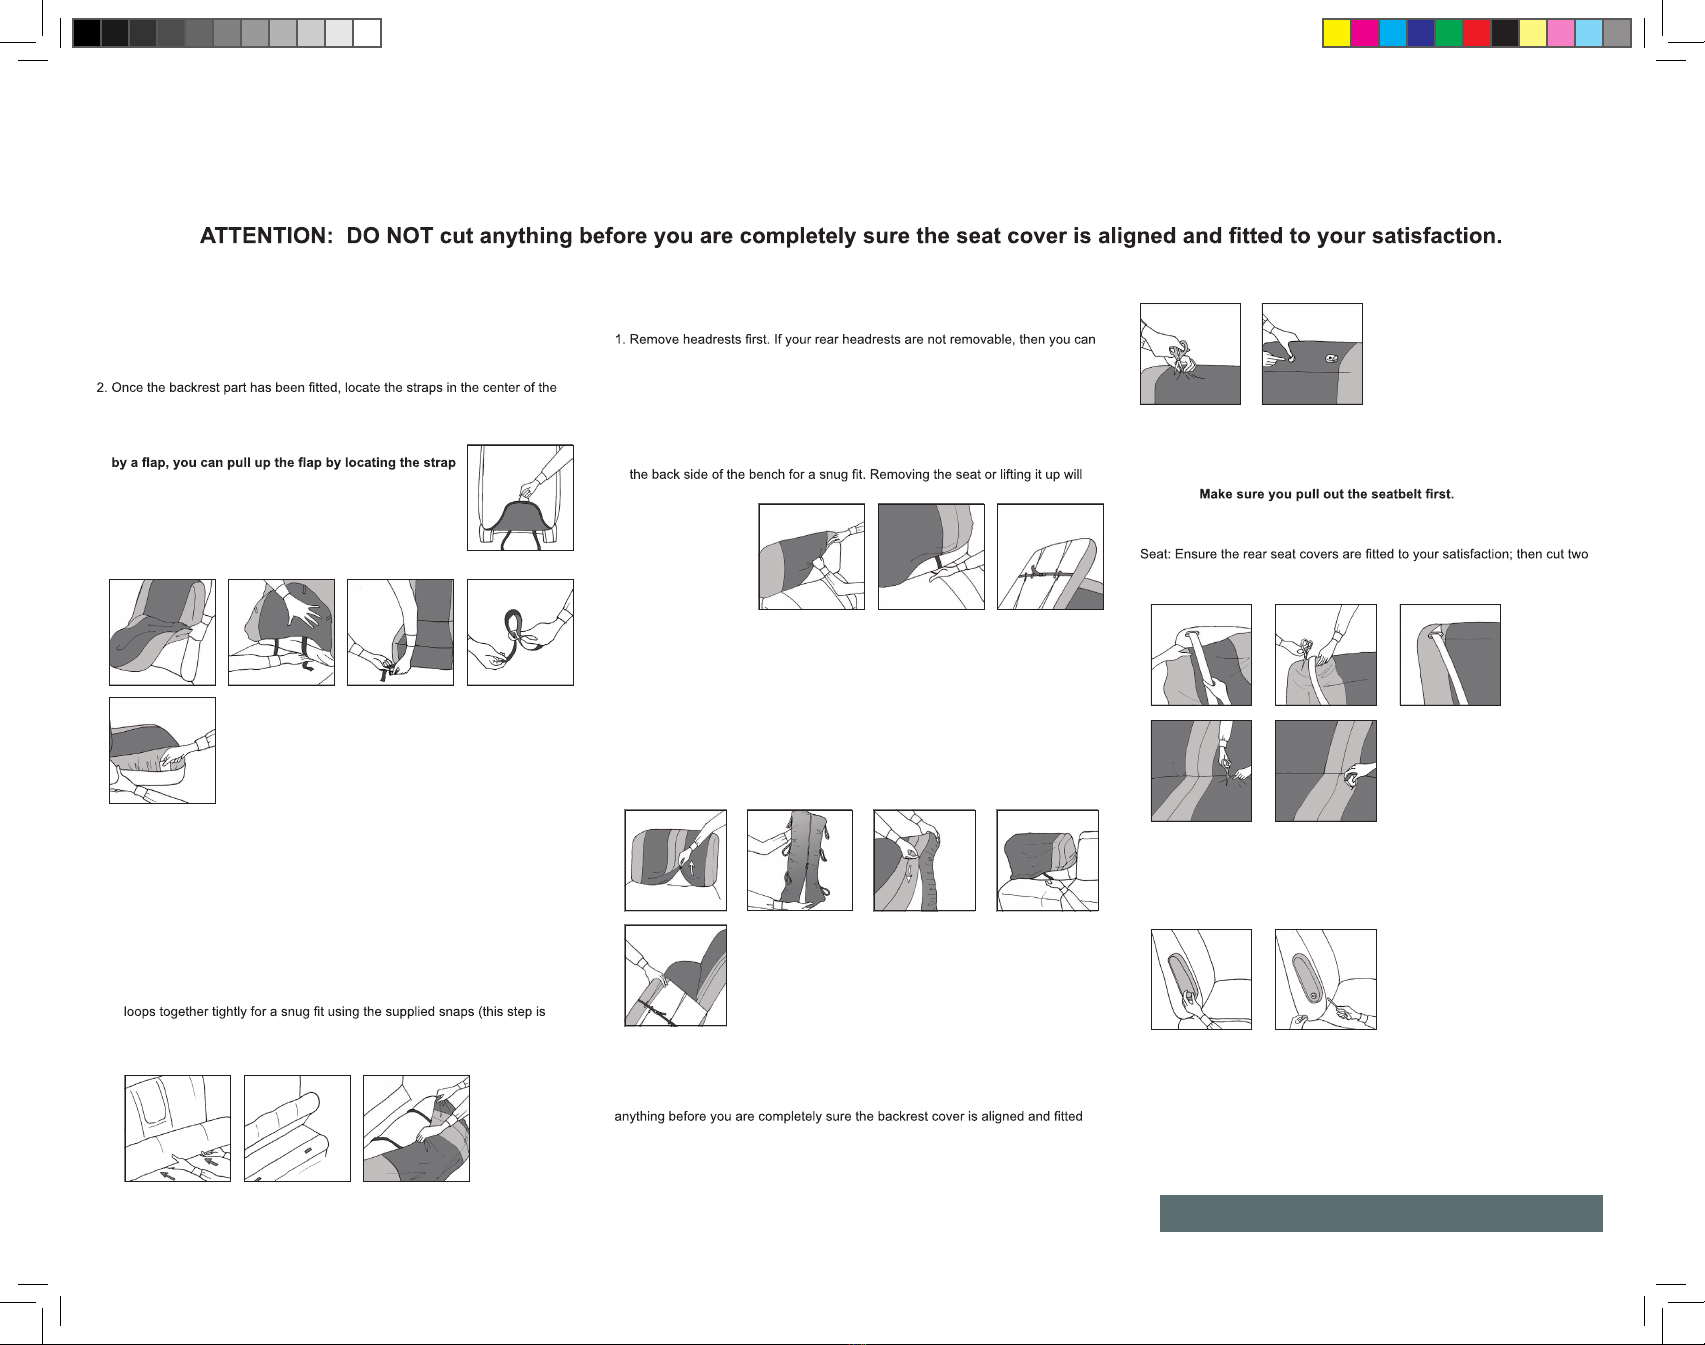
Front one-piece bucket cover:
1. Align the bucket cover over the headrest and slide it down gently; ensure that
the designs are lined up correctly.
cover and push it through the back seat crevice. Please make sure your
airbag tag is on the same side as where your aribag is located.
Optional: If your front seat center crevice is blocked
on the bottom rear of the seat.
3. Fit the base part of the cover over seat and secure it by
connecting the elastic loops underneath the seat with
supplied Snaps OR you can just tuck the mesh cloth
underneath the seat.
Rear bench cover/Seat (bottom) cover:
1. Find the rear seat cover from the package, it is the one with the tag labeled
Bench Bottom located on the border inside of the cover. (It looks very
similar to the backrest cover except it’s smaller in size and has 3 pieces of mesh
cloth attached to it.)
To lift up your bench seat, locate the control on the bench and push to yank
it up.
2. Fit the cover over seat (zipper should open from top to bottom)and secure
it by fastening the straps on the bottom of the seats. Also fasten the elastic
optional). These snaps and straps will be hidden underneath the seat. Or you
can just tuck in the mesh cloth underneath the seat. The installation will be
easier if you are able to lift up the seat.
Rear bench cover/backrest cover:
cut a line from the edge of the backrest cover to install the backrest cover. The
material will not rip.
The backrest cover is the one labeled Bench Backrest located on the
border inside the cover.
2. Fit the cover on the backrest. Zipper should open from bottom to top. Push
the bottom straps through seat crevice to the back and fasten the straps from
make it much easier to install the backrest cover. You can also connect the
loops with supplied
snaps (this step is
optional). Or you can
just tuck in the mesh
cloth on the side of
the seat.
To split or fold the rear bench:
Based on the position of the bench split, unzip the corresponding zipper on the
backrest or bottom seat cover, this will allow you to fold the bench up and down.
Unzip one zipper from the bottom. When using the split feature, you can use
the included extra set of mesh cloth to cover the newly exposed middle/side
edge. You can unzip the zipper in the middle to allow allow armrest/cup holder
down. You can also unzip and take off middle piece to make the cover shorter
if needed. If the bench cover is too short, then you can ask for extension
piece to be added on.
Rear headrest cover:
Fit the headrest cover over rear bench headrest. Cut two tiny holes on top of
the backrest cover where the headrest needs to be inserted back. DO NOT cut
to your satisfaction. Stuff the material underneath the rim for a smoother look
(this step is optional), then put the headrests back. Fasten the straps to secure
headrest covers.
Bucket Seat Armrest:
To remove armrest: the screw is located at the end of the armrest. Remove the
round cap and undo the screw inside to take out the armrest. After you have
installed the seat covers, redo the screw and put back the armrest.
Note – Rear seat belt adjustment
Backrest: Fit the seat cover on the
backrest, make sure seatbelt is on top of the cover, not beneath the cover. Then
cut a slit from the edge of the cover where the seatbelt comes out.
small holes at where the belt buckles are in order to pull the belt buckles out. The
material will not tear up.
Video Instructions are available at www.fhseatcovers.com/installation
Installation Manual
For installation videos go to
www.fhseatcovers.com/installation
Other FH Group Automobile Accessories manuals


Popular Automobile Accessories manuals by other brands


ULTIMATE SPEED
ULTIMATE SPEED 279746 Assembly and Safety Advice

SSV Works
SSV Works DF-F65 manual

ULTIMATE SPEED
ULTIMATE SPEED CARBON Assembly and Safety Advice

Witter
Witter F174 Fitting instructions

WeatherTech
WeatherTech No-Drill installation instructions

TAUBENREUTHER
TAUBENREUTHER 1-336050 Installation instruction