Filco Majestouch Convertible 2 User manual

お名前(会社名)
ご住所
電話番号
E-Mail
保証期間 お買い上げ日 年月日より 12ヶ月間
■販売店様へ
お客様へ商品をお渡しする際は、必ず販 売日をご記入の上 貴店印をご捺印ください。
記載漏れがありますと、保証期間内でも無償保証が受けられません。
販売店印
この保証書は製品が万が一故障した場合、ご購入頂いた日から12ヶ月間の保証を行うものです。製品の初期不良はご購入日から1週間と
し、初期不良と認められた場合は商品を交換します。保証期間内で初期不良と認められない場合は製品を修理します。
1)保証書に販売店捺印、購入年月日の記入がない場合は無効となります。2)保証書は日本国内のみで有効です。3)本製品の故障または
その使用上生じたお客様の直接、間接の損害につきましては、当社はその責任を負いかねます。4)保証期間内でも次のような場合は有償
での修理となります。A)通常の使用以外の操作で発生した場合の故障または損害。B)改造されたり不当な修理をされたことに起因する故
障または損傷。C)お買い上げ後輸送されたことに起因する故障または損傷。D)地震、風水害そのほか不測の事故による損傷。E)本保証書
を提示されない場合。F)保証書の所定事項の未記入、訂正された場合。
保証書
〒101− 0 0 21 東京都千代田区外神田6−5−4偕楽ビル(外神田)4F
KairakuBldg(Sotokanda)4F,6-5-4Sotokanda,Chiyoda-ku,Tokyo,101-0021,Japan
URLhttp://www.diatec.co.jp/
Microsoft Windowsは米国マイクロソフト社及びその他の国における登録商標です。 Windows is a registered trademark of
MicrosoftCorporationintheUnitedStatesandothercountries.
Bluetoothは、BluetoothSIG,Inc.の登録商標です。BluetoothisatrademarkofBluetoothSIG,Inc.
FILCOはダイヤテック株式会社の登録商標です。FILCOisaregisteredtrademarkofDIATECCORPORATION.
●
●
●
平日AM10:00〜12:00/PM13:00〜17:00
●サポート専用お 問い合せフォーム
ダイヤテックホームページ>サポート情報>
お問い合せフォーム
https://www.diatec.co.jp/support/#FORM
取扱説明書
接 続 す る
◆接続方法を選ぶ ......................................................................................................... 6
◆パソコンと有線接続する ......................................................................................... 6
USB接続 ................................................................................................................ 6
USB接続時のLED点灯パターン ........................................................................ 6
◆パソコンと無線接続する ......................................................................................... 6
Bluetooth接続 ..................................................................................................... 6
Bluetooth接続の流れ ......................................................................................... 7
Bluetooth接続時のLED点灯パターン ............................................................. 7
手順①キーボードをペアリングモードにする ........................................................ 8
手順②Bluetoothデバイスのセットアップ(ペアリング) ................................ 9
WindowsXP/Vistaの場合 ............................................................................... 9
Windows7/8/8.1/10の場合......................................................................... 9
Windows10の「設定」から操作する場合 ................................................. 10
手順③2台目以降の登録.......................................................................................... 11
◆Bluetoothデバイスの変更と削除...................................................................... 11
接続先デバイスの変更をしたい時 ................................................................... 11
登録済みのデバイス情報を削除したい時 ....................................................... 12
登録済みのデバイス情報を別の登録キーに変更したい時............................ 12
USB接続・Bluetooth接続の優先順位、関係について.............................. 12
無線接続時のUSB給電開始方法 ...................................................................... 13
無線接続中に有線接続に切り替える ............................................................... 13
その他................................................................................................................... 14
◆使用上の注意点 ......................................................................................................... 2
◆お問い合せ窓口 ......................................................................................................... 2
◆システム要件 ............................................................................................................. 3
◆製品紹介 ..................................................................................................................... 3
◆各部の名称と付属品 ................................................................................................. 4
◆スイッチ・LEDの機能 ............................................................................................ 5
使 用 す る
◆DIPスイッチによるキーファンクション変更操作 ........................................... 15
◆メディアキーによるデバイス操作 ...................................................................... 15
◆Windowsスリープスタンバイモードの移行・復帰 ........................................ 15
◆無線接続時の省電力モード .................................................................................. 16
◆キー印字・キー配列と配列の変更について ...................................................... 16
USASCII準拠配列 英語キーボードについて ............................................ 16
日本語キー配列への設定変更 ........................................................................... 16
英語キー配列への設定変更 ............................................................................... 17
◆iPad・iPhoneに接続して使用する場合........................................................... 18
英語配列のキーボードとして認識された場合のキー配列図........................18
◆トラブルシューティング ...................................................................................... 19
English:Usermanual ................................................................................. 20
中 文( 简 ):使 用 说 明 书 ...................................................................................35
中 文( 繁 ):使用說明書 ................................................................................... 46
한국어 : 사용설명서 ........................................................................................... 57
EN
CN
TW
KR
テンキーレスモデル

PC:有線接続する場合はUSBポートを持つWindowsパソコン
無線接続する場合はBluetoothHIDプ ロファイルに対応したWindowsパソコン
OS:WindowsXPServicePack2以降、WindowsVista、Windows7/8/8.1/10
Bluetooth接続の場合は、Bluetooth機能が搭載されたパソコンまたはBluetooth受信アダプタが必要です。ただし互換性の問題
でまれに接続できない場合があります。全てのBluetooth受信アダプタに対応するものではありません。
※Bluetooth接続のセットアップ操作には動作可能なマウスが必要です。
このたびはFILCO Majestouch Convertible 2をご購入いただきまして誠にありがとうござい
ます。本書記載事項をよく読んでご使用下さい。
• セットアッ プ 作 業 を 行 う 際 は 、管 理者 権限を持 つユーザーでログインして 下さい 。
•本製品は一般的なオフィスや家庭での使用を目的としています。本製品を人命が直接的・間接的に関わる医療機器や金融システム、電算
機システム、原子力関連施設等、高い安全性・信頼性が求められる環境下、及び直接的な防衛軍事目的では使用しないで下さい。損害等
発生した場合弊社は一切の責任を負いません。
•本製品の故障、不具合、通信不良や、停電など外的要因、第三者による妨害などの要因によって通信の機会を逃したために損害等発生し
た場合弊社は一切の責任を負いません。
•第三者による通信内容の傍受、情報の漏洩、改竄、破壊などによって損害等発生した場合弊社は一切の責任を負いません。
通信についての注 意点
•見通しのいい場所で通信して下さい。建物の構造や障害物によっては通信可能距離が変わる場合があります。また鉄筋や金属、コンク
リートを挟むと通信できません。
•通信中に障害物の陰や電波の届かない範囲に移動すると、通信が途中で途切れる場合があります。
•AV機器やOA機器などから2m以上離れて通信して下さい。また電子レンジからは影響を受けやすいので3m以上離れて通信して下さい。
正 常 に 通 信 で き な い 場 合 が あ りま す。
•IEEE802.11g/bの無線LAN機器と本製品などのBluetooth機器は同一周波数帯(2.4GHz)を使用しているため、近くで使用すると電
波障害が発生し、通信速度が低下したり接続できなくなる場合があります。この場合は使用しない機器の電源をお切り下さい。
•本製品や他のBluetooth機器が発する電磁波の影響により、音声や映像にノイズが発生する場合がありますので、テレビやラジオなど
の 近 くで 接 続 しな い こと をお す す めしま す。
健康についての注意点
マウスやキーボード、トラックボールなどを長時間操作すると、手・腕・首・肩などに負担がかかり、痛みやしびれなどの症状を感じる場合
があります。そのまま操作を続けたり、繰り返したりしていると深刻な障害を引き起こす可能性もあります。上記のような症状を感じた時
は、ただちにマウスやキーボードなどの操作を中止し、場合によっては医師に相談することをおすすめします。
また日常のパソコン操作時には定期的に休憩を取るなどして、手・腕・首・肩など身体に負担がかからないよう心がけましょう。
安全のために
•電池の使用について
•小さいお子様の手の届かない場所で保管して下さい。
•電池に熱を加えないで下さい。また分解したり水中に投入しないで下さい。
•古い電池と新しい電池を組み合わせて使用しないで下さい。また異なる種類の電池(マンガン電池とアルカリ電池など)を組み合わ
せて使 用しないで下さい。
• 古くなったり電 力が 弱くなった電池は使 用を中止し、お住まいの地 域の 条例および法 令に従って処 分して下さい。
•キーボードの取り扱いについて
• 落下などにより思わぬ事 故となる場合がありますので、平らで滑らない場所を選 んで設置して下さい。キーボードは精密機械であり、
内部に電池や変圧装置を含みます。飲み物などの水分が内部に侵入しないようお取り扱いに十分ご注意下さい。
•分 解 、改 造 は し な い で 下 さ い 。なお保守用ラベルをはがすなど分解や改造の痕跡が見られた場合、保証規定の内容が適用されません。
•以下の環境下では使用を中止、もしくは使用しないで下さい。電波が影響を及ぼし誤作動による事故の原因となるおそれがあります。
• 心 臓 ペ ース メーカ ー の 近 く
•医療機関内、医療用電気機器の近く
•航空機内
•本製品を使用中に他の機器に電波障害などが発生した場合
•本製品は購入国内での使用を前提に保 証を 規 定して います。日本国内で販売店を通じて購入した場合はダイヤテック株式会社、海外代
理店を経由して購入した場合は代 理店の定める保証 規定が適用されます。ま た 本 書の保証書は日本国内でのみ有効です。
◆使用上の注意点
◆システム 要 件
2wayキーボード USB有線接続とBluetooth無線接続
■USB接続
同梱のUSBケーブルを使用することにより操作できます。(充電式ニッケル水素電池への充電機能はありません)
■Bluetooth接続
パソコンとの接続方法に省電力性を向上させたBluetooth ver 3.0 class2技術を採用、ケーブルレス操作環境が 可能となります。動
作範囲は約10mまでサポートします。パソコンとの接続設定は初回のみ。その後はセットアップする必要なく操作することができます。
最大4台のパソコンとの接続が可能で自由に切替ができます。
電池駆動のほか、USBケーブルを利用したUSB給電も可能になりました。
電池駆動時は30分キー操作をしなければ自動的に省電力モードに移行し、消費電力を節約します。
FR-4の2層基板
基本性能をより充実にするため新しくFR-4(ガラスエポキシ基板)の2層基板を採用しました。
全スイッチ端子のスルーホールを半田でしっかりと固定し、打鍵時に発生する負荷と振動を鉄板にだけではなく基板側でも逃がす事が
可 能 と な り 、耐 久 性・信 頼 性・打 鍵 感 の 向 上 を 実 現 しまし た 。
CherryMXキースイッチ採用
Cherry MXキースイッチとは、ド イ ツ・CHERRY社のメカニカルスイッチです。キーは、ストローク約4mmと一般的なキーボードと比
較し深く、接点は約2mm押し下げた位置にあるため動作に余裕がある設計です。本製品はキーひとつひとつに独立したスイッチを搭載
しているため、軽快なキー動作が得られます。
D I P ス イッ チ に よ る キ ーフ ァ ン ク シ ョ ン 変 更 操 作
D I P スイ ッ チ の 設 定 に よ り「 C a p s L o c k 」キ ー と「 左 C t r l」キ ー を 入 れ 替 え た り 、「 W i n d o w s 」キ ー・「 A p p 」キ ー を ロ ッ ク す る こ と が で
きま す。
◆製品紹介
お電話でのお問い合わせ(サポート専用ダイヤル)
03-5688-5778
9:00〜12:00、13:00〜17:00(弊社指定日、年末年始、土日、祝日を除く)
ホームページからのお問い合わせ(お問い合わせフォーム)
https://www.diatec.co.jp/support/#FORM
ご使用中のお気づきの点、万が一問題が発生したときのお問い合わせは、以下の窓口をご利用ください。
◆お問い合せ窓口
Bluetooth接続 USB給電
Bluetooth接続 電池駆動USB接続
3
2

◆スイッチ・LEDの機能
【CapsLock、ScrollLockのLED表示について】
Bluetooth接続時は電池駆動中・USB給電中ともに、CapsLock・ScrollLockが有効でもキーボード本体には表示されません。
本 体 背 面に ありま す。
Bluetooth接続で使用するときにオンにします。
長時間操作しない場合、パソコンの電源を切っている場合、USB接続の場合
は オ フにしま す。
Bluetooth
電 源 スイッ チ
本 体 裏 面に ありま す。
キーコードを変更したり無効化したりすることができます。工場出荷時はすべ
てオフに なっています。詳 細は15 ページ をご 覧ください。
D I P スイッ チ
1
ON
2 3 4
ScrollLockLED
兼
レベル チェックLE D
•USB接続時
CapsLockキーを有効にすると青色で点灯します。
•Bluetooth接続時
デバイス切 替 モ ード 時、ペ アリング モ ード 時、接 続 確 立 時 に点 灯 ま たは点 滅
します。点灯パターンの詳細は7ページをご覧ください。
CapsLockLED
兼
ペアリングLED
登録を削除・再登録する時に押します。
Bluetooth接続中に押すと登録内容がクリアされ、引き続きペアリングモー
ドに移行します。詳細は11ページをご覧ください。
マ ル チ メディア フ ァン ク ション
Fnキーとの同時押しで、動画や音楽の再生、音量調整などをキーボード上か
ら 操 作 す るこ とが で き ま す。
USB接続中にFnキーとの同時押しで、Windowsスリープスタンバイモード
の移行/復帰をキーボード上から操作することができます。詳細 は15ページ
をご覧ください。
※Bluetooth接続時の復帰動作はBluetoothの仕様上非対応です。
•Bluetooth接続でUSB給電で動作している場合、デバイス切替モードから
有線接続に切り替えるときに押します。
•デバイス切替モード(※7ページ[Bluetooth接続の流れ]参照)からペアリ
ングモードに移行し、Bluetoothデバイスを新規登録するときに押します。
• デバイス切替モードから接続先デバイスを変更するときに押します。
各キー1台づつ、合計4台のデバイス情報を登録しておくことができます。
デバイスクリアボタン
•USB接続時
ScrollLockを有効にすると赤色で点灯します。
•Bluetooth接続時
① 電 池 を 消 耗 した 時 に 赤 色 で 点 滅し ま す。
LEDが点滅した時は速やかに電池を交換して下さい。消耗した電池をその
まま使用するとBluetooth接続に必要な電圧が保持できず、動作が不安定
になります。電池を完全に消耗した場合はLEDの点灯・点滅はなく、キー
ボード は動 作 しま せん 。
※電池寿命:1日5時間使用で約6ヶ月(アルカリ乾電池使用時)
ただし電池の寿命は使用環 境により大きく異なります。
② デバイ ス切 替 モ ード 時、ペアリン グモ ード 時、接 続 確 立 時 に 点 灯ま たは 点 滅
します。点灯パターンの詳細は7ページをご覧ください。
オン オフ
メディア キ ー
Bluetoothデバイス
登録/切替キー
スリープキー
有線接続切替キー
〜
〜
5
◆各部の名称と付属品
メディア キ ー
<テンキーレス
キーボード正面>
<テンキーレス
キーボード裏面>
スリープキー
有線接続切替キーBluetoothデバイス登録/切替キー
チルトスタンド 電 池 ケ ース
デバイスクリアボタン
テンキーレスキーボードの場合、LEDインジ
ケーターの隣ではなく本体 裏面にあります
USB接続用
miniUSBコネクタ
D I P スイッ チ
FILCOKeyPuller
※Bluetooth受信アダプタは同梱されておりませんので別途ご用意下さい。
交換 用キ ーキャップ一式
配列によって同梱内容が
異なります
取扱説明書保証書
(本書)
試供用単三乾電池
×2
USBケーブル
<付属品>
CapsLockLED ScrollLockLED
ペアリングLED レベル チェックL ED
誤って電源スイッチに触れないよう
電源オン時には完全に本体ケース
内に収まるようになっています
電源オン 電源オフ
Bluetooth電源スイッチ
4

給電方法は単三電池を使う方法(左ページ図㋑)とUSBケーブルを接続して行う方法(左ページ図㋒)の2つから選べます。
パソコンのUSBポートからのUSB給電中にデバイス切替モードにして有線接続切替キー(USBキー)を押すと、Bluetooth接続が切断
されUSB接続に切り替わります。詳しくは13ページをご覧ください。
USB給電はパソコンのUSBポートのほか、USB-ACアダプタ(モバイルクルーザー)などからでも可能です。なお、USB給電には充電
式ニッケル水素電池への充電機能はありません。
Bluetooth接続時のLED点灯パターン
接続の流れ
接 続
ペアリングモード
デバイス切替モード ※ 8 ペ ー ジ【 手 順 ① 】 ※ 9 ペ ー ジ【 手 順 ② 】
電源オン
●ペアリング完了後はケーブルが接続されていない状態でキーボードの電源を入れ、いずれかのキーを押せば最後に登録・使用した
デバイスに自動的に再接続されます
パソコンの
セットアップ
作業
5分経過
ペアリング
成功!!
デバイス登録 先
①〜④のいずれか
のキーを押す
「Ctrl」「Alt」「Fn」
を同時押し
2回目
以降
デバイスクリア
ボタンを押す
初回
待機状態
モ ード・操 作 L E D 点 灯 パタ ーン
デバイス切替 モード
•「Ctrl」「Alt」「Fn」キーを同時押しした時
ペアリングモード…Ⓐが表示された後にペアリングLED(青)が単独で約5分間点滅し
ます
•ペアリングモードが開始された時
LOWバッテリー表示
• 電池の残りが 少なくなった時
通信未接続表示…Ⓐが表示された後にペアリングLED(青)が単独で約10秒間ゆっく
りと点滅します
•登録したデバイスが見つからなかった時※11ページ
•PC側のBluetoothデバイス登録情報が削除されている時
デバイス切替変更表示Ⓐ
•デバイス未登録もしくはデバイス登録済みのBluetoothデバイス登録/切替キー
①〜④のいずれかを押した時
•USB給電中に有線接続に切り替えた時※13ページ
•デバイスクリアボタンを押した時
• USBケーブルを接続した時
Ⓐ
接続完了表示
•ペアリング作業が完了した時
•Bluetooth接続が確立した時
両方とも同時に点灯約10秒間
青赤
レベルチェックLEDが点滅
赤
両方とも同時に3回点滅
青赤×3
ペアリングLEDが点滅約5分間
青
ペアリングLEDがゆっくり点滅約10秒間
青
青
交互に点滅約4秒間
赤
…点灯 …点滅 …消灯
7
◆接続方法を選ぶ
◆パ ソコンと無 線 接 続 する
B l u e t o o t h 接 続( 上 図 ㋑・㋒)
Bluetooth受信アダプタやデバイスに内蔵されたBluetooth機能を利用し、接続設定作業(ペアリング)をすることにより操作できます。
本製品にはBluetooth受信アダプタは同梱されていません。市販品をお求めいただき、Bluetooth受信アダプタのセットアップが完了
した状態で操作してください。Bluetooth機能が搭載されているパソコンで使用する場合はBluetooth機能をオンにしてください。
また、セットアップ作業は管理者権限を持つユーザーでログインし、クラシックスタートメニュー、クラシックコントロールパネルで操作し
てく ださ い 。
接 続 す る
◆パ ソコンと有 線 接 続 する
U S B 接 続( 上 図 ㋐ )
同梱USBケーブルを使用することにより操作できます。(充電式ニッケル水素電池への充電機能はありません。)
USB接続したままパソコンの電源をオンにした場合は一打目でUSB接続キーボードとしてパソコン側に認識され、二打目から操作可能
となります。USB接続とBluetooth接続共用のための仕様です。
※USB接続では電池は必要ありません。長期間USB接続で使用する場合は、電池を取り外してください。
※USB接続ではBluetooth電源スイッチをオフにして使用してください。
有線接続 無線接続
USB接続時のLED点灯パターン
CapsLockLEDが点灯
青
ScrollLockLEDが点灯
赤
モ ード・操 作 L E D 点 灯 パタ ーン
•CapsLockキーを有効にした時
•ScrollLockキーを有効にした時
USB接続 Bluetooth接続 USB給電
Bluetooth接続 電池駆動
ア イ ウ
…点灯 …点滅 …消灯
青
交互に約4秒間点滅点滅終了後に操作可能
赤
•USBケーブルを接続した時 ※キーボードのいずれかのキーを押します
6
1.
WindowsXP/Vistaの場合
※ペアリングの手順は同じですが画面はOSによって異なります。
1. コントロールパネル>Bluetoothデバイスアイコンをダブルクリックします。
2. Bluetoothデバイス>デバイス>追 加をクリックします。
3.Bluetoothデバイスの追加ウィザードが起動します。
「セットアップを完了し、デバイスは発見可能になりました」にチェックを入れ、次へをクリックします。
4.Bluetooth機器を検索します。
「Convertible2TKL新しいデバイス」を選択し、次へをクリックします。
5. パスキーをデバイスに追 加します。
「自動的に選択されたパスキーを使用する」を選択し、次へをクリックします。
6. パソコンとキーボードのパスキーを交換します。
キーボードの数字キーからパスキーを入力して下さい。入力し終わったらEnterキーを押します。パスキーは30秒以内に入力して下さい。
【参考】パスキーを入力するとき、画面に入力状態を示す表示はありません。
7. パスキーの入力に成功したらBluetoothキーボードがインストールされますのでしばらく待ちます。
もし入力に誤りがあった場合は前の作業に戻り、再度パスキーを入力します。
8.「Bluetoothデバイスの追加ウィザードの完了」画面が表示されればセットアップは完了です。画面
を 閉じ ま す。
9. ペアリングしたデバイス情報はキーボードに記録されます。ペアリング完了後はキーボードの電源を
投入し、いずれかのキーを押すと「サーチモード」になります。ペアリングLEDが点滅し、自動で再
接 続しま す。
10.設定はコントロールパネル>Bluetoothデバイス>デバイスで接続状態を確認できます。
10.
【 手 順 ② 】B l u e t o o t h デ バ イ ス の セ ッ ト ア ッ プ( ペ ア リ ン グ )
下記はOS純正のソフトやドライバで設定する場合の操作方法です。ご使用のBluetoothアダプタに同梱された専用ソフトで設定する場合
はBluetoothアダプタの取扱説明書をご参考下さい。
Windows7/8/8.1/10の場合
1. コントロールパネルを開きます。
2. カテゴリ 表 示で は「ハード ウェアとサ ウンド」の「 デバイ スの 追 加 」を クリックしま す。
ア イ コ ン 表 示 で は「 デ バ イ ス と プ リ ン タ ー 」を 選 び ク リ ッ ク し 、「 デ バ イ ス の 追 加 」を ク
リックしま す。
3.Bluetoothデバイスの追加ウィザードが起動します。
デバイスの追加>このコンピューターに追加するデバイスの選択画面になります。
4.Bluetooth機器を検索します。
「Convertible2TKL」を 選 択 し 、次 へ を ク リ ッ ク し ま す 。
5. パスコードをデバイスに追 加します。
ペアリングオプションの画面が表れたら「独自のペアリングコードの作成」を選択し、
クリックしま す。
6. キ ーボード の 数字 キ ーからパ スコ ードを 入 力して 下さい 。入 力し 終わったら Ent er
キーを押します。パスコードは30秒以内に入力して下さい。
【参考】パスコードを入力するとき、画面に入力状態を示す表示はありません。
4.
5.
6.
9
【手 順 ①】キ ーボード をペアリングモ ードにする
3.「Ctrl」「Alt」「Fn」キーを同時押し 4.Bluetoothデバイス登録/切替
キーの①を押す
2.電源スイッチをオン
電池カバー
押し込む
ツマミ
1. キーボードに電池を挿入します。電池ケースの表示に従い、電極の向きを間違えないようにご注意下さい。
※本製品のBluetooth接続はUSB給電が可能ですが、初回のBluetooth接続設定は電池駆動の状態で行なってください。接続設定
前の有線接続はすべてUSB接続として認識されるためです。
2. 電源スイッチをオンにします。
α.購入後初めてBluetoothの接続設定する場合
デバイスクリアボタンを押して、ペアリングLED(青)とレベ
ルチェックLED(赤)が交互に約4秒間点滅するかどうかを
確 認しま す。
2回目以降はこの項目を省略します。
【初回のみ】
デバイスクリアボタンを押す
(テンキーレスキーボードの
デバイスクリアボタンは本体
裏面にあります)
3.キーボードの「Ctrl」「Alt」「Fn」キーを同時押ししてデバイス切替モードにします。ペアリングLED(青)とレベルチェックLED(赤)
が 同 時 に 約10 秒 間 点 灯しま す。
4.デバイス情報を登録したい「Bluetoothデバイス登録/切替キー①〜④」(下図の場合①キー)のいずれかを押します。
Ctrl Alt Fn
5. ペアリングLED(青)とレベルチェックLED(赤)が交互に約4秒間点 滅した後、ペアリングLED(青)が単独で点滅してペアリング モー
ド(パソコンに認識される状態)が始まります。
6.次ページ【手順②】へ進みます。
※ペアリングモード中にキー入力されないまま5分以上経過した場合は、ペアリングLED(青)が消灯し、ペアリングモードがキャンセ
ルされて待機状態に戻ります。3.の操作に戻ってやり直してください。
交互に点滅約4秒間
青赤
1.ツ マミを 押して 電 池 カバー を
外し、単三乾電池2本を挿入
8

Ctrl Alt Fn
1. キーボードの電源が入っていることを確認します。
2.「Ctrl」+「Alt」+「Fn」キーを同時押ししてデバイス切替モードにします。ペアリングLED(青)とレベルチェックLED(赤)が同時に約
10 秒 間 点 灯し ます。
※Bluetooth接続中にデバイスクリアボタンを押すと、そのときに接続しているデバイスのペアリング情報がクリアされてしまい、上書
きされるかたちで新たにペアリングモードが始まります。デバイスクリアボタンを使ってペアリングモードにするときはご注意くださ
い。(デバイスクリアボタンは、テンキーレスの場合本体裏 面にあります。)
3.まだデバイス情報が登録されていない「Bluetoothデバイス登録/切替キー」(下図の場合②〜④キー)のいずれかを押します。
2.「Ctrl」「Alt」「Fn」キーを同時押し
①はデバイス登録済み
【手順③】2台目以降の登録(最大4台登録できます)
3.Bluetoothデバイス登録/切替
キーの②を押す
4.ペアリングLED(青)とレベルチェックLED(赤)が交互に約4秒間点滅した後、ペアリングLED(青)が単独で点滅してペ アリング モー
ド(パソコンに認識される状態)が始まります。
5. Bluetoothデバイスのセットアップ(ペアリング)をします。(※9ページ【手順②】)
6.選択したキーに登録されます。
7. 1〜6を繰り返します。
◆Bluetoothデバイスの変更と削除
接続先デバイスの変更をしたい時
1. キーボードの電源が入っていることを確認します。
2 . 「 C t r l」+「 A l t 」+「 F n 」キ ー を 同 時 押 し して デ バ イ ス 切 替 モ ー ド に し ま す。ペアリングLED(青)とレベルチェックLED(赤)が同時に約
10 秒 間 点 灯し ます。
3.接続したいデバイスが登録されている「Bluetoothデバイス登録/切替キー」①〜④のいずれかを押します。
4.ペアリングLED(青)とレベルチェックLED(赤)が交互に約4秒間点 滅しま す。
接続が確立すると3回同時に点滅します。
5.接続先が変更され、LED消灯後にキーボード操作が可能となります。
※ペアリングLED(青)が約10秒間ゆっくりと点滅しその後消灯した場合はBluetooth受信アダプタが接続されていないか、デバイス
側のBluetooth機能がオフにされている状態ですので確認して下さい。
※ 3 . で デバイスを登録していないキーを押した場合、キーボードはペアリングモードに入ります。2.の操作に戻ってやり直してください。
10.
10.ペアリングタイムアウトやタイプミスでPINコードの入力に失敗す
ると再ペアリングするときに右図のような「Convertible 2 TKL
のPINを入力してください。」画面が表示されることがあります。
入力欄をマウスで左クリックして、自分で決めた4〜8桁のPIN
コードを別のUSBキーボードまたはスクリーンキーボードから入
力します。
「 接 続 」をクリックして同じP INコードを Convertible2Tenkeyless
か ら 入 力 し 、「 E n t e r 」キ ー を 押 し ま す 。
ペアリングが開始され「接続済み」になったら完了です。
11
8.
9.「接続済み」になったら完了です。
4. デバイスを追 加するポップ アップより「 Blu et ooth」をクリックし
ます。
5.周辺にあるBluetoothデバイスを検索する状態になります。
6. Conver tible2Tenkeylessをペアリングモードにします。
7. キーボードが検出されるとキーボード名「Convertible2TKL」
の表示が出ますのでクリックします。
8. 表 示 されて い るP I Nコ ードを Convertible2Tenkeylessから入
力し、「Enter」キーを押します。
9.
8.
PI Nコード
4.
7.
3. 「Bluetooth またはその他のデバイスを追加する」をクリックし
ます。
W i n d o w s 1 0 の「 設 定 」か ら 操 作 す る 場 合
1. スタートメニューから「設定」をクリックします。
2. Windowsの設 定画面から「デバイス」をクリックします。
1. 2.
3.
7.
7. パスコードの入力に成功したらBluetoothキーボードがインストールされますので
しばらく待ちます。もし入力に誤りがあった場合は前の作業に戻り、再度パスコード
を入力します。
Windows 8/8.1/10の場合、パスコードの入力にタイムアウトで失敗すると再ペア
リングするときに右図のような「キーボードのパスコードを入力してください」画面
が表示されることがあります。画面上の「または、パスコードを接続先のデバイスで
入力してください。」をクリックすると新しいパスコードが表示されます。
8. 「このデバイスは、このコンピュータに正常に追 加されました」がデバイスの追 加画 面
に 表 示 さ れ れ ば セットアップ は 完 了 で す。画 面 を 閉 じま す。
Windows10の場合は自動で画面が閉じられます。
9. ペアリングしたデバイス情報はキーボードに記録されます。
ペアリング完了後はキーボードの電源を投入し、いずれかのキーを押すと「サーチ
モ ード」に なりま す。ペ アリン グ L E D が点 滅 し、自 動 で 再 接 続 しま す。
10.
設定はコントロールパネル>デバイスとプリンターの表示>デバイスで接続状態を確
認 で き ま す。
10

Ctrl Alt Fn
1.「Ctrl」「Alt」「Fn」キーを同時押し
無線接続時のUSB給電開始方法
本製品は電池を使わずUSBケーブルを接続してUSBポートからの給電でBluetooth接続することができます。
但し、Bluetooth接続中のパソコンからUSB給電するには、キーボードを一度USB接続する必要があります。
1. 付属のUSBケーブルでパソコンに接続します。ペアリングLED(青)とレベルチェックLED(赤)が交互に約4秒間点滅します。
Bluetooth接続が切断され、USB接続のキーボードとしてパソコン側に認識されます。
無線接続中に有線接続に切り替える
前項で設定したBluetooth接続・USB給電の状態から、キー操作のみでUSB接続に戻すことができます。
高レスポンスが必要なアクションゲームをプレイする場合や、長時間高速タイピングを行う場合は、USB接続での使用を推奨します。
1 . 「 C t r l 」+「 A l t 」+「 F n 」キ ー を 同 時 押 し して デ バ イ ス 切 替 モ ー ド に し ま す 。
2.有線接続切替キー(キー前面に「USB」と印字されています)を押します。
2.有線接続切替キーを押す
1.USBケーブルをパソコンに接続 Bluetooth接続は切断
USBキーボードとして
認識されます
2 . 「 C t r l」+「 A l t 」+「 F n 」キ ー を 同 時 押 し して デ バ イ ス 切 替 モ ー ド
にします。ペアリングLED(青)とレベルチェックLED(赤)が同
時 に 約10 秒 間 点 灯しま す。
3. このパソコンが登録されている「Bluetoothデバイス登録/切替
キー」①〜④の い ず れ か を押 しま す。
新しくデバイスを登録する場合は、12ページ【手順③】の3.の操
作 か ら 行 いま す。
4. ペアリングLED(青)とレベルチェックLED(赤)が交互に約4
秒間点 滅しま す。
接続が確立すると3回同時に 点 滅しま す。
5.Bluetooth接続・USB給電の状態になり、LED消灯後にキー
ボード操作が可能となります。
3. ペアリングLED(青)とレベルチェックLED(赤)が交互に約4秒間点 滅しま す。
4. USB接 続のキーボードとしてパソコン側に認識され、LED消灯後にキーボード操作が可能となります。
LED表示はCapsLock、ScrollLockのオン/オフに切り替わります。
3.Bluetoothデバイス登録/切替キーを押す3.Bluetoothデバイス登録/切替キーを押す
13
USB接続・Bluetooth接続の優先順位、関係について
USB接続はBluetooth接続より
常に優先されます。
登録済みのデバイス情報を別の登録キーに変更をしたい時
一度キーボード側・デバイス側の両方から登録情報を削除し、別の登録キーに改めて登録しなおす必要があります。「登録済みのデバイス
情報を削除したい時」と「【手順③】2台目以降の登録」の項目をそれぞれご参照ください。
USBケーブルを
接続する
USBケーブルを
抜く
USBケーブルを
抜く
デバイス切 替モ ードから
Bluetoothデバイス登録/切替キー
①〜④のいずれかを押す
デバイス切 替モ ードから
有線接続切替キー
(USB)を押す
有線接続が優先され、
USB接続に
接続がBluetoothになり、
USBケーブルは給 電のみに
Bluetooth接続 USB給電
Bluetooth接続 電池駆動
USB接続
登録済みのデバイス情報を削除したい時
1. キーボードの電源が入っていることを確認します。
2.「Ctrl」+「Alt」+「Fn」キーを同時押ししてデバイス切替モードにします。ペアリングLED(青)とレベルチェックLED(赤)が同時に約
10 秒 間 点 灯し ます。
3.削除したいデバイスが登録されている「Bluetoothデバイス登録/切替キー」①〜④のいずれかを押します。
4.ペアリングLED(青)とレベルチェックLED(赤)が交互に約4秒間点滅しま す。
接続が確立すると3回同時に点滅します。
5. LED消灯後にデバイスクリアボタンを押します。
ペアリングLED(青)とレベルチェックLED(赤)が交互に約4秒間点滅した後、ペアリングLED(青)が単独で点滅します。
6.ペアリング情報がクリアされ、新たにペアリングモードが始まります。別のデバイスを登録する場合はそのままデバイス側のセットアッ
プ 作 業 を 開 始 しま す。登 録 しな い 場 合 は キ ー ボード の 電 源 を 切 りま す。
7. デバイス側に残っている登録情報を削除します。
PCの場合、コントロールパネル>ハードウェアとサウンド>デバイスとプリンターから削除したいキーボードのアイコンを選択し、削除
をクリックします。確認画面が出ますので「はい」をクリックします。(XP/Vista:コントロールパネル>Bluetoothデバイス>デバイ
スタブ)
12

使 用 す る
本体裏面のDIPスイッチを操作することで、キーコードを変 更したり無効化したりすることができます。工場
出荷時は全てOFFになっています。DIPスイッチを操作する場合は、USBケーブルを外し、Bluetooth電源ス
イッチをオフにしてからおこなってください。パソコンに接続された状態や電源スイッチがオンの状態で操作
すると故障や誤動作など不具合の原因となりますのでご注意ください。DIPスイッチを操作する場合は先の
細い棒状のものをご利用ください。
工場出荷時OFF
1
ON
2 3 4
◆DIPスイッチによるキーファンクション変更操作
◆メディアキーによるデバイス操作
Fnキーとの同時押しで、動画や音楽の再生、音量調整などをキーボード上から操作することができます。
DIPNo.
キー
表示
機能
91JP 配列 87US配列 88EU配列89KR配列
スイッ チ1
スイッ チ2
スイッ チ2
スイッ チ3
スイッ チ4
スイッ チ4
91JP 配列 87US配列 88EU配列89KR配列
CapsLockキーと左Ctrlキーを入れ替える
Escキーと半角/全角キー
を入れ替える
音量を上げる 音量を下げる ミュート
前のトラックへ 再 生 /一 時 停止
停止
次のトラックへ
上 面:A l t キ ー
Fnキー→
側 面:A p p キ ー
上 面:A p p キ ー →Fnキー
側 面:A l t キ ー
/
上面:右Winキー →Fnキー
側 面:A p p キ ー
上 面:A p p キ ー
Fnキー→
側 面:右 W i n キ ー
Escキーと「~」キーを入れ替える Escキーと「 ¦ ¬」キー
を入れ替える
2キー同時に
入れ替えます
交換 用キーキャップについて
DIPスイッチ に よる キ ーフ ァンク ション の 変 更 操 作 を 行 った 場 合 に 必 要 と なる 、以 下 の キ ー キャップ が 同 梱 さ れて い ま す。
FILCOKeyPullerを使って付け替えてください。
有線接続中にFnキーとスリープキーの同時押しで、Windowsスリープスタンバイモードの移行/復帰をキー
ボード上から操作することができます。キー操作で復帰できるようにするには、以下の通り設定をします。
1.「デバイスマネージャ」を開く
2.「キ ーボード」をダ ブル クリック
3.「 HI Dキーボードデバイス 」を ダブル クリック
4.「電源の管理 」タブをクリックして「このデバイスで、コンピュータのスタンバイ状 態を解除できるようにする」にチェックをつけます。こ
の時「電源の管理」タブが表示されない機種は対象外です。また、高速スタートアップ機能が有効の時は、解除できない場合があります。
なお、Bluetooth接続時のWindowsのスリープスタンバイモードからの復帰は、Bluetoothの仕様上非対応となっています。あらかじめ
マウス操作などでWindowsスリープスタンバイモードを解除してからご使用ください。
◆Windowsスリープスタンバイモードの移行・復帰
キー
表示
Windowsキー()とアプリケーションキー()をロックし、無効にする
15
その他
•Bluetooth接続中かつ電池駆動中にパソコン本体をスタートメニューから再起動させた場合は、パソコン起動後にキーボードのいずれ
かのキーを押せば自動で再接続されます。(パターン1)
•Bluetooth接続中かつパソコンのUSBポートからUSB給電中にパソコン本体をスタートメニューから再起動させた場合も、パソコン起
動後にキーボードのいずれかのキーを押せば自動で再接続されます。(パターン2)
パターン1、パターン2でBluetoothの再接続が確立した時はペアリングLED(青)とレベルチェックLED(赤)が3回同時点滅します。
•Bluetooth接続中かつパソコンのUSBポートからUSB給電中にパソコン本体の電源をオフにし(シャットダウン)、その後改めて電源を
オンにした場合は、有線接続が優先されてUSB接続として認識されます。(パターン3)
•Bluetooth接続中にB l u e t o o t h 受 信 ア ダ プ タ( Bluetoothドングル)を一度抜いて、再度差した場合は、キーボードのいずれかのキーを
押せば自動で再接続されます。
再接続が確立した時はペアリングLED(青)とレベルチェックLED(赤)が3回同時点滅します。
•マルチブート環境下での動作について
1台のパソコンに複数のWindows OSを組み込んだマルチブート環境下でUSB接続によるBIOS設定後、ブート画面のOS選択時にお
いて、まれに「↓キー」が効かなくなることがあります。これはBIOS設定後の再起動がキーボードのデータ読み込むよりも前にWindows
のプログラムに入ってしまうことに起因しますので製品の不具合ではありません。
任意のOSを選択できなかった際はもう一度再起動してください。
ブート画面のOS選択時はまだOSが起動していないので仕様上Bluetooth接続を確立できません。USB接続でOSの選択をしてくださ
い。
Bluetooth接続はマルチブート環境下のパソコンでは1つのOSのみで登録/機能します。登録情報は他のOSには反映されません。また、
OSごとにBluetoothデバイス登 録キー ①〜④を割り当て、切り替えて使 用するという設 定もできません。
例)Windows7とWindows8がインストールされているデュアルブート環境下で、
Bluetoothデバイス登録キー①にはWindows7を登録
Bluetoothデバイス登録キー②にはWindows8を登録 といった設定はできません。
一度キーボード側・デバイス側の両方から登録情報を削除し、新たに選択したOSで再度接続設定作業(ペアリング)が必要となります。
Windowsスタートメニューから
再起動を選択
再接続!!
Windowsスタートメニューから
再起動を選択
Windowsスタートメニューから
再起動を選択
パターン1
USB接続
パソコンの電源をオフ→オンパソコンの電源をオフ→オン
パターン3
パターン2
再接続!!
再起動!!
再起動!!
14

マイコンピュータ(またはコンピュータ)
|HKEYLOCALMACHINE
|SYSTEM
|CurrentControlSet
|Services
|i8042prt
|Parameters
◆キー印字・キー配列と配列の変更について
日本語キー配列への設定変更 (英語配列として認識されてしまった日本語配列キーボードを、正しく認識させなおす)
OSによっては、なんらかの原因で日本語配列のキーボードが英語配列のキーボードとして認識されるケースがあります。
こ の 場 合 、@ キ ー を 押 し て も 他 の 記 号 が 入 力 さ れ る 、S h i f t + 2 キ ー で「 @ 」が 入 力 さ れ る 、S h i f t +7 キ ー で「 & 」が 入 力 さ れ る 、な ど の 現 象
が発生しますが、以下の方法で修正することができます。
①PS/2キーボードをお持ちでパソコンに接続可能な場合、ノートパソコンの場合
1. コントロールパネル>キーボードを選択します。
2.ハードウェア>デバイス欄>「101/102英語またはMicrosoftNaturalPS/2キーボード」、7/8/8.1/10では「標準PS/2キーボー
ド 」を 選 択 し プ ロ パ テ ィ を ク リ ッ ク し ま す 。
3. 設定の変更>ドライバ>ドライバの更新をクリックします。
4.XP 「一覧または特定の場所からインストールする」を選択して次へをクリックします。
Vista/7/8/8.1/10
「コンピュータを参照してドライバソフトウェアを検索します」をクリックします。
5. XP 「検 索しないで、インストールするドライバを選 択する」を選 択して次へをクリックします。
Vista/7/8/8.1/10
「コンピュータ上のデバイスドライバの一覧から選択します」をクリックします。
6. XP 「互換性のあるハードウェアを表示」のチェックを外し、製造元は「標準キーボード」、モデルは「日本語PS/2キーボード
(106/109キ ーctrl +英 数)」を 選択して次へ をクリックします。
Vista/7/8/8.1/10
「互換性のあるハードウェアを表示」のチェックを外し、製造元は「標準キーボード」、モデルは「日本語PS/2キーボード
(106/109キー)」を選択して次へをクリックします。
7. ド ラ イバの 更 新 警 告 画 面 が 出 ま す。は い を クリッ クしま す。
8. ドライバがインストールされます。
9. ドライバのインストールが完了したら完了をクリックします。
10.再起動後日本語キーボードとして機能します。
②PS/2キーボードをパソコンに接続できない場合
a. レジストリデータをダウンロードし設定する
ダイヤテックW E B サ イトよりレジストリデータをダウンロードし、設定を変 更します。
ダウ ンロ ードしたファイル を ダブル クリックした 後再 起 動しま す。
b. レジストリデータを書き換え設定する
1. XP、Vistaではスタートメニューから、8/8.1では全てのアプリ一覧から、10では左下の「スタートボタン」を右クリックして「ファイ
ル 名 を 指 定 し て 実 行 」を 選 択 し ま す 。
2 . 名 前 欄 に「 r e g e d i t 」と 入 力 し 、「OK」を クリックしま す。
7で はプ ログ ラムとファイル の 検 索 の 欄 に「r e ge di t 」と 入 力し、プ ログ ラムを クリック
しま す。「変 更を許 可しますか?」の確認画面で「はい」をクリックします。
3 . レ ジ ストリエ ディタが 起 動 しま す。
画面左より項目を選択します。
USASCII準拠配列英語キーボードについて
US ASCII準拠配列の英語モデルをご用意しています。日本語配列とは操作が異なる部分があります。日本語環境Windows上での日本語
入力操作(IMEを起動)、\(バックスラッシュ)キー、変換キーは以下の表を参考にしてください。
¥マーク 変換キー
半角/全 角キー
(日本語入力切替)
スペ ースキ ー
操作
方法
機能
Bluetooth接続・電池駆動の状態でキー操作が30分間行われない場合、自動的に消費電力を節約する省電力モードに移行します。省電
力モードはキーボードのいずれかを押すことで解除され、自動的にデバイスとの接続が復帰します。約3〜5秒で操作が可能になります。
なお、USB接続中は省電力モードには移行しません。
◆無線接続時の省電力モード
16
※すでに左記のデータがある
場合は追 加は必要ありませ
ん。
編集>新規>文字列値
名前:OverrideKeyboardIdentifier 値のデータ:PCAT106KEY
編集>新規>DWORD値
名前:OverrideKeyboardSubtype 値のデータ:2 表記:16進
名前:OverrideKeyboardType 値のデータ:7 表記:16進
6. レ ジ ストリエ ディタを 終 了しま す。
7. パ ソ コン を 再 起 動 しま す。
OverrideKeyboardIdentifier
OverrideKeyboardSubtype
OverrideKeyboardType
6. レ ジ ストリエ ディタを 終 了しま す。
7. パソコンを再起動します。
【重 要】
この方法でレジストリデータの設定変更を行う場合は、必ずシステムの復元でレジストリのバックアップを行い、設定を変更する前
の状態に戻せるようにしてから行なってください。
英語キー配列への設定変更 (日本語配列として認識されてしまった英語配列キーボードを、正しく認識させなおす)
英語配列への設定は前項「日本語キー配列への設定変更」を参考にしてください。
①PS/2キーボードをお持ちでパソコンに接続可能な場合、ノートパソコンの場合
前項2.の項目「日本語PS/2キーボード(106/109キーCtrl+英数)」と「101/102英語またはMicrosoftNaturalPS/2キーボード」
を入れ替えて作業します。
②PS/2キーボードをパソコンに接続できない場合
b.レ ジ ストリ デー タ を 書き 換 え 設 定 する
1.〜3. まで同じ作業をする。
4. 名前「LayerDriverJPN」をダブルクリック、値のデータを「kbd101.dll」に書き換え OK をクリックします。
5. 以下の名前のデータを削除します。選択>右クリック>削除で削除してください。
4. 名前「LayerDriverJPN」をダブルクリック、値のデータを「kbd106.dll」に書き換えOKをクリックします。
5. レジストリキーを新たに追加します。すべて半角文字で大文字/小文字を正しく入力してください。
③Windows10で日本語配列から英語配列に変更する場合
1. スタートメニューから「設定」をクリックします。
2. 「設定」画面から「時刻と言語」をクリックします。
3. 「時刻と言語」画面から「地域と言語」クリックします。
4. 「言語」の下に「日本語」が表示されます。
5. 日本語の部分をクリックすると「オプション」が表示されますのでクリックします。
6. 「ハードウエ アキ ーボード レイ アウト」の「 レイ アウトを 変 更 する」を クリックしま す。
7. 「ハード ウエ アキ ーボード の 変 更 」ポップ アップより「 英 語 キ ーボード(101/ 102 キ ー)」を 選 択し「 サイン アウト」を クリックしま す。
※ 英語キーボードから日本語キーボードに変更する時は「日本語キーボード(106/109キー)」を選択します。サインイン画面が表示さ
れますので再度サインインします。
17

ショ ートカット
Shift+左右カーソル
(Win)+A
(Win)+X
(Win)+C
(Win)+V
(Win)+Z
範囲選択
全て選択
カット
コピー
ペースト
アンドゥ(操作の取消)
英語配列のキーボードとして認識された場合のキー配列図
グレーに色付けされているキーは記号などの位置が変わったキーです。この図のように入力されます。
×印がついているキーは押下しても何も入力されません。
※上図は弊社独自の検証結果ですので、アップルジャパン株式会社への問い合わせは
ご遠慮ください。
※「かな入力」は入力できない文字があるためサポートいたしません。
※ 「 半 角 / 全 角 」「 無 変 換 」「 変 換 」「 カ タ カ ナ ひ ら が な 」 は 動 作 し ま せ ん 。 ま た P r i n t
ScreenやHome・Endなど動作しない装飾キーがありますが検証いたしません。
※右表のショートカットが利用できます。
1. キーボードを「ペアリングモード」にします。(※8ページ【手順①】)
2.iPad・iPhoneのホーム画面から「設定」>「Bluetooth」の順にタップし、Bluetoothを「オン」にします。
3. デバイス一覧に「Convertible2TKL」が「未接続」と表示されます。タップして、画面に表示されたコードをキーボードから入力し
「Enter」キーを押します。
4 . デ バ イ ス 一 覧 の「 Convertible2TKL」が「接続済み」と表示されたらペアリングが完了します。
5. iPad・iPhoneのホーム画 面から「設定」>「一般 」>「キーボード」>「各国のキーボード」の順にタップし、「日本語 ローマ字」があれ
ばタップします。ない場合は「新しいキーボードを追加...」>「日本語ローマ字」の順にタップします。
6.ハードウェアキーボード配列の項目で「U.S.」にチェックを入れます。(ローマ字入力の場合)
7. ホームボタンを押して設定を終了します。
※iOS11.2.2で検証しています。それ以前のiOSでは検証していません。
※Bluetoothキーボードを使っている間は、ソフトウェアキーボードは画面に表示されません。
※ i O S 11 で は「
Ctrl
」+「スペースキー」によって入力モード(キーボード)を切り替えます。押すごとに入力モードが切り替わり、現在
選択されている入力モードは青色で表示されます。
【重 要】
iOSの機器にアップル純正以外の「日本語配列」のキーボードを接続すると「英語配列」のキーボードとして認識されます。こ
れはiOSの仕様によるもので、キーボードの不具合ではありません。
英語配列キーボードとして認識されると記号の位置が変わってキー印字とは異なる文字が入力されたり(「@」や「"」など)、押下
してもキ ーが反応しない 場合 がありますので、予めご了承ください。配列図をご参 照いただくと便利です。
◆iPad・iPhoneに接続して使用する場合(【重要】欄を必ずお読みください)
18
Q.電源が入りません。
電 池 の向 きを 確 認して 下さい 。
電池が消耗した可能性があります。新しい電池に交換して下さい。
Q.ペアリングができません。Bluetooth機器を検索する画面でキーボードが表示されません。
・キーボードの電源スイッチがオンになっているか確認して下さい。
・電 池の 向 きを 確 認して 下さ い。電 池 が 消耗してる 場 合は 新し い電 池 に交 換して 下さ い。
・キーボードの「Ctrl」「Alt」「Fn」キーを同時押ししてデバイス切替モードにします。デバイス情報を登録したい「Bluetoothデバイ
ス登録/切替キー①〜④」のいずれかを押してペアリングLED(青)が点 滅して いることを 確 認して 下 さい 。
・キーボードのデバイスクリアボタンを押してペアリングLED(青)が点 滅して いる ことを 確 認して 下さ い。
・Bluetooth受信アダプタ使用時は、正常にセットアップされ動作しているかどうか確認して下さい。
・パソコンに内蔵するBluetooth機能を使用する場合は、設定がオンになっているかどうか確認して下さい。
Q.EnterキーやShiftキーなど大型のキーが他の小さいキーと比べて感触が違うように感じられます。
大 型 キ ー の 動 作 は 仕 様 で す。
大 型 キ ーは どの 部 分を 押して もキ ースイッチ が上下 運 動 で きるように「スタビ ライザー」を 搭 載して いま す。
Q.パソコンの電源投入直後、Bluetooth接続でBIOS操作やOSの選択ができません。
Bluetooth2.1以降のアダプタにはペアリング設定後、パスキーのパラメータがアダプタ内部に登録され、OS起動前でもBIOS画面
やOS選択画面で操作できる機能を持ったものがあります。
この機能を持たないBluetoothアダプタではWindowsが起動する前は操作できません。必要時はUSB接続、またはPS/2接続でき
る他のキーボードにて操作して下さい。
これはアダプタ側の機能ですので、ご不明な点はアダプタの製造元サポートにご確認下さい。
Q.セーフモードでBluetooth接続できません。
セーフモード中にBluetooth接続はご使用になれません。
Q.Bluetoothアダプタを抜き差しした後、キーボードが動作しません。
Bluetoothアダプタを抜き差しした後は、いずれかのキーを押せば自動で再接続します。
Q.Windowsのスリープスタンバイモードから復帰できません。
Bluetooth接続時は、Windowsのスリープモードからの復帰はBluetoothの仕様上非対応となっています。あらかじめマウス操作
などでWindowsスリープスタンバイモードを解除してからご使用下さい。
Q.他のWindowsで使用できますか?
BluetoothアダプタはWindows10、Windows8/8.1、Windows7、WindowsVista、WindowsXPSP2以降の標準機能で動
作するものです。他のWindowsシステムではご使用になれません。ドライバやソフトウェアによる対応はおこなっておりません。
Q.Bluetooth接続時、キーボードの動作が異常となる時があります。
電波送受信範囲は、使用環境によって異なります。パソコンやキーボードの近くに電子レンジ、ワイヤレスネットワーク製品、コードレ
ス電話などの電波干渉が発生する環境がある場合、正常に動作しない可能性があります。
Q.文字入力が正しく行われないことがあります。
以前に使用していたキーボードのソフトウェアが残っている場合はアンインストールして下さい。古い設定が残っていると動作障害
となる場合があります。
Q.キーボードが頻 繁に反応しなくなったり、最後に入 力した文 字が連 続で入力されたりします。
同じ周波数帯域を使用した無線機器が電波の届く範囲に多数存在する場合、混信による通信の切断が発生している可能性があります。
ご使用のBluetoothアダプタに同梱された専用ソフトやドライバは高性能で扱いやすくなっていますが、混信が発生しやすい環境で
頻繁に通信の切断が発生する場合もあります。
この ような 場 合 は 、専 用ソ フトやドラ イバ をア ンイン ストールし OS 標 準 のソ フトやド ライバ で 動 作 さ せると不 具 合 の 頻 度 が 明らか に
減った、という実績が多数確認されています。
◆トラブル シュー ティング
19

PC : When installing with a wired connection, please use a Windows PC that has a USB port.
OS :Windows XP Service Pack 2 or higher version, Windows Vista, Windows 7, Windows 8, Windows 8.1, Windows 10
If using Bluetooth connection, the personal computer must be equipped with Bluetooth function or have a Bluetooth adapt-
er. Nevertheless, due to toggling, there might be situations whereby it is unable to connect. Therefore, not all Bluetooth
adapters are supported.
* When installing Bluetooth connection, please ensure to use the mouse for operations. When installing with a wireless
connection, please use a Windows PC that has a Bluetooth HID Profile.
◆System Requirements
Cherry MX Key Switch
Cherry MX key switch is a mechanical switch manufactured by CHERRY GmbH, Germany. Its depth differs from standard
keyboards, it has more depth, the keystroke depth is approximately 4mm, the actuation point is at approximately 2mm, and
it has a higher spring distance. Because this product has an independent key switch, therefore the operation of the key is
brisk.
FR-4 2-Layer Circuit Board
We have introduced the new 2-layer printed circuit board FR-4 (fiberglass board), thus enhancing the basic performance.
All terminals are through-holes, and are securely soldered, so as to effectively prevent any influence from vibrations and
loads to the base and copper foil wirings during typing. Therefore, this product has been improved for durability, reliability
and keys operational performance.
2way Keyboard USB wired connection and Bluetooth wireless connection
■USB Connection
May use the USB cable supplied with the product for operations. (This product is not equipped with battery recharging
function.)
■Bluetooth Connection
This product uses the technique of standard Bluetooth Version 3.0 Class 2 Specification to enhance the power saving
function of the personal computer during the connection. This way; a wireless operating environment may be enjoyed. The
supported range for the product is within approximately 10m. Performing the computer connection setup is only required
for the first time. Henceforth, future usage does not require installation setup. A maximum of four units of personal comput-
ers may be connected and toggled randomly.
Besides using power from batteries, power may also be supplied by the USB cable from the USB.
When using battery power, if there is no activity for more than 30 minutes, it will automatically enter into power saving
mode, to save electrical consumption.
◆Product Overview
Health Issues Attention Items
If you have been using a mouse, keyboard, trackball mouse for a prolong period of time, the stress to your hand, wrist, head or
shoulder might result in pain or numbness in these areas. If you continue to use repeatedly, it might result in serious injuries.
When you encounter any of the above-mentioned discomforts, please stop using the mouse and keyboard immediately, and
it is recommended that you consult a professional doctor. When using a personal computer, please rest periodically, and
please take care not to add stress to your hand, wrist, head and shoulder.
comprising of internal batteries and transformer. Therefore, please handle with care, and avoid spilling beverages or
liquid into the interior of the keyboard.
• Please do not dismantle or modify. Please do not tear off or modify the original factory maintenance label to avoid affect-
ing the terms and conditions of warranty.
• Under the following circumstances, either temporarily stop or completely stop the use of the product. Under the influ-
ence of the electronic waves, equipment might not operate properly and accidents might happen.
• in the vicinity of a cardiac pacemaker
• in the vicinity of medical institutions or medical electronic equipment
• inside an airplane cabin
• the use of this product interfered with the electronic waves of other devices
• The terms and conditions of the warranty of this product is restricted to the country of purchase. If the product was
purchased in Japan, the terms and conditions of Diatec Corporation Japan will apply; if the purchase is made through an
overseas representative, then the maintenance terms and conditions of that representative will apply. In addition, the
warranty in this user manual is applicable and effective only within Japan.
Changing the Function of a Key through the DIP Switch
Through the setting of the DIP switch, you may change the [CapsLock] key and [Left Ctrl] key, and also lock [Windows ]
key and one [App ] key.
21
Thank you for purchasing the FILCO Majestouch Convertible 2 Bluetooth Keyboard. Please read
carefully the Attention Items published in this manual.
Attention Items During Communication
• Please use in an environment where there are no obstructions and where there is good reception. The distance for reception
may vary, depending on the building structure and influence from obstructing objects. When sandwiched between steel,
metals and concrete, the signal might not come online.
• If user moves to a location where there is an obstruction to the communication and where there is no wireless signal, under
such circumstances, the communication connectivity will be terminated.
• During connection, please ensure a distance of at least 2m away from any AV or OA equipment. In addition, microwaves tend
to influence signals. Therefore, during connection, please maintain a distance of at least 3m away, or else the connection will
not be successful.
• IEEE802.11g/b wireless LAN mechanism and the Bluetooth mechanism in our product uses the same frequency (2.4GHz), if
the distance is too near during use, it might result in wave interference, affecting connection speed or unable to connect.
Under such circumstances, please switch off the power of the device that is not in use.
• Electromagnetic waves are emitted from this product or other Bluetooth devices, please do not use in the vicinity of a televi-
sion or radio, as it might interfere with the transmission of sound or images.
• To begin installation, please register using an account that has administrator privileges.
• This product is applicable only for general usage within the office or at home. Please do not use this product with medical
facilities and financial systems, computer systems, nuclear power facilities where there might be direct or indirect impact to
life, or in an environment that requires a high level of security and reliability, or an environment that directly impacts military
defense objectives. Our Company will not be liable for any losses incurred from any of these above actions.
• Our Company will not be liable for any losses incurred by external factors, such as product malfunction, connectivity failure,
bad communication, power outage, or interference by a third party resulting in lost communication opportunities.
• Our Company will not be liable for any losses incurred due to interception of communications, leaked information, tamper-
ing or destruction by a third party.
◆Attention Items During Use
Safety Items
• Battery Usage
• Please place in a location that is out of reach from children.
• Please do not add heat to the batteries. Please do not open up the batteries or place them in water.
• Please do not mix usage of new and old batteries. In addition, please do not mix usage of different types of batteries (such
as mix usage of alkaline batteries and manganese batteries).
• Stop usage of expired or insufficient power batteries, and please dispose used batteries according to the local regulations
or in a manner stipulate by the regulations of the administrative authorities.
• Keyboard Handling
• Please place on a flat smooth surface to avoid dropping accidentally or otherwise. The keyboard is a precision machine,
User manual ◆Attention Items During Use .........................................................................................................................20
◆System Requirements .....................................................................................................................................21
◆Product Overview .............................................................................................................................................21
◆Parts and Accessories......................................................................................................................................22
◆Function of Switches/LED Indicator Lamps..........................................................................................23
How to Connect
◆Selecting Connection Methods..................................................................................................................24
◆Connect to Personal Computer Via Cable .............................................................................................24
◆Connect to Personal Computer Via Wireless ........................................................................................24
[Procedure 1] Switching to Pairing Mode from Keyboard................................................................26
[Procedure 2] Installing Bluetooth Device (Pairing Mode)...............................................................27
[Procedure 3] Setup from 2nd Unit Onwards..........................................................................................29
◆Changing or Removing Bluetooth Devices...........................................................................................29
Usage Methods
◆Modifying the Function of the Key throughthe DIP Switch Configuration...........................33
◆Media Keys Device Operations ...................................................................................................................33
◆Windows Sleep and Standby Mode Toggle/Resume........................................................................33
◆Wireless Connection Power Saving Mode.............................................................................................34
◆Connecting to iPad/iPhone ..........................................................................................................................34
◆Troubleshooting ................................................................................................................................................34
EN
20
◆Function of Switches/LED Indicator Lamps
[Regarding CapsLock, ScrollLock LED Indicator Lamps Display]
When using Bluetooth connection, regardless whether the power is supplied via the battery or USB, the CapsLock lamp and
ScrollLock lamp on the keyboard will not light up.
Located on the rear of the keyboard.
When using Bluetooth to connect, this switch must be turned ON.
This Bluetooth switch must be turned OFF under the following circumstances :
Not using the Bluetooth connection for a long period of time, personal
computer shutdown, or changed to using USB connection.
Bluetooth
Power Switch
Located on the base of the keyboard.
May be used to change or temporarily stop the key usage. The default factory
setting for all is OFF. For further understanding of related contents, please
reference page 33.
DIP Switch
1
ON
2 3 4
• During USB Connection
When the CapsLock key is enabled, this indicator lamp is blue.
• During Bluetooth Connection
During device toggle mode, pairing mode, and upon successful connection,
this indicator lamp will either flash or light up. For further understanding of
the details of the lit lamp modes, please reference page 25.
CapsLock
LED Lamp
cum
Pairing
LED Lamp
Delete registration, press re-register.
The clear device button is on the back side of the Tenkeyless keyboard.
During Bluetooth connection, press this button, and it will clear the registration
information, and then switch to pairing mode. For further understanding of
related contents, please reference page26.
Multi-Media function. When pressed simultaneously with the Fn key, may
manage the playing of videos or music from the keyboard, as well as adjust the
sound volume and so forth.
During USB connection, if this key is pressed simultaneously with the Fn key,
the keyboard may control whether to enter or exit Windows sleep standby
mode. For further understanding of related contents, please reference page 33.
* This Bluetooth specification does not support the wakeup action during
Bluetooth connection.
• When the power for the Bluetooth connection is supplied via the USB, press
this key to switch from Bluetooth connection mode to USB cable mode.
• Enter pairing mode from the device toggle mode (*reference page 25
[Bluetooth Connection Flow Diagram]), and press any device 1-4 to begin
registration.
• Press when switching connection device on the toggle mode. Each key
connects one device, may register up to a total of four devices.
Clear Device
Button
• During USB Connection
When the ScrollLock key is enabled, this indicator lamp is red.
• During Bluetooth Connection
1) When the battery is exhausted, this red lamp will flash.
When this LED lamp is flashing, replace the battery as soon as possible.
Continued use will exhaust the battery power, and it will not be possible to
maintain the voltage required by the Bluetooth connection, operations will
become unstable. When the battery is totally exhausted, this LED indicator
lamp will not light up and will not flash, and the keyboard will not response.
*Battery Life : Approximately 6 months when used for 5 hours per day
(alkaline batteries), but the batteries life will differ based on usage conditions
and environmental factors.
2) Entering into device toggle mode, pairing mode, upon successful
connection this indicator lamps will either light up or flash. For further
understanding of the details of lit lamp modes, please reference page 25.
Media Key
Bluetooth
Device
Registration
/ Toggle
Keys
Sleep Key
Wired
Connection
Toggle Key
〜
〜
ScrollLock
LED Lamp
cum
Low Power
indicator
LED Lamp
ON OFF
23
◆Parts and Accessories
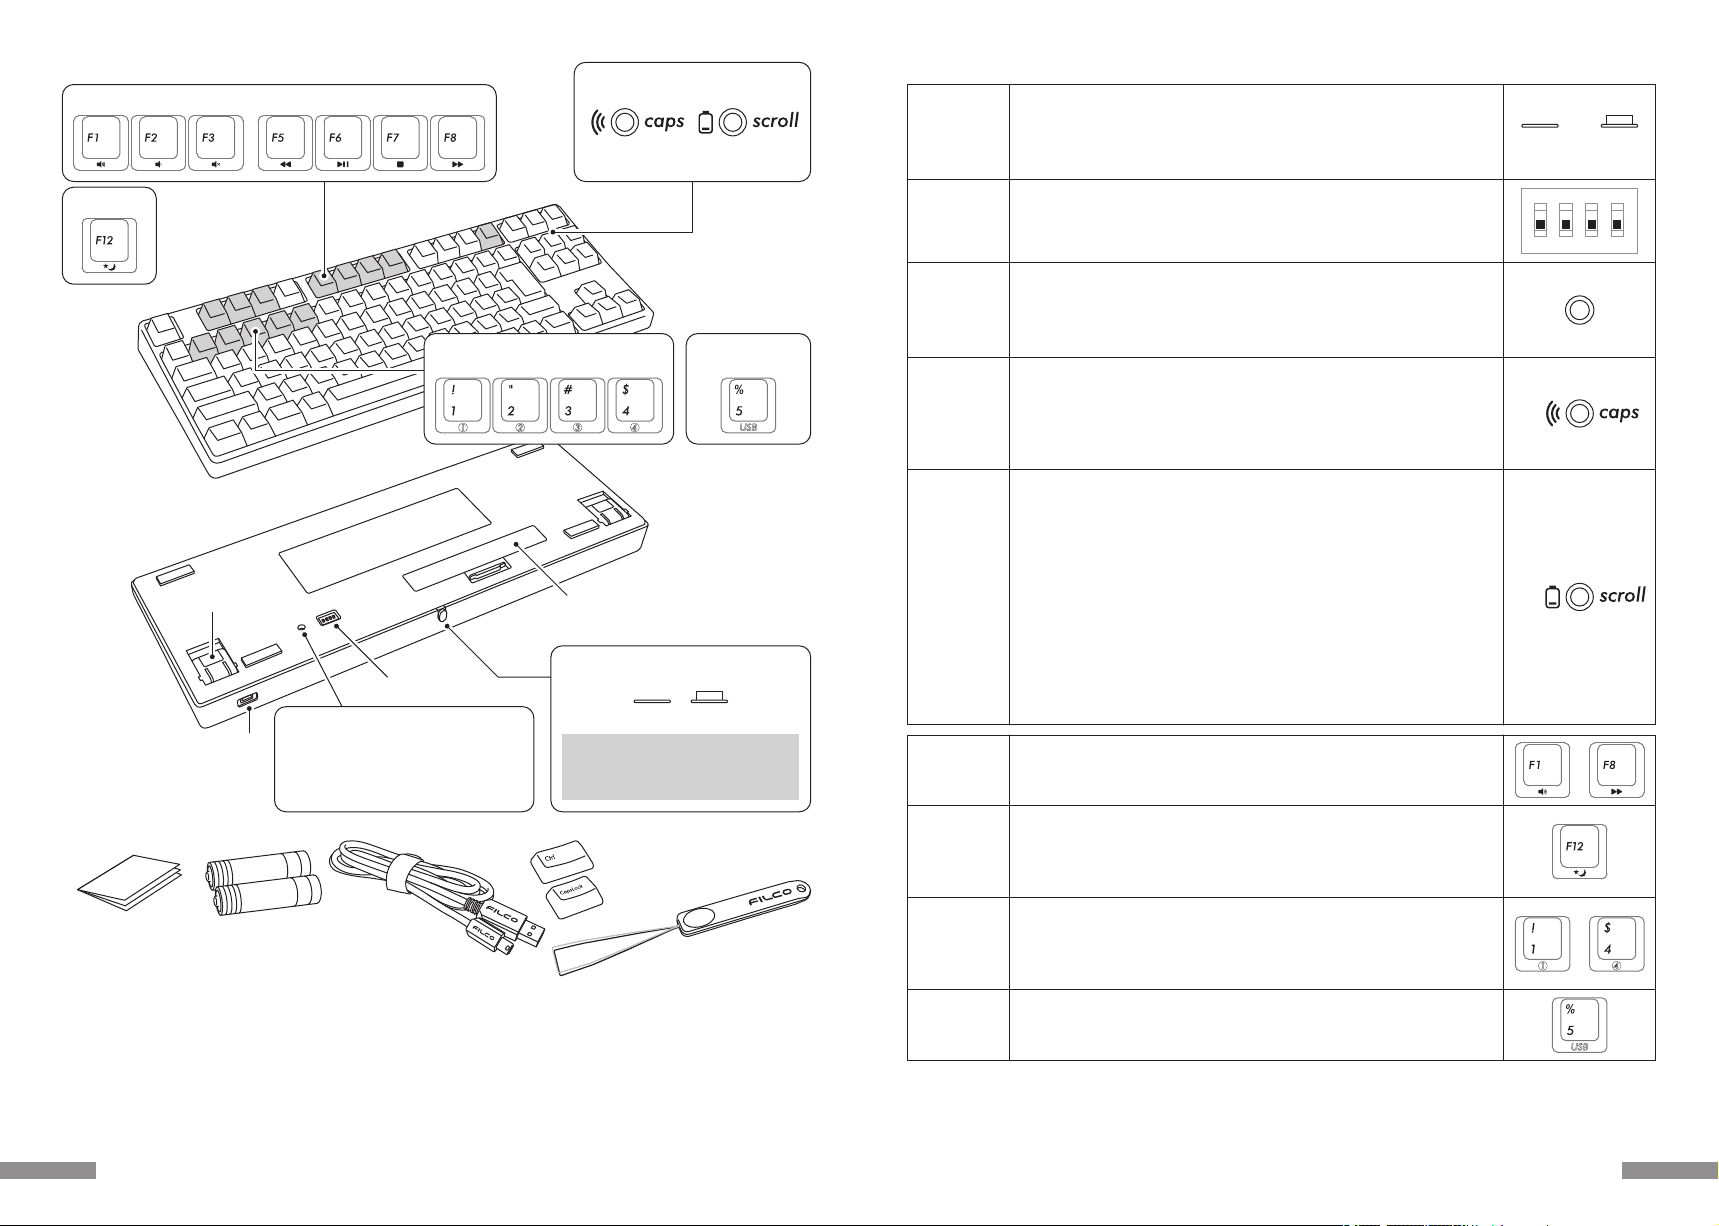
DIP Switch
< Back side >
Mini USB socket
for USB connection
Keyboard Feet/Legs Battery Cover
FILCO Key Puller
* Bluetooth adapter is not included in this product, please prepare separately.
< Accessories >
User Manual/Warranty
(this manual)
Spare AA Batteries
×2
USB Cable
Replacement keycaps
The contents will differ
according to the key layout.
Bluetooth device
registration/toggle keys
Wired connection
toggle key
< Front side >
Media Keys
Sleep Key
Low Power indicator
LED Lamp
Pairing
LED Lamp
ScrollLock
LED Lamp
CapsLock
LED Lamp
Bluetooth
Power Switch
ON OFF
When powered on, the power button
must be fully pushed inside the
keyboard, to avoid accidental contact.
In the case of Tenkeyless keyboard, the
clear device button is not located by
the LED indicator lamp, but on the back
of the body.
Clear Device Button
22

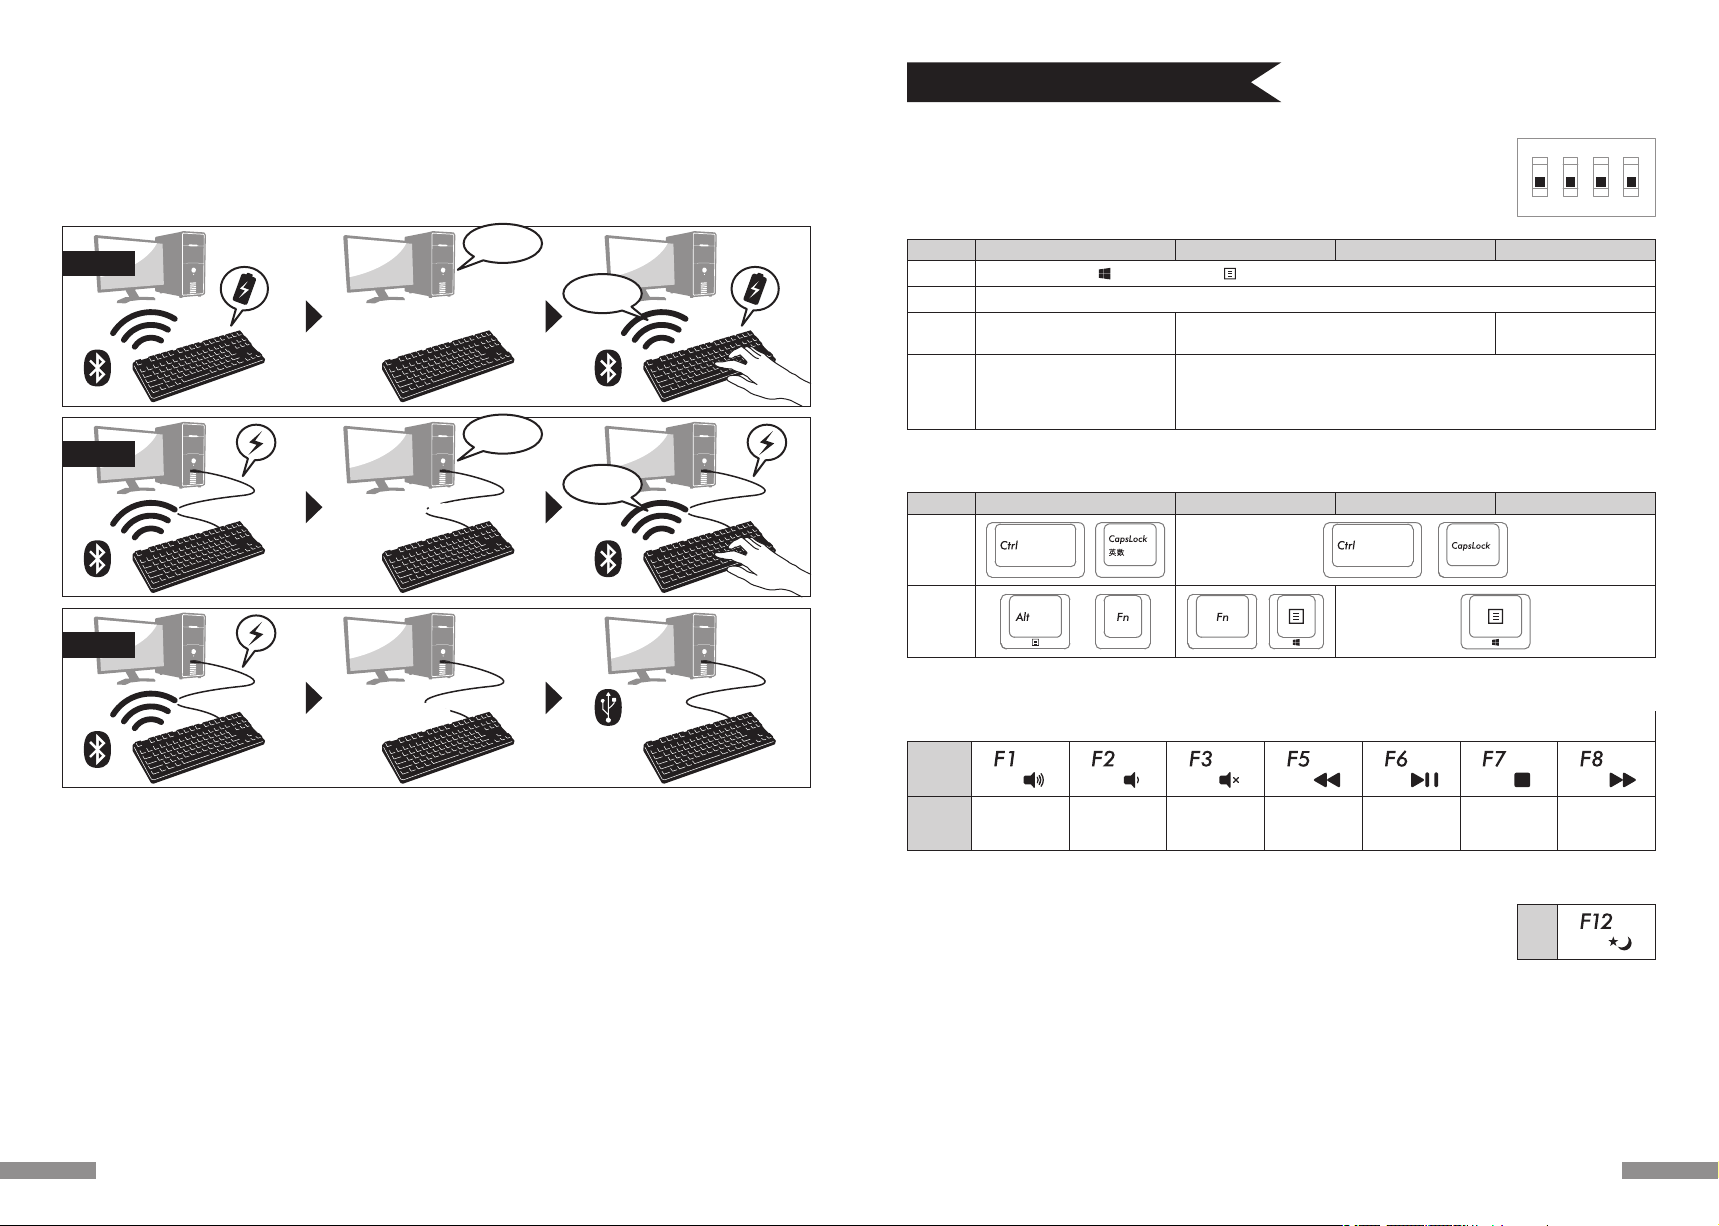
Two options for Power Supply : one method is to use
AA batteries (left page diagram B) and another method
is to use USB connection (left page diagram C).
When the power is supplied through the USB port of
the computer, press the wired connection toggle key
(USB key) to enter device toggle mode, and at this
instant, the Bluetooth connection will be disconnected
and connection switched to USB. For further
understanding of related contents, please reference
page 31.
USB power supply may be via the USB port of the
computer or the USB-AC power adapters (such as:USB
charger) etc.. In addition, USB power supply does not
have a rechargeable function for manganese batteries.
Bluetooth Connection LED Lamp Lit Modes
: lit : flash : not lit
Connection Flow Diagram
Device Toggle Mode
• [Ctrl] + [Alt] + [Fn] pressed simultaneously
Pairing Mode … After Ⓐis displayed, pairing LED lamp (blue)
would flash for about 5 minutes
• when pairing mode is enabled
Indicator for Low Power
• when the remaining power in the battery is insufficient
Indicator for Failed Connection … After displaying the Ⓐ, pairing
LED lamp (blue) flashes slowly for about 10 secs
• unable to locate installed device * page 29
• when the pairing information is deleted from the personal computer
Indicator for Change / Toggle Device Ⓐ
• when any one Bluetooth device registration/toggle keys ①〜④ is
pressed for already registered or not registered devices
• when switching to USB power supply wired connection * page 31
• when clear device button is pressed
• when USB cable is connected
Ⓐ
Indicator for Connection completed
• when pairing operation is completed
• when Bluetooth connection is successful
Low Power Indicator LED lamp flashes
red
flashes blue and red back and forth for about 4 secs
red
blueblue
Pairing LED lamp flashes for about 5 minutes
blueblue
Both lamps simultaneously flashes 3 times
×3
red
blueblue
Pairing LED lamp flashes slowly for about 10 secs
blueblue
Both lamps will lit simultaneously for about 10 secs
red
blueblue
Connected
Device Toggle Mode
Pairing Mode
* Page 26
[Procedure 1]
From ①〜④, press any key
to enter registration
* Page 27
[Procedure 2]
Personal computer
installation
After
5 minutes
Power On
Standby Status
Press
clear device button
1st Time
Press
[Ctrl] + [Alt] + [Fn]
2nd Time onwards
Mode • Operation LED Lamp Lit Mode
* After pairing, make sure a cable is disconnected
when switching on the keyboard, press any key
and the memory will automatically connect to
the last used device.
Successful
pairing!!
25
How to Connect
Wired Connection Wireless Connection
USB
Connection
Bluetooth
Connection
USB
Power
A B C
◆Selecting Connection Methods
USB Connection (As per diagram A)
May perform connection by using the USB cable supplied with this product. (Does not have recharging function for Ni-MN
Rechargeable Batteries.)
When powering up the computer with the keyboard connected to a USB port the keyboard will connect in wired USB mode
by simply pressing any key. This is because when Bluetooth and USB are both connected the keyboard will default to USB
wired mode which is the priority connection. Normal operation can be started after second key is pressed.
* When using USB connection, batteries are not required. Therefore, for prolong usage of USB connection, please remove the
batteries.
* When using USB connection, please turn off the Bluetooth power switch.
◆Connect to Personal Computer Via Cable
Bluetooth Connection (As per diagram B, C)
Using a Bluetooth adapter or a device embedded with Bluetooth function for the connection setup (pairing function), hence
connecting to the personal computer.
This product does not include a Bluetooth adapter. Therefore, one must be purchased from the retail market, and after
installing the Bluetooth adapter, connection setup may then be performed. When the personal computer has an embedded
Bluetooth function, please enable the Bluetooth function.
This installation procedure must be done with an administrator account which is logon to listings and Control Panel in
Classic View.
◆Connect to Personal Computer Via Wireless
Battery
Power
Bluetooth
Connection
USB Connection LED Lamp Lit Modes
ScrollLock LED lamp lit
red
Mode • Operation LED Lamp Lit Mode
• When CapsLock key is enabled
• When ScrollLock key is enabled
: lit : flash : not lit
• Upon connecting USB cable
*Pressanykeyonthekeyboard The LED indicator lamp will flash for about 4 seconds
alternately between LED after which normal operation
will be resumed.
CapsLock LED lamp lit
blueblue
red
blueblue
24
Windows XP / Vista
* Pairing mode procedure is the same, but the displayed graphics are based on the OS, therefore, there will be minor discrep-
ancies.
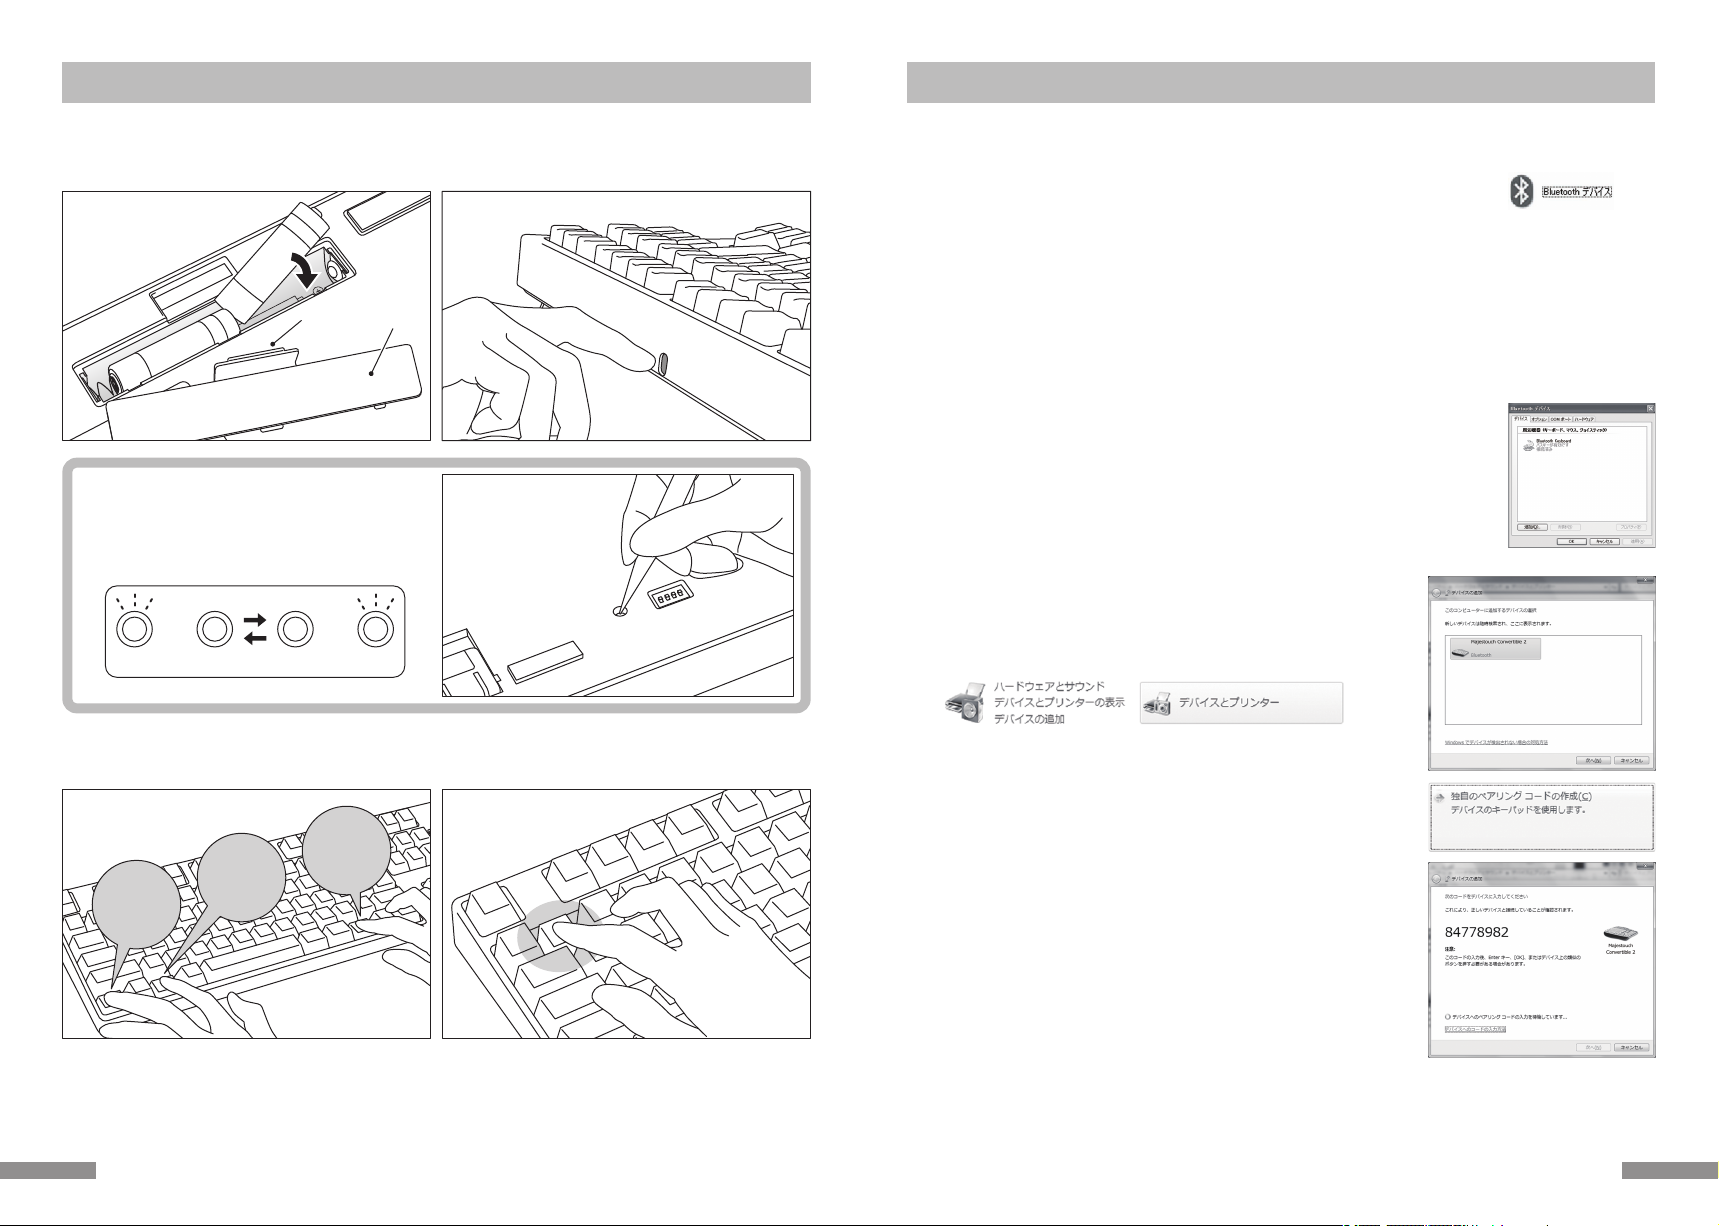
1. Remove battery cover,
insert two AA batteries.
3. Simultaneously,
press the [Ctrl] + [Alt] + [Fn]
Press Bluetooth device registration
/toggle key ①
2. Turn on the power switch
Battery cover
Push inwards
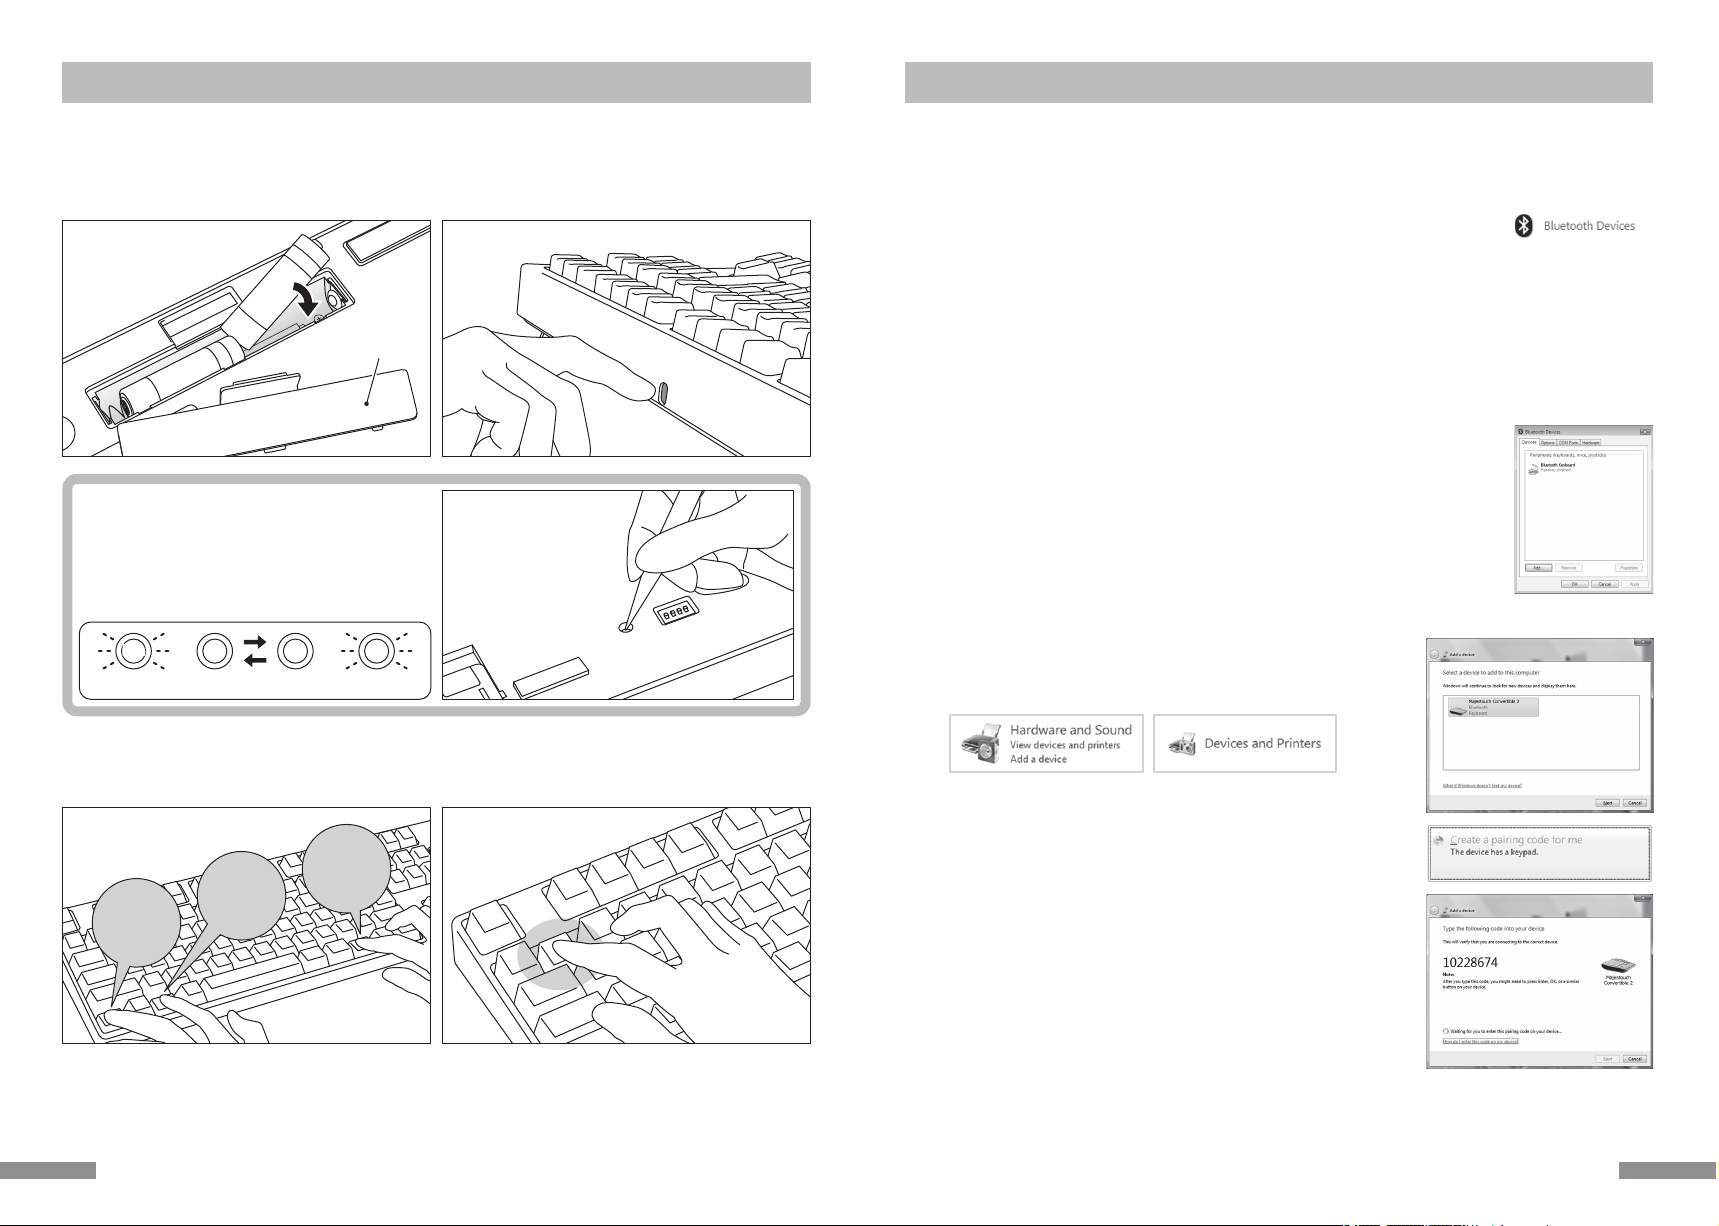
1. Insert the batteries into the keyboard. Please insert according to the label on the battery case; and take note of the
directions for the positive and negative terminals.
* Power for the Bluetooth of this product may be supplied from the USB. But, for the initial Bluetooth connection setup,
please start from the battery power supply. This is because prior to installation, all wired connections are regarded as USB
connection.
2. Turn on the Bluetooth power switch.
α. Initial Bluetooth connection setup after purchase. First,
press the clear device button, and check whether the
pairing LED lamp (blue) and the low power indicator LED
lamp (red), are flashing back and forth for about 4
seconds.
From the second connection onwards, this action
should be omitted.
3. Simultaneously, press the [Ctrl] + [Alt] + [Fn] keys on the keyboard to perform device toggle mode. The pairing LED lamp
(blue) and the low power indicator LED lamp (red) will simultaneously light up for about 10 seconds.
4. Press any one of the Bluetooth device registration/toggle keys ①〜④ (as per diagram, press key ①) to enter the registration
device information.
Ctrl Alt Fn
5. The pairing LED lamp (blue) and the low power indicator LED lamp (red) will flash back and forth for about 4 seconds. Upon
entering pairing mode (computer identifying status), only the pairing LED lamp (blue) will remain flashing.
6. Continue next page [Procedure 2].
* When it is in the pairing mode, if the any key operation is not performed for 5 minutes, then the pairing LED lamp (blue)
would go out and it would end the pairing mode and go back to the standby mode. Please go to step 3 and start over.
flashes back and forth for about 4 secs
red
blueblue
[Procedure 1] Switching to Pairing Mode from Keyboard [Procedure 2] Installing Bluetooth Device (Pairing Mode)
1. Control Panel > double-click the [Bluetooth Devices] icon
2. Bluetooth Devices > Devices tab > click [Add]
3. Open the Add Bluetooth Device Wizard dialog box.
Tick [My device is set up and ready to be found.], and then click [Next].
4. Bluetooth device found.
Select [Convertible 2 TKL New device], and then click [Next].
5. Add passkey for the device.
Select [Choose a passkey for me], and then click [Next] .
6. Passkey exchange between computer and keyboard.
Please input the passkey using the numeric keys on the keyboard. Then press Enter. Ensure to complete the passkey input
within 30 seconds.
[Reference] When inputting passkey, the status will not be displayed on the screen.
7. When the passkey has been entered successfully, the Bluetooth keyboard installation will
start within a short while.
If the entered passkey is incorrect, please re-execute the previous step, by re-entering the
passkey again.
8. When [Completing the Add Bluetooth Device Wizard] dialog box is displayed on the screen,
indicating that the installation has completed.
Close the wizard by clicking Finish.
9. Paired device information will automatically be stored within the keyboard. After pairing,
turn on the keyboard power, press any key and it will enter into [Search mode]. The pairing
LED lamp will flash, and then reconnect automatically.
10. To confirm the connection status settings, please go to ControlPanel > Bluetooth Devices >
Devices tab.
10.
1.
4.
5.
6.
[restricted to initial execution]
Press the clear device button.
(The clear device button
of Tenkeyless keyboard is
located on the back of the
body)
[restricted to initial execution]
Press the clear device button.
(The clear device button
of Tenkeyless keyboard is
located on the back of the
body)
Windows 7 / 8 / 8.1 / 10
1. Open the Control Panel.
2. On category view, click [Hardware and Sound], then click [Add a device].
On icon view, click [Devices and Printers],then click [Add a device].
3. Open the [Add Bluetooth Device Wizard].
Add a device window displays [Select a device to add to this computer.]
4. Bluetooth devices found.
Select [Convertible 2 TKL], then click [Next].
5. Add device passcode.
When the passcode dialog box appears, select [Create a pairing code for me]
then click [Next]. (Windows 7)
6. Please input the passcode using the numeric keys on the keyboard, and then
press Enter. Ensure to complete the pairing code input within 30 seconds.
[Reference] When inputting a pairing code, the status will not be displayed
on the screen.
* The following is the operating method of genuine OS software or drive program setting. Please refer to the Bluetooth receiver
instruction manual when setting with the special software attached to the Bluetooth receiver.
2726
Ctrl Alt Fn
1. Confirm that the power of the keyboard is on.
2. Simultaneously, press [Ctrl] + [Alt] + [Fn] to execute the device toggle mode. The pairing LED lamp (blue) and the low power
indicator lamp (red) will light up simultaneously for about 10 seconds.
* During Bluetooth connection, if the clear device button is pressed, the currently connected paired device information will
be cleared, and will be replaced by the new paired mode. Please use the clear device button with caution to setup the
pairing mode. (The clear device button is on the back side of the Tenkeyless keyboard.)
3. Following, press one of the [Bluetooth device registration/toggle keys] that has not been assigned any device information
(as per diagram, keys ②〜④), to input the registration device information.
Changing the connected device
1. Confirm that the keyboard is powered on.
2. Press [Ctrl] + [Alt] + [Fn] keys to enter the device toggle mode. The pairing LED lamp (blue) and the low power indicator lamp
(red) will light up simultaneously for about 10 seconds.
3. To connect the already registered device, press any of the ①〜④ [Bluetooth device registration/toggle keys].
4. The pairing LED lamp (blue) and the low power indicator lamp (red) will flash back and forth for about 4 seconds.
If the connection is successful, both lamps will flash 3 times simultaneously.
5. Upon changing the connected device, and after the LED lamp has gone off, you may start to use the keyboard.
* Please check: when the pairing LED lamp (blue) flashes slowly for about 10 seconds and then goes off, it could be that the
Bluetooth adapter is not actually connected, or the Bluetooth function of the device has been disabled.
* If a key that is not registered any device at step 3 is pressed, the keyboard will enter into pairing mode, then, please go back
to step 2, and start over again.
Device already registered
4. The pairing LED lamp (blue) and the low power indicator lamp (red) will flash back and forth for about 4 seconds. Upon
entering pairing mode (computer identifying status), only the pairing lamp (blue) will remain flashing.
5. Begin Bluetooth device installation (pairing in progress). (* page 27 [Procedure 2])
6. The selected key will be registered.
7. Repeat steps 1~6 (for additional units).
[Procedure 3] Setup from 2nd Unit Onwards (maximum setup 4 units)
2. Simultaneously,
press the [Ctrl] + [Alt] + [Fn]
3. Press once on key ②of [Bluetooth
device registration
/toggle keys]
◆Changing or Removing Bluetooth Devices
10.
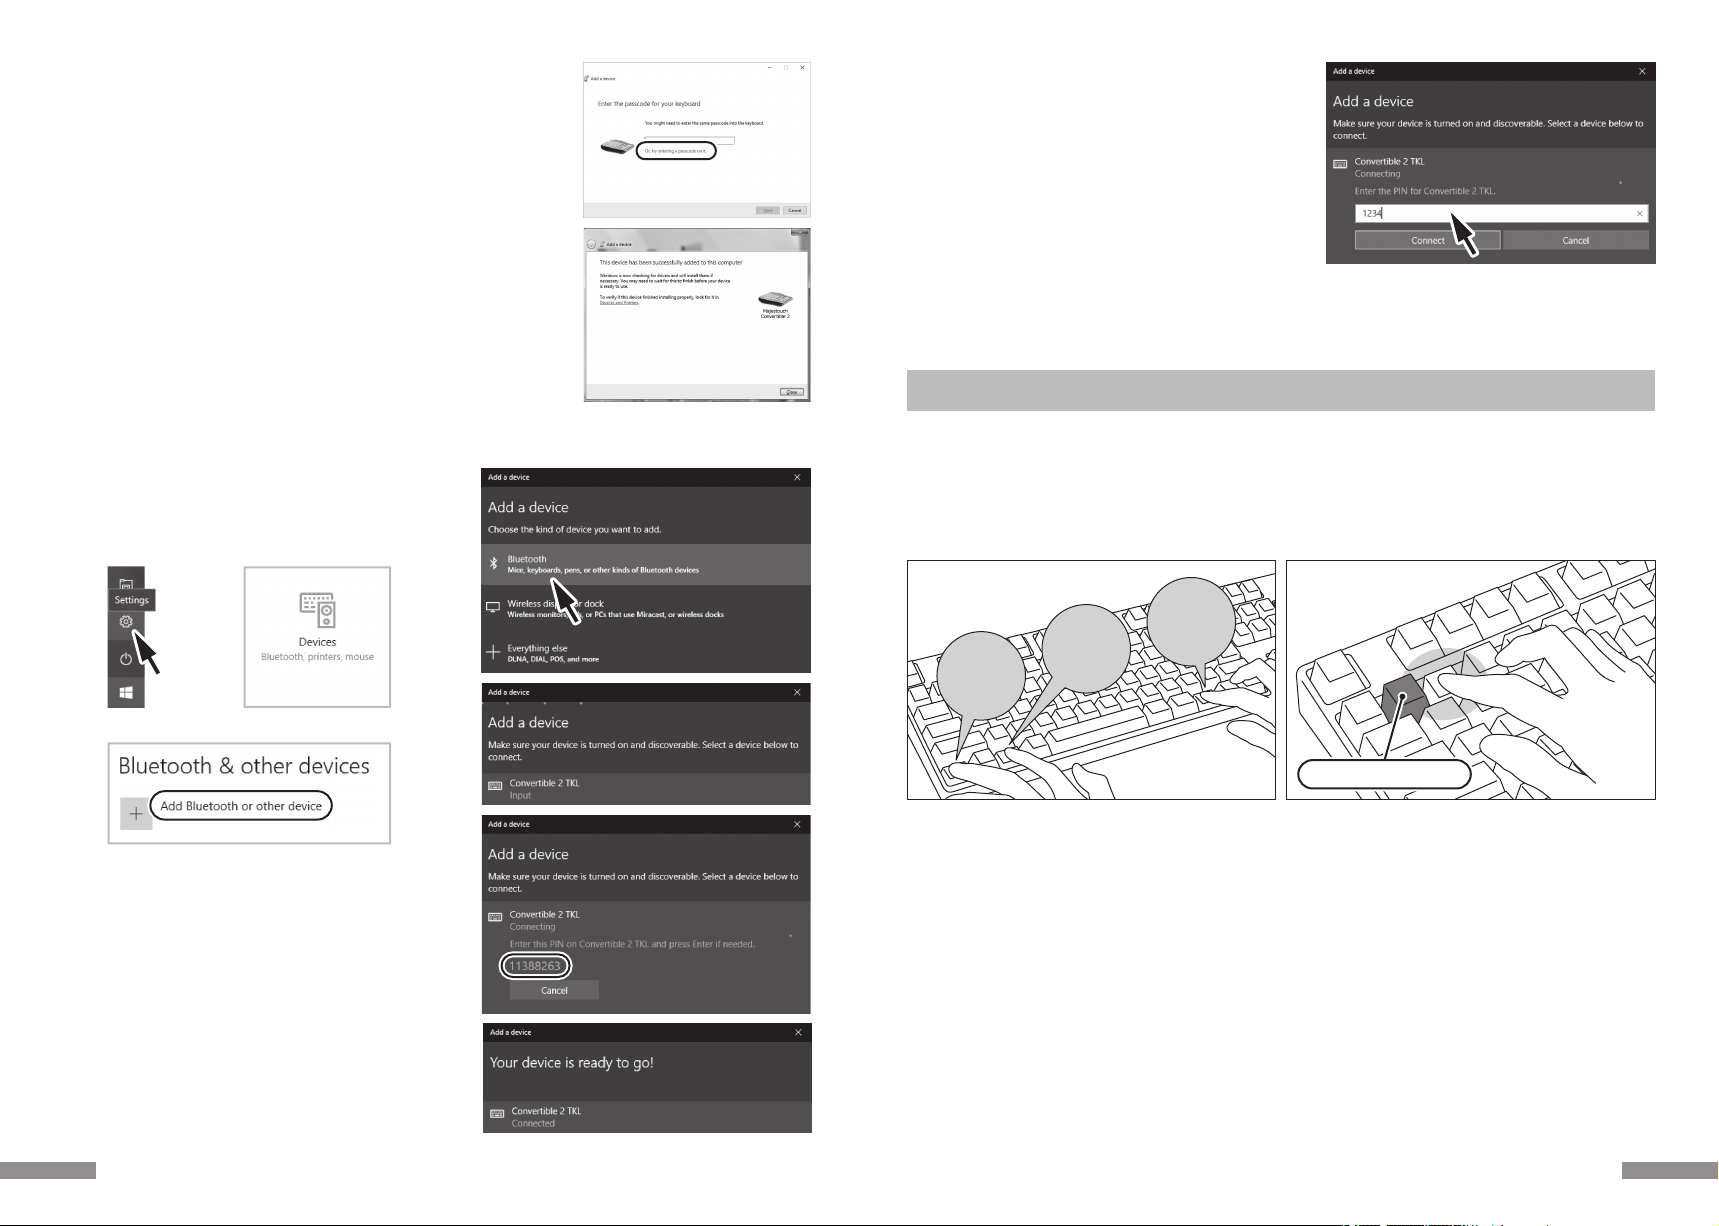
10. In the event of re-pairing due to PIN code input failure
because of the timeout of pairing or input error, the [Enter
the PIN for Convertible 2 TKL.] may be displayed.
Click on the input field with the left key of mouse and enter
the self-determined 4-8-digit PIN code with the other USB
keyboard or soft keypad. Click on the [Connect], input the
same PIN code with Convertible 2 Tenkeyless and press the
Enter key.
The pairing begins and your device is ready after the
[Connected] is displayed.
29
8.
7. When the passcode has been entered successfully, installation for the Bluetooth
keyboard will start within a short while. If the entered passcode is incorrect,
please re-execute the previous step by re-entering the passcode.
In the case of failing to input the passcode by time-out and re-pairing under
Windows 8/8.1/10, the passcode may not be displayed on the screen of "Enter
the passcode for your keyboard" . Click on the "or, try entering a passcode on it."
to get a new passcode displayed.
8. The dialog box of Add a device will display [This device has been successfully
added to this computer.] indicating that the installation is complete. Please
close the dialog box.
9. Paired device information will automatically be stored within the keyboard.
After pairing, turn on the keyboard power, press any key and it will enter into
[Search mode]. The pairing LED lamp will flash, and then reconnect automatical-
ly.
10. To confirm the connection status settings, please go to Control Panel > Devices
and Printers > Devices.
4.
7.
8.
9.
PIN
7.
1. 2.
3.
When starting operation
from the [Settings] of Windows 10,
1. Please click on the [Settings] on the start menu.
2. Please click on the [Devices] on the [Windows Settings]
screen.
3. Please click on the [Add Bluetooth or other device].
4. Please click on the [Bluetooth] of [Add a device Popup].
5. It starts to search for the nearby Bluetooth devices.
6. Convertible 2 Tenkeyless changes into the pairing mode.
7. Find the keyboard and click on it when the [Convertible 2
TKL] is displayed.
8. Input the PIN code displayed on the screen from Convertible
2 Tenkeyless and press the Enter key.
9. Your device is ready when the [Connected] is displayed.
28

Ctrl Alt Fn
Wireless Connection USB Power Startup Method
This product allows the USB cable to be connected to the USB port to supply power to the Bluetooth connection, so that it does
not need to use batteries. But, when the Bluetooth connection is powered by through the USB by the computer, the keyboard
must be connected with a USB cable.
1. Use the supplied USB cable to connect to the personal computer. The pairing LED lamp (blue) and the low power indicator
LED lamp (red) will flash back and forth for about 4 seconds.
When the Bluetooth connection is terminated, it will be identified as a USB keyboard by the personal computer.
Switching from Wireless connection to wired connection while charging from USB
Via any key press, you may restore USB connection from a previously setup Bluetooth connection/USB power status.
To play quick-response games, or speed typing for a prolonged period of time, we strongly recommend that you use the USB
connection.
1. To enter the device toggle mode, simultaneously press the 3 keys [Ctrl] + [Alt] + [Fn].
2. Press the wired connection toggle key (key face has [USB] printed on it).
3. The pairing LED lamp (blue) and the low power indicator lamp (red) will flash back and forth for 4 seconds.
4. When the LED lamp has stopped flashing, you may start to use the keyboard that has been identified as a USB keyboard by
the personal computer.
LED lamps are indicators for the on/off of the CapsLock and ScrollLock.
2. To enter the device toggle mode, simultaneously press the 3
keys [Ctrl] + [Alt] + [Fn]. The pairing LED lamp (blue) and the
low power indicator LED lamp (red) will simultaneously light
up for about 10 seconds.
3. From the [Bluetooth device registration/toggle keys] ①〜④,
press any one key which already contains the registration
data of the computer. To register a new device, execute page
29 [Procedure 3] step 3 again.
4. The pairing LED lamp (blue) and the low power indicator
LED lamp (red) will flash back and forth for about 4 seconds.
Upon successful connection, both lamps will flash 3 times
simultaneously.
5. Once the status is Bluetooth connection / USB power, and
when the LED lamp has gone off, you may start to use the
keyboard functions.
1. USB cable connected
to personal computer
Bluetooth connection
terminated,
identified as USB keyboard.
3. Press the Bluetooth Device registration/toggle keys
3. Press the Bluetooth Device registration/toggle keys
1. Simultaneously press [Ctrl] + [Alt] + [Fn] 3. Press the Wired connection toggle key
2. Press the Wired connection toggle key
31
Removing the registered device information
1. Confirm that the keyboard is powered on.
2. Press [Ctrl] + [Alt] + [Fn] keys to enter the device toggle mode. The pairing LED lamp (blue) and the low power indicator lamp
(red) will light up simultaneously for about 10 seconds.
3. To remove the already registered device, press any key ①〜④ from the [Bluetooth device registration/toggle keys].
4. The pairing LED lamp (blue) and the low power indicator lamp (red) will flash back and forth for about 4 seconds. If the
connection is successful, both lamps will flash 3 times simultaneously.
5. After the LED lamp has gone off, press the clear device button.
After the pairing LED lamp (blue) and the low power indicator lamp (red) flashes back and forth for about 4 seconds, then the
pairing lamp (blue) will flash independently.
6. The paired device information will be deleted, and it will restart with the new pairing mode. If you wish to register other
devices, please continue to execute device installation procedure. If you do not intend to continue registering, please turn off
the keyboard power.
7. When using the PC, select [Control Panel] > [Hardware and Sound] > [Device and Printer].
Select the icon of the keyboard that you wish to delete, then click delete. When the confirmation dialog box appears, press
[OK].
(XP/Vista sequence: [Control Panel] > [Bluetooth Device] > [Device Tab])
Priority and Relationship between USB Connection and Bluetooth Connection
USB connection always has priority over the Bluetooth connection.
Changing the registered information to another registration key
Please remove the registration information from both the keyboard and the device, and ensure to register the device
information to a new key.
Please reference [Removing the already registered device information] and [Procedure 3 / Setup for 2nd Unit Onwards].
Connect
USB Cable
Unplug
USB Cable
Unplug
USB Cable
From the device toggle mode,
Bluetooth registration / toggle keys ①〜④,
press any one key
From the device toggle
mode, press the cable
connection toggle key (USB)
USB connection,
priority to use wired
connection
Changed to Bluetooth
connection, USB power
USB
Connection
Bluetooth
Connection
USB
Power
Battery
Power
Bluetooth
Connection
30
Usage Methods
◆Modifying the Function of the Key through the DIP Switch Configuration
Factory default is
OFF status
1
ON
2 3 4
Switch2
Key
Tags
Function
Switch4
Increase
sound
volume
Decrease
sound
volume
Mute Previous
track Play / Pause Stop Next track
DIP No. 91JP Keyboard 87EN Keyboard 88EU Keyboard89KR Keyboard
Switch1
Switch2
Switch3
Switch4
Changes CapsLock key and left Ctrl key
Change Esc key and 半角/全角
keys
top : Alt key
Fn key →
side : App key
top : App key →Fn key
side : Alt key
/
top : right Win key →Fn key
side : App key
top : App key
Fn key →
side : right Win key
Changes Esc key and [` ~] keys Changes Esc key and
[` ¦ ¬] keys
Changes
two keys
simulta-
neously
Windows key and Applications (App) key, are locked and cannot be used
Replacing Keycaps
When the key functions are changed through the configuration of the DIP switch, included replacement keycaps will be used.
When replacing the keycaps, please use the FILCO key puller.
You may change or stop the use of the key codes by using the DIP switch located at the base of the
keyboard. The factory default values for all are OFF.
When intending to use the DIP switch, please unplug the USB cable, and then turn off the Bluetooth
power. Please note that when the cable and the personal computer are still in connection and the
power is still turned on, this might result in damage or malfunction during operation. Please use a
fine-tip rod to configure the DIP switch.
◆Media Keys Device Operations
Pressing the Fn keys simultaneously, allows the keyboard to management the playing of videos and music, as well as adjusting
the sound volume.
Key
Tags
◆Windows Sleep and Standby Mode Toggle/Resume
During wired connection, pressing the Fn key and the Sleep key simultaneoulsy, allows the keyboard
to control the Windows Sleep standby mode toggle/resume. Through the key setup, may perform
resume, as per following setup example.
1. Open [Device Manager] Tags.
2. Double-click on [Keyboard].
3. Double-click on [HID Keyboard Device].
4. Click on [Power Management] tab, and tick [Allow this device to wake the computer]. If the [Power Management] tab does not
display the option for this machine model, then it is not applicable. (Moreover, when a Fast Startup function is effective, it may
be unable to cancel.)
Moreover, for Bluetooth connection, Bluetooth specifications do not support resume from Windows Sleep Standby mode.
Please use the mouse to wake up from Windows Sleep Standby mode.
91JP Keyboard 87EN Keyboard 88EU Keyboard89KR Keyboard
33
From Windows Start Menu,
select Re-start
Reconnected!!
From Windows Start Menu,
select Re-start
From Windows Start Menu,
select Re-start
Mode 1
USB
Connection
Mode 3
Mode 2
Reconnected!!
Other Attention Items
• When restarting a personal computer from start menu under battery powered Bluetooth connection, press any key on the
keyboard to automatically reconnect after the computer has restarted. (Mode 1)
• When restarting a personal computer from start menu under Bluetooth connection with USB power supplied from the USB
port, press any key on the keyboard to automatically reconnect after the computer has restarted. (Mode 2)
For Mode 1 and Mode 2, when the Bluetooth connection is successful, the pairing LED lamp (blue) and the low power indica-
tor lamp (red) will both flash 3 times simultaneously.
• For Bluetooth connection with USB power supplied from the USB port of a personal computer, switch off the power of the
computer (Shutdown); later when the power is again turned on, it will be regarded as USB connection, because wired
connection has priority during identification. (Mode 3)
• During Bluetooth connection, when the Bluetooth adapter (Bluetooth transmitter) is removed, and then again connected,
press any key on the keyboard, to automatically reconnect.
Having reconnected successfully, the pairing LED lamp (blue) and the low power indicator lamp (red) will flash 3 times simul-
taneously.
• Actions for multiple platform system environment options
Under multiple platform system environment options, when one personal computer unit has multiple Windows OS operat-
ing systems, after USB connection, perform BIOS setup, when the select OS operating system startup screen appears, at
times the [
↓key] does not function normally. This happens on BIOS setup restart, the reason is that prior to reading the
keyboard data, it enters into the Windows system; hence this is not a product defect.
If unable to select any operating system, then please restart again.
At the select OS operating system startup screen, when the OS operating system does not startup then it is still unable to
create the Bluetooth connection configuration. Therefore, use the USB connection to select the OS operating system.
Based on the multiple machine startup environment options, the Bluetooth connection may only be registered under one
operating system.
The registered account must not appear under other operating systems. In addition, you may not assign or setup the Blue-
tooth device registration codes ①〜④ on other operating systems.
For example: Under environment installed with Windows 7 and Windows 8 dual startup options
Under Windows 7, register the Bluetooth device registration code ①.
Under Windows 8, registering the Bluetooth device registration code ②
is not accepted. First, clear the registration message from both the keyboard and the device; next, re-execute the newly
selected operating system connection (pairing) setup operations.
Power cycle the PCPower cycle the PC
Re-start!
Re-start!
32

非常感谢您本次购买FILCO Majestouch Convertible 2蓝牙无线键盘。请详细阅读本手册刊载的
注意事项。
· 安装时,请以具有管理权限的使用者账户登录。
· 本产品适用于办公室和家庭的一般性使用。当涉及对生命有直接或间接影响的医疗设备与金融系统、计算机系统、核能设施,以及安全性和可靠性要求极
高,或直接影响军事防御目的等环境,请勿使用本产品。上列因素所造成之损害行为,本公司不承担任何责任。
· 因外部因素造成本产品故障、连接失败、通讯不良、停电,或因第三方介入而错失通讯机会等,所造成之损害行为,本公司不承担任何责任。
· 因第三者通过拦截通讯内容、泄漏信息、篡改、破坏等所造成的损害行为,本公司不承担任何责任。
关于通讯的注意事项
· 请在无阻碍的良好收讯场所使用。收讯距离所影响之通讯质量,取决于建筑物结构和障碍物。处在钢筋、金属、和混凝土之间,讯号可能无法连接。
· 用户若置身妨碍通讯的死角,或未提供无线讯号的地方,会导致通讯中断或无法连接。
· 联机时,请距离AV和OA等机器2公尺以外。微波炉极易影响讯号,联机时请确保相距3米以外,否则可能无法联机成功。
· 由于IEEE802.11g/b的无线LAN机器,和本产品的蓝牙功能使用同样频率(2.4GHz),两者靠近使用时,会产生电波干扰,以致影响连接速度或无法连
线。在此情况下,请将未使用的装置电源关闭。
· 本产品或其它蓝牙机器会释放电磁波,请勿使用于电视或收音机附近,有可能干扰声音或影像的传送。
关于健康问题的注意事项
如果长时间使用鼠标、键盘、轨迹球鼠标,会增加手部、手腕、头部、肩膀的负担,可能会感到疼痛和麻木。如果持续不断重复使用,可能会导致严重伤害。当
产生上述不适情形时,请马上停止使用鼠标和键盘,并建议咨询专业医师。使用个人计算机,请定期休息,并请留意勿造成手部、手腕、头部、肩膀等不适。
安全事项
· 关于电池的使用
· 请放置于幼童触摸不到的地方。
· 请勿将电池加热,勿拆卸电池或倒入水中。
· 请勿新旧电池混合使用,勿混合使用不同种类电池(如碱性电池与锰电池混用)。
· 勿使用过期或电力不足的电池,并请依照所在地法规或行政规定,适当处理或丢弃使用过的电池。
· 关于键盘处理
· 请摆放在平整场所,以免发生掉落等意外事故。键盘属于精密机械,内有电池与变压器,故请小心放稳,避免饮料或液体流入机身内部。
· 请勿拆卸或改装。原厂维修标签请勿任意撕毁或改造,以免影响保固。
· 以下情形请暂时或完全停止使用本产品,电波影响有可能造成机器无法正常运作而发生事故。
· 心脏起搏器附近
· 医疗机构及医疗电子设备附近
· 飞机机舱内
· 使用本产品会产生对其它机器的电波干扰
· 本产品保固内容与规定,只限于您所购买的地区。如果您在日本国内购买,将适用日本Diatec Corporation公司的规定;如果您通过海外代理商购买,
则 适用该代理商规定的保修条款。此外,本手册之保证书,只适用于日本境内。
◆ 使用注意事项
PC(个人计算机): 使用有线连接时,请用有USB端口的Windows个人计算机 使用无线连接时,请用有蓝牙HID Profile的Windows个人计算机
OS(操作系统): Windows XP Service Pack 2或更新的版本、Windows Vista、Windows 7、Windows 8、Windows 8.1、Windows 10 如果使用
蓝牙连接,个人计算机需具备蓝牙功能,或有蓝牙接收器。由于切换问题,可能会发生无法连接的情形,并非所有蓝牙接收器都有支持。
※安装蓝牙连接时,请务必使用鼠标操作。
◆ 系統要求
◆使用注意事项.................................................................................................35
◆系统要求 .........................................................................................................35
◆产品介绍 .........................................................................................................36
◆零件名称及附件 ............................................................................................ 36
◆開關·LED指示燈的功能 ........................................................................... 37
如 何 连 接
◆选择连接方式.................................................................................................38
◆通过有线连接到个人计算机 ....................................................................... 38
◆通过无线连接到个人计算机 ....................................................................... 38
【步骤①】由键盘转成配对模式................................................................... 39
【步骤②】安装蓝牙装置(配对模式) ...........................................................40
【步骤③】第2台以后的设定(最多可设定4台).........................................40
◆变更与删除蓝牙装置.................................................................................... 41
使 用 方 法
◆藉由DIP开关操作变更按键功能................................................................44
◆媒体键的装置操作 ........................................................................................ 44
◆Windows睡眠待机模式的切换/回复....................................................44
◆无线连接的省电模式.................................................................................... 44
◆连接iPad/iPhone使用操作系统 ..............................................................45
◆疑难排解 .........................................................................................................45
使用说明书
CN
35
1. Use the keyboard [Pairing mode]. (* page 26 [Procedure 1])
2. Tapping sequence : from Home screen, tap on [Settings] icon > [Bluetooth], and [On] the Bluetooth device.
3. Devices displays [Convertible 2 TKL] as [Not Connected]. Tap on it and use
the keyboard to input the PIN code displayed on the screen, then press the
[Enter]key.
4. After pairing, the devices will display [Convertible 2 TKL] as [Connected].
* Compatible with iOS11.2.2 and above. However earlier versions which are
not supported may have limited functionality.
* Onscreen keyboard does not appear during Bluetooth connection.
* May use the hotkeys provided in the table on the right.
◆Wireless Connection Power Saving Mode
◆Connecting to iPad/iPhone
Q. No power supply.
Check the direction of the batteries.
Could be that the batteries are out of power. Please replace with new batteries.
Q. Unable to execute pairing. When searching for Bluetooth device, keyboard did not appear on the screen.
• Please confirm that the power of the keyboard has been turned on.
• Please check the direction of the batteries. If the batteries are out of power, please replace with new batteries.
• When executing device toggle mode, please press the 3 keys [Ctrl] + [Alt] + [Fn] simultaneously. Registered device data, press
one of the [Bluetooth device register/toggle keys ①〜④] once, please confirm whether the Pairing LED lamp (blue) is
flashing.
• Press the clear device button and confirm that the Pairing LED lamp (blue) is flashing.
• When using a Bluetooth adaptor, please check whether operating normally, and whether installed correctly.
• If you wish to use the embedded Bluetooth function of the personal computer, please check whether it has been turned on.
Q. In comparison, the touch of the larger keys such as Enter key and Shift key is different from the other small keys
The specification for the larger keys is specially designed.
The larger keys are designed with [Stabilizers], therefore pressing on any part of the key will move it up and down freely.
Q. After personal computer startup, Bluetooth connection is unable to select BIOS setup or execute operating system.
Adapters from Bluetooth version 2.1 upwards, after pairing setup, the passkey parameter will be registered internally into the
adaptor, therefore prior to operating system startup, there will be a function that can configure the BIOS screen or select from
the operating system screen.
Bluetooth adapter is not equipped with this function, and therefore prior to Windows startup, it will not be usable. When
necessary, please use other USB connected or PS/2 connected keyboard for operation.
This is a problem with the function of the adapter, any question, please contact the manufacturer of the adapter.
Q. Unable to connect Bluetooth under Safe mode.
Bluetooth connection cannot be used under Safe mode.
Q. Unable to use keyboard when connecting or removing the Bluetooth adapter.
When connecting or removing the Bluetooth adapter, press any key to automatically reconnect.
Q. Unable to resume Windows from Sleep Standby Mode.
When using Bluetooth connection, the design of the Bluetooth function does not support resume Windows from Sleep
Standby mode. Please use the mouse or other devices in advance to deactivate Windows Sleep Standby Mode.
Q. Can it be used with other Windows system?
Bluetooth adapters can be operated with Windows 10, Windows 8/8.1, Windows 7, Windows Vista, Windows XP SP2 or
upgraded versions having standard application functions.But, it cannot be used with other Windows systems. There is no
support software and drivers.
Q. Keyboard operational error during Bluetooth connection.
Due to different environmental usage, the range of wireless signal may be affected. If the personal computer or keyboard is
near a microwave, wireless networking products, or in an environment generating wireless electronic waves interference:
such as wireless telephone, these might result in it operating abnormally.
Q. Incorrect character appears during input.
If the initial keyboard software is still installed, please remove it first. Old settings not removed might result in operating issues.
Q. Keyboard frequently does not operate properly, the last entered character keeps repeating.
If many same frequency wireless devices exist in the vicinity, the interference might result in signal terminated.
The software and drivers of this model of Bluetooth adapter has a high efficiency and is easy to use, but if there are constant
communication issues, it might be due to factors causing interference in the vicinity.
Under such circumstance, first, please remove the dedicated software program, then via executing the OS standard operating
system software program can reduce the frequency of the occurrence of problems; there has been many physical proofs that
malfunction situations are significantly reduced.
◆Troubleshooting
Under battery powered Bluetooth connection status, if there is no activity for more than 30 minutes, it will automatically switch
to power saving mode to save power consumption. Press any key on the keyboard to deactivate the power saving mode, the
device will automatically resume connection. It might take 3-5 seconds for the operation.
On the other hand, under USB connection, it is unable to switch to power saving mode.
Hotkeys
Shift + cursor left/right key
(Win) + A
(Win) + X
(Win) + C
(Win) + V
(Win) + Z
Select Range
Select All
Cut
Copy
Paste
Undo
34

【有关大写锁定、滚动锁定的LED指示灯显示】
使用蓝牙连接时,不论通过电池或USB供电,键盘本身的大写锁定LED灯和滚动锁定L E D 灯 ,皆 不 会 显 示 。
◆ 开 关·L E D 指 示 灯 的 功 能
位于键盘背面。
使用蓝牙连接时,必须开启本开关。
以下情形应关闭蓝牙开关:长时间不使用蓝牙连接,个人计算机已关机,或改成使用USB连接。
蓝牙电源开关
位于键盘底部。
用以变更使用及暂停按键。所有开关出厂预设为关闭状态。欲了解更多相关内容,请参阅第44页。
DIP开关
滚动锁定LED灯
兼
低电量显示LED灯
· U S B 连 接 时
启用大写锁定键 时 ,显 示 蓝 灯 。
· 蓝 牙 连 接 时
装置切换模式、配对模式、连接成功时,指示灯会闪烁或亮起。欲了解更多有关亮灯模式的详细
说明,请参阅第39页。
大写锁定LED灯
兼
配对LED灯
刪除登录·按下重新再登录。
装置清除钮在无数字键键盘本体的背面。当蓝牙连接时按下本键,将清除登录信息,并转换成配
对 模 式 。欲 了 解 更 多 相 关 内 容 ,请 参 阅 第 4 1 页 。
多媒体功能
同时按下Fn键时,可以用键盘操控播放影片或音乐,并能调节音量大小等。
使用USB连接时,和Fn键同时按下,可以从键盘操控进入或退出Windows的睡眠待机模式。欲了
解 更多相关内容,请参阅第44页。
※本蓝牙规格不支持蓝牙连接时的唤醒动作。
· 当蓝牙连接通过USB供电时,按下这个键将由蓝牙模式连接改为USB有线模式。
· 从装置切换模式(※参阅第38页[蓝牙连接流程图])进入配对模式、按下①~④任意装置进行
登录
· 按下切换模式装置来改变连接的装置。每个键连接一个,总共可登录四个装置。
装置清除钮
· U S B 连 接 时
启 用 滚 动 锁 定 时 ,显 示 红 灯 。
· 蓝 牙 连 接 时
① 当电池耗尽,红色灯会闪烁
当LED灯闪烁时,需尽快更换电池。若继续使用,将耗尽电池电力,就无法维持蓝牙连接所需的
电压,操作动作会不稳定。当电池完全耗尽时,LED指示灯将不亮,也不闪烁,键盘也无动作。
※电池寿命: 1天5小时约可使用6个月(碱性电池),但电池寿命会因使用状况与环境因素而有
所不同。
② 进入装置切换模式、配对模式、连接成功时,灯号显示亮灯或闪烁。了解更多有关亮灯模式的详
细说明,请参阅第39页。
媒体键
蓝牙装置
登录/切换键
睡眠键
有线连接切换键
~
~
1
ON
2 3 4
开启 关闭
37
2way键盘 USB有线连接和蓝牙无线连接
■USB连接
可以通过本产品所附的USB连接线进行操作。(本产品不具备充电池的功能)
■蓝牙连接
本产品采用蓝牙标准规格 ver3.0 class2技术来加强个人计算机连接时的省电功能,并可享用无线连接的操作环境。本产品支持的使用范围约10公尺以
内, 只须于首度使用时,进行计算机连接设定,之后使用无需另行安装设定。最多可连接四台个人计算机,并可自由切换。除电池供电外,也可使用USB
电线供电。 使用电池供电时,若静止约30分钟以上,将自动进入省电模式,以节省电力耗损。
FR-4的2层电路板
本产品引进全新双面印刷电路板FR-4(玻璃纤维基板),使基本性能更充实。所有端子都用贯孔方式,以焊锡牢牢固定,能够有效避免打字时,对基板及
铜箔走线产生振动与压载力的影响,积极增进耐久性、可靠性,和提高键控操作等性能。
使用Cherry MX按键开关
Cherry MX按键开关是德国CHERRY公司所产的机械开关,深度有别于一般键盘,键触击深度约4mm,触发点约为2mm的位置,操作时具有较大弹性
距离。因本产品具有独立按键开关,故能使按键动作更为轻快。
藉由DIP开关改变按键功能的操作方式
通过DIP开关的设定,可以切换「大写锁定键」和「左Ctrl」,以及锁定「Windows」键和一个「App」键。
◆ 产品介绍
◆ 零件名称及附件
DIP开关
<正面> <背面>
FILCO 拔键器
※本产品不包含蓝牙接收器,请另外准备。
更换用键帽一组
不同的语言别内容物
将有所不同
使用说明书/保证书(本书) 备用5号电池×2 USB连接线
<附件>
USB连接用的
迷你USB连接孔
蓝牙装置登录/切换键
有线连接切换键
倾斜脚架
电池盖
媒体键
睡眠键
蓝牙电源开关
开启 关闭
当开启电源时,开关按钮必须
完全推进键盘机身内部,以避
免不慎误触。
装置清除钮
如 为 无 数 字 键 键 盘 ,则 装置清除钮不在LED
指示灯的旁边,而是在本体的背面。
配对LED灯 低电量显示LED灯
大写锁定LED灯 滚动锁定LED灯
36
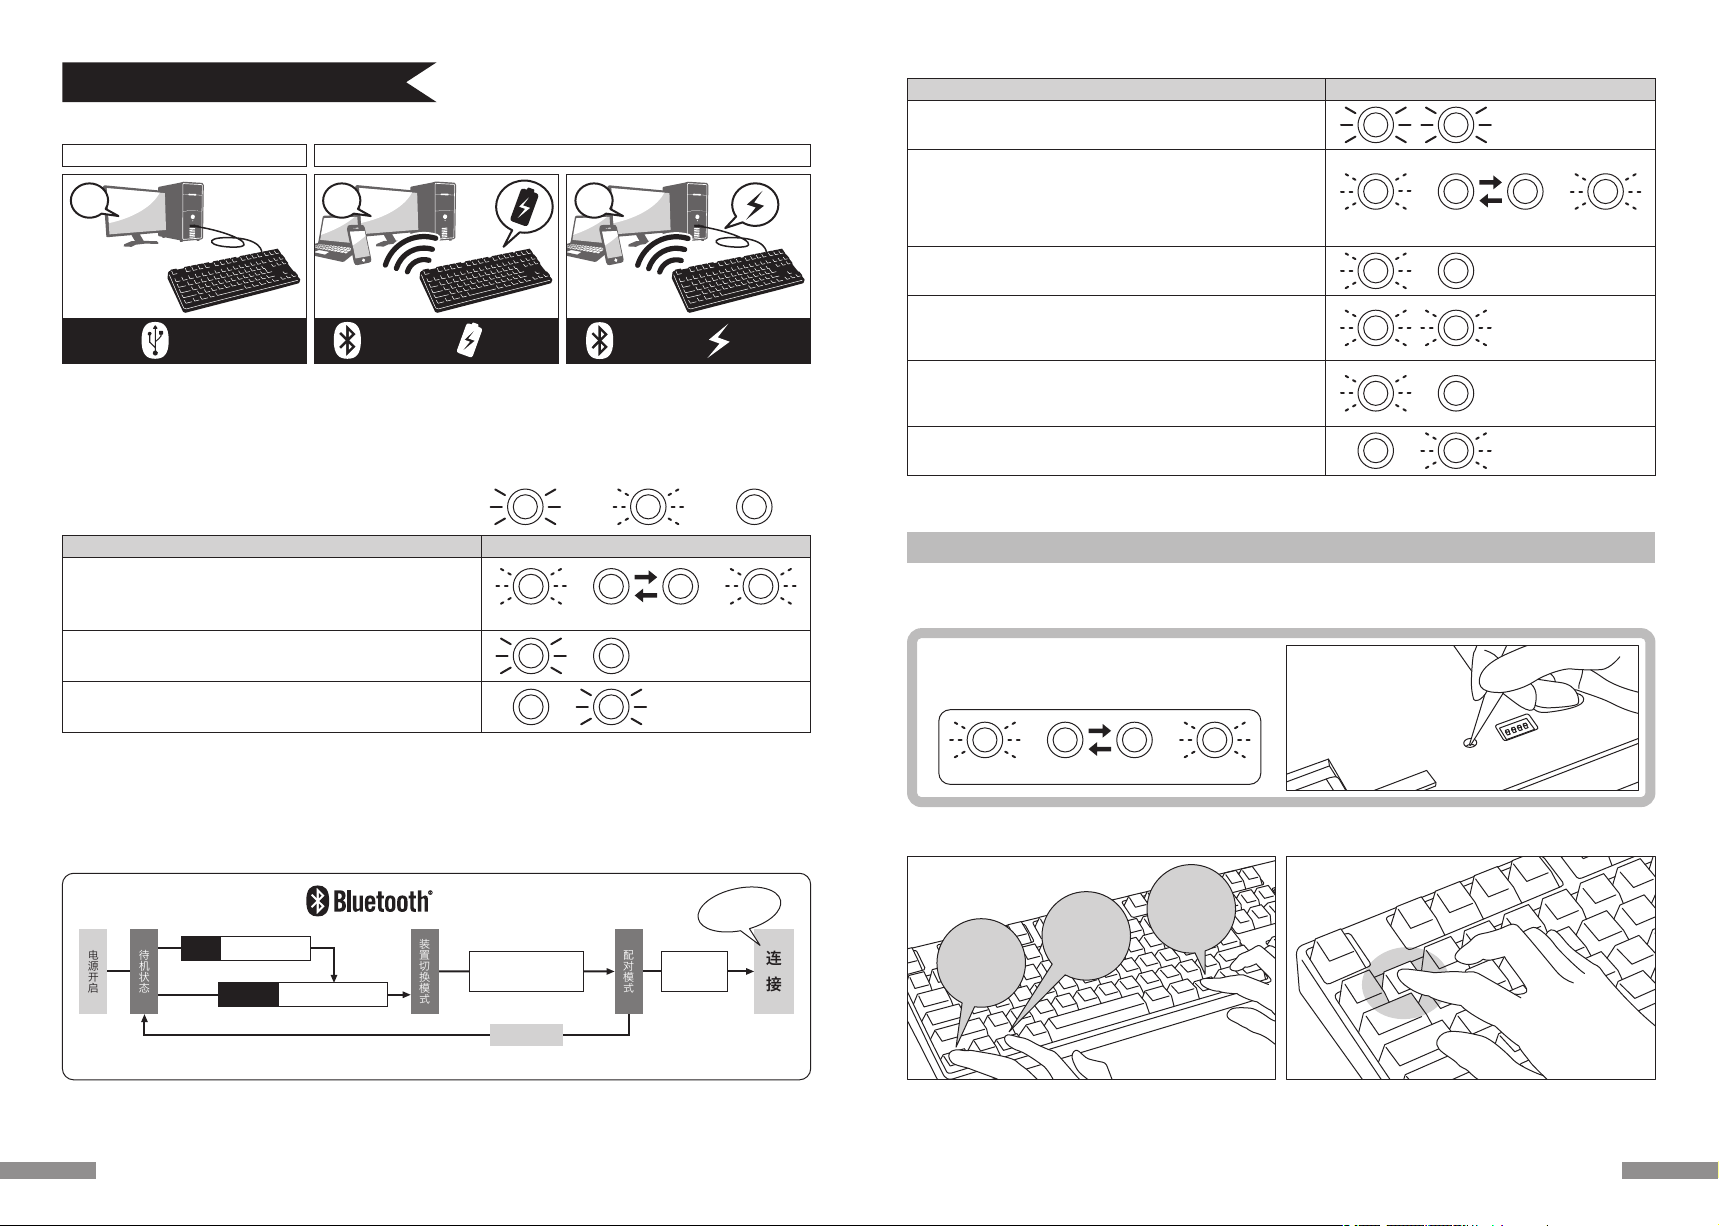
蓝牙连接时的LED亮灯模式
模 式·操 作
装置切换模式
· 同 时 按 下「 C t r l 」+「 A l t 」+「 F n 」时
配对模式… 在显示〈A〉之后,配对LED灯(蓝)会独自闪烁约5分钟
· 当 配 对 模 式 被 启 动 时
显示低电量
· 当 电 池 剩 余 电 量 不 足 时
显示连接失败… 显示〈A〉后, 配对LED灯(蓝)慢速闪烁10秒左右表示连接失败
· 无法找到已登录的装置时 (※第41页)
· 当个人计算机端的蓝牙装置安装信息已被移除时
装置切换/变更的显示〈A〉
· 已登录或尚未登录的装置,从蓝牙装置登录/切换键①~④按下任意一个键
· 使用无线蓝牙切换到由USB供电的有线连接 (※第42页)
· 按 下 装 置 清 除 钮 时
· 连 接 U S B 有 线 时
〈A〉
显示连接完成
· 当配对操作完成时
· 当 蓝 牙 连 接 成 功 时
3 . 同 时 按 下「 C t r l 」+「 A l t 」+「 F n 」 4. 按一下蓝牙装置登录/切换键①
1. 将电池放入键盘中。根据电池外盒标示,请注意勿弄错正负极方向。
※本产品的蓝牙可以从USB供电,但首次执行蓝牙连接设定,请先由电池供电开始,因为安装前的有线连接,将全部视为USB连接。
2. 打开电源开关。
α. 购买后首次设定连接蓝牙时,先按一下装置清除钮,检查配对 LED
灯(蓝色)和低电量显示LED灯(红色),是否有来回闪烁约4秒。
第 二 次 以 后 ,这 个 动 作 可 省 略 。
3. 同时按下键盘的「Ctrl」+「Alt」+「Fn」进行装置切换模式。配对LED灯(蓝)和低电量显示LED灯(红)同时亮灯10秒左右。
4. 从「蓝牙装置登录/切换键 ①~④」(如下图按①键)按下任一键输入登录装置信息。
Ctrl Alt Fn
5. 配对LED灯(蓝)和低电量显示LED灯(红)来回闪烁约4秒后,开始进入配对模式(计算机识别的状态)时,只剩下配对LED灯(蓝)单独闪烁。
6 . 接 下 一 页【 步 骤 ② 】。
※当处于配对模式时,如5分钟内没有操作任何按键,则配对LED灯(蓝)会熄灭,并结束配对模式回到待机状态。请返回操作3,然后重新开始。
【步骤①】由键盘转成配对模式
LED亮灯模式
配对LED灯闪烁约5分钟
蓝
配对LED灯慢速闪烁约10秒
蓝
低电量显示LED灯闪烁
红
两边同时闪烁3次
×3
蓝红
两边同时亮灯约10秒
蓝红
蓝
来回闪烁约4秒
红
蓝
来回闪烁约4秒
红
【限首次执行时】
按下装置清除钮 ( 无数字键键盘的
装置清除钮在本体的背面 )
【限首次执行时】
按下装置清除钮 ( 无数字键
键盘的装置清除钮在本体的
背面 )
39
USB连接 蓝牙连接 电池供电 蓝牙连接 USB供电
蓝牙连接(如上图2·3)
使用蓝牙接收器,或装置内建蓝牙功能进行连接设定(配对功能),进而与个人计算机联机。
本产品不包含蓝牙接收器,故需购买市面贩卖商品,并将蓝牙接收器完成安装后,才可再进行连接设定。个人计算机已内建蓝牙功能时,请将该蓝牙功能开
启。
此安装作业由具管理员权限的使用者,登录传统检视的清单和控制台。
供电方法有两种选择:使用5号电池(如上图2),或使用USB连接(如上图3)。
从计算机USB端口供电,按下有线连接切换键(USB键)进行装置切换模式,此时蓝牙连接将切断并变更为USB连接。欲了解更多相关内容,请参阅第42页。
USB电源供电可以通过计算机的USB端或USB-AC供电器(如:USB充电器)等。此外,USB供电不具备镍氢电池可重复充电的功能。
如 何 连 接
有线连接 无线连接
连接流程图
连
接
配对模式
装置切换模式 ※ 3 9 页【 步 骤 ① 】 ※ 4 0 页【 步 骤 ② 】
电源开启
●配对完成过后,在蓝牙无线状态下重新开启键盘时,按下任意一键记忆会自动连接最后使用的装置上。
个人 计 算 机
安装作业
经过5分钟
配对成功!
从①~④按下任意一
个键进入登录装置
1 2 3
「 C t r l 」+「 A l t 」+「 F n 」
第二次以后
按下装置清除钮
第一次
待机状态
◆ 选择连接方式
USB连接(如上图1)
可以通过本产品所附的USB连接线进行操作。(无镍氢充电电池的充电功能。)如在链接USB的情况下开启计算机电源时,只需要按下任何按键,键盘就
会在USB模式中联机。这是因为当键盘与 和USB联机时,USB联机模式是默认模式。按下第二键开始可正常操作。
※使用USB连接时,无需使用电池,故长时间使用USB连接时,请取出电池。
※使用USB连接时,请关闭蓝牙电源开关。
USB连接时的LED亮灯模式
· 刚连接USB电线时 ※按任意一个键
· 当 启 动 大 写 锁 定 键 时
· 当启动滚动锁定键时
◆ 通过有线连接到个人计算机
◆ 通过无线连接到个人计算机
模 式·操 作
大写锁定LED灯亮
蓝
滚动锁定LED灯亮
红
LED亮灯模式
蓝
LED指示灯将交互闪烁约4秒,闪烁结束后可正常操作
红
…亮灯 …闪烁 …熄灯
38
Other manuals for Majestouch Convertible 2
1
This manual suits for next models
4
Table of contents
Languages:
Other Filco Keyboard manuals

Filco
Filco Majestouch MINILA-R Convertible User manual

Filco
Filco Majestouch Convertible 3 User manual

Filco
Filco MINILA-R User manual

Filco
Filco Majestouch Xacro M3A Series User manual

Filco
Filco Majestouch Convertible 2 User manual

Filco
Filco Majestouch MINILA Air User manual

Filco
Filco Majestouch Hybrid User manual

Filco
Filco Majestouch 2 Special Edition User manual

Filco
Filco Majestouch MINILA Air User manual

Filco
Filco Majestouch Stingray User manual


