Filtec FT-50 Installation manual

Document 40378-0502
Dud Inspection Operation Manual
Can and Bottle Inspection
for the FT-50 and FT-70

Industrial Dynamics Company, Ltd.
Document 40378-0502 Copyright. All rights reserved.
No part of this publication may be reproduced or used in any form or by any means (graphic,
electronic, or mechanical including photocopying, recording, taping, or information storage
and retrieval system) without written permission of Industrial Dynamics Company, Ltd.
Filtecand Industrial Dynamicsare registered trademarks of Industrial Dynamics Company,
Ltd. All other trademarks are the property of their respective owners.
Contact Information
Corporate Headquarters: 3100 Fujita Street,
Torrance, California
90505-4007
U.S.A.
Telephone:(310) 325-5633
FAX: (310) 530-1000
Internet: www.filtec.com
Mailing Address: P.O. Box 2945,
Torrance, California
90509-2945
U.S.A.
Shipping Address: 3100 Fujita Street,
Torrance, California
90505-4007
U.S.A.
Customer Service: (800) 733-5173
1
Document 40378-0502
Dud Inspection Overview
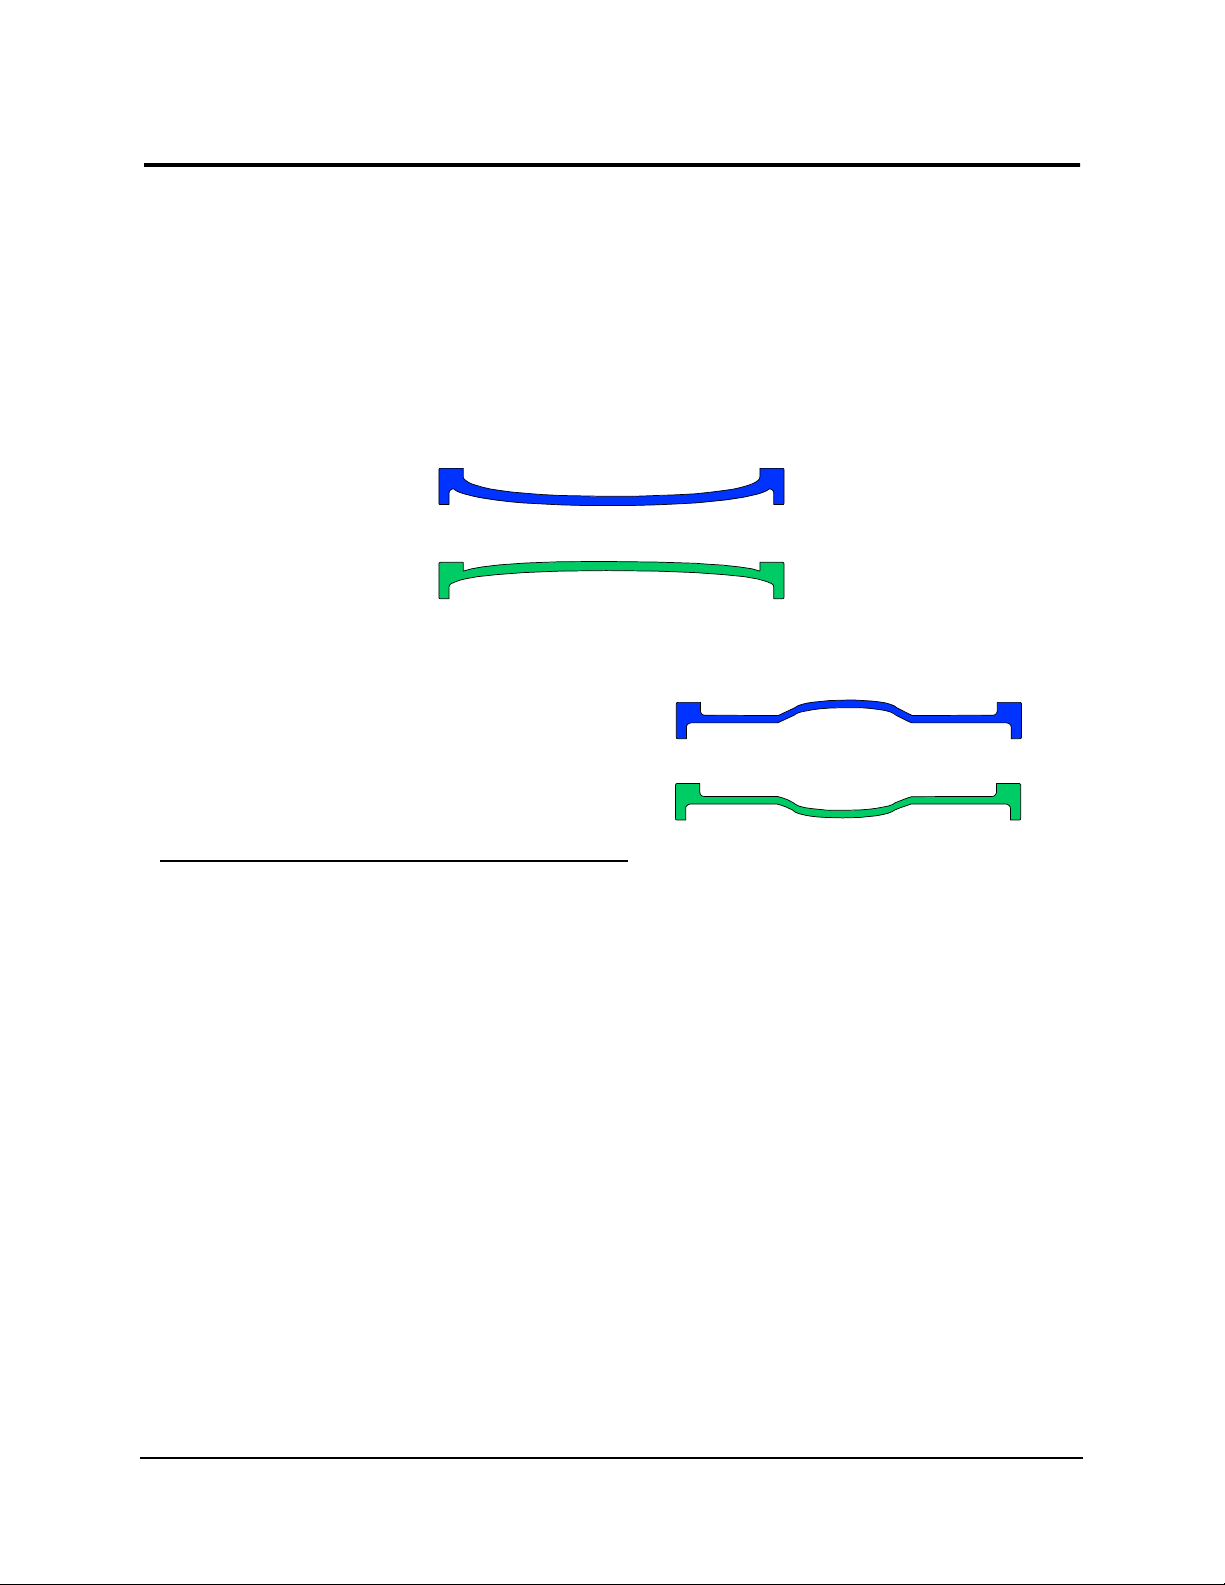
Dud inspection detects improperly sealed vacuum or pressure
sealed containers. If the container is not sealed properly, the
container shape is distorted and the dimensions at the inspection
reference point will deviate from a correctly sealed container.
When inspecting cans the reference point is the lid and when
inspecting bottles the reference point is the cap seal button.
Figure 1. Lid and cap characteristics of vacuum and pressure
sealed containers.
If a container is pressurized properly and the seal is intact, the
pressure will distort the lid or cap by raising it (pressurized) or
indenting it (vacuumed). If the container is not pressurized
properly, or the seal is not intact, the cap is not raised or
indented as there is low pressure or indented as there is over
pressure.
1
2
3
4
No. Description
1 Vacuum seal good as lid is indented.
Pressure seal bad as lid is indented (dud).
2 Vacuum seal bad as lid is raised (dud).
Pressure seal good as lid is raised.
3 Vacuum seal bad as cap button is raised (dud).
Pressure seal good as cap button is raised.
4 Vacuum seal good as cap button is indented.
Pressure seal bad as cap button is indented (dud).
2Dud Inspection Operation Manual
Document 40378-0502
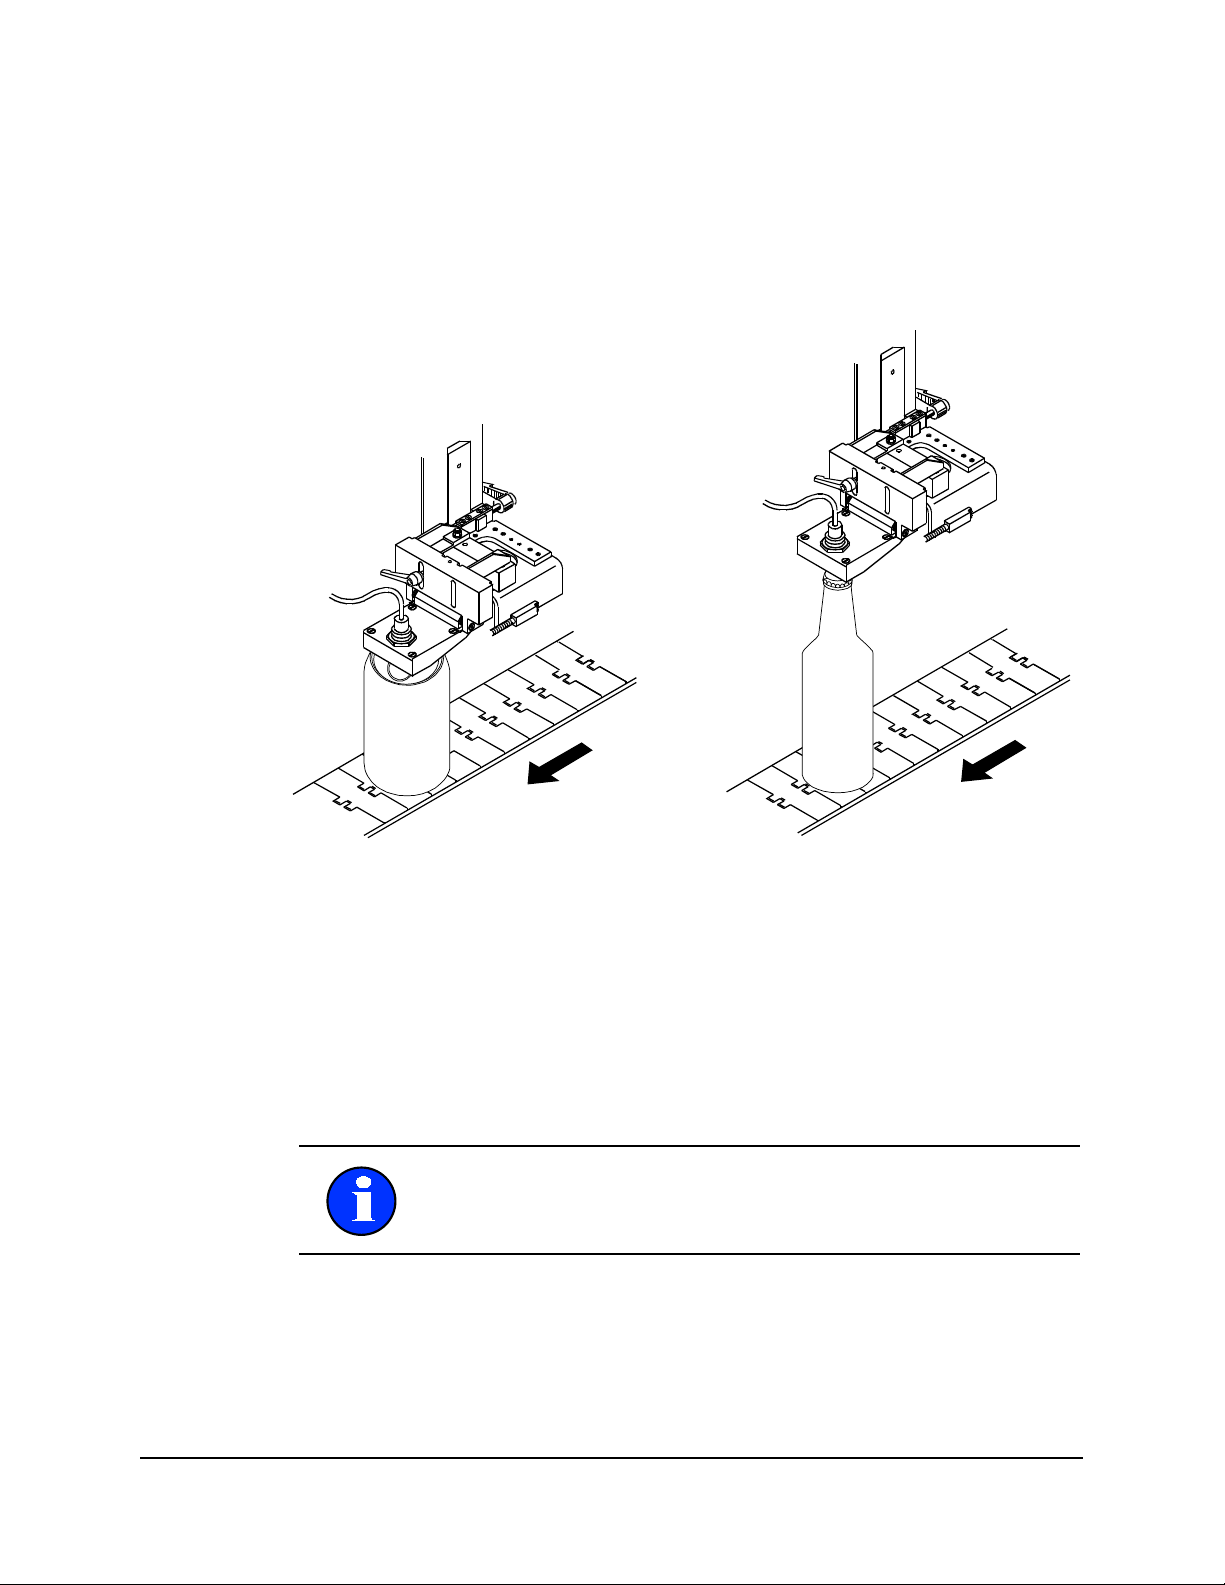
As the container passes under the proximity sensor the sensor
determines if the seal is intact based on the distance between
the sensor and the top surface of the lid or cap. If the lid or cap is
too far from the sensor, the pressure seal is not intact because
the cap is not raised high enough by the container pressure.
Figure 2. Containers passing under the dud inspection sensor.
When configuring dud inspection you must pass both good and
bad containers through the inspection tunnel to perform the
automatic calibration procedure. This determines the threshold
settings for good and bad containers. During inspection each
container is compared to these thresholds and non-conforming
containers are rejected.
For proper inspection, the overall variation in can height should
be no more than 1/16 inch (1.5 mm). The containers must flow
smoothly under the exact center of the dud sensor as they travel
on the conveyor.
Note: Low threshold defines the low pressure or over vacuum
and high threshold defines the over pressure or low vacuum.

3
Document 40378-0502
Container Changeover
When changing to a container type that does not require dud
inspection:
1. Press Key 5 until Dud Status appears and press the Arrow Key
to turn dud inspection off.
2. Perform the container fill level changeover as explained in
the inspection unit Operation Guide.
3. Verify the dud sensor is raised out of the way, so that it is not
will not be struck by the containers.
When changing to a container type that requires dud Inspection:
1. Perform the container fill level changeover as explained in
the inspection unit Operation Guide. This places the
proximity sensor at the correct height above the can.
2. Repeat the dud sensor alignment procedure. For more infor-
mation see Dud Inspection Sensor Alignment on page 4.

4Dud Inspection Operation Manual
Document 40378-0502
Dud Inspection Sensor Alignment
Before you align the dud sensor you must configure the inspection
head and inspection trigger to the proper height for fill level
inspection and calibrate the fill level inspection. Align the dud
sensor immediately after all fill level inspection adjustments are
complete. For more information refer to the service manual
provided with you inspection unit.
Also, verify the following:
• The containers are centered on the conveyor so they pass
directly under the center of the dud sensor.
• The dud sensor face is parallel with the top of the
containers.
1. Locate several good production containers. These should be
containers that pass all inspections. If the height of the
containers varies slightly, select the container that is the
shortest.
2. With the conveyor moving slowly and no production
containers present, place the good container on the conveyor
upstream of the inspection head.
3. Watch the container as it passes under the dud sensor and
verify the container is centered directly under the dud sensor
as it passes under the sensor.
4. Stop the conveyor and place the center the good container
directly underneath the dud sensor.
Note: Aligning the dud sensor can change the height of the
inspection trigger. After you align the dud sensor, verify the
inspection trigger height has not changed.
5
Document 40378-0502
5. Unlock the dud sensor height adjustment mechanism and
adjust the height of the sensor so the sensor’s face is 3/32
±1/32 inch [3 ±1 mm] above the container.
Figure 3. Centering a container under the sensor and adjusting
the height of the sensor.
1
2
3
3
No. Description
1 Height Adjustment Locking Lever
2 Bracket Pivot Hinge allows deflection if hit by container.
3 3/32 inch [3mm] space between can rim or bottle cap.

6Dud Inspection Operation Manual
Document 40378-0502
6. Verify the dud sensor face is parallel to the top of the can. If
necessary, use the adjusting screw to change the angle. When
complete, tighten the adjusting screw and its locknut
securely.
Figure 4. Level the sensor bracket parallel to the container top.
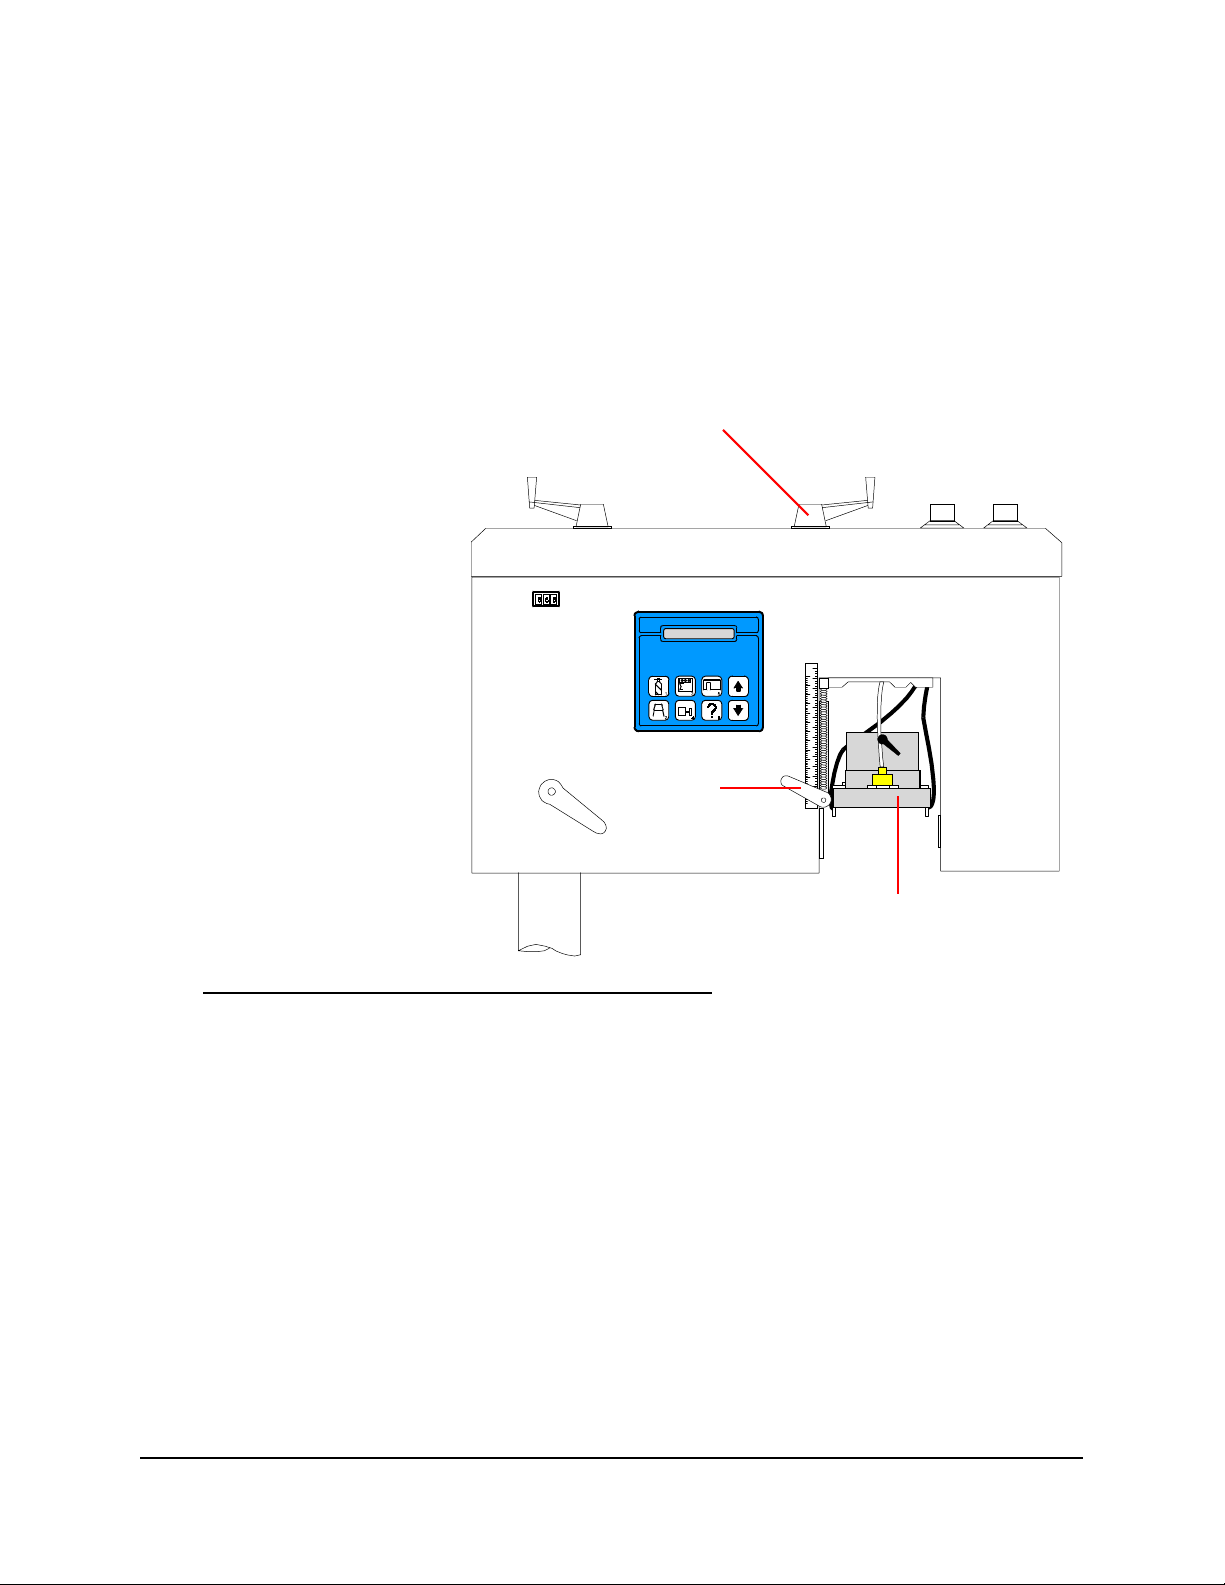
7. Press Key 5 until System Display appears.
8. Press the Arrow Key until Calibrate appears in the bottom line
of the display, and if prompted, enter the password to access
the Calibrate Mode.
9. Press Key 2 until Dud Status appears and verify the status is
turned on. If not, press the Arrow Key until ON appears. Dud
inspection is now activated.
10.Press Key 2 until Dud Readings appears. Four (4) readings are
listed on the bottom line. The reading marked C= is the
current dud sensor reading.
1
2
3
4
No. Description
1BracketPivotHinge
2 Bracket Leveling Adjustment Screw
3 Bracket is parallel with lid or cap
4 Direction of container flow
7
Document 40378-0502
11.Unlock the inspection (centerline) trigger adjustment
mechanism and raise or lower the sensor very slightly until
the C= reading is between:
• 120-140 for cans
• 70-90 for bottles
Record the position of the trigger on the trigger height scale
for ease of future container changeovers.
Figure 5. Fine tuning the sensor position.
12.Lock the inspection (centerline) trigger adjustment
mechanism.
13.Press the Key 5 until Container Width At Trigger appears and
verify the width of the container at the point where it inter-
sects the trigger is correct. For more information refer to the
Service Manual provided with your inspection system
1
2
3
No. Description
1 Centerline Bracket Height Locking Lever
2 Centerline Bracket Positioning Lever
3 Dud Sensor Bracket attached to Centerline Bracket

8Dud Inspection Operation Manual
Document 40378-0502
Dud Inspection Software Setup
1. Align the dud sensor. For more information see Dud Inspection
Sensor Alignment on page 4.
2. Prepare five good containers and four bad containers to use
during the calibration procedure.
• The good containers should be containers you are certain
will pass dud inspection and any other inspection enabled
on the inspection unit.
• The bad containers should be containers that you are
certain will fail only dud inspection, but pass all other
enabled inspection processes. For more information see
How to Create a Dud Container on page 12.
3. Press the Key 2 until Reject Undefined appears and press the
Arrow Key to turn the function On. The Reject Undefined
function enables rejection of any containers that give faulty
dud readings. These readings can be caused by:
• off-centered containers.
• containers with bulged, missing, deformed or abnormal
lids.
• bulged lid containers which struck the dud sensor bracket
and passed under the sensor before the bracket returned
to position.
• the sensor being too close to or too far away from the
container.
A low priority diagnostic will be generated for each undefined
reject to explain the cause of the reject.
Note: Turning the Beacon Status is on while setting up the dud
inspection enables low priority diagnostic messages, that can
help provide feedback about errors that can occur during the
setup procedure.
9
Document 40378-0502
4. Depending on the type of container you are inspecting,
proceed as follows:
• If you are inspecting bottles, proceed to step 5 on page 9
to determine the dud reference points for cap inspection.
When finished proceed to step 9 on page 10.
• If you are inspecting cans, proceed to step 5 on page 9 to
determine the dud reference points for cap inspection.
When finished proceed to step 9 on page 10.
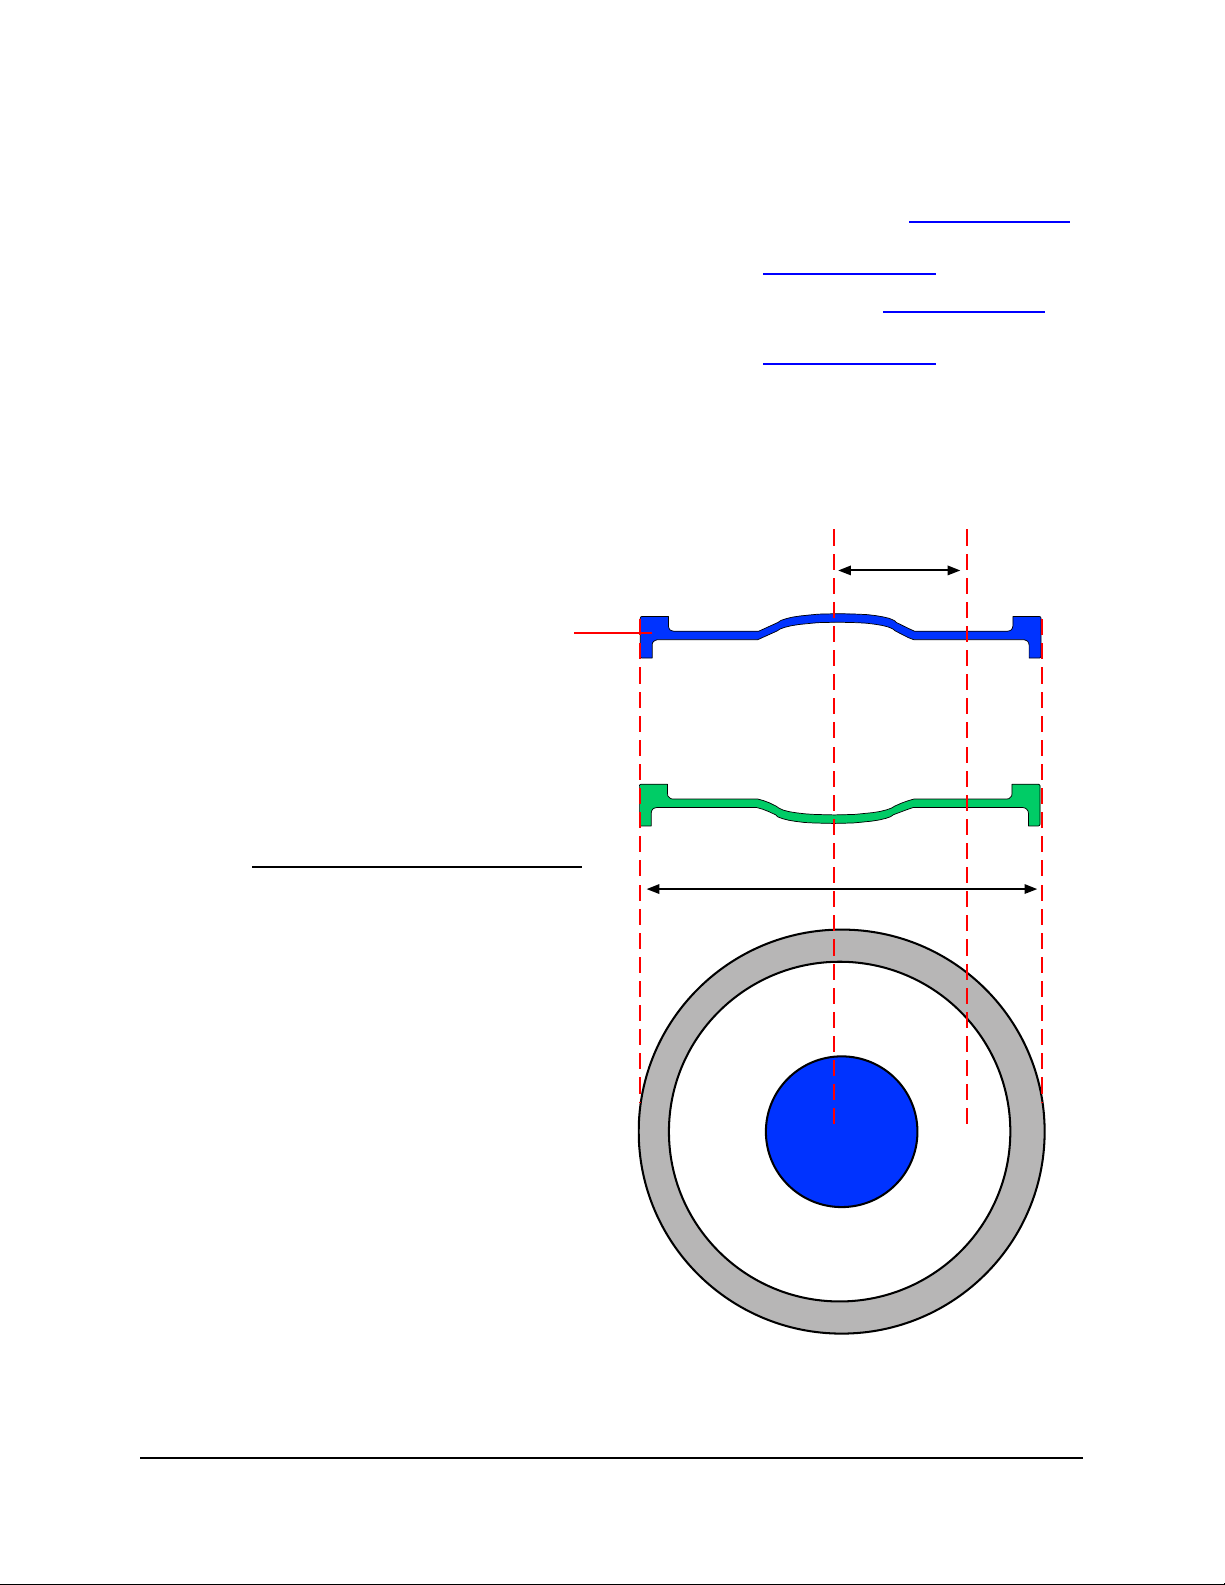
5. Determine the Dud Reference Points by measuring (in milli-
meters) from the center of the dud button outward to the
middle of the flat portion of the cap.
Figure 6. Measure the dud reference points.
12
3
4
No. Description
1 Center of Cap or Dud Button
2 Center of outer flat area.
3 Distance between 1 and 2.
4 Diameter of cap or lid.
5 Lip or Rim of Cap.
5

10 Dud Inspection Operation Manual
Document 40378-0502
6. Multiply the measurement from step 5 on page 9 by two (2) to
calculate the Diameter of Dud Reference Points.
7. Press Key 2 until Diameter of Dud Reference Points appears
and use the Arrow Key to enter the value you calculate in step
6 on page 10. When complete, proceed to step 9 on page 10.
8. Press Key 2 until Dud Insp. Method appears and use the Arrow
Key to select a can inspection method from the list below.
When you have selected an inspection method proceed to
step 9 on page 10.
9. Press Key 2 until Calibrate Dud appears and a flashing execute
message also appears.
10.Press the Arrow Key and a message instructing you to Run 5
Good Containers appears.
Method Description
Necked-in 3p Necked-in centering and 3-point inspection
point calculation. Default method used for
standard aluminum cans.
Necked-in Abs Necked-in centering an absolute inspection
point calculation. Can be used for standard
aluminum cans.
Chines 3p Chines centering and 3-point inspection point
calculation. Preferred method for standard steel
3-piece cans.
Chines Abs Chines centering and absolute inspection point
calculation. Can be used for standard steel 3-
piece cans.
Distance Abs Distance or encoder based centering and
absolute inspection point calculation.
Distance 3p Distance or encoder based centering and 3-point
inspection point calculation.
Necked-In Weighted Similar to Necked-in Abs and Necked-in 3P with
added logic to improve inspection margins.
Consult IDC Technical Support before using this a
method.
Measurement (mm) x 2 = Diameter of Dud Ref. Points

11
Document 40378-0502
11.With the conveyor running, place a good container on the
conveyor upstream of the inspection head. As the container
passes under the dud sensor, verify the beacon does not light.
• If there are no errors, pass 4 more good containers
through the inspection head. The display will count down
until the run is complete.
• If the beacon lights or the message Aborted appears, press
Key 6 to determine the cause of the fault. Correct the
error before proceeding.
12.You are now prompted to Run 4 Bad Containers through the
inspection head. When the data from the last can is
processed, Completed appears. Verify that the Beacon does
not light, indicating problems.
If the beacon lights or the message Aborted appears, press
Key 6 to determine the cause of the fault. Correct the error
before proceeding.
13.Repeat step 11 on page 11 and step 12 on page 11 to verify
14.Press Key 5 until Alarm Low or High Dud appears. Use the
Arrow Key to enter the number of consecutive rejects which
you want to cause a consecutive rejects alarm. When this
number of consecutive rejects occurs, a high priority
diagnostic message is activated and the beacon will flash.
15.Press the Key 5 until Alarm Undefined (Dud) appears. Use the
Arrow Key to enter the number of consecutive rejects which
you want to cause a consecutive rejects alarm.

12 Dud Inspection Operation Manual
Document 40378-0502
How to Create a Dud Container
The calibration and testing procedures used to setup dud
inspection require you to create or acquire at least four (4) bad
containers. Depending upon the type of container you are
inspection you will need to create dud cans or dud bottles.
Creating a Dud Can
To create a dud can puncture the can just below the lid seam and
allow the pressure to dissipate. Create as small a puncture hole
as possible and be careful not to disfigure the can. Alternatively,
you can fill cans with non-carbonated water and then pass them
through the seamer.
Figure 7. Creating a dud can.
Creating a Dud Bottle
To create a dud bottle, loosen the cap until the seal indiction
button pops and then tighten the cap.
1
No. Description
1 Puncture or drill a hole directly under the lip. Be
careful not to dent or alter the shape of the can.

13
Document 40378-0502
Dud Software Advanced Functions
The FT-50/70 includes special advanced functions that enable you
to configure the dud inspection parameters. These functions are
accessed through the following control panel keys:
Key 2: Can Finish
Dud Status
Enables or disables dud inspection. When disabled all dud
inspection functions deactivated and will not appear in the
software menus.
Reject Undefined
Enables rejection of any containers that give faulty dud readings
caused by:
•bulgedcan
• raised lid/high cap
• deformed lid/crooked cap
• container not centered under sensor
• sensor too far away from lid
• sensor too close to lid
Errors for undefined Rejects (in order of priority) are:
•DiagnosticError94
• Diagnostic Error 108
• Diagnostic Error 109
• Diagnostic Error 113
• Diagnostic Error 114
• Diagnostic Error 116
•DiagnosticError93
• Diagnostic Error 100
•DiagnosticError95
For more information see Diagnostic Errors on page 18.

14 Dud Inspection Operation Manual
Document 40378-0502
This function may also reject the container following a bulged
can or high cap that strikes the sensor bracket and the container r
passes under the sensor before bracket returns to position.
If your system contains a bulged can, raised can, or high cap
inspection, the dud inspection software will not increment the
undefined (dud) reject counter.
Dud Low Threshold
If the current dud value falls below the Low Threshold a low dud
reject is generated. A low threshold reject can be a low pressure
container or an over vacuum container depending on the appli-
cation.(range 255, default: 0).
Two values are stored under this setting; one for absolute
inspection and one for three point inspection. Only one is
displayed and adjusted depending on the method selected.
Dud High Threshold
If the current dud value falls above the High Threshold a over
pressure reject is generated. A high threshold reject can be a
high pressure container or an under vacuum container depending
on the application.(range 255, default: 0).
Two values are stored under this setting; one for absolute
inspection and one for three point inspection. Only one is
displayed and adjusted depending on the method selected.
Diameter of Dud Reference Points
This diameter is used to help find the center of the container for
both the necked-in and chines inspection methods. It is automati-
cally calculated in during the calibrate dud procedure. It should
only need manual adjustment in special applications.(Range: 1
mm - 90% of Can Width At Trigger, default: 35 mm)
Diameter of Dud Inspection Points
The diameter in millimeters used in the 3 point inspection
methods. Used as a flowing reference for inspection. It is
automatically calculated in during the calibrate dud procedure.
This should only need manual adjustments in special applica-
tions.(Range: 1-255 mm)

15
Document 40378-0502
Calibrate Dud
Automatically calibrates the dud inspection and calculates the
reference and inspection diameters, Container Threshold and the
Container Inspection Window Threshold.
You need 1 good container and 1 bad container to execute the
routine properly. A good container must be run 5 times and the
bad container run 4 times. It automatically detects the difference
between the good and the bad containers and updates the appro-
priate threshold (low or high). The process needs to be repeated
to setup both the high and low thresholds.
A bad sample of both a high and low reject will be needed.
Calibration will abort if differences between good and bad is too
small or if more than one container is between the trigger and
rejector.
Dud Readings
Displays the dud sensor readings for the current lid. These
readings are primarily used for troubleshooting. Pressing either
arrow key will toggle the following display modes.(Range: 0 - 255)
1=XXX, M=XXX, 2=XXX, C=XXX (Continuous display mode)
R1=XXX, M-XXX, 2=XXX, C=XXX (Reject Only mode)
It displays the inspection points used to create the current dud
value.
• 1 is the reading at inspection point 1,
• M is the reading in the middle of the container,
• 2 is the reading at inspection point 2,
• C is the current reading from the sensor.
Dud Values (Low Vac and Pressure)
The measurement of the dud position for the current can and the
measurement of the last rejected can. (Range: 0-255)
CUR=XXX, LAST REJ=XXX displays the last dud inspection reading
for current inspection method. It also displays the last reject
reading.

16 Dud Inspection Operation Manual
Document 40378-0502
Dud Data Length and Values
The inspection buffer length, the inspection points and their
positions or offsets in the buffer. This display is used to help
determine if the automatic centering methods of necked-in or
chines are working. All values range from 0 to 255. This system is
set up properly if the average of the positions of reference 1 and
2 are in the middle of the buffer length. Pressing either arrow key
will toggle display modes.
XXX 1=XXX, XXX 2=XXX, XXX (continuous display mode)
RXXX 1=XXX,XXX 2=XXX,XXX (reject only mode)
Dud Data Position
The centering offset value, inspection buffer length, and
reference diameter calculated. This display is used to help
determine if the automatic centering methods of necked-in or
chines are working. The offset value should normally be in the
single digits (+ or -) or less than 10-15% of the buffer length. The
dia value (the difference between the reference positions and 1
and 2)should not vary by more than 10-15%.
Dud Inspection Method
This function allows you to select one of the six dud inspection
method. This function applies to can inspection only. For more
information see step 8 on page 10
Dud Skew Threshold
This setting is hidden under S1-5 and is used to generate an
undefined reject and diagnostic 95.
Key 3: Counters
Total Dud Low Threshold Vac
The total number of containers that were rejected as duds since
the last time the counter was reset. This includes the total of all
cans that were detected below the dud low threshold. (Range: 0
to 99,999,999)

17
Document 40378-0502
Total Dud High Threshold
The total number of containers that were rejected as duds since
the last time the counter was reset. This includes the total of all
cans that were detected above the Dud High Threshold. (Range: 0
To 99,999,999)
Total Undefined (Dud)
The total number of containers that were rejected by dud
inspection for undefined faults that interfered with dud
inspection since the last time the Counter was reset. This
includes missing lids/caps, bulged cans/high caps, sliding
containers, down containers. (Range: 0 to 99,999,999)
Reset Dud Low Vac
Resets the Total Dud Low Vac counter. If the previous count value
is to be saved, it must be recorded externally as there is no
storage for the number in the counter once it is reset.
Reset Dud High
Resets the Total Dud High Vac counter. If the previous count value
is to be saved, it must be recorded externally as there is no
storage for the number in the counter once it is reset.
Reset Total Undefined
Resets the Total Undefined (Dud) counter. If the previous count
value is to be saved, it must be recorded externally as there is no
storage for the number in the counter once it is reset.
Last Reject Detect
The classification of the last dud reject; low dud, high dud, or
undefined reject
Note: Lowfilled containers are not included in the dud totals. A
container is not counted unless it is properly filled. If it is not
properly filled it is counted in the fill level counters.

18 Dud Inspection Operation Manual
Document 40378-0502
Key 5: System
Alarm Dud Low or High
Defines the number of consecutive dud rejects that will trigger an
alarm condition. Rejects must be consecutive. Each good bottle,
for this condition, that passes through the FT-50/70 will reset the
counter to zero. (Range: OFF, 1-250, Default: OFF)
Alarm Undefined (Dud)
Dud Undefined status turns off rejection of undefined dud
inspection and deactivates all undefined dud software functions.
Last Reject Detected
Displays the cause for the last reject which falls into one of the
following categories: fill level, missing cap, high cap, dud.
Diagnostic Errors
The amber warning beacon on top of the inspection head signals
an alarm or error condition by blinking rapidly. The error
condition number can be obtained from the FT-50/70 by pressing
the Key 6. Below The diagnostic errors specifically related to the
dud inspection are listed below. For other errors, refer to the
inspection system Service Manual.
Error Number 92
Too many containers in dud queue.
Error Number 93
Possible sliding container, missing cap, high lid, or dud sensor is
positioned too far away from cap. Verify sensor position.
Error Number 94
Container diameter entered is smaller than Dud ref. Diameter
setting. Verify Dud ref. Diameter and verify trigger width of
container.
Other manuals for FT-50
3
This manual suits for next models
1
Table of contents
Popular Analytical Instrument manuals by other brands


Kummert
Kummert K-28 HD instruction manual

Eddyfi Technologies
Eddyfi Technologies INUKTUN MINIMAG user manual

Bacharach
Bacharach Oxor III operation & maintenance

KROHNE
KROHNE OPTISENS TSS 7000 Supplementary instructions

Ames Instruments
Ames Instruments 64001 Owner's manual & safety instructions

Coffee Laboratory
Coffee Laboratory Color Track GENESIS User reference guide


