Finerfilters RO50-DI-1 Manual

01704 807600
www.finerfilters.co.uk
Reverse Osmosis System
Installation and Maintenance Manual
For Systems –RO50-DI-1, RO75-DI-1, RO100-DI-1
RO50-DI-2, RO75-DI-2, RO100-DI-2

1
Contents
1) General Information Page 1
2) Preparation Page 4
3) Installation Page 5
4) Maintenance Page 10
5) Replacement Filters Page 11
6) Troubleshooting Page 13

2
General Information
TO BE INSTALLED ON COLD WATER SUPPLY ONLY
TURN OFF MAINS WATER SUPPLY BEFORE STARTING
INSTALLATION
PLEASE CAREFULLY READ THROUGH MANUAL BEFORE
INSTALLING SYSTEM.
PLEASE KEEP THIS MANUAL IN A SAFE PLACE.INSTRUCTIONS
ARE INCLUDED FOR FILTER CHANGES
PLEASE NOTE THAT RO SYSTEMS REQUIRE A MINIMUM OF 3
BAR (45PSI)PRESSURE TO WORK.THE HIGHER THE PRESSURE
THE BETTER THE PERFORMANCE WILL BE.OPTIMAL
PRESSURE:5.5 BAR (80PSI)
(BOOSTER PUMP KITS CAN BE PURCHASED ON OUR WEBSITE)
Our reverse osmosis system will remove more than 96% of: foreign
particles, colloid, organic substances, heavy metals, soluble solids,
bacteria, viruses, pyrogen, nitrate, microorganisms, hormones,
Fluoride and other harmful impurities. It only retains water molecules
and dissolved oxygen.
To achieve this, RO systems use a special kind of semi-permeable
membrane. This membrane is protected by pre-filters, these remove
sediment, particulates and Chlorine. The membrane has layers of
filtration which the water is pushed through, any water that does not
go through all the layers is expelled to the waste line leaving only the
pure filtrated water. RO units waste around 70% of the water and will
get the TDS down to around 10-15% of the incoming TDS readings.
The 4th stage unit with a post DI filter will remove the remaining ions
in the water to get (or as close as possible) to 0 TDS.
This is an Aquatic Unit and is not recommend for drinking water.

3
Stages of the Unit:
Stage one: Polypropylene pre-filter to remove sediment and dirt down
to 5 microns.
Stage two: High density carbon block filter to remove chlorine.
Stage three: Reverse osmosis membrane, filters down to 0.0001 micron.
Stage four: Post DI resin filter chamber (Refillable) to remove the remaining
ions.
Main Technical Parameter
1) Purified water output (based on optimal water pressure):
•50GPD membrane, 185L/day
•75GPD membrane, 275L/day
•100GPD membrane, 370L/day
2) Inlet water temperature: 4~42⁰C
4) Pre-treatment filters total water output: >1000L
5) Water supply: tap or ground water, TDS <1000ppm
6) Operating bar pressure: 3 Bar (45PSI) or more. Optimal pressure to
received performance above is 5.5 bar (80PSI). Please do not use
on water pressure that exceeds 7 bar (100PSI) without a pressure
limiting valve.
Pumped Units:
7) Volt: AC220V/110V –DC24V / 50-60HZ
8) Power: 25W
9) Type of Guard against electric shock: Type II
10) The pump is adjustable. Use the allen screw on the head to adjust
the pressure. Please note: the pump will arrive on the highest
setting. Please do not use pump on pressure that exceeds 7 bar
(100 psi).
Pump Operation Principle Diagram
4
Preparation
Recommended Equipment List
•Variable speed drill
•Drill bit: ⅛” (for guidance) ¼” (to drain) and ½” (for tap)
•Pliers
•Phillips screwdriver
•Plastic tube cutter / Stanley Blade
The unit is supplied with white tubing which is to be cut to length
through each stage of installation.
Mark 1 (Red stopper) –Cold water supply to RO system
Mark 2 (Black stopper) –Wastewater to drain
Mark 3 (Blue Stopper) –Last stage on RO system to water outlet.
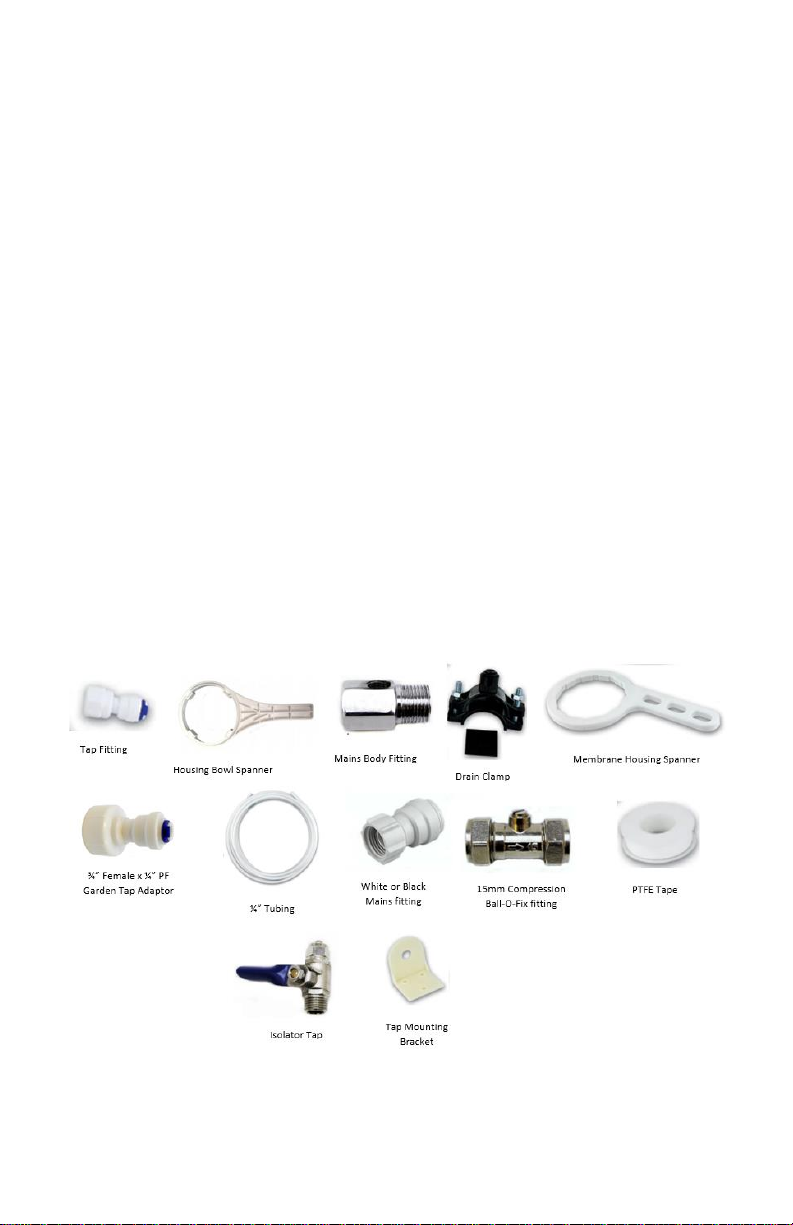
Fittings Included
5
Installation
TO BE INSTALLED ON COLD WATER SUPPLY ONLY
TURN OFF MAINS WATER SUPPLY BEFORE STARTING
INSTALLATION
WHEN CUTTING TUBING TO SIZE,ENSURE THAT IT IS CUT
STRAIGHT WITH NO JAGGED EDGES
Fitting type:
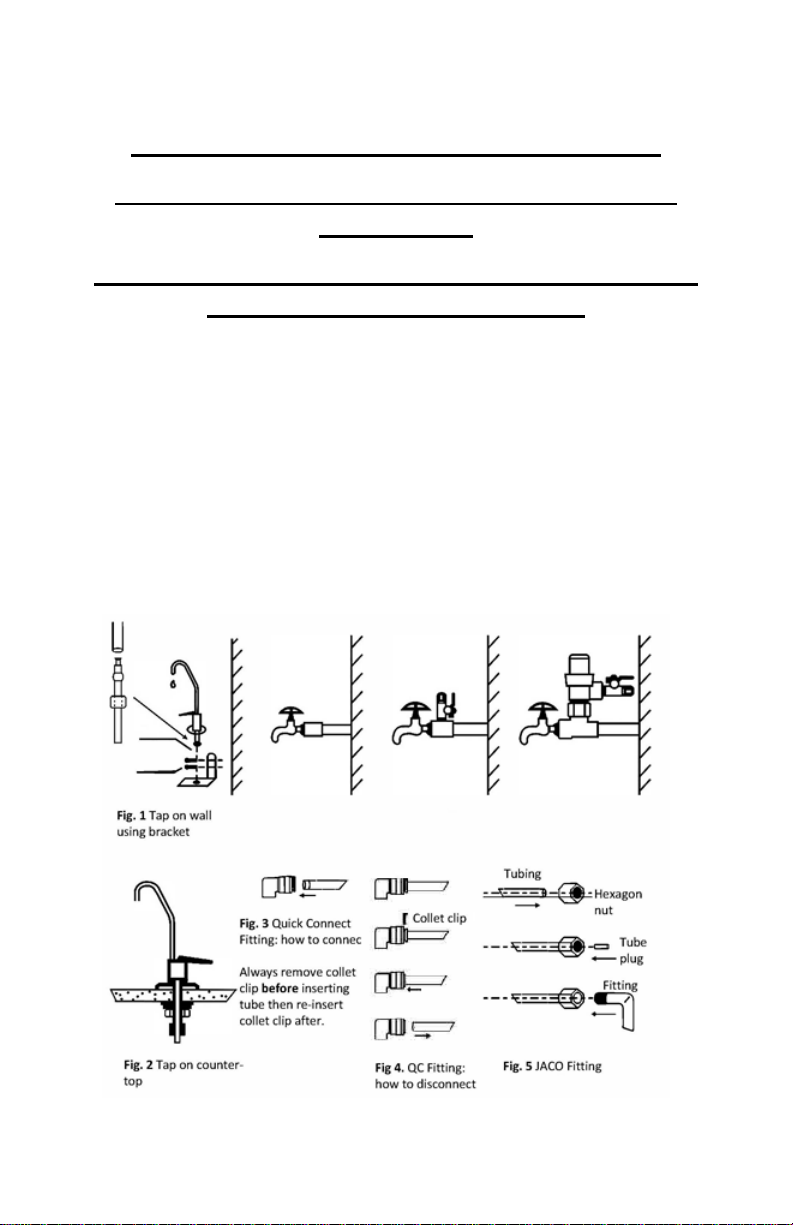
1. Quick-Connect (QC) fitting:
How to connect –See Fig. 3. Remove collet clip, insert tubing
into fitting until it locks. Gently pull tubing back to ensure fit is
secure. Re-place collet clip.
How to disconnect –See Fig. 4. Remove collet clip, push
down on collet so it is completely flush with the fitting and pull
tubing simultaneously.

6
Tap Installation
The tap is optional for installation on this unit as some users will
prefer to gather the water directly into a clean bucket or container and
it is not recommended to consume DI Water.
1. Determine location for tap, cut tubing to length (see fig.1 and 2) and
install tap using the diagram below or using white fitting provided:
Diagram for illustration purposes only, your tap may differ, but installation
is identical.

7
Connect to cold water supply
1. Cut into existing 15mm copper pipe.
Screw the isolator tap into the body.
Add the 15mm compression ball-o-fix
fitting, take the nut and olive off the
other end and screw on the isolator
body.
2. Using the white (or black) fitting,
screw on to the male thread of the
isolator body and push copper pipe into
the both sides of the fitting. Ensure all
fittings are secure.
(A garden tap fitting is also included if you prefer to connect the unit
this way. This fitting will screw directly onto your Garden tap).
Install drain clamp
Determine location for drain clamp based
on plumbing layout. Drain should be
installed above the trap on either the
horizontal or vertical tailpiece, it should be
mounted as low as possible to avoid
draining noise.
3. (1/8” Optional) using a 1/8” drill bit, drill a
1/8” hole into one side of the drainpipe.
Then to enlarge the hole, use a ¼” drill bit.
4. Taking the side of the drain clamp with the QC fitting, stick the self-
adhesive sponge provided to the inside of the drain clamp (remove
centre piece of sponge beforehand). Place one half of the plastic clamp
on either side of the drainpipe with, and clamp loosely using the nuts
and bolts included.
5. Align hole on drain clamp with drilled hole. A drill bit (or pen/pencil)
may be used to help with alignment. Once aligned, tighten clamp with
Phillips screwdriver. Avoid over-tightening clamp.
6. Determine length of tubing needed for connection from RO system
to drain clamp and cut to length. Push tubing into fitting on clamp and

8
insert blue collet clip under collet. Pull the tubing back to check seal is
secure.
Assemble main RO system
7. Remove all packaging and plastic wrapping/seals from filters. Do
not include the membrane in this step.
Connect housings to RO system by hand and then use spanner
provided to completely tighten. From right to left (closest to inlet):
- Sediment 5-micron pre-filter in 1st stage housing
- Carbon block filter in 2nd stage housing
- DI Filter in the 3rd stage Housing
Connect system
Determine length of tubing needed between RO system and mains
water supply and remove red stopper on unit. Connect tubing from
cold water supply, drain clamp and water outlet to RO system by
removing the coloured stoppers and inserting tubing into the
connections listed below:
Mark 1 (Red stopper) –Cold water supply to RO system
Mark 2 (Black stopper) –Wastewater to drain
Mark 3 (Blue stopper) –Last stage on RO system to water outlet
Check all tubing is secure by pulling back on tubing, remembering to
always remove collet clips before inserting tubing.
System Flushing –
It is very important to flush the RO system through in 2 stages to protect
the membrane and to ensure optimum performance for your unit.
Flushing the unit releases any carbon fines, dust, air etc from the pre
and post filters which may have been present at the manufacturing
process.
By flushing the unit in 2 stages this stops the membrane from getting
clogged or a reduction in flow as the pre and post filters have already
been flushed.

9
1st System Flush –
The pre-filters now need to be flushed BEFORE the membrane is added
to the unit.
Turn on mains water supply by putting the ball-o-fix and isolator tap to
‘on’ position (1/4” turn from off position). (The ball-o-fix fitting can be left
in ‘on’ position from here and the isolator tap is to be used to turn the
water ‘on’and ‘off’).
Let the water run for approximately 10 minutes into a bucket or until the
water runs clear. While the water is flowing this will also release any
trapped air in the unit, so there may be spluttering.
Check around the unit for any leaks.
(If a leak is found, turn off the water, and check the fitting / tubing where the leak
was found. Also see our troubleshooting section at the back of the manual. Once
the issue is resolved, start process again).
Turn off the mains water by the isolator and let the water drain out.
Insert Membrane
8. To insert membrane, remove post filters by pulling on bracket
connected to the membrane housing. Remove the tubing from the QC
fitting (inlet to membrane housing).
9. Lift membrane housing out of brackets and unscrew housing cap
using spanner provided. Please ensure the o’ring is kept on the thread
on the body of the membrane housing (not inside the housing cap).
10. Remove airtight film from membrane only (not blue film) and insert
into housing with the end with two black O-rings first. Screw cap back on,
push housing back into bracket and re-attached post filters. Check tubing
each end to prevent leaks.

10
2nd (Final) System Flush –
Turn on the water by putting the isolator tap to ‘on’ position (1/4” turn
from off position).
You will hear the RO unit starting to produce water. Double check the
unit for leaks. (As per 1st system flush).
Open the shut off valve (L1) on the drain line to allow water to pass over
the membrane for around 5 minutes. Open the faucet tap (if installed) to
release any excess pressure from the system.
Run the water from the RO unit for 10-15 mins. Please dispose of the
water.
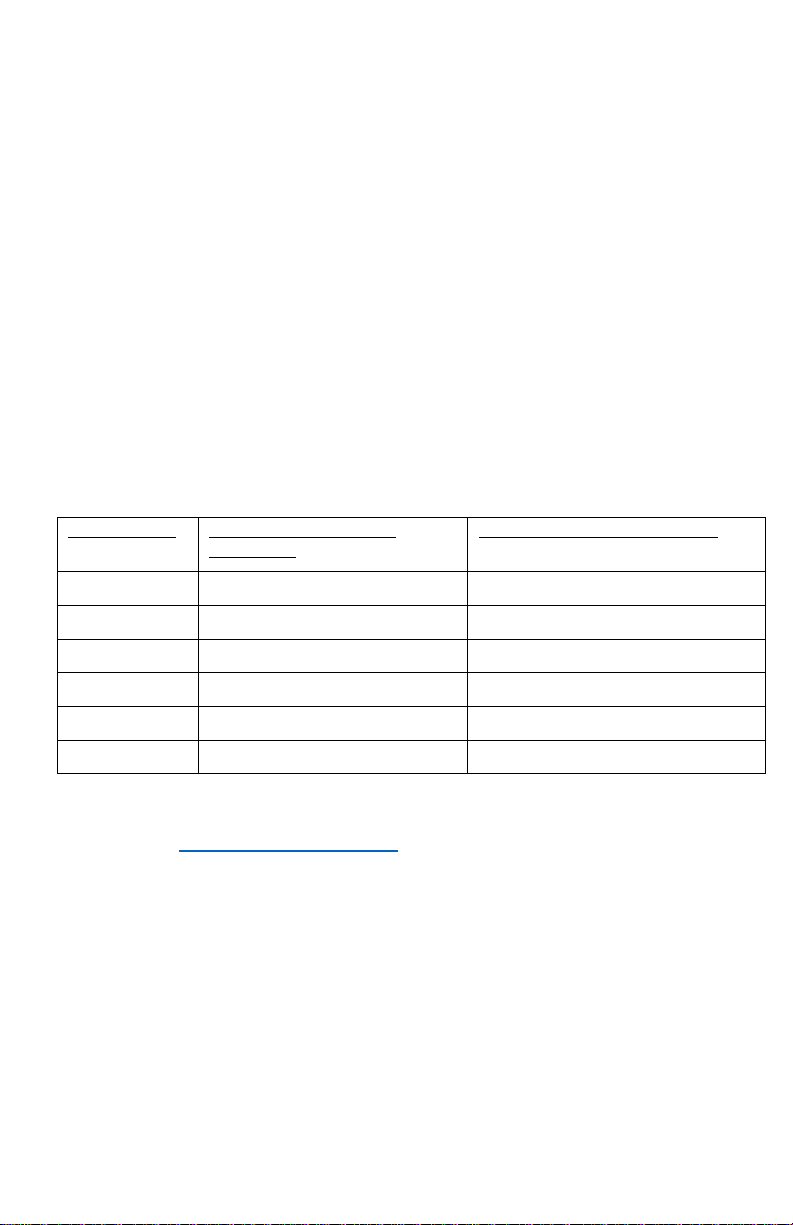
Maintenance
It is highly recommended to change your filters periodically to
maintain the highest level of filtration from your RO system. Changing
your filters regularly can also prolong the life of your RO system. The
table (below) shows how often it is recommended to replace each
filter/stage in your system. This is dependent upon water quality;
water hardness & particulates may result in filters being changed
more regularly than shown:
Filter Cartridge
Function
Lifespan
PP Sediment Filter
To remove sand, dirt and other
suspensions 5 micron or larger
6 months
Carbon Block Filter
To remove chlorine and to improve
taste and odour
6 months
RO Membrane
To remove foreign particles, soluble
solids, bacteria and viruses
1-3 years
DI Resin Filter
Deionises the water, reduces the TDS
reading (PPM) through ion exchange
6 months
11
RO Membrane Pressure Washing
When the RO membrane purifies the water, there are impurities and
bacteria left on the surface of the membrane which may affect the
quality and volume of the purified water. The RO membrane needs to
be cleaned periodically.
Our units will flush the RO membrane manually by turning ‘on’ the
flush valve for 2-3 minutes once a week. Please ensure this valve is
CLOSED when complete.
This valve is located on the drain line of the unit. This needs to be
opened when the unit is in the process of making water to allow the
water flowing through, to be re-directed back over the membrane.
Replacement Filter Codes:
Please enter these codes into the search bar on our website:
System Code
Filter Codes WITHOUT
Membrane
Filter Codes WITH Membrane
RO50-DI-1
FF-RO-REPL-DI4-TRPL
FF-RO-REPL-DI4-TRPL-50GPD
RO75-DI-1
FF-RO-REPL-DI4-TRPL
FF-RO-REPL-DI4-TRPL-75GPD
RO100-DI-1
FF-RO-REPL-DI4-TRPL
FF-RO-REPL-DI4-TRPL-100GPD
RO50-DI-2
FF-RO-REPL-DI4-TRPL
FF-RO-REPL-DI4-TRPL-50GPD
RO75-DI-2
FF-RO-REPL-DI4-TRPL
FF-RO-REPL-DI4-TRPL-75GPD
RO100-DI-2
FF-RO-REPL-DI4-TRPL
FF-RO-REPL-DI4-TRPL-100GPD
All replacement filters and membranes can be purchased through
our website www.finerfilters.co.uk or call us on 01704 807600.
Replacing your filters –
(Filters only, not membrane)
Please have some towels and cloths ready, as some water will
escape from the unit.
Turn off the water by putting the isolator tap to ‘off’ position (1/4” turn
from on position).
Drain as much water from the unit as possible.

12
*REMOVE THE MEMBRANE FROM THE HOUSING AND SET
ASIDE UNTIL FILTERS HAVE BEEN CHANGED AND THE UNIT
FLUSHED*
Carefully remove the housing bowls and empty any residual water
down the sink / drain and remove the exhausted filters.
Remove the wrapping of the new filter(s) and insert into housing(s).
Screw housing bowl back into place.
Repeat this for all filters contained in the housing bowls.
4th Stage –Remove the DI Drop in filter from the housing. Unscrew
the end of the filter. Remove the old media and rinse chamber. Add
new media and put back together. Please wash your hands after
handling the media.
Now carry out 1st System Flush from page 10. (2nd flush not required
unless the membrane is replaced, see Replacing Filters and
Membrane).
Carefully add membrane back into the housing.
Replacing Filters and Membrane –
Please carry out all steps from the Replacing Filters section and carry
out the 1st flushing stage.
Follow the instructions for inserting your membrane on page 10 then
carry out the 2nd flushing stage to complete the filter and membrane
changes.

13
Troubleshooting
Symptom
Probable Cause
Solution
No water
1. Water supply is off
2. Fault on non-return
valve
3. Pre, or post filter
clogged
4. RO membrane
damaged or clogged
5. Output line crimped
6. Flush valve open
1. Turn water supply on
and/or isolator tap in on
position
2. Fitting requires
replacing
3. Check/replace pre, or
post filter
4. Check/replace
membrane
5. Remove crimp
6. Ensure L1 flush valve
is closed
Slow flow
1. Pre, or post filter
clogged
2. Low Water
Pressure
3. Clogged Membrane
1. Check/replace pre, or
post filter
2. Booster Pump required
3. Open L1 flush valve
and carry out system
back wash.
Pre, or post filter
leaking
1. Tubing not inserted
fully
1. Remove tubing, ensure
end is straight. Insert and
gently pull back on tubing
to check secure
Bad odour
1. Membrane not
installed correctly
2. Bad membrane
3. New system (or
new filters/membrane)
1. Check membrane is
installed as instructed
2. If TDS reading is below
85%, replace
Membrane
3. Flush 20 litres through
system before use

14
Leaking membrane
housing
1. Threaded end cap
leaking
2. Cap or body of
housing leaking
3. O-ring not seated
properly
1. Unscrew cap, lubricate
O-ring. If leak continues,
replace
2. Check for any checks
in membrane housing or
cap. Replace if cracked
3. Make sure O-ring is in
groove and lubricated
(Membrane housing see
insert membrane on pg
10)
Cloudy/milky water
1. Defective
membrane
2. New filters or
membrane
1. Replace if TDS reading
is below 85%
2. Flush system through
Leaking fitting
1. Fitting damaged or
cracked
2. Tubing not pushed
in fitting or screw fit
not installed properly
1. Replace fitting
2. Push tubing in firmly
until it locks. Check screw
fit is installed correctly,
refer to image in
installation
This manual suits for next models
5
Table of contents
Other Finerfilters Water Filtration System manuals


Popular Water Filtration System manuals by other brands


Swimline
Swimline HYDROTOOLS 71610 instructions

Watts
Watts SmartStream UV WA002 Installation, operation and maintenance guide

BWT
BWT Vida 2.6 L instruction manual

Philips
Philips AC4012 quick start guide

TotalPond
TotalPond 52231 instruction manual

PREMIER TECH
PREMIER TECH REWATEC Phosphorus removal unit owner's manual


