Fireye SureFire II SP-48-NG-FD User manual

®
1
SF-600
MAY
15, 2019
SureFire II™
Forced Draught
Gas Pilot type
SP-48-NG/PG-FD
Instruction Manual
1.
INTRODUCTION
This Instruction Manual contains a description of the type SureFire II™ SP-48-NG/PG-FD gas pilot construction,
operation principle and the instructions for installation, start-up and service, including the industrial health & safety
recommendations.
The SP-48-NG/PG-FD-xxx (48 mm outer diameter, NG - Natural Gas or PG - Propane Gas or LPG, FD - Forced
Draught) gas pilot is a reliable and effective source of ignition for oil and gas burners.
A sample of Pilot Part Number for Natural gas is “SP-48-NG-FD-xxx”, for Propane gas is “SP-48-PG-FD-xxx”
where “-xxx” is the insertion length “L”from 0.5 to 3.0 metres (see Appendix 1 –the pilot capacity vs. gas pressure
graphs for Natural gas and Propane). For other Fuel gas types or capacity ranges –see p. 11 Ordering Information
for Special Pilots Part Numbering approach.
The pilot is constructed of high quality materials and each unit is checked and tested before dispatch.
Acquaintance with the following instructions and strict attention to the indications reduce the possibility of
equipment failure to a minimum and ensure safety during normal operation.
2.
OPERATION PRINCIPLE AND TECHNICAL
SPECIFICATION
Unit construction provides a stable flame, ignition repeatability, with low demand for combustion and cooling
air. No moving parts ensure long, trouble-free operation with low maintenance costs.
SureFire II™ Pilot SP-48-NG/PG-FD can operate as an intermittent (light-off), or as a continuous pilot.
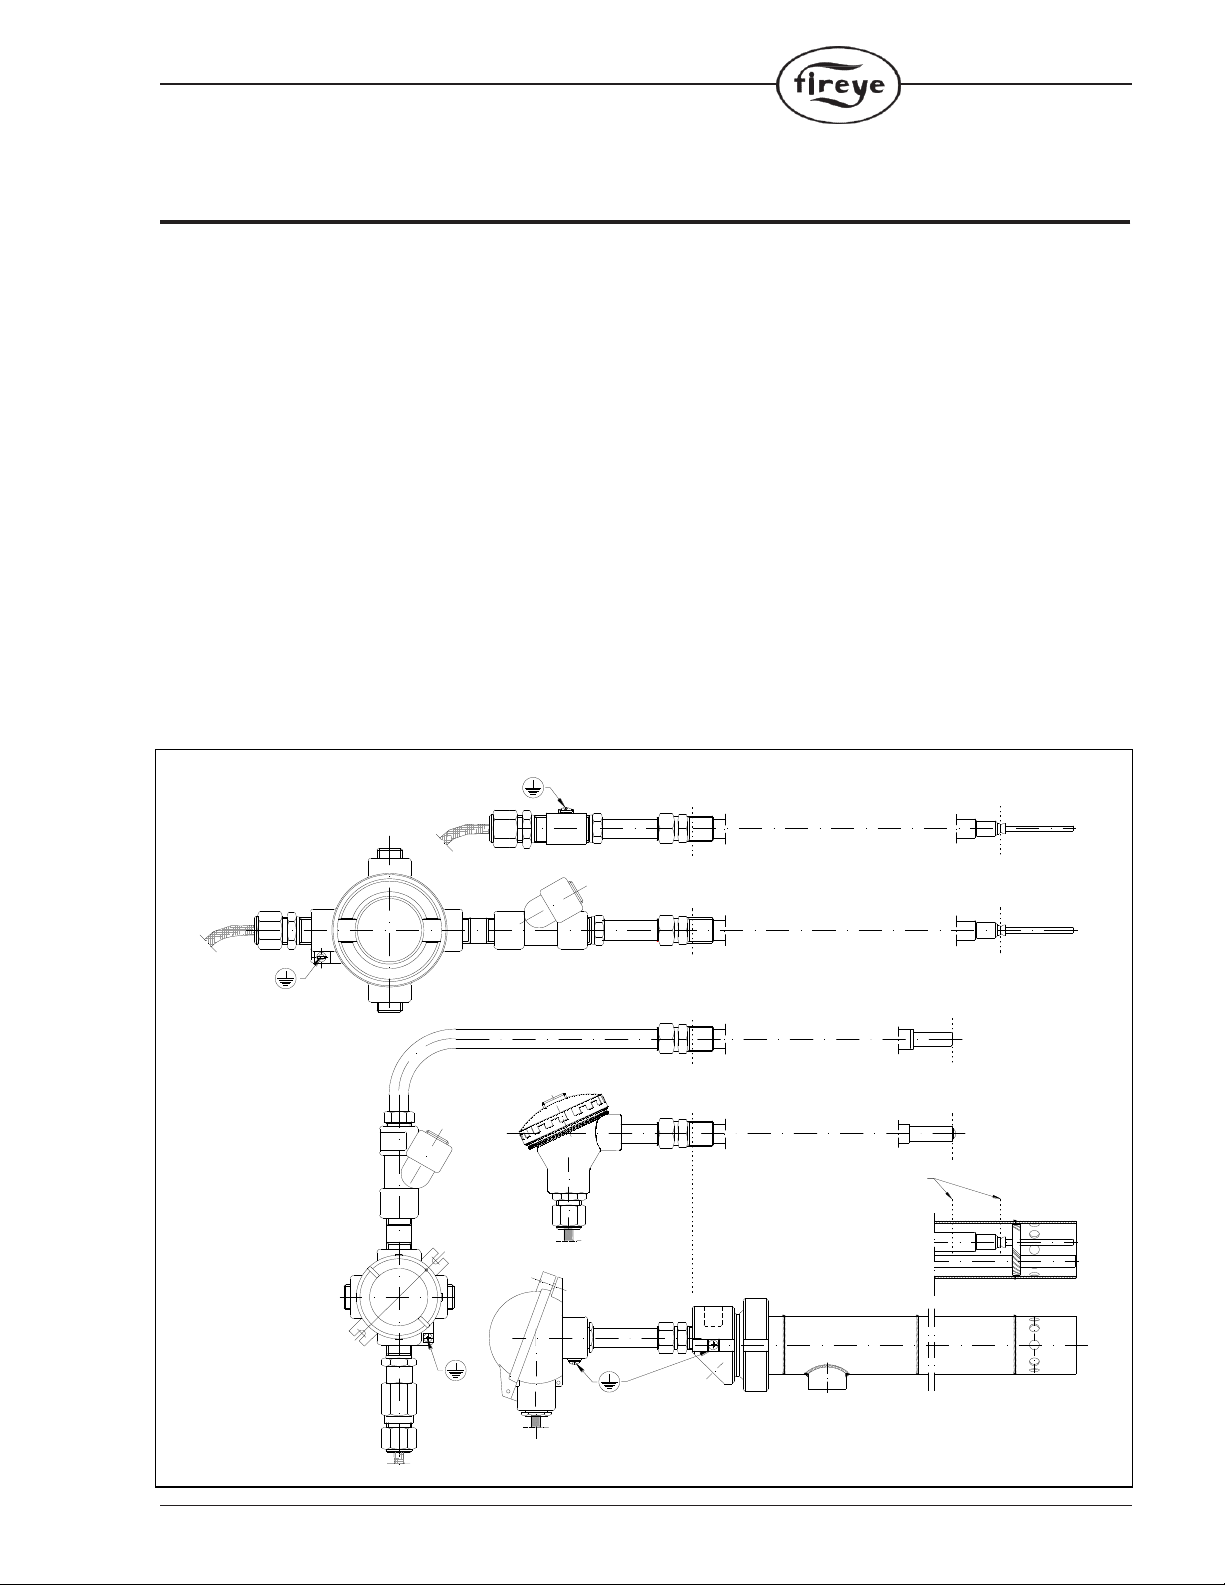
FIGURE 1.
Gas pilot type SP-48-NG/PG-FD.
Detail B
L
~ 188 mm
~10 mm
Air inlet
3/4" BSP
3
Gas inlet
1/2" BSP
6- rod gland 1/2"
2 1
4
A
HESI igniter rod
HTI igniter rod
Spark & Sense
C
C
View C-C
Gas inlet 1/2" BSP
Rod mounting
hole with gland
1/2"BSP
Sight port or
mounting hole with
stop plug 1/2"BSP
View A-A
~50 mm
A
Swirler-stabilizer plate
~ 112 mm
Electrical Igniter rod of OD 16mm
(out of the pilot scope) 5
Detail B
Main orifice gas tube
Bleed orifice
2:1
Gas tube Gas divider with
main gas orifice
Igniter rod mounting bracket
O 48 mm
Main orifice gas tube
HTI igniter rod tip
Spark & Sense

2
®
Main parts of SP-48-FD pilot are: air tube (pos. 4 on Fig. 1) with combustion-cooling air inlet (3/4”BSP) and gas
part assembly including gas head (pos. 3) with gas inlet (1/2” BSP), ignition rod hole (1/2”BSP) with igniter rod
holding gland (pos. 6) and sight port hole (1/2” BSP) with stop plug mounted. It includes also the gas tube
(pos. 2) mounted in gas head. The orifice-stabilizer assembly (pos. 1) is fixed at the end of gas tube. It consist of a
gas divider with main and bleed orifices, gas tube and swirler-stabilizer. Gas part assembly is mounted in the air
tube by means of the thread joint with mounting ring (pos. 5).
Note that gas supply line should be equipped with an effective strainer unit to prevent the orifices from clogging.
In many applications SP-48 pilots are mounted on the main burner using the mounting tube (see p. 3).
The source of ignition is an electric high energy spark igniter (HESI) or high tension arc igniter (HTI) for safe or
hazardous area (depending on the application) equipped with the ignition rods of outer diameter of 16 mm and
coaxial electrode arrangement –see Fig. 3.
The ignition rod is mounted in the gas head and goes through air tube to the orifice-stabilizer assembly. The rod tip
end should be placed as on drawing Fig. 1, to provide a successful ignition of air-gas mixture.
Gas pilot SP-48 can be supplied together with electric ignition device selected depending on the application.
Ignition device is not in gas pilot scope of supply and should be ordered separately.
SP-48-FD pilot principle of use: gas is supplied through the inlet 1/2“BSP to the gas head and to the gas tube and
further to the orifice-stabilizer assembly. A small amount of gas leaves through the bleed orifice mounted in the gas
divider, into the zone before the swirler-stabilizer plate, where it mixes with air to form a combustible mixture. It is
ignited in that zone by a spark or an electric arc generated at the tip of the electrical igniter rod. This pilot flame
stabilizes at swirler-stabilizer plate. Further it ignites the main stream of gas which exits the main nozzle at the outlet
of the air tube. The main flame then stabilizes in the primary combustion zone at the outlet of the air tube. The
swirler-stabilizer plate and holes in air tube provide an adequate shape and stability of the flame.
The orifice-stabilizer assembly is optimized for Natural gas or Propane gas/LPG. In case of other Fuel gas type or
other capacity needed contact Fireye as this may need the pilot construction changes - see p. 11 for Special Pilots.
Thanks to this principle of design, the pilot combustion zone is protected, the main combustion zone is outside the
pilot, hence the air tube does not overheat and there is no need for retraction of the ignition device rod.
Pilot has to be mounted on main burner such that no part of pilot shall be in the main burner flame and cannot
project beyond the heater lining or a burner throat. The distance of the tip of pilot air tube from the main burner
flame should not be smaller than 150 mm –see Appendix 2.
The flame length is 0.6 –0.8 m depending on the kind of gas, gas pressure and pressure in combustion chamber.
In addition, using Fireye high tension igniter type HTSS in the Spark & Sense version, the center electrode of
igniter rod is also an ionization rod extended into the primary combustion zone and specially designed to work with
SureFire II™Pilots. The HT igniter initially creates the electric arc to ignite the gas, and then the electric circuit
switches the operating mode for ionization detection, confirming the presence of the igniter flame.
3.
MOUNTING TUBES
FIGURE 2.
Pilot mounting tubes: for welding and flanged
For fixing the pilot burner to a burner plate there are two types of mounting tubes available (material: carbon steel),
offered as an optional accessory and to be ordered separately (see Fig. 2):
- a flanged mounting tube allowing the fixing of a gas pilot without the use of welding, to be fixed with bolts to
the burner plate. After inserting the pilot into the mounting tube its position is determined and secured with a
clamping ring located at the end of the tube assembly. This ring also provides the necessary sealing for the
connection,
A
O 55 mm
O 90 mm
3 x O 9 mm
O 73 mm
120 mm
FLANGED MOUNTING TUBE
MOUNTING TUBE FOR WELDING
120°
6 mm
~ 34 mm
®
3
- a mounting tube for welding, has a free tube section left to be welded to the burner plate. Pilot fixing inside the
mounting tube as in p. 7.1. There are two lengths A available: 150 and 600 mm.
4.
IGNITION SOURCES FOR GAS PILOT LIGHT-OFF. (SETTING METHOD)
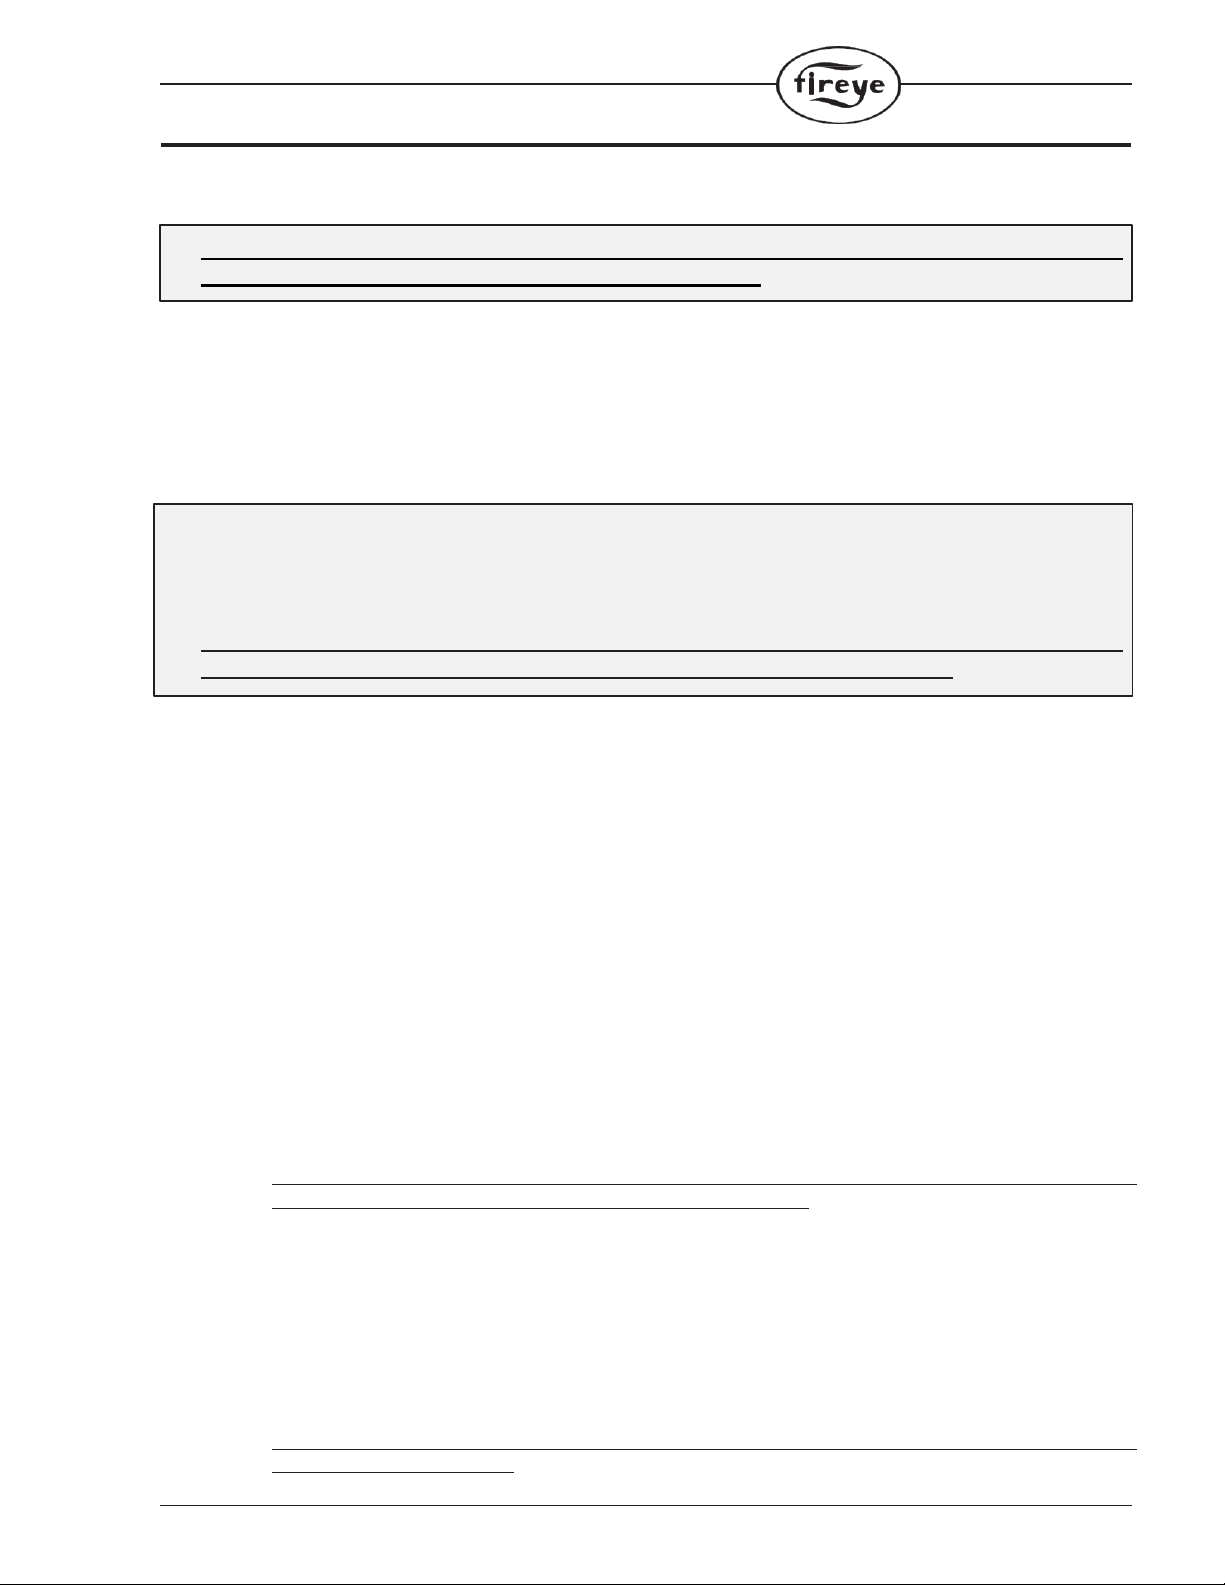
Sources of ignition in the gas pilot SP-48 are electrical high energy spark igniters (HESI) or high tension igniters
(HTI) equipped with the ignition rods of outer diameter 16 mm and coaxial electrode arrangement (see Fig. 3):
-for the high energy spark igniter (HESI): this type of device creates single sparks of a high energy
of about 12 J. With frequency of 4 to 5 sparks per second it ensures reliable ignition of a gas/air mixture under
all conditions. The secondary circuit voltage is nominally 2,000 VDC at primary supply 230VAC or 110 VAC,
-for the high tension igniter (HTI): this type of device creates an electrical arc of low energy which allows for
ignition of a gas/air mixture in clean environment and repeatable conditions. The secondary circuit voltage is
8,000 VAC at primary supply 230VAC or 110 VAC.
Using the Fireye High Tension Igniter, the end of the rod tip should be placed at a distance of 10 mm back from the
swirler-stabilizer (see Fig.1). In case of the High Energy Spark Igniter, the rod tip should be placed further back ~
50 mm back from the swirler-stabilizer.
It should be noted that the rod tip positioning against the swirler-stabilizer plate in the pilot gas part
assembly (pos. 1 on Fig. 1) should be done outside the air tube only (do not install the rod in the gas head
already mounted in the air tube). Only after proper rod positioning, should the rod be fixed by tightening the
rod holding gland and the whole gas assembly with igniter rod inserted into the air tube pos. 4.
The rods of both types of devices are mounted in gas head by means of a holding gland 1/2"BSP.
The ignition device is not in gas pilot scope of supply. It is normally specified and ordered separately.
FIGURE 3.
Gas pilot type SP-48-NG/PG-FD with examples of electrical ignition devices
.
Gas Pilot type SP-48-NG/PG-FD-xxx
with HTI igniter rod type HTSS-xxx-J (Spark & Sense) for safe area
HESI igniter rod for safe area
HESI igniter rod for Zone 1 Exd
HTI igniter rod type HTSS-xxx-CEX for Zone 1 Exd (Spark & Sense)
HTI igniter rod type HTSS-xxx-J-CEX with j. box for Zone 1 Exd (S&S)
ignition point

4
®
5.
TECHNICAL DATA
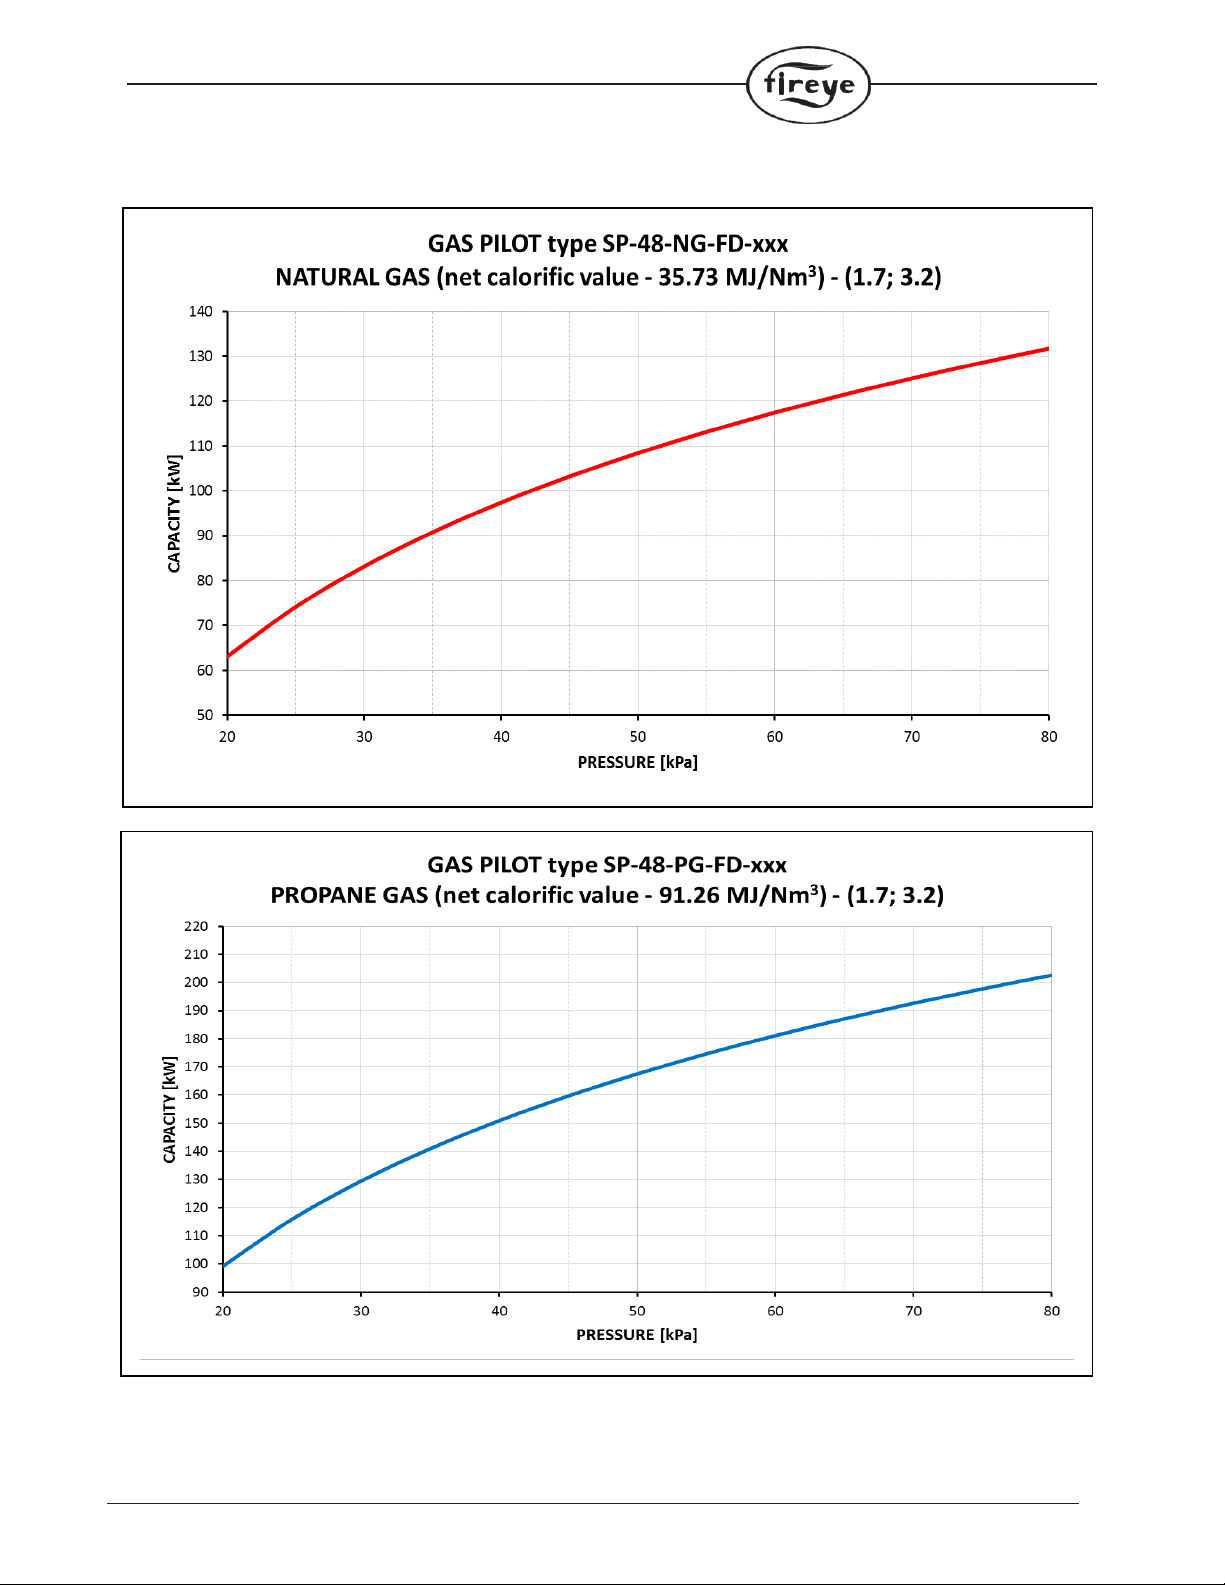
Fuel: two standard versions for Natural Gas (NG) and for Propane Gas or LPG (PG) - see gas characteristics in
Appendix 1. In case of other fuel gas needed see p. 11 Ordering Information Special Pilots and Appendix 3.
Outer diameter of the air tube: 48.0 mm
Outer diameter of the mounting tube: 55.0 mm
Outer diameter of the ignition rod: ≤16.0 mm
Capacity range : Natural Gas 63 ÷ 132 kW - see capacity vs. pressure graph in Appendix 1
Propane Gas 98 ÷ 203 kW - see capacity vs. pressure graph in Appendix 1
-in case of other capacity range needed - see p. 11 for Special Pilots
Air flow and pressure: max. ~ 30 m3/h –adjust to capacity as in p. 8.11
Air pressure range 0.5-1.0 (max. 1.2 kPa)
Air connection 3/4" BSP (inner thread)
Gas connection 1/2" BSP (inner thread)
Operating temperature max. continuous 300°C, swirler-stabilizer, end of gas and air tubes 500°C
Igniter rod reference length range “L”0.5 ÷ 3.0 m - longer upon request
Pilot weight: P/N SP-48-NG/PG-FD-0.5 (length L=0.5 m): 2.96 kg, pilot weight adder: approx. 2,60 kg/m
Material used for pilot construction all parts: 304/316 SS and heat-resistant steel 310/330
Notes: 1. If the above parameters are different than those required please contact Fireye
2. For Imperial Units please refer to the Appendix 4 Unit Conversion Table
3. Device complies with the requirements of the European Directive 2002/95/EC (RoHS)
6.
OPERATIONAL SAFETY
When operating and handling the pilot burner please follow the rules below:
6.1 Use pilot only for its intended purpose.
6.2 At the time of installation, operation and maintenance follow the procedures described in the instructions
and documentation of the pilot, ignition device and the main burner.
6.3 Check environmental conditions and ensure that the specified operating temperatures of pilot and
igniter components will not be exceeded (see p. 5 and igniter Manual).
6.4 Follow the warnings contained in the documentation.
6.5 Do not make any modifications or changes to the pilot construction.
6.6 Before starting, make sure that all parts of the pilot and electric ignition device are in good condition.
6.7 Circuits of power packs as well as igniter rods, enclosures and junction boxes must be properly grounded.
6.8 Before igniting, check the tightness of gas tube connections.
6.9 During the observation of the pilot flame wear special goggles to protect the eyes from flame UV radiation.
6.10 Do not remove the protective ground when the ignition device is energized.
6.11 Before working on the ignition device, ensure the power is disconnected.
6.12 Before maintenance or repair works check that the gas shut-off valve is closed.
6.13 During installation, start-up or maintenance works on the pilot or burner/ heater always wear protective
clothing and use protective gloves.
WARNING: ALL ACTIONS RELATED TO THE INSTALLATION, SERVICE AND
OPERATION OF GAS PILOT MAY ONLY BE CARRIED OUT BY A TRAINED AND
QUALIFIED PERSONNEL.
REMARK: IN CASE OF ANY DOUBTS REGARDING INSTALLATION OF THE PILOT
CONSULT WITH THE MANUFACTURER.
®
5
7.
INSTALLATION
During the installation, all components have to be protected from impact or bending.
WARNING: DURING PILOT INSTALLATION THE RECOMMENDATIONS IN THE
APPENDIX 2 SHOULD BE STRICTLY OBSERVED.
SP-48-FD pilot’s air tube can be welded directly to the burner plate, or placed in the mounting tube (see Fig. 2).
It should be noted that the distance from the gas head with mounting ring to the burner plate should be not less than
150 mm and insertion depth cannot exceed the “L” value – see Fig. 1.
Pilot air tube is made of stainless steel, mounting tube is made of carbon steel which must be noted for welding.
Note: Particulates entrained in the gas could block the pilot’s gas orifices so gas supply line should be equipped
with an effective strainer unit.
WARNING: STRICTLY OBSERVE THE TEMPERATURE LIMITS FOR PILOT
AND IGNITER ROD MOUNTED INSIDE. IN THE CASE OF EXPECTED WORK AT
THE LIMIT OF PERMISSIBLE OPERATING TEMPERATURES, APPROPRIATE
MEASURES SHOULD BE TAKEN (E.G. CHANGE OF THE MOUNTING POSITION).
WHEN BOILER OR HEATER INSTALLATION IS IN OPERATION ALWAYS KEEP
THE PROPER AIRFLOW OF PILOT COMBUSTION-COOLING AIR.
7.1 MOUNTING TUBE
The mounting tube, if used, should be attached to the burner plate using bolts or welding (see Fig. 2). If it is not
possible to use one of mounting tubes proposed above, a different type can be used, bearing in mind that its inner
diameter should be properly matched to the outer diameter of the pilot air tube to be able to fit and fix the pilot in
a tube with proper clearance.
In the case of application including a mounting tube proceed the following way:
a) Based on assembly drawings mark and cut a hole in the burner plate with a diameter slightly larger than
the diameter of the mounting tube.
b) The mounting tube for welding: slide the mounting tube in the hole and set it in the correct position
(insertion depth and proper angle relative to the main burner nozzle position).
c) The mounting tube for welding: weld using the electrode appropriate for the material.
d) If the flanged mounting tube is used, bolt it to the burner plate after drilling the correct sized holes.
7.2 GAS ASSEMBLY AND AIR TUBE
a) The position of the electric igniter rod tip in relation with the orifice-stabilizer assembly of pilot should be
checked following information in p. 4. The correct position for different types of electrical igniter rods
should be taken into consideration (see Fig. 1).
It should be remembered that the rod tip positioning against the swirler-stabilizer plate in the pilot gas part
assembly (pos. 1 on Fig.1) should be done outside the air tube only.
Only after proper rod positioning should the rod be fixed by tightening the gland and the whole gas
assembly with rod inserted into the air tube.
b) Mounting of electrical igniter rod in a pilot: unscrew the rod tip, disassemble the gland, put all gland
parts on rod, insert the rod in gas head, screw back the rod tip and then set the appropriate tip
position relative to an orifice-stabilizer assy. Now the gland can be screwed onto gas head tightly. In
case of problems sliding the rod through rings of fixing gland apply a small amount of high temperature
resistant grease or grind slightly the gland ring inner surface.
After setting the correct rod position, fasten the rod fixing gland in the gas head. Then the complete gas part
assembly can be slid into the air tube.
Do not remove the rod from fixing gland if it is not necessary, as the gland rings once clamped on rod do
not allow easy rod movement.
.
6
®
c) Gas part assembly and air tube should be fastened by the mounting ring thread joint. Ensure that the ring
gasket is correctly fitted in the gas head seat (see Fig. 4).
d) The complete pilot (air tube) can be inserted into the mounting tube. In order to make the air tube slide-in
easier, apply a small amount of high temperature resistant grease.
e) The insertion depth of SP-48-FD pilot is determined by the design of the main burner. If an existing pilot
has to be replaced, the insertion length and pilot tip position should be the same. In case of any doubts, the
position of the pilot should be consulted with the pilot and burner manufacturer.
f) After determining the position of the complete pilot relative to the mounting tube, the mounting tube
clamping screws should be tightened to prevent the device from moving.
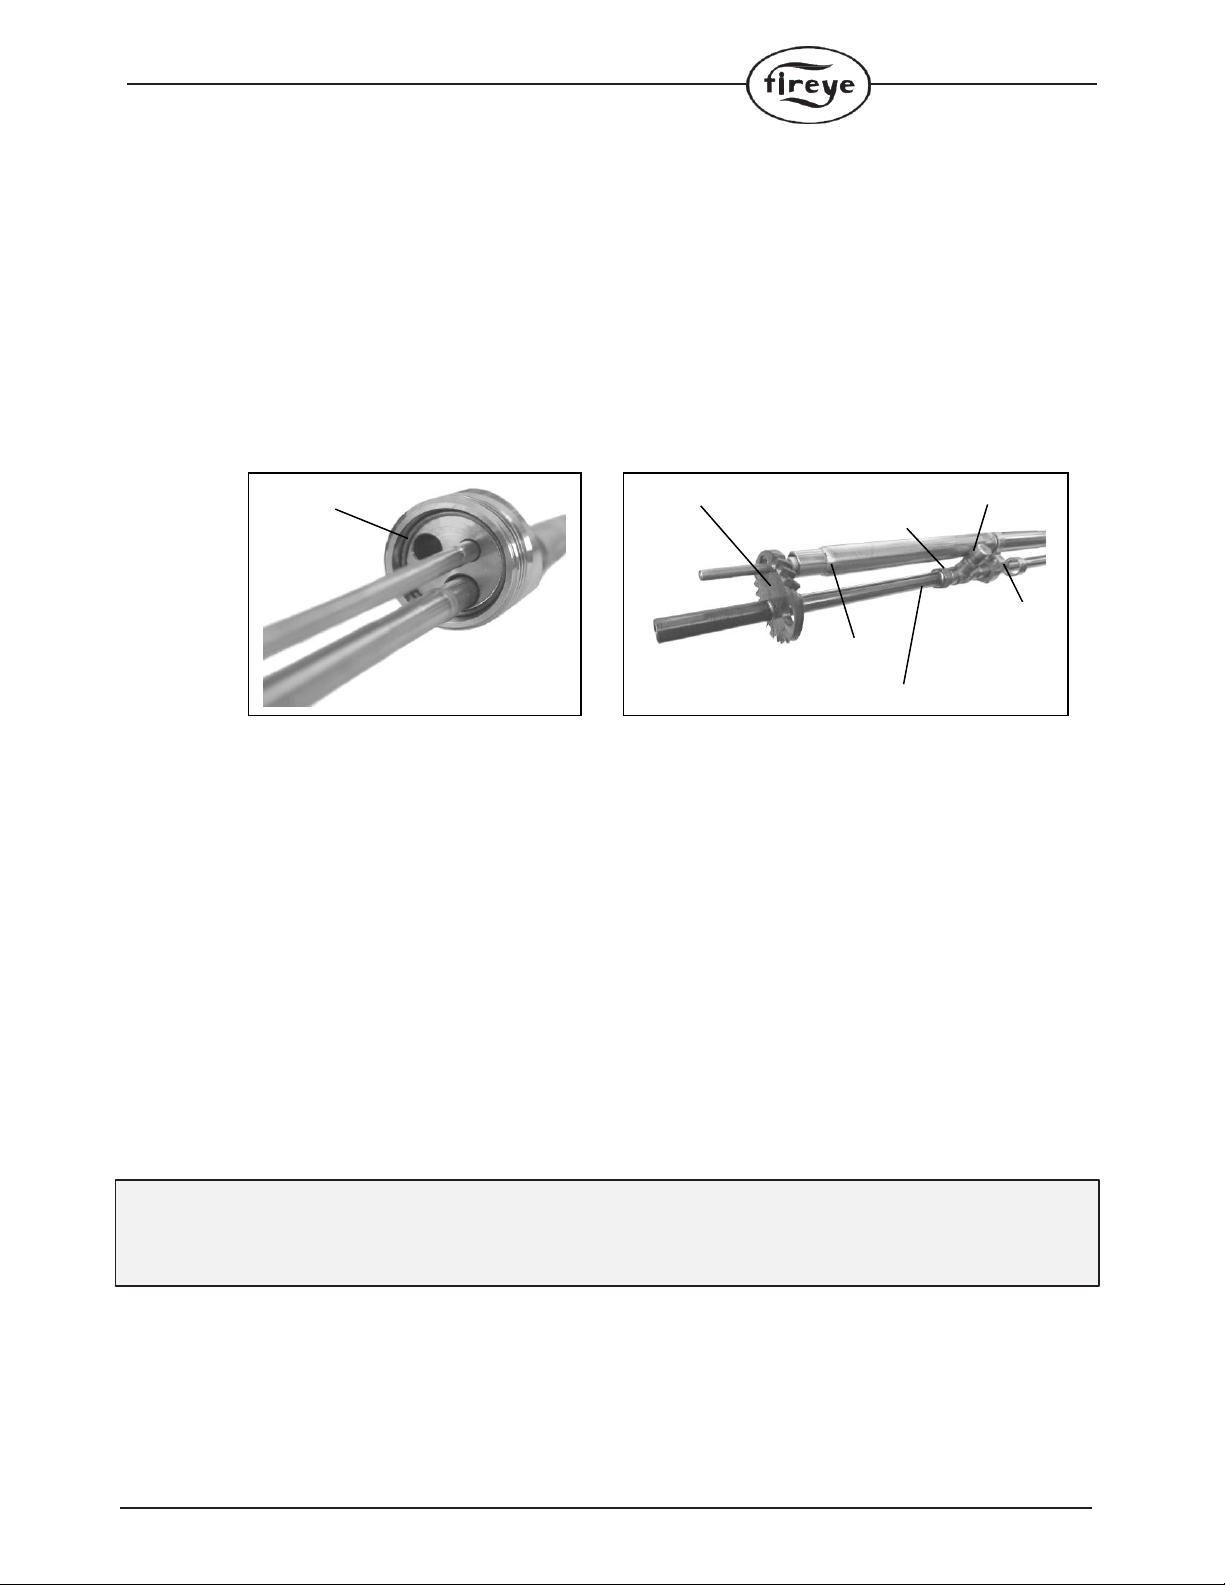
FIGURE 4.
Gas head with ring gasket and swirler-stabilizer assembly with bleed and main gas orifices
7.3 GASAND AIR SUPPLY INSTALLATION
a) The pilot must be set in the mounting tube such that the air and gas connections are in the desired
positions.
b) Connect the air and gas hoses to the appropriate pilot inputs. Hoses cannot be tangled or twisted.
If necessary, additional connectors may be used.
c) To ensure a long and trouble-free operation of the pilot it should be kept clean. Check the condition of the
gas pipe and if the orifices are not blocked. Remove all buildups. Hoses should be dry and not cracked.
d) During maintenance or service works, secure the disconnected ends of the hoses by closing the ends with
a plug or a tape.
e) Use the automatic shutoff valves of the appropriate size and the respective closing rate and pilot gas pressure
measurement with safety interlocks (compliant with the requirements of relevant standards concerning the
shut-off safety fuel valves and burner safety) to be sure that the gas delivered to the pilot is of an adequate
pressure and can be quickly and effectively shut off.
f) Use manual shut-off valves on air and gas lines for each pilot in case of maintenance or replacement and
for adjustment of pressure and flow on each pilot separately.
REMARK: AT THE DESIGN STAGE DETERMINE LENGTH OF CABLES AND
FLEXIBLE AIR AND GAS CONNECTIONS TO ACCOMMODATE ANY EXPECTED
HEATER OR BOILER CONSTRUCTION MOVEMENT
7.4 CABLING
Wiring and electrical connections design and layout should be in accordance with the requirements for burner
installation devices specified in their instructions and the relevant regulations.
Ring gasket
HTI rod tip
Bracket
Gas divider with main orifice
Main orifice gas tube
Bleed gas orifice
Swirler- stabilizer plate

®
7
8.
PILOT START-UP, OPERATIONAL TESTS
Before proceeding with the start-up and operational tests of SP-48-NG/PG-FD pilot check the following:
8.1 Gas and air installations are correctly mounted, tight and functionally checked, including: valves, flaps,
strainers, fittings and joints (flanged and screwed), control and interlock devices.
8.2 Gas and air connections to the pilot are made in accordance with the above instructions and the assy drawing.
8.3 Electrical components and circuitsare properly connected, grounded and tested.
8.4 Power supply to the electrical circuit of the ignition device and spark or arc release should be allowed only
after assembly of the device, and when installed in the operating position on the burner or outside the burner
only to validate the operation strictly according to the device instructions e.g. on special test stand.
Then perform next steps:
8.5 Select one pilot as a representative for tests.
8.6 Prepare the burner control system to enable manual trials in a safe way.
8.7 Install for the trial period appropriate gauge and manual valve on the igniter gas supply line. This will allow
for fine adjustment of the gas pressure.
8.8 After verification of ignition device mounting and wiring, the electric igniter can be powered up.
Check for the spark or arc presence.
8.9 At presence of a spark or an electric arc from ignition device, slowly open the pilot manual shut-off gas
valve without opening the air manual shut-off valve (it should be closed). At certain degree of opening the
pilot flame should establish.
8.10 Adjust the gas pressure slowly up to the working pressure. Pilot flame may be yellow and bushy due to too
little combustion air.
8.11 Slowly open the air valve manually until the flame stabilizes at the end of the air tube and reaches
a blue-yellow color. If the airflow is too low the end of the air tube may start to glow (it starts to glow at 400-
500°C) as the main flame burns inside the igniter. Further opening of the air valve should stabilize the flame
outside the air tube. This will stop the overheating of the air tube. Flame should be as stable as possible.
Remarks::`
a) Pilot flame should be blue near the igniter tip and yellow at its end. With some kind of gases the
flame color may stay yellow.
b) In some applications e.g. on up-fired burners, when the draught of the furnace is significant, it may
be necessary to limit the amount of air by closing the air valve accordingly in order to keep stable
pilot flame.
c) Gas pilot cannot be used as a burner –it works usually with preset, constant air/fuel ratio (turn-down
ratio 1:1), after proper adjustment as above. However it should ignite repetitively and burn with a
stable flame in each gas pressure point throughout the whole range after proper adjustments.
8.12 In case of insufficient pilot capacity, the amount of gas and air can be further adjusted bearing in mind the
above principles.
8.13 In multiple burner and pilot applications on one heater/boiler with a similar gas and air supply installation
and similar layout on the main burner, set the other pilots gas and air valves to be in the same position.
8.14 Then carry out light-off tests. In case of differences in the quality of combustion adjust manual valves so that
the flame is similar to that on the test pilot. In some cases the main burner air should be adjusted.
8.15 Repeat the light-off tests several times on each pilot to confirm the repeatability of ignition. Flame should be
stable, in proper position and of desired shape.
If the SP-48-NG/PG-FD gas pilot has been correctly commissioned and the settings were optimized, with correct
maintenance, the igniter will operate trouble free.

8
®
9.
OPERATION
After installing and completion of pilot start up and tests SP-48-NG/PG-FD is ready for operation.
General description of activities performed by the burner/boiler control system or manually by operator:
9.1 Preparation of the furnace/boiler for firing up.
9.2 Opening of air to the burner and pilot.
9.3 Preparation of gas installation for operation.
9.4 Setting the gas pressure at the correct level.
9.5 Starting of pilot trial for ignition sequence performed by the controller or in some cases by the operator:
a) The correct setting of the main burner combustion air.
b) Checking the interlock conditions before firing up.
c) Providing power to the ignition source.
d) Optionally, carrying out the gas line leakage test.
e) Closing the purge valves and opening of gas shut off valves.
f) The ignition should take place within the time specified by the standards, which should be confirmed
by the relay output of the flame detector.
g) Electrical igniter power off after confirming the presence of the pilot flame, closing the pilot shut off
valves (in case of continuous pilot operation they stay open).
h) In case of the absence of the flame after trial for ignition - the valves are closed and electrical igniter is
switched off.
i) Eventual repeating of trial for ignition sequence (depends on the application). Details of sequence,
timings are dependent on application and applicable standards.
In the case of a manually controlled gas pilot, the operator has to close the gas supply to the pilot himself at the
right time if the flame is not detected.
10.
SERVICE, MAINTENANCE AND REPAIRS
To remove the igniter for inspection or repair the gas and electrical supply must be shut off first. Checks that the gas
and air manual shut off valves are closed and that the power for ignition device is disconnected.
WARNING:DO NOT PERFORM ANY MODIFICATIONS TO THIS EQUIPMENT
AND NEVER USE UNAUTHORIZED SPARE PARTS AS THIS WOULD RESULT IN
A BREACH OF THE ATEX CERTIFICATES CONDITIONS AND COULD PROVE
HAZARDOUS TO YOUR HEALTH AND LIFE !
WARNING: WHEN THE HEATER/BOILER IS IN OPERATION, DURING SERVICE
WORKS ON BURNER INSTALLATION ALWAYS USE PROTECTIVE PPE CLOTHING,
GLOVES AND GOGGLES !
REMARK: EVERY 12 MONTHS MAKE AN INSPECTION OF AIR TUBE. IF YOU SEE
ANY TRACES OF EXCESSIVE TEMPERATURE DURING OPERATION INCREASE THE
COOLING-COMBUSTION AIR FLOW OR RETRACT THE GAS PILOT A LITTLE FROM
THE COMBUSTION CHAMBER. IF INCREASING THE AMOUNT OF AIR REMEMBER
THAT IT MAY IMPACT THE FLAME QUALITY.

®
9
10.1 INSPECTION AND MAINTENANCE
SP-48-FD pilot because of its simple design does not require complicated maintenance procedures.
Checking and cleaning of gas tube and orifice-stabilizerassembly:
a) Close the manual gas valve and disconnect the pilot gas line.
b) Disconnect the ignition rod electric supply cable.
c) Unscrew the mounting ring.
d) Carefully slide out the gas part assembly from the air tube.
e) Check the ignition rod at least every 12 months. For checking and standard service do not remove the rod
from the gas part. Follow the igniter User’s Manual.
Pull out the electrical igniter only if it is absolutely necessary e.g. when rod is worn or damaged and has to
be repaired or replaced. Before that, loose the ignition rod holding gland and then follow p. 7.2.
Unscrew the rod tip before pulling out rod from the gas part and holding gland for easier slide without any
jamming.
f) Check and clean the bleed orifice and main nozzle. For cleaning use a soft copper wire.
g) To remove heavy dirt use a soft wire brush e.g. copper wire brush.
h) Blow compressed air through the whole gas part assembly.
i) To check the air tube condition loosen the mounting tube clamp assembly screws and pull out air tube.
Check for overheating traces and clean it. If it is damaged –repair or replace it.
j) Assemble all the elements back to obtain the original configuration.
Checking of ignition device:
k) Check the complete ignition device at least every 12 months. Follow instructions in its User's Manual.
10.2 TROUBLESHOOTING
If the gas pilot does not operate correctly check the following:
a) All manual gas valves on gas supply line were open and there is gas available.
b) All valves in the supply line are functioning properly.
c) The preset gas pressure is correct.
d) The correct pilot air pressure is maintained.
e) Gas and air supply lines are clear - check strainers.
f) Bleed orifice and the main orifice in orifice-stabilizer assembly are clear.
g) Electric ignition device is working correctly and its rod is correctly positioned in gas part assembly.
If it is not working properly - follow the ignition device Manual.
h) The power parameters for ignition device are correct.
If the gas lights but the flame is unstable, or goes out when main burner goes into operation, check that:
i) The gas pressure does not drop during pilot light-off (trial for ignition).
j) The air pressure is always at the correct level.
k) The air from the main burner does not blow out the pilot flame or does not move it out of the field of
view of the flame scanner (if applied).
l) Flame safeguard system works correctly and the flame is not obscured.
Improper operation of the whole installation requires detailed checking of the power line and all components,
including any temporary use of override switches or jumpers.
Be aware of all connections to be later restored to normal state, to allow safe operation.
11.
SPARE PARTS, WARRANTY CONDITIONS
11.1 For start-up and warranty period it’s recommended to order following spare parts in quantity as below:
–a set of loose parts used on both sizes on pilots: SP-32 and SP-48 (see Fig. 5) - one for 4 pilots
–complete orifice-stabilizer assembly for SP-48-FD pilot, including: - one for 4 pilots
main orifice nipple with gas tube, bleed orifice, swirler-stablizer, divider

10
®
11.2 In case of air tube wear or damage:
–if air tube or mounting ring has to be replaced - order a replacement air tube (with mounting ring) of length
“L” – prices on request only,
–if just the end of air tube is eroded - cut 200 mm of the tube tip, order and weld spare part
P/N SP-48-END - replacement air tube end, length 200 mm, SS310/330.
List of pilot spare parts Part Numbers is in Table 2.
11.3 The warranty (see page 16) covers delivered devices and materials under conditions of proper
installation, start-up, operation and maintenance, it means the use in accordance with applicable
instructions and manuals.
This is particularly applicable to overheated parts i.e. working above their maximum operating
temperature defined in Instruction Manual.
11.4 The defective device or part will be replaced or repaired at manufacturer’s option.
The warranty applies to and may be executed only on a failed device send to the manufacturer warehouse for
examination or warranty repair.
11.5 The manufacturer does not accept liability for damage to persons or property resulting from:
–mechanical damages,
–improper installation, operation, maintenance of igniter contrary to the instructions in the user manual,
–unauthorized igniter modifications or repairs made by unauthorized personnel,
–use of components or spare parts other than original.
11.6 During the guarantee period any repairs must be carried out by the manufacturer service department, or the user,
upon the service's notification and consent.
11.7Replacement of the consumables can be user-performed only after expiration of the guarantee.
FIGURE 5.
Loose Spare Parts set for SP-32 and SP-48 pilots
Loose Spare Parts set includes:
1 - rod gland ½” NPT (for SP-32 and SP-48) –1 pc
2 - gasket OD 25x5 (for SP-32) –1 pc
3 - O ring 46x3 (for SP-48) –1 pc
4 - thumb screw M4 with snap ring
(for SP-32-ND and SP-48-ND) –1 pc
12.
STORAGE
SP-48 gas pilot should be stored in a clean, dry environment and in its original packaging if possible.
In case of long length pilots, always keep them in a horizontal position by supporting both ends and in the middle. It
should also be protected from contamination using caps on gas and air inlet and pilot outlet and covered with foil.
Storage over 30 days: relative humidity of no more than 85%, temperature below 50°C.
NOTICE:THE MANUFACTURER RESERVES THE RIGHT TO CARRY OUT
MODIFICATIONS TO THE PRODUCT DESCRIBED IN THIS INSTRUCTION MANUAL
AT ANY TIME AND WITHOUT ANY ADVANCE NOTICE.
.
1
2
3
4

®
11
13.
ORDERING INFORMATION
Before ordering, please provide the data as in Appendix 3.
The Table 1 below shows examples of the Part Numbers of length “L” every 0.5 metre, the fuel options of Natural
Gas or Propane Gas/LPG in typical capacity ranges as in Appendix 1.
Pilots can be ordered in size increments of 0.1 metre lengths, from 0.5 to 3.0 metres.
Part Number coding samples:
SP-48-NG-FD-1.5 or SP-48-PG-FD-1.5
Which means: SureFire II™Pilot - 48 mm OD - Natural Gas (NG) or Propane Gas/LPG (PG) - Forced
Draught (FD) -1.5 metre insertion length
Table 1: SureFire II™Forced Draught Pilot selection Table, showing only the 0.5 metre intervals, 0.1 metre
intervals may be ordered (See Price List).
REMARKS:
1. Select required kind of fuel –choose NG for Natural Gas or PG for Propane Gas or LPG.
2. Select Electric Igniter rod and power pack separately
Part No
Description
SP-48-NG/PG-FD-0.5
SureFire II™Pilot, 48 mm OD, Nat. Gas or Propane Gas, Forced Draught, 0.5 m ins. length
SP-48-NG/PG-FD-1.0
SureFire II™Pilot, 48 mm OD, Nat. Gas or Propane Gas, Forced Draught, 1.0 m ins. length
SP-48-NG/PG-FD-1.5
SureFire II™Pilot, 48 mm OD, Nat. Gas or Propane Gas, Forced Draught, 1.5 m ins. length
SP-48-NG/PG-FD-2.0
SureFire II™Pilot, 48 mm OD, Nat. Gas or Propane Gas, Forced Draught, 2.0 m ins. length
SP-48-NG/PG-FD-2.5
SureFire II™Pilot, 48 mm OD, Nat. Gas or Propane Gas, Forced Draught, 2.5 m ins. length
SP-48-NG/PG-FD-3.0
SureFire II™Pilot, 48 mm OD, Nat. Gas or Propane Gas, Forced Draught, 3.0 m ins. length
The Table 2 below shows Part Numbers of gas igniter mounting tubes and spare parts.
Table 2: SureFire II™Pilot Mounting Tubes & Spare Parts
Part No
Description
SP-48-MTF
Mounting Tube Flanged, flange OD 80, length 120mm
SP-48-MTW-150
Mounting Tube for Welding, length 150 mm
SP-48-MTW-600
Mounting Tube for Welding, length 600 mm
SP-32/48-LS-SET
Loose Spare Part set for SP32 and SP-48 pilots *
SP-48-FD-STOR
Stabilizer assy: swirler-stabilizer, divider, main & bleed orifice for SP-48-FD
SP-48-END
Air tube end with inlets, 200 mm long, SS310, for SP-48-ND and SP-48-FD
* Loose Spare Part set includes items as on Fig. 5
Special Pilots:
Not all applications can be easily coded to cover every requirement. In order to provide for these, there is a
supplementary Part Numbering system. It is used in case of applications that require:
- other Natural gas or Propane gas capacity ranges than standard needed,
- other Fuel gas than specified above –see Remarks in Appendix 3,
- other pilot construction needed.
In such case please provide the data as in Table in Appendix 3, especially the gas composition. It is required
for the proper selection of materials used for pilot construction and feasibility of operation checking.
Part Number in such case is SP-48-ZYY-F-xxx where:
- “Z” is capacity range e.g. S-small, M-medium, L-large or possibly others,
- “YY” is the specific Project Number given by Fireye after analyzing the Proposal Data Sheet,
- “F” is Forced draught,
- “xxx” is the length L.
REMARKS: Fireye will provide a special price for the pilot after Proposal Data Sheet analysis.
Fireye may refuse to execute of an order if considered as impossible to complete.
12
®
APPENDIX No 1
The Pilot capacity vs. gas pressure graphs - standard version
Remark: The real measured capacity may differ by ± 5% depending on a particular pilot and
measurement conditions
®
13
APPENDIX No 2
Proper position of the SureFire II™ SP-32 and SP-48 Pilots on burners
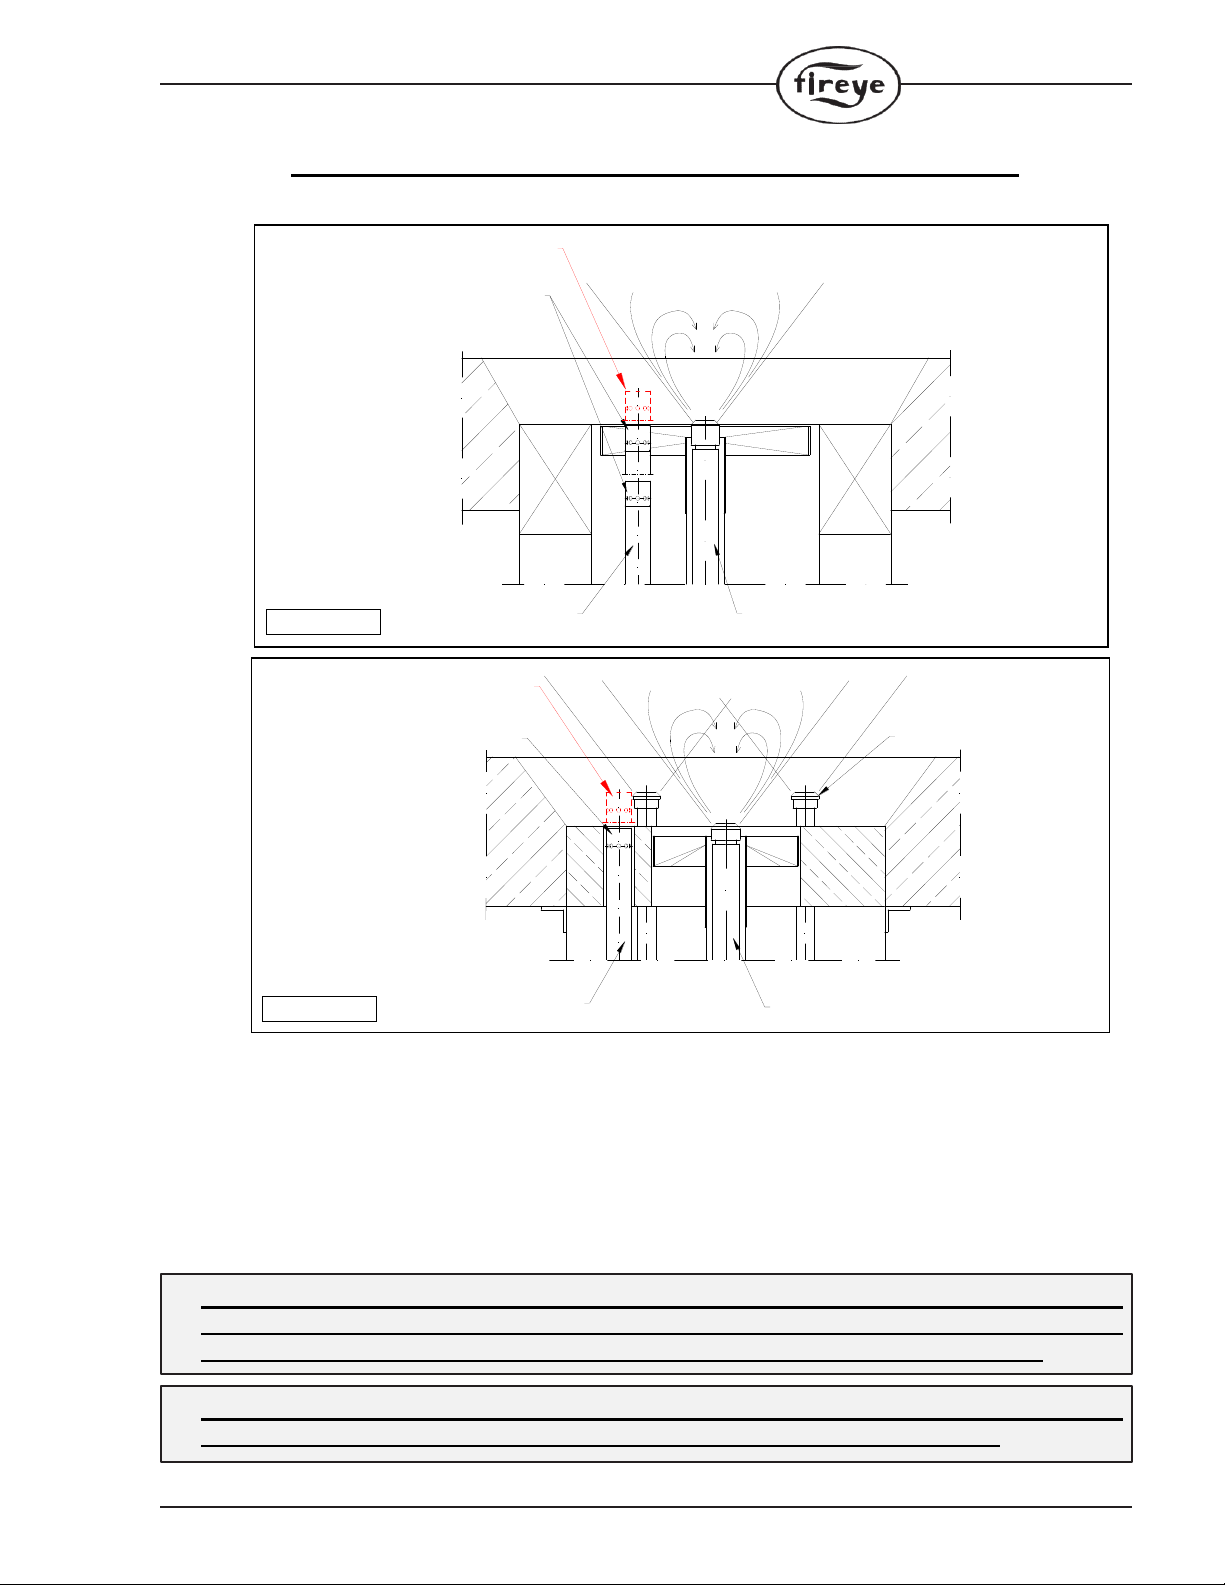
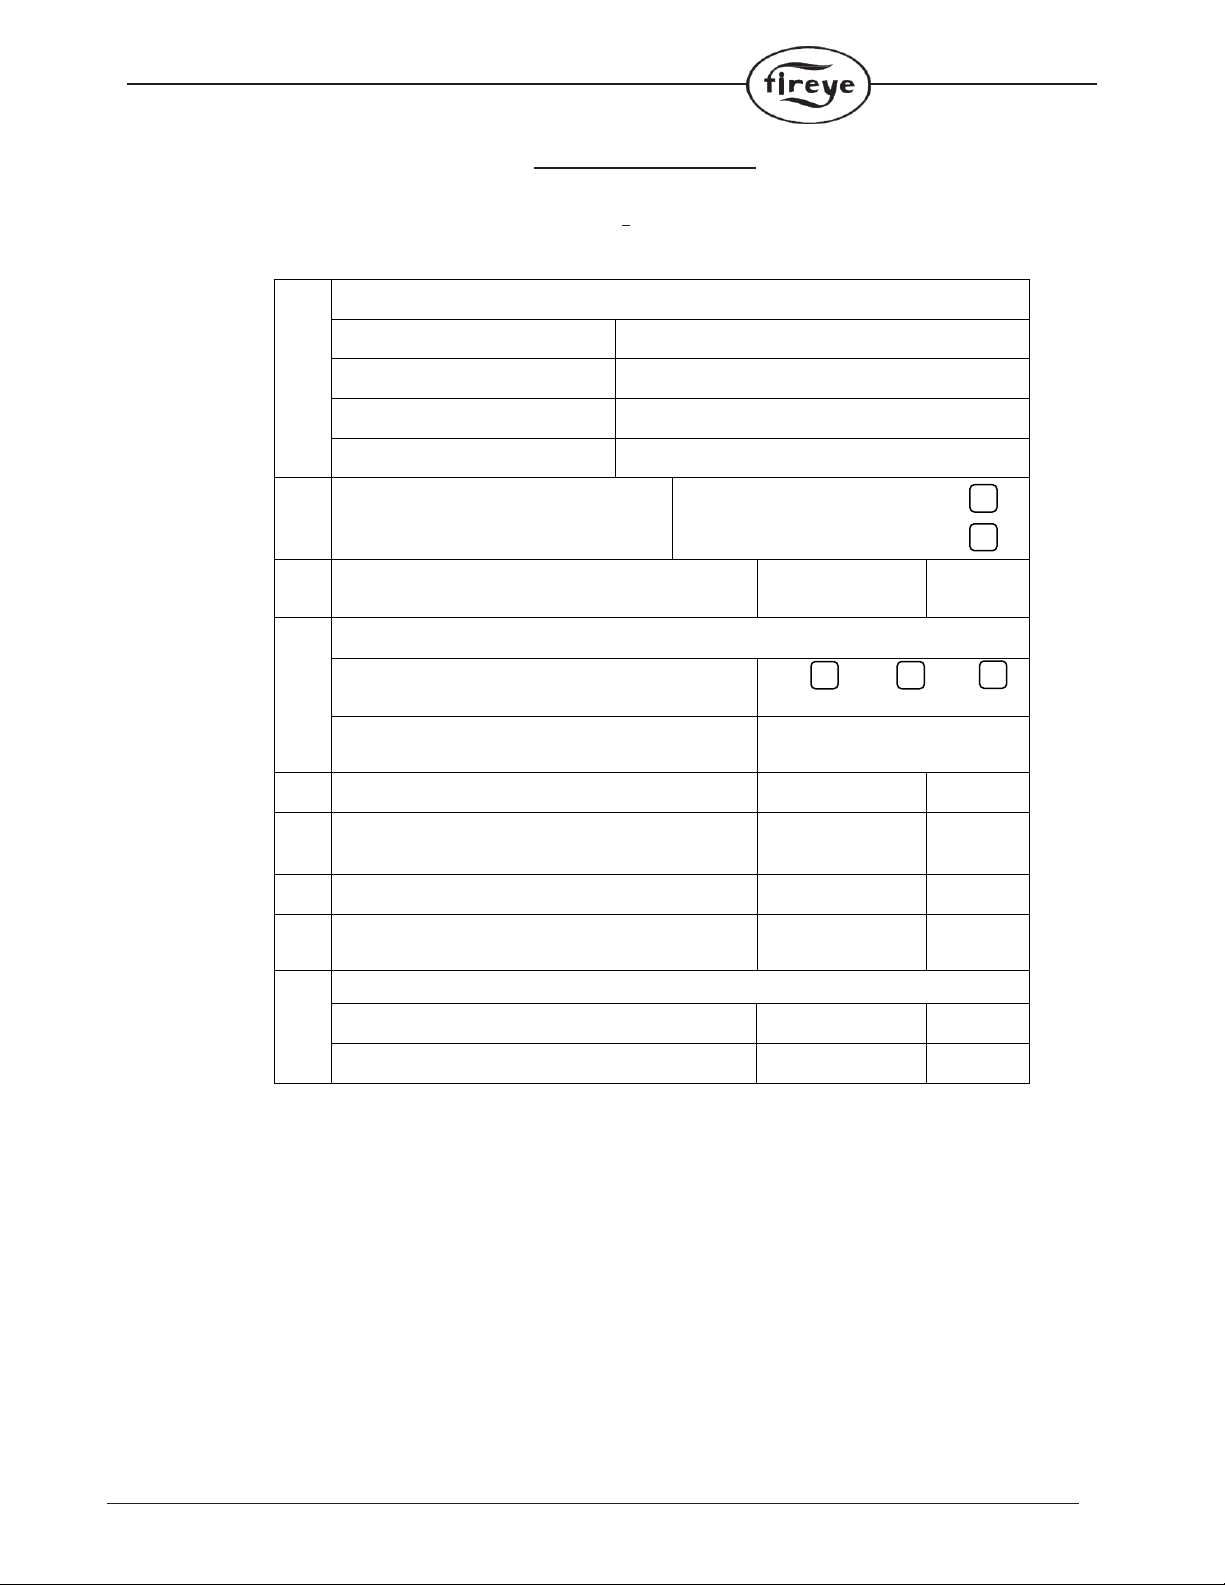
Appendix shows a sample of typical positions of gas pilots on two types of burners.
Fig. A Typical for power & utility boilers, industrial heaters - shows position of SP-32 and SP-48 Gas Igniter operating
as an intermittent (light-off) on a sample single gun main burner, oil or gas fired, vertical or horizontal mounting.
The pilot air tube tip can reach the swirler or can be placed before it. Pilot tip cannot extend beyond the swirler plane.
Fig. B Typical for refinery, petrochem and industrial heaters - shows position of SP-32 and SP-48 Gas Igniter operating
as a continuous pilot on a sample main burner, with gas spuds and central oil or gas gun, vertical mounting.
The pilot air tube tip can be mounted in the throat or in the swirler. Pilot tip cannot extend beyond the heater lining or
swirler plane and has to be at least 150 mm away from the main burner nozzle flame.
WARNING: PILOT TIP CANNOT BE MOUNTED IN MAIN BURNER FLAME. THE
DISTANCE SHOULD BE AT LEAST 150 MM FROM THE FUEL CONE. PILOT TIP
CANNOT EXTEND BEYOND THE HEATER LINING OR BURNER THROAT.
WARNING: IN CASE OF ANY DOUBTS CONCERNING THE PILOT POSITION ON
A BURNER CONSULT PILOT AND MAIN BURNER MANUFACTURERS.
Atomized fuel cone
Incorrect position
too close to flame
Correct position
SP-32, -48 Gas Pilot
Gas spuds
Oil or gas central gun
FIGURE B
Atomized fuel cone
Incorrect position
too close to flame
Correct position
SP-32, -48 Gas Igniter Oil or gas gun
FIGURE A
14
®
APPENDIX No 3 Proposal Data Sheet
SureFire II™Pilot - Forced Draught Gas Pilot
Type SP-48-NG/PG-FD-xxx
Please provide the following data before placing the Order for gas pilot:
1.
Information about End User
—Plant Name:
. . . . . . . . . . . . . . . . . . . . . . . . . . . . . . . . . . . . . .
—Owner:
. . . . . . . . . . . . . . . . . . . . . . . . . . . . . . . . . . . . . .
—Country:
. . . . . . . . . . . . . . . . . . . . . . . . . . . . . . . . . . . . . .
—Localization (address):
. . . . . . . . . . . . . . . . . . . . . . . . . . . . . . . . . . . . . .
2.
Gas pilot mode of operation:
(check the proper box)
—intermittent light-off
—continuous pilot
3.
Insertion length “L”:
(see Fig. 1)
. . . . . . . . . . . . .
[m]
4.
Fuel gas for pilot:
—Natural Gas, Propane Gas, other Fuel Gas:
(check the proper box)
NG PG FG
—if other Fuel Gas –specify the type of gas:
enclose gas composition sheet
. . . . . . . . . . . . . . . . . . . . . . . . .
5.
Gas net calorific value:
. . . . . . . . . . . . .
[MJ/Nm3]
6.
Required pilot heat input (capacity) at
pressure:
. . . . . . . . . . . . .
[kW]
at [kPa]
7.
Gas pressure range available for pilot:
. . . . . . . . . . . . .
[kPa]
8.
Main burner nominal (or max.) capacity:
capacity of burner to be lit
. . . . . . . . . . . . .
[kW]
9.
Air for pilot: cooling and combustion air
—air pressure:
. . . . . . . . . . . . .
[kPa]
—air flow:
. . . . . . . . . . . . .
[m3/min]
Remarks: The reasons why the gas composition information is so important in case of other Fuel gases used:
1. Use of other Fuel Gases like: coke oven gas, blast furnace gas, biogas and especially refinery gas (Refinery
Off Gas) needs additional engineering and testing because their gas compositions and calorific values are
different than these of NG, PG and LPG taken for gas pilot design. Moreover they can vary considerably
from one plant to another and also change a lot over time.
2. Refinery Off Gas (ROG): is a mixture of gases generated during the processing of crude oil in the refinery.
Such recovery gases have common components such as hydrogen, methane, ethane, butane, propane and ethylene
and are used as a fuel to produce energy to run the refinery processes.
An ROG contains many additional components such as oxygen, ammonia, nitriles, acetylenes, heavy sulfur
compounds, butadiene, chlorides, arsenic, mercury, vanadium and water, in addition to the acid gases H2S, CO2,
and COS. Many of them are harmful to the environment.
High contents of H2- over 50%, presence of H2S or vanadium can cause significant problems during
combustion, especially high temperature corrosion of pilot, igniter and combustion chamber metal parts.
3. For this reason, every pilot’s application where such Fuel gas is used requires careful analysis of the pilot
construction and often functional tests on similar gases.

®
15
APPENDIX No 4
UNIT CONVERSION TABLE
Quantity
Metric Units
Imperial Units
Length
1 millimetre [mm]
x 0.003281 = foot [ft.; ’]
x 0.03937 = inch [in; ”]
1 metre [m]
x 3.281 = foot [ft; ’]
x 39.370 = inch [in; ”]
Volume
1 cubic metre [m3]
x 35.315 = cubic foot [ft3]
Air flow rate
1 cubic metre/hour [m3/h]
x 0.589 = standard cubic foot/min [SCFM]
Weight
1 kilogram [kg]
x 2.2046 = pound [lb.]
Pressure
1 kilopascal [kPa]
x 6.895 = pound square inch gauge [psig]
x 4.015 = inch H2O
Power
(capacity)
1 kilowatt [kW]
x 293.1 = million BTU/hr. [mmBTU/Hr]
Calorific
value
1 mega joule/cubic metre
[MJ/m3]
x 26.839 = BTU/ cubic foot [BTU/ft3]
Temperature
Deg. Celsius [°C]
Formula: °C x1.8 + 32 = Deg. Fahrenheit [°F]

16
®
NOTICE
When Fireye products are combined with equipment manufactured by others and/or integrated into
systems designed or manufactured by others, the Fireye warranty, as stated in its General Terms and
Conditions of Sale, pertains only to the Fireye products and not to any other equipment or to the
combined system or its overall performance.
WARRANTIES
FIREYE guarantees for one year from the date of installation or 18 months from date of
manufacture of its products to replace, or, at its option, to repair any product or part thereof (except
lamps, electronic tubes and photocells) which is found defective in material or workmanship or
which otherwise fails to conform to the description of the product on the face of its sales order.
THE FOREGOING IS IN LIEU OF ALL OTHER WARRANTIES AND FIREYE MAKES
NO WARRANTY OF MERCHANTABILITY OR ANY OTHER WARRANTY, EXPRESS
OR IMPLIED. Except as specifically stated in these general terms and conditions of sale, remedies
with respect to any product or part number manufactured or sold by Fireye shall be limited
exclusively to the right to replacement or repair as above provided. In no event shall Fireye be
liable for consequential or special damages of any nature that may arise in connection with such
product or part.
FIREYE
SF-600
3 Manchester Road MAY 15, 2019
Derry, New Hampshire 03038 USA Supersedes
August 3
rd
, 2018
www.fireye.com
®
This manual suits for next models
1
Table of contents
Other Fireye Industrial Equipment manuals


Popular Industrial Equipment manuals by other brands

Barnes
Barnes Synventive eGate 2.0 Field installation guide

Big Daishowa
Big Daishowa SMART DAMPER operating manual

Stahl
Stahl isPAC HART 9196 Series operating instructions

Jäger
Jäger Z33-M060.03 K2S2A manual

Precision Rated Optics
Precision Rated Optics OFS-945S Operation guide

ABB
ABB HT609732 Operation manual


