WeeklY testIng
might accidentally damage or set fire to the unit or to your
for
Using the test button is the recommended way to test this
Smoke Alarm. Press and hold the test button on the cover of the unit
until the alarm sounds (the unit may continue to alarm for a few seconds
after you release the button).
hoW to Install thIs sMoke alarM
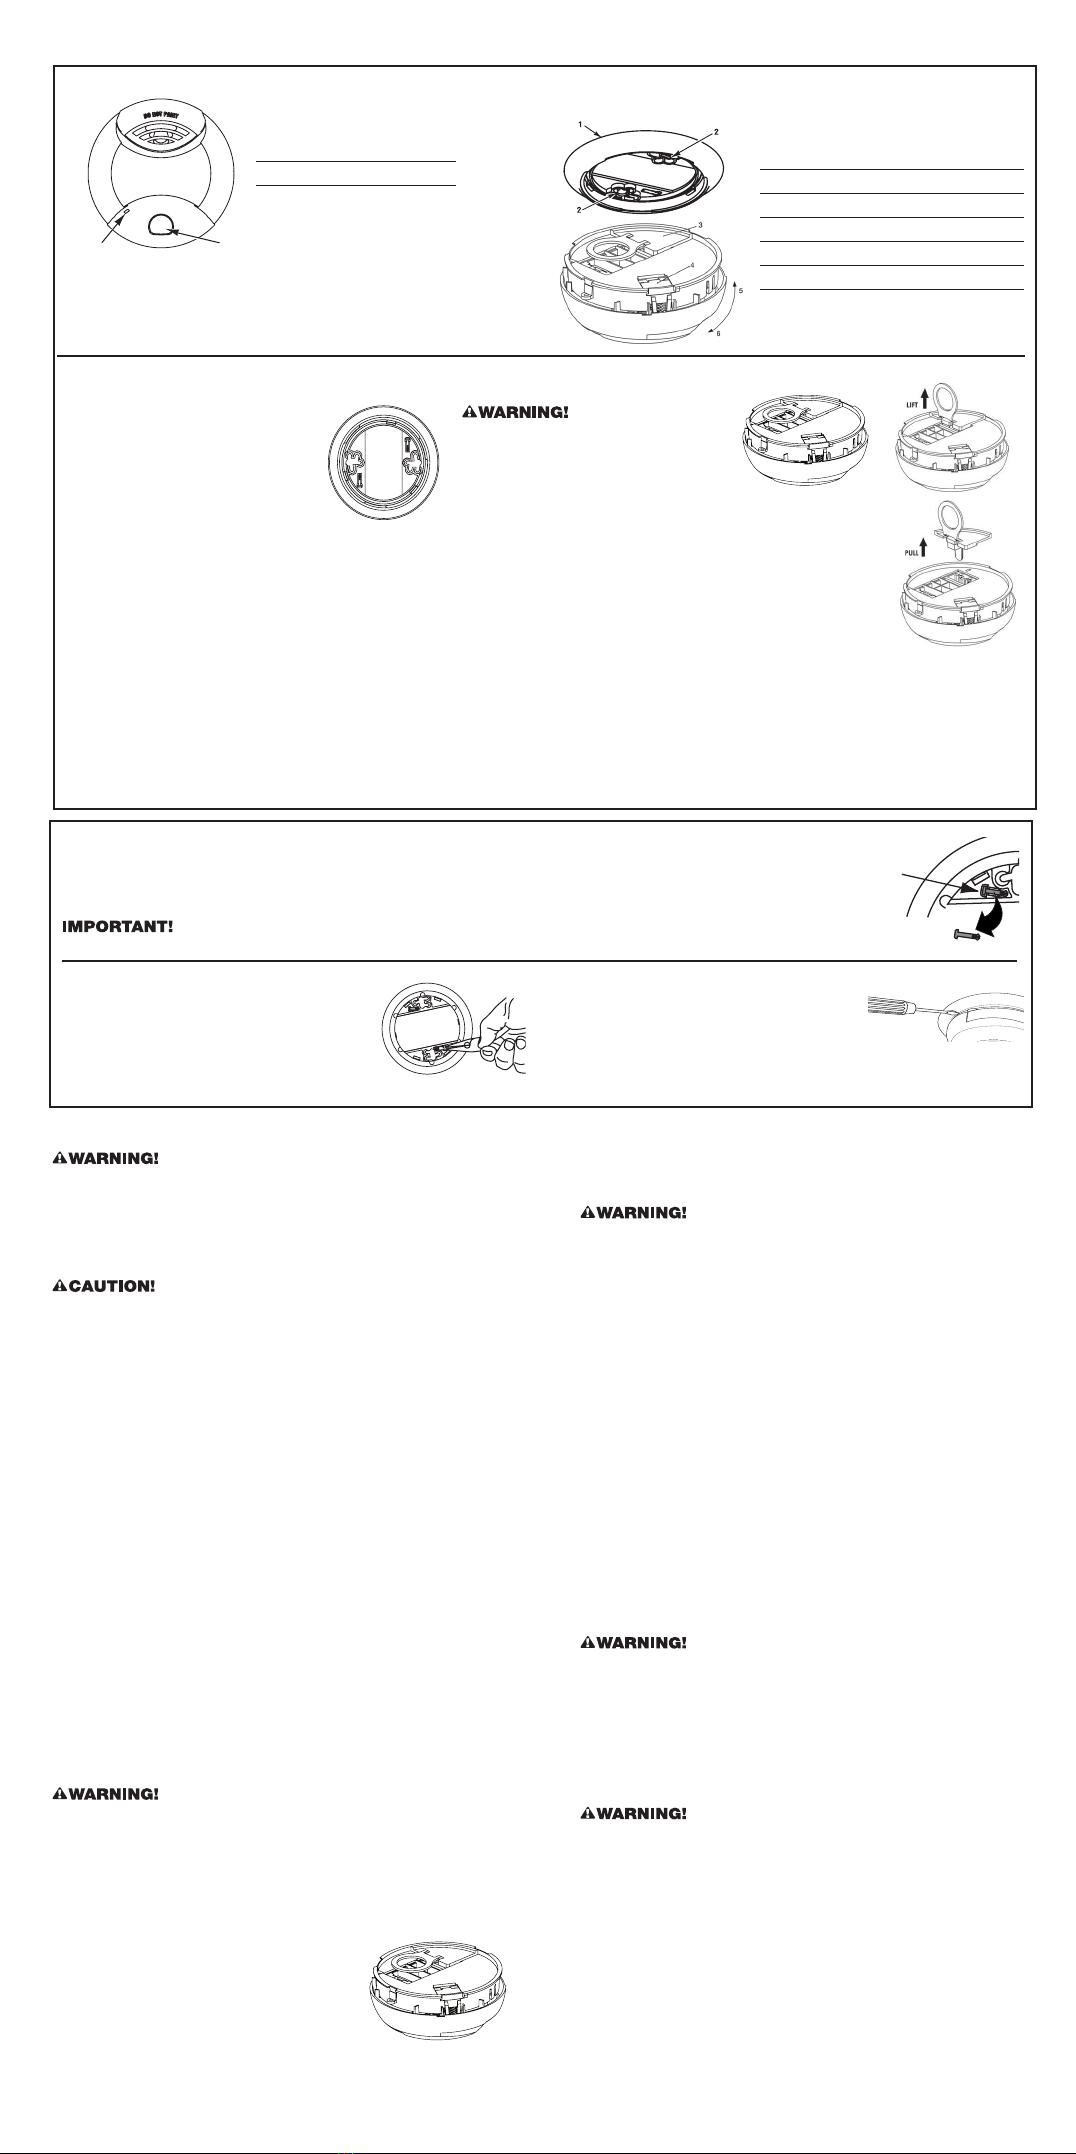
the parts oF thIs sMoke alarM
FolloW these sIMple steps!
IF thIs sMoke alarM soUnds
respondIng to an alarM
you of a potentially dangerous situation that requires your
What to do In case oF FIre
• Don’t panic; stay calm. Follow your family escape plan.
• Get out of the house as quickly as possible. Don’t stop to
get dressed or collect anything.
• Feel doors with the back of your hand before opening them.
If a door is cool, open it slowly. Don’t open a hot door. Keep doors
and windows closed, unless you must escape through them.
• Cover your nose and mouth with a cloth (preferably damp).
Take short, shallow breaths.
• Meet at your planned meeting place outside your home,
and do a head count to make sure everybody got out safely.
• Call the Fire Department as soon as possible from outside.
Give your address, then your name.
• Never go back inside a burning building for any reason.
• Contact your Fire Department for ideas on making your home safer.
Install the MoUntIng Bracket:
1. Place the bracket on the wall or ceiling
where you want to mount the alarm.
2. Hold the mounting bracket against the
ceiling (or wall) and trace around the
inside of the two keyhole slots.
3. Make a mark inside each outline for
the drill holes.
4. Put the unit where it won’t get covered
with dust when you drill the mounting holes.
5. Using a 3/16-inch (5 mm) drill bit, drill a hole
through each
pencil mark.
6. Insert the plastic screw anchors (in the plastic bag
with screws) into the holes. Tap the screw anchors
gently with a hammer, if
necessary, until they are flush with the ceiling or
wall.
7. Line the mounting bracket up over the plastic screw
anchors.
8. Screw the mounting bracket to the ceiling or wall
through the mounting slots using the two screws
provided.
9. Tighten both screws all the way.
UsIng the sIlence FeatUre
The Silence Feature can temporarily quiet an unwanted alarm for up
to 10 minutes. To use this feature, press the “Test/Silence” button.
The Alarm remains functional. The LED will flash every 10 seconds
(for up to 10 minutes) to remind you the alarm has been silenced.
The flashing LED will stop when the unit returns to normal operation.
unit is dense enough to suggest a potentially dangerous
2 3
regUlar MaIntenance
This unit has been designed to be as maintenance free as possible, but
there are a few simple things you must do to keep it working properly.
• Test it at least once a week.
• Clean the Smoke Alarm at least once a month; gently vacuum the
outside of the Smoke Alarm using your household vacuum’s soft
brush attachment. A can of clean compressed air (sold at computer
or office supply stores) may also be used. Follow manufacturer
instructions for use. Test the Smoke Alarm. Never use water,
cleaners or solvents since they may damage the unit.
• If the Smoke Alarm becomes contaminated by excessive dirt, dust
and/or grime, and cannot be cleaned to avoid unwanted alarms,
replace the unit immediately.
• Relocate the unit if it sounds frequent unwanted alarms. See
“Locations to Avoid For Smoke Alarms” for details.
When the battery pack becomes weak, the Smoke Alarm unit will
“chirp” about once a minute (the End of Life warning). This End of
Life warning should last for 7 days, but you should replace the Smoke
Alarm
immediately to continue your protection.
1
2
1. Test/Silence button
2. Power/alarm indicator LED
1. Mounting bracket
2. Mounting slots
3. Activation Tab
4. Deactivation Tab (located under label)
5. Turn to attach to bracket
6 Turn this way to remove from bracket
actIvatIng the alarM:
attaching the Smoke Alarm to the
1. Turn alarm upside down and pull out
activation tab as shown in diagram.
2. Test the Smoke Alarm. Press and hold the test button on the
cover of the unit until the alarm sounds (the unit may continue
to alarm for a few seconds after you release the button).
If the unit does not alarm
during testing, call Consumer Affairs for assistance.
attach sMoke alarM to MoUntIng Bracket
1. Push the unit toward the bracket, and turn it clockwise until you feel it snap into place.
2. Test the unit again. Press the test button until the horn begins sounding. During
to perManentlY deactIvate the sMoke alarM
1. Once you deactivate this unit, it will not detect smoke or alarm.
It cannot be reactivated. You must install a new unit to continue
your protection. Alarm will resist mounting to the bracket after
deactivation.
2. Use a flathead screwdriver to score
label along dotted line.
3. Use thumb to pull deactivation tab
outward until tab snaps into place.
This will discharge the battery pack and
deactivate the unit.
4. Install a new Smoke Alarm immediately!
tools YoU WIll need:
• Pencil
• Drill with 3/16” (5 mm)
drill bit
• Standard flathead
screwdriver
• Hammer
BEDROOM
BEDROOM HALL
LIVING ROOM KITCHEN
FINISHED BASEMENT
REQUIRED TO MEET
NFPA RECOMMENDATIONS
RECOMMENDED FOR
ADDITIONAL PROTECTION
BEDROOM
BEDROOM
KITCHEN
LIVING ROOM
DINING ROOM
MULTI-STORY RESIDENCE
SINGLE-STORY RESIDENCE, APARTMENT,
MOBILE HOME
KEY:
EXISTING HOMES
SMOKE ALARMS WITH SILENCE
FEATURES RECOMMENDED FOR
ADDITIONAL PROTECTION
INTERCONNECTED AC OR
AC/DC SMOKE ALARMS
BEDROOM
BEDROOM HALL
LIVING ROOM KITCHEN
FINISHED BASEMENT
REQUIRED TO MEET
NFPA RECOMMENDATIONS
RECOMMENDED FOR
ADDITIONAL PROTECTION
BEDROOM
BEDROOM LIVING ROOM
DINING ROOM
MULTI-STORY RESIDENCE
SINGLE-STORY RESIDENCE, APARTMENT,
MOBILE HOME
KEY:
NEW CONSTRUCTION
SMOKE ALARMS WITH SILENCE
FEATURES RECOMMENDED FOR
ADDITIONAL PROTECTION
KITCHEN
to Unlock the MoUntIng Bracket
1. Insert a flathead screwdriver between the
mounting bracket pin and the mounting
bracket.
2. Pry the Smoke Alarm away from the bracket by turning both the
screwdriver and the Smoke Alarm counterclockwise (left) at the
same time.
to lock the MoUntIng Bracket
1. Using needle-nose pliers, detach one locking
pin from mounting bracket.
2. Insert locking pin into notch on base of alarm.
3. Attach Smoke Alarm to mounting bracket.
Locking Pin
optIonal lockIng FeatUre
Tools you will need: • Needle-nose pliers or utility knife • Standard Flathead screwdriver.
This locking feature uses locking pins, which are molded into the mounting bracket. Using needle nose pliers or a utility knife,
remove one pin from the mounting bracket.


