FIRST AUSTRIA FA-5408-6 User manual

28
FA-5408-6
INSTRUCTION MANUAL
JUG KETTLE
BEDIENUNGSANLEITUNG
WASSERKOCHER
INSTRUKCIÄ PO
QKSPLUATACII
QLEKTROHAJNIK
CZAJNIKA
ELEKTRYCZNEGO
FOLOSIRE
FIERBATORULUI
UPUTSTVO ZA UPOTREBU
BOKAL ZA KUVANJE VODE
NAUDOJIMO INSTRUKCIJA
VIRDULYS
BOUILLOIRE
MANUAL DE
INSTRUCCIONES
JARRA HERVIDORA
ҚОЛДАНУ ЖӨНІНДЕ
НҰСҚАУЛАР
эЛЕтР шәйНЕгІ
ENGLISH................. PAGE 2
DEUTSCH ............... SEITE 4
RUSSKIJ ................. STR. 6
POLSKI............... STRONA 8
ROMANESTE..... PAGINA 10
SCG/CRO/B.i.H. . STRANA 12
LATVIAN................... LPP. 14
LIETUVIU K.................. P. 16
.......... STR. 18
....... 20
FRANÇAIS ............ PAGE 22
ESPAÑOL........... PÁGINA 24
......................
28......................
29
!
1
/ 2
3
4
5
360 6
:
1
2
3
4
5
.)( 6
7
8
9
10
11
12
13
14
15
16
17
18
/ 19
20
21
22
)( 23
24
:
1
2
3
)""( 0.5 4
.)""( 1.2 5
6
10 5
7
8
9
/ 10
11
12
13
)(
"" 1
2
3
"" 4
5
6
360
360
:
1630-1370 • 60/50 • 240-220
!
:
2
5
6
4
3
1

INSTRUCTION MANUAL
JUG KETTLE
SAVE THESE INSTRUCTIONS!
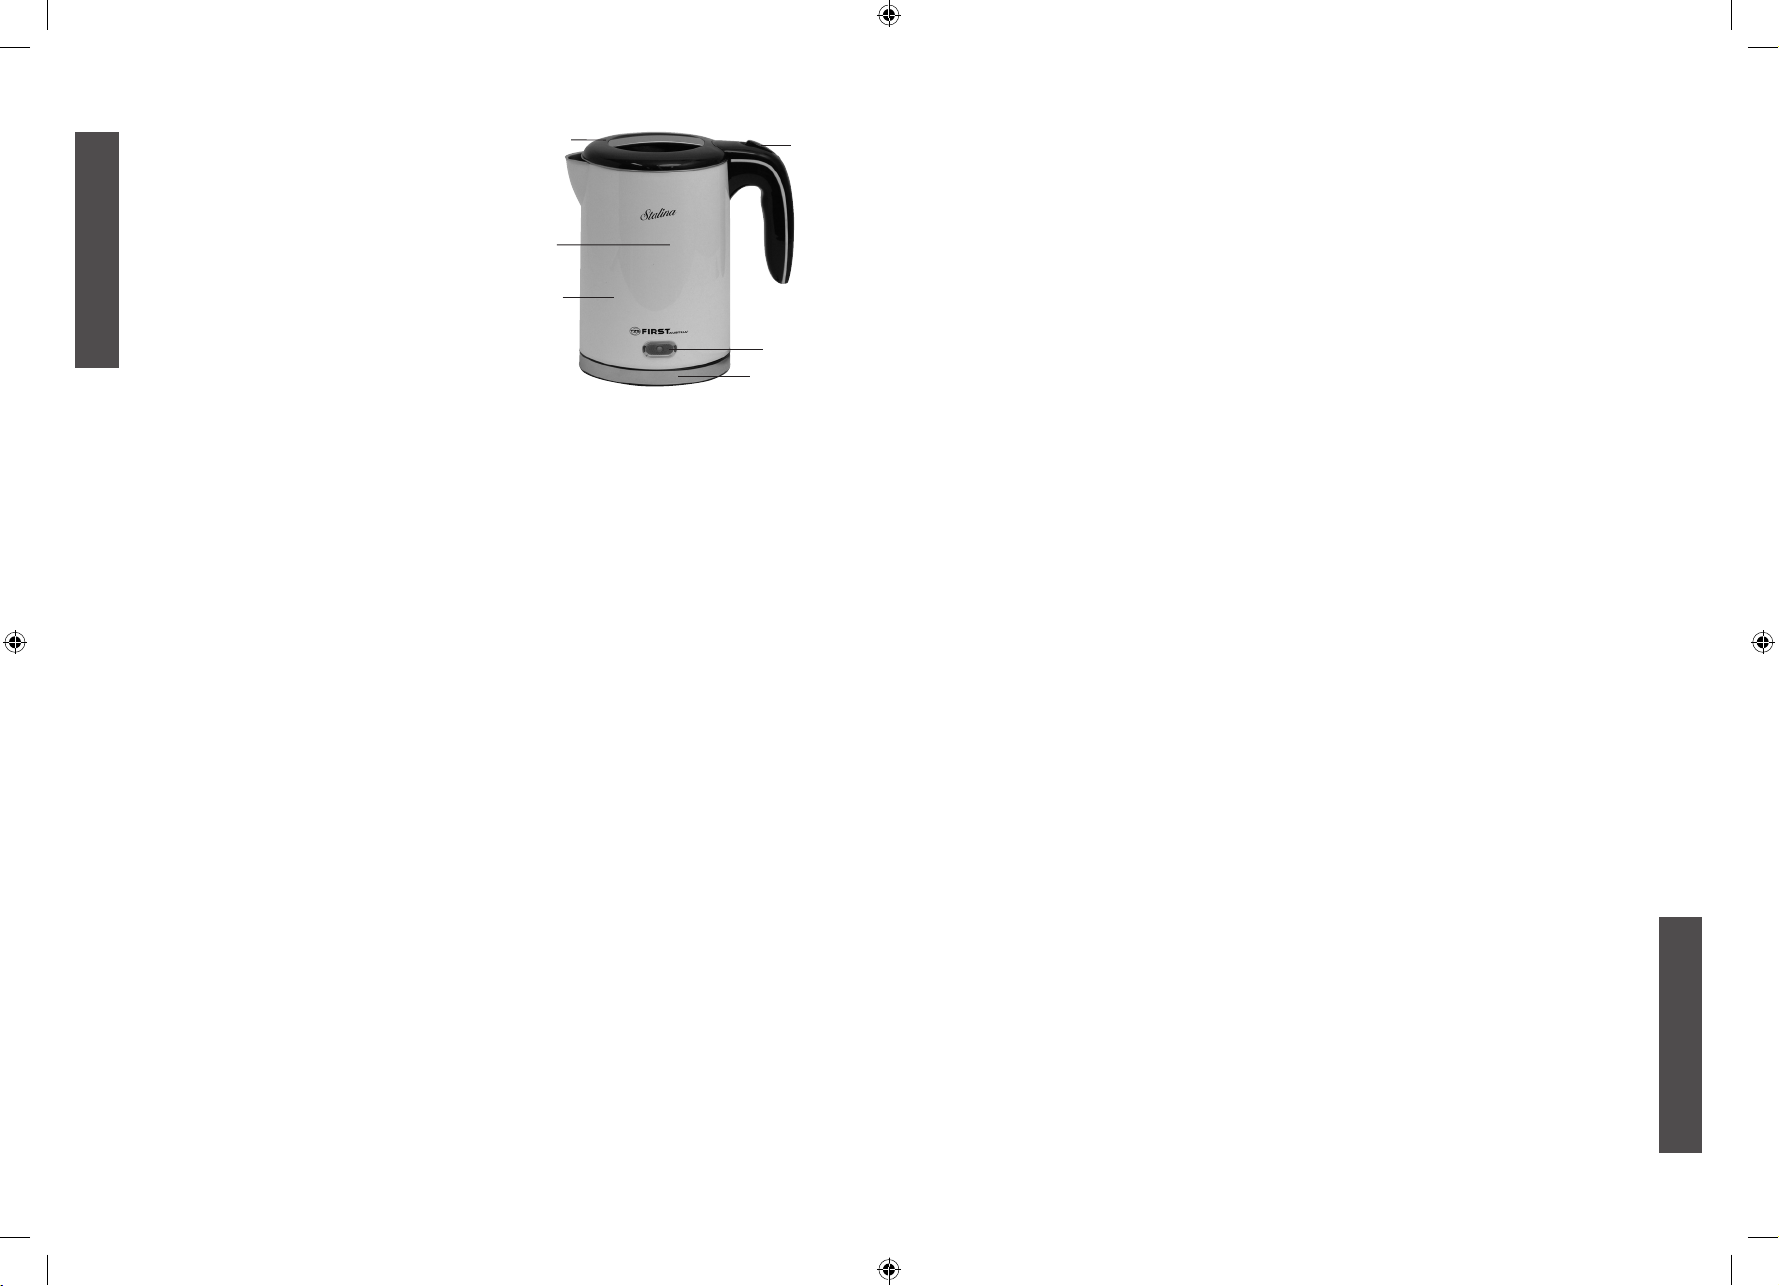
PRODUCT DESCRIPTION
1. Hinged Lid
2. ON/OFF Switch
3. Pilot Light
4. MAX Water Level Indicator
5. Cordless Power Base
6. 360° Connector
IMPORTANT SAFEGUARDS
When using your kettle, basic safety precautions should always be followed, including the following:
1. Read all instructions carefully, even if you are familiar with the appliance.
2. Close supervision is necessary when any appliance is used by or near children.
3. Before connecting the kettle, check if the voltage indicated on the appliance corresponds with the mains
voltage in your home. If this is not the case, contact your dealer and do not use the kettle.
4. Switch off and unplug from the outlet before filling, emptying or cleaning, or when not in use.
5. Do not overfill as boiling water may be ejected. The maximum level is marked inside the kettle.
6. Do not operate or place any part of this appliance on or near any hot surface (such as gas or electric
burner or in a heated oven).
7. Do not let the cord hang over the edge of a table or counter. Do not let the cord touch hot surfaces.
8. Never yank on the cord as this may damage the cord and eventually cause a risk of electric shock.
9. If the supply cord of this appliance is damaged, it must only be replaced by a repair shop appointed by
the manufacturer, because special purpose tools are required.
10. Avoid touching hot kettle surfaces - use the handle and the knobs.
11. To avoid possible steam damage, turn the spout away from walls or cabinets when operating the kettle.
12. If operated on wood furniture, use a protective pad to prevent damage to delicate finishes.
13. To avoid scalding, always ensure the lid is correctly positioned before operating.
14. Scalding may occur if the lid is removed whilst heating.
lid. Always use the body handle.
16. Do not switch your kettle on if it is empty.
17. To protect from electrical hazard, do not immerse this kettle or cordset in any liquid.
18. Use the kettle only with the supplied base unit. Do not use the base unit for other purposes.
19. To protect against fire, do not operate in the presence of explosive and/or flammable fumes.
20. A kettle should not be left connected to a wall socket when the room temperature is likely to fall to outdoor
winter temperatures. At sub-zero temperatures the automatic control thermostat may reset to boil and
energize the element.
21. Do not use the kettle for any purpose other than heating water. Other liquids or food will contaminate the
interior.
22. This product has not been designed for any other uses than those specified in this manual.
23. This appliance is not intended for use by persons (including children) with reduced physical, sensory or
mental capabilities, or lack of experience and knowledge, unless they have been given supervision or
instruction concerning use of the appliance by a person responsible for their safety.
24. Children should be supervised to ensure that they do not play with the appliance.
WARNING: Compare the local voltage with the voltage declared on the device.
INSTRUCTIONS FOR USE
1. Before first use, fill the kettle with clean water to maximum capacity and boil. Discard the water and
repeat.
2. The kettle should always be unplugged when filling or adding water.
3. Fill the kettle with water to the desired level. Do not overfill or there will be a risk of spillage or spitting.
Do not forget to close the lid after filling, otherwise the kettle will not automatically switch off after use.
operating.
6. An automatic safety cut-out has been fitted for protection against overheating. It will operate if the kettle
is switched on when containing insufficient water. Always ensure that the water inside the kettle covers
the minimum mark. If the automatic safety cut-out has operated, disconnect from the power outlet and
allow the kettle to cool down for 5 to 10 minutes. Then refill with water and switch on - the kettle will then
boil and cut off as in normal operation.
7. Place the power base on a dry flat surface.
8. Place the kettle on the power base. The electrical connections will be made automatically as the kettle
slides onto the power base.
9. Plug the cordset into an earthed power socket.
10. The appliance is switched on by pressing the ON/OFF switch. The pilot light will come on
11. When the water has boiled, the kettle will switch off automatically.
12. Do not remove the kettle from the power base without switching off first.
13. To pour water, lift the kettle from the power base and pour.
HOW TO CARE FOR YOUR KETTLE
Wipe the exterior of the kettle with a soft, damp cloth or sponge. Remove stubborn spots with a cloth
moistened with mild liquid detergent. Do not use abrasive scouring pads or powders. Never immerse the
kettle in water or other liquids.
From time to time depending on the nature of your water supply, a limescale deposit is naturally formed and
can be found mostly adhered to the heating element and reduces the heating capacity. The amount of lime-
scale deposited (and subsequently the need to clean or descale) largely depends on the water hardness in
your area and the frequency with which the kettle is used.
Limescale is not harmful to your health. But if poured into your beverage, it can give a powdery taste to your
drink. Therefore, the kettle should be descaled periodically as indicated below:
DESCALING
Descale the kettle regularly. With normal use, at least twice a year.
wait for the appliance to switch off automatically.
2. Let the mixture remain inside the kettle overnight.
3. Throw the mixture away next morning.
5. Throw away this boiled water to remove any remaining scale and vinegar.
6. Rinse the inside of the kettle with clean water.
360° CONNECTOR BASE
The 360° connector between the kettle and its base means that the kettle can be located at any point on the
base. This is ideal for left and right-handed users as the kettle can be positioned conveniently on your kitchen
counter.
TECHNICAL DATA:
Environment friendly disposal
You can help protect the environment! Please remember to respect the local regulations: hand in the non-
working electrical equipments to an appropriate waste disposal center.
3
ENGLISH
2
ENGLISH
2
5
6
4
3
1

5
DEUTSCH
4
DEUTSCH
WARNUNG: Vergewissern Sie sich zunächst, dass die lokale Spannung mit der auf dem Leistungsschild
angegebenen Spannung übereinstimmt.
VERWENDUNG
1. Bevor Sie das Gerät zum ersten Mal verwenden, füllen Sie bitten den Wasserkocher bis zur Maximalhöhe
mit Wasser und lassen Sie es kochen. Schütten Sie das Wasser weg und wiederholen Sie den Vorgang.
2. Sie sollten den Stecker des Geräts immer aus der Steckdose ziehen, wenn Sie Wasser ein- oder nach-
füllen.
3. Füllen Sie den Wasserkocher bis zur gewünschten Höhe mit Wasser. Überfüllen Sie das Gerät nicht, da
Wasser herausspritzen könnte. Vergessen Sie nicht, den Deckel nach dem Füllen wieder zu schliessen,
da sich der Wasserkocher sonst nach der Verwendung nicht automatisch ausschaltet.
Wasserkocher leer läuft.
6. Ihr Wasserkocher hat einen automatischen Sicherheitsschalter zum Schutz gegen Überhitzen. Er schal-
tet aus, wenn der Wasserkocher eingeschalten wird und zu wenig Wasser enthält. Achten Sie immer
Sicherheitsschalter das Gerät ausgeschaltet hat, ziehen Sie den Stecker aus der Steckdose und lassen
Sie den Wasserkocher 5 bis 10 Minuten auskühlen. Dann füllen Sie ihn wieder mit Wasser und schalten
Sie ihn ein - der Wasserkocher wird kochen und sich ausschalten wie bei normalem Betrieb.
7. Stellen Sie die Basiseinheit auf eine trockene flache Oberfläche.
8. Setzen Sie den Wasserkocher auf die Basiseinheit. Die Stromverbindung wird automatisch hergestellt,
wenn die Kanne auf die Basiseinheit gleitet.
9. Stecken Sie das Kabel an eine geerdete Steckdose an.
10. Schalten Sie das Gerät ein, indem Sie den EIN/AUS-Schalter drücken. Die Kontrollampe leuchtet auf.
11. Wenn das Wasser gekocht hat, wird sich der Wasserkocher automatisch ausschalten.
12. Nehmen Sie den Wasserkocher nur von der Basiseinheit, wenn Sie ihn zuerst ausgeschaltet haben.
13. Um Wasser einzugiessen, heben Sie den Wasserkocher von der Basiseinheit auf und giessen Sie ein.
PFLEGE IHRES WASSERKOCHERS
Reinigen Sie das Äußere Ihres Wasserkochers mit einem weichen, feuchten Tuch oder Schwamm. Entfernen
Sie festklebende Flecken mit einem Tuch, das mit einem milden Reinigungsmittel angefeuchtet ist. Verwenden
Sie keine scheuernden oder kratzenden Lappen oder Pulver. Tauchen Sie den Wasserkocher niemals in
Wasser oder andere Flüssigkeiten.
Von Zeit zu Zeit bildet sich je nach Art Ihrer Wasserversorgung eine natürliche Kalkablagerung und wird
hauptsächlich am Heizelement kleben und die Heizleistung verringern. Die Menge der Kalkablagerung (und
in der Folge der Bedarf an Reinigung oder Entkalkung) hängt vor allem vom Grad der Wasserhärte in Ihrem
Gebiet ab und von der Häufigkeit, mit der Sie den Wasserkocher verwenden. Kalkablagerung ist für Ihre
Gesundheit nicht schädlich. Wenn Sie sie jedoch in Ihr Getränk giessen, kann es einen pudrigen Geschmack
bekommen. Entkalken Sie daher Ihr Gerät von Zeit zu Zeit wie folgt:
ENTKALKEN
Entkalken Sie das Gerät regelmäßig. Bei normaler Verwendung mindestens zweimal pro Jahr.
1. Füllen Sie den Wasserkocher bis zur Maximalhöhe mit einer Mischung aus einem Teil normaler Essig
und zwei Teile Wasser. Schalten Sie ein und warten Sie, bis sich das Gerät automatisch ausschaltet.
2. Lassen Sie die Mischung über Nacht im Wasserkocher stehen.
3. Schütten Sie die Mischung am nächsten Morgen weg.
4. Füllen Sie den Kocher bis zur Maximalhöhe mit sauberem Wasser und kochen Sie es wieder.
5. Schütten Sie auch dieses gekochte Wasser weg, um jeden Rest der Mischung aus Wasser und Essig zu
entfernen.
6. Spülen Sie das Innere des Wasserkochers gut mit sauberem Wasser aus.
360° ANSCHLUSSBUCHSE
Die 360° Anschlußbuchse zwischen dem Kessel und seiner Basiseinheit hat den Vorteil, dass der Kessel in
jeder Drehrichtung auf die Platte gestellt werden kann. So können sowohl Links- als auch Rechtshänder den
Kessel bequem auf den Küchentisch positionieren.
TECHNISCHE DATEN:
Entsorgung
Helfen Sie mit beim Umweltschutz!
Entsorgen Sie Elektroaltgeräte nicht mit dem Hausmüll. Geben Sie dieses Gerät an einer Sammelstelle für
Elektroaltgeräte ab.
BEDIENUNGSANLEITUNG
WASSERKOCHER
HEBEN SIE DIESE ANLEITUNG GUT AUF!
PRODUKTBESCHREIBUNG
1. Klappbarer Deckel
2. EIN/AUS-Schalter
3. Kontrolllampe
4. Anzeige - Maximale Wassereinfüllhöhe
5. Kabellose Basiseinheit
6. 360° Anschlußbuchse
WICHTIGE SICHERHEITSHINWEISE
Wenn Sie den Wasserkocher verwenden, sollten Sie die folgen-
den grundlegenden Sicherheitshinweise immer befolgen:
1. Lesen Sie alle Hinweise sorgfältig durch, auch wenn Sie mit dem Gerät vertraut sind.
2. Passen Sie besonders auf, wenn ein Gerät durch oder in der Nähe von Kindern verwendet wird.
3. Bevor Sie den Wasserkocher anstecken, überprüfen Sie bitte, ob die Stromspannung mit der in Ihrem
Haushalt herrschenden übereinstimmt. Wenn das nicht der Fall ist, wenden Sie sich an Ihren Händler
und verwenden Sie den Wasserkocher nicht.
4. Schalten Sie das Gerät aus und ziehen Sie den Stecker aus der Steckdose, bevor Sie Wasser einfüllen,
ausleeren oder reinigen, oder wenn Sie das Gerät nicht verwenden.
5. Überfüllen Sie den Wasserkocher nicht, da Wasser herausspritzen könnte. Die maximale Höhe ist auf der
Innenseite des Wasserkochers angegeben.
6. Verwenden Sie oder stellen Sie niemals das Gerät auf oder neben eine heisse Oberfläche (wie z.B. eine
Gas- oder Elektrokochstelle oder in einen heissen Ofen).
7. Lassen Sie das Kabel niemals über die Kante eines Tisches oder Kastens hängen. Lassen Sie das Kabel
keine heissen Flächen berühren.
8. Ziehen Sie niemals am Kabel, da es beschädigt werden könnte und eventuell auch einen Stromschlag
verursachen könnte.
9. Wenn das Stromkabel dieses Gerätes beschädigt wurde, darf es nur von einer durch den Hersteller
befugten Servicestelle erneuert werden, da besondere Werkzeuge erforderlich sind.
10. Vermeiden Sie es, die heisse Oberfläche des Wasserkochers zu berühren – verwenden Sie Griffe und
Knöpfe.
11. Um eine Beschädigung durch Dampf zu vermeiden, drehen Sie den Ausguß von Wänden oder Kasten
weg, wenn das Gerät in Betrieb ist.
12. Wenn Sie das Gerät auf einem Möbelstück aus Holz verwenden, verwenden Sie bitte eine
Schutzunterlage, damit die empfindliche Oberfläche nicht beschädigt wird.
13. Um Verbrühungen zu vermeiden, passen Sie auf, dass der Deckel immer richtig sitzt, bevor Sie das Gerät
in Betrieb nehmen.
14. Entfernen Sie niemals den Deckel während des Aufheizens, Sie könnten sich verbrühen.
15. Seien Sie besonders vorsichtig, wenn Sie den Wasserkocher bewegen, solange heisses Wasser darin
ist. Heben Sie den Wasserkocher niemals am Deckel auf. Verwenden Sie immer den Haltegriff.
16. Schalten Sie Ihren Wasserkocher niemals ein, wenn er leer ist.
17. Um keinen Stromschlag zu verursachen, tauchen Sie niemals das Gerät oder das Kabel in Wasser oder
irgendeine Flüssigkeit.
18. Verwenden Sie den Wasserkocher nur mit der gelieferten Basiseinheit. Verwenden Sie die Basiseinheit
niemals für einen anderen Zweck.
19. Um einen Brand zu vermeiden, verwenden Sie das Gerät niemals in der Nähe von explosiven und/oder
brennbaren Dämpfen.
20. Lassen Sie den Wasserkocher niemals in der Steckdose angesteckt, wenn die Raumtemperatur auf
winterliche Außentemperaturen sinken könnte. Bei Temperaturen unter Null könnte sich der automati-
sche Kontrollthermostat auf Kochen stellen und das Gerät einschalten.
21. Verwenden Sie den Wasserkocher nur zum Wärmen von Wasser. Andere Flüssigkeiten oder Lebensmittel
würden das Innere verunreinigen.
22. Dieses Gerät wurde nur für den in dieser Betriebsanleitung angegebenen Zweck entworfen.
23. Dieses Gerät ist nicht für die Benutzung durch Personen (einschließlich Kinder) mit verminderten physi-
schen, sensorischen und geistigen Fähigkeiten oder unzureichender Erfahrung und Kenntnis geeignet,
es sei denn, es wurden Anleitungen betreffs der Benutzung des Geräts durch eine verantwortliche
Aufsichtsperson erteilt.
24. Kinder müssen beaufsichtigt werden, damit sie nicht mit dem Gerät spielen.
2
5
6
4
3
1

VNIMANIE: V nahale ubedites´, hto mestnoe napräøenie sootvetstvuet ukazannomu
napräøeniüna tablice mownosti.
INSTRUKCII POLÆZOVATELÄ
1. Pered pervym vvedeniem pribora v dejstvie, zapolnite hajnik do maksimalænogo urovnå i
vskipåtite ego. Slejte vodu i snova vskipåtite va‚ hajnik.
2. Hajnik dolΩen bytæ otsoedinen ot qlektroseti, v moment sliva ili dobavleniå vody.
3. Zapolnite hajnik vodoj do Ωelaemogo urovnå. ne perepolnåjte ego, tak kak v qtom sluhae voznikaet
opasnostæ razbryzgivaniå ili vylianiü kipåwix struek vody.
4. Ne zapolnåjte hajnik vodoj menæ‚e 0,5 litra, hto sootvetstvuet urovnü, niΩe minimalæno
dopustimogo urovnå zapolneniå, ukazannogo na pribore MIN, htoby predoxranitæ hajnik ot raboty
pri pustoj emkosti.
5. Ne zapolnåjte hajnik vodoj, bolee hem 1,2 litrov (bolee hem maksimalænyj urovenæ, ukazannyj na
samom pribore.)
6. Avtomatiheskij preryvatelæ bezopasnosti byl ustaanovlen dlå predoxraneniå pribora ot peregreva.
On vvoditså v dejstvie, esli hajnik vklühaetså pri nedostatohnom kolihestve vody v pribore.
vegda ubeΩdajtesæ, hto kolihestvo vody vnutri hajnika pokryvaet minimalænyj urovenæ markirovki
vnutri pribora. Esli vklühaetså avtomatiheskij preryvatelæ bezopasnosti, otsoedinite pribor ot
qlektroseti i dajte emu ostytæ v tehenie ot 5 do 10 sekund. zatem zapolnite hajnik vodoj i vklühite
ego, pribor nahnet kipåtitæ vodu i vyklühitså posle okonhaniå processa kipåheniå v normalænom
reΩime dejstviå.
7. Ustanovite qnergetiheskuü podstavku pribora na suxuü, ploskuü poverxnostæ.
8. Ustanovite hajnik na qnergetiheskuü podstavku. Qlektriheskoe podsoedinenie proizojdet
avtomatiheski, kak tolæo hajnik pravilæno vojdet v pazy qnergetiheskoj podstavki.
9. Podsoedinite vilku kabelå v rozetku qlektroseti.
10. Pribor vvoditså v dejstvie naΩtiem knopki ON/OFF. ZaΩΩetså indikator dejstviå pribora.
11. Esli process kipåheniå vody okonhen, pribor vyklühitså avtomatiheski.
12. Ne snimajte hajnik s qnergetiheskoj podstavki, ne vyklühiv ego.
13. Dlå togo, htoby razlitæ vodu iz hajnika v ha‚ki, snimite ego s qnergitiheskoj podstavki i razlejte
vodu.
PRAVILA UXODA ZA PRIBOROM
Vætirajte vne‚nüü poverxnostæ pribora vlaΩnoj, mågkoj tkanæü ili gubkoj. Ustranåjte nesmyvaemye
påtna na poverxnosti pribora pri pomowi tkani, smohennoj v mågkoj moüwej Ωidkosti. Ne primenåjte
abrazivnyx mohalok ili poro‚kov. Nikogd ne pogruΩajte hajnik v vodu ili drugie Ωidkosti.
Vremå ot vremeni, v zavisimosti ot kahestva va‚ego vodosnabΩeniå, na dne pribora obrazuetså
estestvennyj osadok, skaplivaüwijså v osnovnom na nagrevaüwem qlemente i sniΩaüwij kahestvo
processa nagreva vody.
Kolihestvo osadka i sootvetstvenno neobxodimostæ ohistki i dekalæcirovaniå v osnovnom zavisit ot
Ωestkosti vody va‚ego vodosnabΩeniå i hastoty ispolæzovaniå pribora.
Obrazuüwijså osadok ne vreden dlå va‚ego zdorovæå. No popav v va‚u ha‚ku, moΩet pridatæ napitku
poro‚kovyj vkus. takim obrazom hajnik dolΩen periodiheski ohiwatæså, kak ukazno niΩe:
DEKALÆCIROVANIE
Regulårno provodite dekalæcirovnie va‚ego hajnika, po krajnej mere dva raza v god.
1. Zapolnite hajnik do maksimalænogo urovnå smesæü, sostoåwej iz odnoj hasti obyknovennogo uksusa
i dvumå haståmi vody. Vklühite pribor i doΩditesæ, poka on vyklühitså avtomatiheski.
2. Dajte smesi otstoåtæså vnutri hajnika v tehenie nohi.
3. Na sleduüwee utro vylejte soderΩimoe pribora.
4. Zapolnite hajnik vodoj do maksimalænogo urovnå i snova vskipåtite ego.
5. Vylejte qtu vodu toΩe, htoby ustranitæ ostatki osadka i uksusa.
6. Vymojte vnutrennostæ pribora histoj vodoj.
360° SOEDINITELÆNAå OSNOVA
360° soedinitelæ meΩdu hajnikom i ego bes‚nurovoj osnovoj pozvolået hajniku naxoditså na
lüboj tohke qtoj osnovy. Qto - idealæno takΩe i dlå potrebitelå - lev‚i, tak kak hajnik moΩno
udobno pomestitæ na kuxonnoj poverxnosti.
TEXNIHESKIE DANNyE: 220-240V • 50/60Gc • 1370-1630Vt
76
INSTRUKCIÄ PO QKSPLUATACII
QLEKTROHAJNIK
SOXRANITE DANNyE INSTRUKCII!
OPISANIE PRIBORA
1. Kry‚ka
2. ON/OFF Pereklühatelæ
3. Indikator deejstviå pribora
4. Indikator maksimalænogo urovnå zapolneniå
5. Bezkabelænaå qnergetiheskaå podstavka
6. 360° Konnektor
OSNOVNyE PRAVILA BEZOPASNOSTI
Pri ispolæzovanii qlektrohajnika vsegda dolΩny
soblüdatæså osnovnye pravila bezopasnosti, vklühaå sleduüwie:
1. Vnimatelæno prohitajte vse instrukcii, daΩe esli vy uΩe znakomy s dannym priborom.
2. Neobxodim blizkij kontrolæ za rabotoj pribora, esli on ispolæzuetså detæmi ili vblizi detej.
3. Pered qkspluataciej pribora ubeditesæ, hto napråΩenie pitaniä pribora, sootvetstvuet napråΩeniü
va‚ej doma‚nej qlektroseti. Esli qto ne tak, svåΩitesæ s dilerom i ne polæzujtesæ priborom.
4. Vyklühajte pribor i otsoedinåjte ego ot rozetki seti pered tem kak zapolnåtæ, opusto‚atæ,histitæ,
xranitæ pribor v period ego nefunkcionirovaniå.
5. Ne perezapolnåjte pribor vodoj, tak kak v qtom sluhae suwestvuet opasnostæ vybryzgivaniå kipåwix
vodånyx struek. Maksimalænyj urovenæ zapolneniå ukazan na vnutrennej stenke hajnika.
6. Ne dopuskajte funkcionirovaniå pribora ili ustanovki kakoj-libo ego sostavnoj hasti na ili okolo
lübyx goråhix poverxnostej (takix kak gazovaå- ili qlektroplita ili vnutri nagretoj pehki).
7. Ne pozvolåjte kabelü sve‚ivatæså s poverxnosti stola ili prilavka. Ne dopuskajte kontakta
kabelå s goråhimi poverxnoståmi.
8. Nikogda ne dergajte za provod, tak kak qto moΩet povreditæ kabelæ i, vozmoΩno, privesti k
qlektro‚oku.
9. Esli qlektrokabelæ pribora povreΩden, on dolΩen bytæ zamenen remontnoj sluΩboj, ukazannoj
proizvoditelelem, tak kak dlå remonta dannogo pribora pribora neobxodim specialænyj
instrument.
10. Ne dotragivajtesæ do nagretyx poverxnostej hajnika, beritesæ tolæko za ruhku hajnika i
dotragivajtesæ tolæko do knopok pribora.
11. Dlå izbeΩaniå vozmoΩnyx povreΩdenij ot vyxodåwego para, otvorahivajte nosik hajnika ot sten i
mebeli vo vremå ego funkcionirovaniå.
12. Esli hajnik ustanovlen na derevånnoj poverxnosti, ispolæzujte podstvku, htoby predoxranitæ
huvstvitelænoe pokrytie mebeli ot povreΩdeniå.
13. Dlå izbeΩaniå oΩogov, vsegda udostoverætesæ v tom, hto kry‚ka hajnika naxoditså v pravilænoj
pozicii, preΩde hem vvoditæ pribor v dejstvie.
14. Vypleskivanie kipåwej vody vozmoΩno takΩe, esli kry‚ka hajnika snimaetså v processe kipåheniå
vody.
15. Osobennaå ostoroΩnostæ dolΩna bytæ pri peredviΩenii hajnika s goråhej vodoj. Nikogda ne
podnimajte hajnik za kry‚ku. Vsegda beritesæ za ruhku na korpuse hajnika.
16. Ne vklühajte hajnik esli on pustoj.
17. Dlå predupreΩdeniå qlektro‚oka na opuskajte hajnik ili kabelæ hajnika v kakuü-libo Ωidkostæ.
18. Ispolæzujte hajnik tolæko vmeste s vxodåwej v komplekt podstavkoj. Ne ispolæzujte podstavku dlå
drugix celej.
19. Dlå predotvraweniå vosplameneniå, ne dopuskajte funkcionirovanie hajnika vblizi vzryvhatyx
i/ili vosplamenåüwixså vewestv.
20. Ne ostavlåjte hajnik vklühennym v setæ, esli tempertura v pomewenii, gde on naxoditså moΩet
upastæ do vne‚nej zimnej tempertury. Pri temperaturax niΩe nulå termostat pribora moΩet
vernutæså v poziciü kipåheniå vody i vvesti pribor v dejstvie.
21. Ne ispolæzujte va‚ hajnik dlå drugix celej krome kipåheniå vody. Drugie Ωidkosti ili piwevye
produkty mogut povreditæ vnutrennüü poverxnostæ pribora.
22. Dannyj pribor ne razrabotan dlå drugix celej, krome ukazannyx v dannoj instrukcii.
RUSSKIJ
RUSSKIJ
2
5
6
4
3
1

9
POLSKI
8
POLSKI
L
wygotowania wody.
L(poziom maksymalny)
automatycznie
ON/OFF
KONSERWACJA CZAJNIKA
Od czasu do czasu oczyszczaj czajnik z kamienia.
USUWANIE KAMIENIA
DANE TECHNICZNE:
CZAJNIKA ELEKTRYCZNEGO
OPIS PRODUKTU
1. Pokrywa
2. P
3. Lampka kontrolna
4. W
5. Bezprzewodowa podstawa
P
1. P
uchwyt
N
2
5
6
4
3
1

INSTRUCTIUNI DE UTILIZARE
1. La prima utilizare umpleti fierbatorul cu apa curata, la capacitate maxima. Aruncati apa si repetati.
2. Aparatul trebuie scos intotdeauna din priza inainte de a umple sau adauga apa.
3. Umpleti fierbatorul cu apa pana la nivelul dorit. Nu treceti peste aceasta limita deoarece exista riscul
reversarii. Nu uitati sa inchideti capacul dupa umplere, altfel aparatul nu se va deconecta automat dupa
utilizare.
4. Nu puneti mai putin de 0,5l apa (pana la indicatorul MIN) pentru a evita ca fierbatorul sa ramana fara apa
in timpul fierberii.
5. Nu umpleti cu mai mult de 1,2l (pana la indicatorul MAX).
6. Fierbatorul este prevazut cu un senzor automat de intrerupere a functionarii pentru a proteja impotriva
supraincalzirii. Acesta va porni daca fierbatorul este in functiune si nu are suficienta apa. Asigurati-va
ca intotdeauna apa din vas atinge nivelul minim Daca senzorul automat a intrat in functiune, scoateti
aparatul din priza si lasati-l sa se raceasca 5-10 minute. Apoi reumpleti cu apa si porniti-l in acest moment
fierbatorul va functiona in conditii normale.
8. Asezati unitatea de baza pe o suprafata uscata, dreapta. Conexiunile electyrice se vor face automat
atunci cand fierbatorul este asezat pe baza.
9. Introduceti stecherul intr-o priza cu pamantare.
10. Aparatul porneste prin apasarea butonului PORNIT/OPRIT. Indicatorul luminos va porni.
11. Cand apa se evapora complet, dispozitivul se va opri automat.
12. Nu indepartati fierbatorul din baza inainte de a-l opri.
13. Pentru a turna apa, scoateti cana din unitatea de baza si umpleti.
INGRIJIREA FIERBATORULUI
Stergeti exteriorul cu o carpa umeda, moale sau cu un burete. Indepartati petele cu o carpa umezita in
detergent lichid. Nu folositi bureti abrazivi sau detergenti pudra. Niciodata nu scufundati fierbatorul in apa
sau alte lichide.
Din cand in cand, in functie de duritatea apei din zona in care locuiti, in interiorul canii se va forma un depozit
de piatra, aderand in special la elementele de incalzire si reduce capacitatea acestuia. Cantitatea de piatra
depusa (prin urmare si necesitatea de a curata aparatul) depinde foarte mult de duritatea apei si frecventa
cu care este folosit dispozitivul.
Depunerea de piatra nu dauneaza sanatatii. Dar daca este turnata in bautura, ii poate da acesteia un gust
pudrat. Prin urmare, fierbatorul trebuie curatat periodic dupa cum este indicat mai jos:
DEPIETRIFICAREA
Curatati dispozitivul periodic. In conditii normale de utilizare, cel putin de doua ori pe an.
1. Umpleti cana pana la nivelul maxim cu o combinatie de o parte otet obisnuit si doua parti de apa. Porniti
aparatul si asteptati pana cand se stinge singur.
2. Lasati amestecul in interior peste noapte.
3. A doua zi dimineata aruncati amestecul.
4. Umpleti cu apa curate si fierbeti din nou.
5. Aruncati aceasta apa pentru a inlatura orice urma de piatra si otet.
6. Clatiti interiorul cu apa curata.
BAZA CONECTOARE 360°
Conectorul de 360° dintre fierbator si baza inseamna ca acesta poate fi asezat oriunde pe baza. Aceasta
trasatura este ideala atat pentru dreptaci cat si pentru stangaci deoarece fierbatorul poate fi asezat
convenabil pe un dulapior de bucatarie.
DATE TEHNICE:
1110
FIERBATORULUI
DESCRIEREA PRODUSULUI
1. Capac
2. Comutator PORNIT/OPRIT
3. Indicator luminos
4. Indicator pentru nivelul maxim de apa
5. Baza fara cablu
6. Conector 360°
PREVEDERI PENTRU SIGURANTA
In timpul utilizarii fierbatorului, trebuie respectate cateva instructiuni de baza printre care se numara
urmatoarele:
1. Cititi toate instructiunile de utilizare, chiar si atunci cand cunoasteti aparatul.
2. Este necesara atentie suplimentara atunci cand dispozitivul este folosit in apropierea sau de catre copii.
3. Inainte de utilizare, verificati daca voltajul indicat pe aparat corespunde cu cel al locuintei dumneavoastra.
Daca acestea difera, contactati vanzatorul fara a utiliza aparatul.
4. Opriti si scoateti din priza inainte de umplere, golire sau curatare, ori atunci cand aparatul nu este utilizat.
5. Nu umpleti peste limita deoarece apa clocotita poate da pe dinafara. Nivelul maxim este marcat pe
interior.
6. Nu utilizati sau amplasati pe sau langa o suprafata incinsa. (cum ar fi o plita sau un cuptor incalzit).
7. Nu lasati cablul sa atarne peste marginea mesei sau a suprafetei pe care este amplasat. Nu lasati ca
acesta sa atinga suprafete incinse.
8. Nu trageti niciodata de cablu deoarece acesta se poate deteriora si poate cauza in final electrocutarea.
9. Daca observati distrugerea cablului electric, acesta trebuie inlocuit de un service autorizat de catre
producator, intrucat sunt necesare instrumente speciale.
10. Evitati atingerea suprafetelor fierbinti.
11. Pentru a evita deteriorarea datorata aburului, indepartati aparatul de pereti sau dulapioare.
12. Daca dispozitivul este asezat pe o suprafata din lemn, este necesara folosirea unui servet care sa protejeze
finisajele delicate.
13. Pentru a evita scalding-ul, asigurati-va, verificati intotdeauna asezarea corecta a capacului.
14. Scalding poate avea loc daca se inlatura capacul in timpul fierberii.
15. Este necesara atentie suplimentara la mutarea fierbatorului plin cu apa fierbinte. Nu ridicatti niciodata
aparatul tinandu-l de capac. Utilizati intotdeauna manerul.
16. Nu porniti fierbatorul daca este gol.
17. Pentru a va feri de incidente electrice, nu introduceti aparatul sau cordonul in nici un lichid.
18. Folositi fierbatorul numai cu unitatea de baza furnizata. Nu folositi aceasta componenta pentru alte
activitati.
19. Pentru a va feri de incendii, nu folositi aparatul in prezenta unor materiale explozibile/inflamabile.
20. Fierbatoul nu trebuie lasat in priza atunci cand temperatura din incapere este foarte scazuta. La temperaturi
21. Nu folositi aparatul pentru alte activitati decat acelea de incalzire a apei. Alte lichide sau alimente pot
contamina interiorul.
22. Acest produs nu este destinat altor utilizari decat celor prevazute in acest manual.
AVERTIZARE: Comparati voltajul locuintei dumneavoastra cu cel inscriptionat pe produs.
ROMANESTE
ROMANESTE
2
5
6
4
3
1

13
SCG/CRO/i
UPUTSTVO ZA UPOTREBU:
BOKAL ZA KUVANJE VODE
OPIS PROIZVODA
3. Kontrolna lampica
5. Bazna jedinica bez kabla
Kada koristite bokal za kuvanje vode, trebalo bi uvek da sledite osnovna sigurnosna uputstva:
bokal za kuvanje vode.
5. Nemojte da prepunite bokal za kuvanje vode jer bi voda mogla da prska napolje. Maksimalna visina
navedena je na unutrašnjoj strani bokala za kuvanje vode.
7. Nemojte nikada da ostavljate kabl da visi preko ivice stola ili kutije. Nemojte da dozvolite da kabl dodiruje
vrele površine.
radu.
18. Bokal za kuvanje vode koristite samo sa dostavljenom baznom jedinicom. Baznu jedinicu nemojte nikada
da koristite u drugu svrhu.
se spusti na spoljnu zimsku temperaturu. Kod temperatura ispod nule, automatski kontrolni termostat bi
unutrašnjost.
12
SCG/CRO/i
UPOZORENJE:
o snazi.
UPOTREBA
i pustite neka kuva. Ispraznite vodu i ponovite postupak.
vode radi na prazno.
5. Bokal za kuvanje vode nemojte da kuvate sa više od
1,2
radu.
7. Baznu jedinicu postavite na suvu i ravnu površinu.
8. Bokal za kuvanje vode postavite na baznu jedinicu. Veza sa strujom se automatski uspostavlja, kada
bokal nalegne na baznu jedinicu.
13. Da sipate vodu, podignite bokal za kuvanje vode sa bazne jedinice i sipajte je.
NEGA VAŠEG BOKALA ZA KUVANJE VODE
UKLANJANJE KAMENCA
kuhinjski sto.
TEHNIKI PODACI:
2
5
6
4
3
1

spriegumam.
LIETOŠANA
1,2
TEHNISKIE DATI:
15
PRODUKTA APRAKSTS
14
LATVIAN
LATVIAN
2
5
6
4
3
1
17
NAUDOJIMO INSTRUKCIJA
VIRDULYS
NEPAMESKITE ŠIOS INSTRUKCIJOS!
GAMINIO APRAŠYMAS
5. Pagrindas be kabelio
6. 360° Jungties lizdas
16
NAUDOJIMAS
automatiškai neišsijungs.
1,2
pagrindo.
NUKALKINIMAS
du kartus per metus.
360° JUNGTIES LIZDAS
TECHNINIAI DUOMENYS:
2
5
6
4
3
1

1,2
10.
5.
19
18
2
5
6
4
3
1

20
21
2
5
6
4
3
1

22 23
FRANÇAIS
FRANÇAIS
BOUILLOIRE
DESCRIPTION DU PRODUIT
1. Couvercle rabattable
2. Interrupteur MARCHE/ARRET
3. Voyant lumineux
4. Affichage – hauteur de remplissage maximum
5. Unité de base sans fil
6. 360° Prise de raccordement
INDICATIONS DE SECURITE IMPORTANTES
Lorsque vous utilisez la bouilloire, respectez toujours les indications de sécurité fondamentales suivantes :
la bouilloire.
gazinière, des plaques électriques ou dans un four chaud).
pas en contact avec des surfaces chaudes.
8. Ne tirez jamais sur le câble car il pourrait être endommagé et cela pourrait éventuellement causer un
choc électrique.
9. Si le câble électrique de cet appareil a été endommagé, il ne doit être remplacé que par un SAV agréé
par le fabricant. Des outils spéciaux sont en effet nécessaires.
10. Evitez de toucher les surfaces chaudes de la bouilloire, utilisez les poignées et les boutons.
11. Pour éviter une détérioration par la vapeur, détournez le bec verseur des murs ou meubles lorsque
sensible ne soit pas endommagée.
14. Ne retirez jamais le couvercle pendant le chauffage, vous pourriez vous ébouillanter.
soulevez jamais la bouilloire par le couvercle. Utilisez toujours la poignée.
chose.
températures extérieures hivernales. Pour des températures en dessous de zéro, le thermostat de
23. Cet appareil n'est pas destiné aux personnes (enfants inclus) ayant des capacités physiques, sensorielles
soient mises sous la garde d'une personne pouvant les surveiller.
24. Les enfants doivent être surveillés afin de s'assurer qu'ils ne jouent pas avec cet appareil.
ATTENTION :
signalétique.
UTILISATION
5. Ne remplissez pas la bouilloire au-dessus de 1,2
glisse celle-ci.
ENTRETIEN DE VOTRE BOUILLOIRE
colle principalement sur la résistance, ce qui diminue la capacité de chauffe. La quantité de calcaire déposé
santé. Si cependant vous le versez dans votre boisson, cela peut donner un goût poudreux. Détartrez donc
votre appareil de temps en temps comme suit :
DETARTRAGE
2. Laissez le mélange toute la nuit dans la bouilloire.
3. Le lendemain jetez le mélange.
SOCLE MULTIDIRECTIONNEL 360°
bouilloire dans tous les sens de rotation sur le plateau. Aussi bien les gauchers que les droitiers peuvent
facilement positionner la bouilloire sur la table de cuisine.
DONNéES TECHNIqUES :
Il faut respecter les règlementations locales. La mise en rebut de votre appareil électrique usagé doit se faire
dans un centre approprié de traitement des déchets.
2
5
6
4
3
1

24 25
ESPAÑOL
ESPAÑOL
MANUAL DE INSTRUCCIONES
JARRA HERVIDORA
¡GUARDE ESTAS INSTRUCCIONES!
DESCRIPCIÓN DEL PRODUCTO
1. Tapa con quicio
2. Interruptor ON/OFF
3. Luz indicadora
4. Indicador de nivel MÁXIMO de agua
6. Conector de 360°
DIRECTRICES DE SEGURIDAD IMPORTANTES
siguientes:
1. Lea todas las instrucciones detenidamente aun cuando esté familiarizado con el aparato.
3. Antes de conectar la hervidora, compruebe si el voltaje que se indica en el aparato se corresponde con
hervidora.
a usarse.
la hervidora.
6. No la ponga en funcionamiento o coloque cualquier componente de este electrodoméstico en o cerca de
una superficie caliente (como quemadores de gas, eléctricos o en un horno caliente).
7. No deje que el cable cuelgue sobre el borde de una mesa o de la encimera ni que toque superficies
calientes.
8.
10. Evite tocar las superficies calientes de la hervidora - use el asa y los botones.
funcionamiento la hervidora.
12. En caso de que se ponga en funcionamiento sobre mobiliario de Madera, use una almohadilla protectora
funcionamiento.
Nunca levante la hervidora de la tapa. Use siempre el asa de la unidad.
16. No encienda la hervidora si ésta se encuentra vacía.
otra finalidad.
19. Para protegerse frente al fuego, no la ponga en funcionamiento en presencia de humos explosivos y/o
inflamables.
20. No se debe dejar la hervidora conectada a una toma de pared cuando sea probable que la temperatura
ambiente baje a temperaturas exteriores invernales. A temperaturas bajo cero el termostato de control
21. No use la hervidora para cualquier otra finalidad que no sea la de hervir agua. Otros líquidos o alimentos
contaminan el interior de la misma.
físicas, sensoriales o mentales reducidas, o que presentan falta de experiencia y conocimientos, salvo
que se les haya supervisado o se les haya formado en el uso del aparato por parte de una persona
responsable de su seguridad.
ADVERTENCIA: Compare el voltaje local con el voltaje declarado en el dispositivo.
INSTRUCCIONES DE USO
hiérvala. Deseche el agua y repita el procedimiento.
3. Llene la hervidora con agua hasta el nivel que desee. No la llene mucho ya que existe el riesgo de que
se vierta el agua o la expulse.
tras su uso.
siempre que el agua de la hervidora cubre la marca mínima. En caso de que el corte de corriente de
deje que la hervidora se enfríe durante 5 a 10 minutos. Después, vuelva a llenarla de agua y conéctela
8.
9. Enchufe el cable de una toma de corriente de tierra.
CÓMO CUIDAR DE LA HERVIDORA
sumerja la hervidora en agua u otros líquidos.
puede encontrar adherido principalmente al elemento de calor, lo que reduce la capacidad de calentamiento.
La cantidad de cal depositada (y por consiguiente, la necesidad de limpiarla o descalar) depende
principalmente de la dureza del agua de su zona y la frecuencia con que se use la hervidora.
La cal no es perniciosa para su salud. Pero, si se vierte sobre una bebida, puede dar un gusto diferente a la
DESCALAR
2. Deje que la mezcla permanezca en el interior de la hervidora toda la noche.
5. Tire este agua hervida y retire cualquier resto de cal y vinagre.
6. Aclare el interior de la hervidora con agua limpia.
BASE CONECTORA DE 360°
TEl conector de 360° entre la hervidora y su base indica que la hervidora puede colocarse en cualquier punto
de la base. Esto es ideal tanto para usuarios diestros como zurdos ya que la hervidora puede colocarse de
DATOS TéCNICOS:
¡Puede ayudar a proteger el medio ambiente!
Por favor, recuerde respetar la normativa local: entregue los equipos eléctricos que no funcionen en un centro
de reciclaje adecuado.
2
5
6
4
3
1

26 27
ҚАзАҚ
ҚАзАҚ
ПАйДАЛАНУшЫНЫҢ НҰСҚАУЛЫҒЫ
ҚҰРЫЛҒЫНЫ КҮтУ ЕРЕЖЕСІ
ДЕКАЛЬЦИРЛЕУ
360° ҚОСЫЛУ НЕгІзІ
тЕхНИКАЛЫҚ ДЕРЕКтЕР
БЕРІЛгЕН НҰСҚАУЛЫҚтЫ САҚтАҢЫз
ҚҰРЫЛҒЫНЫҢ СИПАттАМАСЫ
НЕгІзгІ ҚАУІІІСІзДІК ЕРЕЖЕЛЕРІ
НАзАР АУДАРЫҢЫз:
2
5
6
4
3
1
Table of contents
Languages:
Other FIRST AUSTRIA Kettle manuals

FIRST AUSTRIA
FIRST AUSTRIA FA-5409-3-BU User manual

FIRST AUSTRIA
FIRST AUSTRIA FA-5405-2 User manual

FIRST AUSTRIA
FIRST AUSTRIA FA-5427-2 User manual

FIRST AUSTRIA
FIRST AUSTRIA FA-5409 User manual

FIRST AUSTRIA
FIRST AUSTRIA FA-5405-3-OR User manual

FIRST AUSTRIA
FIRST AUSTRIA Silverstar User manual

FIRST AUSTRIA
FIRST AUSTRIA FA-5448-9 User manual


