Firstkind Firefly User manual
1 2
T-1
INSTSKY2C/R2
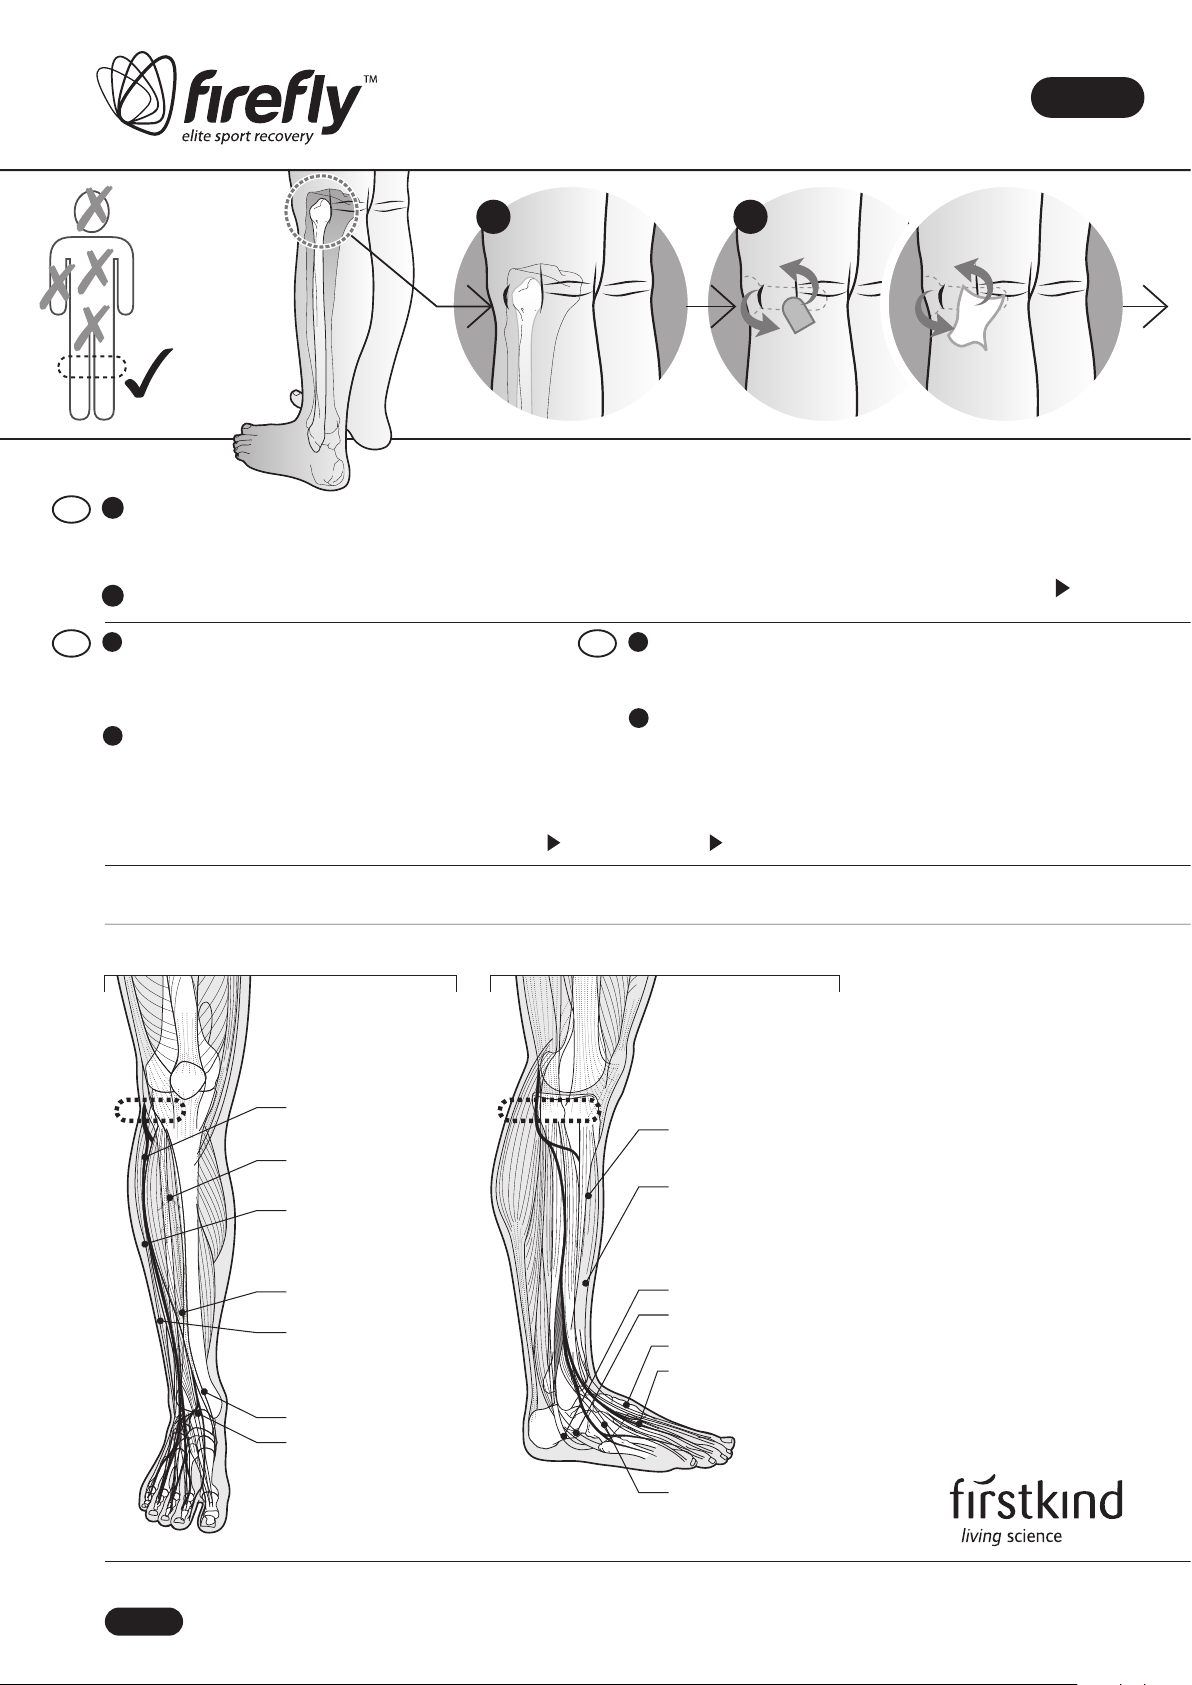
Find the location where the device is to be secured. It can be
found on the outside of the leg, just below the level of the knee,
at the centre of the bula head. The bula head can be felt as a
round protrusion at the very top of the bula bone.
Using the grey abrasive pad, gently exfoliate the area of skin
that will make contact with the electrodes (once a week should
be sucient for this process – DO NOT over exfoliate, especially if
the skin is fragile or may be damaged through abrasion) and then
wipe thoroughly with the electrode preparation wipe. For best
results, remove any excess hair and moisturiser if present.
1
2
Trouver l'emplacement où le dispositif doit être xé. Celui-ci peut
être trouvé du côté extérieur de la jambe, juste au-dessous du niveau
du genou, au centre de la tête du péroné. La tête du péroné peut être
ressentie comme une protubérance ronde tout à fait au sommet de
l'os du péroné.
Avec le tampon abrasif gris, exfolier délicatement la surface de la
peau qui sera mise en contact avec les électrodes (une seule exfoliation
par semaine devrait sure – NE PAS abuser de l'exfoliation,
particulièrement si la peau est fragile ou si elle peut être endommagée
par une abrasion), puis essuyer soigneusement à l'aide du linge de
préparation d'électrode. Pour obtenir les meilleurs résultats, retirer
tous les poils en excès et toute trace de crème hydratante s'il y a lieu.
F1
2
Aunden der Stelle, an der das Gerät befestigt werden soll. Sie
bendet sich außen am Bein, direkt unterhalb des Knies, in der Mitte
des Wadenbeinkopfs. Der Wadenbeinkopf kann als runder Vorsprung
an der höchsten Stelle des Wadenbeinknochens ertastet werden.
Mithilfe des grauen Schleifpads den Bereich der Haut vorsichtig
abschälen, der mit den Elektroden in Kontakt kommt (einmal
wöchentlich sollte hierbei genügen – NICHT zu häug abschälen,
insbesondere bei empndlicher Haut oder Haut, die durch das Abschälen
geschädigt ist). Anschließend mit dem Elektroden-Vorbereitungstuch
gründlich abwischen. Um beste Ergebnisse zu erzielen, sind
überschüssige Haare und Feuchtigkeitscremes zu entfernen, falls
vorhanden.
D1
2
Muscles extend
into foot
Tibialis anterior
Extensor digitorum
longus
Tibialis anterior
Extensor
digitorum longus
Extensor hallucis
longus
Peroneus tertius
g.1
Anterior muscle
engagement
Peroneal nerve
Muscles extend
into foot
Peroneus longus
Peroneus brevis
Extensor hallucis longus
Extensor digitorum
brevis
Peroneus tertius
Peroneus longus
Peroneus brevis
g.2
Lateral muscle
engagement
gs. 1 & 2: Stimulated muscles / Muscles stimulés / Stimulierte Muskeln
Fitting instructions / Instructions de mise en place / Gebrauchsanleitung
Only to be worn
at the knee
Usage réservé au
genou
Nur für den
Gebrauch am Knie
EN
Daily disposable / A usage unique journalier / Einwegartikel
– replace every 24 hours / – remplacer toutes les 24 heures / – alle 24 Stunden auswechseln
To nd out more about rey™ visit: www.reyrecovery.com
p1 of 2
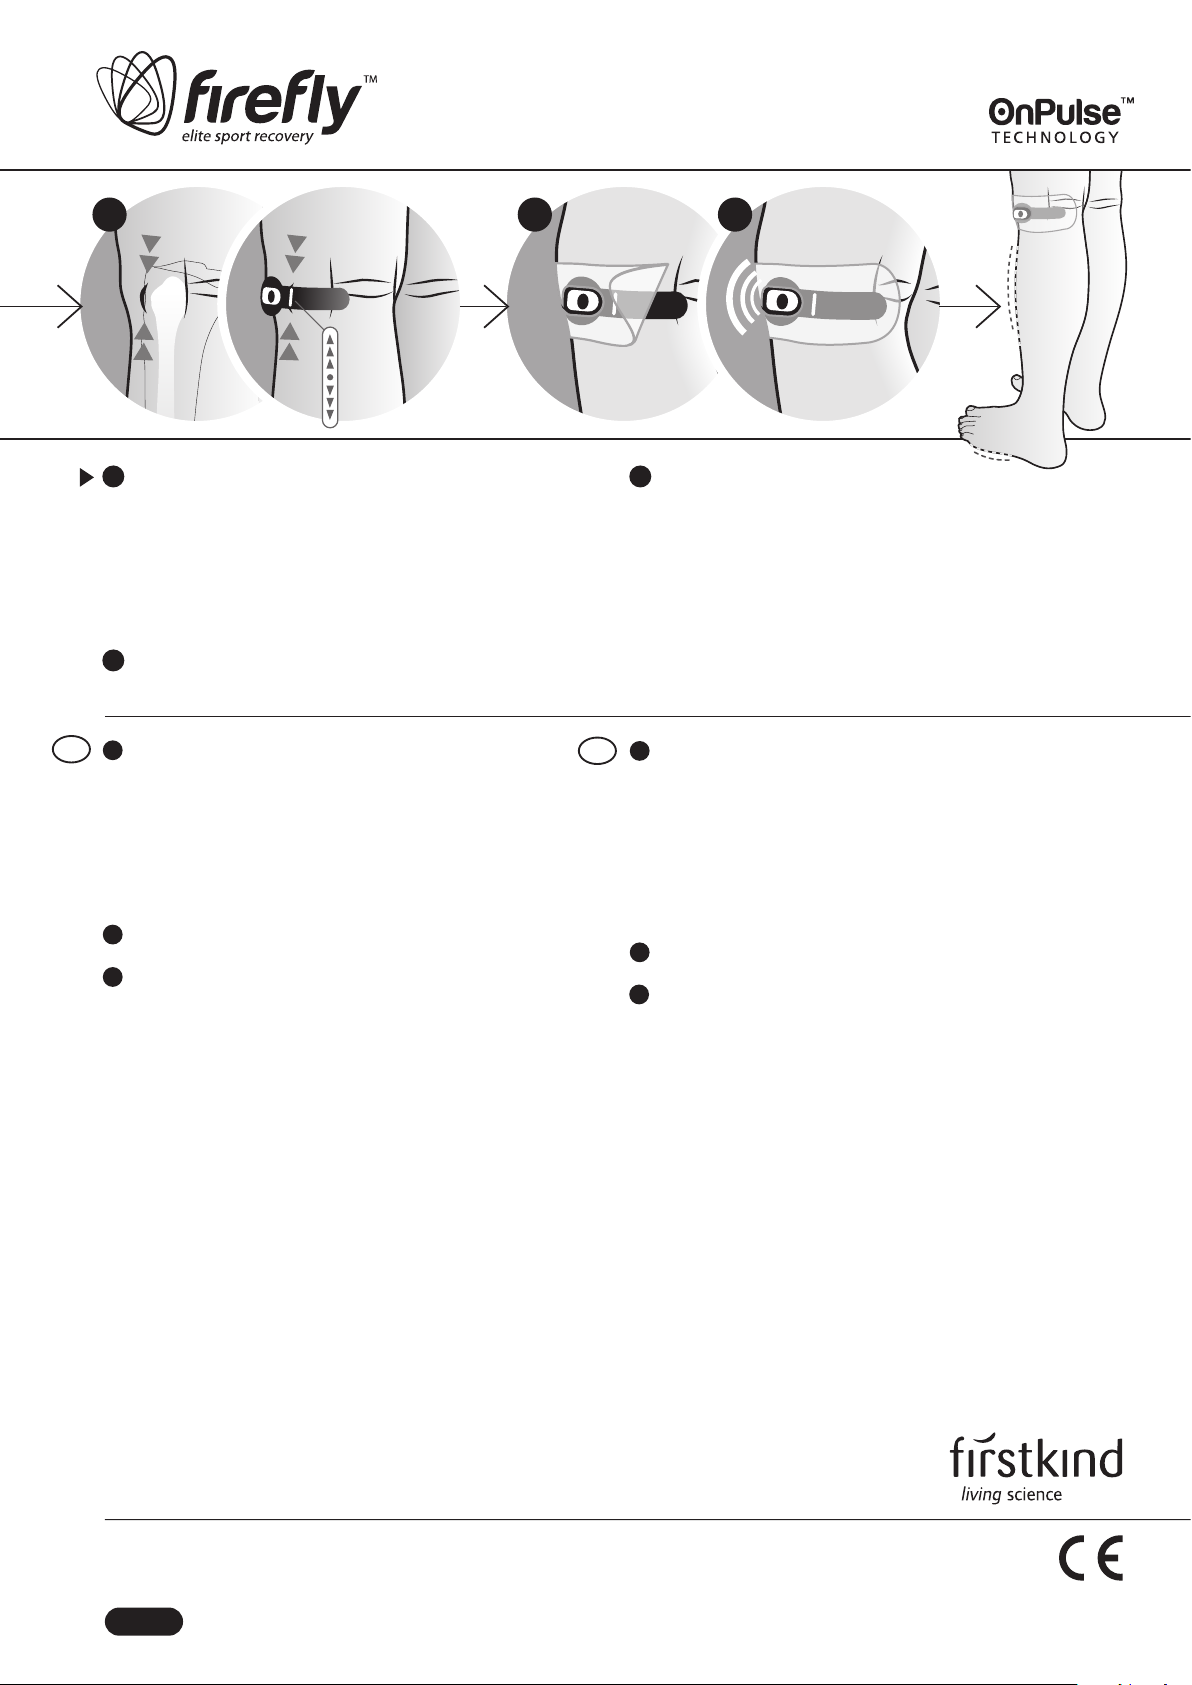
Après 30 secondes, retirer le lm de protection et xer le
dispositif sur une jambe tendue de façon à positionner la ligne
indicatrice saillante du dispositif (repérée par des èches) au centre de
la tête du péroné. Il convient de positionner la tête du dispositif en
direction de l'avant de la jambe – la queue du dispositif enveloppant
l'arrière de la jambe sous le pli du genou.
> Le dispositif rey™ est conçu pour stimuler le nerf péronier
commun. Il existe d'autres méthodes permettant de localiser le nerf
péronier commun. Consulter la notice « Instructions d'utilisation » pour
d'autres emplacements de mise en place.
Pour plus d'adhérence, appliquer l'une des bandes adhésives
fournies par dessus le dispositif.
Appuyer/cliquer brièvement sur le bouton (0,5 seconde) pour
activer le dispositif (le dispositif démarrera une fois le bouton
relâché) et procéder ensuite par clics brefs pour régler le niveau
approprié - atteint lorsque l'on constate un léger mouvement visible
des muscles spéciés dans la jambe inférieure, représentés aux g.1
et g.2 de la page précédente (muscles stimulés). Pour s'adapter à
toute variation du stimulus dû à des changements de position de la
jambe, jouer simplement sur le réglage en augmentant ou diminuant
la puissance. Il y a 7 niveaux (indiqués par la lumière clignotante); les
niveaux 3 ou 4 sont idéaux dans la plupart des cas. Pour diminuer un
par un les niveaux, cliquer plus longuement (1 à 2 secondes) et pour
arrêter complètement le dispositif, maintenir le bouton enfoncé
jusqu’à l’arrêt du clignotement de la lumière.
F
4
Den Schutzlm nach 30 Sekunden abziehen und das Gerät am
ausgestreckten Bein anbringen, so dass sich die erhöhte
Markierungslinie auf dem Gerät (mit Pfeilen gekennzeichnet) in der
Mitte des Wadenbeinkopfs bendet. Der Kopf des Geräts sollte zur
Vorderseite des Beins positioniert werden, wobei das hintere Ende des
Geräts seitlich um das Bein herum, zur Rückseite des Beins, unter die
Kniekehlenfalte geführt wird.
> Das rey™-Gerät ist für die Stimulation des gemeinsamen Waden-
beinnervs vorgesehen. Es gibt andere Methoden zum Aunden des
gemeinsamen Wadenbeinnervs. Alternative Befestigungspositionen
sind auf dem Faltblatt „Gebrauchsanweisung“ beschrieben.
Um eine zusätzliche Haftung zu erreichen, kann einer der
mitgelieferten Klebestreifen über das Gerät geklebt werden.
Durch kurzes Drücken/Betätigen der Taste (0,5 Sekunden) das
Gerät aktivieren (das Gerät startet nach dem Loslassen der Taste)
und durch wiederholtes kurzes Drücken die entsprechende Stufe
einstellen. Diese ist erreicht, sobald eine leichte, sichtbare Bewegung
der beschriebenen Muskeln im Unterschenkel zu erkennen ist,
dargestellt in Abb. 1 und Abb. 2 (stimulierte Muskeln) auf der
Rückseite. Um Reizschwankungen aufgrund von
Positionsveränderungen des Beins auszugleichen, einfach die
Einstellung erhöhen oder verringern. Es gibt 7 Stufen (durch das
Blinklicht angezeigt); in den meisten Fällen ist Stufe 3 oder 4 ideal. Um
die Stufen schrittweise zu verringern, die Taste länger drücken (1 bis 2
Sekunden). Zum vollständigen Abschalten des Geräts den Knopf
länger gedrückt halten, bis das Licht aufhört zu blinken.
D
3
5
4
3
5
0120
Firstkind Limited*
Hawk House, Peregine Business Park, High Wycombe,
Buckinghamshire, HP13 7DL, United Kingdom
T: +44 (0)1494 572040 www.rstkindmedical.com
rey™ and OnPulse™ are registered trademarks of Sky Medical Technology Limited. *Firstkind Ltd is a wholly owned subsidiary of
Sky Medical Technology Limited. This product is covered by granted and pending patents. ©2013 Sky Medical Technology Limited.
To nd out more about rey™ visit: www.reyrecovery.com
3 4 5
After 30 seconds, peel o the protective lm and secure the
device to a straight leg so that the raised indicator line on the
device (marked with arrows) is positioned at the centre of the
bula head. The head of the device should be positioned towards
the front of the leg – with the tail of the device wrapped around
and to the rear of the leg below the crease of the knee.
> The geko™ device is designed to stimulate the common peroneal
nerve. There are other methods of locating the common peroneal nerve.
See ‘instructions for use’ leaet for alternative tting locations.
For additional adhesion, apply one of the supplied adhesive
strips over the device.
Use a short press/click of the button
(0.5 seconds) to activate the device (the device will start once the
button is released) and further short clicks to set the appropriate
level – reached when there is a slight visible movement of the
specied muscles in the lower leg, indicated in g.1 and g.2
(stimulated muscles) overleaf. To accommodate any variation in
stimulus due to leg position changes, simply turn the setting up or
down. There are 7 levels (indicated by the ashing light); in most
cases levels 3 or 4 are ideal. To reduce the levels, one-by-one, use a
longer click (1 to 2 seconds) and to turn o the device completely,
hold the button down until the light stops ashing.
3
4
5
p2 of 2
Popular Medical Equipment manuals by other brands


Getinge
Getinge Arjohuntleigh Nimbus 3 Professional Instructions for use

Mettler Electronics
Mettler Electronics Sonicator 730 Maintenance manual

Pressalit Care
Pressalit Care R1100 Mounting instruction

Denas MS
Denas MS DENAS-T operating manual

bort medical
bort medical ActiveColor quick guide

AccuVein
AccuVein AV400 user manual


