manuals.online logo
Brands
  1. Home
  2. •
  3. Brands
  4. •
  5. fish mate
  6. •
  7. Pond Pump
  8. •
  9. fish mate 5000 S-UV User manual

fish mate 5000 S-UV User manual

IMP RTANT SAFETY
INSTRUCTI NS
WARNING - To guard against injury or
death, basic safety precautions should
be observed, including the following:
READ AND F LL W ALL
SAFETY INSTRUCTI NS
•Register your purchase on-line at
www.pet-mate.com/uk (see guarantee below).
• Closely supervise children when near to pond or
pond equipment.
•All electrical work must be carried out by a
competent electrician.
•The product UST be wired into an R.C.D./G.F.I.
circuit breaker (maximum 30mA) and a 3 A P
(maximum) fuse. Ensure breaker is regularly
tested in accordance with manufacturers
instructions.
•Ensure that the voltage on the rating labels of the
UV transformer (14) and pump motor (15) (see
Fig. A) conforms with your supply voltage.
• Connection to the power supply should be made
through a suitable dry weatherproofed 3 pin plug
or double pole switched enclosure with minimum
3mm (1/8") contact separation in all poles. If
product is hard wired to electrical supply this
must comply fully with the wiring regulations of
the national and local electricity authority. The
pump must be protected by a 3 A P (maximum)
fuse.
•This appliance must be earthed. It is essential
that all connections are securely made using the
following code:
Brown - Live
Blue - Neutral
Green/Yellow - Earth
•UV lamps emit radiation that can be harmful to
eyes and skin. When checking the UV lamp you
should never look directly at the light. Only view
using the lamp indicator lens (6) - see section 4B.
• Do not carry or pull the product using the supply
cords.
• Disconnect electrical supply from all appliances
in the pond before contact with the pond water or
product.
• Do not connect power to product unless filter is
fully assembled.
• Do not leave power connected unless water is
running through product.
• The product is for outdoor ornamental pond use
only. It must not be used for a swimming pool.
• Ensure UV transformer (14) is in a well ventilated
position out of direct sunlight and well away from
flammable items.
• Do not immerse UV transformer (14). If the
transformer falls in the water DO NOT reach for
it. Switch it off immediately and isolate completely
from power supply before removing from water.
Contact Pet ate customer service for advice on
re-installing product.
• Use conduit approved by your electricity authority
to protect supply cord where damage from
gardening equipment, children and animals may
occur.
• Never run the product with damaged components
or faulty electrical supply. Check plastic
mouldings for damage and hairline cracks
regularly.
• Discard if UV lamp holder (13), transformer (14)
or pump motor (15) show visual defects (e.g.
cracks or swelling).
• The supply cords of this appliance cannot be
replaced; if the cord is damaged the appliance
should be discarded.
• Do not allow the product to run dry.
• In freezing conditions disconnect power supplies
to product, remove and drain water from product.
• The pump (15) is provided with a thermal cut-out
switch that temporarily switches off the pump in
case of overheating. The pump may restart when
it has cooled.
• UV lamps and Quartz tubes are made from
delicate glass and must always be handled with
care.
• Check quartz tube (8) is not cracked if product is
dropped or exposed to freezing temperatures.
• aintain product annually with the appropriate
FISH ATE parts (not included).
SAVE THESE
INSTRUCTI NS
Pet ate Ltd. guarantees your product for a period of 3 years from the date of purchase, subject to the registration of your
purchase details on our website www.pet-mate.com/uk within 14 days of purchase. (If you do not have access to a computer,
please send details of your purchase with copy of receipt along with your name and address.) In the event of a fault developing
contact Pet ate customer services for a returns authorisation number. The guarantee is limited to any defect arising due to faulty
materials or manufacture. Any defective item will be repaired or replaced free of charge at the manufacturer’s discretion, provided
that the defect has not been caused by neglect, misuse or normal wear and tear. The guarantee excludes moving parts and claims
arising from frost, accidental damage or loss of fish. Your statutory rights are not affected.
5000S
-
UV
FISH MATE ®
A
Instructions · Read before use
1
2
3
24
21
22
12
13
4
5
7
6
9
8
10 11
16
15
14
23
17
20
19
x3
T
R
P
S
18
25mm
(1”) 19mm
(3/4”)
12mm
(1/2”)
© PET MATE Ltd · Lyon Road · Hersham · Surrey · KT12 3PU · England
B
1
B
2
21
22
24
23
25
26
27
28
29 31
32
30
37505/1215
www.pet-mate.com +44 (0)1932 700 001
C
1. SETTING UP
A. Choose a suitable position
For convenience the product should be positioned within reach from the side of the pond on a
level and solid platform (e.g. paving slabs) approximately 250mm (10") below the pond surface.
The product should be at least 200mm (8") below water level to avoid problems of freezing or low
water levels in summer and no more than 1000mm (40") deep.
nly use product if completely immersed in water.
From the chosen location, ensure that there is enough cable for connection to the power supply.
All cables must be adequately protected using conduit against damage from garden equipment,
children and animals.
The UV transformer (14) must be sited in a well ventilated position out of direct sunlight and well
away from flammable items. Ensure that the transformer cannot fall into the pond.
B. Installation
For maximum flow and filtration performance we recommend that the product is operated with a
plume fountain.
This product should only be used with small waterfalls less than 450mm (18”) above pond level.
Waterfall nly
Fit flow valve (21) to outlet adapter (16). Turn flow control (22) fully anticlockwise for horizontal
outlet (24).
The pump may be connected to a waterfall using 12mm (1/2"), 19mm (3/4") or preferably 25mm
(1") bore hose for maximum flow. Insert hose adapter (25) if required and connect hose.
Fountain (and Waterfall)
Insert fountain components as shown in Fig. B1 (conventional fountain) / B2 (bell fountain). If
required tubes (26) and (28) may be shortened with a hacksaw. Also bell fountain (31 and 32) may
be fitted directly to outlet (23). For plume fountain do not fit any parts to tube (28). If required,
connect to waterfall with hose to outlet (24). The fountain heads (30) may be unscrewed
anticlockwise for cleaning. For use with fountain only turn flow control (22) fully clockwise. If using
a waterfall adjust fountain height/width using the flow control (22) turning clockwise for increased
height/width. If using the bell fountain you will also need to manually adjust the gap between parts
(31) and (32) for the required effect. (Try starting with approximately 1mm (1/16”) gap.)
2. PERATI N
The product is now ready to run. The product should be run 24 hours a day throughout the year
except when there is a risk of the water freezing.
The water should start to clear in 2 to 3 weeks, but full clarification may take 1 to 2 months. If the
pond water is very green a water change should be made before starting the product.
3. MAINTENANCE (see Fig. A).
IMP RTANT SAFETY INSTRUCTI NS
• Disconnect both electrical supplies from the product before removing from pond or
contacting pond water.
• Do not carry or pull the product by the cables.
A. Routine maintenance or when flow from the product is noticeably reduced or fountain
display has deteriorated:
i) Disconnect all items attached to outlet adapter (16).
ii) Remove top cover (1) by releasing the retaining clips at both ends, as shown by arrows (A)
and (B) in Fig. C.
iii) Remove filter foams (2, 3 and 17) and clean by squeezing in a bucket of pond water.
iv) Remove 4 x biological filter medium bags (18) and (19) and rinse in a bucket of pond water.
NOTE: The filter foams and biological filter medium bags should never be cleaned in tap water as
the beneficial bacteria will be killed.
v) Check and remove any obstruction to inlet of UV chamber (5).
vi) If you are using a fountain, remove and clean fountain head in water with a brush.
vii) Reassemble.
If flow is still poor check:
• Flow control (22) is correctly set.
• No blockage, kinks or leaks in outlet hose (if fitted).
1
20
A
B
B. If flow / fountain has stopped (check power supply first!):
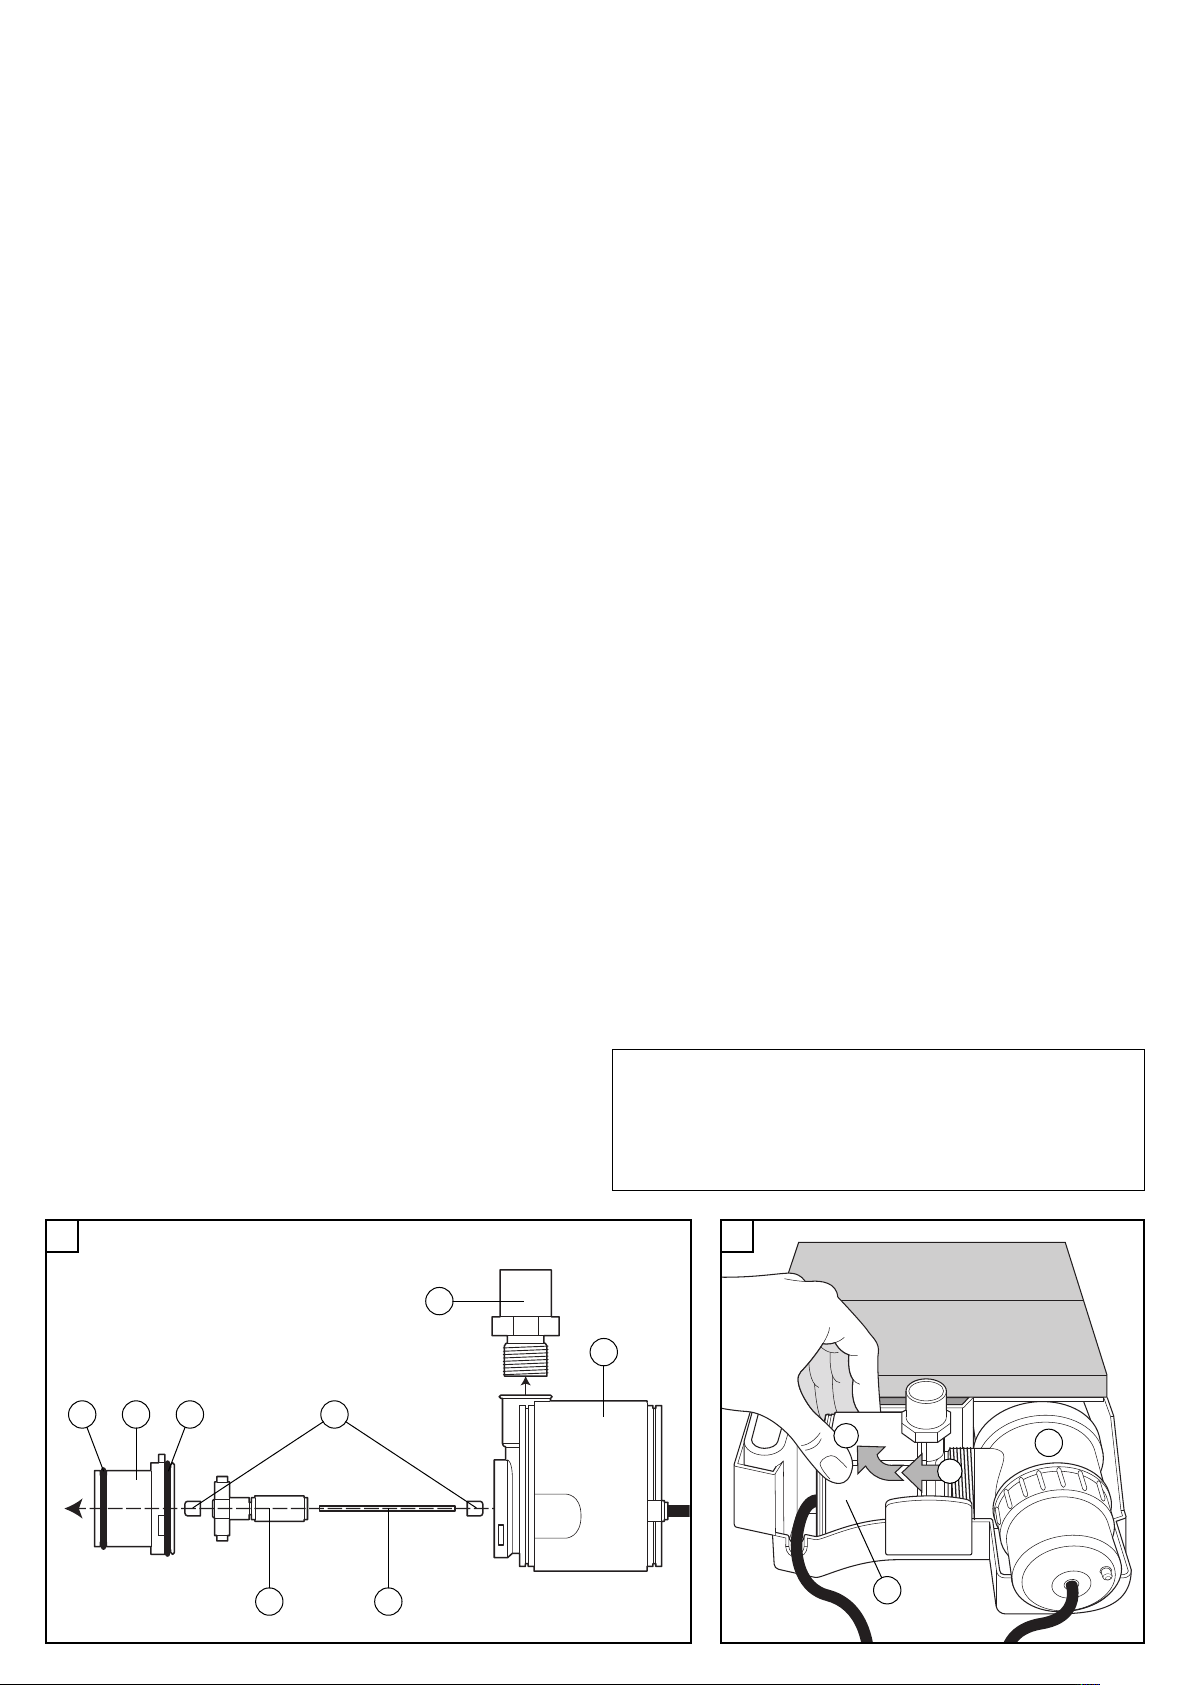
Remove pump (15) and completely dissemble to the component parts as shown in
Fig. D as follows:
i) Disconnect all items attached to outlet adapter (16) and remove top cover (1)
by releasing the retaining clips at both ends, as shown by arrows (A) and (B) in
Fig. C.
ii) Remove pump (15) by holding the rear of the motor and carefully lifting out from
the UV outlet chamber (10) as shown by arrows (A) and (B) in Fig. E.
iii) Remove impeller cover (34) by rotating anticlockwise.
iv) Carefully pull out pump impeller assembly (37) and (38).
v) After cleaning all components:
• Check for wear of impeller (37) on shaft (38) and condition of rubber bushes
(36). Replace with new pump if required.
• Check cable and pump body (15) for any damage or deterioration and discard
pump if suspected faulty.
vi) Carefully reassemble all parts in reverse sequence.
C. Annual maintenance
In addition to the routine maintenance (section 3A) we recommend:
UV chamber and quartz tube
The UV chamber (5) and quartz tube (8) should only be cleaned if dirty.
i) Disconnect all items attached to outlet adapter (16) and remove top cover (1)
by releasing the retaining clips at both ends, as shown by arrows (A) and (B) in
Fig. C.
ii) Remove filter foams (2) and (3) and lift off UV chamber cover (4).
iii) Flex side wall of base unit (20) as shown by arrow (S) in Fig. A and lift out
complete UV chamber assembly (5, 10 and 13) carefully pulling UV outlet
chamber (10) away from pump (15).
iv) Release retaining clip (9) and remove UV outlet chamber (10) by turning UV inlet
chamber (5) firmly in direction of arrow (T, Fig. A) while holding UV outlet
chamber (10) to reveal quartz tube (8).
v) Clean out UV inlet chamber (5). Carefully clean quartz tube (8) using a
non-scratch scouring pad.
vi) Re-fit UV inlet chamber (5) to UV outlet chamber (10) ensuring that inlet / outlet
are aligned.
vii) Carefully reassemble taking care to clip the complete UV assembly (5, 10 and
13) into base unit (20).
UV lamp replacement
The UV output of the lamp (12) reduces over time and after 12 months running
should be replaced. Note that the UV lamp will carry on giving off violet light well after
the UV light that kills the algae has stopped. We recommend the lamp is replaced at
the start of summer so that it is at its most efficient when the need is greatest.
• For safety the filter is fitted with a low voltage UV lamp, ensure that the
replacement lamp type is 12V / 11W.
i) Disconnect all items attached to outlet adapter (16) and remove top cover (1) by
releasing the retaining clips at both ends, as shown by arrows (A) and (B) in
Fig. C.
ii) Remove filter foams (2) and (3) and lift off UV chamber cover (4).
iii) Flex side wall of base unit (20) as shown by arrow (S) in Fig. A and lift out
complete UV chamber assembly (5, 10 and 13) carefully pulling UV outlet
chamber (10) away from pump (15).
iv) Remove UV lamp holder (13) from UV outlet chamber (10) by turning as shown
by arrow (R) in Fig. A.
v) Remove UV lamp (12) by pulling away from UV lamp holder (13). Pull the UV
lamp (12) straight out in the direction shown by arrow (P) in Fig. A.
vi) Confirm that your new FISH ATE UV lamp voltage/wattage is correct by
checking that the voltage/wattage on the UV lamp (12) is the same as the
old part.
vii) Fit new UV lamp (12) by pushing into UV lamp holder (13).
viii) Re-fit UV lamp holder (13) onto UV outlet chamber (10) ensuring UV chamber
O-ring (11) is in place in groove at end of UV outlet chamber (10).
ix) Carefully reassemble taking care to clip the complete UV assembly (5, 10 and
13) into base unit (20).
4. TR UBLE SH TING
A. Water does not clear
•The water should start to clear in 2 to 3 weeks, but full clarification may take 1 to 2
months. If the pond water is very green a partial water change should be made
before starting the filter. Thereafter the filter will keep the water clear.
• If the UV lamp (12) is over 12 months old replace with new FISH ATE UV lamp.
•Check UV lamp is working (see section 4B). Never look at the UV lamp (12) directly
as it produces UV-C light which may be harmful to the eyes and skin.
• Check that you have selected the correct size filter for your pond (see carton).
• Check that the filter is being run 24 hours a day throughout the year except when
there is a risk of the water freezing.
• Set flow control (22) to maximum flow and use a plume fountain.
•Check quartz tube (8) is not dirty. Clean carefully if necessary.
• Do not feed your fish more food daily than they can consume in 2-3 minutes. We
recommend the use of our FISH ATE automatic fish feeders - specially designed
for safe feeding of fish.
• Do not use a lawn or pond plant fertiliser.
B. Testing the lamp
WARNING: UV lamps emit radiation that can be harmful to eyes and skin.
When checking the UV lamp you should never look directly at the light. nly
view using the lamp indicator lens (6).
• Test that the UV lamp is functioning as follows:
i) Disconnect electrical supply to filter and remove from pond.
ii) Disconnect all items attached to outlet adapter (16) remove top cover (1) by
releasing the retaining clips at both ends, as shown by arrows (A) and (B) in
Fig. C.
iii) Remove filter foams (2) and (3) and lift off UV chamber cover (4). D N T lift
out UV chamber assembly (5, 10 and 13) or remove foams (17) and (18).
iv) Connect the UV transformer (14) NLY to power supply.
v) Confirm that the UV lamp is working by looking at the lamp indicator lens (6).
NOTE: Only a small amount of safe light will be coming through the lamp indicator
lens (6) so you may have to cup your hands over the indicator.
C. Blanket weed
• This filter will not eliminate blanket weed.
• Increased use of plants in the pond may be beneficial.
• Do not use lawn or pond plant fertiliser.
D. The flow coming out of the filter has reduced over time
• The flow will naturally reduce as the filter gets dirty.
• Perform routine maintenance (see section 3A).
D E
33 3534
15
36
37 38
16
NOTE HERE DATE FOR NEXT SCHEDULED MAINTENENCE
10
B
A
15

Other fish mate Pond Pump manuals

fish mate 16000 User manual

fish mate

fish mate 16000 User manual

fish mate 500 User manual

fish mate

fish mate 500 User manual

fish mate 2000 User manual

fish mate

fish mate 2000 User manual

fish mate 9000 User manual

fish mate

fish mate 9000 User manual

fish mate 2000 User manual

fish mate

fish mate 2000 User manual

Popular Pond Pump manuals by other brands

AL’S GARDEN ART AHP manual

AL’S GARDEN ART

AL’S GARDEN ART AHP manual

Messner power-X2 4000 manual

Messner

Messner power-X2 4000 manual

AquaScape AQUAFORCE 1000 Instructions & maintenance

AquaScape

AquaScape AQUAFORCE 1000 Instructions & maintenance

Waldbeck Nemesis Series manual

Waldbeck

Waldbeck Nemesis Series manual

EasyPro Eco-Clear EPS1300 Instructions for Operation, Safety, Warranty

EasyPro

EasyPro Eco-Clear EPS1300 Instructions for Operation, Safety, Warranty

Fiap Aqua Active Power manual

Fiap

Fiap Aqua Active Power manual

EasyPro EX8800 Installation and service manual

EasyPro

EasyPro EX8800 Installation and service manual

Messner System M 800 operating instructions

Messner

Messner System M 800 operating instructions

SunSun CHJ-603 Operation manual

SunSun

SunSun CHJ-603 Operation manual

Oase AquaOxy 400 operating instructions

Oase

Oase AquaOxy 400 operating instructions

EasyPro PA90AD Installation, Operation, Maintenance Guidelines

EasyPro

EasyPro PA90AD Installation, Operation, Maintenance Guidelines

Oase Aquamax Dry 6000 operating instructions

Oase

Oase Aquamax Dry 6000 operating instructions

Meßner eco-X operating instructions

Meßner

Meßner eco-X operating instructions

Angelo Decor Pond Building Series instructions

Angelo Decor

Angelo Decor Pond Building Series instructions

Blagdon MINIPOND 2000 manual

Blagdon

Blagdon MINIPOND 2000 manual

manuals.online logo
manuals.online logoBrands
  • About & Mission
  • Contact us
  • Privacy Policy
  • Terms and Conditions

Copyright 2025 Manuals.Online. All Rights Reserved.