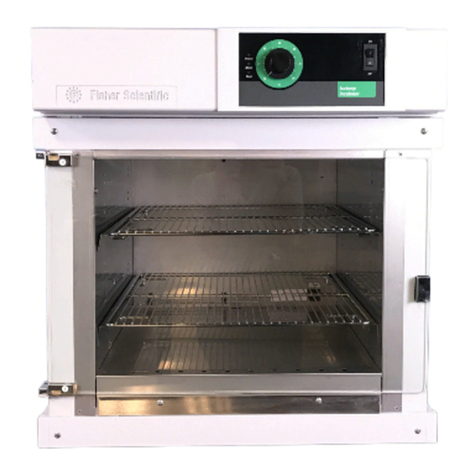
Fisher Scientific Isotemp 600 Series User manual

Instruction Manual
Fisher Scientific
IsotempâStandard Incubators
600 Series
Model 625D (Small)
Cat. No. 11-690-625D & -626D
Model 637D (Medium)
Cat. No. 11-690-637D & -638D
Model 650D (Large)
Cat. No. 11-690-650D & -651D

Isotemp Incubators
Table of
Contents
Introduction..........................................................................…………..1
Installation..............................................................…......………….......2
Selecting a Location......................................…........…….............2
Unpacking...........................................................…….....................2
Preparing the Incubator................................………........................3
Power Switch...................................................................................3
Convenience Outlet…………………………………………………….3
Control................................................................... ………......................4
Display.............................................................................................4
Keypad.............................................................................................5
Operation........................................………….........................................6
Safety Precautions................................................................……...7
Alarm Limits.............................................................................…...8
Display Offsets....................................................................….........8
Cleaning………………………………………………...……………….9
Service.......................................................................…………................9
Replacing the Door Gasket..................................................…......10
Accessing the Electronics..................................................... .......11
Replacing the Heater.............................................................….....12
Replacing the Controller........................................................…....13
Replacing the Solid State Relay................................................….13
Replacing the Safety Relay....................................................…....14
Replacing the Thermocouple....................................................….14
Replacing the Door Hinges......................................................…..15
Replacing the Handle......................................................…….......16
Adjusting the Door Cam........................................................…....16
Trouble-Shooting.............................................................…………......17
Replacement Parts................................................................……….....18
Performance Characteristics................................................………....19
Specifications....................................................………………….........20
Schematic Diagram...........................................................…………....21


1
Isotemp Incubators
Introduction
Fisher Isotemp 600 Series incubators are available in three sizes:
small (Model 625D), medium (Model 637D) and large (Model 650D).
All models provide PID microprocessor control at operating
temperatures ranging from 30 (86°F) to 75°C (167°F).
Note: Ambient temperature must be at least 5°C below
operating temperatures.
In these models, fresh air enters through an air intake on the bottom
of the incubator, then is heated in a plenum below the chamber,
finally flowing into the oven chamber itself in uniform flow patterns.
Exhaust air is vented through a port at the top of the incubator.
Temperature readouts and control parameters are shown on red
LED’s. Three additional LED’s indicate when the heater power is
being applied, an error condition is encountered, or the temperature is
being set.
The Model 625D accommodates a maximum of three shelves. The
Model 637D holds six shelves, and the model 650D holds 10 shelves.
Isotemp Incubators incorporate a variety of safety features. A safety
backup is built into the controller software. If the primary heater
control fails, the backup will maintain control at 3°C above the set
point. An alarm LED then indicates that the backup controller is
operating the incubator. A circuit breaker protects the incubator from
power surges.

Isotemp Incubators
2
Installation
Selecting a
Location
Unpacking
Choose a location for the incubator that will provide an area of
approximately 30inches by 30 inches. Allow at least 2” of open space
on both sides and back of unit (six inches if combustible materials).
The bench or table selected must be capable of supporting at least
120 lbs for the Model 625D, 130 lbs for the Model 637D, or 135 lbs for
the Model 650D. Appropriate electrical power must be available.
Locate the incubator within three feet of the power outlet so that no
extension cord is required.
Fisher Isotemp® Incubators are shipped in a single carton. After
unpacking, locate each item shown in the list below. Report any
missing items, by name and part number, to your Fisher branch or
representative. In the event of shipping damage, retain the carton
and packing material and file a claim with the final carrier.
Item
Incubator Assembly
Models 625D (small)
625D 120 V, 60Hz
626D 240 V , 50/60Hz
Models 637D (medium)
637D 120 V
638D 240 V
Models 650D (large)
650D 120 V, 60 HZ
651D 240 V, 50/60 HZ
Shelves
Models 625D & 637D (one provided)
Models 650D (two provided)
Shelf Supports
Models 625D & 637D (two provided)
Model 650D (four provided)
Instruction Manual

3
Isotemp Incubators
I
0
Preparing the
Incubator
Power Switch
Convenience
Outlet
To prepare the incubator for operation, perform the following procedures:
1. Install the shelf(s).
2. Make certain all packing material has been removed from incubator
chamber.
3. Connect the line cord to an appropriate electrical outlet.
Caution: See data plate on incubator for voltage, current
and line frequency specifications. Check that the power
requirements of the incubator will not overload the circuit to
which it will be connected.
4. The incubator is now ready for operation. No preliminary
adjustments or calibrations are required. Depending on the customer
application and customer laboratory procedures an initial calibration
may be done at this point.
The 600 Series incubators feature a front panel mounted power switch
which is a combination power switch and circuit breaker, eliminating the
need for separate internal fusing. The circuit breaker will interrupt power in
the event of an incubator heater malfunction.
Press the |(upper) half of the rocker-type power switch to the
in position to turn the incubator on. Press the 0 (lower) half to
the in position to turn off incubator power. To reset the
breaker, first place the switch to the off position, then return it
to the on position.
The 600 Series incubators feature a convenience electrical outlet located
inside the incubator, at the lower right of the back panel. This outlet is rated
at the same voltage as the incubator itself and is limited to a maximum
current of 5A for all models. If the current limit is exceeded, the circuit
breaker will trip. For safety, the integrity of the electrical ground should
always be maintained.

Isotemp Incubators
4
Controls
Display
The following sections briefly describe the locations and functions of various
display fields and keypad controls. More detailed descriptions are provided,
when required, in the operating sections of the manual.
The 600 Series controller features two bright, one-half inch, 7-segment LED
displays used in setting up the incubator program or reading incubator
temperature. Two smaller LEDs indicate, respectively, an alarm condition or
when power is being applied to the incubator heaters. Each display field is
discussed separately below.
Temperature Display In the normal operating mode, shows the current
incubator temperature. During programming, indicates the incubator set
temperature target.
Heat Indicator Lights when power is being supplied to the incubator heater.
Alarm Indicator Lights if the actual incubator temperature exceeds the
alarm temperature. The alarm temperature is factory-adjusted to be 5°C
above the set temperature.
Program Indicator Lights when the control temperature is being set.

5
Isotemp Incubators
Keypad
The 600 Series incorporates a four-key, tactile keypad. The function of each
key is discussed individually below.
Pressing the MENU Key will cause display to show CAL. Then pressing SET
Key will display calibration.
Pressing INCREASE Key while holding down the SET Key increases the
incubator set temperature, as indicated on the temperature display.
Pressing the DECREASE Key while holding down the SET Key decreases
the incubator set temperature, as indicated on the temperature display.
Pressing the SET Key causes the display to show the set temperature.
Used with INCREASE Key and DECREASE Key to change the set
temperature. With MENU Key to access entry of a temperature display
offset (calibration feature).

Isotemp Incubators
6
Operation
In Control mode operation, the incubator maintains a set temperature until
that set temperature is changed. The Actual and Set Displays will indicate
current chamber temperature and the temperature set point, respectively. To
set a temperature and initiate Control mode operation, perform the following
1. Place the power switch in the ON position. All 8’s will flash
as a test of the display.
2. Press and hold the SET Key.
3. Observe the set temperature in the Set Display window.
4. To decrease the set temperature, press the DECREASE
Key while holding the SET Key.
5. To increase the set temperature, press the INCREASE Key
while holding the SET Key.
6. When the desired set temperature is shown, release the
INCREASE OR DECREASE Key. Finally, release the SET
Key. The incubator automatically begins to control at the set
temperature.
Note: To rapidly increase or decrease the set temperature, press and
hold the appropriate key. To slowly increment or
decrement the set temperature one degree at a time, press and
immediately release the key.
Note: Upon initial heat up to temperature, the over range alarm
indicator light may illuminate briefly (several minutes) until the
temperature stabilizes at the set point. The incubator temperature
should be allowed to stabilize prior to loading samples.

7
Isotemp Incubators
Safety
Precautions
Before operating the incubator, always observe the following Safety
precautions:
This unit is not explosion proof.
Do not use in the presence of flammable or combustible materials; fire or
explosion may result. Unit contains components that may ignite such
materials.
Fumes and spillage from acidic solutions cause corrosion of the stainless
steel chamber and other components. Care should be taken to maintain a
neutral pH at all times.
The heater is in the bottom of the unit. Surface temperatures at the bottom
cover may be higher than set point temperature.
For Example: A plastic container setting on the heater cover may become hot
enough to melt/burn the container at settings below the melting point of
plastic. Do not place items on the heater cover.
•Wear insulated gloves.
•Use tongs.
•Never stand in front of an open incubator.
•Use safety goggles.

Isotemp Incubators
8
Alarm Limits
Display
Offsets
The 600 Series controller features a deviation alarm, which alerts the
operator and interrupts heater power whenever the actual incubator
temperature differs from the set temperature by more than 3 °C. This set
limit can not be adjusted by the operator.
If the actual temperature exceeds the alarm limit, the alarm indicator LED
will light and the Display will flash “EEE”.
The reference point for the alarm is the set temperature. Any change in the
set temperature will cause a corresponding shift in the alarm temperature.
Example:
If the set temperature is 40 °C, the alarm will trip at 43 °C. if the set
temperature is changed to 50 °C, the alarm will follow the set temperature
and trip at 53 °C.
Changing the set temperature to a value more than 3 °C. below the present
incubator temperature will trip the alarm. Power is removed from the
heaters when an alarm condition occurs. As an example:
An experiment was being run at 50°C. The experiment finished and another
researcher needed to run an experiment at 40°C. The researcher reset the
set point to 40 and the unit went into alarm. The researcher knowing this
was a normal operation allowed the unit to cool and stabilize at 40°C. Just
below 43 degrees the unit alarm LED went off and the display resumed
normal operation.
The 600 Series controllers permit the operator to select a display offset
temperature. With a display offset entered, the temperature displayed will
be the actual incubator temperature (measured at the control thermocouple)
plus or minus the display offset selected. Functionally, the offset feature
permits the operator to measure and calibrate such that the display will
indicate the temperature at a specific point or zone within the incubator.
To enter a display offset, carry out the following steps:
1. Press the MENU Key, the display will indicate –
2. To view the present offset value, press and hold the SET Key.
3. To change the display offset, press and hold the SET Key. Press the
INCREASE Key or DECREASE Key until the display indicates the desired
offset.
4. Release the SET Key.
5. Press MENU Key Once to return to normal temperature control.
Example:
The displayed temperature is the result of algebraically adding the actual
temperature to the offset value. Thus, if an offset value of –3 degrees is being
used, a measured temperature of 50 degrees will be displayed as 47 degrees.

9
Isotemp Incubators
Cleaning
Service
1. Always unplug unit prior to cleaning
2. During cleaning take precautions to prevent cleaning agents from
contacting electrical components.
3. Use a mild, non-abrasive cleaner (i.e. damp cloth and mild soap) to clean
all normally accessible surfaces.
4. Make sure unit is dry before re-connecting to power source.
The following sections describe procedures for servicing the 600 Series
incubators. The procedures, Replacing the Door Gasket, Replacing the
door handle, and adjusting the door handle may be performed by most
users. However, all other service procedures involve possible exposure to
line voltage. Only qualified service personnel should undertake these
procedures. The second section, Accessing the Electronics Compartment,
describes procedures required for subsequent service sections and is
referenced by these later sections when required.
Caution: Service procedures involve exposure to line voltage and
should be done only by qualified service personnel. Disconnect
incubator from power source before attempting repairs.
For Technical Assistance call 1-800-926-0505
For Field Service Division Assistance Call: 1-800-395-5442

Isotemp Incubators
10
Replacing the
Door Gasket
The Isotemp 600 Series incubators incorporate a durable, silicone door
gasket to minimize heat loss. Should the gasket become defective or be
damaged, it may be replaced by following the procedures below.
1. Set the power switch to the off position and open chamber door.
Caution: Allow incubator to cool to ambient temperature
before attempting repair.
2. Open door fully and lift it off of hinge pins. Lay door on a flat surface with
the handle over the edge.
3. Note the joint position of the old gasket. This is where the new gasket
installation will start.
Note: Study the method of door gasket attachment before
starting disassembly. This understanding will avoid
confusion later in this process.
4. Bend back the old door gasket and remove the phillips head screws
attaching the gasket.
5. Remove the old door gasket.
6. Loosely install two screws through the stainless steel liner and into the
door wrap to align these pieces during the installation of the new gasket.
Once one side of the new gasket is installed, these screws will need to be
removed to install the new gasket.
7. Begin installing the replacement gasket at the joint position of the old
gasket. Strech the replacement gasket around the corners of the liner to
avoid bunching up of the gasket material.
8. Install a phillips head screw as the gasket rounds each corner to keep the
gasket properly streched. (The screw goes through the liner. Pierces the
gasket and threads into the door wrap.
9. After all four corners are secured, install the remainder of the phillips
head screws. Make sure there is no gap at the gasket joint; stretch the
gasket slightly, if necessary.
10. Reinstall the door onto the hinge pins.

11
Isotemp Incubators
Accessing
the
Electronics
To access the electronics compartment, proceed as follows:
1. Disconnect power cord from the electrical outlet.
2. Open the chamber door. Carefully lift the door upward and off its two
hinges. Set door aside.
3. Remove the screws securing bezel from top of the incubator.
4. Grasp bezel and pull top outward. Bezel will disengage from fascia. Lay
bezel on top of the unit.
5. Assembly is in the reverse order.
Controller and relays inside bezel
Bezel Screws
Heater Cover Heater Cover Screws
Caution: Allow unit to cool to ambient temperature
before attempting repair.
Caution: Service procedures requiring access to
the electronics compartment involve exposure to
line voltage and should be done by qualified
service personnel. Disconnect unit from power
before attempting repairs.

Isotemp Incubators
12
Caution: Service procedures requiring access to the
electronics compartment involve exposure to line
voltage and should be done by qualified personnel.
Disconnect unit from power before attempting repairs.
Replacing the
Heater
Caution: Allow incubator to cool to ambient temperature
before attempting repair.
To replace a defective heater, proceed as follows:
1. Disconnect power cord from the electrical outlet.
2. Remove the outer chamber door and glass door.
3. Remove the two screws that secure the heater cover. Remove the
cover by lifting and sliding it forward. It may be necessary to use a flat-
blade screwdriver to assist in lifting the cover upward. Set heater cover
aside.
4. Remove the two nuts and shake proof washers securing the heater
leads, then pull the lead terminals off the heater studs.
6. Remove the two screws securing heater to cabinet. Slide heater
forward to disengage back heater clips, lift back of heater up, then slide
heater back and lift out.
7. Install replacement heater and reassemble unit by generally reversing
the steps above.

13
Isotemp Incubators
Replacing
The
Controller
Replacing the
Solid State
Relay
To replace a defective controller, proceed as follows:
1. Complete the procedures discussed in Accessing the
Electronics Compartment.
2. Locate terminal blocks on controller, remove all wires
connected to controller. Note color and location of wires.
3. Remove four screws that hold controller to bezel, then remove
old controller.
4. Install new replacement controller and reattach wires previously
removed.
5. Check wiring connections against schematic, making sure that the
line power wiring is attached to the proper terminal, i.e. 120V or
230V.
6. Check switch DS 1 setting:
Switches A and B should be OFF.
To replace a defective solid state relay, proceed as follows:
1. Complete the procedures discussed in Accessing the
Electronics Compartment.
2. Consult the schematic and locate the solid state relay
(mounted on bezel).
3. Remove four lead wires from their screw-down terminals.
4. Remove two Phillips screws which mount the solid state relay
to the bezel.
5. Lift out the solid state relay. Put new solid state relay in place,
making certain that the thin, conductive pad remains between the
solid state relay and the bezel.
6. Generally reverse the steps above to reassemble incubator.
Caution: Service procedures requiring access to the
electronics compartment involve exposure to line
voltage and should be done by qualified service
personnel. Disconnect from power before attempting
repairs.

Isotemp Incubators
14
Note: Observe position in terminal for each lead. When re-
connecting, be certain to observe polarity. Compare
with polarity indication on controller housing. For
thermocouples, the red wire is negative and yellow is
positive.
Caution: Service procedures requiring access to the electronics
compartment involve exposure to line voltage and
should be done by qualified service personnel.
Disconnect from power before attempting repairs.
Replacing the
Safety Relay
Replacing the
Thermocouple
To replace a defective safety relay, proceed as follows:
1. Complete the procedures discussed in Accessing the
Electronics Compartment.
2. Consult the schematic and locate the safety relay (mounted on
Bezel).
3. Remove four lead wires from their push-on terminals.
4. Remove two Phillips screws which mount the safety relay to the
bezel.
5. Lift out the safety relay.
6. Generally reverse the steps above to install the replacement
safety relay and reassemble incubator.
To replace a defective control thermocouple, proceed as follows:
1. Complete the procedures discussed in Accessing the
Electronics Department.
2. Locate the thermocouple connections on the controller.
3. Remove the thermocouple wires by loosening two securing
screws.
4. The thermocouple is located on the roof of the chamber, locate
clip which holds thermocouple in place. Remove thermocouple
from clip.
5. Pull thermocouple forward into chamber, exposing roughly a 6
inch section of the thermocouple wire.
6. Cut the thermocouple wire to remove the thermocouple sheath.
Caution: Service procedures requiring access to the
electronics compartment involve exposure to line voltage
and should be done by qualified service personnel.
Disconnect from power before attempting repairs.

15
Isotemp Incubators
Caution: Allow incubator to cool to ambient
temperature before attempting repair.
Replacing the
Door Hinges
Replacing the
Glass Door
7. Securely loop together the cut end of the defective thermocouple
with the two leads of the replacement thermocouple. Wrap
masking tape over the length of the loops to secure them.
8. Gently pull the defective thermocouple out through the
electronics compartment while guiding ("fishing") the
replacement thermocouple into place.
9. Generally reverse steps 1 through 3 to complete installation of
new thermocouple and reassemble incubator.
To replace a defective door hinge, perform the steps below:
1. Remove door by lifting it straight up.
2. Remove the two mounting screws securing the defective hinge.
3. Remove defective hinge and mount new hinge by replacing the
mounting screws.
4. Put door back onto hinges.
___________________________________________________________________
The Isotemp 600 series incubators feature a glass, inner door to allow the
chamber to be viewed with minimal heat loss. Should the glass door become
damaged, it may be replaced by following the procedures below.
1. While holding the glass door, loosen the set screws on insides of
upper and lower hinges of glass door.
2. Remove old glass door and set aside.
3. Generally reverse steps above to install replacement glass
door. Adjust hinge position until gap between door and frame
is roughly equal on all sides.
Caution: While loosening hinge set screws, continue to
grasp the glass door. When the set screws are
loosened, the door is freed and will fall out if not held.

Isotemp Incubators
16
Caution: Allow Door to Cool !
Replacing the
Handle
Adjusting the
Door Cam
To replace a defective door handle, perform the steps below:
1. Remove the two mounting screws holding latch cover in place.
2. Remove the two mounting screws holding defective handle in place.
3. Mount the replacement handle using two screws.
4. Adjust bottom nut (13/16) from end of shaft.
5. Secure latch cover in place with two screws.
Due to handling in shipment or to heat distortion with use, the door cam may
require adjustment.
To adjust the door cam, perform the following:
1. Open door and remove screws holding latch cover in place.
2. Locate nuts securing tongue on cam shaft.
3. Loosen but do not remove outside nut.
4. Adjust inside nut, one full turn clockwise draws door 1/16” closer to
cabinet when door is closed.
5. Secure cam tongue in place by tightening outside nut.
6. Repeat 1 thru 5 as necessary to get desired door seal.
7. Secure latch cover in place with two screws.

17
Isotemp Incubators
Trouble-
shooting
Symptom
No power
Incubator temperature
Erratically high
Failure to heat
Alarm LED stays On
and oven is higher than
set temperature
Set Display Shows
"EEE"
Temperature off from
Independent
thermometer
This table is intended to assist in resolving incubator problems by relating
symptoms to their likely causes. The service discussed below is beyond the
scope of most users and should be performed by qualified and trained
personnel.
Probable Cause Action
Unit not plugged in or turned on. Plug in or turn on
Defective circuit breaker. Replace circuit breaker.
Wire Disconnected. Replace loose wire.
Defective control thermocouple. Replace control thermocouple.
Defective control board. Replace control board.
Set temperature less than Refer to Operation. (ambient
actual temperature. needs to be cooler than set
temperature).
Defective control thermocouple Replace control thermocouple.
Poor heater connections Tighten connections at terminal
strip. (check resistance from
control board out)
Defective heater element Check heater resistance on
schematic at back of manual.
Replace heater unless
approximately the same as
schematic.
Defective solid state relay Refer to schematic and replace
or safety relay relay.
Defective controller Replace controller
Set temperature has been changed Wait for actual temperature to
to a value less than the actual cool to the set temperature.
temperature minus the high alarm (to Set plus 3-° and Led will go out
limit. and EEE display back to normal
operation.)
Defective controller Replace controller
Defective solid state relay Refer to schematic and replace relay
Alarm LED also lit Allow incubator to cool to set point.
See above.
Alarm LED not on:
Faulty or broken connections Check thermocouple connections
at rear of temperature controller.
Defective control Replace control if thermocouple ok.
Calibration off set needs adjusted. Begin by setting offset to 0.
(Seepage 8)
Other manuals for Isotemp 600 Series
1
This manual suits for next models
9
Table of contents
Other Fisher Scientific Accessories manuals

Fisher Scientific
Fisher Scientific 146E User manual

Fisher Scientific
Fisher Scientific 3530 User manual

Fisher Scientific
Fisher Scientific Isotemp 60L Incbtr Grvity 120V User manual

Fisher Scientific
Fisher Scientific Isotemp 178L 120V User manual

Fisher Scientific
Fisher Scientific Isotemp 500 Series User manual

Fisher Scientific
Fisher Scientific Isotemp 500 Series User manual

Fisher Scientific
Fisher Scientific Isotemp Series User manual