Fisherbrand Accu100 User manual
Accu100
Ultrapure Water System
USER MANUAL

www.eu.fishersci.com/fisherbrand
2
Notice
The Accu100 system is manufactured in a facility whose quality management
system is approved by an accredited registering body to the ISO9001 Quality
System Standards.
DECLARATION OF CONFORMITY
EUROPEAN UNION EC DIRECTIVES AND FCC RULES
We certify that these water systems are designed and manufactured in
accordance with the following European Council directives and FCC rules:
•The Essential Safety Requirements of EU Low Voltage Directive
2006/95/EC Applied Codes and Standards.
•The Essential Safety Requirements of EU Electromagnetic Compatibility
Directive 2004/108/EC Applied Codes and Standards.
•The Requirements of FCC Part 15 Class B Rules.
FCC Part 15 Class B
Directive 2006/95/EC
Directive 2004/108/EC

www.eu.fishersci.com/fisherbrand 3
This Manual is Applicable to the Following Accu100
Models
15489749 Accu100 Ultrapure Water System, 100 - 240 VAC
15499749 Accu100 UV Ultrapure Water System, 100 - 240 VAC

www.eu.fishersci.com/fisherbrand
4
Table of Contents
1 INTRODUCTION................................................................................................5
1.1 Product Features..........................................................................................6
1.2 Main Applications.........................................................................................7
1.3 Specifications...............................................................................................7
2 INSTALLATION...................................................................................................8
2.1 Preparation for Installation...........................................................................8
2.2 Items Included..............................................................................................8
2.3 Structure and Flow Diagrams.......................................................................9
2.4 Installation..................................................................................................12
3 SYSTEM START UPAND OPERATION ..........................................................16
3.1 Check List Prior to System Start Up...........................................................16
3.2 System Start UP and Display.....................................................................17
3.3 Routine Operation......................................................................................22
3.4 Volumetric Dispensing ...............................................................................23
4 MAINTENANCE ...............................................................................................24
4.1 Messages for Maintenance........................................................................24
4.2 Maintenance Menu and Settings................................................................25
4.3 Replacing the Ultrapure Pack and the Final Filter......................................27
4.4 Replacing the UV Lamp (for UV models)...................................................29
5 BASIC TROUBLESHOOTING..........................................................................32
6 PARTS AND ORDER INFORMATION..............................................................33
7 WARRANTY INFORMATION ...........................................................................35

www.eu.fishersci.com/fisherbrand 5
1 INTRODUCTION
This manual describes in detail about system performance characteristics,
installation, operation, and routine maintenance. Please read this manual
thoroughly for its instruction on installation, use and maintenance. Proper
installation and maintenance guarantee the continuous flow of high quality
pure water.
Please contact us or your local distributor if you encounter any issues during
installation and use. Professional engineers are fully trained to support you.
Safety Information
WARNING!
To avoid electrical shock, always:
1) Use with a properly grounded electrical outlet of correct voltage and
current handling capacity.
2) Replace fuses with those of the same type and rating.
3) Disconnect from the power supply prior to maintenance and service.
4) Refer servicing to qualified personnel.

www.eu.fishersci.com/fisherbrand
6
1.1 Product Features
The Accu100 Ultrapure Water System produces ultrapure water from
reverse osmosis (RO), distillation or deionized water. Ultrapure water from
the Accu100 system meets or exceeds quality standards of ASTM, CAP,
CLSI and ISO Type I water standards.
The system has the following characteristics:
•Automatic system recirculation every hour to prevent bacteria from
growing inside the system
•Large-capacity purification cartridges contain uniquely formulated ion
resin and fine activated carbon to ensure long useful life and a low running
cost
•A 0.2 µm final filter or an ultrafiltration filter (optional) removes any
remaining contaminants
•Adual UV lamp to kill bacteria and reduce organics to trace level (optional)
•Volumetric dispensing and dispense volume calibration for easy
dispensing of ultrapure water
•Resistivity measurement by a high-precision resistivity sensor (cell
constant 0.01cm
-1
)
•Alarms when consumable reach the end of life
•Small compact footprint that occupies minimal space, and easy to move
around with an ergonomically designed handle
•CE marked and FCC certified

www.eu.fishersci.com/fisherbrand 7
1.2 Main Applications
Preparation of blanks, buffers and samples in GC/HPLC/AA/ICP-MS and
other advanced analytical techniques.
Preparation of media and regents in cell culture/molecular biology/
nanotechnology research.
1.3 Specifications
Operating Voltage 100 - 240 V
Max. Power 55 W
System Dimensions
Width × height x depth
8 × 17 × 14 in
21 × 44 × 36 cm
Water Production Rate 1 - 1.5 L/min
Resistivity of Ultrapure Water
(@25)18.2 MΩ.cm
TOC of Ultrapure Water < 10 ppb, or < 5 ppb (with a dual wavelength
UV lamp)
Particles in Ultrapure Water
(> 0.2 µm) < 1 /mL (with a 0.2 µm final filter or final
ultrafilter)
Microorganism < 0.1 cfu/mL (with a 0.2 µm final filter or final
ultrafilter)
Pyrogen Content < 0.001 EU/mL (with a final ultrafilter)

www.eu.fishersci.com/fisherbrand
8
2 INSTALLATION
2.1 Preparation for Installation
2.1.1 Power Supply:
Power supply must be properly grounded
2.1.2 Feed Water:
20L of purified water
2.1.3 Tools Needed (Not Included):
Scissors or a box opener to open packages and cut water tubing
2.2 Items Included
The Accu100 system comes with the following items in the package. The
following items are packed separately. These items need to be installed at
initial set-up:
1) Main system
2) User Manual and Quality Certificate
3) Accessories Pack: power adapter, 1.5m 3/8 in OD PE tubing for feed
water connection (place one end to the feed water tank and the other
end to the Accu100 system), tweezers, degassing fitting and 1/4 in PE
tubing

www.eu.fishersci.com/fisherbrand 9
2.3 Structure and Flow Diagrams
2.3.1 System External Layout
Front View
Side View
Lock bar
Purification cartridge
Final filter
Power switch
Power Socket
Handle
Water inlet
Final filter
Lock bar
Purification cartridge
Display panel Control panel
(see explanation on 2.3.3)
www.eu.fishersci.com/fisherbrand
10
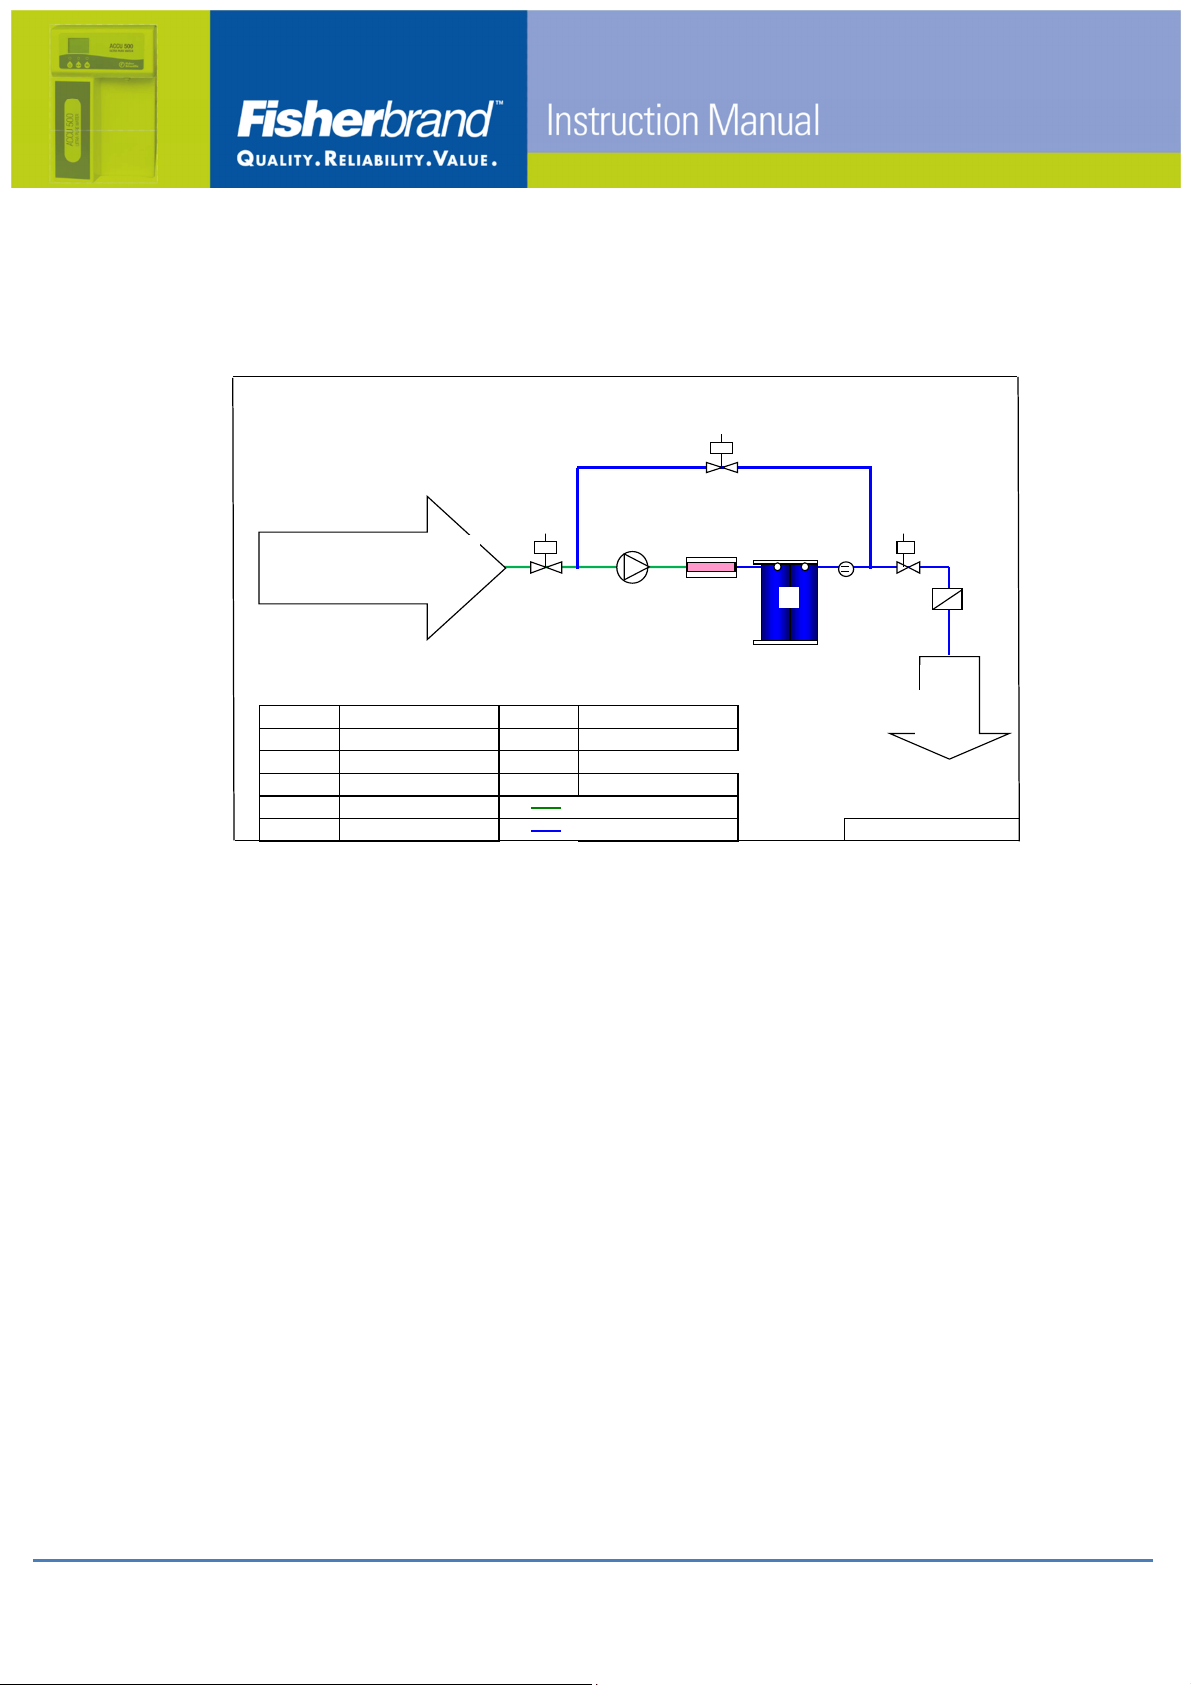
2.3.2 Accu100 System Water Flow Diagram
The water flow path for the Accu100 and Accu100 UV models are described
below. Each component is explained in the legend.
I T E M
C o mp o nen t
I T E M
Component
C
Booster pump
M U pack
E1
Water inlet valve
I Resistivity sensor
E2
Recirculation valve
H
Final filter
E3
Dispense valve
RO water loop
N UV lamp UP water loop
E1
(DISTILLED WATER)
(RO WATER)
(DI WATER) MC E
NIH
ACCU100 UV Flow Diagram
UP
WATER
RephiLe Bioscience,
E2

www.eu.fishersci.com/fisherbrand 11
2.3.3 System Control Panel
Main Buttons:
Dispense Press it to dispense water. Press it again to stop
dispensing.
Recirculation
In Ready mode, press it to enter Recirculation
mode, Press and simultaneously to
enter user menu.
Volumetric
Dispensing
In Ready mode, press it to enter volumetric
dispensing. Press and simultaneously
to enter user menu.
Pressure
Relief In Ready mode, press it to enter Pressure Relief
mode.
Display panel Recirculation
Button Volumetric
Dispensing
B
utton
Pressure Relief
Button
Dispense button
www.eu.fishersci.com/fisherbrand
12
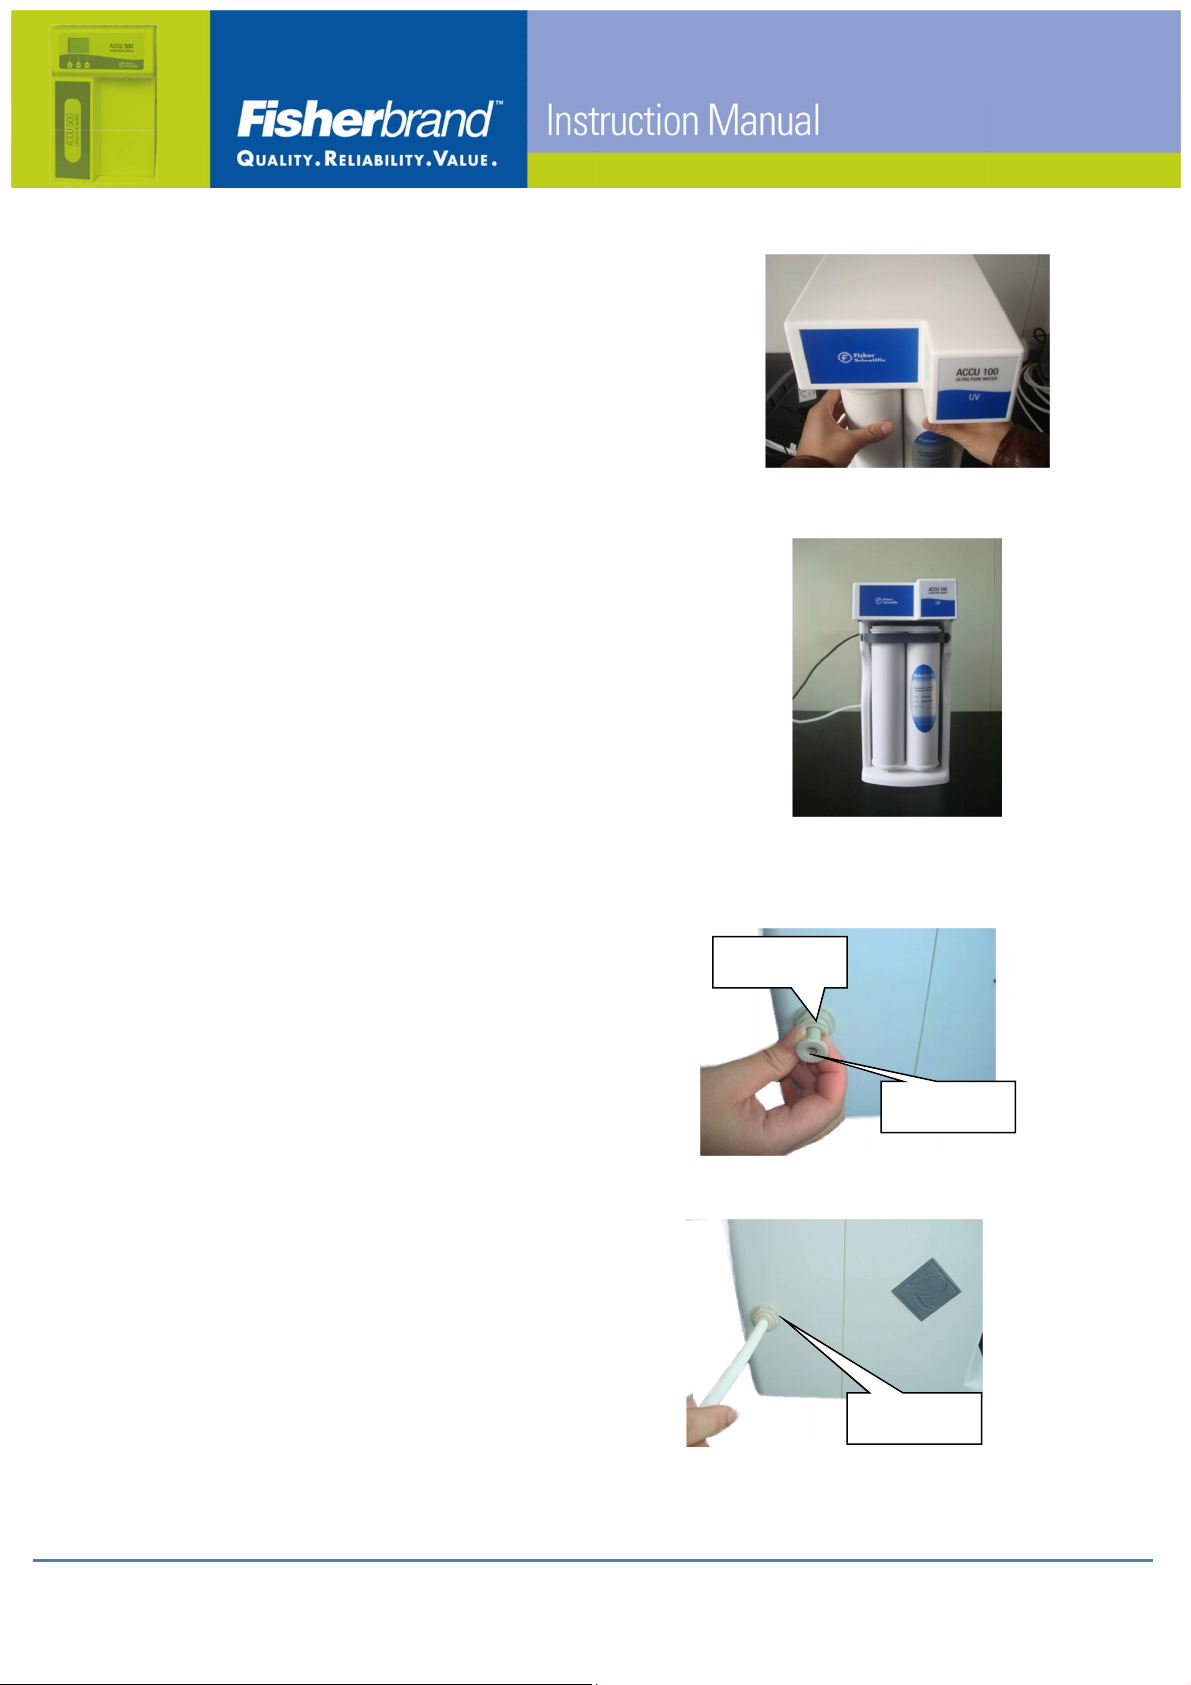
2.4 Installation
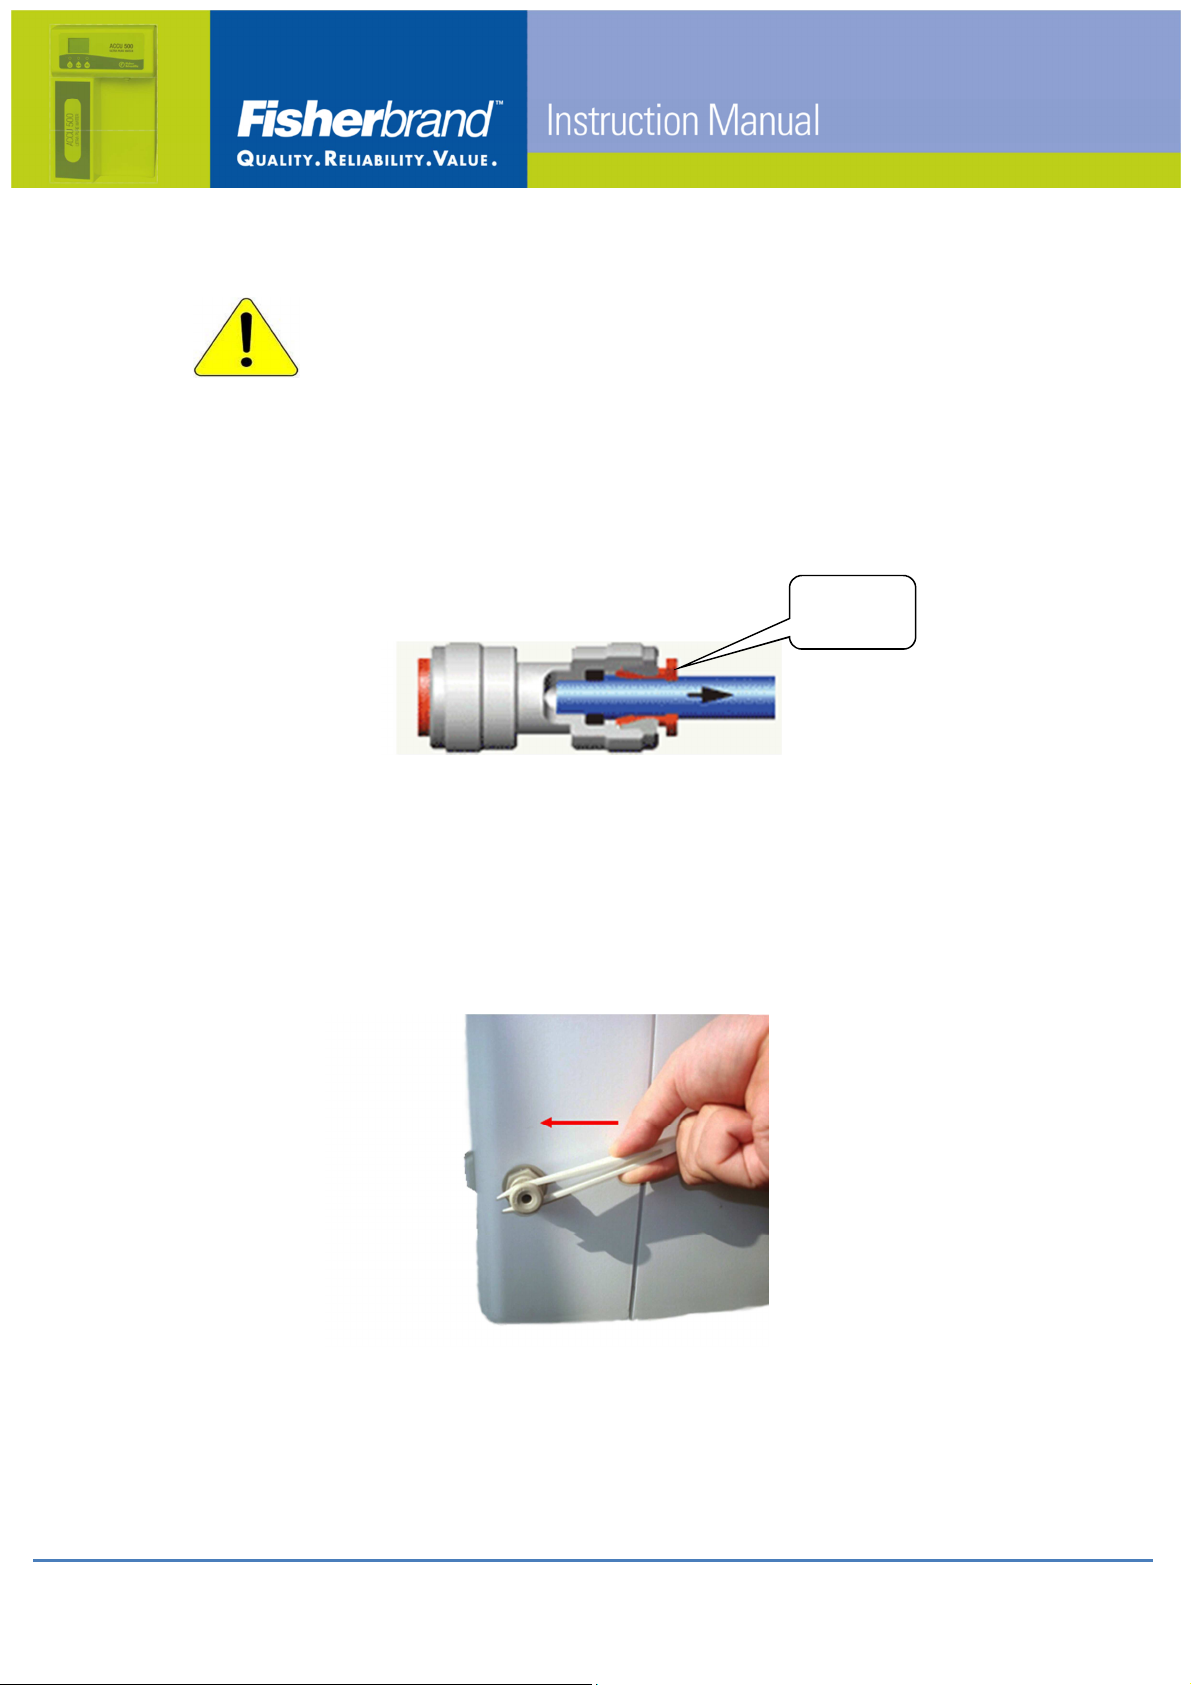
Attention
Water inlet is a quick connector type with a lock (collet). It comes
protected by a stopper. DO NOT attempt to pull the stopper out from
the port with force without unlocking the collet first as this will damage
the quick connector, rendering it useless.
Please follow the instruction below to remove the stopper
A. Insert the tweezers to the gap between the stopper and the collet.
B. Pinch the tweezers and push it as the picture indicated to remove the
stopper.
Collet
(push in)
www.eu.fishersci.com/fisherbrand 13
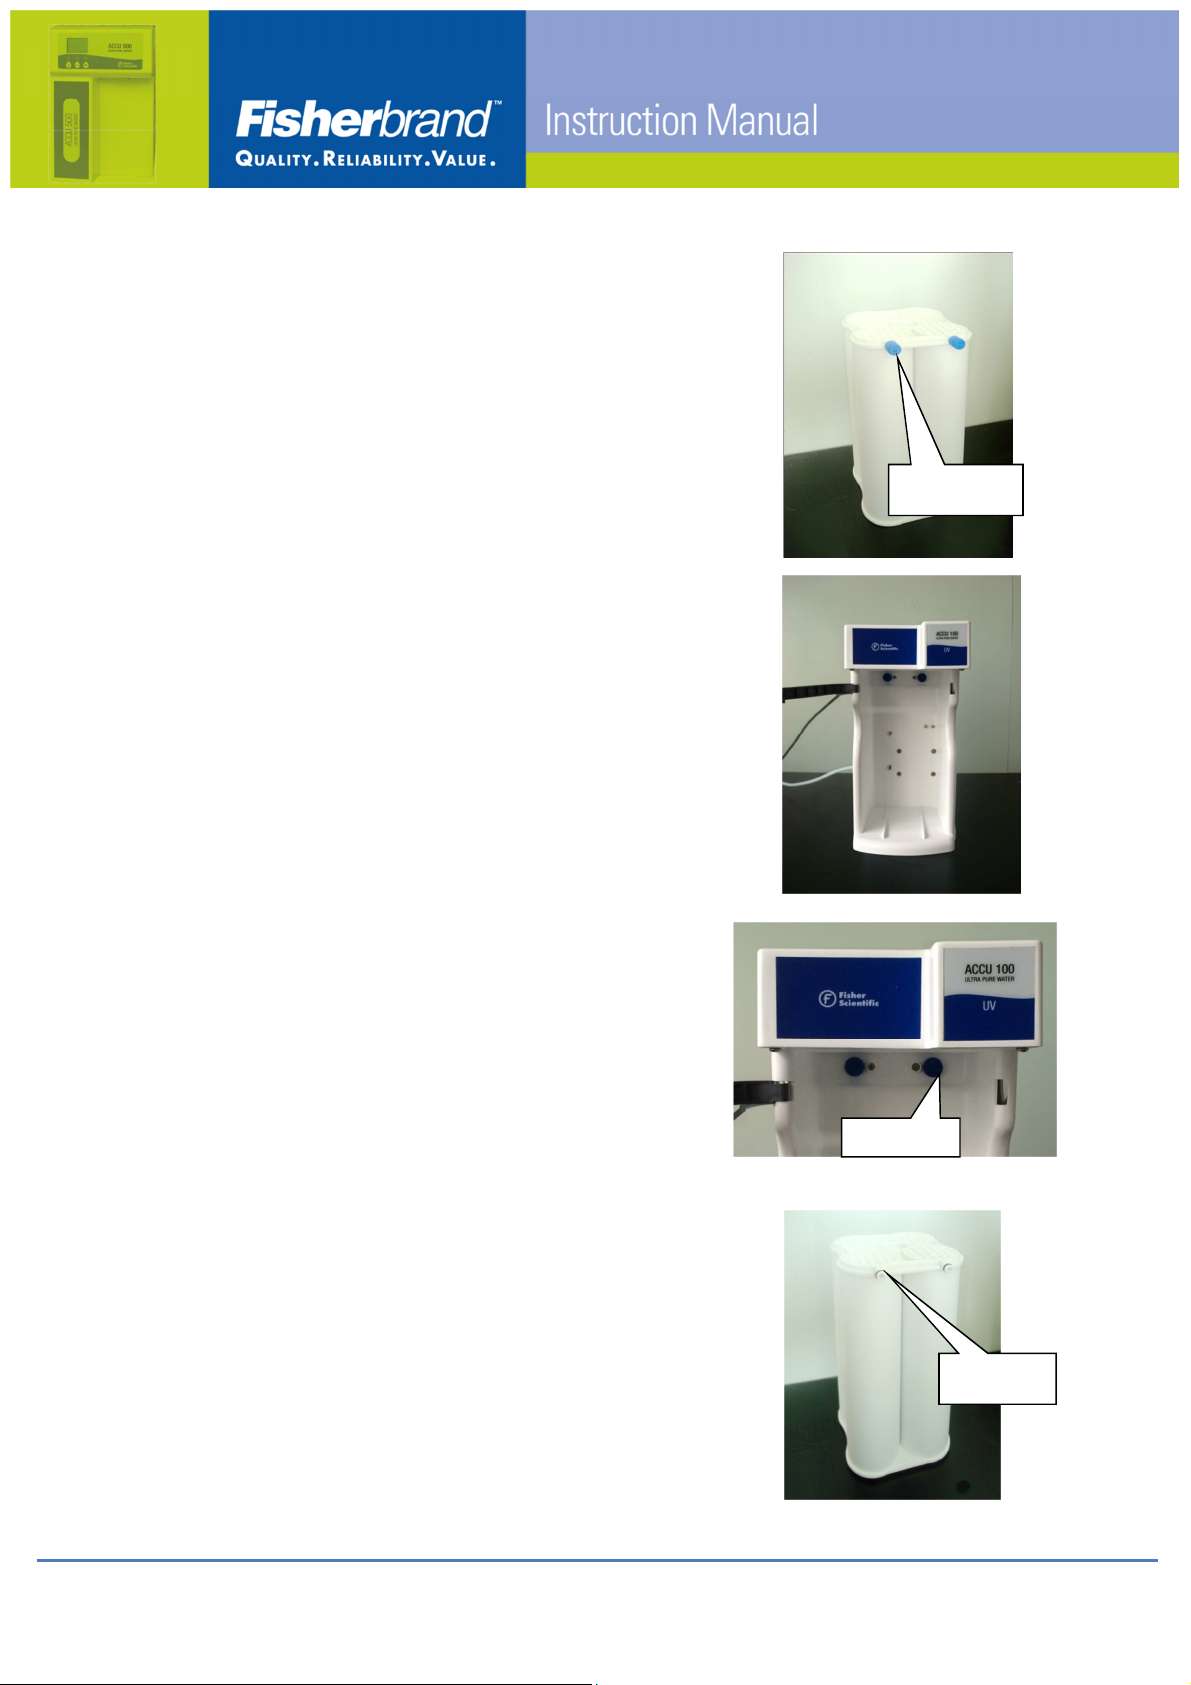
2.4.1 Installing the AccuQuatro U Pack Cartridge
2.4.1.1
1) Take out the cartridge from its packaging.
2) Remove blue caps on the cartridge inlet /
outlet.
2.4.1.2
Open the lock bar at the front of the system.
2.4.1.3
Remove the two blue caps at the water
inlet/outlet inside the cabinet.
2.4.1.4
Wet the O-rings on the cartridge with purified
water.
Blue caps
S
toppers
O Rings
www.eu.fishersci.com/fisherbrand
14
2.4.1.5
Push the cartridge gradually into the cabinet
until it is seated fully inside the cabinet.
2.4.1.6
Lock the front lock bar by inserting the flexible
buckle to the groove.
If the bar cannot be locked, reseat the cartridge
all the way in, then lock the bar again.
2.4.2 Connecting the Inlet Water Tubing
2.4.2.1
Remove the stopper at the water inlet with the
tweezers as described before.
2.4.2.2
1) Insert one end of the PE tubing into the
water inlet (Note: make sure to insert the
tubing all the way in for about 20 mm).
2) Gently pull the tubing outwards to check if
the connection is secure.
Water inlet
Stopper
Water inlet

www.eu.fishersci.com/fisherbrand 15
2.4.2.3
Connect the other end of the tubing to a feed
water tank; ensure the tubing inlet is immersed
to the bottom of the tank.
2.4.3 Connecting Power Cord
1) Make sure the power switch is OFF at "O"
position.
2) Insert one end of the power cord into the
socket on the left side of the Accu100 system.
3) Plug the other end of the power cord into the
power outlet.
Note: Do not install the final filter at this stage. It will be installed after
system start-up and degassing.
End of System Installation
Proceed to "System Start up and Operation"
Power cord
Feed tank

www.eu.fishersci.com/fisherbrand
16
3 SYSTEM START UP AND OPERATION
3.1 Check List Prior to System Start Up
Prior to system start up, use the table below to make sure all parts have been
installed and connected, and quality of feed water meets minimal requirements.
Check List Results
Feed Water quality
Water temperature: 5 - 35
o
C
Feed Water connection
Power cord connection
AccuQuatro U Pack cartridge installed

www.eu.fishersci.com/fisherbrand 17
3.2 System Start Up and Display
3.2.1 Panel Display
System panel will display the following messages at start up.
Displays system serial number (S/N) at
power up, then enters Ready mode.
In Ready mode
Press to dispense ultrapure
water, system enters Product mode.
In Product mode
Press again to stop dispensing.
System enters Recirculation mode.
In Recirculation mode
Press to dispense water.
Press to enter Ready mode
Product
18.2
MΩ.cm
25
0
C
Recirculation
18.2
MΩ.cm
25
0
C
S4PPAL3701
Ready

www.eu.fishersci.com/fisherbrand
18
Operations:
In Ready modepress system enters Recirculation mode.
InRecirculation/Readymodepress systementersProductmode.
In Product modepress system enters Recirculation mode.
In Recirculation modepress system enters Ready mode.
3.2.2 Starting Up the System
After turning on the power, system
displays serial number (S / N) for 3
seconds, then automatically goes to
Ready mode.
3.2.3 Degassing the System
3.2.3.1
Screw off the cap from the water outlet.
3.2.3.2
Screw the degassing fitting from the system
accessory bag onto the water outlet and
connect it with 1/4 inch PE tubing, put
another end of the tubing to the sink.
Press to enter Product mode;
Gas inside the system will be flushed out
with water.
S4PPAL3701
Cap

www.eu.fishersci.com/fisherbrand 19
3.2.3.3
1) Wait until no more gas (bubbles) is
discharged from the outlet and the
resistivity reaches 18.2 MΩ·cm @ 25℃.
2) Press to stop degassing.
3.2.3.4
Screw off the degassing fitting.
3.2.4 Installing the Final Filter
3.2.4.1
Open the attached 0.2µm final filter
package.
3.2.4.2
Screw the final filter onto the water outlet
till finger tight (no leaking at dispensing).
DO NOT over-tighten it.
3.2.4.3
Loosen the knob on the top of the final
filter for degassing.
Knob for
discharging
trapped air

www.eu.fishersci.com/fisherbrand
20
3.2.4.4
1) Press to dispense water and flush
out the gas from the filter into a container.
2) Tighten the knob on the top of the final
filter after no more air in the filter.
3.2.4.5
Press to enter Recirculation mode.
3.2.4.6
1) Press to turn the system from
Recirculation into Ready mode.
2) Installation is completed.
3) Alternatively, the system automatically
enters Ready mode after 30 s without
pressing
If an ultrafiltration filter for pyrogen
removal is needed, follow the same
installation procedures as above.
Other manuals for Accu100
1
Table of contents
Other Fisherbrand Water System manuals


Popular Water System manuals by other brands


DIRECT COIL
DIRECT COIL WATER COILS Installation and operating manual

Elkay
Elkay EZH2O LZWS-LRPBM28K installation instructions

Reclaim
Reclaim REHP-CO2-160GL Owners & installation manual

Culligan
Culligan Aquasential Salt Free Conditioner 9x16 Condo... owner's guide

KSB
KSB Ama-Drainer-Box operating manual

Osaki
Osaki O Hydrogen Water manual

aarke
aarke CARBONATOR instruction manual

Bunn
Bunn EASY CLEAR EQ-12-TH Specifications

Hamworthy
Hamworthy Weymouth Series Installation, commissioning and servicing instructions

Prime Water
Prime Water PRIME-501S user manual

Primochill
Primochill Myriad D5 installation guide

AMI
AMI AAA-N50W Installation guide & owner's manual