Fitness Quest Pilates Power Gym User manual

O W N E R ’ S MO W N E R ’ S M
A N UA N U
A LA L
For maximum effectiveness and safety, pleaseFor maximum effectiveness and safety, please
review this Owner’s Manual, view the Video,review this Owner’s Manual, view the Video,
and for healthy eating tips refer to the Jumpand for healthy eating tips refer to the Jump
Start Section.Start Section.


TABLE OF CONTENTSTABLE OF CONTENTS
©2007 Fitness ©2007 Fitness
Quest Inc.Quest Inc.
All rights reserved. Made in China.All rights reserved. Made in China.
Pilates Power Gym™ is a trademark of Kaswit, Inc. U.S. Patent 7,163,498.Pilates Power Gym™ is a trademark of Kaswit, Inc. U.S. Patent 7,163,498.
Fitness Quest® is a registered trademark of Fitness Quest Inc.Fitness Quest® is a registered trademark of Fitness Quest Inc.
No part of this booklet may be reproduced or utilized in any form or by any means electronic,No part of this booklet may be reproduced or utilized in any form or by any means electronic,
mechanical or otherwise without the express written consent of the copyright holder.mechanical or otherwise without the express written consent of the copyright holder.
7/12/077/12/07
Important Important
Safety Safety
Information Information
......................
......................
........................
......................
..2..2
Equipment Equipment
Warning/CaWarning/Ca
ution ution
Labels..........Labels..........
......................
........................
....3....3
Specifications Specifications
& &
PartsParts
....................
........................
........................
......................
........................
.3.3
Introduction Introduction
......................
........................
......................
........................
........................
........................
....4....4
Setup Setup
InstructionsInstructions
......................
......................
........................
......................
........................
.......5.......5
Care Care
& &
StorageStorage
........................
......................
........................
......................
........................
......................
55
Parts Parts
List List
......................
........................
........................
......................
........................
......................
.........6.........6
Exploded Exploded
View View
......................
........................
......................
........................
......................
.........7-9.........7-9
Getting Getting
StartedStarted
........................
......................
........................
......................
........................
.........10.........10
Glideboard Glideboard
AdjustmentsAdjustments
........................
......................
........................
......................
1010
TT
ension ension
Cord Cord
Adjustments................Adjustments................
........................
......................
....11....11
Handle and Foot Strap Attachments...........................11Handle and Foot Strap Attachments...........................11
Headrest Headrest
Adjustments Adjustments
......................
........................
......................
......................
....12....12
Exercise Exercise
Guidelines....................Guidelines....................
......................
........................
........................
12-1312-13
Warm Up & Cool Down Warm Up & Cool Down
StretchesStretches
......................
........................
.........14-15.........14-15
Pilates Power GymPilates Power Gym
TMTM
SystemSystem
....................
........................
........................
......................
1616
Pilates Power GymPilates Power Gym
TMTM
Workout ......................................16-17Workout ......................................16-17
Pilates Power GymPilates Power Gym
TMTM
Exercises Exercises
........................
........................
......................
.18-33.18-33
Pilates Pilates
WoWo
rkout..........rkout..........
........................
......................
........................
..........18-2..........18-2
55
Strength Strength
TT
raining raining
WorWor
koutkout
........................
........................
......................
...26-33...26-33
WoWo
rkout rkout
ProgrProgr
essionession
........................
........................
......................
........................
......................
3434
Pilates Power GymPilates Power Gym
TMTM
WoWo
rkout rkout
TT
racking racking
Sheets..........Sheets..........
..35-36..35-36
Pilates Pilates
WoWo
rkoutrkout
....................
........................
........................
......................
........................
...35...35
Strength Strength
TT
raining raining
WoWo
rkout rkout
....................
........................
........................
.........36.........36
Cardiovascular Cardiovascular
Conditioning...............Conditioning...............
........................
........................
..36-37..36-37
ProgrProgr
essive essive
Cardiovascular TrCardiovascular Tr
aining aining
ProgramProgram
......................
........38........38
Cardio Workout Cardio Workout
TT
racking racking
SheetsSheets
........................
........................
..........39..........39
-40-40
JUMP START DIETJUMP START DIET
......................
......................
........................
........................
........41-46........41-46
ProgrProgr
ess ess
ChartsCharts
......................
........................
......................
........................
......................
...47-48...47-48
®®

----------------
22
-------- --------
IMPORTANT SAFETY INFORMATIONIMPORTANT SAFETY INFORMATION
1) 1)
BeforBefor
e starting thie starting thi
s or any s or any
other exeother exe
rcise prorcise pro
gram,gram,
consult your physician.consult your physician.
Your physician should assist you inYour physician should assist you in
determinidetermini
ng the ng the
target heart target heart
rate zone appropriate for yourrate zone appropriate for your
age and physical condition. Certain exercise programs orage and physical condition. Certain exercise programs or
types of equipment may not be appropriate for all peopletypes of equipment may not be appropriate for all people
..
ThisThis
is especially important for people over the age of 35, pregnantis especially important for people over the age of 35, pregnant
women, or women, or
those with pre-existinthose with pre-existin
g health g health
problprobl
ems or ems or
balancebalance
impairments.impairments.
If you are taking medication which may affectIf you are taking medication which may affect
your heart rate,your heart rate,
a physician's advice is absolutely essential.a physician's advice is absolutely essential.
2) 2)
Start out sloStart out slo
wly and progwly and prog
ress sensiress sensi
blybly
..
Even if you are anEven if you are an
experienced exerciser, start with the beginner workout andexperienced exerciser, start with the beginner workout and
become familiar with all of the exercises before moving on tobecome familiar with all of the exercises before moving on to
more advanced workouts or exercises. For best results,more advanced workouts or exercises. For best results,
perform all of the exercises at the tempo demonstrated inperform all of the exercises at the tempo demonstrated in
the DVD.the DVD.
3) 3)
Do not overeDo not overe
xert yourxert your
self with thiself with thi
s or any other exercs or any other exerc
iseise
program.program.
Listen to your body and respond to any reactionsListen to your body and respond to any reactions
you may be you may be
havinhavin
g.g.
YY
ou must ou must
learn to learn to
distingdisting
uish “good” painuish “good” pain
,,
like fatiguelike fatigue
, ,
from “bad” pain, which hurts.from “bad” pain, which hurts.
If you experienceIf you experience
any pain or tightness in your chest, an irregularany pain or tightness in your chest, an irregular
heartbeat, dizziness, nausea, or shortness of breath,heartbeat, dizziness, nausea, or shortness of breath,
stop exercising at once and consult your physicianstop exercising at once and consult your physician
immediately.immediately.
4) 4)
WaWa
rm rm
upup
before any exercise program by doing 5before any exercise program by doing 5
toto
10 minutes of gentle aerobic exe10 minutes of gentle aerobic exe
rcise, such asrcise, such as
walking, followed by stretching or follow the warm-upswalking, followed by stretching or follow the warm-ups
demonstrated on the Pilates Power Gym™ DVD.demonstrated on the Pilates Power Gym™ DVD.
5) 5)
BeforBefor
e EACH use, visuale EACH use, visual
ly inspecly inspec
t the equipment the equipmen
t.t.
Never operate the equipment if the equipment isNever operate the equipment if the equipment is
not functioning properly.not functioning properly.
6) 6)
USE CARE whUSE CARE wh
en gettien getti
ng on and ofng on and of
f the equipf the equip
mentment
..
7) 7)
Use this equUse this equ
ipmenipmen
t ONLt ONL
Y for the intenY for the inten
ded useded use
as described in this manual.as described in this manual.
Do notDo not
modify themodify the
equipmeequipme
nt or nt or
use attachments not use attachments not
recommerecomme
ndednded
by the manufacturer.by the manufacturer.
8) 8)
Have plenHave plen
ty of clearanty of clearan
ce behince behin
d and in front ofd and in front of
your equipment.your equipment.
It is important to keep children, pets,It is important to keep children, pets,
furniture and other objects out of the way when usingfurniture and other objects out of the way when using
your equipmenyour equipmen
t.t.
YY
ou should have a ou should have a
minimuminimu
m of m of
3 feet of3 feet of
clearance both in front of and behind your equipment.clearance both in front of and behind your equipment.
9) 9)
Wear apprWear appr
opriate cloopriate clo
thing when thing when
exercising.exercising.
WorkoutWorkout
clothing should be comfortable and lightweight, and shouldclothing should be comfortable and lightweight, and should
allow freedom of movement.allow freedom of movement.
The Pilates WorkThe Pilates Work
out may beout may be
perfoperfo
rmed with rmed with
bare feet, or bare feet, or
you may wear you may wear
flexiflexi
ble athleticble athletic
shoes if you find that more comfortable. It is notshoes if you find that more comfortable. It is not
recommenrecommen
ded that ded that
you exercyou exerc
ise with ise with
socks or socks or
stockistocki
ngsngs
only on the feet.only on the feet.
WeariWeari
ng socks or stockings only may causeng socks or stockings only may cause
slippage of the feet when using the Foot Rest Bar or Pushslippage of the feet when using the Foot Rest Bar or Push
Up Bar.Up Bar.
10) 10)
THIS EQUTHIS EQU
IPMENIPMEN
T IS NOT FOR USE BY CHILT IS NOT FOR USE BY CHIL
DREN.DREN.
To prevent injuries, keep this and all fitness equipmentTo prevent injuries, keep this and all fitness equipment
out of the reach of children. Follow these simple rules:out of the reach of children. Follow these simple rules:
– Keep children out of rooms where you have– Keep children out of rooms where you have
your exercise equipment.your exercise equipment.
– Store exercise equipment in a room that– Store exercise equipment in a room that
can be locked.can be locked.
– Know exactly where your children are when– Know exactly where your children are when
you work out.you work out.
– If you have small children at home, don’t wear– If you have small children at home, don’t wear
headphheadph
ones while you ones while you
work out.work out.
– Talk to your kids about the dangers of exercise– Talk to your kids about the dangers of exercise
equipment.equipment.
11) 11)
Breathe Breathe
naturallynaturally
,,
never holding your breath during annever holding your breath during an
exercise. Avoid over training, you should be able to carryexercise. Avoid over training, you should be able to carry
on a conversation while exercising.on a conversation while exercising.
12) 12)
Cool doCool do
wn after an exercwn after an exerc
ise sessiise sessi
on,on,
with 5 to10 minuteswith 5 to10 minutes
of gentle exerciseof gentle exercise
, ,
such as such as
walkinwalkin
g, followed by stretching org, followed by stretching or
follfoll
ow the ow the
cool-docool-do
wn stretches wn stretches
demonstrdemonstr
ated in ated in
the Pilatesthe Pilates
Power Gym™ DVD.Power Gym™ DVD.
13) 13)
HandHand
icappicapp
ed or disabled peoped or disabled peop
le must have medicalle must have medical
approvalapproval
before using this equipment and should be underbefore using this equipment and should be under
close supervision when using any exercise equipment.close supervision when using any exercise equipment.
14) 14)
Only one persoOnly one perso
n at a n at a
time shoultime shoul
d use this equipmed use this equipme
nt.nt.
15) 15)
DO NOT put handDO NOT put hand
s, feet, or any fors, feet, or any for
eign objeign obj
ectsects
on or near this equipment when in use by others.on or near this equipment when in use by others.
Use caution not to pinch fingers or hands in moving partsUse caution not to pinch fingers or hands in moving parts
when folding, setting up, or when folding, setting up, or
using the using the
equipmequipm
ent.ent.
16) To prevent the Pilates Power Gym16) To prevent the Pilates Power Gym
TMTM
from tipping andfrom tipping and
causing an injury,causing an injury,
set up and use the equipment on aset up and use the equipment on a
solid, level surface and follow the exercise instructionssolid, level surface and follow the exercise instructions
demonstrated in the DVD and the exercise instructionsdemonstrated in the DVD and the exercise instructions
describedescribe
d on d on
pagespages
18 through 3318 through 33
of this manual. Failureof this manual. Failure
to follow these instructions could result in serious injuryto follow these instructions could result in serious injury
or death.or death.
WARNINGWARNING
YOU AND OTHERS CAN BE SERIOUSLY INJURED OR KILLED IFYOU AND OTHERS CAN BE SERIOUSLY INJURED OR KILLED IF
WARWAR
NINGS ONNINGS ON
THE EQUIPMENTTHE EQUIPMENT
, IN, IN
THIS OWNER’S MANUTHIS OWNER’S MANU
ALAL
ANDAND
VIDEO ARE NOT FOLLVIDEO ARE NOT FOLL
OWEDOWED
..
Go to www.fitnessquest.comGo to www.fitnessquest.com
or call 1-800-497-5831 foror call 1-800-497-5831 for
replacereplace
ment labels, ment labels,
manualmanual
s s
or or
video(video(
s).s).

----------------
33
-------- --------
EQUIPMENT WARNING/CAUTION LABELSEQUIPMENT WARNING/CAUTION LABELS
WARNINGWARNING
Failure to read and follow the safety instructions stated in the Owner’sFailure to read and follow the safety instructions stated in the Owner’s
Manual andManual and
Video may result in Video may result in
POSSIBLE SERIOUS INJURPOSSIBLE SERIOUS INJUR
Y OR DEATH.Y OR DEATH.
KEEP CHILDREN AWAKEEP CHILDREN AWA
Y. MaximY. Maxim
um user um user
weight 300 weight 300
lbs. Replace thislbs. Replace this
label if damaged, illegible or removed. Class HC.label if damaged, illegible or removed. Class HC.
WARNING LABEL 1WARNING LABEL 1
CAUTIONCAUTION
Keep hair, fingers, loose clothing, pets, and children away from hingesKeep hair, fingers, loose clothing, pets, and children away from hinges
and other moving parts to avoid serious injury. Also, be sure to have alland other moving parts to avoid serious injury. Also, be sure to have all
pins locked in place before getting on your UNIT to avoid severe injury.pins locked in place before getting on your UNIT to avoid severe injury.
CAUTION LABEL 1CAUTION LABEL 1
CAUTIONCAUTION
When attachingWhen attaching
Tension Cords, hoTension Cords, ho
ld firmly until the ld firmly until the
Cords are properlyCords are properly
positioned. DO NOT LET GO of thepositioned. DO NOT LET GO of the
Tension CordTension Cord
s until they are lockeds until they are locked
in or back in the start position.in or back in the start position.
CAUTION LABEL 2CAUTION LABEL 2
WARNINGWARNING
CRUSH HAZARD.CRUSH HAZARD.
Keep hands clear whenKeep hands clear when
lowering Glideboard.lowering Glideboard.
WARNING LABEL 2WARNING LABEL 2
SPECIFICATIONS & PARTSSPECIFICATIONS & PARTS
IMPORTANT: See below for placement of the following Warning/Caution Labels on your equipment.IMPORTANT: See below for placement of the following Warning/Caution Labels on your equipment.
INCLUDESINCLUDES
WORKOWORKO
UT DVDUT DVD
WARNINGWARNING
Keep hands away fromKeep hands away from
pulleys and movingpulleys and moving
parts.parts.
WARNING LABEL 3WARNING LABEL 3
WARNINGWARNING
LABEL 1LABEL 1
WARNINGWARNING
LABEL 3LABEL 3
CAUTIONCAUTION
LABEL 2LABEL 2
CAUTIONCAUTION
LABEL 1LABEL 1
WARNINGWARNING
LABEL 2LABEL 2
2 locations on2 locations on
Rear of UnitRear of Unit
2 locations on2 locations on
Pulley Arm AssemblyPulley Arm Assembly
REARREAR
FRONTFRONT
Large Hitch PinLarge Hitch Pin
X18154-37X18154-37
Headrest BaseHeadrest Base
X18154-25X18154-25
HeadrestHeadrest
X18154-45X18154-45
Pulley ArmPulley Arm
AssemblyAssembly
X18155X18155
Long CableLong Cable
X18154-30X18154-30
Foot StrapFoot Strap
AssemblyAssembly
X18157X18157
GlideboardGlideboard
AssemblyAssembly
X18154X18154
(OPTIONAL)(OPTIONAL)
Push Up BarPush Up Bar
AssemblyAssembly
X18158X18158
TenTen
sion Cord sion Cord
22
X18154-42X18154-42
Tension Cord 4Tension Cord 4
X18154-41X18154-41
TenTen
sion Cord sion Cord
33
X18154-40X18154-40
Tension Cord 1Tension Cord 1
X18154-39X18154-39
Foot Rest BarFoot Rest Bar
AssemblyAssembly
X18156X18156
SmallSmall
Hitch PinHitch Pin
X18154-38X18154-38
4 locations4 locations
HeightHeight
Adjustment BarAdjustment Bar
X18153X18153
HeightHeight
Adjustment KnobAdjustment Knob
X18152-2X18152-2
Transport HandleTransport Handle
X18151-8X18151-8
Extension BarExtension Bar
AssemblyAssembly
X18152X18152
Base FrameBase Frame
AssemblyAssembly
X18151X18151
HandleHandle
AssemblyAssembly
X18154-31X18154-31
KnobKnob
X18159X18159
Product Weight:Product Weight:
Approx. 58 lbs.Approx. 58 lbs.
Maximum User Weight:Maximum User Weight:
300 lbs.300 lbs.
Assembled Approximate Specifications:Assembled Approximate Specifications:
Dimensions are based on unit set up for use.Dimensions are based on unit set up for use.
Length:Length:
56”56”
Width:Width:
15”15”
Height Lowered:Height Lowered:
23.5”23.5”
Height Raised:Height Raised:
23.5”23.5”

----------------
44
-------- --------
Congratulations on your purchase of the Pilates Power GymCongratulations on your purchase of the Pilates Power Gym
TMTM
! You’ve just taken an important step! You’ve just taken an important step
toward your fitness goals. Whether that means strengthening the muscles of your upper body,toward your fitness goals. Whether that means strengthening the muscles of your upper body,
lower body and core, or improving your flexibility while toning your entire body, the Pilates Powerlower body and core, or improving your flexibility while toning your entire body, the Pilates Power
GymGym
TMTM
can help you get the results you want.can help you get the results you want.
Working out on comfortable, efficient equipment that allows you to start and progress at the levelWorking out on comfortable, efficient equipment that allows you to start and progress at the level
that’s appropriate for you is a vital element in sticking with a program of regular exercise. With yourthat’s appropriate for you is a vital element in sticking with a program of regular exercise. With your
Pilates Power GymPilates Power Gym
TMTM
, you’ll use almost every muscle in your body in smooth natural motions. You’ll, you’ll use almost every muscle in your body in smooth natural motions. You’ll
be able to choose the Pilates Power Gymbe able to choose the Pilates Power Gym
TMTM
workout that’s perfect for your fitness level and beginworkout that’s perfect for your fitness level and begin
your workouts right away – just what you need to improve your fitness the healthy, easy way!your workouts right away – just what you need to improve your fitness the healthy, easy way!
Just a few minutes a day is all it takes to begin experiencing the strengthening, toning andJust a few minutes a day is all it takes to begin experiencing the strengthening, toning and
flexibility benefits of your Pilates Power Gymflexibility benefits of your Pilates Power Gym
TMTM
. Additional aerobic workouts are required to round. Additional aerobic workouts are required to round
out your program. With regular use of your Pilates Power Gymout your program. With regular use of your Pilates Power Gym
TMTM
, you may soon notice some, you may soon notice some
important changes in yourself, such as:important changes in yourself, such as:
• More endurance and stamina• More endurance and stamina
• Less body fat and excess weight (if you do not increase your calorie intake)• Less body fat and excess weight (if you do not increase your calorie intake)
• Improved upper body, lower body and abdominal muscle tone• Improved upper body, lower body and abdominal muscle tone
• Increased energy for daily tasks• Increased energy for daily tasks
• Less stress and a more positive outlook• Less stress and a more positive outlook
With a minimal time commitment, you’ll receive an impressive return on your investment!With a minimal time commitment, you’ll receive an impressive return on your investment!
We’re so sure that you will be completely satisfied with your Pilates Power GymWe’re so sure that you will be completely satisfied with your Pilates Power Gym
TMTM
that wethat we
encourage you to write or call our Customer Service Specialists at the address or phone numberencourage you to write or call our Customer Service Specialists at the address or phone number
listed below, or contact us on our website. As always, you have our personal assurance that welisted below, or contact us on our website. As always, you have our personal assurance that we
want your complete satisfaction. After all, your success is our success too!want your complete satisfaction. After all, your success is our success too!
Sincerely,Sincerely,
Karla Williamson, Customer ServiceKarla Williamson, Customer Service
Pilates Power GymPilates Power Gym
™™
, Customer Service Department, Customer Service Department
272 Fitness Quest Plaza, Canton, OH 44750-1001272 Fitness Quest Plaza, Canton, OH 44750-1001
Call Toll Free: 1-800-321-9236 • Monday – Friday, 8:30am to 8:00pm, Eastern Standard Time.Call Toll Free: 1-800-321-9236 • Monday – Friday, 8:30am to 8:00pm, Eastern Standard Time.
Email: [email protected] • www.fitnessquest.comEmail: [email protected] • www.fitnessquest.com
Please do not call the above number for Parts. See Ordering ReplacementPlease do not call the above number for Parts. See Ordering Replacement
Parts section belowParts section below
..
IMPORTANT: This owner’s manual is the authoritative source of information about yourIMPORTANT: This owner’s manual is the authoritative source of information about your
Pilates Power GymPilates Power Gym
TMTM
exerciser. Please read it carefully and follow all the instructions.exerciser. Please read it carefully and follow all the instructions.
When ordering parts, please contact our Parts Department, toll free at 1-800-497-5831,When ordering parts, please contact our Parts Department, toll free at 1-800-497-5831,
Monday through Friday, 8:30am to 8:00pm, Eastern Standard Time.Monday through Friday, 8:30am to 8:00pm, Eastern Standard Time.
IMPORTANT: You must have your serial number, date of purchase and this manual readyIMPORTANT: You must have your serial number, date of purchase and this manual ready
when calling for parts.when calling for parts.
SeriaSeria
l l
#: #:
__________
__________
__________
____________
____________
_ _
Date__Date__
____________
____________
__
If you would like a FREE VHS* copy of your DVD, simply give us a call. All you have to doIf you would like a FREE VHS* copy of your DVD, simply give us a call. All you have to do
is pay $3.95 for shipping and handling.is pay $3.95 for shipping and handling.
*Offer valid for a limited time. Limit one video per customer. Additional shipping and handling charges may apply to*Offer valid for a limited time. Limit one video per customer. Additional shipping and handling charges may apply to
deliveries outside the continental U.S.deliveries outside the continental U.S.
INTRODUCTIONINTRODUCTION
Ordering Replacement PartsOrdering Replacement Parts

--------
5
--------
ASSEMBL
Y
INSTRUCTIONS
CARE
&
STORAGE
INSTRUCTIONS
Occasionally our products contain components that are pre-lubricated at the
factory. We recommend that you protect flooring, or anything else the parts
may contact, with newspaper or cloth.
NOTE: All location references, such as front, rear, left or right, made in
these instructions are from the user standing behind the Headrest and facing
the Foot Rest Bar Assembly.
Fig. 1a
Fig. 1b
1a.
Remove the Knobs from Poly Bag. Lift the Foot Rest Bar
Assem
bly to the upright position
, as
shown in Fig 1a.
Then
secure it with the Knobs. Make sure they are fully inserted
and tightened.
Attaching
Optional
Push Up
Bar
Assembly:
Place the
Push Up Bar Assembly onto the Foot Rest Bar Assembly
and secure with the Small Hitch Pins that are attached to
the Push Up Bar Assembly. Make sure they are fully
inserted and stay in place.
1b.
Remove the Pins from the Pulley Arm Assemblies. Lift the
Pulley Arm Assembly to an upright position as shown in
Fig 1b. Replace the Large Hitch Pins. Make sure Large
Hitch Pins are fully inserted and stay in place.
SETUP IS NOW COMPLETE.
IMPORTANT: Please read this owner’s manual before beginning your workout for
important instruction
s on how to
use your Pilates Power Gym
TM
exerciser.
•
Keep your unit clean
. Wipe sweat, dust or other
residue off the Frame, Glideboard, Foot Rest and
Handles with a soft, clean cloth after each use.
•
Store your unit after use.
It’s a good idea to store
your equipment in a space away from children and
high traffic areas
.
The Pilates Pow
er Gym™ is
light
and easy
to store.
T
o store your
Pilate
s Power
Gym™ exerciser, simply return it to the same state
as you
first receiv
ed
it. First
,
lowe
r
the Glideboar
d
to
its flat position. Remove Push Up Bar Assembly
(if attached) by removing the Small Hitch Pins from
both sides of the Push Up Bar Assembly. Remove
the Large Hitch Pins from Pulley Arm Assembly and
lower (Fig. 1b). Replace Large Hitch Pins. Remove
Knobs from Foot Rest Bar Assembly and lower it
toward the Glideboard. Replace Knobs.
Your Pilates Power Gym™ can now be rolled away
for storage by lifting. It is recommended that you
store your Pilates Power Gym™ exerciser in a
horizontal position only. DO NOT store your
equipment vertically.
T
o move, use slow controlled
movements. Lift the rear of the Base Frame
Assembly by grasping the Transport Handle and
lifting until wheels engage with the floor and roll to
desired location.
•
Maintenance.
Periodically check for signs of wear or
fraying of cables, bands, pulleys and wheels.
If you notice any wear, stop using equipment
immediately.
Call our Parts Department to order
replacement parts. Refer to page 4, Ordering
Replacement Parts.
Your Pilates Power Gym
™
exerciser has been carefully
designed to require minimum maintenance.
To ensure this, we recommend that you do the
following:
Optional
FRONT
Knob
Foot Rest Bar
Assembly
Foot
Rest Bar
Assembly
Push Up
Bar Assembly
Pulley Arm
Assemblies
Large
Hitch
Pin
Knob
REAR
Large
Hitch
Pin
Small
Hitch Pin
Small
Hitch Pin
T
ransport
Handle
wheels
Moving and Storage of Unit

--------
6
--------
PARTS LIST
3
X
1
8
1
5
3
-
1
H
e
i
g
h
t
A
d
j
u
s
t
m
e
n
t
B
a
r
1
6
X
1
8
1
5
5
-
1
P
u
l
l
e
y
A
r
m
T
u
b
e
2
9
X
1
8
1
5
5
-
6
S
m
a
l
l
P
u
l
l
e
y
B
r
a
c
k
e
t
2
1
0
X
1
8
1
5
4
-
3
3
H
e
a
d
r
e
s
t
B
r
a
c
k
e
t
1
1
1
X
1
8
1
5
5
-
3
P
l
a
t
e
2
1
3
X
1
8
1
5
1
-
2
P
a
d
7
1
4
X
1
8
1
5
9
K
n
o
b
2
15
X1
81
54
-9
L
ar
ge
P
ul
le
y
w/
Be
ar
in
g
&
Sm
al
l
Pu
ll
ey
S
pa
ce
r 5
1
6 X
1
8
1
5
4
-
8
M
e
d
i
u
m
P
u
l
l
e
y
2
1
7
X
1
8
1
5
4
-
5
W
h
e
e
l
w
/
B
e
a
r
i
n
g
&
L
a
r
g
e
S
p
a
c
e
r
8
18
X1
81
54
-1
2
Sm
al
l
Pu
ll
ey
w/
Be
ar
in
g
&
La
rg
e
Pu
ll
ey
Sp
ac
er
4
1
9
X
1
8
1
5
4
-
3
P
l
u
g
2
2
2
L
X
1
8
1
5
5
-
7
L
L
e
f
t
S
m
a
l
l
P
u
l
l
e
y
B
r
a
c
k
e
t
C
o
v
e
r
2
2
2
R
X
1
8
1
5
5
-
7
R
R
i
g
h
t
S
m
a
l
l
P
u
l
l
e
y
B
r
a
c
k
e
t
C
o
v
e
r
2
2
3 X
1
8
1
5
4
-
2
5
H
e
a
d
r
e
s
t
B
a
s
e
1
2
7
X
1
8
1
5
4
-
1
4
O
u
t
e
r
R
o
l
l
e
r
C
o
v
e
r
2
2
8
X
1
8
1
5
4
-
1
3
I
n
n
e
r
R
o
l
l
e
r
C
o
v
e
r
2
2
9
X
1
8
1
5
2
-
2
H
e
i
g
h
t
A
d
j
u
s
t
m
e
n
t
K
n
o
b
1
3
0
X
1
8
1
5
1
-
3
R
o
l
l
e
r
2
3
1
X
1
8
1
5
1
-
7
M
8
N
y
l
o
n
N
u
t
2
4
3
2
X
1
8
1
5
1
-
6
M
8
W
a
s
h
e
r
2
2
3
3
X
1
8
1
5
1
-
4
M
8
x
3
0
m
m
A
l
l
e
n
B
o
l
t
2
3
4
X
1
8
1
5
1
-
5
M
8
x
4
5
m
m
A
l
l
e
n
B
o
l
t
9
3
5
X
1
8
1
5
4
-
7
M
8
x
6
5
m
m
A
l
l
e
n
B
o
l
t
1
3
6
X
1
8
1
5
4
-
1
0
M
8
x
4
0
m
m
A
l
l
e
n
B
o
l
t
4
3
7
X
1
8
1
5
4
-
2
0
M
8
x
5
0
m
m
A
l
l
e
n
B
o
l
t
2
3
8
X
1
8
1
5
3
-
2
M
8
x
2
0
m
m
A
l
l
e
n
B
o
l
t
2
3
9
X
1
8
1
5
2
-
3
M
6
x
1
6
m
m
P
h
i
l
l
i
p
s
B
o
l
t
1
4
0 X
1
8
1
5
4
-
6
S
m
a
l
l
S
p
a
c
e
r
3
2
4
5
X
1
8
1
5
5
-
8
M
5
x
1
0
m
m
P
h
i
l
l
i
p
s
B
o
l
t
8
4
6
X
1
8
1
5
5
-
9
M
5
N
y
l
o
n
N
u
t
8
4
7
X
1
8
1
5
4
-
3
6
S
m
a
l
l
L
o
c
k
i
n
g
C
l
i
p
4
4
9
X
1
8
1
5
4
-
3
4
M
6
x
3
0
m
m
A
l
l
e
n
B
o
l
t
1
5
0
X
1
8
1
5
4
-
1
8
M
6
W
a
s
h
e
r
3
5
1
X
1
8
1
5
4
-
3
5
M
6
N
y
l
o
n
N
u
t
1
5
2
X
1
8
1
5
4
-
1
6
M
8
x
1
5
m
m
A
l
l
e
n
B
o
l
t
8
5
3
X
1
8
1
5
5
-
4
B
e
a
r
i
n
g
(
6
2
0
3
Z
Z
)
2
5
4
X
1
8
1
5
5
-
5
L
a
r
g
e
L
o
c
k
i
n
g
C
l
i
p
2
5
5
X
1
8
1
5
4
-
3
2 C
l
i
p
4
5
6
X
1
8
1
5
5
-
1
0
M
8
x
3
5
m
m
A
l
l
e
n
B
o
l
t
4
5
7
X
1
8
1
5
5
-
2
F
o
a
m
2
5
8
X
1
8
1
5
4
-
3
8
S
m
a
l
l
Hi
t
c
h
P
i
n
w
/
L
a
n
ya
r
d
(
M
6
x
5
0
m
m
)
2
5
9
X
1
8
1
5
4
-
3
7
L
a
r
g
e
Hi
t
c
h
P
i
n
w
/
L
a
n
ya
r
d
(
M
8
x
5
5
m
m
)
2
6
0 X
1
8
1
5
4
-
1
1
P
u
l
l
e
y
G
u
i
d
e
2
6
1
X
1
8
1
5
4
-
2
8
S
h
o
r
t
C
a
b
l
e
(
3
.
5
x
5
4
9
)
1
6
2
X
1
8
1
5
4
-
3
0
L
o
n
g
C
a
b
l
e
(
4
.
8
x
3
9
8
0
)
1
6
3
X
1
8
1
5
4
-
2
9
M
e
d
i
u
m
C
a
b
l
e
(
3
.
5
x
8
9
5
)
1
6
4
X
1
8
1
5
7
-
2
F
o
o
t
S
t
r
a
p
C
a
b
l
e
2
6
5
X
1
8
1
5
4
-
1
9
F
r
a
m
e
G
u
i
d
e
2
6
6
X
1
8
1
5
4
-
1
7
M
4
x
1
6
m
m
P
h
i
l
l
i
p
s
S
c
r
e
w
2
6
7
X
1
8
1
5
4
-
1
5
M
4
x
8
m
m
P
h
i
l
l
i
p
s
S
c
r
e
w
6
6
8
L
X
1
8
1
5
4
-
2
1
L
L
e
f
t
S
h
r
o
u
d
1
6
8
R
X
1
8
1
5
4
-
2
1
R
R
i
g
h
t
S
h
r
o
u
d
1
6
9
X
1
8
1
5
3
-
3
M
6
x
8
m
m
A
l
l
e
n
B
o
l
t
2
7
0
X
1
8
1
5
4
-
2
4
M
4
x
1
0
m
m
P
h
i
l
l
i
p
s
B
o
l
t
4
7
1
X
1
8
1
5
4
-
2
6
M
4
x
1
5
m
m
P
h
i
l
l
i
p
s
B
o
l
t
2
7
2
X
1
8
1
5
4
-
2
7
M
4
.
2
x
1
0
m
m
P
h
i
l
l
i
p
s
S
c
r
e
w
1
8
7
3
X
1
8
1
5
1
-
8
T
r
a
n
s
p
o
r
t
H
a
n
d
l
e
1
7
4
X
1
8
1
5
4
-
3
1
H
a
n
d
l
e
A
s
s
e
m
b
l
y
2
7
5
X
1
8
1
5
4
-
4
5
H
e
a
d
r
e
s
t
1
7
6
X
1
8
1
5
4
-
2
G
l
i
d
e
b
o
a
r
d
1
7
7
X
1
8
1
5
7
-
1
F
o
o
t
S
t
r
a
p
2
7
8
X
1
8
1
5
4
-
3
9
T
e
n
s
i
o
n
C
o
r
d
1
(
g
r
e
y
)
1
7
9
X
1
8
1
5
4
-
4
0
T
e
n
s
i
o
n
C
o
r
d
3
(
b
l
a
c
k
)
1
8
0
X
1
8
1
5
4
-
4
1
T
e
n
s
i
o
n
C
o
r
d
4
(
b
l
a
c
k
)
1
8
1
X
1
8
1
5
4
-
4
2
T
e
n
s
i
o
n
C
o
r
d
2
(
g
r
e
y
)
1
8
2
X
1
8
1
5
4
-
4
4
S
t
o
p
p
e
r
6
8
4
X
1
8
1
5
4
-
4
7
M
2
.
9
x
2
0
m
m
P
h
i
l
l
i
p
s
B
o
l
t
4
1
8
1
6
1
V
V
H
S
1
X
1
8
1
5
1
B
a
s
e
F
r
a
m
e
A
s
s
e
m
b
l
y
1
X
1
8
1
5
2
E
x
t
e
n
s
i
o
n
B
a
r
A
s
s
e
m
b
l
y
1
X
1
8
1
5
4
G
l
i
d
e
b
o
a
r
d
A
s
s
e
m
b
l
y
1
X
1
8
1
5
6
F
o
o
t
R
e
s
t
B
a
r
A
s
s
e
m
b
l
y
1
X
1
8
1
5
7
F
o
o
t
S
t
r
a
p
A
s
s
e
m
b
l
y
1
X
1
8
1
5
8
P
u
s
h
U
p
B
a
r
A
s
s
e
m
b
l
y
(
o
p
t
i
o
n
a
l
)
1
X
1
8
1
6
0
L
i
t
e
r
a
t
u
r
e
P
a
c
k
1
X
1
8
1
6
1
D
D
V
D
1
X
1
8
1
6
2
B
B
o
x
B
o
t
t
o
m
1
X
1
8
1
6
2
T
B
o
x
T
o
p
1
I
T
E
M
P
A
R
T
#
D
E
S
C
R
I
P
T
I
O
N
Q
T
Y
.
I
T
E
M
P
A
R
T
#
D
E
S
C
R
I
P
T
I
O
N
Q
T
Y
.
--------
7
--------
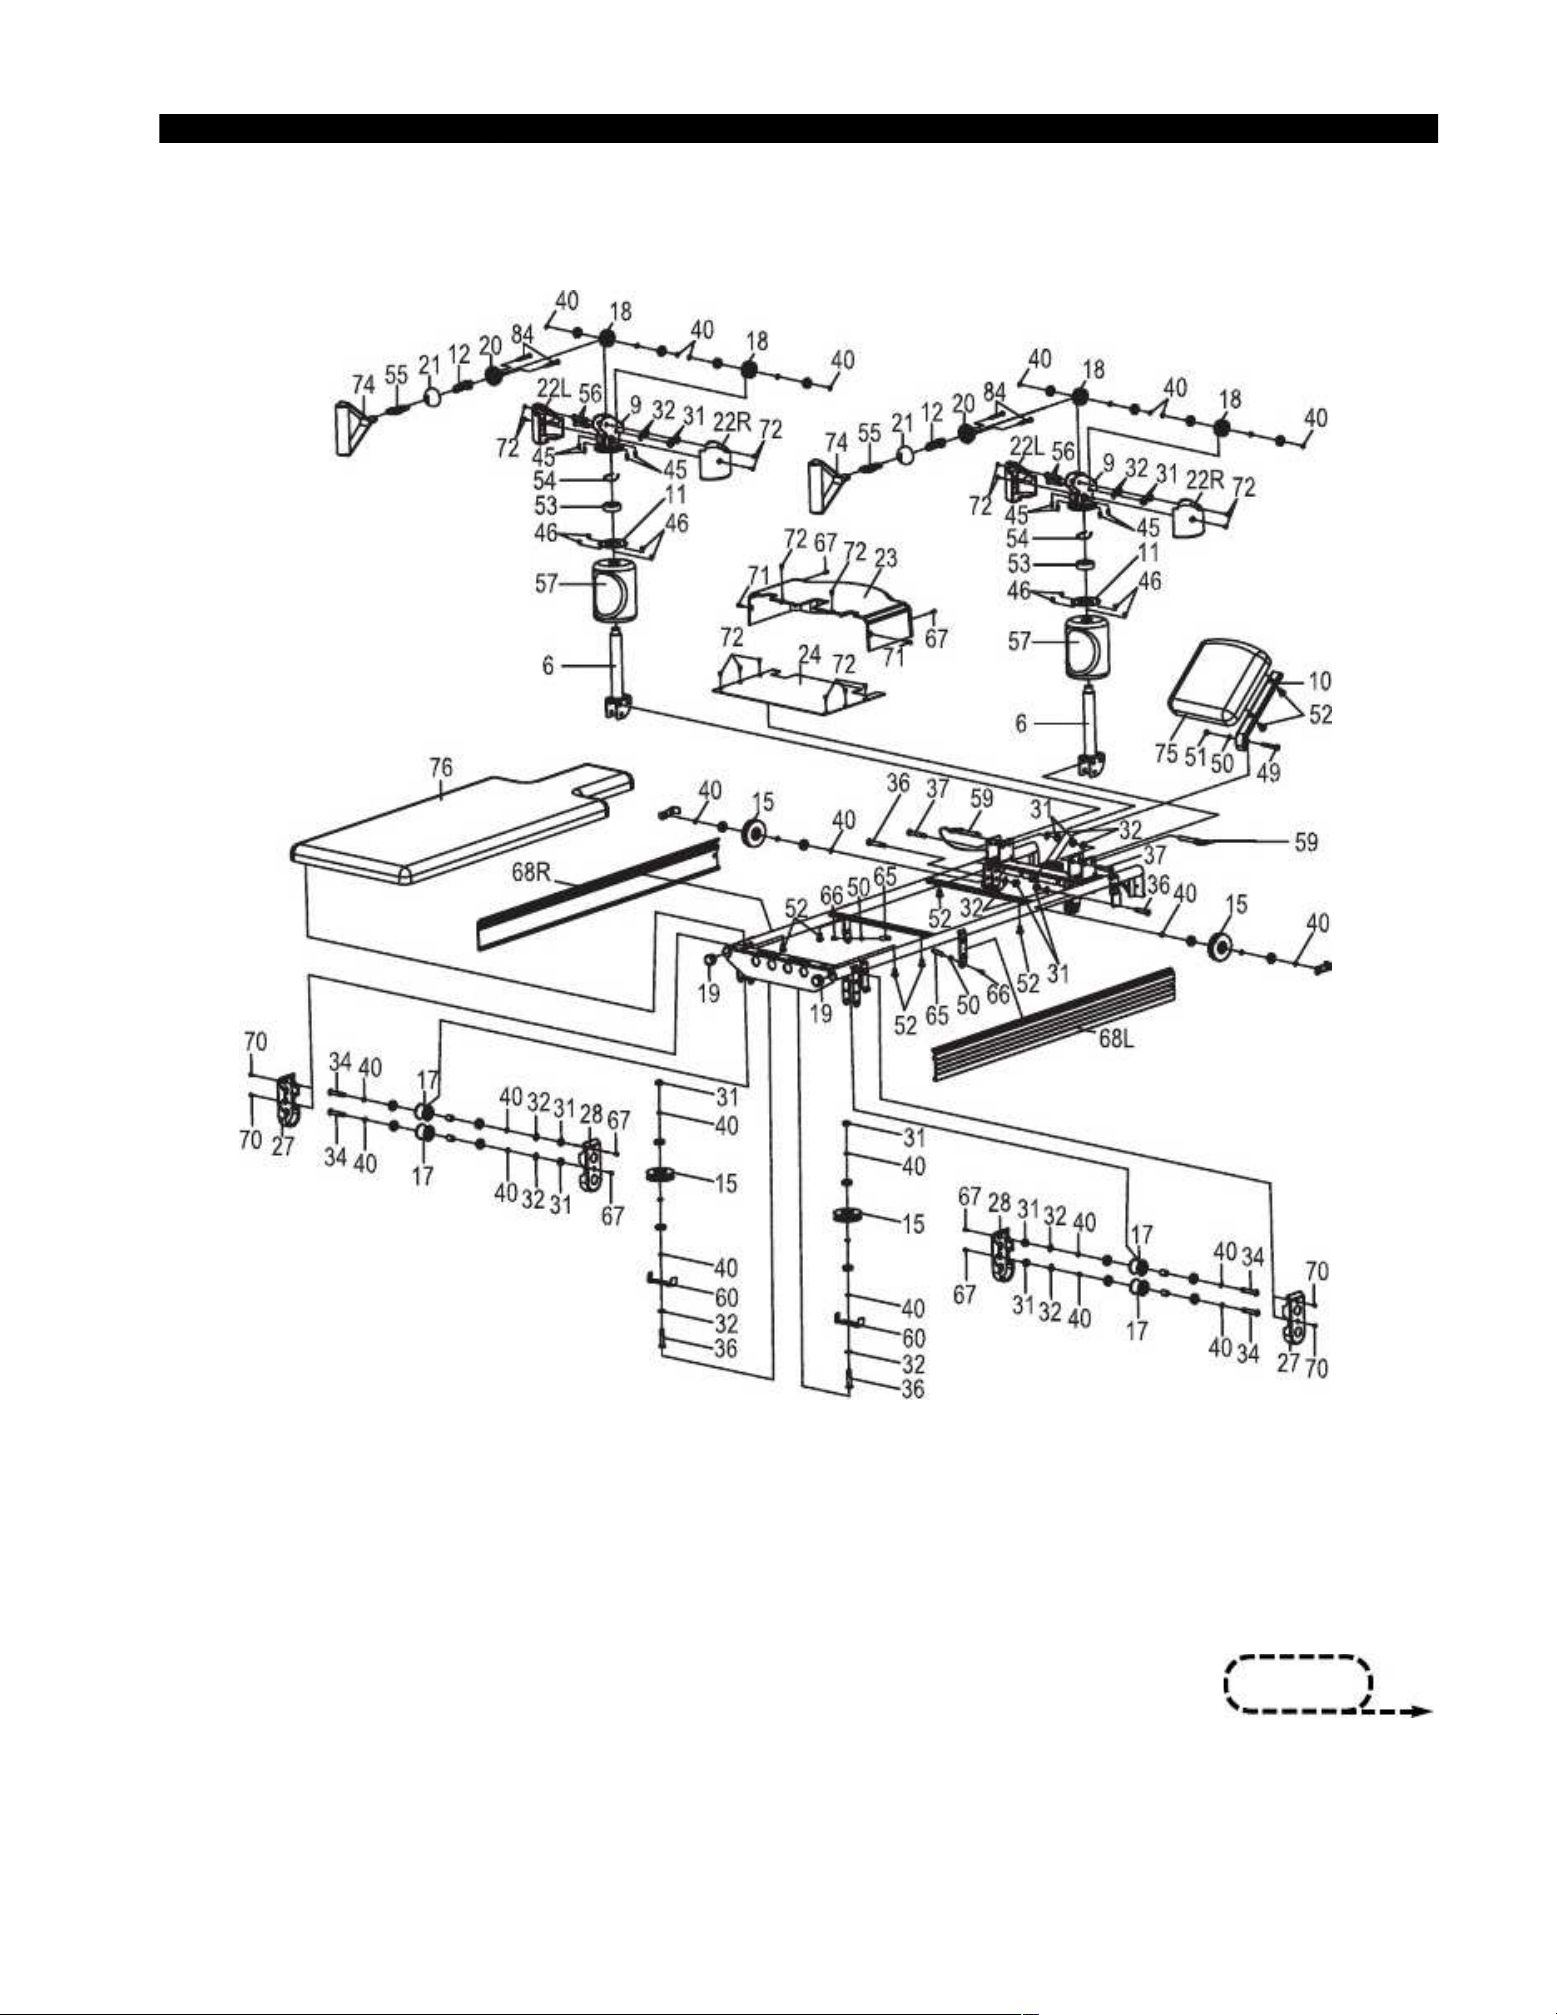
EXPLODED VIEW
continued on
next page

--------
8
--------
EXPLODED VIEW
optional

--------
9
--------
Extension Bar Assembly
X18152
Glideboard Assembly
X18154
Base Frame Assembly
X18151
Foot Rest Bar Assembly
X18156
ASSEMBLIES
Push Up Bar Assembly
X18158
OPTIONAL

--------
10
--------
Glideboard Adjustments
The Glideboard allows you to vary the intensity of your workout by using
several different height adjustments to move the Glideboard from a flat
position to more challenging inclines. There are a total of 11 different
Glideboard positions that will allow you to customize the resistance on
your Pilates Power Gym
™
exerciser to your exact fitness level. The flat
position is perfect for much of the Pilates Workout, as well as for
beginners getting in shape with the Strength Workout. The 2 low incline
positions and 8 high incline positions allow you to progress the resistance
as you get more fit.
The flat position of the Glideboard will be referred to as Position A. To
raise the Glideboard from the flat Position A to either of the two low
incline positions, place one hand under the rear of the Glideboard,
under the Headrest Base, and slowly lift. (See FIG. A.) The Extension
Bar Assembly will slide into the Position B notch on the bottom of the
Frame, or when lifted higher, into the Position C notch on the bottom of
the Frame. (See FIG. B.) Make sure that the Extension Bar Assembly is
securely settled in the notches on both sides of the Frame before
beginning to exercise.
To raise the Glideboard to any of the high incline positions for more
advanced exercises, make sure that the Extension Bar Assembly is
securely settled into Position C. Then, release the Height Adjustment
Knob on the Extension Bar Assembly by unscrewing the Height
Adjustment
Knob and
pulling
the
Height
Adjustment
Knob
outward. With
one hand
holdin
g
the Height Adjustmen
t
Knob in
the release
d
positi
on, lift
the Glideboard with the other hand, letting the Height Adjustment Bar
slide upward. Release the Height Adjustment Knob into the
second
hole
in the Base Frame Assembly for Incline Position 1, or into the third, fourth
or fifth holes for Incline Positions 2, 3 and 4. (See FIG. C.) Place the
Height Adjustment Knob into the desired hole. Make sure that the Height
Adjustment
Knob pops
securely into
the
hole,
then
tighten
the
Height
Adjustment
Knob.
With each of the Height Adjustment Knob settings, you have the
optio
n
to make
a
micr
o-adj
ustme
nt by
movin
g
the Extension Bar
Assembly from Position C to Position B on the bottom of the Frame.
Moving the Extension Bar Assembly to Position B will decrease the
resistance
slightly
.
Always make
sure that
the
Height
Adjustment
Knob
is
locked
in
place
and the Extension Bar Assembly is securely settled in the notches on
both sides of the Base Frame Assembly before beginning to exercise.
To lower the Glideboard from the high incline settings, hold the rear of the
Glideboard firmly with one hand and unscrew the Height Adjustment Knob
on the Extension Bar Assembly with the other hand. Lift the Glideboard
slightly while pulling the Height Adjustment Knob outward. When the
Height Adjustment Knob releases from the hole, slowly lower the
Glideboard until the Height Adjustment Knob is lined up with the Resting Position Hole in the Height
Adjustment
Bar
(See
Fig.
C).
Place
the
Height
Adjustment
knob
into
that
hole,
make sure
it
pops
securely into
place, and tighten the Height Adjustment Knob. To lower the Glideboard to its (Flat) Position A, place one
hand on the rear of the Glideboard and the other hand on the Extension Bar Assembly. Lift the Glideboard
slightly to release the Extension Bar Assembly from the notches in the Base Frame Assembly, and raise the
Extension Bar Assembly upward until the Extension Bar Assembly slides forward easily. Release the hand
from the Extension Bar Assembly and slowly lower the Glideboard to the Flat Position.
GETTING
ST
ARTED
Position
C
Height
Adjustment
Knob
Extension
Bar
Assembly
Extension
Bar
Assembly
Position C
Position A
Position B
1
Resting
Position
2
3
4
Height
Adjustment
Bar
Shown in Position C. For less resistance, move
Extension Bar Assembly to Position B.
Position
B
Position
A (Flat)
Fig. B
Fig. A
Fig. C
Rear of Glideboard
*
*

--------
11
--------
NOTE: Do not change the Glideboard adjustment while seated or lying on the Glideboard of the Pilates
Power Gym™ exerciser. All adjustments must be made while standing or kneeling on the floor. Always
make sure that the Height Adjustment Knob is locked in place and tightened, and the Extension Bar
Assembly is securely settled in the notches on both sides of the Base Frame Assembly before beginning or
continuing to exercise.
Tension Cord Adjustments
The Tension Cords allow you to vary the intensity of your workout by inserting or
removing any combination of the four Tension Cords. There are 16 possible
Tension Cord tension combinations that can be used to customize the resistance
to your individual fitness level. When used with the 11 Glideboard settings, you
have over 175 possible resistance settings. This will allow you to start at and
progress to your optimal fitness level with the Pilates Power Gym
™
exerciser!
The Tension Cords are numbered to progressively increase resistance. Tension
Cords #1 and #2 are lower resistance cords, and are situated in the two outside
positions. Tension Cords #3 and #4 are heavier resistance cords, and are situated
in the two middle positions. (See FIG. D). With each exercise, Tension Cord
settings will be suggested for both beginner and more advanced exercises.
To adjust the Tension Cords, firmly grasp the Handle at the end of one Tension
Cords. Pull the Tension Cord away from the Glideboard and lift it slightly so that
the Handle clears the Base Frame Assembly. Lower the middle groove of the
Handle into the corresponding notch on the Base Frame Assembly. Make sure
that the Handle is secure in the notch before releasing your hand from the
Handle. (See FIG. E). To release a Tension Cord from its notch, firmly grasp the
Handle and pull the Tension Cord away from the Base Frame Assembly until the
Handle is clear of the notch. Lift the Tension Cord slightly until it clears the Base
Frame Assembly and slowly bring the Handle toward the Glideboard. Place the
end of the Handle back into the hole in the Glideboard. Make sure that the end of
the Handle is secure in the hole before releasing your hand from the Handle.
Handle and Foot Strap Assembly Attachments
Either the Handles or the Foot Strap Assemblies can
be attached to the Cables in the Pulley Arm Assembly
on either side of the Headrest, depending on the
exercise.
Attach
the
Handles
by
clipping
one
to
the
end
of
each
Cable, through
the
Clip
at
the end of the Position Ball. Make sure that the Clip at the end of each Cable is
closed before using the Handles (See FIG. F). To release the Handles, open the
Clip by pressing one side and slide the Handle off of the Clip.
Attach
the
Foot
Strap
Assembly
by
clipping
the
Ring
on
the
end
of
each
Foot
Strap Assembly to the Clip at the end of each Cable. Make sure that the Clip at
the end of each Cable is closed before attaching the Foot Strap Assemblies to
the feet (See FIG. G).
Attach
one
Foot Strap
Assembly
to
each
foot
by
wrapping t
he
Foot Strap
around
the middle of the foot, near the arch, and securing the hook and loop strap firmly
(See FIG. H). Check to make sure that the Foot Strap Assemblies are secure
before beginning to exercise.
CAUTION
When attaching
Tension Cords, hol
d firmly until the
Cords are properly
positioned. DO NO
T LET GO of the
Tension Cords until they are locked
in or back in the start position.
CAUTION LABEL 2
Fig. D
Fig. E
Fig. G
Fig. H
Clip
Fig. F
Clip

--------
12
--------
EXERCISE GUIDELINES
IMPORTANT:
If you are over 35 and have been inactive for
several years, you should consult your physician,
who may or may not recommend a graded
exercise test.
Y
our physician can also
assist you
in determining the Target Heart Rate Zone
appropriate for your age and physical condition.
You should also consult your physician if you
have the following:
•
Hig
h
blo
od
pre
ssu
re
•
Hig
h
cho
les
ter
ol
•
As
th
m
a
•
He
art
tr
ou
bl
e
•
F
ami
ly his
tory o
f earl
y str
oke o
r
heart attack deaths
•
Fr
equ
ent
dizz
y s
pel
ls
•
Extre
me bre
athle
ssness
after
mild e
xerti
on
•
Arth
riti
s or o
the
r bon
e pro
ble
ms
•
Sev
ere
musc
ular
, li
gament
or
tendon problems
•
Other
know
n or
suspec
ted
diseas
e
•
If y
ou e
xperie
nce an
y pain
or tig
htness
in your chest, an irregular heartbeat or
shortness of breath, stop exercising
immediately. Consult your physician
before continuing.
•
Pr
eg
na
nt
•
Bala
nce
imp
airm
ent
•
T
aking m
edicat
ions tha
t aff
ect hea
rt rate
IMPORTANT
Please review this section before you begin exercising.
Workout Phases
Every workout should consist of the following
three phases:
Warm-Up
To prevent injury and maximize performance, we
recom
mend that each
work
out period
should start with
a warm-up.
Y
our warm-up should gently prepare your
muscles for the coming exertion. Start by doing 5 to
10 minutes of gentle exercise, such as walking, that
grad
ually increase
s
your heart rate
and loosens up
your muscles.
Y
our warm-up exercise should be aerobic
in nature and only require an easy, unforced range of
motio
n.
This may be follo
wed by 5 to
10 minute
s of
stretching. Refer to the stretches found on pages 14
and 15 of this manual. Never push yourself beyond a
point of gentle tension on the muscles being stretched.
Keep your movements gentle, rhythmic and controlled.
Muscle Toning or Cardio Workout
Your warm-up should be followed by either a muscle
toning or strength training workout with the Pilates Power
Gym™ exerciser or a cardio workout, depending on your
workout plan for that day. Regardless of which type of
workout you are doing, build up as your current fitness
level allows and progress at a rate that is comfortable
to you.
For the first week or so, you may feel some muscle
soren
ess.
This is quite normal and should disappea
r in
a
matter of days. If you experience major discomfort, you
may be on a regimen that is too advanced for you or you
may have increased your program too rapidly.
Cool Down and Stretching
Every work
out should be followe
d by
a cool
down
.
The
cool down should consist of 5 to 10 minutes of easy
exercise, followed by stretching. Refer to the stretches
found on pages 14 and 15 of this manual. Never push
yourself beyond a point of gentle tension on the muscle
being stretched. Keep your movements relaxed, rhythmic
and controlled.
Headrest Adjustment
There are two positions for the Headrest, flat and raised. The Headrest is in the
flat position when unit is first received. To move Headrest to raised position
stand at the rear of the unit, lift the Headrest and push Headrest away from you
letting the bracket slide into place. To move the Headrest from a raised position,
lift Headrest, pull it towards you then set down the Headrest so it
lies flat.
Headrest
(raised
position)

--------
13
--------
When to Exercise
T
he hour just before the evening meal is a popular time
for exe
rcise
.
The late
aftern
oon workout provide
s
a
welcome change of pace at the end of the work day
and helps dissolve the day's worries and tensions.
Another popular time to work out is early morning,
befo
re the
work day begins. Adv
ocate
s
of the
early start
say it makes them more alert and energetic on the job.
Among the factors you should consider in developing
your workout schedule are personal preference, job and
family responsibilities, availability of exercise facilities
and weather. It's important to schedule your workouts for
a time when there is little chance that you will have to
cancel or interrupt them because of other demands on
your time.
You should not exercise strenuously during extremely
hot, humid weather or
withi
n
two hours after eating.
Heat and/or digestion both make
heav
y
deman
ds
on
the circulatory system
,
and in
combin
ation with
exercise can be an over-taxing double load.
Measuring Your Heart Rate
When checking Heart Rate during a workout, take your
pulse within five seconds after interrupting exercise
because it starts to go down once you stop moving.
Count pulse for 10 seconds and multiply by six to get
the per-minute rate.
Target Heart Rate
Aerobic intensity guidelines for healthy adults are
generally set at 60 to 85 percent of heart rate. But, if
you’re out of shape, remember that moderate to low level
and consistent cardiovascular training – well below the
standa
rd recommend
ation
s
set forth –
can result in
substa
ntial and
benefi
cial effect
s
to your
health and can
greatly improve cardiovascular endurance.
You can use the following calculation to determine what
percentage of your heart rate you are working at:
% heart rate = (220 - age) x %.
Using this calculation, a 70% heart rate for a 40 year old
would be (220 - 40) x 70% or 126.
Thus, th
is individua
l
would need to reach 126 beats per minute to equal a
70% heart rate.
The above
are guideline
s, people
with any
medic
al
limitations should discuss this formula with their
physician.
Clothing
All exerci
se
cloth
ing should
be loose-fitt
ing to
permit
freedom of movement, and should make the wearer feel
comfortable and self-assured.
Never wear rubberized or plastic clothing, garments like
this can interfere with the evaporation of perspiration and
can cause
body tempera
ture to
rise to
danger
ous levels
.
The Pilates Workout may be performed with bare feet, or
you may wear flexible athletic shoes if you find that more
comfortable. It is not recommended that you exercise
with socks or stockings only on the feet, wearing socks
or stockings only may cause slippage of the feet when
using the Foot Rest Bar Assembly or the
Optional
Push
Up Bar Assembly.
Tips to Keep You Going
1.
Adopt a specific plan and write it down.
2.
Keep setting realistic goals as you go
along, and
remin
d
your
self of
them often.
3.
Keep a log to record your progress and
make sure to keep it up-to-date. See charts
in this booklet.
4.
Include weight and/or percent body fat
measu
res in
your log. Extr
a
pounds can
easily creep back.
5.
Enlist the support and company of your
family and friends.
6.
Update others on your successes.
7.
Avoid injuries by pacing yourself and
including a warm up and cool down
period as part of every workout.
8.
Reward yourself periodically for a job
well done!

--------
14
--------
WARM UP & COOL DOWN STRETCHES
When performing these stretches, your movements should be slow and smooth,
with no bouncing or jerking. Move into the stretch until you feel a slight tension,
not pain, in the muscle and hold the stretch for 20 to 30 seconds. Breathe slowly
and rhythmically. Be sure not to hold your breath. Remember that all stretches
must be done for both sides of your body.
1. Quadriceps Stretch
Stand close to a wall, chair or other solid object. Use one hand to
assist your balance. Be
nd
the opposite knee
and lift
your heel towards
your buttocks. Reach back and grasp the top of your foot with the
same side hand. Keeping your inner thighs close together, slowly pull
your foot towards your buttocks until you feel a gentle stretch in the
front of your thigh.
Y
ou do
not have to
touch your butto
cks with your
heel. Stop pulling when you
fee
l
the stretch. K
eep your
kneec
ap
pointing straight down and keep your knees close together.
(Do not let the lifted knee swing outward.)
Hold for 20 to 30 seconds. Repeat for the other leg.
2. Calf and Achilles Stretch
Stand approximately one arms length away from a wall or chair with
your feet hip-width apart. Keeping your toes pointed forward, move
one leg in close to the chair while extending the other leg behind you.
Bending the leg closest to the chair and keeping the other leg straight,
place your hands on the chair. Keep the heel of the back leg on the
ground and move your hips forward. Slowly lean forward from the
ankle, keeping your back leg straight until you feel a stretch in
your calf muscles.
Hold for 20 to 30 seconds. Repeat for the opposite leg.
3. Overhead/Triceps Stretch
Stand with your feet shoulder width apart and your knees slightly bent.
Lift one arm overhead and bend your elbow, reaching down behind
your head with your hand
tow
ard the
oppos
ite shoulder blade
.
Wal
k
your fingertips down your back as far as you can. Hold this position.
Reach up with your opposite hand and grasp your flexed elbow. Gently
assist the stretch by pulling on the elbow.
Hold for 20 to 30 seconds. Repeat for the opposite arm.

--------
15
--------
4. Back Stretch
Stand with your legs shoulder width apart and your knees slightly
bent. Bend forward from your waist with your arms extending loosely
in front of your body. Gently bend from the waist flexing your body as
far forward as it will go.
Hold for 20 to 30 seconds. Straighten up and repeat.
5. Standing Hamstrings Stretch
Stand with your legs hip-width apart. Extend one leg out in front
of you and
keep that foot flat agains
t the
grou
nd.
With your hands
resting lightly on your thighs, bend your back leg and lean forward
slightly from your hips until you feel a stretch in the back of your
thigh. Be sure to lean forward from the hip joint rather than
bending at your waist.
Hold for 20 to 30 seconds. Repeat for the opposite leg.
6. Buttocks, Hips and Abdominal Stretch
Lay flat on your back with your hips relaxed against the floor. Bend
one leg at the knee. Keeping both shoulders flat on the floor, gently
grasp the bent knee with your hands and pull it over your body
and toward
s the
groun
d.
Y
ou should feel a
stret
ch in
your hips,
abdominals and lower back.
Hold for 20 to 30 seconds and release. Repeat for opposite side.
7. Inner Thigh Stretch
Sit on the floor and bend your legs so that the soles of your feet are
together. Place your elbows on your knees. Lean forward from the
waist and press down lightly on
the inside of
your knees
.
Y
ou
should feel a stretch in the muscles of your inside thigh.
Hold for 20 to 30 seconds and release.
8. Arm
Pullb
ack
Stand with your
fee
t
should
er width
apart and
toes pointing forw
ard
and with your knees slightly bent. Let your arms hang relaxed on
either side of your body. Expand your chest and pull your shoulders
back
. Bend
your elbow
s
slight
ly and
clasp your hands
behind your
back. Slowly straighten your arms as you lift your hands upward.
Raise your hands upward until you feel mild tension in your
should
er
and
chest region.
Hold for 20 to 30 seconds. Lower your arms to their original position
and bend your elbows. Release your hands and return them to
your sides.

--------
16
--------
PILATES POWER GYM
TM
SYSTEM
The Pilates Power Gym
™
is more than just a piece of
exercise equipment, it is a total body exercise and
nutrit
ion system. It is
a “fitness for life” plan that
goes
hand in
hand with an
ove
rall health
y
life
style
.
This
includes regular check-ups, healthy eating habits and
exercise for the rest of your life.
Today, all fitness research recommends both
cardiovascular exercise and strength conditioning
to achieve balanced fitness. By improving your
cardiovascular fitness you will strengthen your heart
and lungs, increase your stamina and endurance, and
help with weight loss. Strength conditioning adds lean
muscle to your body, which increases your body’s
metabolism. Remember that a healthy eating plan is
an important part of any balanced fitness program.
The Pilates Power Gym
™
System is designed to help
you achiev
e
a balanced fitness progra
m.
The system
consists of three parts:
1. Strength Conditioning and Muscle Toning.
The
Pilates Power Gym
™
exerciser was designed to help
you tone and strengthen your upper body, lower body
and core.
We recom
mend that you do either the
Pilates Workout or the Strength Training Workout 3
times a week. However, the frequency and duration of
your workouts will depend on your current fitness level
and goals. Please refer to the Pilates Power Gym
™
Work
out section of
this booklet to
determ
ine the
workout that is appropriate for you.
2. Cardiovascular Exercise.
The Pilates Power Gym
™
System includes a cardio workout program.
Y
ou can
achieve an effective cardio workout from a variety of
activities, such as walking, hiking, swimming and
jogging.
We recommend
that
you
do
a
cardio
workout
for at least 30
minut
es, 3
times a week.
Y
ou can
easily
alternate days for your Pilates Power Gym
™
and
cardio workouts. Again, the frequency and duration of
your workouts will depend on your current fitness level
and goals. Please refer to the Cardiovascular Workout
section on pages 36-40 to determine the workout that
is appropriate for you.
3. Nutrition.
The Pilates Power Gym
™
System also
includes both the Jump Start and Eating Plan
booklets to provide you with healthy eating choices.
PILATES POWER GYM
TM
WORKOUT
5.
Keep track of how many repetitions you are able to
do at
first
.
Y
ou will
be surprised at how quickly you
progr
ess. In just a
fe
w
week
s
you’ll probab
ly
be able
to complete all of the repetitions demonstrated in the
workout DVD.
6.
Progress slowly. If you are very sore and tired after
your workout you are working at a level that is too
hard. Great results can be obtained by working out
at a level that challenges you, but doesn’t create
soreness or excessive fatigue.
7.
It is important that you know how to work out safely
and properly
.
These safet
y
steps are for
your benefit
and you should follow them closely to maximize the
effectiveness of your workout routine.
8.
When laying your head on the Headrest, use caution
and slowly lower your head between the 2 Pulley
Arm Assemblies. Also use caution not to get hair
tangled or caught in unit.
1.
Once your equipment is set up, make sure it is on a
solid, level, surface with a minimum of 3 feet of
clearance space on all sides of the equipment.
2.
Review this Owner’s Manual and the DVD completely
before you begin your exercise program. Remember
to follow the instructions exactly – they have been
dev
eloped with your
health and safety in
mind.
3.
Perform the exercises at a slow and controlled speed.
For best results, perform all of the exercises at the
temp
o
demon
stra
ted in
the DVD
.
Work
ing at
a
fas
t
pace is not recommended, and may compromise
your safety and results.
4.
You may not be able to complete all of the repetitions
sugge
sted at
first
.
When you feel your muscles
fatiguing, or are unable to work with good form and
technique, take a short break and rest.
You should begin to feel results within one to two
weeks of working out with your equipment. Look for
better endurance and the feeling of more strength
and efficiency in your muscles.
IMPORTANT EXERCISE AND SAFETY TIPS

--------
17
--------
Develo
ping Your Pilates
Power Gym
™
Workout
The choices you make about the frequency (how often),
the duration (how long), and intensity (how hard) at
which you workout, will directly influence your results.
Before beginning any workouts on the Pilates Power
Gym
™
exerciser, you should first determine your current
fitnes
s level.
The follow
ing are
guidel
ines that you
can
use to determine your fitness level, but remember these
are just guideli
nes.
Y
ou must always listen to
your body
.
Start out at a level that is comfortable to you and
progress
sensibly
.
Beginner
– No previous exercise experience,
or have not exercised in a long time.
Intermediate
– Have been exercising regularly
for three months or more.
Advanced
– Have been exercising regularly for
six months or more.
How Often, How Long, How Hard
Beginners
should start out slowly and perform only as
many exercises as you are able to do with good form
and technique.
Y
our Pilates Power Gym
™
System
includes the Pilates Power Gym Workout
™
D
VD
.
The
D
VD includes two
compl
ete workout
s:
The Pilates
Workout and The Strength Training Workout. Either of
the workouts are appropriate for a beginning exerciser.
Choose one of the workouts and start by doing that
workout (or as much of the workout as you can
comfortably perform) three times a week.
Y
our goal is
to complete one workout, three times a week, with
good form.
I
ntermediates
should strive to complete one Pilates
Power Gym
™
Workout every other day. Once you can
comfortably complete this workout with good form and
technique, you may increase intensity by adding Tension
Cords or increasing the incline of the Glideboard.
Advanced
should strive for a long term goal of
completing the Pilates Power Gym
™
Workout most days
of the
week
.
T
o
increa
se the
challe
nge of
your work
out,
you may add Tension Cords and/or increase the incline
of the Glideboard. Remember, always work out and
progress at a pace that is comfortable to you, and make
sure you can complete all of the repetitions of each
exercise with good form and technique.
Remember, if you would like a VHS tape of the
workout, please refer to page 4 for ordering
information.

--------
18
--------
PILATES POWER GYM
TM
EXERCISES
Plie
Lie on your back with your head on the Headrest and your arms resting at your
sides. Place the balls of your feet on the Foot Rest Bar Assembly, a few inches
apart, with your toes curled over the Foot Rest Bar Assembly. Make a “V” shape with
your heels touching and lift your heels slightly. Push your feet against the Foot Rest
Bar Assembly and straighten your knees, squeezing your inner thighs together.
Pause at the end of the movement, then slowly return to the starting position.
Perform 12 – 20 repetitions to fatigue.
Works the hips, inner thighs, front and back thighs and calves.
Pilates Workout
Th
e
f
ol
lo
wi
ng
Pi
la
te
s
ex
er
ci
se
s
ar
e
de
si
gn
ed
to
strengthen and tone your abs, lower back, hips, thighs,
legs and arms.
With each exercise
, there are suggestions
for the Glideboard and
T
ension Cord settings for beginner
and advanced exercises
.
These are only suggestions.
Y
ou
can
incr
eas
e
or
dec
rea
se
the
int
ens
ity
as
you
r
fit
nes
s
le
ve
l
dic
tat
es. Prop
er
tec
hniq
ue
is
imp
orta
nt
fo
r
goo
d
results, so make sure the settings you choose allow you
to perform each exercise with good form.
Remember that the Tension Cords are numbered from
lightest (#1) to heaviest (#4).
T
o make an exercise easier,
remove one or more
T
ension Cords in sequence.
T
o make
an exercise harder, add one or more Tension Cords in
seq
uen
ce. Th
e
Gli
deb
oar
d
inc
line
set
tin
gs
are
als
o
in
sequence and are referred to as Flat Position (A), low
incline positions (B and C), and high incline positions (C-
1,
C-
2,
C-3 and
C-4
). T
o
dec
rea
se
the inten
sit
y
of
an
exercise, lower the Glideboard to an easier setting, or to
the Flat Position.
T
o increase the intensity of an exercise,
raise the Glideboard to a higher setting (B or C). Any
S
t
a
r
t
F
i
n
i
s
h
Gl
id
e
bo
ar
d
In
c
li
n
e
P
os
it
io
n
T
en
si
o
n
Co
rd
s
B
e
g
i
n
n
e
r
A
#
1
a
n
d
/
o
r
#
2
Advanced
B
or
C
#1,
#2,
#3
and
#4
CAUTION
When attaching
Tension Cords, h
old firmly until the Cords
are properly
positioned. DO NO
T LET GO of the
Tension Cor
ds until they are locked
in or back in the start position.
CAUTION LABEL 2
combin
ation
of Te
nsion
Cord
s
and
Glideb
oard
setti
ngs
may be used to customize each exercise to your individual
fitness level.
Bre
ath
ing
is
imp
orta
nt
whi
le
per
fo
rmin
g
str
eng
the
nin
g
and
tonin
g
ex
ercise
s. Inhale deeply through
your nose
and
exha
le
throu
gh
your mouth. Many exer
cises find
that
ex
ha
lin
g
on
th
e
ex
ert
ion
an
d
inh
al
in
g
on
th
e
re
lea
se
facilitates good form and technique.
The Pilates Workout may be performed with bare feet, or
you may wear flexible athletic shoes if you find that more
comfortable.
It is not recommended that you e
xercise with
socks or stockings only on the feet, as this may cause
sl
ip
pa
ge
of
th
e
f
ee
t
wh
en
us
in
g
th
e
F
oo
t
Re
st
Ba
r
Assembly or the optional Push Up Bar Assembly.
When laying your head on the Headrest, use caution
and slowly lower your head between the 2 Pulley
Arm Assemblies. Also use caution not to get hair
tangled or caught in unit.
Pleas
e
refer to
your workout DVD for
exerc
ises
using the Foot Strap Assembly.
Other manuals for Pilates Power Gym
2
Table of contents
Other Fitness Quest Fitness Equipment manuals

Fitness Quest
Fitness Quest Leg Magic User manual

Fitness Quest
Fitness Quest LEG MAGIC PULSE User manual

Fitness Quest
Fitness Quest AB LOUNGE XL User manual

Fitness Quest
Fitness Quest EASY SHAPER User manual

Fitness Quest
Fitness Quest RockFit 435 User manual

Fitness Quest
Fitness Quest AB LOUNGE 2 User manual

Fitness Quest
Fitness Quest Total Gym Shaper User manual

Fitness Quest
Fitness Quest BOSU User manual

Fitness Quest
Fitness Quest Pilates Power Gym User manual

Fitness Quest
Fitness Quest AB LOUNGE User manual


