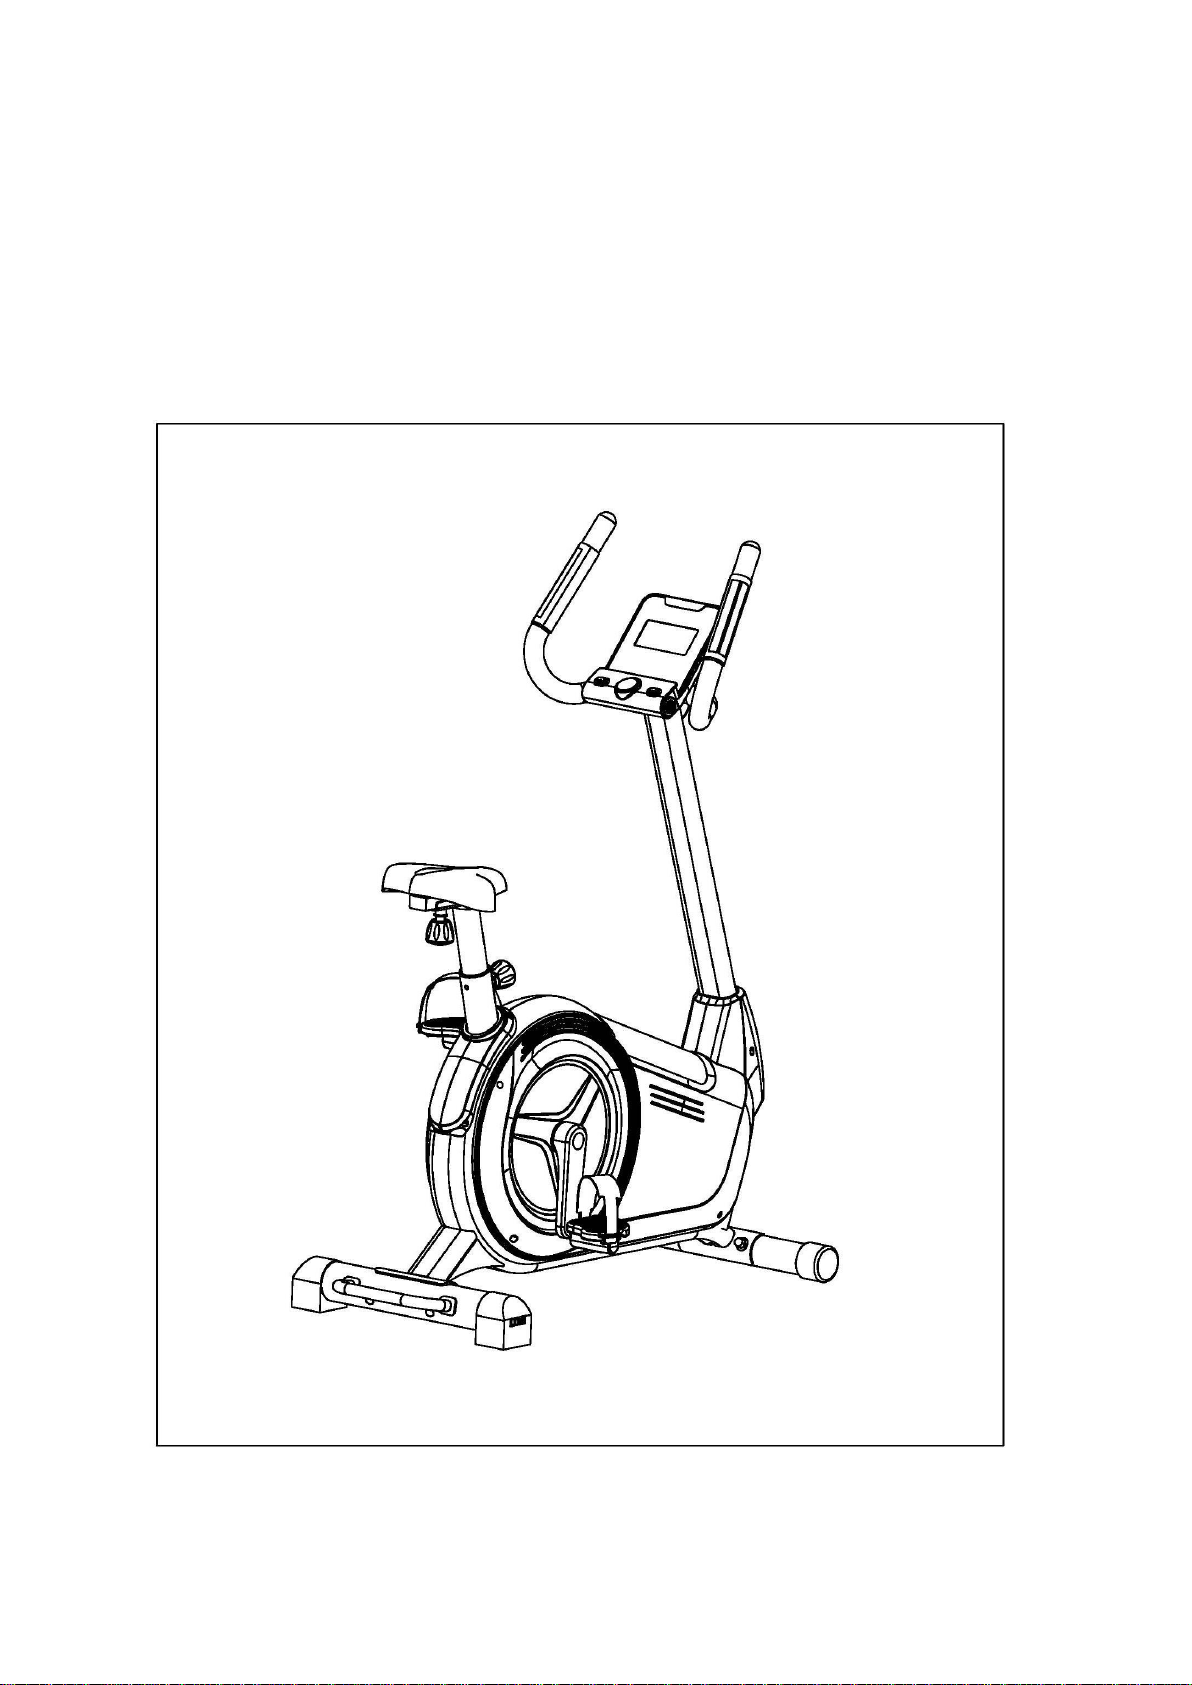
FitNord CYCLO 300 User manual
U
UP
PR
RI
IG
GH
HT
T
B
BI
IK
KE
E
O
OW
WN
NE
ER
R’
’S
S
M
MA
AN
NU
UA
AL
L

1
Before You Start
IMPORTANT! Please read all instructions carefully before using this product. Retain this
manual for future reference. The specifications of this product may vary slightly from the
illustrations and are subject to change without notice.
IMPORTANT SAFETY NOTICE
Note the following precautions before assembling and operating the
machine.
1. Once fully assembled, please check that all hardware parts such as bolts,
nuts and washers are positioned and secured firmly.
2. Please check regularly that the safety chain guard that protects the moving
parts of the machine is secured and in good order.
3. Please always check the seat post, seat slider; pedals and handlebar are
secured firmly before getting on the bike.
4. To lubricate all moving parts annually is recommended.
5. Do not wear loose clothing to avoid entangling in any moving parts.
6. Do not remove feet from the pedals while they are in motion.
7. Always wear shoes when using the machine.
8. Dry the bike after each use to remove sweat and moisture. Wipe the
machine with a damp cloth, water and mild soap. Do not use a
petroleum-based solvent to clean the machine in order not to damage the
finish.
9. Please keep children away from the bike while it is in use. Do not allow
children to use the bike. This bike is designed for adults, not children.
10. Do not dismount the bike until the pedals have stopped completely.
11. Stop exercise immediately in case of nausea, shortness of breath, faint,
headache, pain, tightness in your chest or any discomfort.
12. Do not place fingers or any other objects into the moving parts of the bike.
13. Prior to any exercise, consult with your physician first to establish the
exercise frequency, time and intensity appropriate for your particular age and
condition.
14. After exercising, please pull down the tension controller to increase
resistance so that the pedals will not rotate freely and possibly hurt someone.
15. Maximum user’s weight is 135KGS.

2
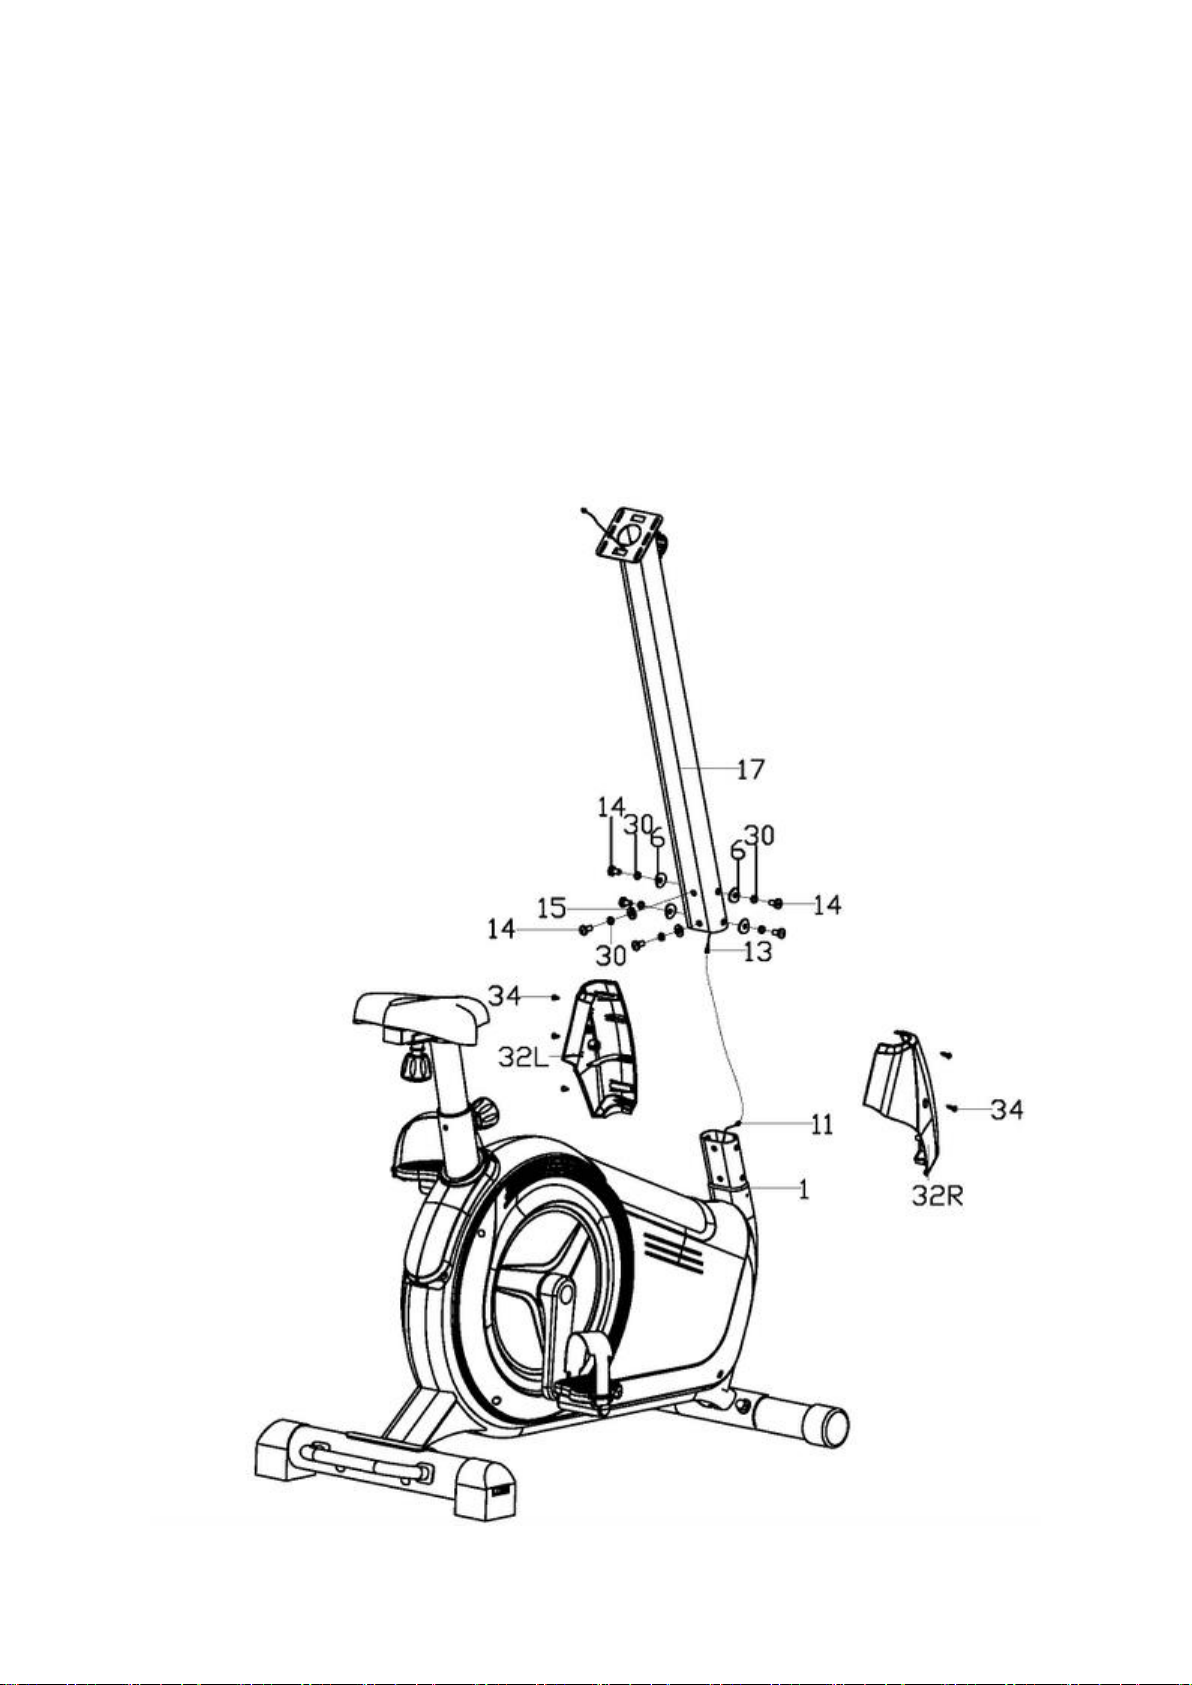
EXPLOADED DIAGRAM

3
PARTS LIST
NO.
Description
QT
Y
NO.
Description
QT
Y
1
Mainframe
1
22
Round end cap
2
2
Front stabilizer
1
23
Cross pan head screw
4
3
Rear stabilizer
1
24
Small handle for easy moving
1
4
Rear stabilizer cap
2
25
Handlebar
1
5
Square neck bolt M8x74
2
26
Console
1
6
Curve washer Φ8x1.5xΦ25
10
27
Square neck bolt M8x93
2
7
Cap nut M8
4
28
Saddle post
1
8L/R
Crank
1/1
29
Spring knob
1
9 L/R
Pedal
1/1
30
Spring washer D8
12
10
Front stabilize cap
2
31
Inner hex pan head bolt M8xL93
2
11
Sensor wire
1
32 L/R
Handlebar cover
1/1
12
Adapter
1
33
Saddle
1
13
Trunk wire
1
34
Cross pan head self-drilling screw ST4.2x18
9
14
Inner hex pan head bolt M8x15
10
35
Knob
1
15
Flat washer
6
36
Flat washer D10xΦ25x2
1
16
Handlebar foam grip
2
37
Square nut
1
17
Handlebar post
1
38
T-shaped bolt
1
18
Saddle support
1
39
Chunk cover
1
19
Square end cap
2
40
Spacer
1
20
Pulse wire
2
41
Flat washer D8xΦ13x1.5
1
21
Handlebar foam grip
2
NOTE:
Most of the listed assembly hardware has been packaged separately, but
some hardware items have been preinstalled in the identified assembly parts.
In these instances, simply remove and reinstall the hardware as assembly is
required.
Please reference the individual assembly steps and make note of all
preinstalled hardware.
Prior to assembly of this product, remove all components from the package
and verify all the listed parts are supplied. Once certain, begin with the first
assembly step.

4
ASSEMBLY INSTRUCTIONS
Step 1
Fix the front stabilizer (2) and rear stabilizer (3) to the mainframe (1) with Cap
nut(7),spring washer (30), curve washer (6) and square neck bolt (5).
Step 2
Fasten the pedal (9L/R) to the crank (8L/R).
Note: To tighten the left pedal COUNTERCLOCKWISE and the right pedal
CLOCKWISE.Please turn the pedal in the direction that showed in the picture
below.And please make sure that pedal were tightened when exercise,or it may
broken the pedal tooth.

5
Step 3
First fix the saddle (33) to the saddle support (18) with inner hex pan head bolt
(14) and flat washer (15).
And then fix the assembled saddle support (18) to the saddle post (28) with
knob (35), flat washer (36) and square nut (37).
At last, insert the assembled saddle post (28) into the mainframe (1) and
tighten it with spring knob (29).
6
Step 4
Fix the trunk wire (13) and sensor wire (11) first.
Then fix the handlebar post (17) to the mainframe (1) with inner hex pan head
bolt (14) , spring washer (30), curve washer (6) for the holes on the left and
right side of the handlebar post, and for the front holes please fix it with inner
hex pan head bolt (14) , spring washer (30) and flat washer (15)
At last fix the handlebar cover (32L/R) to the mainframe with cross pan head
self-drilling screw (34).

7
Step 5
Thread the pulse wire (20) through the hole of handlebar post (17) and pull it
out from the hole of the console bracket.
Then fix the handlebar (25) to the handlebar post (17) with T-shaped bolt
(38),chunk cover(39), spacer(40)and flat washer(41).

8
Step 6
Connect the pulse wire (20), trunk wire (13) with the wire of the console (26)
and then fix the console to the handlebar(17) with cross pan head screw (23).

9
WARM UP AND COOL DOWN ROUTINE
A good exercise program consists of a warm-up, aerobic exercise, and a cool
down. Do the entire program at least two to three times a week, resting for a
day between workouts. After several months you can increase your workouts
to four or five times per week.
AEROBIC EXERCISE is any sustained activity that sends oxygen to your muscles
via your heart and lungs. Aerobic exercise improves the fitness of your lungs
and heart. Aerobic fitness is promoted by any activity that uses your large
muscles eg: legs, arms and buttocks. Your heart beats quickly and you
breathe deeply. An aerobic exercise should be part of your entire exercise
routine.
The WARM-UP is an important part of any workout. It should begin every
session to prepare your body for more strenuous exercise by heating up and
stretching your muscles, increasing your circulation and pulse rate, and
delivering more oxygen to your muscles.
COOL DOWN at the end of your workout, repeat these exercises to reduce
soreness in tired muscles.
WARM UP EXERCISES
Inner Thigh Stretch
Sit with the soles of your feet together with your knees
pointing outward. Pull your feet as close into your groin as
possible. Gently push your knees towards the floor. Hold for 15 counts.
Hamstring Stretch
Sit with your right leg extended. Rest the sole of your
left foot against your right inner thigh. Stretch toward your
toe as far as possible. Hold for 15 counts. Relax and then
repeat with left leg extended.
Head Roll
Rotate your head to the right for one count, feeling the
stretch up the left side of your neck. Next, rotate your head
back for one count, stretching your chin to the ceiling and
letting your mouth open. Rotate your head to the left for one
count, and finally, drop your head to your chest for one
count.

10
Shoulder Lift
Lift your right shoulder up toward your ear for one count. Then lift
your left shoulder up for one count as you lower your right
shoulder.
Calf-Achilles Stretch
Lean against a wall with your left leg in front of the right
and your arms forward. Keep your right leg straight and
the left foot on the floor; then bend the left leg and
lean forward by moving your hips toward the wall. Hold,
then repeat on the other side for 15 counts.
Toe Touch
Slowly bend forward from your waist, letting your back and
shoulders relax as you stretch toward your toes. Reach down as
far as you can and hold for 15 counts.
Side Stretch
Open your arms to the side and continue lifting them until they
are over your head. Reach your right arm as far upward
toward the ceiling as you can for one count. Feel the stretch
up your right side. Repeat this action with your left arm.
Table of contents
Other FitNord Exercise Bike manuals


