FitNord Cyclo 500E User manual

FitNord Cyclo 500E
OWNER’S MANUAL
IMPORTANT!
Read all instructions carefully before using this product. Retain this manual for future
reference. The specifications of this product may vary slightly from the illustrations and are
subject to change without notice.

2
Before You Start
Thank you for purchasing this Product! For your safety and benefit, read this manual carefully
before using the machine.
Prior to assembly, remove components from the box and verify that all the listed parts were
supplied. Assembly instructions are described in the following steps and illustrations.
IMPORTANT SAFETY NOTICE
PRECAUTIONS
BE SURE TO READ THE ENTIRE MANUAL BEFORE YOU ASSEMBLE OR OPERATE YOUR MACHINE. IN
PARTICULAR, NOTE THE FOLLOWING SAFETY PRECAUTIONS:
01- Check all the screws, nuts and other connections before using the machine for the first time and
ensure that the trainer is safe to use.
02- Position the machine in a dry, level place and keep away from moisture and water.
03- Use the equipment on a solid, flat level surface with a protective cover for your floor or carpet. To
ensure safety, the equipment should have at least 2 meters of free space all around it.
04- DO NOT use aggressive cleaning articles to clean the machine. Only use the supplied tools or
suitable tools of your own to assemble the machine or repair any parts of machine. Remove drops of
sweat from the machine immediately after finishing training.
05- Your health can be affected by incorrect or excessive training. Consult a doctor before beginning a
training program. He can define the maximum settings (Pulse. Watts. Duration of training etc.) to
which you may train yourself and can get precise information during training. This machine is not
suitable for therapeutic purposes.
06- Only train on the machine when it is working correctly. Use only original spare parts for any necessary
repairs.
07- Only one person at a time on the machine.
08- Wear training clothes and rubber sole shoes which are suitable for fitness training on the machine.
09- If you have a feeling of dizziness, sickness, or other abnormal symptoms, stop training and consult a
doctor as soon as possible.
10- Children and disabled persons should only use the machine in the presence of another adult who can
give aid and advice.
11- The machine’s power increases with speed. The machine is equipped with an adjustable knob that
can be used to adjust the resistance. Reduce the resistance by turning the knob towards stage 1.
Increase the resistance by turning the knob towards stage 15.
WARNING: BEFORE BEGINNING ANY EXERCISE PROGRAM, CONSULT YOUR PHYSICIAN. THIS IS
ESPECIALLY IMPORTANT FOR PERSONS WITH PRE-EXISTING HEALTH PROBLEMS. READ ALL
INSTRUCTIONS BEFORE USING ANY FITNESS EQUIPMENT.
SAVE THESE INSTRUCTIONS / Maximum user’s weight: 130KG

3
EXPLODED DIAGRAM ........................................................................................................ 4
PARTS LIST ......................................................................................................................... 5
ASSEMBLY INSTRUCTIONS .............................................................................................. 6
DISPLAY MANUAL ............................................................................................................ 11
DISPLAY FUNCTIONS ...................................................................................................... 11
KEY FUNCTIONS .............................................................................................................. 11
OPERATIONS.................................................................................................................... 12
APP.................................................................................................................................... 16
4
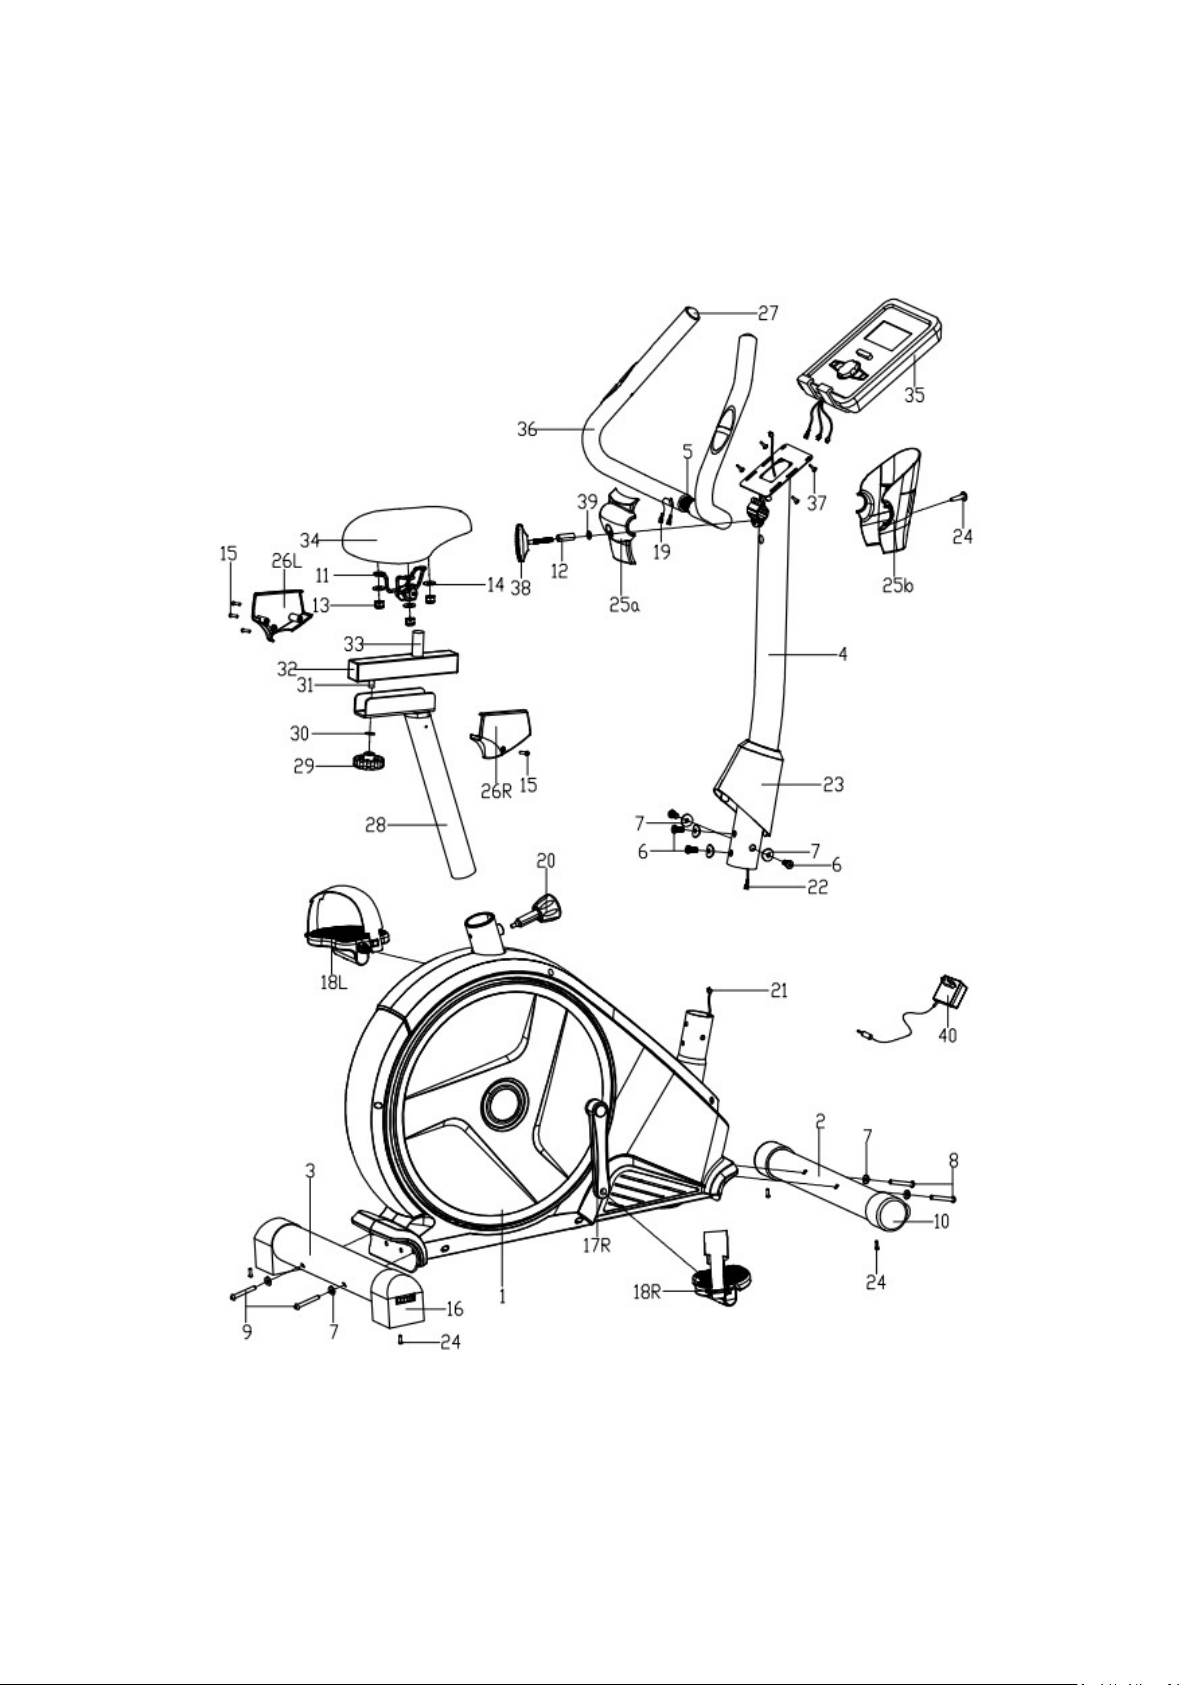
EXPLODED DIAGRAM

5
PARTS LIST
Part
No. Description Qty
Part
No. Description Qty
1 Main frame 1
21 Sensor wire 1
2 Front bottom tube 1
22 Extension sensor wire 1
3 Rear bottom tube 1
23 Handlebar post cover 1
4 Handlebar post 1
24 Cross tapping screw
ST4.2×18 5
5 Handlebar 1
25a/b Computer cover 1pr
6 Allen bolt M8×18 4
26L/R Protective guard for saddle
post 1pr
7 Arc washerΦ8×1.5×Φ25 8
27 Round end cap 2
8 Hex bolt M8×L72 2
28 Saddle post 1
9 Hex bolt M8×L90 2
29 Knob 1
10 Front end cap 2
30 Flat washer D10×Φ25×2 1
11 Seat bracket 1
31 U-shaped slider 1
12 BushingΦ13×2×35 1
32 Square end cap 2
13 Nylon nut 3 33 Saddle Slider 1
14 Flat washer 3
34 Saddle 1
15 Cross tapping screw ST4.2×12 4 35 Computer 1
16 Rear end cap 2
36 Foam grip 2
17L/R Crank 1pr
37 Cross screw 4
18L/R Pedal 1pr
38 Knob 1
19 Pulse wire 2
39 Flat washer D8×Φ13×1.5 1
20 Pop-pin knob 1
40 Adapter 1
NOTE:
Most of the listed assembly hardware has been packaged separately, but some items have
been preinstalled in the identified assembly parts. In these instances, simply remove and
reinstall the hardware when required.
Reference the individual assembly steps and make note of all preinstalled hardware.

6
ASSEMBLY INSTRUCTIONS
Step 1.
1. Attach the Front bottom tube (2) to the Main frame (1) with Hex bolts (8) and Arc
washers (7).
2. Attach the Rear bottom tube (3) to the Main frame (1) with Hex bolts (9) and Arc
washers (7).
Step 2.
Attach the Pedals (18L/R) to the Cranks (17L/R) accordingly with the wrench.
Note: Secure the left pedal in a clockwise direction and the right pedal in a
counter-clockwise direction as the following picture. Make sure the Pedals (18L/R) are
securely tightened to avoid damage to the pedals.
7
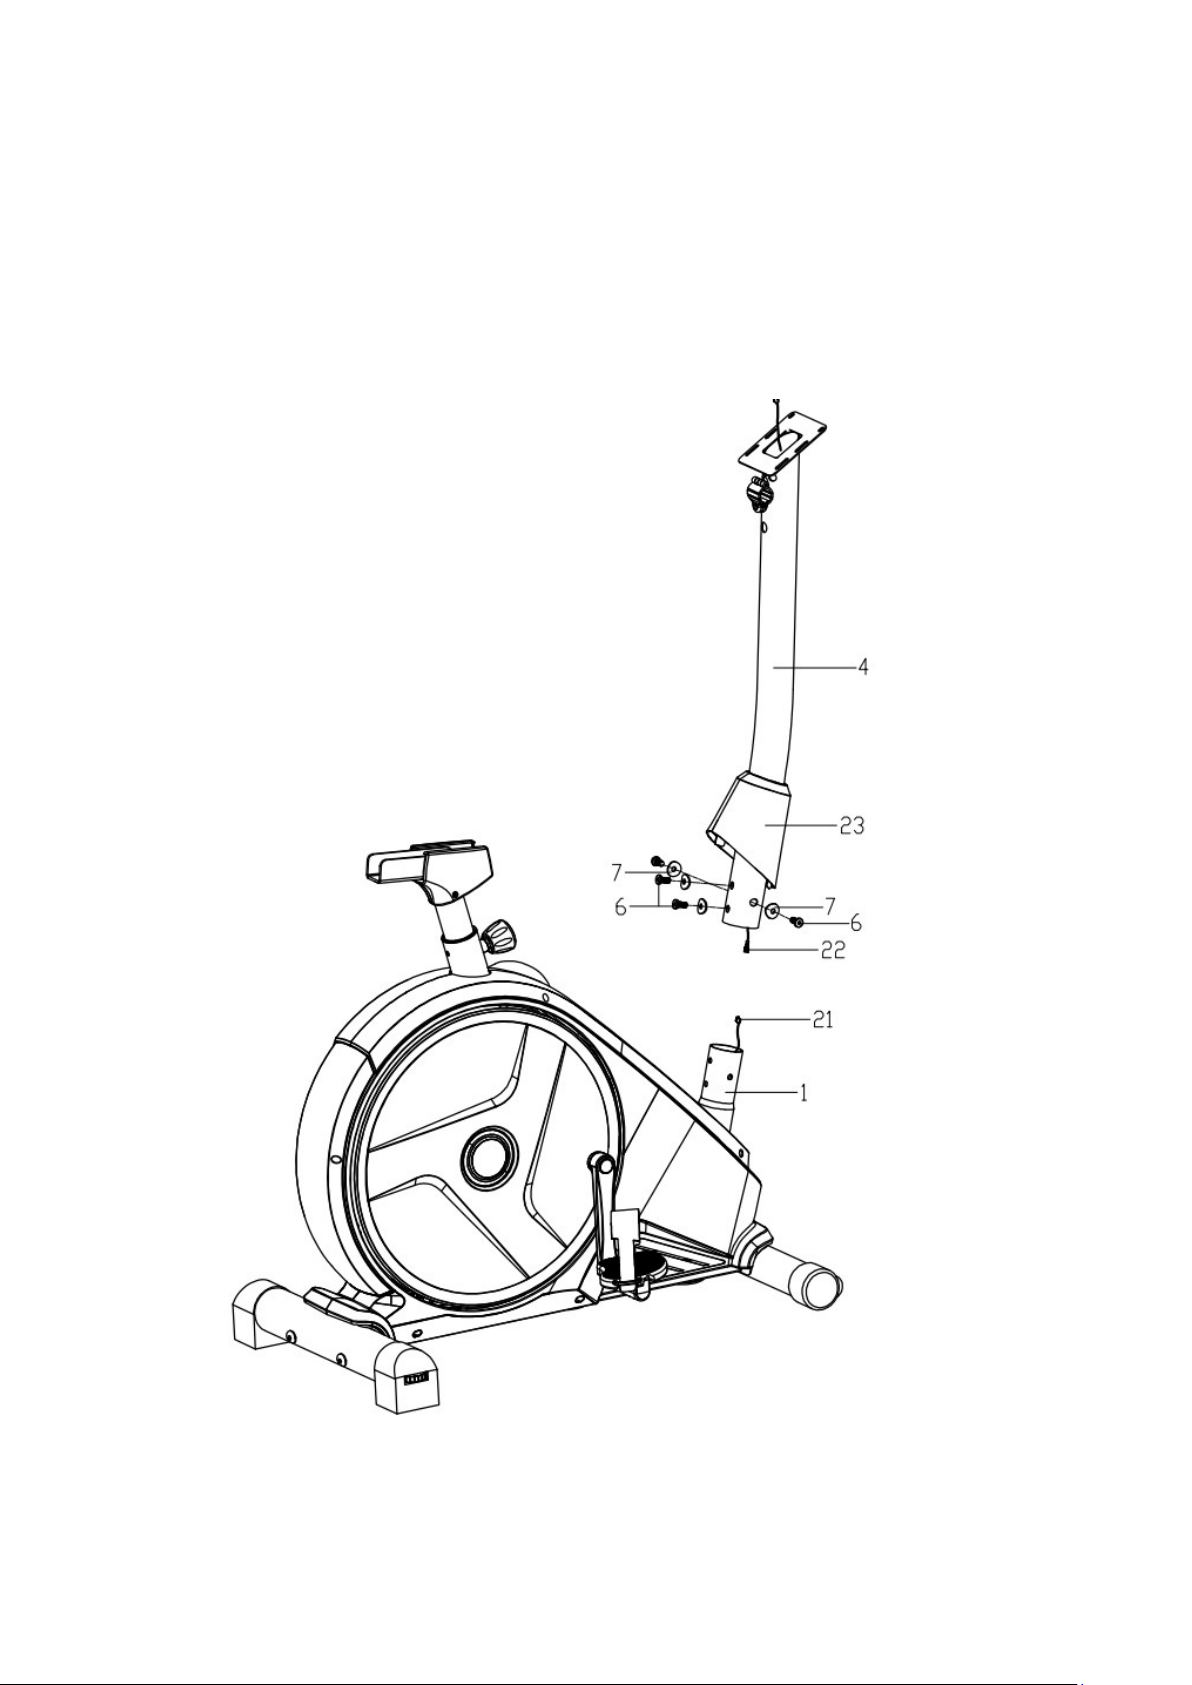
Step 3
1. Insert the Handlebar post cover (23) onto the Handlebar post (4).
2. Connect the Extension Sensor wire (22) with Sensor wire (21).
3. Attach the Handlebar post (4) to the Main frame (1) with Allen bolts (6) and Arc washers
(7).
4. Slide down the Handlebar post cover (23) and fit in place.
8
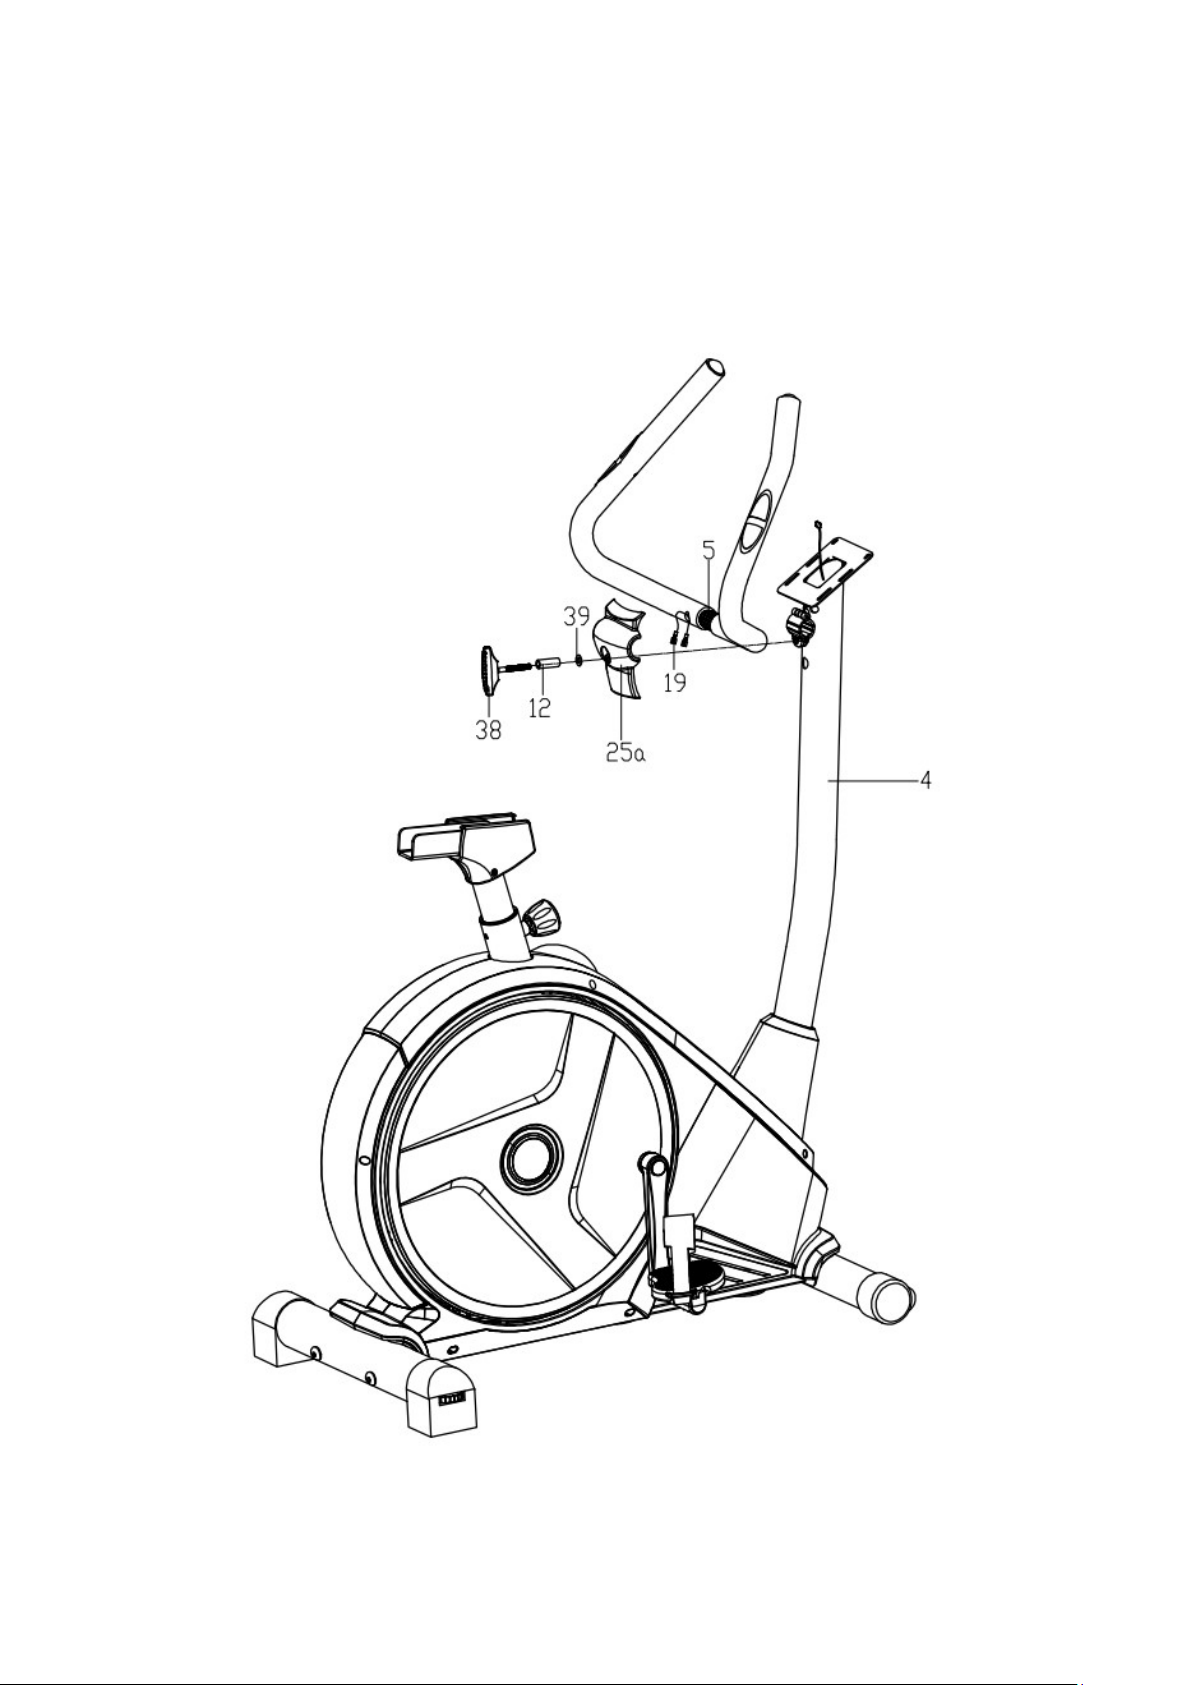
Step4.
1. Insert the Pulse wires (19) through the hole on the Handlebar post (4) and pull them out
from the top of the computer bracket.
2. Attach the Handlebar (5) to the Handlebar post (4) with the Knob (38), bushing (12),
Computer cover (25a) and flat washer (39).
9
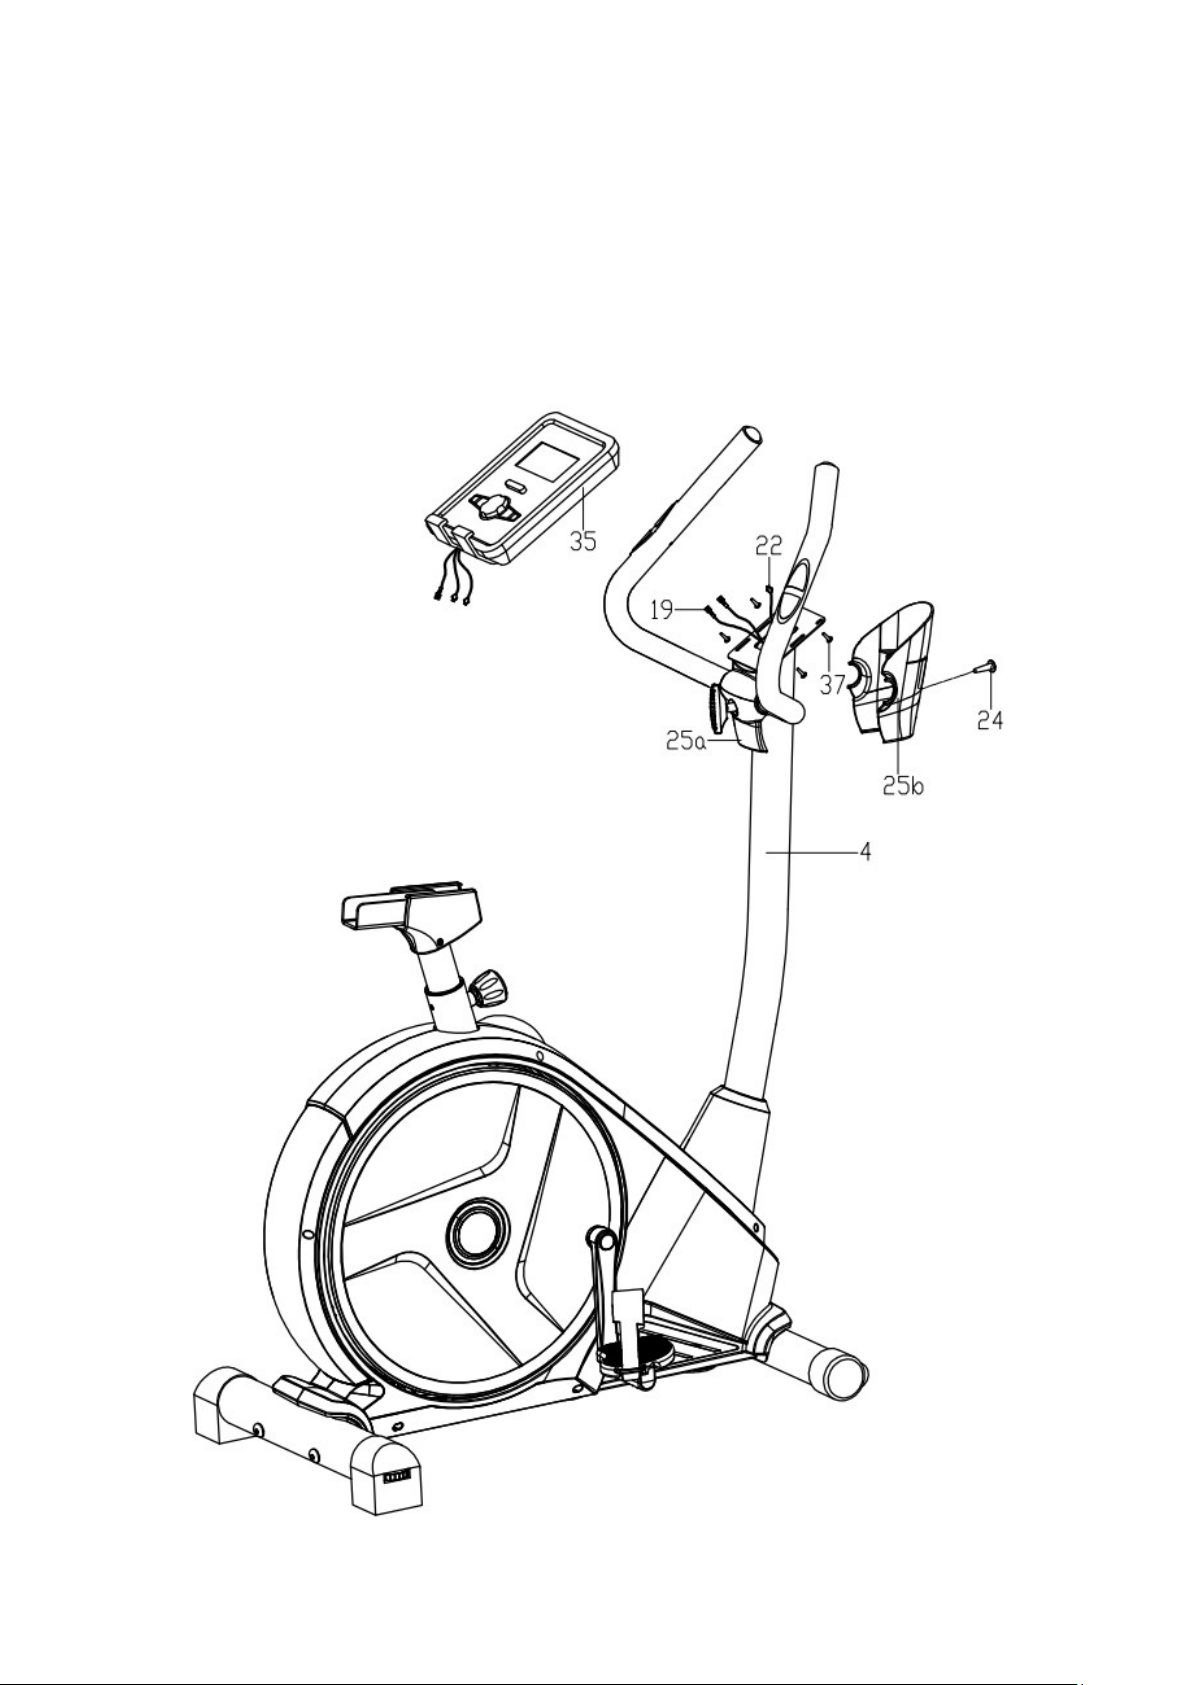
Step 5.
1. Connect the Extension sensor wire (22) and Pulse wire (19) with the Computer (35)
wires,
2. Attach the Computer (35) to the computer bracket of the Handlebar post (4) with Cross
screws (37).
3. Tighten the Handle and Computer cover (25a/b) on the Handlebar post (4) with Cross
tapping screws (24).

10
Step 6.
1. Attach the Saddle bracket (11) to the Saddle (34) with Flat washers (14) and Nylon nuts
(13).
2. Attach the saddle (34) to the Saddle slider (33) with the wrench tightly.
3. Attach the Saddle Slider (33) to the Saddle post (28) with the Knob (29), Flat washer (30)
and U-shaped slider (31).
Note: Always make sure the saddle (34) has been tightly fastened on the Saddle slider (33)
before exercising.

11
DISPLAY MANUAL
DISPLAY FUNCTIONS
ITEM DESCRIPTION+
TIME Count up - No preset target, Time will count up from 00:00 to maximum 99:59 with 1-minute
increments.
Count down - If training with preset Time, Time will count down from preset to 00:00.
Each preset increment or decrement is 1 minutes between 00:00 to 99:00.
SPEED Displays current training speed. Maximum speed is 99.9 km/h or mph.
RPM Displays the Rotation Per Minute. Display range 0~15~999
DISTANCE Accumulates total distance from 0.00 up to 99.99 km/h or mph. The user may preset target
distance data by using WHEEL+/-.
Each preset increment or decrement is 0.1 km or m between 0.00 to 99.90.
CALORIES Accumulates calorie consumption during training from 0 to maximum 9999 calories.
(This data is a rough guide for comparison of different exercise sessions and cannot be used
for medical purposes.)
PULSE User may set up target pulse from 0 - 30 to 230; buzzer will beep when actual heart rate is
over the target value during workout.
WATTS Display current workout watts. Display range 0-999.
MANUAL Manual mode workout.
BEGINNER 4 PROGRAM selection.
ADVANCE 4 PROGRAM selection.
SPORTY 4 PROGRAM selection.
CARDIO Target HR training mode.
WATT PROGRAM WATT constant training mode.
KEY FUNCTIONS
ITEM DESCRIPTION
WHEEL + Increase resistance level
Setting selection.
WHEEL - Decrease resistance level
Setting selection.
Mode / Enter Confirm setting or selection.
Reset Press and hold for 2 seconds, computer will reboot and start from user setting.
Reverse to main menu during preset workout value or stop mode.
Start/ Stop Start or Stop workout.
Recovery Test heart rate recovery status.
Body fat In stop mode, press for body fat measurement

12
OPERATIONS
1. POWER ON
Plug in power supply, computer will power on and display all segments on LCD for 2 seconds (Picture 1).
Picture 1
2. WORKOUT SELECTION
Use WHEEL+/- to select workout Manual (Picture 2) Beginner (Picture 3) Advance (Picture 4)
Sporty (Picture 5) Cardio (Picture 6) Watt (Picture 7).
Picture 2 Picture 3
Picture 4 Picture 5
Picture 6 Picture 7
Manual Mode
Press START in the main menu to workout in manual mode.
1. Use WHEEL+/- to select workout program, choose Manual and press MODE / ENTER.
2. Use WHEEL+/- to set TIME (Picture 8), DISTANCE (Picture 9), CALORIES (Picture 10), PULSE (Picture
11) and press MODE / ENTER to confirm.
3. Press START/STOP to start exercising. Use WHEEL+/- to adjust load level. Load level displays in WATT
window. After 3s of no input it will switch to display WATT (Picture 12).
4. Press START/STOP to pause. Press RESET to reverse to main menu.
Picture 8 Picture 9

13
Picture 10 Picture 11
Picture 12
Beginner Mode
1. Use WHEEL+/- to select workout program, choose Beginner and press MODE / ENTER.
2. Use WHEEL+/- to browse Beginner programs 1-4 (Picture 13) and select with MODE / ENTER.
3. Use WHEEL+/- to set TIME.
4. Press START/STOP to start exercising. Use WHEEL+/- to adjust load level.
5. Press START/STOP to pause. Press RESET to reverse to main menu.
Picture 13
Advance Mode
1. Use WHEEL+/- to select workout program, choose Advance and press MODE / ENTER.
2. Use WHEEL+/- to browse Advance programs 1-4 (Picture 14) and select with MODE / ENTER.
3. Use WHEEL+/- to set TIME.
4. Press START/STOP to start exercising. Use WHEEL+/- to adjust load level.
5. Press START/STOP to pause. Press RESET to go back to main menu.
Picture 14
Sporty Mode
1. Use WHEEL+/- to select workout program, choose Sporty and press MODE / ENTER.
2. Use WHEEL+/- to browse Sporty programs 1-4 (Picture 15) and select with MODE / ENTER.
3. Use WHEEL+/- to set TIME.
4. Press START/STOP key to start exercising. Use WHEEL+/- to adjust load level.
6. Press START/STOP to pause. Press RESET to go back to main menu.
Picture 15

14
Cardio Mode
1. Use WHEEL+/- to select workout program, choose H.R.C. and press MODE / ENTER.
2. Use WHEEL+/- to set Age (Picture 16).
3. Use WHEEL+/- to select 55% (Picture 17), 75%, 90% or TAG (TARGET H.R.) (default: 100).
4. Use WHEEL+/- to set workout TIME.
5. Press START/STOP to start or stop the workout. Press RESET to go back to main menu.
Picture 16 Picture 17
Watt Mode
1. Use WHEEL+/- to select workout program, choose WATT and press MODE / ENTER.
2. Use WHEEL+/- to set WATT target. (default: 120, Picture 18)
3. Use WHEEL+/- to set TIME.
4. Press START/STOP to start exercising. Use WHEEL+/- to adjust Watt level.
5. Press START/STOP to pause. Press RESET to go back to main menu.
Picture 18
RECOVERY
1. After exercising for a period, keep holding the hand grips or wearing the chest strap and press
RECOVERY.
2. All function displays will stop. “TIME” starts counting down from 00:60 to 00:00 (Picture 19).
3. Screen will display your heart rate recovery status as F1, F2…. to F6. F1 is the best, F6 is the worst
(Picture 20).
4. User may keep exercising to improve the heart rate recovery status. (Press the RECOVERY button
again to return to the main display.)
Picture 19 Picture 20
15
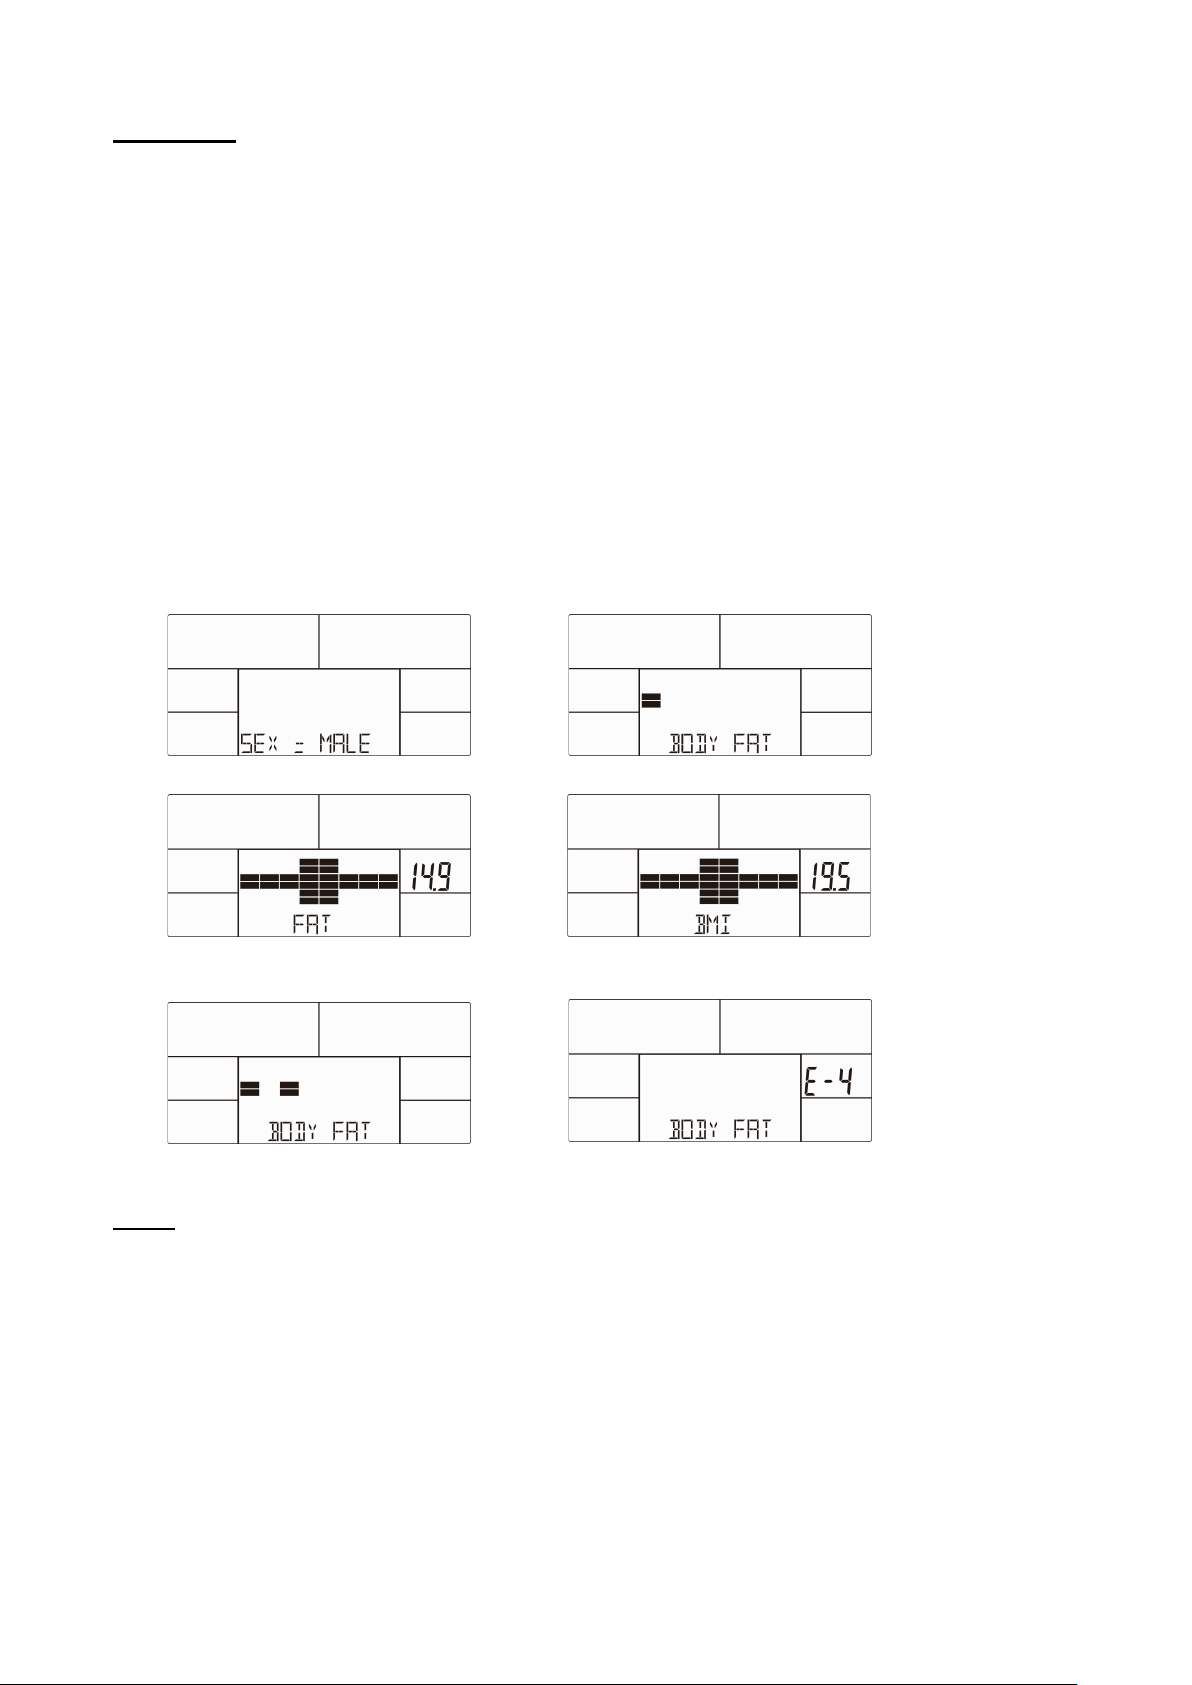
BODY FAT
1. When STOPPED, press BODY FAT to start body fat measurement.
2. Console will remind to input user GENDER (Picture 21), AGE, HEIGHT and WEIGHT, then begin to
measure.
3. Hold both hands on the hand grips during the measurement.
4. The LCD will display “= ” “= = ” (Picture 22) for 8 seconds, until computer finishes measuring.
5. The LCD will display BODY FAT advice symbol, BODY FAT percentage (Picture 23) and BMI (Picture 24)
for 30 seconds.
Error messages:
1. The LCD displays “= = ” “ = =” (Picture 25): User is holding the handgrips incorrectly, or the chest
strap is not correctly worn.
2. E-1: No heart rate signal input detected.
3. E-4: Occurs when FAT% is below 5 or exceeds 50 and BMI result is below 5 or exceeds 50 (Picture
26).
Picture 21 Picture 22
Picture 23 Picture 24
Picture 25 Picture 26
Note:
1. After 4 minutes without pedaling or heart rate input, console will enter into power saving
mode. Pressing any key will wake the console up.
2. In case the computer is slow or works abnormally, unplug the power cord and plug it back
in.

16
APP
User can scan the QR code label to download i-Console+ training APP to a tablet or mobile
device.
Turn on Bluetooth on your tablet, search for the console device and connect.
Table of contents
Other FitNord Exercise Bike manuals


