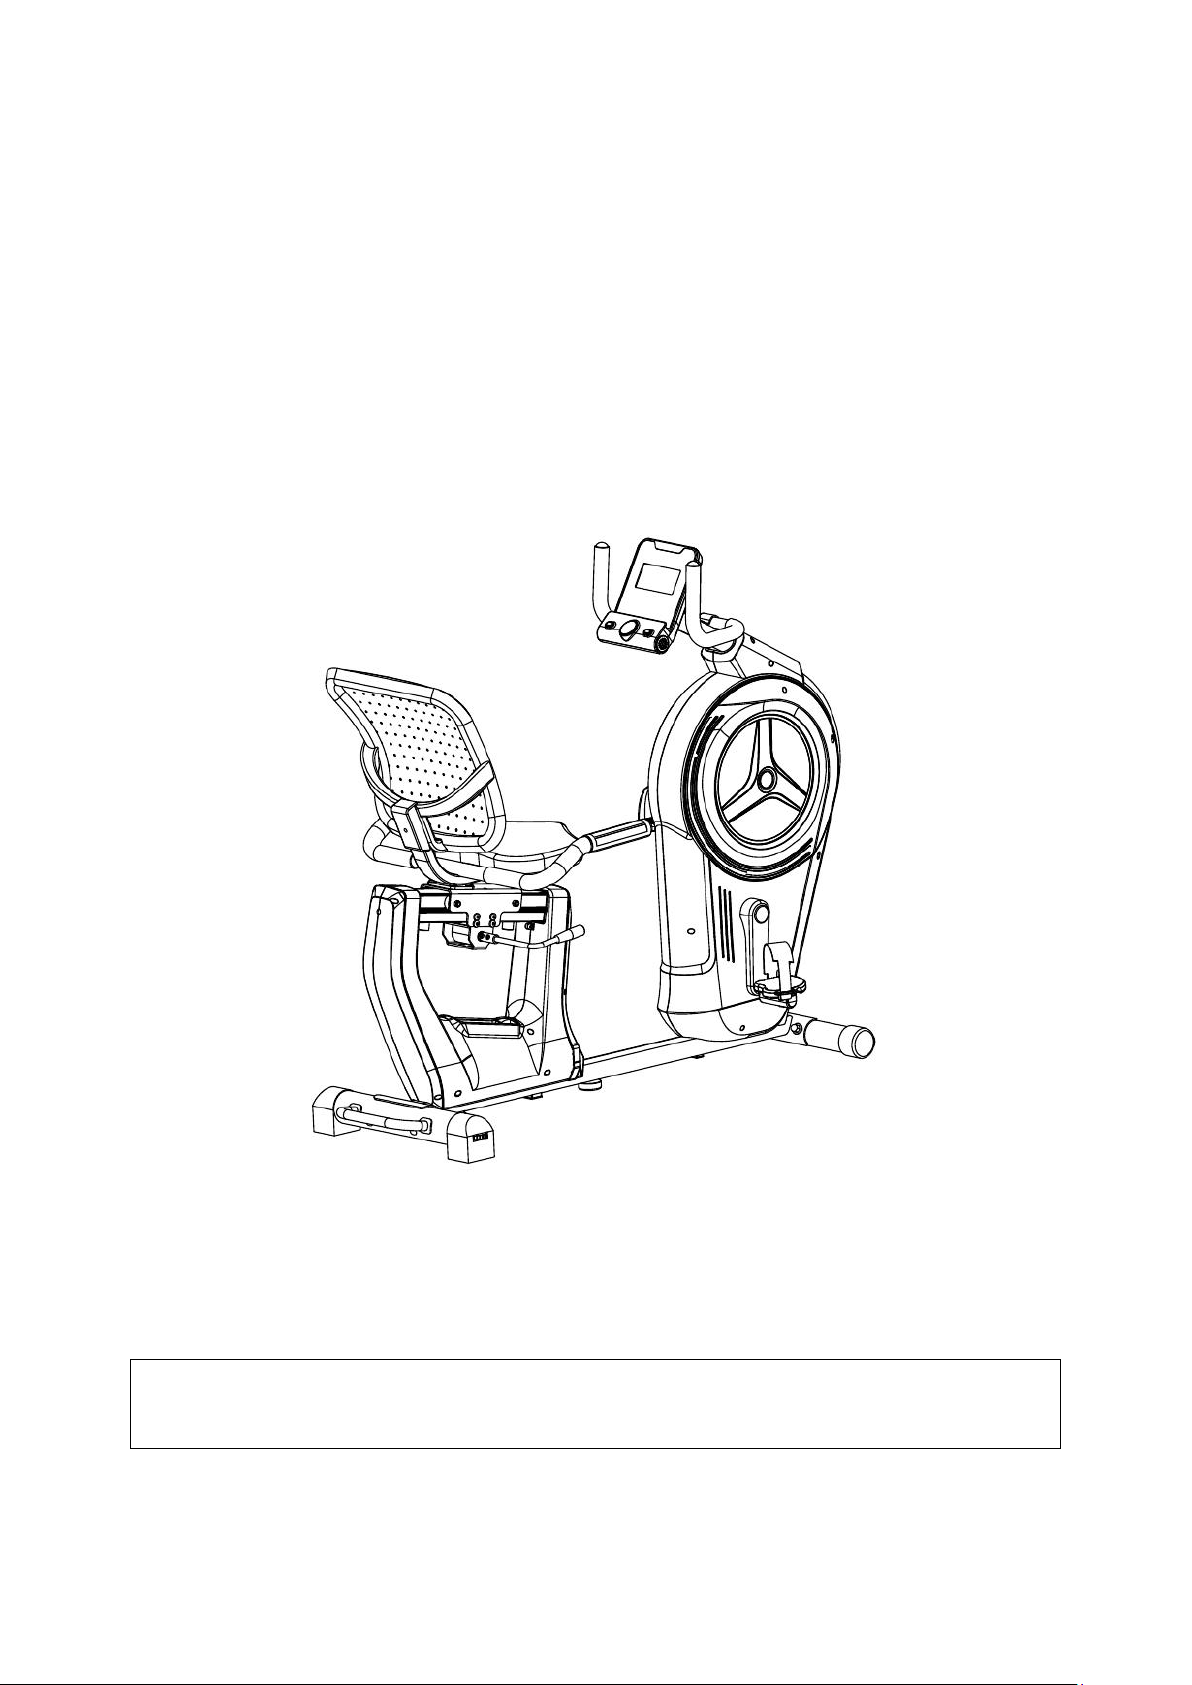
FitNord CYCLO 300R User manual
F
FI
IT
TN
NO
OR
RD
D
C
CY
YC
CL
LO
O
3
30
00
0R
R
R
RE
EC
CU
UM
MB
BE
EN
NT
T
B
BI
IK
KE
E
O
OW
WN
NE
ER
R’
’S
S
M
MA
AN
NU
UA
AL
L
Before You Start
IMPORTANT! Please read all instructions carefully before using this product. Retain this manual
for future reference. The specifications of this product may vary slightly from the illustrations
and are subject to change without notice.

1
IMPORTANT SAFETY NOTICE
Note the following precautions before assembling and operating the machine.
1. Once fully assembled, check that all hardware parts such as bolts, nuts and
washers are positioned and secured firmly.
2. Check regularly that the safety chain guard that protects the moving parts of the
machine is secured and in good condition.
3. Always check that the seat post, seat slider, pedals and handlebars are secured
firmly before getting on the bike.
4. Lubricate all parts annually.
5. Do not wear loose clothing to avoid getting caught in any moving parts.
6. Do not remove feet from the pedals while they are in motion.
7. Always wear shoes when using the machine.
8. Dry the bike after each use to remove sweat and moisture. Wipe the machine with a
damp cloth, water and mild soap. Do not use a petroleum-based solvent to clean the
machine in order not to damage the finish.
9. Keep children away from the bike while it is in use. Do not allow children to use the
bike. This bike is designed for adults only.
10. Do not dismount the bike until the pedals have completely stopped.
11. Stop exercise immediately in case of nausea, shortness of breath, faintness,
headache, pain, tightness in your chest or any discomfort.
12. Do not put your fingers or any other objects into the moving parts of the bike.
13. Prior to any exercise, consult with your physician to establish the exercise
frequency, time and intensity appropriate for your particular age and condition.
14. After exercising, pull down the tension controller to increase resistance so that the
pedals will not rotate freely and possibly hurt someone.
15. Maximum user’s weight is 120kg.
2
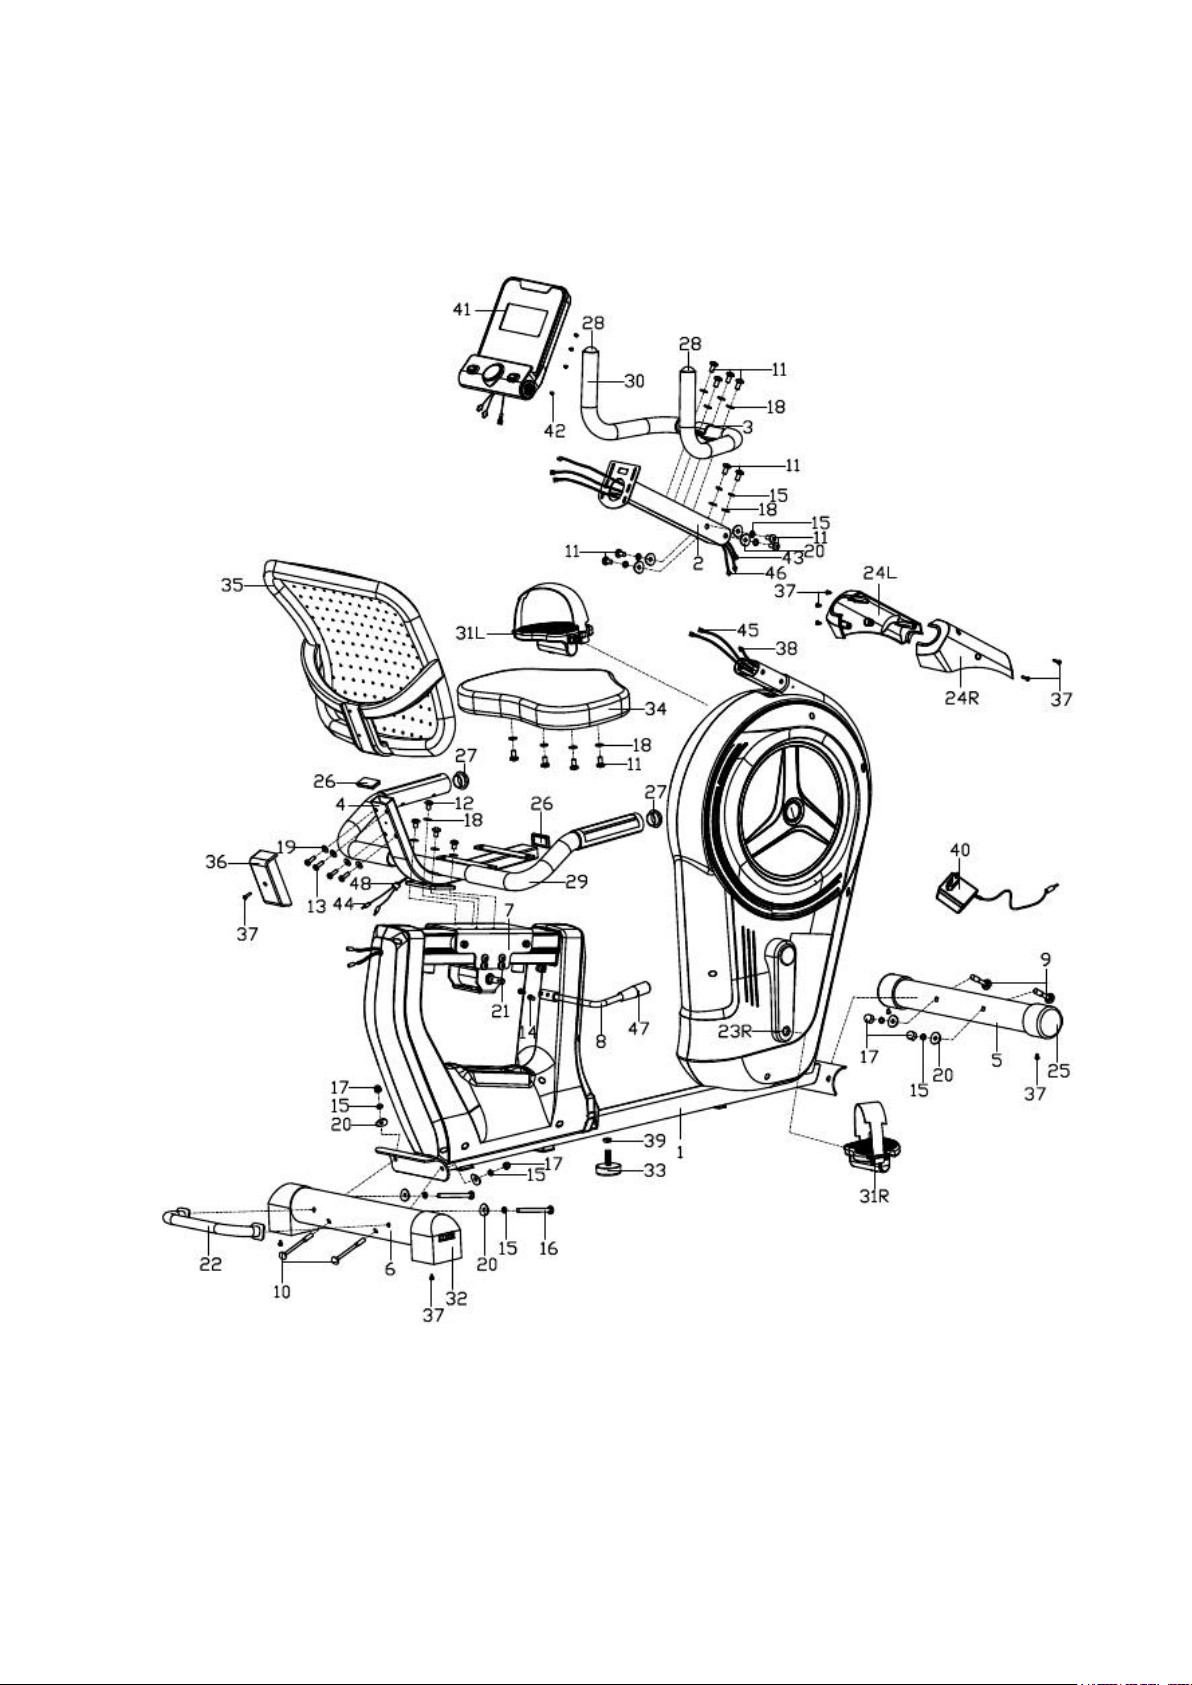
EXPLODED DIAGRAM

3
PARTS LIST
NO.
Description
QTY
NO.
Description
QTY
1
Mainframe
1
25
Front stabilizer end cap
2
2
Handlebar post
1
26
Square end cap
2
3
Small handle
1
27
Round cap 1
2
4
Saddle frame
1
28
Round cap 2
2
5
Front stabilizer
1
29
Handlebar foam grip 1
2
6
Rear stabilizer
1
30
Handlebar foam grip 2
2
7
Backrest frame seat
1
31L/R
Pedal
1/1
8
Adjustable handle
1
32
Rear stabilizer end cap
2
9
Square neck pan head bolt
M8X74 M8X74
2
33
Adjustable leveler
1
10
Square neck pan head bolt
M8X93
2
34
Saddle
1
11
Inner hex pan head bolt M8X16
14
35
Backrest
1
12
Hex pan head bolt M8X12
4
36
End cap
1
13
Inner hex pan head bolt M6X40
4
37
Cross pan head self-drilling screw
10
14
Inner hex cylinder head M6X10
2
38
Sensor wire
1
15
Spring washer D8
12
39
Nut M10
1
16
Inner hex pan head bolt M8XL93
2
40
Adaptor
1
17
Cap nut M8
4
41
Console
1
18
Flat washer D8X1.5
14
42
Cross pan head screw
4
19
Flat washer D6XD16X1.2
4
43
Sensor trunk wire
1
20
Curve washer D8XD25X1.5, R30
10
44
Pulse wire
2
21
Eccentric shaft
1
45
Pulse trunk wire 1
2
22
Handle for moving
1
46
Pulse trunk wire 2
2
23L/R
R
Crank
1/1
47
Handle grip
1
24L/R
Handlebar cover
1/1
48
End cap
1
NOTE:
Most of the listed assembly hardware has been packaged separately, but some items
have been preinstalled in the identified assembly parts. In these instances, simply
remove and reinstall the hardware when required.
Reference the individual assembly steps and make note of all preinstalled hardware.
Prior to assembly of this product, remove all components from the package and verify
all the listed parts are supplied. Once certain, begin with the first assembly step.

4
ASSEMBLY INSTRUCTIONS
Step 1
1. Attach the Front stabilizer (5) to the Mainframe (1) with Cap nuts (17),
Spring washers (15), Curve washers (20) and Square neck pan head bolts (9).
2. Attach the Rear stabilizer (6) to the Mainframe (1) with Cap nuts (17), Spring
washers (15), Curve washers (20) and Square neck pan head bolts (10).
5
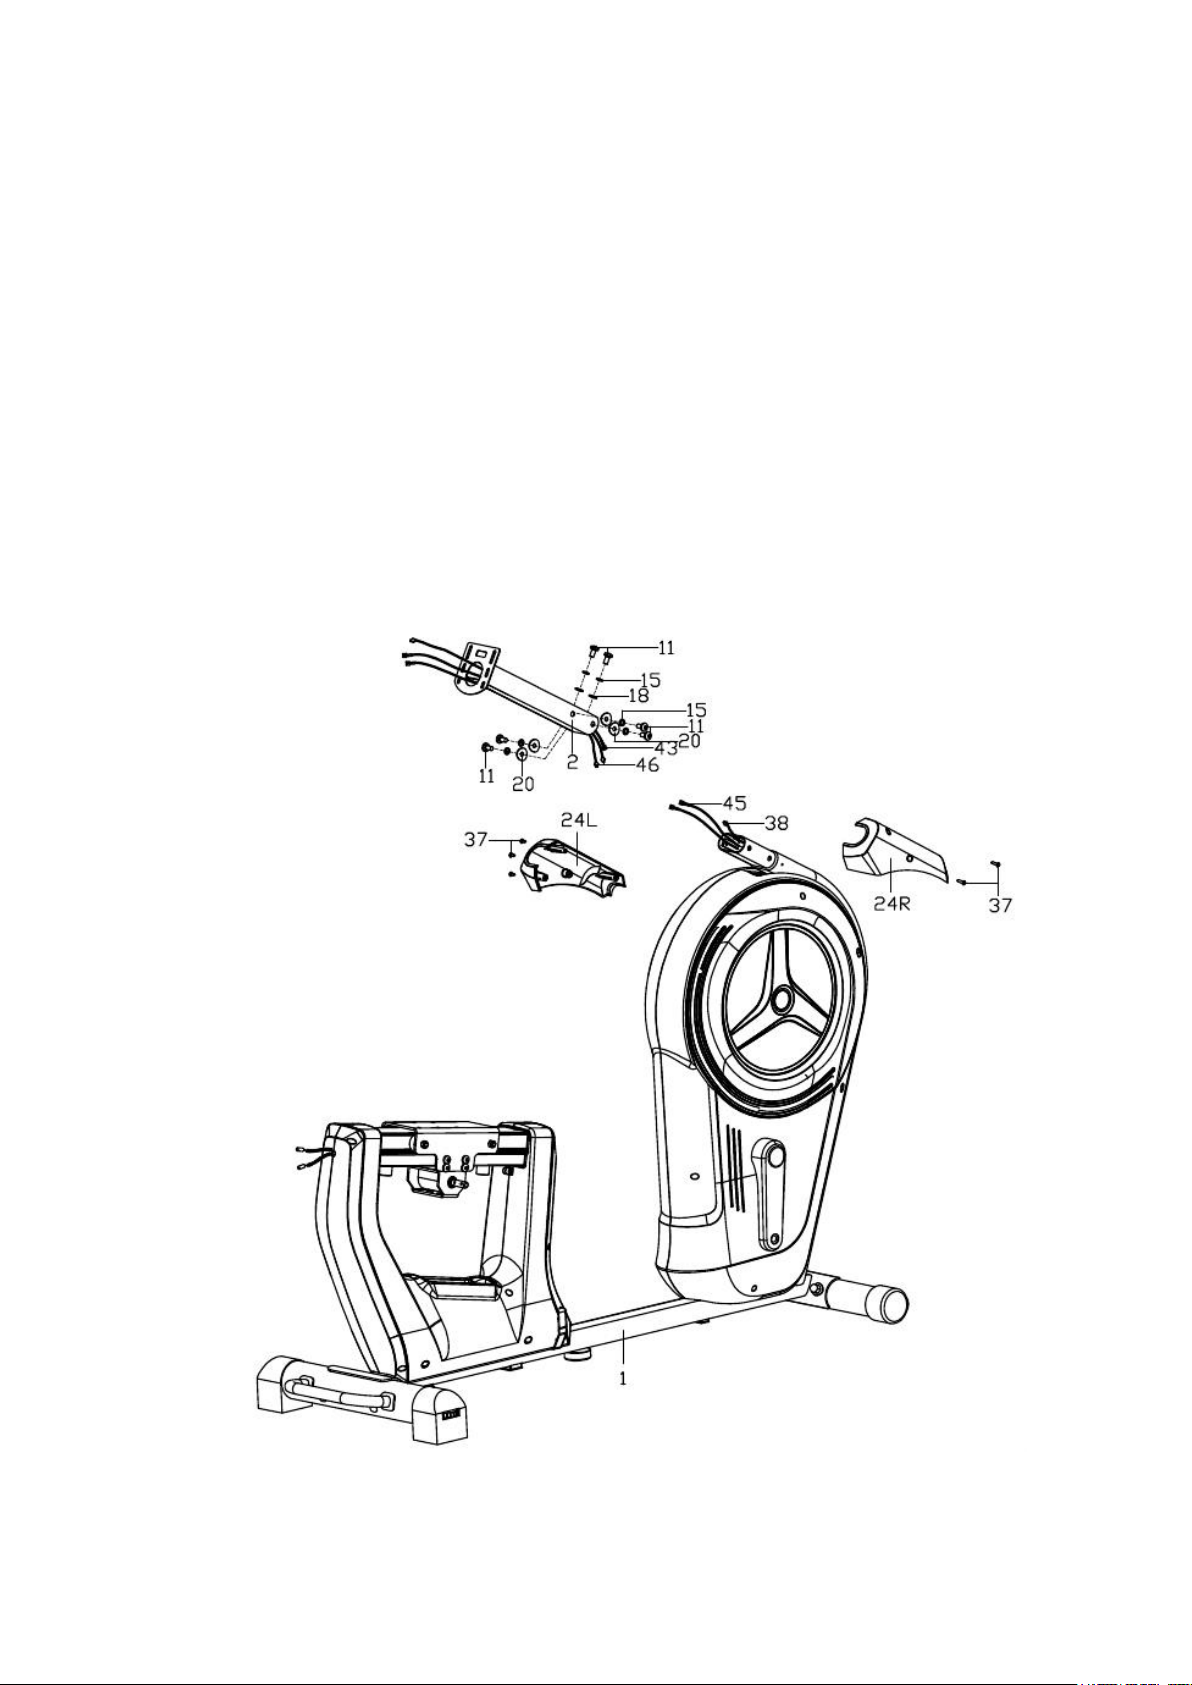
Step 2
1. Connect Sensor wire (38) and Pulse trunk wire 1 (45) with Sensor trunk wire
(43) and Pulse trunk wire 2 (46).
2. Attach the handlebar post (2) to the Mainframe (1) with Bolts (11), Spring
washers (15) and Curve washers (20) from the side holes of the handlebar
post.
3. Attach the Handlebar post (2) to the Mainframe (1) with Bolts (11), Spring
washers (15) and Flat washers (18) from the front holes of the Handlebar
post.
4. Attach the Handlebar cover (24L/R) to the Mainframe (1) with Cross pan
head self-drilling screws (37).
6
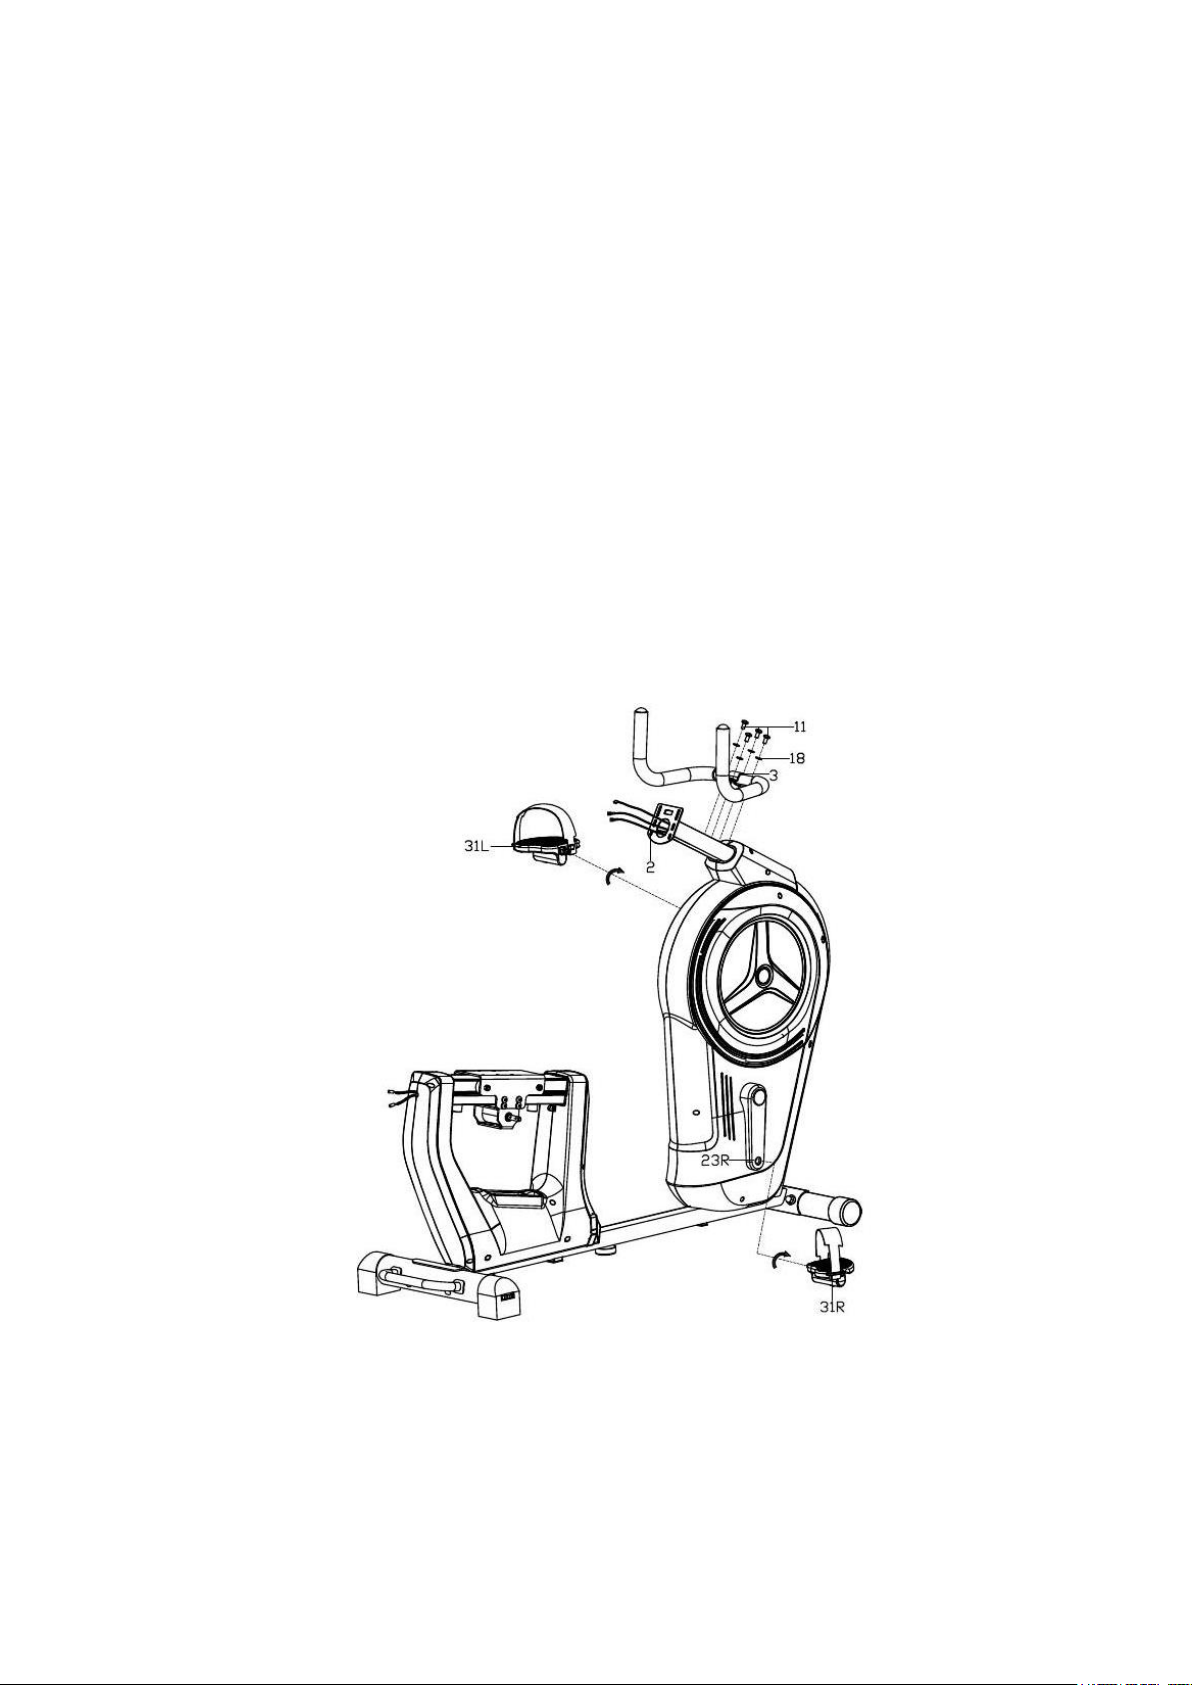
Step 3
1. Attach the Handles (3) to the Handlebar post (2) with Inner hex pan head
bolts (11) and Flat washers (18).
2. Attach the Pedals (31L/R) to the Cranks (23L/R).
Note:
Pedals are labeled L for left and R for right.
Tighten the Left pedal counterclockwise and the Right pedal clockwise.
Check that both pedals are attached tightly when exercising.
7
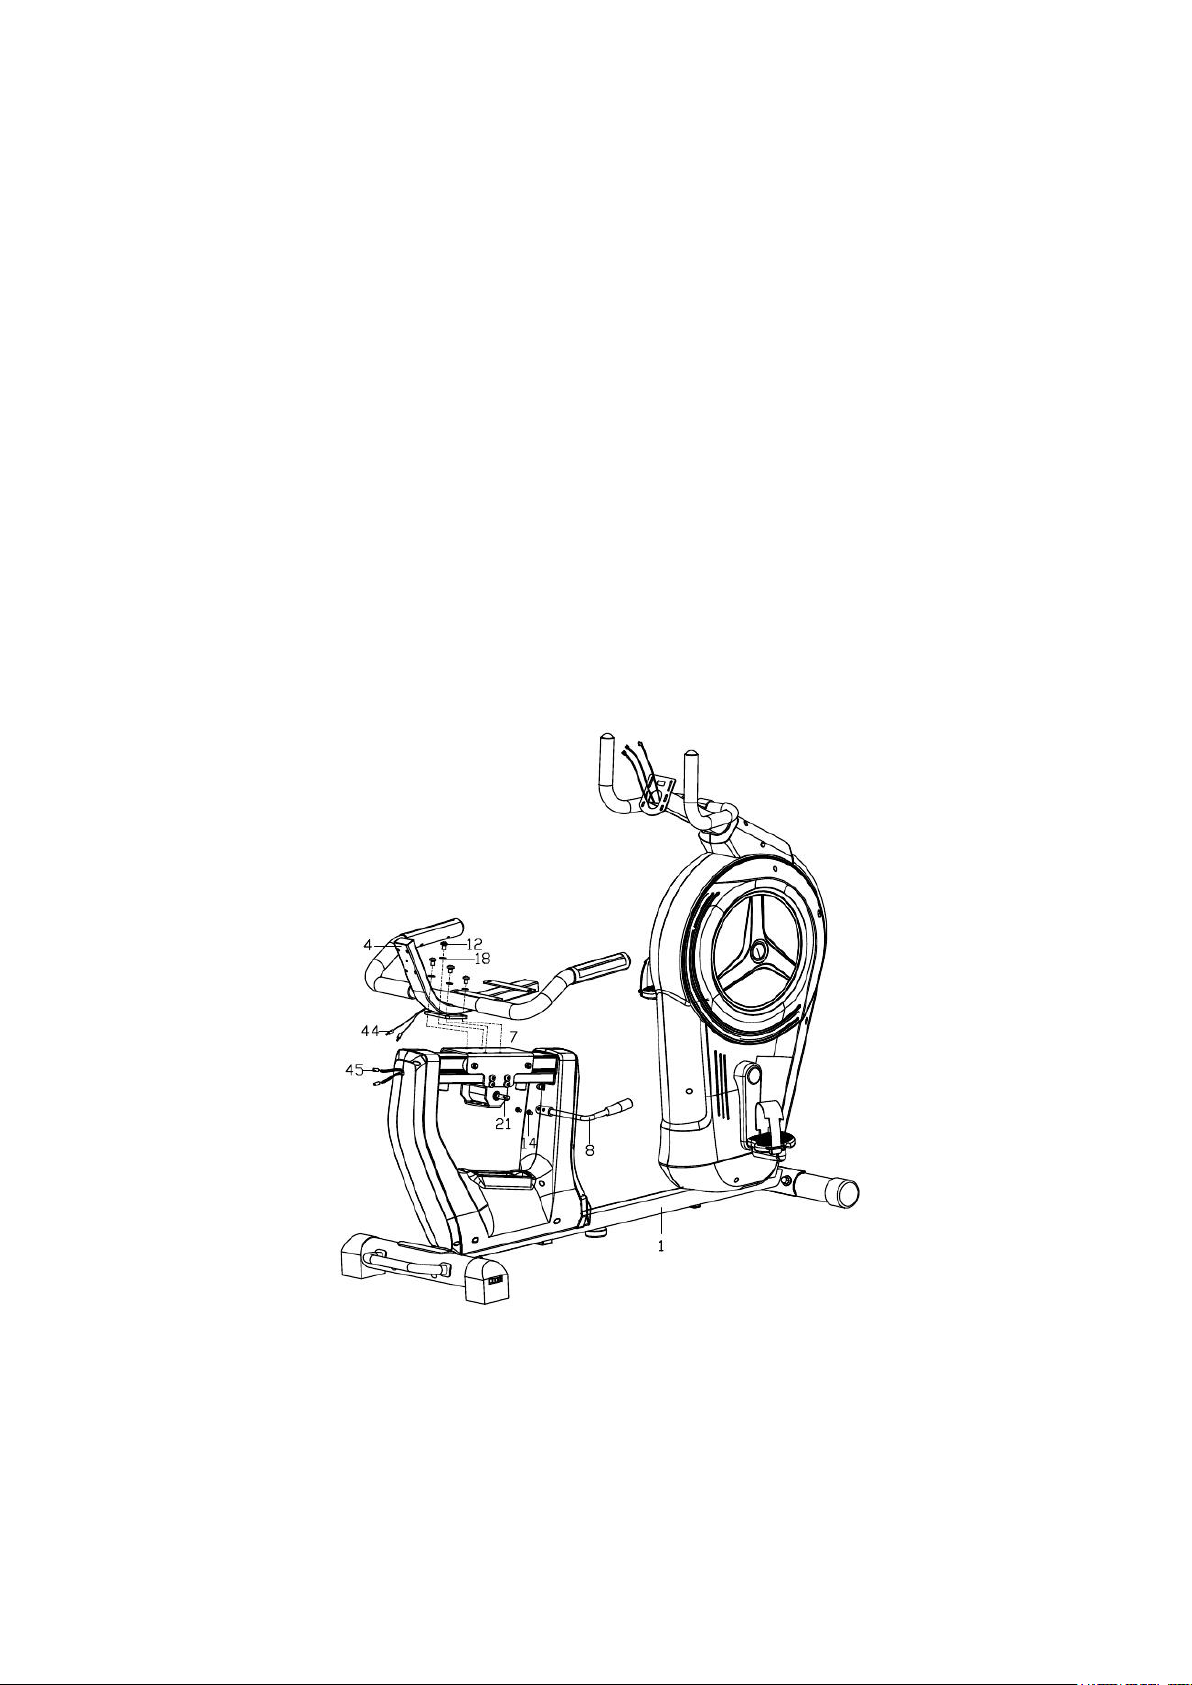
Step 4
1. Connect the Sensor wire (44) and Pulse trunk wire 1 (45).
2. Fasten the Saddle frame (4) to the Backrest frame seat (7) with Flat washers
(18) and Cross pan head bolts (12).
3. Attach the Adjustable handle (8) to the Eccentric shaft (21) with Inner hex
cylinder head bolts (14).
8
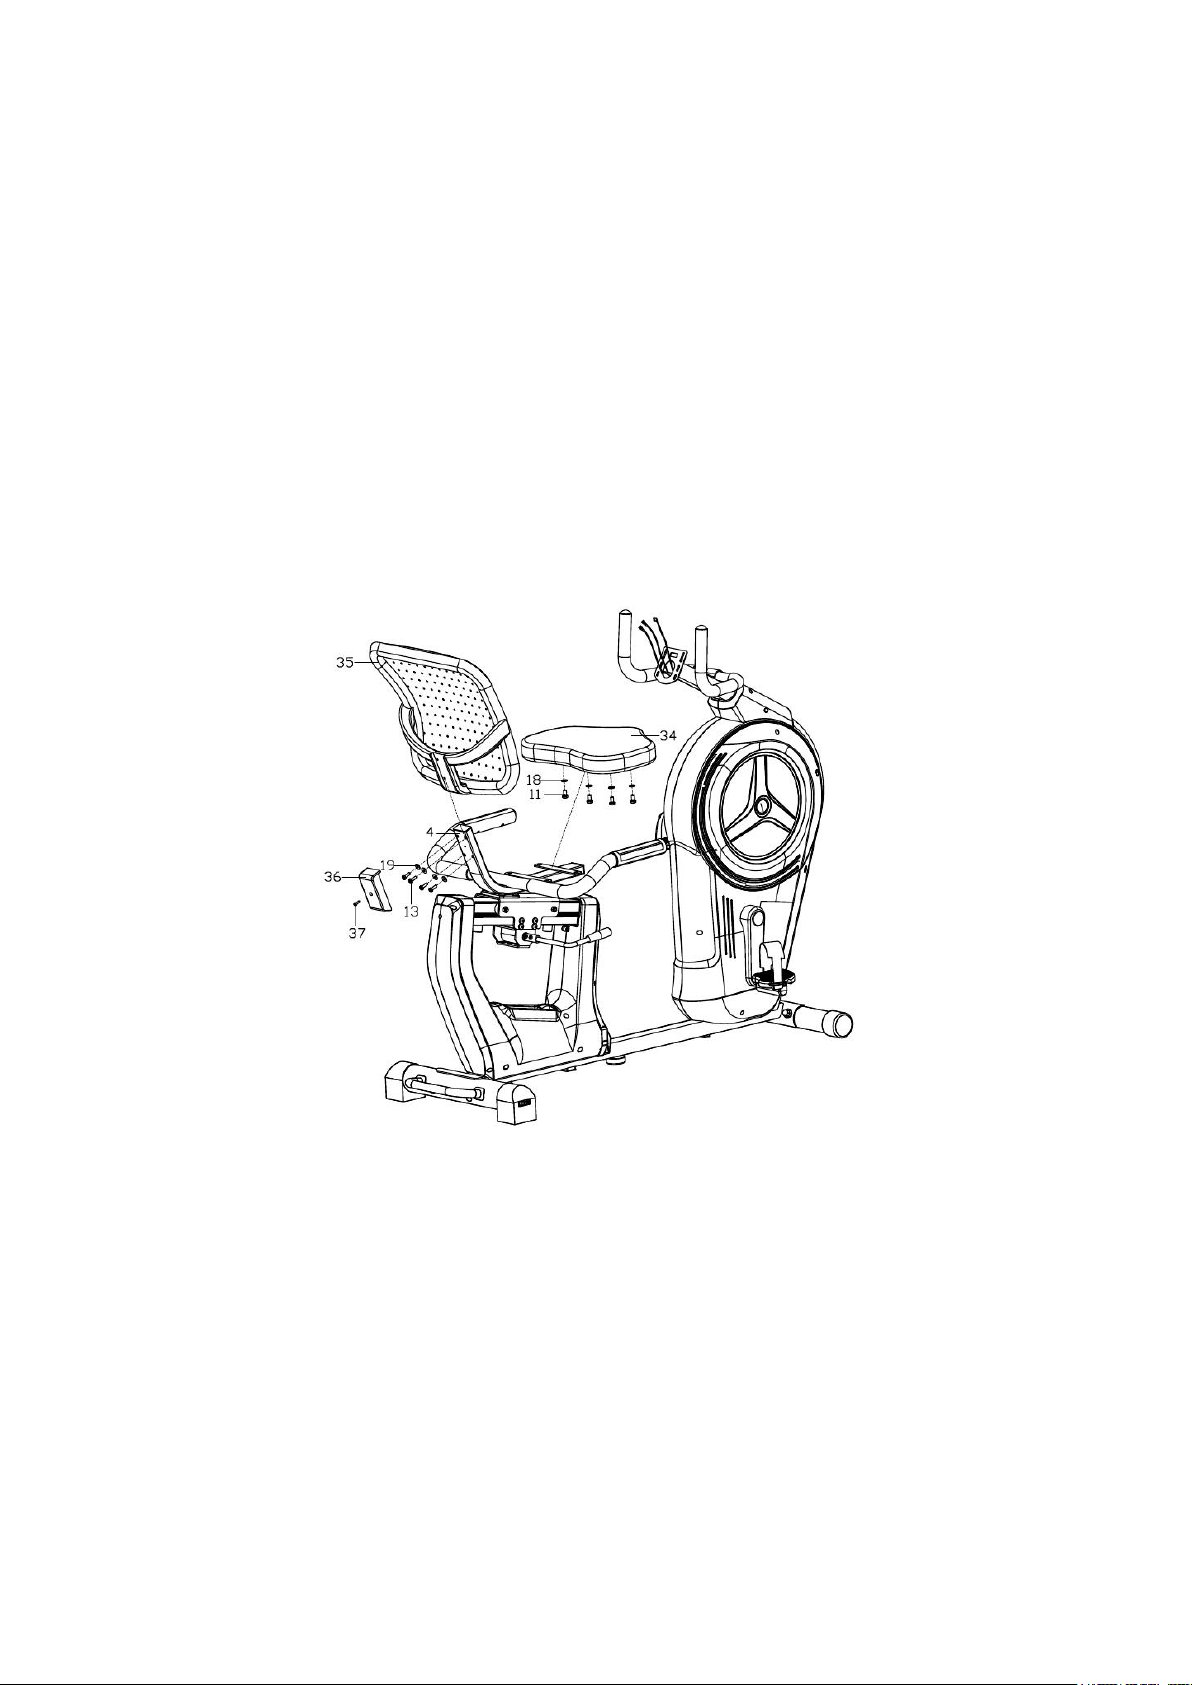
Step 5
1. Attach the Saddle (34) to the Saddle frame (4) with Flat washers (18) and
Inner hex pan head bolts (11).
2. Attach the Backrest (35) to the Saddle frame (4) with Inner hex pan head
bolts (13) and Flat washers (19).
3. Screw the End cover (36) to the Saddle frame (4) with Cross pan head screws
(37).

9
Step 6
1. Connect the Sensor trunk wire (43) and Pulse trunk wire 2 (46) with the
Console (41) wires.
2. Attach the Console (41) to the Handlebar post (2) with Cross pan head screws
(42).

10
CONSOLE MANUAL
Button functions
START/STOP (ST/SP):1. Begin/stop exercise.
2. Begin measuring body fat %
3. Reset all parameters by holding down for 3s. Only works when the bike has
stopped.
DOWN: Reduce the value of a parameter (time, distance, etc.). Reduce resistance during exercise.
UP:Increase the value of a parameter (time, distance, etc.). Increase resistance during exercise.
MODE (ENTER): 1. Input parameter or choose program.
2. Change between displays during exercise. Cycles through RPM, SPEED, ODO
(Overall distance), DIST, WATT and consumed calories.
TEST (PULSE, RECOVERY): Press to start recovery test right after exercising. Keep your hands on
the pulse pads. After 1 minute you can see your results on the screen. Results range from F1-F6.
F1 = great recovery, F6 = poor recovery.
RESET: Hold for 3s to reset current setting or parameter.
BODY FAT: Begin body fat test.
Choosing an Exercise Program
Browse through programs once the machine has been turned on using UP and DOWN. Begin program
with ENTER.
Set exercise parameters TIME / DISTANCE / CALORIES / AGE:
After choosing an exercise program you can set parameters to customise the program:
NOTE.: Some parameters cannot be set in specific programs.
Press ENTER when you have chosen a specific program. "TIME"-parameter will blink, and you can set
the exercise time using UP and DOWN. Press ENTER to save the value. The next parameter will blink.
Use UP and DOWN to modify all parameters. Begin exercise by pressing START/STOP.
Exercise Programs
1. Manual Program (P1)
Choose Manual using UP and DOWN and press ENTER. "TIME"-parameter will blink. Modify the
exercise time with UP/DOWN. Press ENTER to save the value and move on to the next parameter.
Repeat until all parameters have been set and begin exercise by pressing START/STOP.
NOTE.: During exercise the system will count set parameters. When a set parameter is achieved,
you will hear an alarm and the machine will stop automatically. Continue exercising and
move on to the next parameter that has not been achieved yet by pressing START.
2. Pre-set Exercise Programs (P2-P7)
There are 6 pre-set exercise programs.
Setting parameters to pre-set programs
Choose a pre-set program with UP/DOWN and press ENTER. "TIME"-parameter will blink, and you can
choose the exercise time using UP and DOWN. Press ENTER to save the value and move on to the
next parameter.
Repeat until all parameters have been set and begin exercise by pressing START/STOP.
NOTE.: During exercise the system will count set parameters. When a set parameter is achieved,
you will hear an alarm and the machine will stop automatically. Continue exercising and
move on to the next parameter that has not been achieved yet by pressing START.
3. Body fat Program (P8)
Inputting data
Choose BODY FAT Program with UP/DOWN and press ENTER. The screen will display "Male".
Choose sex with UP/DOWN and press ENTER to continue.
The screen will display "175" to indicate height in centimeters. Set your height with UP/DOWN and
press ENTER to continue.
The screen will display "75". Set your weight in kilograms using UP/DOWN and press ENTER to

11
continue.
The screen will diplay "30". Set your age using UP/DOWN and press ENTER to save.
Press START/STOP to begin measurement jand place your hands on the pulse pads.
In about 15 seconds you will see your score on the screen. The program measures the body fat %,
Basal metabolic rate (BMR), Body mass index (BMI) and body type.
NOTE.: Body types:
The system separates 9 different body types based on body fat %:
1. Type: 5–9% 4. Type 20–24% 7. 35-39%
2. Type 10-14% 5. Type 25-29% 8. 40-44%
3. Type 15-19% 6. Type 30-34% 9. 45-50%
BMR: How much energy is consumed for basic vital functions daily.
BMI: Measures body fat based on height and weight.
Press START/STOP to return to the start screen.
4. Target Heart Rate Program (P9)
Set parameters:
Choose TARGET H.R. with UP/DOWN and press ENTER. The screen will display "Time”. Modify the
exercise time using UP/DOWN. Press ENTER to save the value and move on to the next parameter.
Repeat until all parameters have been set and begin exercise by pressing START/STOP.
NOTE.: The system will keep your heart rate at the set value by changing the resistance when
your heart rate increases or decreases by more than 5 from the set value. The system will check
your heart rate every 10 seconds.
When a set parameter is achieved, you will hear an alarm and the machine will stop
automatically. Continue exercising and move on to the next parameter that has not been
achieved yet by pressing START.
5. Heart Rate Control Programs (P10-P12)
Choose between 3 heart rate control programs:
P15- 60% target heart rate = 60% of (220-AGE)
P16- 75% target heart rate = 75% of (220- AGE)
P17- 85% target heart rate = 85% of (220- AGE)
Set parameters:
Choose one of three Heart Rate Control Programs with UP/DOWN and press ENTER The screen will
display "Time”. Modify the exercise time using UP/DOWN. Press ENTER to save the value and move
on to the next parameter. Repeat until all parameters have been set and begin exercise by pressing
START/STOP..
NOTE.: The system will keep your heart rate at the set value by changing the resistance when
your heart rate increases or decreases by more than 5 from the set value. The system will check
your heart rate every 10 seconds.
When a set parameter is achieved, you will hear an alarm and the machine will stop
automatically. Continue exercising and move on to the next parameter that has not been
achieved yet by pressing START.
6. Custom Program (P13)
User can create and save their own program and access it quickly when they turn on the machine.
Setting parameters:
Choose Custom Program with UP/DOWN and press ENTER The screen will display "Time”. Modify
the exercise time using UP/DOWN. Press ENTER to save the value and move on to the next
parameter.
Repeat until all parameters have been set.
After setting the parameters, the screen will display Level 1. Use UP/DOWN to choose the preferred
level and press ENTER. Set all parameters and press START/STOP to begin exercise.
NOTE.: When a set parameter is achieved, you will hear an alarm and the machine will stop
automatically. Continue exercising and move on to the next parameter that has not been
achieved yet by pressing START.
Table of contents
Other FitNord Exercise Bike manuals


Popular Exercise Bike manuals by other brands


HEALTH RIDER
HEALTH RIDER Health Rider R1000t Bike Gebruiksaanwijzing

DarwinFitness
DarwinFitness RB40 Assembly and operating instructions

Pro-Form
Pro-Form 920 S EKG 831.280170 user manual

D.C. Athletics
D.C. Athletics Sven Nys manual

Pro-Form
Pro-Form Le Tour de France CBC PFEX39421-INT.1 user manual

BODYMAX
BODYMAX FXB10 Assembly and operating instructions


