FK Irons Click Ergo User manual

USER MANUAL
Cartridge Grip
2018

USER MANUAL
GRIP OVERVIEW
GRIP FEATURES
• Fully Autoclavable
• Patent Pending Tool-less disassembly system allows the grip to
be broken down into 4 pieces for complete sterilization with ease.
• 3mm internal bore for compatibility with all drive bar tip styles.
• Compatible with ALL major cartridge systems allowing you the
freedom to tattoo with the needles you prefer.
• Patent Pending One- Piece Ratchet Disc mechanism provides
superior adjustment feedback and prevents unwanted turning
even when used with heavier steel machines.
• Ribbed Anti-Slip Back Stem ensures secure locking
and prevents spinning in all machine vises.
• Lifetime Warranty
• Made in the USA
Your new RPG Click is composed of 4 main pieces pictured below:
1. Grip Adjuster
2. Cartridge Receiver
3. Ratchet Disc
4. Combined Grip Guide & BackStem
The Grip Adjuster (1) houses the Cartridge Receiver (2)
and allows the turn depth adjustment while the Grip Guide (3)
ensures that the cartridge remains upright and houses the
Ratchet Disc (4) which provides adjustment feedback and
prevents unwanted turning and accidental adjustment of the grip.
DISASSEMBLY
The grip must be disassembled completely prior to sterilization.
In order to disassemble the grip, with the Back Stem secured in a machine vise,
simply unscrew the Grip Adjuster from the Grip Guide to separate.
Remove the Cartridge Receiver from the Grip Adjuster by turning the Grip
Adjuster upside down. If the Cartridge Receiver does not immediately
drop from the Grip Adjuster gently shake the Grip Adjuster to dislodge the
Cartridge Receiver from the locking groove, to not force its removal as a
sequence of counter grooves hold it in place.
Next, you will simply push up on both open ends of the Ratchet Disc to
separate it from the Grip Guide and can remove the Grip Guide from the
machine vise. 1
2
3
4

You MUST remove the Ratchet Disc and Cartridge Receiver from the aluminum pieces prior to autoclaving.
All pieces of the grip must be autoclaved independently. DO NOT Autoclave the grip parts un-bagged.
The lifetime warranty will not cover grips that have been sterilized improperly.
ASSEMBLY
Once the pieces have been autoclaved and cooled you may reassemble the grip.
IMPORTANT: The grip may only be assembled one way, it is pertinent to follow the steps exactly in the order
outlined as attempting to assemble the grip out of order can cause misalignment of the grip and damage to the
components. DO NOT alternate the assembly steps.
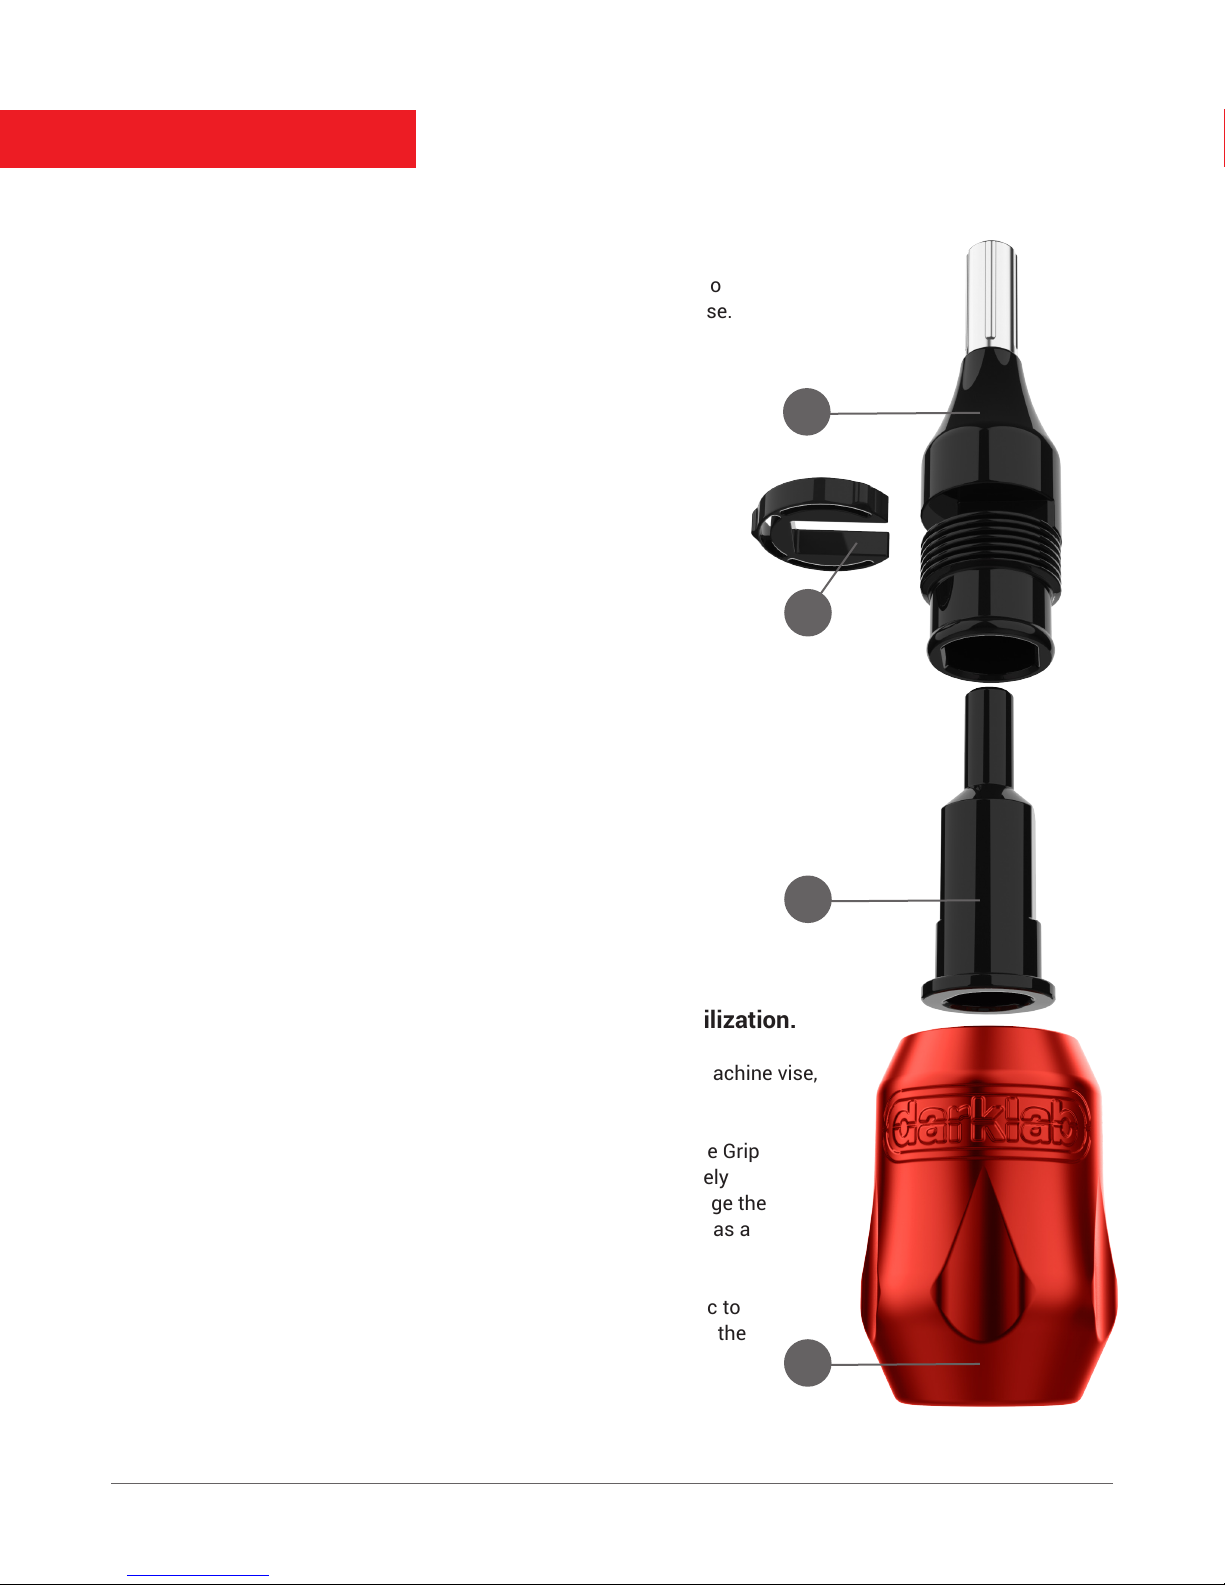
1. Insert the Cartridge Receiver into the aluminum Grip Adjuster.
In order to lock into place, the shoulder will interlock with off centered grooves inside of the Adjuster,
so do not attempt to force the Cartridge receiver straight into the adjuster.
Holding the grip adjuster vertically (with the Darklab logo upright,) gently shake the Grip Adjuster with the
Cartridge Receiver inserted and the Cartridge Receiver will nd it’s way into place. Once fully inserted the
bottom of the Cartridge Receiver should be flush with the bottom of the Grip Adjuster.
2. Gently insert the Ratchet Disc into the designated cutout in the Grip Guide; you may hear and feel a slight “click”
when the disc is locked into place. It is important to ensure that the Disc is fully inserted into the locking position.
3. With the grip adjuster remaining vertical, gently insert the Grip Guide over the Cartridge Receiver into the Grips
Adjuster until the Ratchet Disc is 1/4-1/2 way covered by the Grip Adjuster. Notice that the Cartridge Receiver is
not a perfect circle and has an oval shape, you may assist its positioning by softly rotating each part.
4. Gently turn the Grip Guide clockwise into the Grip Adjuster in order to engage threading. The Cartridge
Receiver will self-align with the Grip Guide as you gently insert with a twisting motion.
If you experience resistance do not force the grip or you may cause cross threading; gently back off the Grip
Guide to ensure that the ratchet is properly inserted and then try again to ensure you are properly engaging
internal threading.
5. Once the Grip Guide has been mostly inserted into the Grip Adjuster you may insert the assembled grip
over your machine’s drive bar to continue tightening the grip. In order to avoid jamming the threads do not
attempt to tighten the grip past its natural stopping point. When inserting the grip into your machine vise
ensure that the extended alignment indicator line (PICTURED) of the grip guide is aligned parallel to the
machine vise so that the cartridge will insert upright into the grip. For most machines of standard geometry,
you will insert the backstem fully into the machine vise until it tops off at the start of the Grip Guide, however,
for some machines with differing machine frame geometry and/or drive bar lengths it may be necessary to
adjust the Back Stem accordingly.

USER MANUAL
ADITIONAL INFORMATION
TIPS AND TRICKS
• To utilize the needle depth adjustment feature of the grip, you will turn the grip clockwise in order to shorten
the needle depth and counterclockwise in order to lengthen it.
• It is safe to extend the grip (shorten the needle depth) to the end of the alignment indicator line.
Do not attempt to extend the grip past this point while tattooing as this will disassemble the grip.
• It is recommended to lubricate the outer surface of the Cartridge Receiver with ointment after sterilization
• To protect the internal parts avoid dropping the grip
• You may autoclave the Cartridge Receiver and the Ratchet disc together in the same autoclavable pouch,
however, they must be separated from the metal portions of the grip.
• The Grip Guide and Back Stem are pressure sealed, do not attempt to disassemble.
• In order to maintain the grip and reduce friction it is recommended to introduce a small amount of oil or
ointment to the threading of the grip guide. There should not be visible lubricant deposits.
• DO NOT ULTRASONIC WASH
• Do not attempt to assemble the grip while attached to a machine that has a built-in drive bar. The grip
should only be introduced onto a machine after all pieces have been joined.
phone at 1-855-FKIRONS. For additional tips and tutorials, please visit Youtube.com/fkirons
Table of contents
Other FK Irons Personal Care Product manuals