FlashPoint XPLOR 600 Pro R2 User manual
FPLFX600PB
Bowens Mount
The world is yours to XPLOR
XPLOR 600 PRO

The compact 600ws marvel invites you to go beyond the straights of wire
dependency and soar into the free and easy heights only R2 Radio tenders. True,
accurate manual exposures, lithium powered mobile imaging that spurs your
creative imagination to conquer distant vistas, solve the challenging lighting
situation in any environment, adapt to multiple camera systems right out of the
box. The unmatched R2 Radio System links Canon, Nikon, Sony, Fujilm and
Olympus/Panasonic seamlessly for the ultimate to remote solutions. The sun is no
match to this exceptional performer with superior HSS up to 1/8000s. And the
broad spectrum of Bowens mount light modiers available, contours every
possible lighting occurrence from studio to peak.
The battery recharge is a snap, too, using the external power charger to keep the
action going without tying up the ash to re-energize. Add the pro LED modeling
light feature and the picture is complete.
The XPLOR 600Pro is the next iteration of the Flashpoint R2 radio system,
compatible with the R2 Canon, Nikon, Sony, Fujilm and Olympus/Panasonic
camera systems, for remote power control and shooting. With a focus on portable
lighting, the R2 Family liberates you from the hassle and tangle of wired 600ws
monolights - whether you are a wedding or event photographer, environmental
portraiture shooter, freelance commercial studio illustrator, eager photojournalist,
a wandering backpack adventurer, or fast action sports snapper.
Take a deep breath. Your reach is now beyond your dreams.
XPLOR 600Pro TTL is reality.
•Studio Quality Light: Delivers 600ws, with a GN of 285ft/87m ISO 100, standard
reflector.
•Wireless Radio: Built-in Flashpoint R2 wireless 2.4Ghz system, compatible with
Canon, Nikon, Sony, Fujifilm, Olympus and Panasonic camera systems.
•Blazing fast Recycle time: 0.9s at Full Power rivals AC strobes.
•Precise power output: power adjusts 9 stops from full power 1/256 to 1/1 in 25
steps.
•Stable Color Temperature mode: color temperature guaranteed within ±75°K
over the entire power range.
•LED Modeling Lamp: Brilliant 38W LED module with Proportional and Variable
settings.
•HSS supremacy: Up to 1/8000s high-speed sync flash triggering overcomes sunlit
challenges.
•Advanced functions: Mask Sequencing, Multi Flash, Slave Delay.
•Dot-matrix LCD panel: Clear and convenient operation.
•Modifier Accessories: Bowens mount ease for softbox, beauty dish, snoots, color
gels, reflectors...
01
We Celebrate Your Flashpoint XPLOR 600Pro R2 Wireless Radio
Monolight selection!

Safety Instructions
•Always keep this product dry. Do not use in rain or in damp conditions.
•This product contains high-voltage electronic parts. Touching the high-voltage
circuit inside it may result in electric shock. Do not disassemble. Should repairs
become necessary, this product must be sent to an authorized maintenance
center.
•Stop using this product if it breaks open due to impact or force. Electric shock
may occur if you touch the internal parts.
•Do not use the ash unit in the presence of ammable gases, chemicals and
ignitable materials. In certain circumstances, these materials may be sensitive
to the strong light or electromagnetic interference emitted from this ash unit.
•Do not leave or store the ash unit if the ambient temperature reaches over
120°F/50°C (e.g. in a sun bathed automobile). Electronic parts may be
permanently damaged.
•Do not use any power supply to charge the battery, other than the one
included.
•Do not insert metal parts into any lighting equipment.
•Do not touch the electrical contacts on the strobe or battery or contact them
with any conductive materials.
•Do not re the ash directly into the eyes, especially those of babies, within
short distances. Visual impairment may occur. When taking pictures of babies,
keep the ash unit at least 3.3 feet (1 meter) away from them. Using bounce
ash to reduce light intensity is also recommended.
•This strobe has an over-heat protection circuit, rapid continuous ring will
cause the strobe to slow operation and trigger a “cool down” period. After this
period, the strobe will resume normal operation. You may also reset the strobe
by cycling the power o and then on again.
•The strobe has a locking mechanism to ensure secure operation. To avoid
damage, slide the release before removing any reectors or accessories.
•In case of abnormal function, sparks, excessive heat, ames or smoke,
immediately power o the unit and disconnect the battery, if safely possible.
Have it checked by an authorized technician.
02

03
Conventions Used in This Manual
•This manual is based on the assumption that both the camera and camera
ash’s power switches are powered on.
•The following alert symbols are used in this manual:
The Caution symbol indicates a warning to prevent shooting problem.
The Note symbol gives supplemental information.

04
Table of Contents
01 Foreword
02 Safety Instructions
05 Name of Parts
05 Body
07 LCD Panel
08 Included Accessories
08 Separately Sold Accessories
09 Preparing the XPLOR 600Pro
Installing Reflector (and Other Modifiers)
Installing the Flash Tube
Tilt Lock Handle
10 Battery Pack and Charging
11 Battery Level Indication
12 Wireless Flash: R2 Radio 2.4Ghz Transmission
14 Wireless Multiple Flash Shooting
15 Flash Mode M: Manual Flash
15 Flash Output Range
15 Flash Duration
16 Optical Slave Triggering
17 Flash Mode Multi -- Stroboscopic Flash
18 High-Speed Sync
Stable Color Temperature Option
19 Modeling Lamp
19 Other Applications
R1 Wireless Control Function
Sync Cord Triggering
20 Masking Feature - Unit/Alt C.Fn
Umbrella Mounting
21 Setting Custom Functions/C.Fn
22 Protection Function
Over-Temperature Protection
Error Messages
23 Technical Data
24 Troubleshooting
24 Firmware Upgrade
24 Maintenance
25 Flashpoint Warranty and Customer Care

05
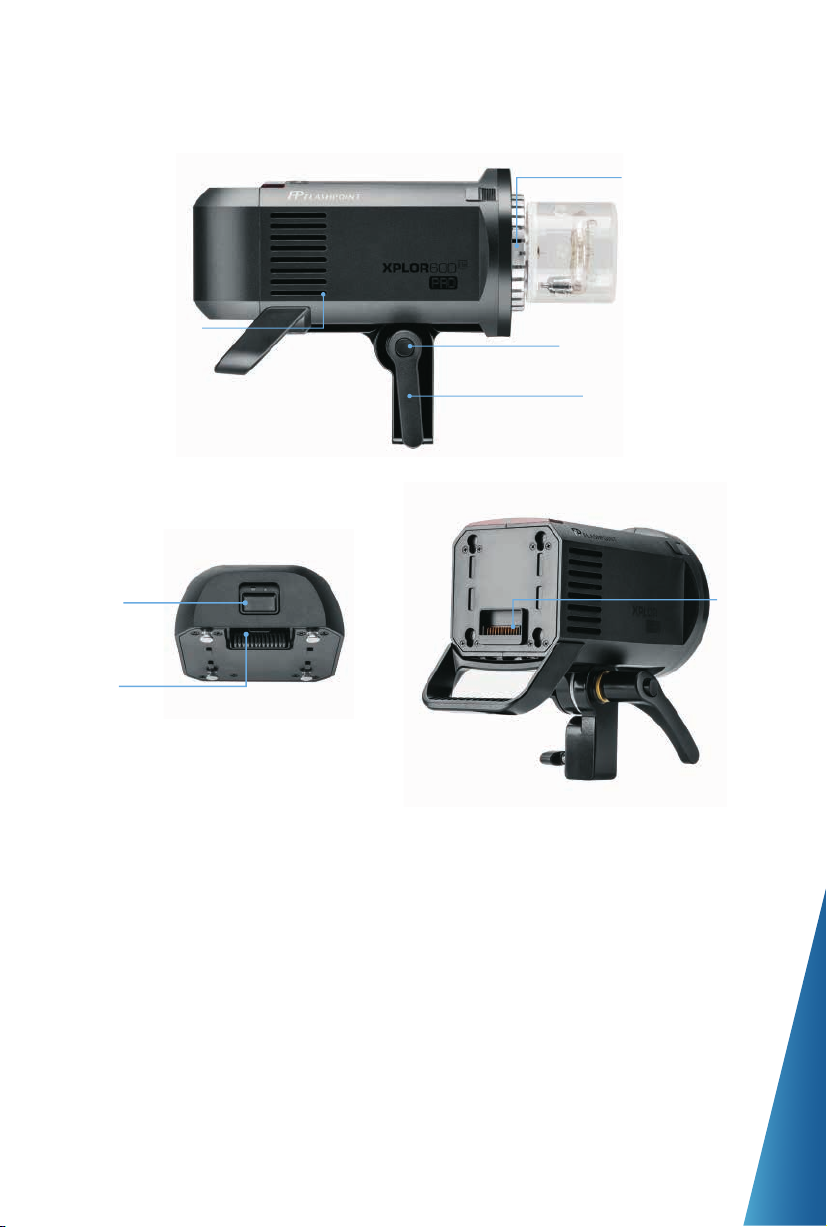
Name of Parts
Body
<MODE> Mode Selection Button
Umbrella Mounting Hole
Mounting Bracket
<SET> Set Button
Select Dial
Bracket Locking Knob
<MENU> Menu Button
< > Wireless
<GR/CH> Group/Channel Button
< H> High Speed
< > Test Button/
Flash Ready Indicator
Audio Beep
< > Modeling Lamp Button
< NO/OFF > Power Switch
Modeling
Lamp (LED)
Tube Socket
Accessory Mount
Light Sensor
Battery Power
Jack
Battery Indicator
Button
Accessory
Locking Ring Mini USB Port
3.5mm Sync Cord Jack
Wireless Control Port
06
Name of Parts
Body
Fan Outlet
Fan Inlet
Tilt Handle Release
Tilt Lock Handle
Ridge
Lithium Battery
Groove
Battery
Locking
Latch

07
Name of Parts
LCD Panel
(1) M Manual Flash
t.11/10100
M
A
10%
1/256
M: Manual ash
Manual ash output
Flash duration
(2) Multi Flash
Multi
AOFF
1/256
5 - 5 Hz
Multi: Stroboscopic ash
Number of ashes
Flash frequency
(3) R2 Radio Transmission Shooting
CH 1 Multi
AOFF
1/256
5 - 5 Hz
: R2 Radio transmission
wireless shooting
Firing group
Channel
M
A1/256
S2
OFF
S1/S2
(4) Optical transmission wireless shooting

08
Included Items
•Flashpoint XPLOR 600Pro Monolight
•Flash tube
•Lithium battery pack
•Battery charger
•Power cord
•Reector
•Carrying bag
•Instruction manual
Separately Sold Accessories
The product can be used in combination with the following accessories sold
separately, so as to achieve best photography eects: R2 Pro & R2 Wireless Flash
Trigger, Softbox, Beauty Dish, Fold up Umbrella, Shoots, Light Stand, etc.

09
Installing a Reflector (or other Accessories or Modifiers)
Installing the Flash Tube
Preparing the XPLOR 600Pro
•
Note: To avoid damage, please detach the ash tube during the transportation.
1. Press down the
Reflector/Modifier Lock
Release lever.
3. Turn clockwise to lock it
into place.
2. Insert the reflector or any
Bowens mount light
modifier into the 3 tabs of
the Reflector/Modifier
Lock Release.
1. Remove the reflector or
other modifiers from
the flash head.
2. Align the 4 Flashtube pins to match the protruding
rings in the Tube Socket [4] surrounding the LED
Modeling Lamp [3] on the XPLOR body. Push the flash
tube in firmly until it is securely seated into the socket.
The flashtube can be handled without protective
gloves as the outer glass shields the actual flashtube.
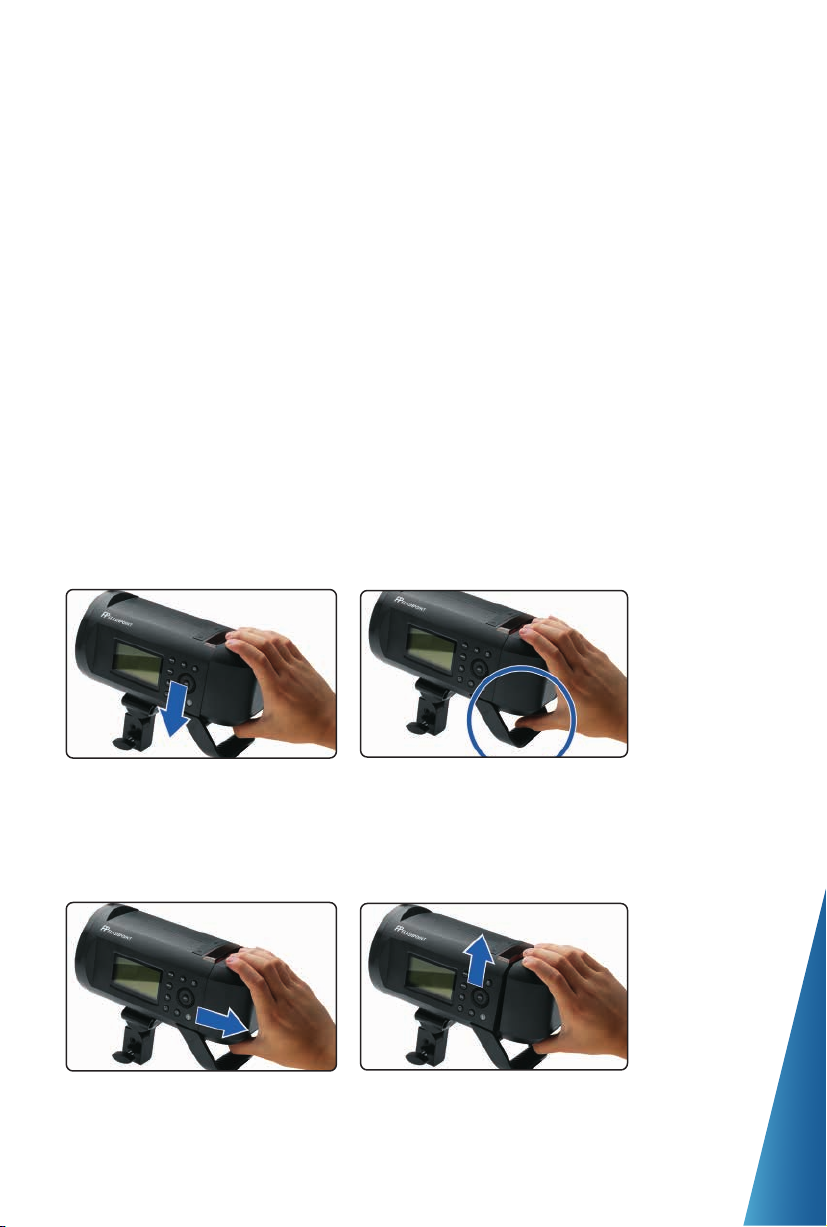
Tilt Lock Handle
1. The Tilt Lock Handle locks
the angle of the flash tilt by
rotating the lever clockwise
and unlocks by rotating
counterclockwise, to allow
for positioning of the light.
2. The handle resting angle can be set to any degree by
pulling the handle away from the body, and freely
rotating it to your desired position. The handle
springs back to act as a locking lever when released.
10
10
Features
Battery Pack Module
The Flashpoint XPLOR 600Pro TTL uses an advanced 28.8v/2600mah Li-ion polymer
battery with exceptional performance. The available charge-and-discharge cycles
exceed 300 times.
The battery pack is designed to be reliable and safe with circuitry to prevent
overcharge, deep discharge, excess current, and short circuit.t takes only 2 hours to
fully charge the battery by using the standard battery charger.
Battery Precautions
Mounting and Releasing the Battery Pack
1. Do not short circuit.
2. Do not expose to rain or immerse into water. This battery is not water proof.
3. Keep out of reach of children.
4. Avoid 24 hours of continuous charging.
5. Store in a dry, cool, ventilated place.
6. Do not dispose into fire or incineration.
7. Dead batteries should be disposed according to local regulations.
8. Never leave a depleted battery in storage. It’s best to recharge batteries every 3
months.
1. To mount the battery pack,
match the battery’s 4 Alignment
Posts with the main battery
compartment’s sockets on the
rear of the XPLOR 600Pro.
2. Slide the battery pack down until
it is securely locked in place.
1. To release the battery, first turn
off the power.
2. Then, slide the Battery Release to the
right while lifting the battery pack
upward, out of the connection.

Note: Please recharge the battery as soon as possible, within 10 days, to avoid
deep discharge that weakens the cell’s refresh abilities and life cycle.
11
Battery Level Indication
The status of the battery pack can be confirmed at any time, by pressing the
Battery Status Button found on the top right of the module. When in use,
attached to the XPLOR 600Pro, the battery level is displayed on the upper right
corner of the LCD panel.
Charging the Battery Pack
Simply plug the post end of the worldwide charger in the socket on the top left
of the lithium battery module, under the protective cover flap.
A complete full charge takes just 2 hours. Uncouple the charger in less than 24
hours to preserve the battery operation at peak performance.
Power Management
Long press the <ON/OFF> Power Switch for a few seconds to turn on the flash
unit. The LCD Display illuminates and shows the memorized previous settings for
Power, Radio Remote, Channel and Group designation. The flash is ready to use.
The XPLOR has an energy saving auto power off function. The flash will
automatically power off the monolight in 30 to 120 minutes depending on your
selection in the Custom Function / Standby menu. Turn off the power pack if the
flash unit will not be used for an extended period. All of the current settings are
stored for auto-recall when the flash is switched on again.
Battery Level Indication on the
LCD Panel (Indicating battery
level and management of the
whole ash system)
LED Battery Level Indication on
the Battery (Indicating battery
level and management of
non-loaded battery)
Battery Level Percentages
Low Battery and Charge
Reminder es
Red blinking lights,
then OFF
3% - 25% / Depleted battery.
Please recharge.
The battery is empty. Blinks a
warning for 1 minute. The ash will
auto power o in 3 minutes. Note:
Please recharge the battery as soon
as possible (within 2 days) or you
risk shortening the cell usage.
3 bars
2 bars
1 bars
No bars
1 red lights +3 green lights
1 red lights +2 green lights
1 red light +1 green light
1 red light
75% - 100% / Fully Charged
50% - 75% / Medium battery
25% - 50% / Low battery

12
The XPLOR 600Pro operates primarily as a R2 wireless slave strobe, either with
the XPLOR’s built-in R2 wireless receiver or external R1 wireless connections.
As a R2 Radio Slave unit, the XPLOR 600Pro can be linked to a Canon, Nikon, Sony,
Olympus/Panasonic or Fujilm camera system according the R2 Transmitter
Master. Flashpoint R2 Streaklights, Zoom Speedlights, R2/Pro Transmitters, Zoom
Mini ashes and older R2 devices can control the XPLOR 600Pro.
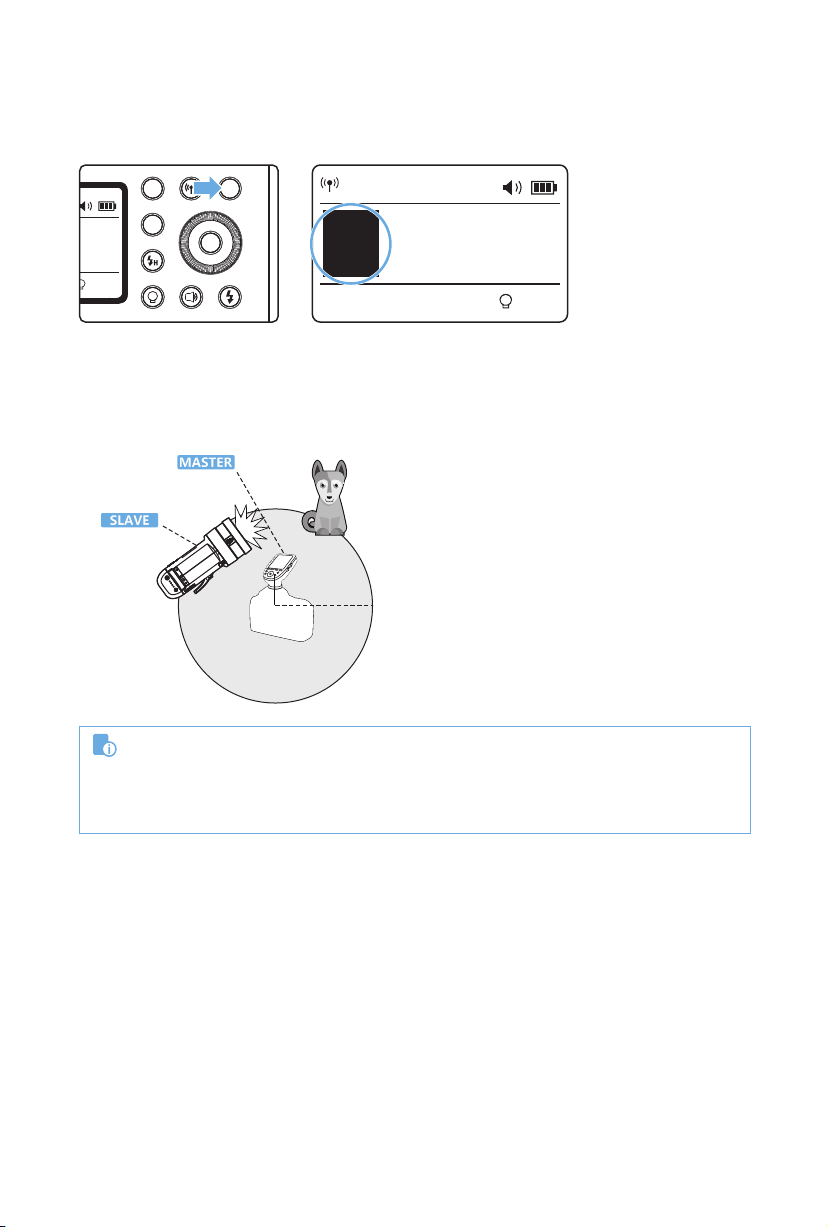
Wireless Flash: R2 Radio 2.4Ghz Transmission
CH 1 M
A
10%
1/256+0.3 1. Wireless Settings
Press < > Wireless Setting Button again
until < > is displayed on the panel.
2. Setting the Communication Channel
If there are other wireless flash systems nearby, you can change the channel IDs to
prevent signal interference. The channel IDs of the master unit and the slave unit(s)
must be set to the same.
MODE
MENU
GR/CH
SET
10%
CH 1 M
A10%
1/256+0.3
1
MENU
SET
MODE
MENU
GR/CH
SET
10%
MODE
MENU
GR/CH
SET
10%
CH32 M
A10%
1/256+0.3
Long press the < GR/CH >
Button for 2 seconds so that
channels ID is displayed on
the LCD panel.
2Turn the Select Dial to
choose a channel ID from
1 to 32.
4Wireless ID setting: press the MENU button to enter
C.Fn-ID and choose from 01 to 99 (Note: this can only be
achieved when the master unit also has this function).
3Press the < SET > button
to confirm.
C.Fn
RESET
Ver 0.6
LCD
ID 99
13
Wireless Flash: R2 Radio 2.4Ghz Transmission
3. Setting the Communication Group
Short press the < GR/CH > Button to choose group ID from A to E.
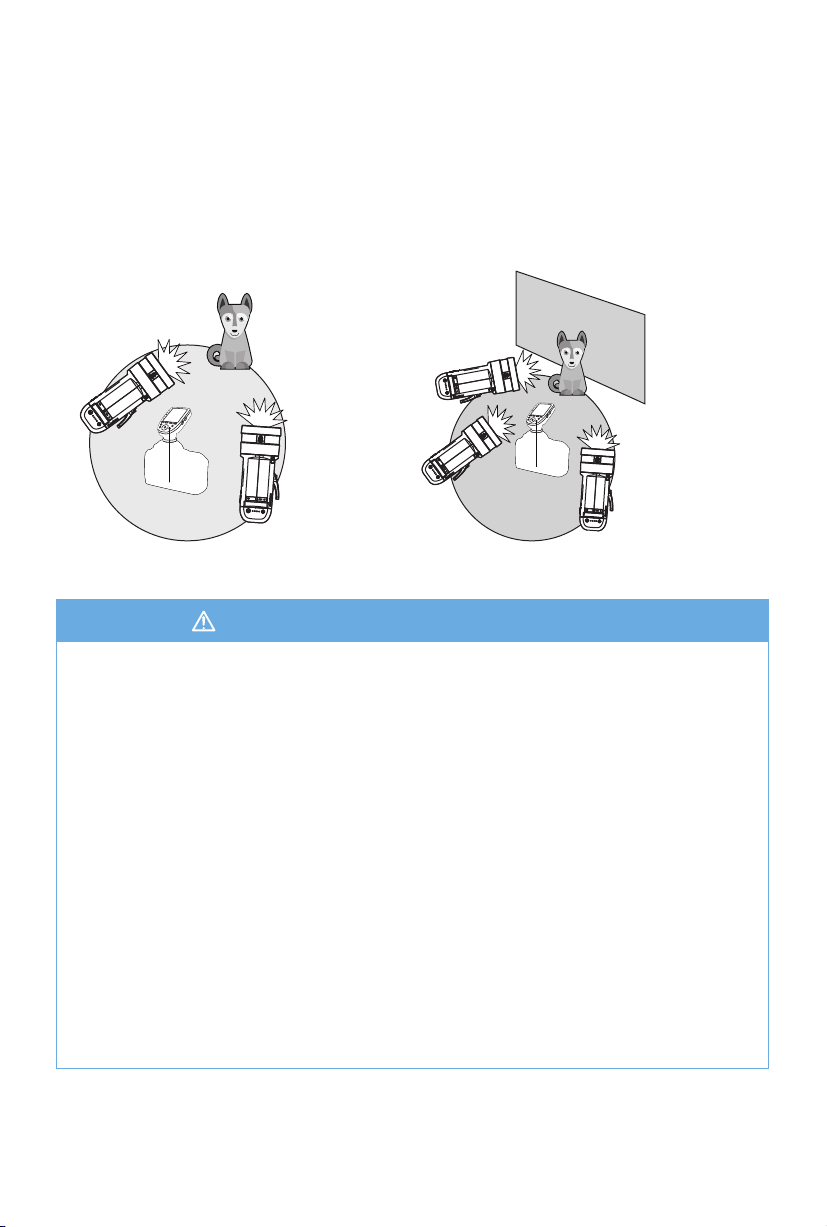
Positioning and Operation Range(Example of wireless flash shooting)
• Autoflash Shooting with One Slave Unit
4. Wireless Flash Shooting
MODE
MENU
GR/CH
SET
10%
CH 1 Multi
EOFF
1/256
5 - 5 Hz
Transmission distance is about 328ft/100m
•
Use master unit with wireless transmitting function as the transmitter end.
•
Before shooting, perform a test ash and test shooting.
•
The transmission distance might be shorter depending on the conditions such as positioning
of slave units, the surrounding environment and whether conditions.
14
Wireless Flash Shooting: Radio (2.4G) Transmission
Wireless Multiple Flash Shooting
• Shooting with Two Slave Groups • Shooting with Three Slave Groups
You can divide the slave units into two or three groups and perform multiflash
while changing the ratio factor.
In addition, you can set and shoot with a different flash mode for each firing group.
A
BA
B
C
1. Interference by the a 2.4Ghz signal in outer environment (e.g. a wireless base
station, 2.4Ghz WiFi router, Bluetooth, etc.)
→Solution: Adjust the channel CH setting on the flash trigger (add 10+ channels) and
use the channel with a clear signal. Alternatively, turn off the other 2.4Ghz devices.
2. XPLOR 600Pro status conditions
a. Solutions: Please make sure that the flash has finished its recycle or caught up
with the continuous shooting speed.
b. Check that the flash is not in a over-heat protection state or other duress factors.
→c. Please lower the flash power output.
3. Signal distance between the remote transmitter trigger and the flash is too close
→Solution: Turn on the “close distance wireless mode” on the flash trigger (<1.6ft / 0.5m).
R2 series: Long press the test button and hold, then turn the flash on until the ready light
blinks for 2 times.
R2 Pro series: Set the C.Fn-DIST to 0-98ft / 0-30m.
4. The flash trigger and the receiver end devices are in the low battery levels
→Solution: Replace the battery. 1.5V disposable alkaline batteries are recommended for
the transmitters.
Troubleshooting R2 2.4Ghz Wireless Conditions

15
Press the Mode Selection Button <MODE> to sequentially display the two ash
modes on the LCD panel with each press.
The XPLOR 600Pro ash has two ash modes: Manual (M) and Multi (Stroboscopic).
The ash output is adjustable manually from 1/1 (full power) to 1/256th power in
1/3rd stop increments. To obtain a precise ash exposure, use a hand-held ash
meter to determine the required ash output.
Flash Modes
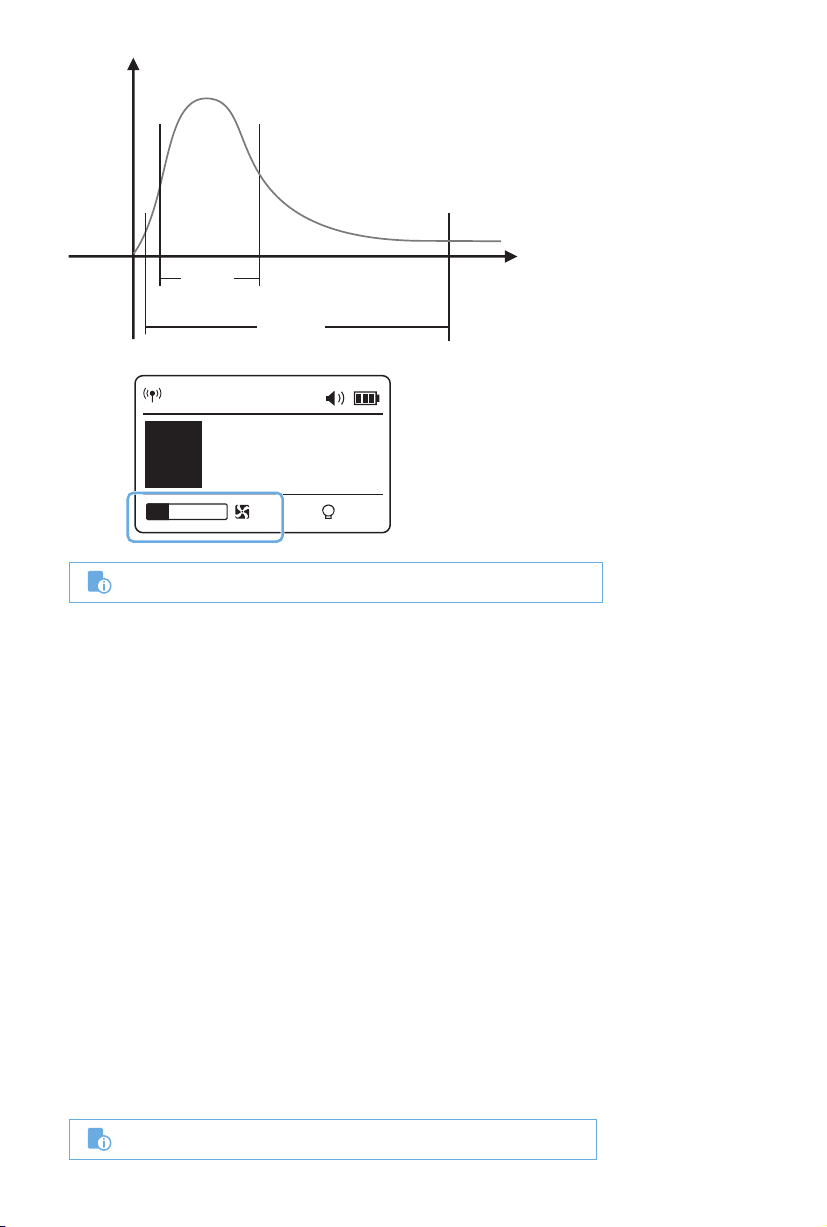
Flash duration refers to the length of time that from ash’s ring to reach the half
peak at maximum output of the light burst. The half peak at maximum is usually
expressed as t=0.5. In order to provide the photographer with more concrete
data, this product adopts t=0.1. The dierence between t=0.5 and t=0.1 is shown
in the following picture.
Flash Duration
Flash Mode M: Manual Flash
The following table makes it easier to see how the exposure values changes in terms
of equivalent stops when you increase or decrease the ash output. For example,
when you decrease the ash output to 1/2, 1/2-0.3, or 1/2-0.7, and the same
exposure value when you increase the ash output to more than 1/2, 1/2+0.3,
1/2+0.7, and 1/1. The relative amount from the starting value will be displayed.
Flash Output Range
Examples of gures displayed when reducing ash output level →
←Examples of gures displayed when increasing ash output level
1/1 1/1–0.3
1/2+0.7
1/1-0.7
1/2+0.3
1/2-0.3
1/4+0.7
1/2-0.7
1/4+0.3
...
...
1/2 1/4
MODE
MENU
GR/CH
SET
10%
MENU
SET
MODE
MENU
GR/CH
SET
10%
CH 1 M
A
10%
1/256+0.3
1Press < MODE >
button so that < M >
is displayed.
Press < SET > button
again to confirm the
setting.
2Turn the Select Dial to
choose a desired flash
output amount. 3
16
Optical Slave Triggering – S2 Setting
Optical Slave Triggering - S1 Setting
The Optical Slave triggers the XPLOR to re in tandem at the speed of light, upon
sensing another ash exposure. This helps in creating multiple lighting very simply.
As some ashes have more than one burst, S1 Slave is to be used for non-TTL
strobes producing a single ash for each exposure.
In M manual ash mode, press the <MENU> button to enter C.FN-SLAVE to choose
the S1 function, so that this strobe will re immediately as a slave, or secondary
ash, when the sensor sees another ash re. Use this mode to trigger this ash
with another manual ash, and in an area where no others are doing ash
photography as well. It provides the same eect as that by the use of R2 radio
triggers without the TTL exposure link.
Press the <MENU> button to enter C.FN-SLAVE to choose the S2 function, so that
this ash can also function as an optical slave S2, or secondary ash, for master
ashes in TTL mode. They produce a single “pre-ash” that the S2 Slave setting will
ignore and will only re in response to the second, actual ash exposure, from the
main unit. The S2 slave function provides the same eect as that by the use of R2
radio triggers but without the TTL exposure link. This helps in creating multiple
lighting very simply.
•
S1 and S2 optic triggering is only available in M manual ash mode.
A
t
50%
10 %
t=0.5
t=0.1
•
The ash duration will only be displayed on the LCD panel in M mode.
CH 1 M
A
10%
1/256
t.11/10100

17
Flash Mode Multi: Stroboscopic Flash
Calculating the Shutter Speed
Number of Flashes / Flash Frequency = Shutter Speed
With stroboscopic ash, a rapid series of ashes are red. The feature can be used to
capture a multiple images of a moving subject in a single photograph.
You can set the ring frequency (number of ashes per second, expressed as Hz), the
number of ashes, and the ash output.
During stroboscopic ash, the shutter should remain open until the ring stops. Use the formula
below to calculate the shutter speed and set it on your camera.
For example, if the number of ashes is 10 and the ring frequency is 5 Hz, the shutter speed
should be at least 2 seconds.
Stroboscopic ash is most eective with a highly reective or a subject that has strong contrast
against a dark background.
Use of a tripod and a remote control is recommended.
A ash output of 1/1 and 1/2 cannot be set for stroboscopic ash.
Stroboscopic ash can be used with “Bulb”, known as “Open Flash” technique.
If the number of ashes is displayed as “--”, the ring will continue until the shutter closes or the
battery is exhausted. The number of ashes will be limited, as shown by the following table below.
•
•
To avoid overheating and deteriorating the ash head, do not use Multi/stroboscopic ash more
than 10 times in succession. After 10 times, allow the ash to rest for at least 15 minutes. If you try
to use the stroboscopic ash more than 10 times in succession, the ring may stop automatically
to protect the ash head. If this happens, allow the ash to rest for at least 15 minutes.
Maximum Stroboscopic Flashes
1/4
1/8
1/16
1/32
1/64
1/128
1/256
1
7
14
30
60
90
100
100
2
6
14
30
60
90
100
100
3
5
12
30
60
90
100
100
4
4
10
20
50
80
100
100
5
4
8
20
50
80
100
100
6-7
3
6
20
40
70
90
90
8-9
3
5
10
30
60
80
80
Flash
Output
Hz 10
2
4
8
20
50
70
70
11
2
4
8
20
40
70
70
12-14
2
4
8
20
40
60
60
15-19
2
4
8
18
35
50
50
20-50
2
4
8
16
30
40
40
60-100
2
4
8
12
20
40
40
1
Press < MODE >
button so that
< MULTI > is
displayed.
2
Turn the Select
Dial to choose
a desired flash
output.
3Set the flash frequency and flash times.
• Press <SET> Button to select the flash times. Turn the Select Dial to set
the number.
• Press <SET> Button to select the flash frequency. Turn the Select Dial
to set the number.
• After you finish the setting, press <SET> button and all the settings
will be displayed.
CH 1 Multi
AOFF
1/256
5 - 5 Hz
MODE
MENU
GR/CH
SET
10%
MENU
SET
MODE
MENU
GR/CH
SET
10%

18
High Speed Sync (HSS) enables the flash to synchronize with all camera shutter
speeds. The sun is no longer an impediment to masterful lighting outdoors. By be
able to utilize shutter speeds as well as f-stops, to control exposure, the power of
the flash can overcome the presence of too much sunlight or the impact of
ambient light when shooting in bright environments. This is also convenient when
you want to use aperture priority for fill-flash portraits.
Stable Color Temperature Option
High-Speed Sync
21Press High Speed
Sync Button so that
< > is displayed.
MODE
MENU
GR/CH
SET
10%
CH 1 M
A
10%
1/256+0.3
Please use an R2 Pro or R2
series transmitter device.
•
If you set a shutter speed that is the same as or slower than the camera’s maximum ash
sync speed,
< >
will not be displayed in the viewnder.
•
With high-speed sync, the faster the shutter speed, the shorter the eective ash range.
•
To return to normal ash, press
< >
button again. Then
< >
will disappear.
•
Multi ash mode cannot be set in high-speed sync mode.
•
Over-temperature protection may be activated after 50 consecutive high-speed sync ashes.
The function limits the maximum error of color temperature in full power to
approximately +/- 75°K. To select this feature, enter MENU C.Fn-COLOR and select
ON. The color temperature function is turned on and ready for Full Power color
stability. When adjusting the power output from high to low in M mode, the Flash
Ready Indicator will blink, the audio beep will prompt for 10 times, indicating power
bleed to stabilize the output. Press the Test Button to discharge and recycle the flash
for normal balanced operation.

19
•
For full instructions on the use of R1 series remote control, see its user manual.
Modeling Lamp
The XPLOR 600Pro is equipped with a brilliant 38W LED modeling lamp which has
three modes: OFF, Percentage and PROP. Short press the Modeling Lamp Button, and
the three modes will be displayed on the LCD panel in sequence.
OFF: the modeling lamp is off.
Variable: Set the brightness you want, from 10%~100%. Long press the Modeling
Lamp Button for 2 seconds to manually adjust the percentage of modeling lamp from
10% to 100%, with the Select Dial. The brightness level is displayed on the LCD panel.
To prevent overheating, the fan rotates at a low speed when the lamp is set to less
than 20%, while a greater than 20% setting, the fan adjusts automatically to cool the
monolight.
PROP: The modeling lamp's power changes in proportion to the flash's power. The
stronger power the flash, the brighter the modeling lamp. To prevent overheating,
the fan rotates in low speed under 1/128, while over 1/128, the fan adjusts automati-
cally to cool the head.
Other Applications
R1 Wireless Control Function
Sync Cord Triggering
This flash unit is designed with an R1 Wireless Control
Port, so that you can wirelessly adjust the power level
of the flash and the flash triggering with a R1 (non R2)
Flashpoint transmitters.
To control the flash wirelessly, you need a R1 remote
control set (Transmitter and Receiver). Insert the
receiver into the Wireless Control Port on the flash and
insert the transmitter into the camera hot shoe.
Settings made on the hotshoe-mounted transmitter
will be wirelessly communicated to the flash. Then you
can press the camera shutter release button to trigger
the flash. You can also hold the transmitter in your
hand to control your off-camera flash.
The Sync Cord Jack is a Φ3.5mm plug. Insert a trigger plug to the port and the other end to
the sync terminal on your camera. While no data is transferred, the flash will be fired in
synchronization with the camera shutter.
• Long press the modeling lamp for 2 seconds to adjust the percentage of
modeling lamp from 10% to100%.
MODE
MENU
GR/CH
SET
10%
CH 1 M
A10%
1/256+0.3
t.11/10100
CHANNEL
Table of contents
Other FlashPoint Lighting Equipment manuals


Popular Lighting Equipment manuals by other brands


Star Headlight & Lantern
Star Headlight & Lantern CONSTELLATION M Tech Plus Minibar manual

Fusion
Fusion 24290 quick start guide

Stellar Lighting
Stellar Lighting MK-12 RGBW user manual

Ecco
Ecco Pro Vantage 12+ Series Installation & operation instructions

Dialight
Dialight L-856 Quick start up guide

Home Accents Holiday
Home Accents Holiday 1004350871 manual


