Flavour Blaster MINI User manual

USER MANUAL

CONGRATULATIONS
CONGRATULATIONS ON YOUR PURCHASE OF THIS FLAVOUR BLASTER MINI!
FOR THE BEST EXPERIENCE PLEASE CAREFULLY READ AND FOLLOW THIS USER MANUAL.
For the latest information and to be part of a great andgrowing community please join our Bubble Heads Club:
https://www.avourblaster.com/account/register
CONGRATULATIONS 01

WARNING
PLEASE READ THIS SECTION CAREFULLY TO ENSURE YOU RECEIVEMAXIMUM BENEFITS FROM
YOURFLAVOUR BLASTER MINI AND ENJOY THE PRODUCTIN THE MOST SAFE EFFECTIVE WAY:
1.
2.
3.
4.
5.
6.
7.
8.
This Flavour Blaster is designed to be used with Flavour Blaster Aroma’s and Bubble X only. It is not designed to be
used with any e-liquids or loose tobacco leaf or herbal substances !
This product is only intended for use by adults (18+) and should not be used by children, women who are pregnant
or breastfeeding, or persons withor at risk of heart disease, high blood pressure, diabetes or taking medicine for
depression or asthma, or who otherwise may be sensitive to Aroma’s. l.e. toxic by inhalation, in contact with the
skin or eyes, or if swallowed. Ingestion of the non-vaporized concentrated Aroma ingredients can be poisonous.
Keep away from children and pets.
TheFlavour Blaster has not been evaluated by the FDA and is not intended to be a smoking device or treat,
mitigate, prevent or cure any disease or condition.
The Tank must be stored outof the reach of children and pets. All spare and used Tanks must also bedisposed of
properly and out the reach of children and pets.
TheFlavour Blaster includes small parts such as the Tank. Always keep any small parts out of reach ofchildren
and pets to prevent swallowing or other harm.
Do not misuse,mishandleor store your Flavour Blaster improperly. Even though it is made ofdurable plastic and
metal it may become damaged when dropped or otherwise mishandled.
Do not attempt to repair the unit by yourself as damage orpersonal injury may occur.
In order to guarantee the normalfunctioning of your Flavour Blaster we strongly advise that you charge the battery
when the power level drops below 10%.
WARNING 02

9. In order to prolong the operation of your Flavour Blaster, please do not place or store in excessively hot or cold
environments. Keep away from sources of excessive heat as damages may occur.
10. Obey local laws or regulations regarding Electronic Cigarettes when producing Aroma Clouds. If you are in an area where
there are any bans or potential dangers, please do not use your Flavour Blaster.
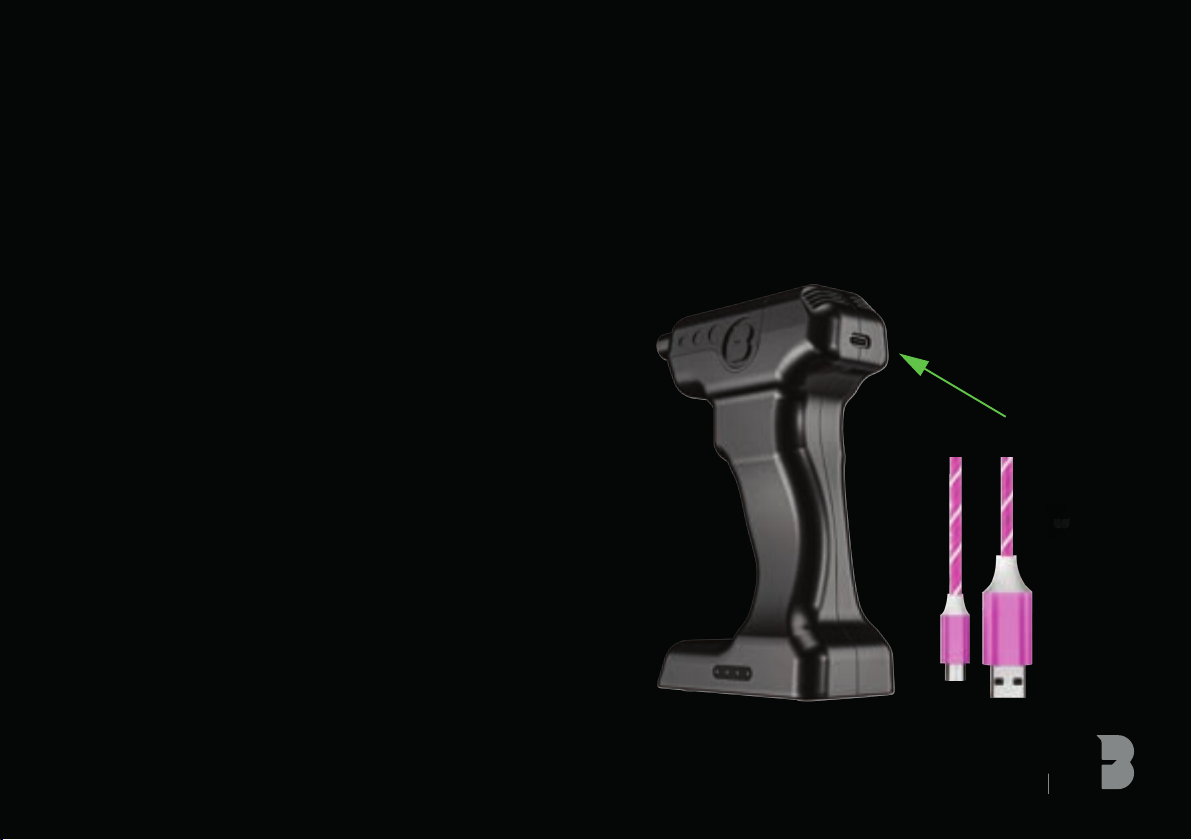
11.Your Flavour Blaster is not waterproof, please keep it dry at all times, especially the USB Port.
12. Do not allow any Aroma, Bubble X, or liquid to enter the device through the USB port. Ifany liquids enter the device, or
come into contact with internal components, please discontinue using or charging the device and contact JetChill
immediately.
13. Do not drop, throw, mishandle your Flavour Blaster as the Casing or inner components may become damaged.
14. JetChill is not responsible for batteryandcharger explosions, ormalfunctions, due to the use ofa low-quality charger.
Only use the original Flavour Blaster USB-C Cable to charge your Flavour Blaster. We strongly recommend that you
always use a high quality USB wall charger (CE & UL Certified). The Flavour Blaster is not designed for use with a car
charger and the Kit does not include a car charger.
15. JetChill is not responsible for anytank or battery damage due to the use ofe-liquid or dry herb.
16. Do not ingest Aroma direct from the Bottle. In case of Aroma contact with skin, wash immediately and thoroughly with
soap and water. In case of contact with eyes, rinse immediately and thoroughly with water and seek full medical advice
immediately. In case of an accident, or if you feelunwell, seek full medical advice.
17. Do not ingest Bubble X direct from the bottle. If swallowed, rinse mouth immediately with plenty of water and drink a
glassof water. Do not induce vomiting. Rinse o the skin and eyes immediately should the liquid come into contact
with them.
WARNING 03

MINI FLAVOUR BLASTER KIT INCLUDES
1x Mini Flavour Blaster
1x USB-C Cable
2x Disposable Tank
2x Aroma
1x Bubble X 180ml
1x Bubble X Bowl
1x Atomiser
KIT INCLUDES 04

QUICK START
1. CHARGE BLASTER
InsertUSB-C Cable
4. TURN ON
Press Trigger 3 times
2. PRIME COIL & FILL TANK
Pour Aromainto Tank
5. DIPNOZZLE TIP
Into BubbleX Jigger
6. HOLD TRIGGER
Creates AromaFilled Bubbles
3. INSERT TANK
Insert Tank & add Nozzle
QUICK START
05

BATTERY
06
BATTERY
To charge your Flavour Blaster Battery connect the correctly powered USB-C Cable to the USB-C Input
Port. The Screen will show the Batterycharge %. A full Battery charge will take 8 hours, giving the Flavour Blaster 8
hours ofusage time.
PLEASE READ AND ADHERE TO THE FOLLOWING WARNINGS WHEN CHARGING YOUR DEVICE:
- Only charge the Flavour Blaster with a high quality CE & UL
Certified wall charger.
- Never charge a Batterythat has been damaged or dropped.
- Never plug a Charger into a non-approved Mains
Power Transformer.
- Do not overcharge, remove the USB-C Cable from
the Flavour Blaster when complete to prolong battery life.
- Remove Tank before charging.
- Never leave a charging batteryunattended.
- Only use the included high quality USB-C
Charging Cable.
- Do not charge your Flavour Blaster in your car.
- Remove the Tank from the Flavour Blaster when shipping
or travelling.
- If there are any issues with the device please contact
JetChill immediately.

RGB LIGHT
07
RGB LIGHT
Flash 5 times
Tank detected
Flash 3 times
Tank resistance lower than 0.05Ω
Flash 3 times
Battery too low
Flash 3 times
Tank not detected
Flash 5 times
Power on/o
Flash 3 times
Tank temperature too high
Flash 3 times
Overuse
100% power 70% power 40% power 10% power Less than 10% power
BATTERY

FILL DISPOSABLE TANK 08
1. OPEN FLAP
Pull Outer Hole Flap open
2. FILL TANK
Pour Aroma into Outer (Not Inner) Hole
3. FILL LINE
Fill to Max then rest for 2 minutes
FILL DISPOSABLE TANK
4. CONNECT TANK
Connect to Mag Base
5. REPLACE TANK
Every 8 weeks
Or once Aroma Cloud smells burnt
6. CLEANING
Clean Base with alcohol wipe

LIQUIDS
LIQUIDS 09
1. STORE UPRIGHT
Handle with care around liquids
4. NO BUBBLE X IN TANK
To prevent Tank damage and leaking
3. DON’T TIP BACKWARDS
To prevent Bubble X leaking into Blaster
2. ONLY DIP NOZZLE END
Don’t dip whole Nozzle into Bubble X
6. REMOVE TANK
When not in use to prevent leaking
5. CLEANING
Clean with alcohol wipe after use

1.
TWIST OPEN
Twist upper half of
Atomiser to open
2. REMOVE INNER BOTTLE 3. FILL WITH WATER
4. SPRAY OVER DRINK/GLASS
Increase bubble success rate by
spraying cocktails/glassware
1/2 x with water
Spray over bubble to further increase
stability
Remove inner tube from
Atomiser outer casing
ATOMISER
10
ATOMISER
6. TWIST CLOSED
Twist upper half in the opposite
direction to close when not in use
Unscrew lid and ll clear container with water
Screw lid back on and place into outer casing
5. SPRAY OVER BUBBLE
Dry bar environments can sometimes be a challenge for the bubble.
To improve it`s stability, we recommend using the Atomiser.

CLEAR BUBBLE 11
CLEAR BUBBLE
1. PRESS TRIGGER TWICE 3. PULL TRIGGER2. DIP NOZZLE IN BUBBLE X
4. PRESS TRIGGER TWICE
To produce Aroma again

BUBBLE TECHNIQUE
BUBBLE TECHNIQUE 12
Create bubbles filled with aromatics, fill cloches with aromatic clouds, make your own
aromatic clouds for cocktail & drinks, add theatrical clouds for desserts, and much more.
BUBBLE QUANTITIES
1. 180ml bottle of Bubble X makes 1000 bubbles.
2. 10ml bottle of Aroma makes 250 aroma clouds.
5.
Glassware must be clean and washed correctly.
Residue detergent from a glass washer may
compromise the forming of the bubble.
4.
Sharp glass edges, shaped glassware,
plastic rim and drinks containing ice will be
very dicult to form a bubble upon. We
recommend using glassware with soft
rolled edges.
6.
Always try and keep the bubble
mixture at 18c room temperature. If it gets too
warm it can make it harder to form bubbles!
2.
Bubbles can be created on both wet and dry
rims. You can create a wet rim by rinsing the glass or
by using a ne mist spray bottle like an atomiser.
Sometimes bubbles are fragile so it’s always best to
prepare the glass for the best chance of achieving
the perfect bubble.
1.
Bubble mixture should be shaken gently
prior to use or every 24 hours
3.
Carbonated drinks can occasionally pop your
bubble as gas bubbles hit the rim of the glass,
breaking the surface tension. Always leave a 2cm to
3cm gap between top of drink and rim. Note if
alcohol is strong or neat, the bubble is harder to
form, as the alcohol will evaporate the water in the
lm of the bubble.

SAFETY13
SAFETY
ALWAYS STORE THE FLAVOUR BLASTER IN AN UPRIGHT POSITION:
THIS WILL PREVENT ANY LIQUIDS ENTERING INSIDE THE CASING.
POWERING THE FLAVOUR BLASTER ON & OFF:
Press the Trigger three times in quick succession to turn on the Flavour Blaster.
Press the Trigger three times in quick succession to turn o the Flavour Blaster.
Always power o the Flavour Blaster when it is not being used and remove the Tank.
8 SECOND CUT OFF:
If Trigger ispressedfor 8seconds Flavour Blaster will stop firinguntil Trigger is released and pressed again.
TANK:
Do not pour alcohol into tank, this can cause re.
Tank / Coil will get hot during use soensure Tank is allowed to cool down before removing Tank from Blaster.
SHIPPING & TRAVELLING:
Remove Tank when shipping or traveling to prevent Tank activating ifFlavour Blaster inadvertently turns on.
Follow rules regarding shipping or traveling with a device with 2 permanently installed Lithium Ion Batteries.
The Batteries are not removable or loose in the device.
SHORT CIRCUIT PROTECTION:
Short Circuit Protection prevents the Flavour Blaster against short circuiting and will stop the unit from functioning in
unsafe conditions. The Flavour Blaster features automatic real-time Tank Ohms detection.
OVER CHARGE PROTECTION:
Flavour Blaster monitors the battery voltage and will automatically power o when the battery is over charged.

FURTHER INFORMATION 14
TECHNICAL SPECIFICATIONS
Battery (Lithium Ion): 2,500 mAh, 3.6 V (INR18650–30Q )
Output Power: 15 W
Output Voltage: 2.99–3.7 V
Output Current (continuous): 4.0-7.0 A
Atomizer Resistance (cold): 0.1–1.2 Ohm
Temperature Limit: 200–600 oF
Input Voltage (unloaded): 2.2–4.1 V
Input Current: 8.0–10.0 A
Quiescent Current: <50 mA
Power Down Current: 32-106 uA
%90:ycneicfifE
WARRANTY INFORMATION
JetChill provides a 12 month warranty on parts and labour for the Flavour Blaster.
Please consult www.avourblaster.com for full terms and conditions.
For warranty assessment the Flavour Blaster needs to be returned to the factory.
Empty Tank before shipping and ensure Tank is not connected to the Mag Base.

www.flavourblaster.com
www.jetchill.com
info@jetchill.com
(uk): 00 44 (0) 208 1243014
JetChill Ltd
Print Centre Fulwell Road
Roker
Sunderland
UK
SR6 0HR
Table of contents