Flexfireleds UltraBright Valor Premier Diffusion Series User manual

UL Listing and Compliance Information:
Our products are safe to use and free from any hazardous substances. They are UL Listed in the USA
and Canada. To comply with UL standards and inspections, please keep in mind that:
Tools Needed
Outdoor IP67
UltraBright™ Valor Premier Diffusion Series
Installation Guide
* Tube of neutral-based silicone electronics grade sealant.
Screwdriver Scissors or Shears Pliers Silicone Sealant* Utility Knife
A Class 2 power supply is to be used with each run of lights.
Each installation of LED strip lights in series should consume no more than 100W max.
Español
Se debe utilizar un transformador de Clase 2 cuando es necesario ajustarse a las normas de seguridad UL.
La instalación no debe exceder un máximo de 100W cuando se conecta la tira LED en serie.
Français
Pour être conforme aux règles de sécurité, une source d'alimentation de Classe 2 doit être utilisée.
L'installation ne doit pas dépasser un total de 100W lorsque les bandes LED sont montées en série.
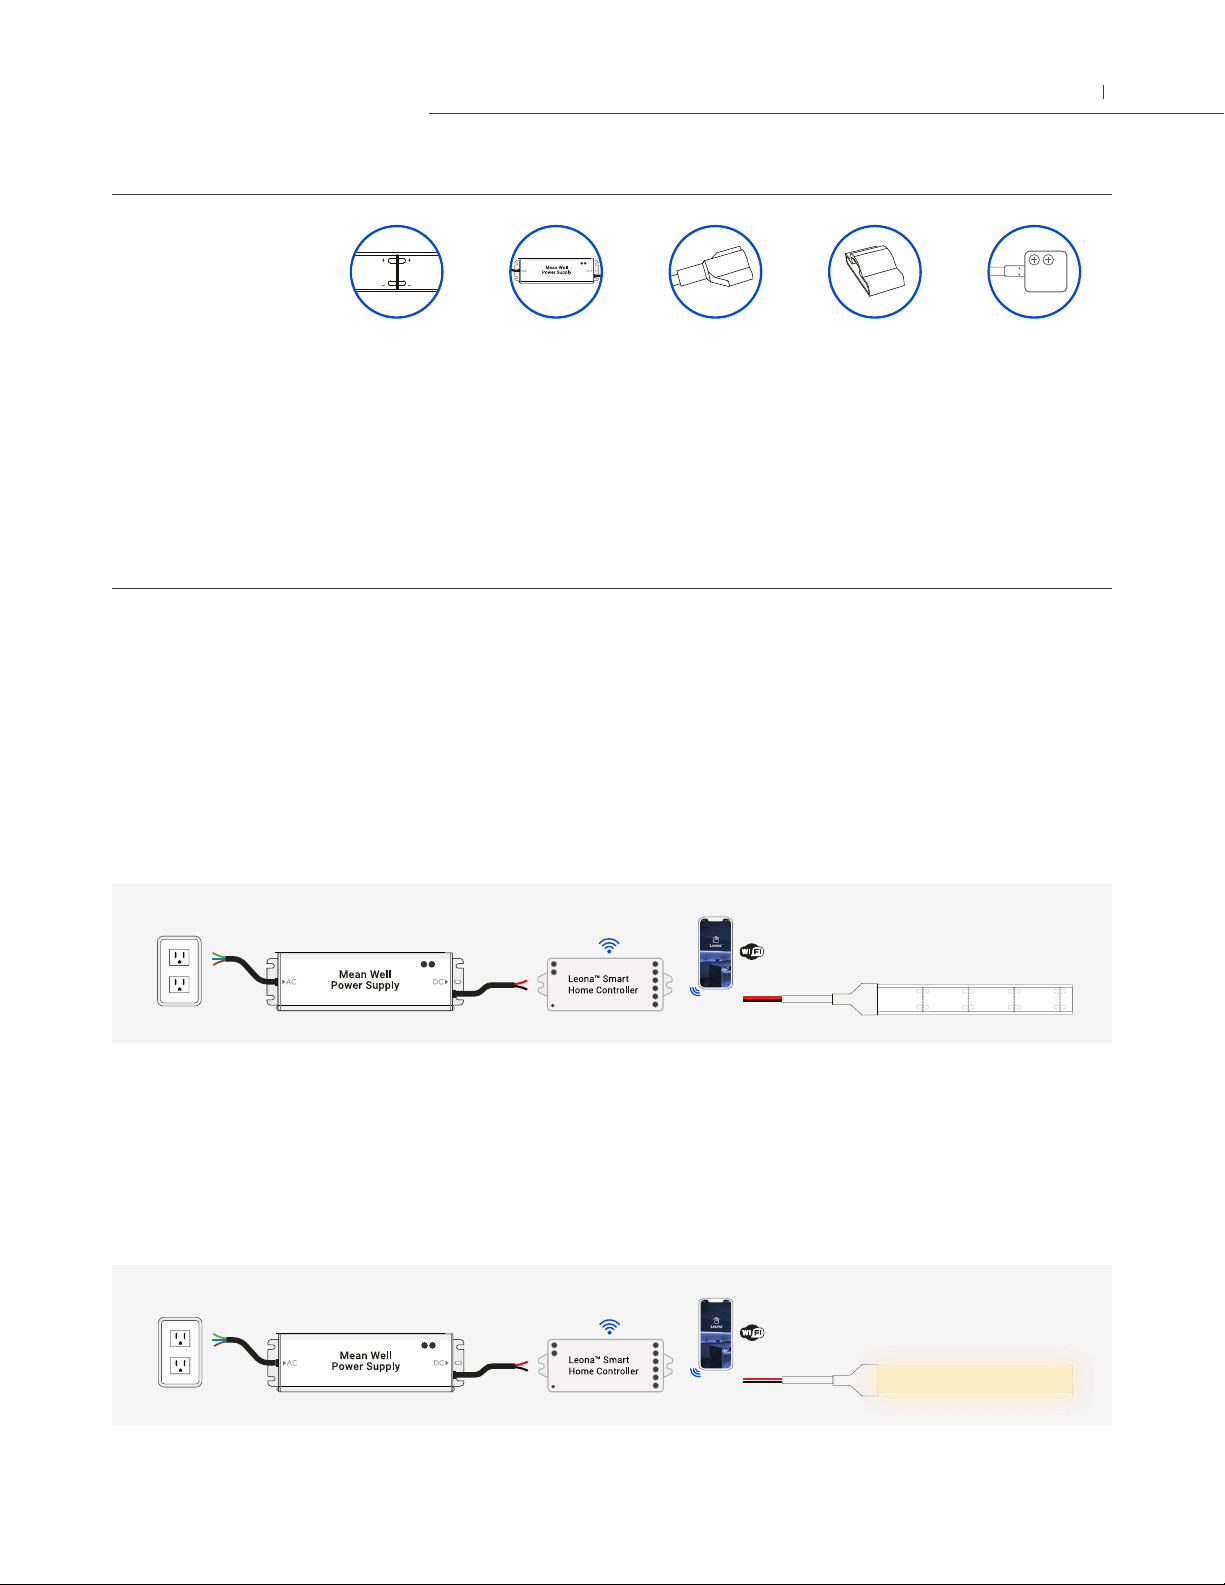
Component Check
• Make sure that you have everything you need to complete the installation.
• Before installation, make sure to complete a mock installation to test your lights and turn them on to make sure all components
are working correctly.
• Do not exceed the maximum run length of your UltraBright™ Valor LED strip light, as this may cause voltage drop
and unwanted effects.
• Make sure that all components are compatible.
1. Mock Installation
• Before cutting the LED strip light, or installing permanently, make sure to complete a mock installation to test your lights.
• It is important that you have a clear vision of your project and know what you want the end result to look like. Plan where you
want to install your driver and dimmer. Lay out all the components in the correct area.
• Connect your LED Strip Light to your dimmer and power supply. It is very important to do this before cutting your strips or
installing them.
• Turn on your lights and check to see if everything is working properly.
The strips should light up after connecting them to your dimmer and power supply. If they do not, please check your
connections and make sure the polarity matches all the way through from the power supply to the LED strip (positive to
positive, negative to negative).
Before installing your lights, check to see if the brightness level and color temperature you chose for your project look the way
you envisioned. You will be ready to proceed with the installation after testing your lights and components.
2. Troubleshoot If Needed
Installation Instructions
Turn the power off at the circuit breaker to avoid any possible injury.
3. Turn Power Off at Circuit Breaker
LED Driver Front caps
(included with the
LED Strip Lights)
End caps
(included with the
LED Strip Lights)
Outdoor IP65 Grip
Connectors for Single
Color LED Strip Lights
Outdoor (IP67) UltraBright™
Valor Premier Diffusion
Series LED Strip Lights
02
UltraBright™ Valor Premier Diffusion Series LED Strip Light Installation Guide
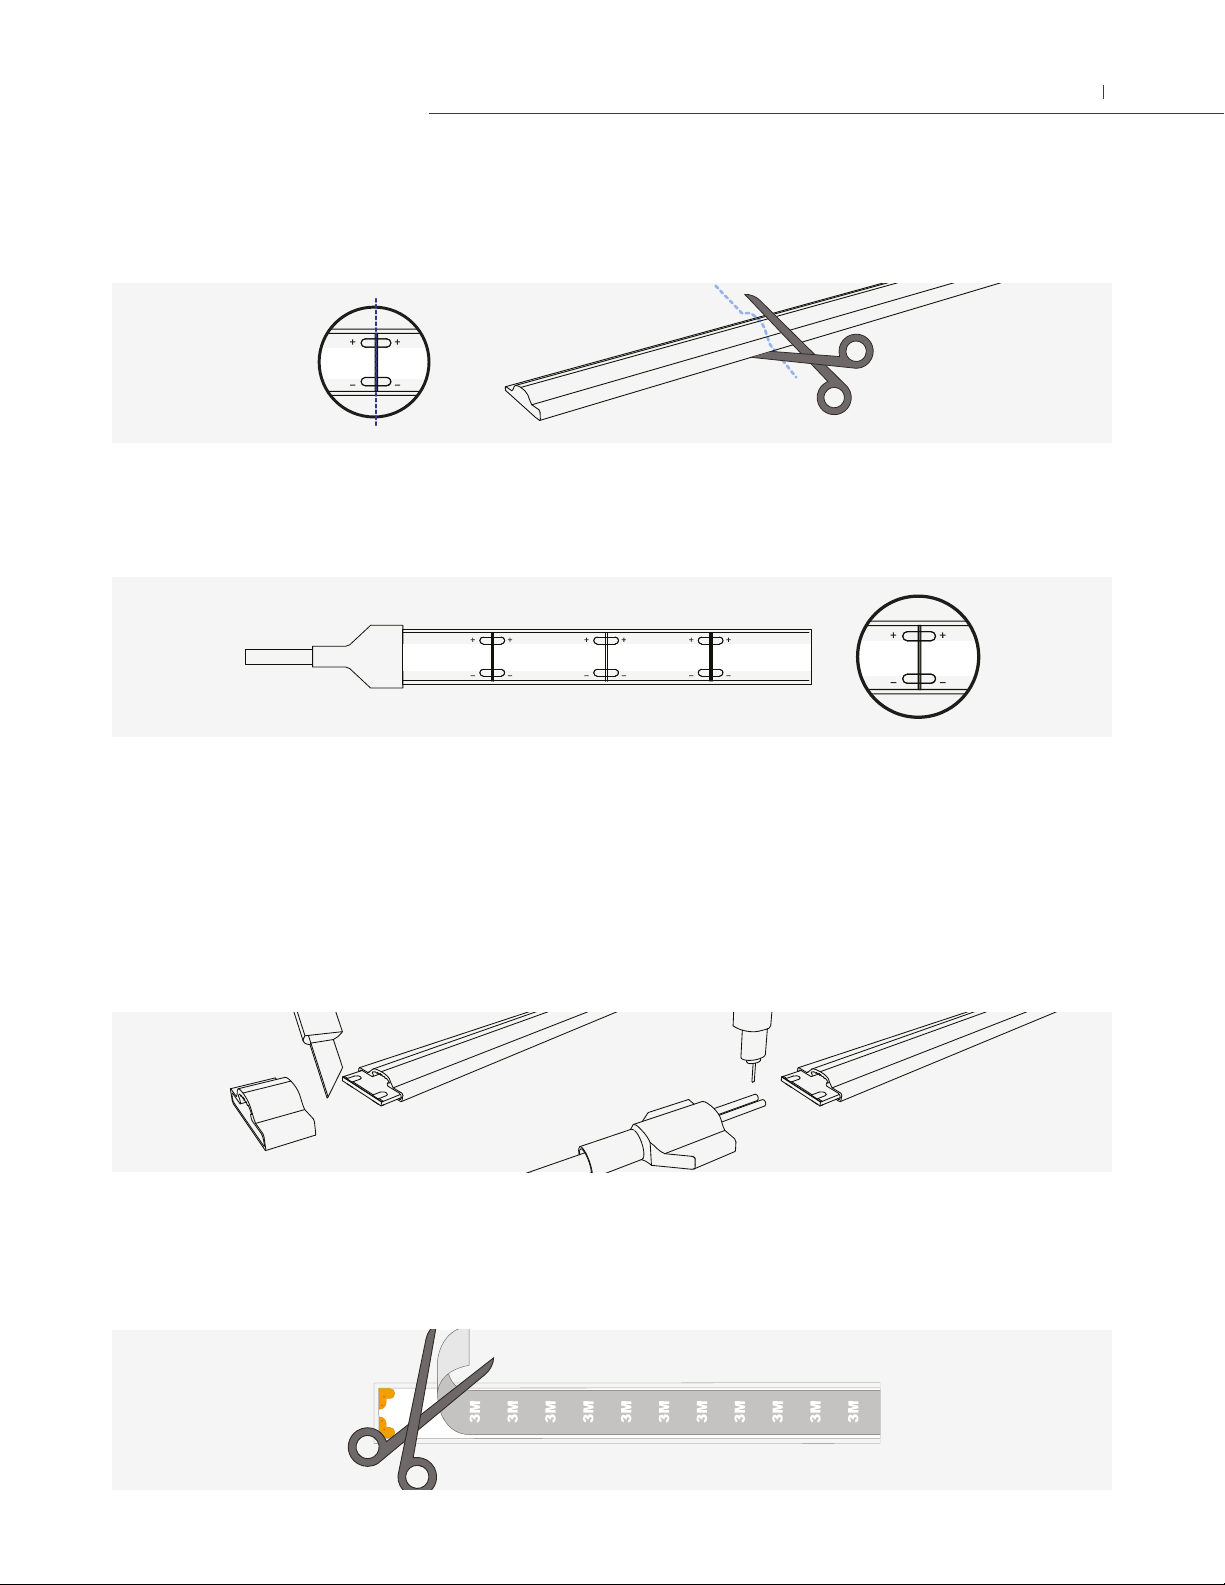
4. Cut LED Strip Light to Required Length
If you need to cut your LED strip light, first measure the length needed and only cut along the indicated cut marks with sharp
scissors. Make sure that you cut straight along the strip’s cut point to ensure a proper seal if using end caps or connectors. As
a reminder, cutting the strip does void the IP67 nature of the strip as customer modifications cannot be guaranteed an IP rating.
When installing separate segments of the LED strip together by soldering or using connectors, always make sure the polarity
is matched from one strip to the next.
5. Make Sure Polarity is Matched Throughout the Setup
• If you are going to solder to the strip take a utility knife and carefully cut away enough of the silicone sheath to expose the
solder pads.
• For the front caps, cut 3 mm off the silicone cover. Grab the front cap and slide it through the wire. Then, solder the wire
to the solder pads on the strip. Fill the front cap with silicone and make sure it is properly adjusted before letting the sealant
cure according to its instructions.
• When using the end caps, repeat the last step.
6. If You Want to Solder
If you don’t want to solder the strip, you can also use IP65 connectors, sold separately. Carefully peel off 2” of the adhesive
tape and its backer from the back of the LED strip light and push it back to make room for the connector. This will allow the
silicone to seal properly and ensure that water is not pulled into the seal.
7. If You Want to Use IP65 Grip Connectors
03
UltraBright™ Valor Premier Diffusion Series LED Strip Light Installation Guide

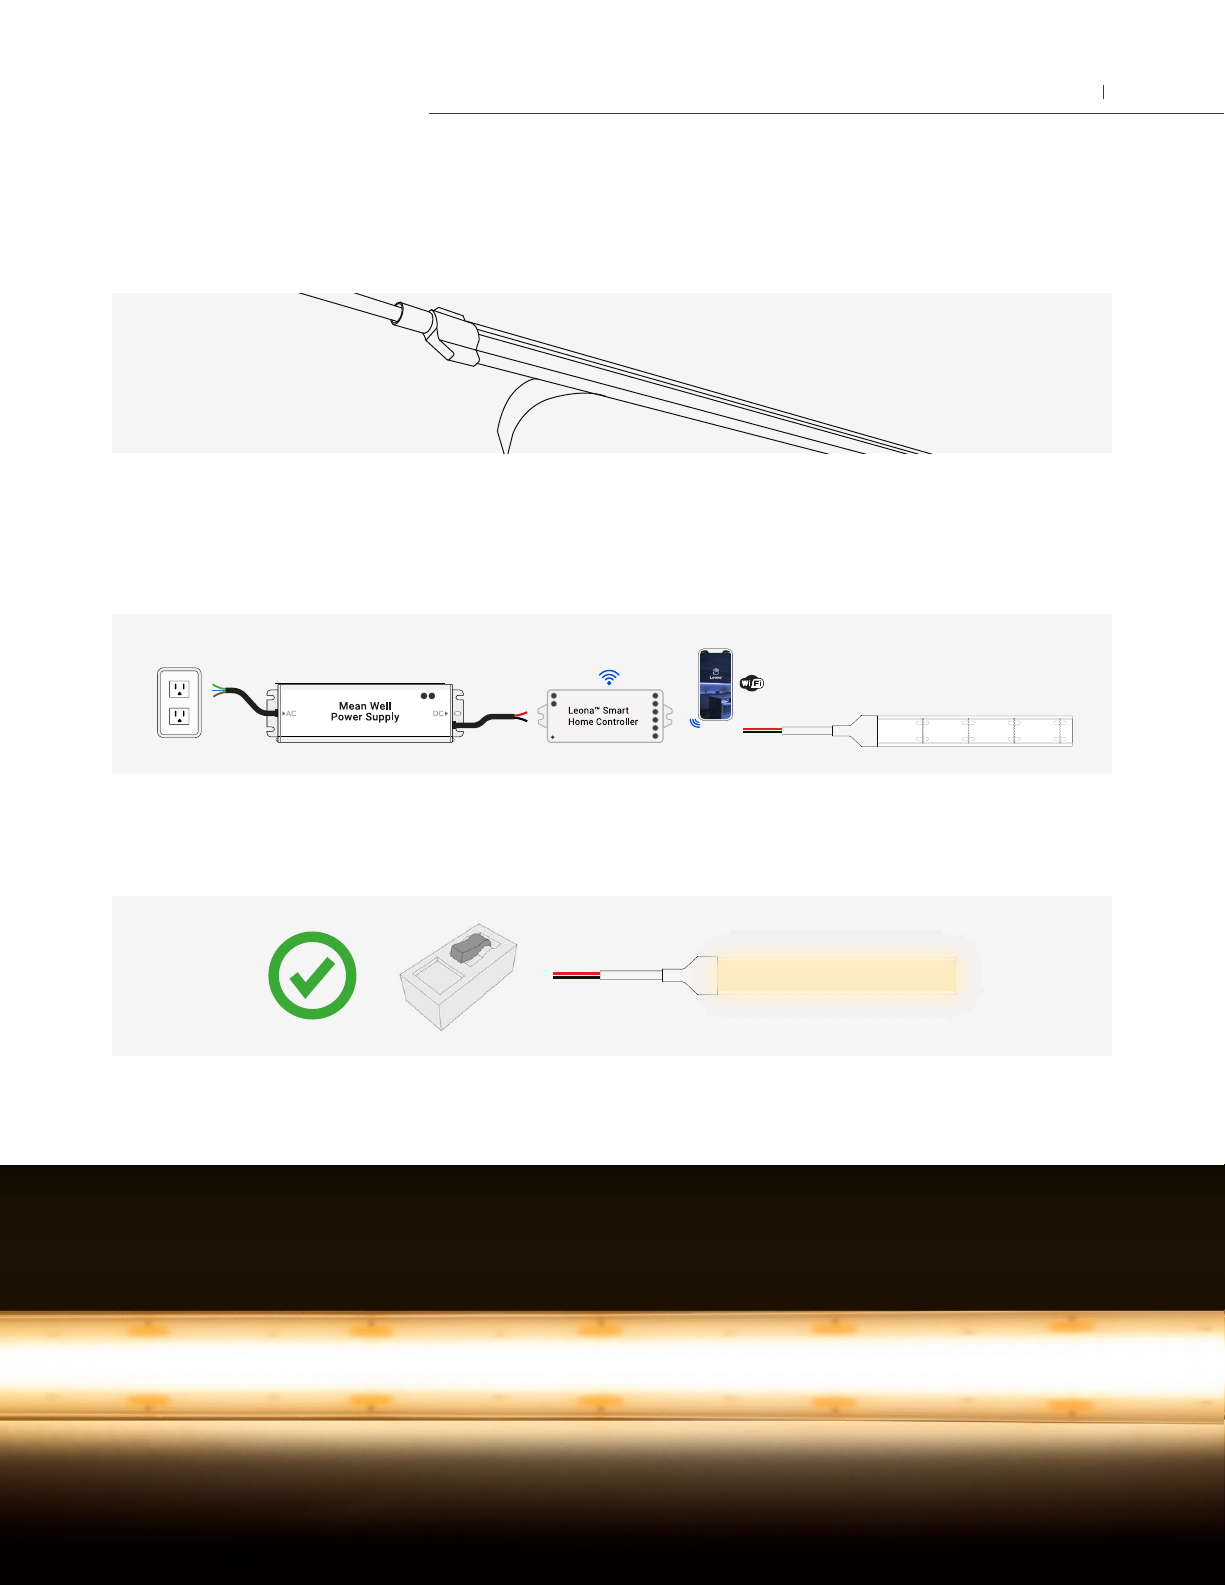
8. Install IP65 Grip Connectors
Coat the open end of the strip and approximately 1” of the top of the strip in silicone sealant. (Due to the dome shaped nature
of the strip, sealant does need to be applied to the top to fill in the gaps on the sides.) Slide the transparent case of your Outdoor
IP65 Grip connector into the sleeve, until the strip is making proper contact with the end of the clear plastic. Then, grab the
white plastic part of your connector and push the metal contacts through the window of the transparent case. Adjust it with
pliers until you hear a click, and then let the sealant cure according to its own instructions.
9. Apply Silicone Sealant
Open your silicone sealant and apply generously around the end of the connector to ensure that any gaps are filled between the
strip and the connector to create a watertight seal.
10. Retest the Setup
Test the strips again to make sure they all light up and are functioning properly before the final installation. Once you have
verified all segments are working, you’re ready to install them.
11. Strip Light Pre-install Preparation
Thoroughly clean any surface where you will be attaching your LED strip lights. The adhesive backing is strong, but will not stick
to surfaces if they are dirty or dusty.
04
UltraBright™ Valor Premier Diffusion Series LED Strip Light Installation Guide
12. Attach the Strip Light in Place
Peel the rest of the cover of the 3M tape a few inches at a time while gently pressing the strip to the installation surface. Make
sure the strip is secured on the surface.
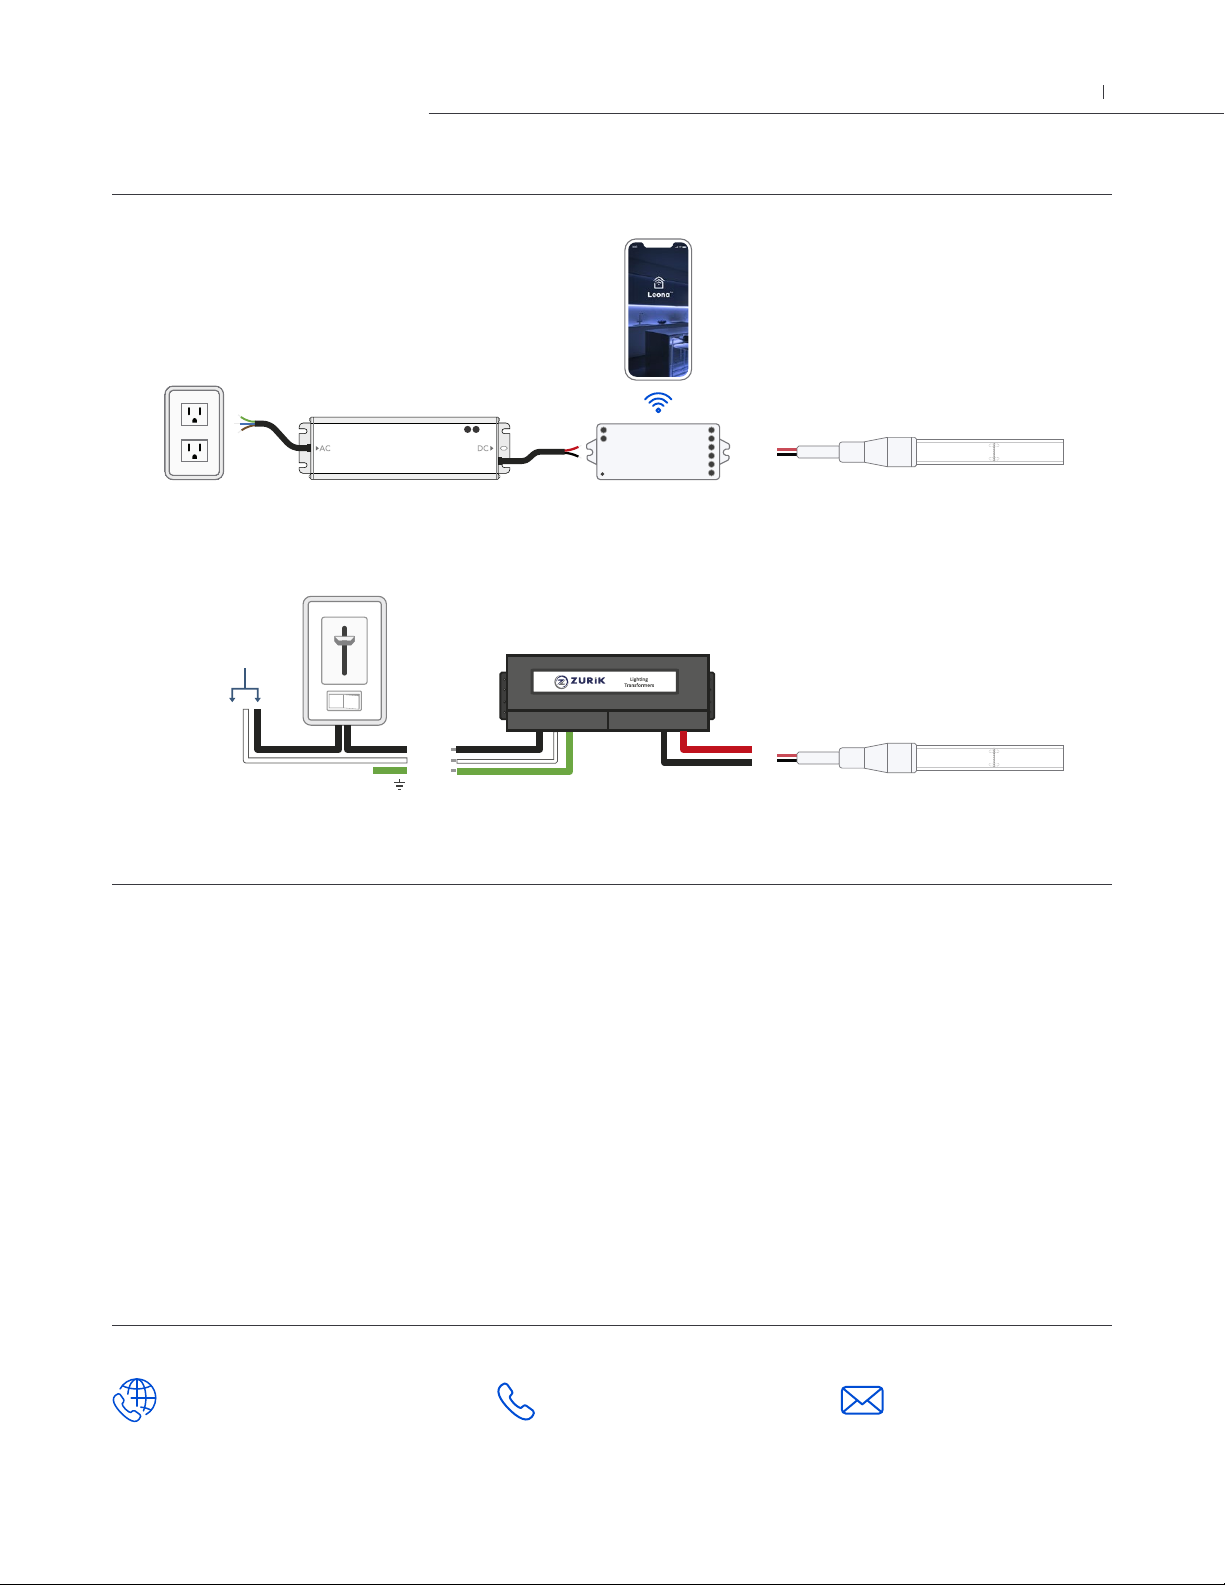
13. Complete All Connections
Complete the connections and wiring between your power supply, dimmers, and controllers. For more guidance, refer to the
system diagrams below on how to connect your UltraBright™ Valor Premier Diffusion Series LED Strip Lights to your driver.
14. Turn Power on at Circuit Breaker
Turn on the power. The UltraBright™ Valor Premier Diffusion Series LED Strip Lights should light up and work properly.
05
UltraBright™ Valor Premier Diffusion Series LED Strip Light Installation Guide
You’re Covered!
Flexfire LEDs’ Industry Leading Warranty
We work our hardest to only use the highest quality components in our LED strip lights, drivers, controllers, and accessories. We
recognize that most people do not use their lighting systems 24 hours a day, and would love to match our LED’s longevity data
with a warranty that fits the majority of our customers’ use cases.
For that reason, we offer an industry topping (7) year warranty on most of our LED strip lighting products, and prolonged warran-
ties on drivers, controllers, dimmers, and accessories. Please read over the warranty policy at www.flexfireleds.com/warranties
to learn about the warranty period and exceptions.
System Diagrams
Warranty
Contact Information
www.flexfireleds.com
Local Number:
Toll Free Number:
1-844-353-9347
ELV/MLV Dimming
PWM Dimming
120V AC
Power
LN
G
+
-
Leona™Smart
Home Controller
Mean Well
Power Supply
+
-
06
UltraBright™ Valor Premier Diffusion Series LED Strip Light Installation Guide
This manual suits for next models
1
Table of contents
Other Flexfireleds Lighting Equipment manuals


Popular Lighting Equipment manuals by other brands


EE Lighting
EE Lighting SLWP-35LED-50K installation instructions

B-K lighting
B-K lighting BACK BOX installation instructions

HEPER
HEPER TILA S AFX 2 Module Installation & maintenance instructions

Catellani & Smith
Catellani & Smith Albero della Luce Assembly instructions

Dometic
Dometic GLO-A500 operating manual

DÖRR
DÖRR REPROSTAND SET H75 instruction manual