Flexifoil BLADE III Instruction Manual

Thank you for purchasing your new Flexifoil Blade III.Before
flying your kite, you should take time to read and understand
these instructions and safety warnings.
Instructions include: safety, wind terminology, overview, setting
up, safety system, launching, steering, landing, packing away,
tuning tips and care and maintenance.
You can download this manual and any updates from
www.flexifoil.com/downloads
INSTRUCTIONS AND SAFETY MANUAL
BLADE III

Blade III Instructions | Page 2
ESSENTIAL DO’S AND DON’TS
Flexifoil strongly recommend that you abide by ALL safety guidelines and conduct yourself in a safe manner at all times
Seek expert advice from a recognised Flexifoil Dealer, or take lessons from a fully qualified instructor BEFORE
undertaking any power and traction activities
NEVER fly your kite in conditions that are too extreme or winds that are too strong for your skill level or your
equipment i.e. ALWAYS learn to fly with a smaller kite in lighter winds before attempting to fly a larger or
more powerful kite in stronger winds
ALWAYS check your equipment for wear and tear before flying. DO NOT fly with worn or damaged equipment.
Repair or replace accordingly
Use EXTREME caution when using kite traction equipment as improper use of this equipment can cause serious
injury or death
ALWAYS select safe launching and landing areas free of people and obstacles. Disable your kite and lines on the
ground when not in use
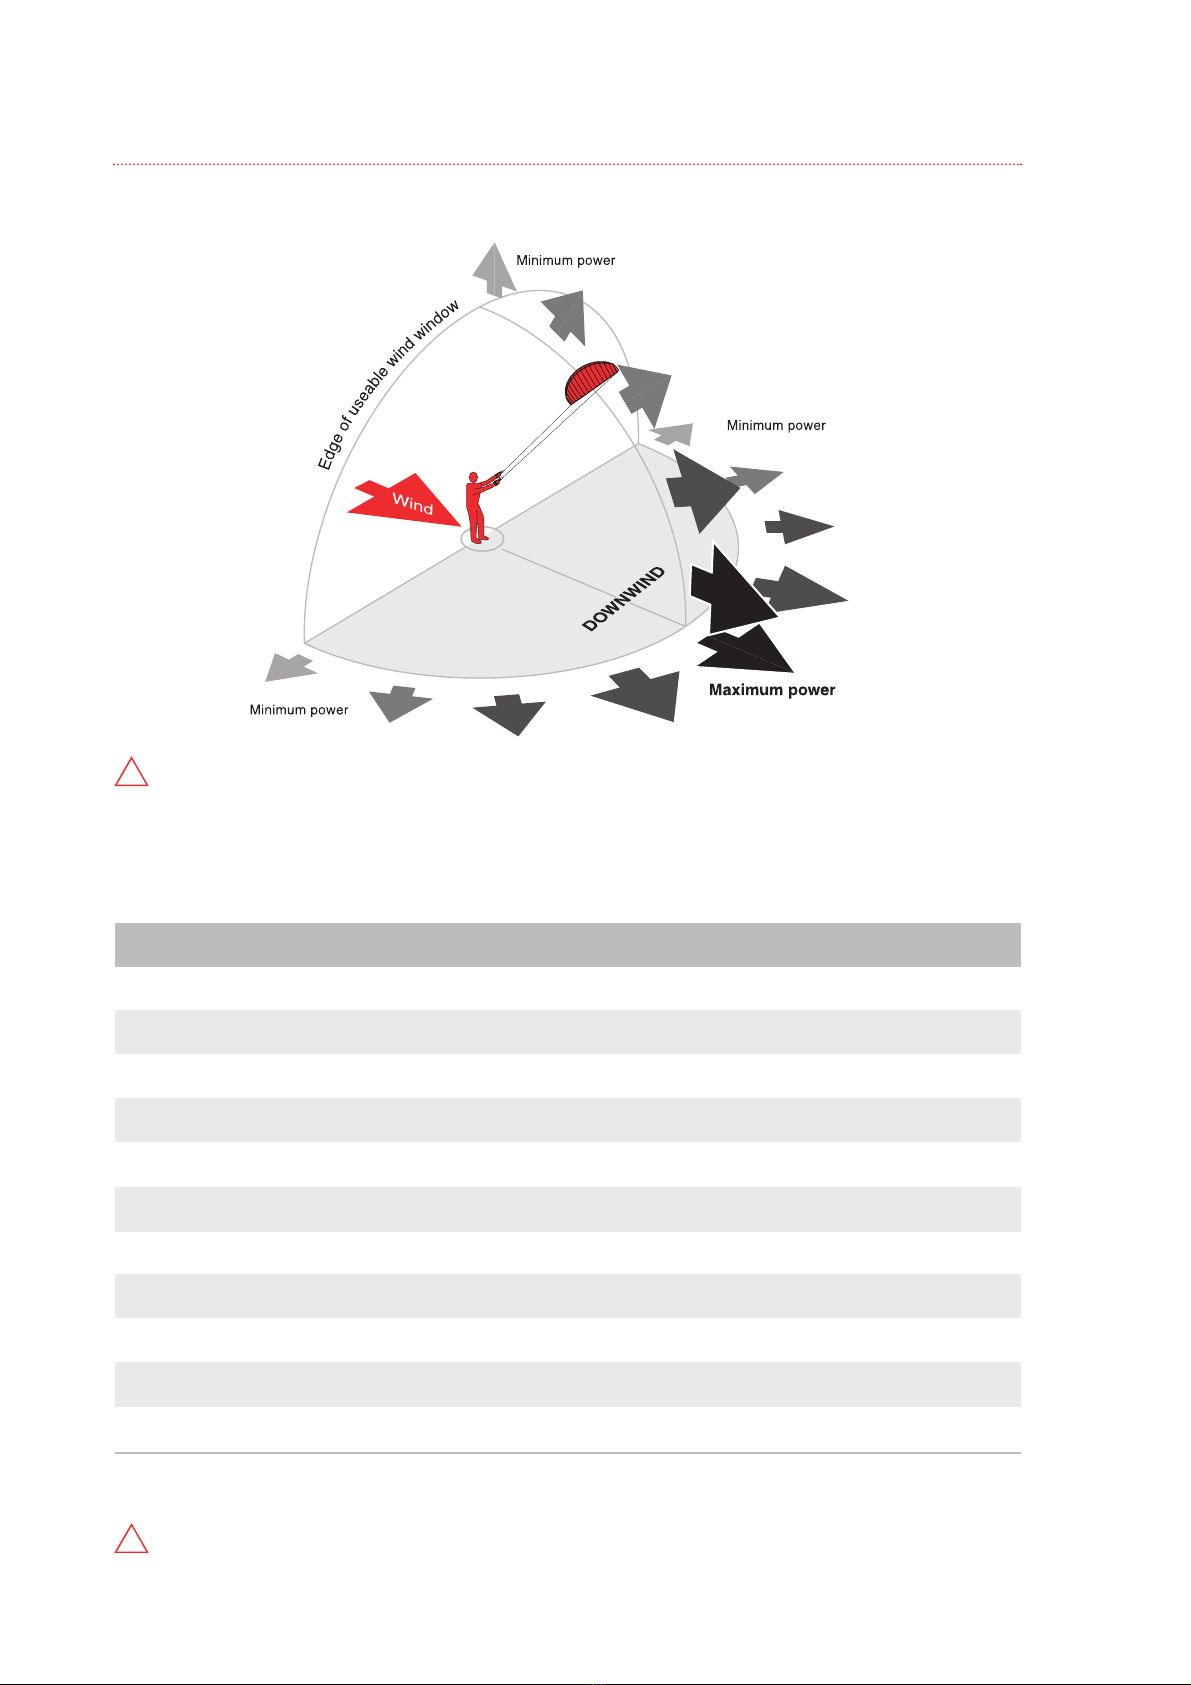
ALWAYS maintain plenty of space around you in all directions, especially downwind. Traction kites can pull you
downwind for a considerable distance
NEVER attach yourself permanently to your kite or secure yourself to a fixed object whilst flying your kite
NEVER allow inexperienced kite flyers to use your equipment
Use appropriate SAFETY equipment i.e helmet, knee and elbow pads, protective eyewear, gloves etc.
Flying lines and bridles under tension can cut like a knife. Always keep your lines away from people and animals.
NEVER attempt to catch or hold a kite by the lines or bridle
DO NOT fly your kite near power lines, in storms, near airports, roads, railways, people or animals
Flexifoil kites CANNOT be used for paragliding or parascending
Remember, YOU are responsible for the safe operation of your kite and equipment at all times
CHOOSE YOUR FLYING SITE CAREFULLY
TURBULENT WIND CLEAN WIND
SAFETY FIRST
.
.
.
.
.
.
.
.
.
.
.
.
.
!

Blade III Instructions | Page 3
THE WIND
CROSS WIND CROSS WIND
!
Weather conditions can be unpredictable and can change very quickly. ALWAYS be vigilant and respect the power of the wind
When launching kites in strong winds, ALWAYS launch at the edge of the wind window
!
Ripples with no appearance of
scales; no foam crests
<1
1-5
6-11
12-19
20-29
30-38
39-50
51-61
62-74
75-86
87-101
0
1
2
3
4
5
6
7
8
9
10
<1
1-3
4-7
8-12
13-18
19-24
25-31
32-38
39-46
47-54
55-63
<1
1-3
4-6
7-10
11-16
17-21
22-27
28-33
34-40
41-47
48-55
Calm
Light Air
Light Breeze
Gentle Wind
Moderate Wind
Fresh Wind
Strong Wind
Near Gale
Gale
Strong Gale
Storm
Smooth as glass Not enough wind to fly kite
Small wavelets; crests of
glassy appearance
Large wavelets; crests begin
to break, scattered whitecaps
1-4ft waves;
numerous whitecaps
4-8ft waves; many whitecaps;
some spray
8-13ft waves forming whitecaps
everywhere; more spray
13-20ft waves; white foam
blown in streaks
13-20ft waves; edges of crests
beginning to break; foam in streaks
20ft waves; sea begins to roll;
dense streaks of foam
20-30ft waves; white churning sea;
rolling is heavy; reduced visibility
Description
Force MPH Knots KPH At Sea
0-0.2
0.3-1.5
1.6-3.3
3.4-5.4
5.5-7.9
8.0-10.7
10.8-13.8
13.9-17.1
17.2-20.7
20.8-24.4
24.5-28.4
Metres/sec The Flying Experience
Difficult to fly kite - very low wind
Good conditions for
large kites or beginners
Ideal flying conditions
Good conditions for smaller kites
or experienced flyers
Experienced flyers
Very small kites or very
experienced flyers
Dangerous winds
Do not fly
Do not fly
This table is intended as a rough guide only
THE WIND WINDOW
Smoke drift indicates wind
direction; vanes do not move
Calm; smoke rises vertically
Wind felt on face; leaves rustle;
vanes begin to move
Leaves & small twigs in
motion; light flags extended
Leaves & loose paper raised up;
flags flap; small branches move
Small trees begin to sway;
flags flap & ripple
Large branches in motion;
whistling heard in wires
Whole trees in motion; resistance
felt in walking against wind
Whole trees in motion; resistance
felt in walking against wind (again)
Slight structural damage occurs;
shingles blow from roofs
Trees broken/uprooted; considerable
structural damage occurs
On Land
WIND SPEED TABLE

Blade III Instructions | Page 4
Flying line
attachment
points
OR
Rucksack Blade III Kite Handles Control BarFlying Lines
HANDLES CONTROL BAR
Trailing edge
Brake bridle
left
Main bridle left
Leading edge
Brake bridle
right
Main bridle right
Main bridle toggle
Main bridle toggle
Brake bridle
knots
Main line left Brake line
left
Main line right
Brake line
right
Quick-release
Safety system
Quick-release
Safety system
Main Leader
Flying line
attachment
points
BLADE III PACKAGE INCLUDES
LINES TO CONTROL GEAR
Main Leader
Brake Leaders
Main Leader
Main Leader
Brake Leaders
Harness Strop
BLADE III OVERVIEW
BLADE III SET-UP
Flying line
attachment
points
Flying line
attachment
points

Blade III Instructions | Page 5
Wind
CONNECTING LINES TO CONTROL GEAR - THE LARKS-HEAD KNOT
1
2
UNWINDING YOUR LINES
Unwind all of your lines and separate them on the ground. Ensure there are no tangles before connecting.
All line to kite connections are made using the larks-head knot. The diagrams below show you how to make one in the
loops at the ends of your flying lines. Connect the lines to your control gear before attaching the lines to your kite.
Larks-head knots can pull very tight during use. However, by pulling on the tag, they will come undone easily.
Your kite is supplied with a set of 25m flying lines. The sleeving has been colour coded for easy identification - red for
left and blue for right. Also, the main (strongest) lines are a little thicker than the grey brake lines in appearance.
Handles: Each handle has two ‘leader’ lines (main and brake) which both have knots at the end. Connect the left main
line to the leader line at the top of the left handle and connect the left brake line to the leader line at the
bottom of the handle. Use larks-head knots. Repeat the procedure for the right main and right brake lines.
Control Bar: Connect the left main line to the leader line on the left side of the bar and connect the right main line to
the leader line on the right of the bar. Use larks-head knots. Connect the left and right brake lines to the
left and right brake leader line attachment points on the centre line.
Flyer’s
eye view
Main Line
Main Line
Brake Lines
!
Main Line
Main Line
Brake Lines
!
Main Line
Main Line
Brake Lines
!
BLADE III SET-UP (PART 2)

Blade III Instructions | Page 6
CONNECTING THE LINES TO THE KITE
1
2
Connect the two main lines to the main bridle toggles. Use larks-head knots.
Connect the two brake lines above the 2nd brake bridle knots on the brake bridle leaders. Use larks-head knots.
TUNING KNOTS ARE SUPPLIED ON THE BRAKE BRIDLE LEADERS. SEE TUNING TIPS (PAGE 15).
Brake bridle
leader left Brake bridle
leader right
Main bridle toggle
Main bridle toggle
2nd Brake bridle knot
Make sure the brake lines are attached
above the 2nd brake bridle knot
BLADE III SET-UP (PART 3)
!
1st Brake bridle knot

Blade III Instructions | Page 7
THESAFETY SYSTEM
To use the safety system, place the straps around each
wrist before launching (bar only has a single safety
strap). Ensure that you have the elastic hanging down
and not tangled in the handles (or bar).
Launch the kite in the normal way (see page 8 for
information on launching with handles and page 11 for
launching the kite using the bar).
Test the safety system to ensure you can activate it in an
emergency. When the kite is powered up, simply let go of
the control gear.
As you let go, the handles (or bar) will fly out of your
hands activating the brake lines. This braking action will
de-power the kite and bring it to the ground.
The kite will gradually come to a standstill on the
ground. Once the kite has landed, simply pick the
handles or bar up and you’re ready to fly again.
ALWAYS TEST BEFORE USE!
Your Blade III is supplied with a safety system. Flexifoil recommend that you use the safety system whenever you fly your kite.
The safety system will enable you to let go of your handles or bar if you are ever overpowered - without losing your kite!
!

Blade III Instructions | Page 8
CORRECT HANDLE POSITION
Ensure you have the correct handle position.
CORRECT LAUNCH TECHNIQUE WITH HANDLES
In STRONG winds always launch towards the edge of the wind window (see page 3) - DO NOT launch directly
downwind (except in light winds) as Blades can be very powerful
The safest way to launch your kite is across the wind as
shown in the diagram above. Place your kite on its back on
the ground with the upwind wing-tip secured with sand
or other suitable weight. When ready, take up the slack on
the lines and the downwind tip will begin to inflate. Keep
the brakes applied until you are ready to launch.
In light winds you may need to walk back
To launch, pull back gently on both handles, releasing the
brakes, until the leading edge of the kite starts to lift off
the ground and the kite fully inflates. The kite will now
stand up on its trailing edge and take off. In strong winds
steer the kite to the edge of the wind window (page 3).
PRE-LAUNCH PREPARATIONS
!
!
LAUNCHING YOUR KITE

Blade III Instructions | Page 9
SLOW TURNING
FAST TURNING
STEERING YOUR KITE WITH HANDLES
When learning, it is best to make gentle left and right turns at the top of the wind window to get used to your kite.
If you fly through the centre of the wind window, the power of the kite will increase significantly and could cause
you difficulties. Get your confidence up first before going for more power!
Basic turns are made by pulling the left handle towards you to turn left and by pulling the right handle to turn right.
You can achieve faster turns by rotating your wrist to pull the bottom of the handle towards you as well as the top of the
handle. This pulls the brake lines as well as the main lines which means the kite will turn faster or even spin on its axis.
Return the handles to the neutral position to stop turning.
Left turn Right turn

Blade III Instructions | Page 10
LANDING YOUR KITE WITH HANDLES
In light to moderate winds, apply full brakes by
rotating both wrists to pull the brake lines only towards
you. The kite will fly slowly backwards and land on its
trailing edge. This manoeuvre takes some practice, as
the handles need to be ‘played.’
If the kite lands leading edge down, you can relaunch it
by reversing. Apply both brakes by twisting your wrists
until the trailing edge rises into the air.
As this happens, release one brake and tighten the other.
The kite will rotate on its axis and point upward. Pull
again on both brakes to land the right way up, or release
them to re-launch.
In strong winds, steer the kite towards the minimum
power area near the ground and release the handles
using the safety system. After landing, walk back to
keep tension on the lines, preventing the kite from
being blown about.
If one wingtip descends too quickly the kite may rotate. In this case, the brake should be released a little on this side
to straighten the descent.
!
REVERSING YOUR KITE WITH HANDLES

Blade III Instructions | Page 11
CORRECT BAR POSITION
In STRONG winds always launch towards the edge of the wind window (see page 3) - DO NOT launch
directly downwind (except in light winds) as Blades can be very powerful
The safest way to launch your kite is across the wind as
shown in the diagram above. Place your kite on its back on
the ground with the upwind wingtip secured with sand or
other suitable weight. When ready, take up the slack on
the lines and the downwind tip will begin to inflate.
You may need to walk back to launch the kite.
Ensure you have the correct bar position.
Continue pulling back on the bar until the kite begins to
launch.
In strong winds steer the kite to the edge of the wind
window.
!
!
CORRECT LAUNCH TECHNIQUE WITH THE BAR

Blade III Instructions | Page 12
STEERING YOUR KITE WITH THE BAR
SLOW TURNING
FAST TURNING
When learning, it is best to make gentle left and right turns at the top of the wind window to get used to your kite. If you
fly through the centre of the wind window, the power of the kite will increase significantly and could cause you difficulties.
Get your confidence up first before going for more power!
Basic turns are made by pulling the bar left towards you to turn left and by pulling the bar right towards you to turn right.
You can achieve faster turns by pushing the top end of the bar away from you whilst pulling the bottom of the bar towards
you. Return the bar to the neutral position to stop turning.
Left turn Right turn

LANDING YOUR KITE WITH THE BAR
Blade III Instructions | Page 13
In light winds, reach forward with one hand to pull on the
centre line and reverse the kite to the ground.
If the kite lands leading edge down, you can relaunch it
by reversing. Whilst holding the bar with one hand,
gently pull on the centre line. The trailing edge will rise
into the air.
Trailing edge
Leading edge
Strong Winds
Light Winds
In strong winds, steer the kite towards the edge of the
wind window near the ground and release the bar using
the safety system. After landing, walk back to keep
tension on the lines, preventing the kite from being
blown about. Secure the kite using the process detailed
on page 14.
As this happens, pull the bar left or right towards you to
rotate the kite on its axis and point upward. Pull more on
the centre line to land the right way up, or release it to
relaunch.
REVERSING YOUR KITE WITH THE BAR

Blade III Instructions | Page 14
Flexifoil recommend that you DO NOT disconnect flying lines from your control gear
WITH CONTROL BAR
Place the handles together. Hold
the brake leaders against the
handles and wind the safety lines
around them. Secure the safety
straps tightly at the centre.
Place the safety strap on
your wrist to keep it
clear. Hold the bar at the
centre and wind the
leader lines around the
bar in a figure of eight.
WINDING YOUR LINES
WITH HANDLES
Holding the handles by the
safety straps, wind the lines in a
figure of eight. Keep winding as
you walk towards the kite.
Just before you reach the kite
attachment points, secure the
lines between the tops of the
handles .
Continue winding the
flying lines using the line
guides on the bar end
mouldings. Wind as you
walk towards the kite.
Just before you reach
the kite attachment
points, wind the lines a
few turns around one
end of the bar and tuck
into the securing slot.
Wind the safety line
around the harness strop
and secure the wrist
strap around the strop.
SECURING YOUR KITE
Handles: Secure to the ground by inserting a ground stake through the loops on the bottom of the handles.
Bar: Secure to the ground by inserting a ground stake through the wrist strap. Walk over to the kite and secure it by
putting sand or heavy objects on the trailing edge. Avoid using sharp objects as these can damage the kite sail.
NEVER leave your kite unattended. If you have finished flying, pack it away for safety
!
!
IMPORTANT:To avoid twists in the lines, it is vital that the next time you use your kite, you unwind the lines in the same way
as you wound them on; i.e. the unwinding action must be the exact reverse of the winding action.
!
IMPORTANT:To avoid twists in the lines, it is vital that the next time you use your kite, you unwind the lines in the same way
as you wound them on; i.e. the unwinding action must be the exact reverse of the winding action.
!

Blade III Instructions | Page 15
Main Lines
Brake Lines nearly tight
Main Lines
Brake Lines too tight
Main Lines
Brake Lines a little loose
Main Lines
Brake Lines too loose
Flexifoil Blades have been designed to fly on lines of equal length. The kite flies primarily on the main lines with the brake
lines being used for extra control in launching, turning, landing, reversing etc. To get the most out of your kite, it may be
necessary to tune it to match the wind conditions whenever you fly it. It will take some experience to become skilled at
tuning your kite, but once you have mastered it, it’s easy to do. Visit www.flexifoil.com/tips for more information.
Brake lines too loose
Lack of brake control.
No reversing of kite.
Brake lines a bit loose
Good control.
Kite climbs fast.
Less responsive brake
movements.
Brake line nearly tight
Good control.
Kite may hesitate to climb
in light winds.
Brakes register small
control movements.
Brakes lines too tight
Kite stalls/lags/rotates.
Difficulty launching.
Difficulty climbing to the
top of the wind window.
If the brake lines are too slack or too tight, the kite will not fly correctly.
Flexifoil recommend that you DO NOT disconnect flying lines from your kite
Separate the two sides of the bridle and secure the line attachment points under the red and blue grip tapes at the centre
of the trailing edge. Keep the bar or handles clear of the kite and fold it from the tips to the centre, concealing the bridle
as you do so. This is most easily done with one tip pointing downwind.
Keep folding until the kite is folded to about 40cms width. Roll it up from the trailing edge including the bar or handles.
Alternatively, the bar or handles can be placed on the side of the bag after the kite has been packed, with the lines
entering the bag between the two zippers.
NEVER store your kite wet. Always allow it to dry before packing and storage
The standard brake connection for equal lengths lines is the knot about 30cms from the end of each brake line (this is the
knot nearest the kite).
If the brake lines are too loose, make your own knots on the brake leader lines nearer to the kite. Connect the brake lines
to these knots to shorten their effective length.
If the brake lines are too tight, you can also shorten the effective length of the main lines to compensate. Do this by
adding a knot to each of the handle main leader lines to shorten them. Then attach the main flying lines to these knots.
When flying with a bar, the brake lines will be loose. If they are too tight you may experience control problems. To
correct this, add knots to the main leader lines on the bar
PACKING AWAY YOUR BLADE (WITH HANDLES OR BAR)
!
!
!
ADJUSTMENT OF FLYING LINES
TUNING TIPS

REPAIRS SERVICE
Damaged your kite? Flexifoil kites have been designed to
be strong and durable. However, they are not
indestructible. If they are crashed hard into the ground
or dragged they may get damaged. For this reason we
have a repairs service available.
ONE MONTH FREE REPAIR OFFER
Blades are covered by our One Month Free Repair Offer. If
you damage your kite within one month of purchase, we
will repair it free of charge! Please follow the
instructions on the Free Repair Voucher you received
with your kite or visit www.flexifoil.com/repairs for
more details.
STANDARD REPAIR SERVICE
If you damage your kite when the One Month Free
Repair Offer has expired, Flexifoil offer a quick and
inexpensive repair service to all its customers. We also
stock spare parts and sails for both current and
discontinued kites. You can repair small tears with
Flexifoil self adhesive repair tape. For larger and more
complicated repairs, we recommend that you return your
kite to Flexifoil International.
Flexifoil undertake most repairs at our factory but
overseas customers should contact their local distributor
for assistance. Please visit www.flexifoil.com/repairs for
the latest information.
WARRANTY
At Flexifoil we believe in designing and manufacturing our products to the highest possible standards. We pride ourselves
on our outstanding quality control but if any of our products fail as a result of defective workmanship or faulty materials,
we will replace it free of charge. This is in addition to your statutory rights.
Products will not be replaced which have been:
damaged as a result of normal wear and tear, misuse or neglect
repaired or modified without the authorisation of Flexifoil International Ltd
returned to Flexifoil International Ltd without a valid receipt
If you live in the UK, please return faulty products to your local dealer or Flexifoil International. If you live outside the UK
please return faulty products to your distributor. A list of dealers and distributors can be found at www.flexifoil.com
IMPORTANT NOTE ON FLYING LINES
Flexifoil will not replace flying lines that have been improperly used, have become worn through normal use or have failed as a
result of knots in the line. If kites are flown on flying lines of insufficient breaking strain, the lines will break. Always follow
Flexifoil recommendations to ensure that flying lines of an appropriate breaking strain are used when flying one or more kites.
Flexifoil International Limited 27 Regal Drive, Soham, Cambridgeshire, CB7 5BE, UK.
Version 1.0 © FLEXIFOIL INTERNATIONAL LIMITED 2004
R
INSTRUCTIONS AND SAFETY MANUAL
CARE AND MAINTENANCE
Taking good care of your kite will prolong its life
AVOID flying your kite near trees, hedges, stone walls,
barbed wire fences or other obstacles that could damage
your kite.
DO NOT drag your kite across the ground when trying to
launch or land, especially in stubble fields, on stony
beaches or on other abrasive surfaces that could damage
your kite.
NEVER store your kite wet. Always allow it to dry before
packing and storage.
Your kite can be hand-washed with care in warm NOT
HOT soapy water. Use a mild detergent, i.e. washing up
liquid, and a soft sponge.
DO NOT use aggressive detergents or abrasive materials
to clean your kite.
DO NOT use a washing machine or tumble dryer!
ALWAYS check your equipment for wear and tear before
using it and repair or replace accordingly.
.
.
.
!
Table of contents