Glide Free Design FOILS Manual

GLIDE FREE FOILS - Welcome 1 Copyright Glide Free Design 17/04/14 Rev 1
GLIDE FREE FOILS 1
Glide Free Design Pty. Ltd.
ACN 144 984 529
Foil set up
In this document we outline the basics how to set up Glide Free Foils for your Laser.
Initial set up
Once you have received your new set of foils, please read all detailed instructions before
proceeding to attach the foils to your boat. Here are the basic steps required to set up your boat.
Fitting the centrecase insert
This operation need only be done once. Firstly, tip your boat on its side on the trolley and insert the
Glide Free centre case insert from the underside as shown below. If you are alone, it helps to put the
lower mast section in the mast step and use this to hold the boat on its side.
Take care to inspect your centrecase as some Laser centrecases, even on new boats, may have
obstructions such as resin left over from manufacture, which needs to be cleared. Be careful to insert
forward edge first and push it firmly into place with a hit from your hand. Tip the boat back upright and
pull the insert up tight from above.
Push the centrecase insert into the underside of the Laser centrecase.
Some Laser centrecases are shorter or narrower than others, which can make it difficult to fit the
centrecase insert. We have found that the key areas requiring attention are those shown in the
figure below. In most cases (90%) the insert slides in without need for any attention. Under
exceptional circumstances however, it may be necessary to cut or file some parts of the
centrecase insert as shown. There is no problem to do this, however it is important to ensure the
insert is a firm fit, so that the foils are not a sloppy fit when sailing.

GLIDE FREE FOILS - Welcome 2 Copyright Glide Free Design 17/04/14 Rev 1
GLIDE FREE FOILS 2
Areas of the centrecase insert which may need to be filed or ground to fit your boat.
Packers
Fit the gear block over the top of the centrecase insert as shown below and insert the toggle pin
always from the starboard side as shown below.
Gear block with retaining pin inserted through the centrecase insert from the starboard side
There will normally be a gap between the underside of the gear block and the deck which will
require packers.
Gear block packer set

GLIDE FREE FOILS - Welcome 3 Copyright Glide Free Design 17/04/14 Rev 1
GLIDE FREE FOILS 3
To make sure the packers are the correct size, pull the centrecase up hard against the underside
of the boat, one way to do this is to place a block under boat to push the centrecase insert up into
the case.
Method to support the centrecase insert from below when fitting the gear block.
Measure the gap under the gear block and choose the appropriate packing blocks to fit under the
gear block. This should normally involve a single 5mm packer on both left and right sides. Due to
subtle variations in the hull/deck height of each Laser dinghy, we have allowed for smaller or larger
gaps to be accommodated by using smaller packers or stacking multiple spacers to fit appropriately
Select the appropriate packer thickness and use the screws provided to attach the packer to the
underside of the gearblock. Use shorter screws for up to 5mm packing height and the longer screws
for larger packers. We have found that a small amount of Superglue on the face of the packer will
help it bond to the gearblock and remain aligned.
Fig 15 Gear block with packers attached with screw Fig 16 Packer
It is not essential to have a perfect or particularly tight fit, but the closer the better.
Once the boat has been fitted with the insert, glue and screw the blocks to the underside of the gear
block using Superglue (not supplied) and allow it to dry before re assembling. There should be no
further need to alter the packing for this specific boat. You only need to set this up once, after that,
you can simply assemble by attaching the gear block with the Toggle pin. Insert the centrecase insert
and attach the gear block with the toggle pin from starboard side.

GLIDE FREE FOILS - Welcome 4 Copyright Glide Free Design 17/04/14 Rev 1
GLIDE FREE FOILS 4
Fit the Large Safety Clip
Firstly, attach the large centreboard retaining safety clip to your existing shock cord used to pull the
board forward as shown below. This clip has multiple purposes and MUST always be fitted through
the ‘keyhole’, not the handle, on the starboard side prior to leaving the beach and immediately the
centreboard is inserted.
Safety clip attached to the shock cord with a short cord, which is used to wrap around the retaining pin
The Safety clip secures the board into the boat, prevents you chopping your fingers off when they are
in the handle and positions the centreboard for engagement into the gear block at the correct height.
The shockcord needs to be tight at all times, even with the board retracted. This can normally be
achieved by attaching the shockcord from the bow. As a secondary safety feature we recommend
attaching a second clip to the centreboard handle, or tie the end of the vang cord to the handle, to
provide extra security should the safety clip be dislodged.
If you do not attach the safety clip through the keyhole you risk losing the centreboard completely out
the bottom of the boat, destroying the internal face of the centrecase, chopping your fingers off or
incorrectly engaging the gear block.
Pull the board down until the clip sits on the deck, then pull the board backwards to engage the gear block.
The Gear handle should always point down, prior to engaging the centreboard handle. Pull the handle
backwards firmly, to engage the centreboard. Once engaged, the teeth in the handle mesh with the
gears in the gear block, which rotates the gear handle into the horizontal position as shown.
Insert Hook in vertical
position in keyhole

GLIDE FREE FOILS - Welcome 5 Copyright Glide Free Design 17/04/14 Rev 1
GLIDE FREE FOILS 5
It is very important now to rotate the large retaining clip 180 degrees and wrap the cord with one
complete turn round the end of the toggle pin as shown. This pulls the board aft into the gear block
and acts as a quick release should the foil hit an object in the water.
The foil is now fully engaged and ready to provide lift. To disengage the foil, simply undo the cord and
push the handle forward.
Once engaged in the gear block, rotate the large retaining clip 180 degrees and wrap the cord around the pin with one
complete turn as shown.
Launching
a) Insert the centreboard
Launch the boat from your trolley in the normal way and take it into knee deep water. Pull on the
mainsheet and tip the boat on its side, sufficiently to allow you to insert the centerboard lifting foil into
the centrecase insert from the underside of the hull. Allow the board to tilt forward, just as with the
standard Laser centerboard.
Inserting the centreboard
Slide the board fully into the centrecase pushing it all the way, until the stops on the wand prevent it
going further.

GLIDE FREE FOILS - Welcome 6 Copyright Glide Free Design 17/04/14 Rev 1
GLIDE FREE FOILS 6
b) Attach safety clip
Walk around to the deck of the boat and attach the safety clip and shock cord.
Connect the safety clip immediately!. This is absolutely essential to prevent the foil falling out of the
boat. Allow the board to be pulled forward, which holds/locks it at the appropriate height.
Then turn the boat upright taking care not to hit the wingtips on the bottom and preventing the board
falling out.
Launching in shallow water with safety clip and shock cord attached
c) Lower the rudder
Lower the rudder to position two, hop on the boat and sail away. Do not sail fast or apply excess
pressure to the foils at this stage, as the wand is not yet fully deployed, it will be heavily loaded if you
sail at over 5kts. Once clear of the shore and in deep water (2m), firstly release the retaining clip on
the rudder stock and lower the rudder, pull on the hold down cord and cleat in position in the normal
way.
d) Lower the centerboard by pulling it backwards a little until it is free and lower it until the large
retaining safety clip sits on the upper surface of the centrecase insert. Use the handle to pull the
board aft, towards you, until it engages with the toggle pin and gear. Pull the top of the centerboard
aft, until the gear handle moves upwards and is fully engaged. You are now ready to go foiling!!
e) It is now just a matter of practice and having some guts!! Start in a moderate 10-12kt steady
breeze, bear away on to a reach and lean hard, as the boat lifts, bear away and pull in the mainsheet.
Experience the thrill of lift off and foiling. Get the feel of the boat. Some of the things you will notice
are the boat remains stable but all goes quiet save the swish of the foils and wand as the boat
accelerates well beyond the wind speed. This feels like low level gliding and is a surreal experience.

GLIDE FREE FOILS - Welcome 7 Copyright Glide Free Design 17/04/14 Rev 1
GLIDE FREE FOILS 7
For your first sail, choose a steady breeze and moderate 10-15kt winds.
Lighter sailors can use a Laser Radial rig, with very good performance.
Rudder set up
Clip on the rudder assembly. *Always attach the thrust washer with retaining clip.
Any of the washers may be used as a thrust washer, in combination with the retaining ‘snail’ clip. This
washer is attached by a cord to the retaining pin and MUST be installed prior to foiling. Otherwise the
rudder will come off the boat when you foil.
The tie cord is attached to the thrust washer and retaining clip. Typical photo of the arrangement as
follows.
Showing the thrust washer in place

GLIDE FREE FOILS - Welcome 8 Copyright Glide Free Design 17/04/14 Rev 1
GLIDE FREE FOILS 8
Ideally your rudder box should be mounted as high as possible to provide clearance for the tiller
above the traveller deck cleat. We have found that the gap in standard Lasers fittings can vary from
by up to 10mm and so variable height of packing in required. Choose the appropriate packer
thickness or combination of packers to give the best fit. This also removes any slack in the rudder
fittings when foiling.
Alternatively, the packers can be added under the gudgeon, above the thrust washer, in order to
remove slack in the rudder fittings when foiling. As they are removed each time the rudder box is
attached, a hole is provided to retain these washers with a cord.
It is extremely important to tighten the large wing nut on the bolt attaching the rudder blade to the
rudder box. There should be no sideways movement of the rudder blade within the rudder box. A
loose bolt can result in deformation of the rudder box when under high loading.
Glide Free rudder washers are also a great asset for any standard Laser as they are purposely
designed to raise the standard rudder box and prevent the tiller hitting the traveller cleat on the deck.
Trim adjustment
The Trim adjusting thumb nut is on the top pf the rudder blade as shown. It is provided for on the
water adjustment of the flying trim of the boat. Turn the nut anti-clockwise to trim the bow down for
safe low level flight in heavy air and clockwise to trim nose up for easier takeoff in light air. It should
only be necessary to change this trim to suit the crew weight and wind strength. Due to the unique
design of the Glide Free Foil arrangement it is not necessary to alter this trim setting while sailing.
The adjustment of the rudder trim is set at the factory. Do not alter this setting until you have sailed
the boat and determined if the flight attitude is correct.
Showing trim adjusting thumb nut on the rudder
Trim Adjusting
thumb nut

GLIDE FREE FOILS - Welcome 9 Copyright Glide Free Design 17/04/14 Rev 1
GLIDE FREE FOILS 9
How the foils work
Initially, the centreboard lifting foil is set at a large angle of attack to the water by the wand. The
Laser requires around 7-8kts boat speed to take off. As the forward foil lifts, so does the bow.
Both the main foil and rudder foil increase their angle of attack, providing even more lift, but also
more drag. At this stage, the boat may stall and fail to take off if there is insufficient power to
overcome this extra drag and to maintain the takeoff speed. This power is provided as the wind
increases. The extra force generated by an increase in windspeed from 10 to 12 kts, provides
around 40% more power, making takeoff easy.
As the boat rotates to around 4 degrees trim angle, the rudder foil lifts and establishes a stable
trim angle compared with the main foil. Otherwise the boat would simply lift higher and higher at
the bow until it stalls or comes clear of the water and crashes. Setting the rudder trim angle is
therefore very important.
Setting the rudder with very little initial lift allows a greater angle of attack during rotation, allowing
easy takeoff. Sitting well aft in the cockpit has a similar effect. The limitation is that too little lift on
the rudder may stall the foils at takeoff and will also make the boat fly far too high when foiling.
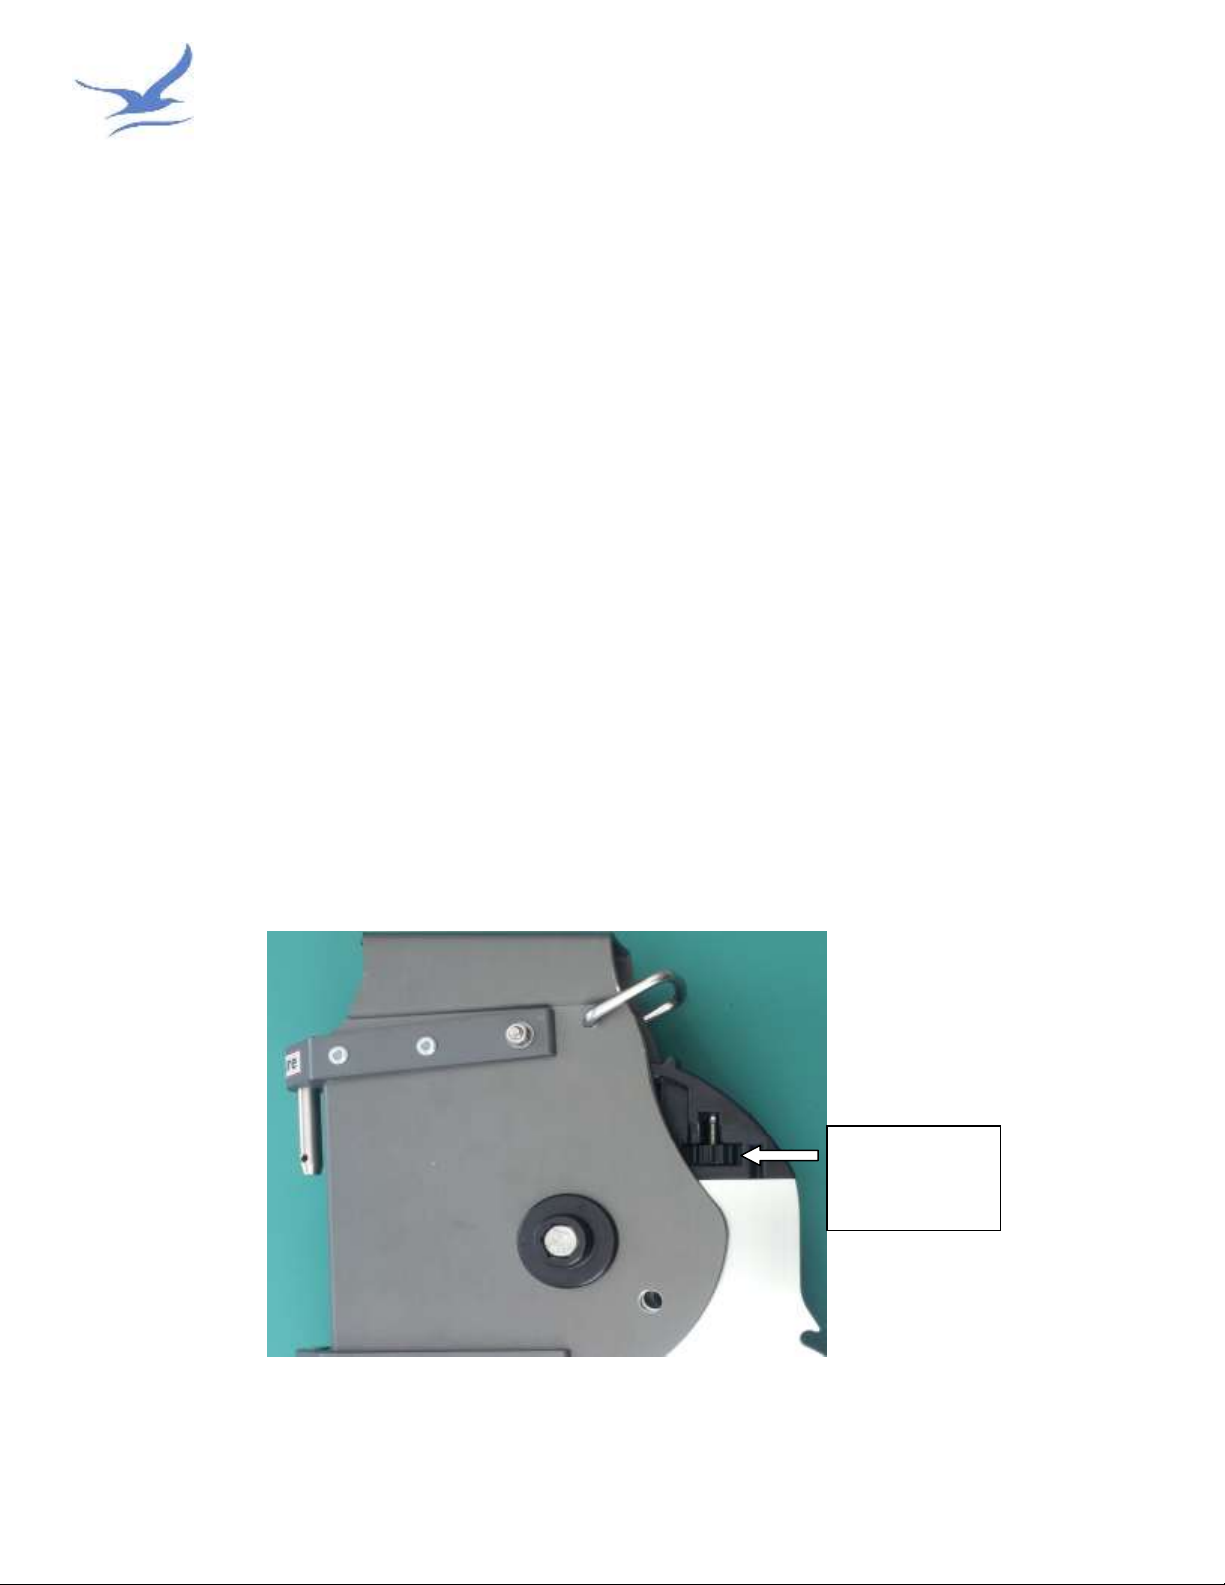
Finding the correct angle is important, but once established, it requires no further adjustment. We
have found that the boat flies best with around 10mm gap between the horixontal and vertical
rudder foils, but we recommend you start with 6-8mm and the gradually adjust with more lift on
the rudder until you get it right for your weight and rig.
You can employ several techniques to promote early takeoff, most require some practice. Heeling
slightly to windward and bearing away to a broad reach works best. Pumping and ooching does
not seem to help. Sheeting in hard and pointing higher on a beam reach does not work either!
Sitting well aft helps the bow lift more easily and produces more lift.
Once the wind strength increases to 15 kts you have well over double the power of 10kts, making
it easy to lift off, without the need for sitting aft or special techniques.
As the boat leaves the water, the wand drops, reducing the angle of attack on the main foil, this in
turn reduces the drag, allowing the boat to accelerate and stay close to the water surface.
Now you are up and away. The best thing to do now is move your weight forward and bear away,
keeping the sail full, not luffing, but make sure you do not over sheet and stall the sail.
With around 10-12kts of wind, there is just enough power to lift the boat clear of the water.
We wish you many hours of fun sailing on your new Glide Free Foils.
Glidefree Design
Please go to our website www.glidefree.com.au for the latest tips and information on Glide Free Foils
Other Glide Free Design Windsurfing Equipment manuals