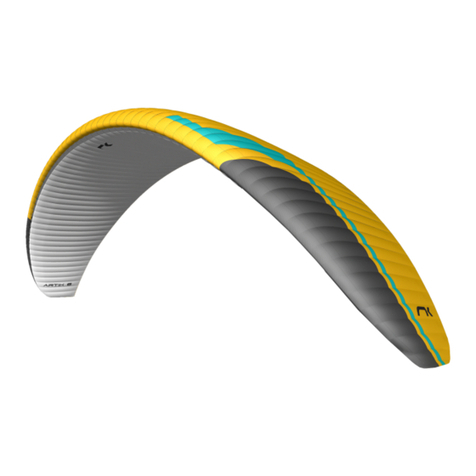
Genetrix Origin User manual


DRAFT
not for distribution
INTRODUCTION 3
WARNING! 4
DISCLAIMER 5
OVERVIEW 6
SAFETY 8
WIND RANGE 10
SETTING UP YOUR KITE 12
SETTING UP YOUR BAR 14
MAIN QUICK RELEASE 16
SECONDARY QUICK RELEASE 18
SAFETY LEASH 20
HOOKING IN 22
ASSISTED LAUNCHING 24
TUNING YOUR KITE 26
ASSISTED LANDING 28
WATER RELAUNCH 30
TIPS 32
PROBLEMS & SOLUTIONS 33
WARRANTY 34
KITE CARE 42
REGISTRATION CARD 43
CONTENT
www.genetrixkites.com

INTRODUCTION
Thank you for purchasing a Genetrix kite. You have chosen a high quality product
with exceptional performance. We are proud of the superior materials, design
and construction that make Genetrix kites extraordinary. Please read this manual
in its entirety and familiarize yourself with the design features of our 4 line traction
kites. It is imperative that you understand and follow all directives and safety
precautions in this user guide. This will insure you get the best use of your kite
as well as increase the longevity of your Genetrix product. This user manual has
been written to help you operate your new kite, but is not intended to replace
professional instruction from a certied kite school.
One (1) year limited warranty for Genetrix kites
To be able to benet from a full warranty coverage and the advantages of the
client service, you must register your product within 7 days of purchase in the
“warranty” section, on the www.genetrixkites.com website.
INTRODUCTION
www.genetrixkites.com

DRAFT
not for distribution
It is the user’s responsibility to carefully read this user’s guide and instruct
all users on the safe operation of Genetrix kites.
You must read and understand the entire contents of this manual before any
attempt to fly your kite. You must be fully aware of the risks that go with this
sport, and know that you are exposing yourself to real danger. Inappropriate
use of traction kite devices can result in serious accidents or lead to the death
of the user or third parties. Completion of formal training in a recognized
kiteboarding school is imperative before rst use of any traction kite. Neither
the dealer, distributor, nor manufacturer of products are liable for material or
bodily damage sustained as a result of inappropriate use of this product.
WARNING!
www.genetrixkites.com

Any use of a traction kite including, kiteboarding, kitesurng,
landboarding and snowkiting is an extreme sport. Use of this product and any of its
components involves certain inherent risks and hazards, and can cause severe injuries,
damage or death to the user and/or third parties. The purchaser/user of this product
freely agrees to accept any and all known and unknown risks of injury, death and/or
liability which may result from the use or misuse of this equipment. In the event of
your death or incapacity, this Agreement shall be effective and binding upon your heirs,
next of kin, executors, administrators, assigns and representatives. The purchaser/user
agrees to release, indemnify and hold harmless Genetrix, ZoneXcess LLC, and any of its/
their respective agents, afliates, subsidiaries, employees, instructors, dealers, ofcers,
directors, suppliers, and their successors
for damage, injury or death to the user or to any other person
or property which may result while using Genetrix products, to the maximum extent
permitted by applicable law.
Although the information and recommendations in this manual and on any Genetrix website
are believed in good faith to be correct, Genetrix and its agents make no representations
or warranties as to the complete accuracy of the information. Any information is supplied
upon the condition that the person receiving it will make their own determination as to its
accuracy and its suitability for their purposes prior to its use.
DISCLAIMER
DISCLAIMER
www.genetrixkites.com
DRAFT
not for distribution
OVERVIEW
1. Quick release
2. Swivel
3. Power line
4. Stopper ball
5. Power adjustment clam cleat
6. Rear lines adjustment strap
7. Rear leader lines
8. Kite leash attachment
c
c
c
c
c
c
c
c
Here is a glossary of your equipment for you to get acquainted with most technical
terms used in this manual.
1. Leading edge
2. Struts
3. Wingtips
4. Trailing edge
5. Front lines
6. Rear lines
7. Bridle
c
c
c
c
c
c
c
1
2
3
4
56
7
Extensible kite bag
Bladder repair kit
Sand bag 1
77
66
5
3
8
2
4
www.genetrixkites.com
SAFETY
The sport of kiteboarding is an “extreme sport” and can be extremely dangerous
or deadly. Always be attentive when using this kite and respect the power of the
wind. Do not attempt to use this product unless you are a procient swimmer
and in good physical condition. Use this kite for the sport of kiteboarding and
not for any other purposes. When you are using this product, you are assuming
and accepting the responsibility for your own safety including the safety of others
surrounding you. That also includes informing subsequent users and owners of
the kite of the risks the sport presents. If you are under 18, these warnings and
instructions must be read by you and by your parent(s) or a legal guardian(s). This
product should only be used under the closest of instruction and supervision. Use
of this product puts the user at risk for numerous un preventable and unexpected
risks and dangers. Do not use this kite while under the influence of alcohol,
drugs or medications.
Using common sense will reduce, but not eliminate all inherent risks of kiteboard-
ing. There are a number of things you must keep in mind prior to attempting to
launch your kite for the rst time:
www.genetrixkites.com

DRAFT
not for distribution
The leash that comes with this product has a safety release to detach yourself from the kite in case of emergency. Never
permanently attach yourself to the kite or to any of its components.
The kite is not a flotation device. For your safety we recommend that you always wear a CE approved life vest for
buoyancy when you are kiting on water. Never let an untrained person fly your kite.
allow an untrained person to assist you in launching or landing your kite.
It is highly recommended that you wear a helmet, gloves, booties, impact vest and eye protection when you are using the kite.
A wetsuit is recommended to prevent hypothermia.
Always use a good quality kite-specic harness. It is your connection point to your kite. Do not use a windsurng harness.
Never try to learN kiteboardiNg oN your owN. This is a sport where proper training is mandatory.
Become very familiar with the safety release system on your kite and how it works. Practice it frequently as it should
be second nature to employ in an emergency or non-emergency situation.
Check for wear and tear regularly. Before launching your kite, the quick release safety system must be free of sand or
debris and functioning properly. Immediately replace any parts that appear worn.
Weather and Location for Kiteboarding:
You should absolutely understand the basic notions of the wind: its behavior and its power.
You must also be able to predict changes of weather and wind pattern. Be familiar with your location and the direction
of the wind.
c
c
c
c
c
c
c
c
c
c
c
c
SAFETY
www.genetrixkites.com

Use a kite that is appropriate for the wind condition. Check the Wind Range
Chart for the recommended size.
Never try to learn kiting when the wind exceeds 10 knots.
Never use this kite in extremely gusty winds.
Never use this kite under hurricane, thunderstorm or lightning conditions.
Never use this kite when the wind conditions exceed your ability to kite safely.
Only kite in side/onshore winds. Never use this kite with offshore wind. If you have
a problem or equipment failure a swim to shore will be required and it is extremely
difcult or impossible to swim with the kite equipment when the wind is offshore.
Never use this kite with onshore wind if you are a beginner. If you can’t go
upwind the wind will blow you directly back to the beach rapidly and you risk
being carried up onto the beach and hard objects.
This wind range chart is only to be used as a guide and is based on an average
rider weight of 75kg/165lbs.
Modications may be necessary based on your ability level, body weight,
water conditions or other factors. Watch and ask seasoned riders at your
area what size kite to use according to body weight ratio. Always use a kite
smaller than you think you need.
c
c
c
c
c
c
c
c
c
www.genetrixkites.com

DRAFT
not for distribution
WINDRANGE
Based on average rider weight of
kg/1lb.
The wind ranges are expressed in knots
and the sizes in actual square meters.
This wind range is given to you as an
estimate for a rider weighting 75 kilos.
Wind range varies according to each
rider. It depends on:
The rider’s level: the more you
The rider’s weight: the bigger you are
the more you will be able to use the
kite in the upper wind range.
The board’s volume: the more volume
your board has the more you will be able
to use the kite in the lower wind range.
c
c
c
ORIGIN
progress the more you will be able to
use the kite in the upper wind range.
www.genetrixkites.com 10

HYDRA You also must choose your kite
according to the gustiness of the wind,
the weather conditions (wind direction,
speed, forecast), and the overall quality
of the spot and the level of safety
it offers. When you get to the spot,
measure the wind speed. Take your
time to fully asses the conditions, and
measure the speed including maximum
gusts. Check out the size of other kites
being used and use that as a guide. If
you hesitate between two kite sizes
always take the smaller one, as it is
safer and you will have more fun riding
underpowered than overpowered.
If you cannot walk upwind alone with the
kite in the air, that means that you are
overpowered. Land your kite immediately
with the assistance of a qualied person
and rig a smaller kite size.
www.genetrixkites.com
11

DRAFT
not for distribution
SETTING UP YOUR KITE
Recommended pressure: - psi. In constant air temperatures above ° F / 0° C, inate only to psi.
1 - Determine the wind direction.
2 - Unroll your kite with the struts and intake valve facing upwards. Position it so that one of its wing tips is located upwind
from the other. Place the included Genetrix sand bag on the upwind wing tip of the kite.
3 - Close one of the deflation valves. Before using the pump, operate it a few times to eject any sand left in the hose. This
will prevent any sand from entering the kite’s bladders.
4 - Attach the pump leash to the small loop located in the middle of the leading edge to prevent the kite from blowing away.
(When using your new kite for the rst few sessions, partially inflate the bladders and gently massage the air through to
4
www.genetrixkites.com 1

6
ll any void and ensure the bladder walls are in full contact with inner walls of
the leading edge and struts).
5 - Remove the sand bag and continue pumping. The kite will turn into the wind
as it becomes fully inflated.
6 - Remove the pump nozzle and make sure to properly close the valve with
the Velcro cover. Do not try to push the valve inside as you would do with an
inflatable toy. Close all valve clips to lock air for each strut. This will allow your
struts to remain inflated (and helpful for self-rescue) even in the event that the
leading edge bladder deflates.
7 - Pick up your kite from the middle of the leading edge and turn it around so
that the kite sits leading edge down facing into the wind.
8 - Secure the kite using the Genetrix sand bag.
3
78
5
www.genetrixkites.com
1

DRAFT
not for distribution
ASSEMBLING: Bar & lines
1 - Unroll your line down wind of the kite. (Rear of the kite) and lay your bar down
with the red Genetrix logo facing down. (Red line on Right and blue on Left).
2 - Untangle your lines, starting at the bar and walking towards the kite. Spread
your lines with the grey front lines in the center, the red back line on the Right
and the blue back line on the Left.
3 - Make sure the bridle is free of knots and tangle free.
4 - You connect the lines to your kite by doing a lark’s head knot.
5 - Connect the back lines making sure to connect the red with red and blue with
blue. Be careful, the front and back lines should not cross each other.
6 - Connect the front lines to the gray front connectors on the bridle.
7 - Walk back to the bar and double check one more time for twists in your lines.
Step on the bar and grab the rear lines and spread them out. Look down the
lines all the way back to your kite. The lines should not cross each other.
Not to scale
www.genetrixkites.com 1

Not to scale
www.genetrixkites.com
1

DRAFT
not for distribution
MAIN QUICK RELEASE
To activate the main quick release: Grasp the handle of the quick release and
push it away from your body (in the direction of the red arrow). When you activate
this quick release the kite will flag out on one line and fall from the sky, but will still
be attached to your safety leash. (To disconnect entirely from the kite, see the
section describing the operation of the secondary quick release on page 18).
It is your responsibility to maintain the proper working order of
the quick release mechanism. Always inspect this piece prior to launching your
kite. Make sure the trigger mechanism is properly seated before you ride, and
occasionally while on the water.
The metal loop to which the flagging line is attached (the smaller line that goes
through the bar) should be rotated to the side of the molded quick release that
features a slot. If not, the quick release will not seat properly.
www.genetrixkites.com 1

To reengage the main quick release, grab the webbing and put tension on it to
pull it far enough to fold the webbing around the metal swivel bar and reengage
the molded plastic quick release. You will need to pinch and grip together the
main line and the molded plastic quick release in order to accomplish this.
www.genetrixkites.com
1

DRAFT
not for distribution
The secondary quick release is the small red plastic device attached to the end
of the flagging line. This is designed to free yourself entirely from the kite in a
serious situation where the main safety release is inadequate to protect yourself.
Be aware that activating the secondary safety release may endanger others as
your kite is likely to fly away.
Should you be required to activate the secondary quick release,
The chicken loop will
stay with you, but the kite and the rest of the bar assembly will not. Always
practice this before launching your kite so it becomes second nature. As it is
designed to work under load, it might be difcult to desengage while testing it on
the beach when your kite is down on the sand and not pulling.
SEC QUICK RELEASE
www.genetrixkites.com 1

To reengage the secondary quick release:
1 - Insert the metal pin through the loop on the end of the flagging line.
2 - Fold the pin back towards you.
3 - Incase the metal pin inside the plastic tube by pushing the tube, away from
you back onto the pin.
www.genetrixkites.com
1

DRAFT
not for distribution
SAFETY LEASH
The Safety Leash is your last connection
to your kite. You will need to disengage
from your kite if your kite is putting
your life in danger even after you have
activated your main quick release
Get familiar with it and always know
at any moment where to nd it. You
will need to grasp the Red handle
and push it way from your body in the
direction of the arrow. This will release
the safety pin and disconect you from
the kite. Simply push away from your
body and let it go making sure the
leash isn’t tangled around any body
parts. Do not try to hang on to it once
you have activated it.
Once you have freed yourself from
your kite, it is very important that you
get to it as soon as possible. At this
point your kite will most likely tumble
downwind until it reaches an obstacle.
You kite will get damaged if it comes
into contact with any hard objects and
put others in danger.
www.genetrixkites.com 0
Table of contents