Florence versatile 4C User manual

Maintenance Manual
versatile™4C mailbox suites

2 64718 REV A

3
64718 REV A
Table Of Contents
For
DESCRIPTION PAGE
Surface Care and Cleaning 5
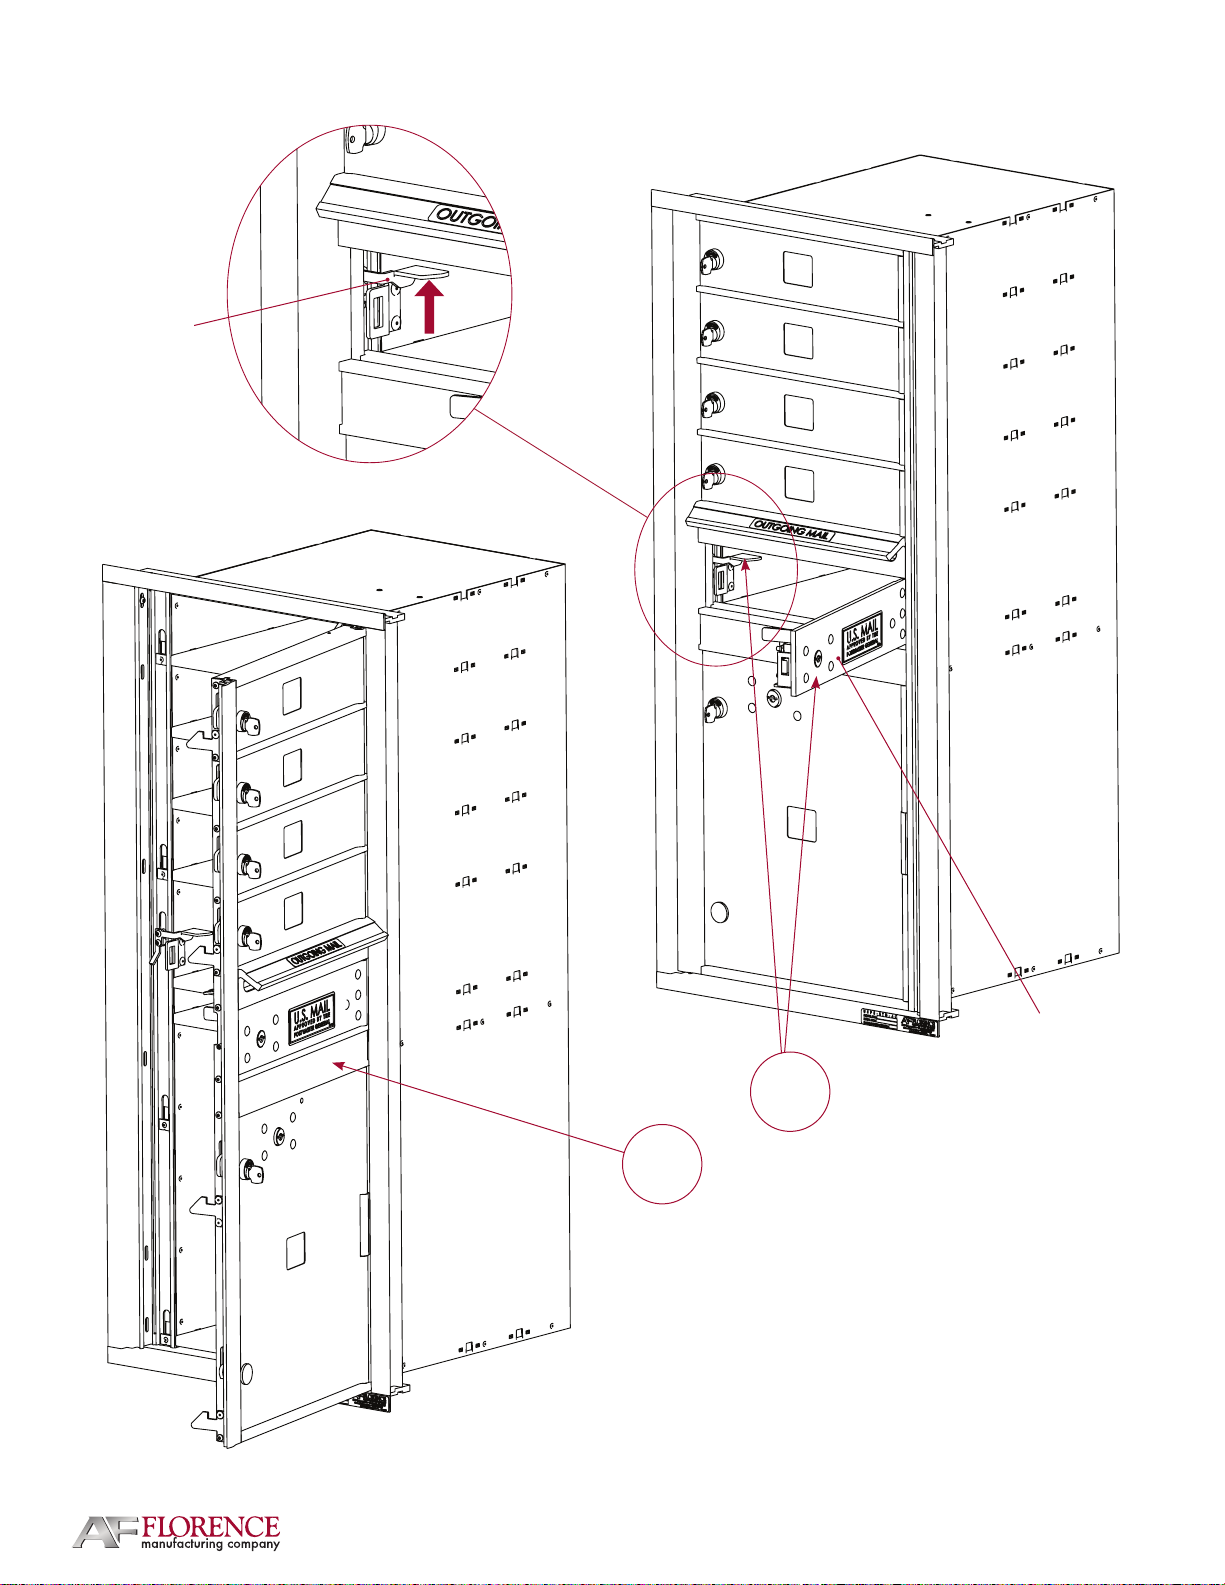
Open master loading door(s) of a front loading tenant or tenant w/ parcel module 6
Open master Loading door(s) of a front loading parcel only module 8
Open Master Loading door of a trash / recycling bin module 10
Removal of module from wall 12
Replacement of front master loading door hold open device for front loading modules only 14
Replacement of top and / or bottom trim 16
Replacement of front master loading door 18
Replacement of left or right front trim 20
Replacement of hinge rod 22
Replacement of front master load door hook 24
Replacement of tenant compartment door 26
Replacement of single high compartment standard tenant lock 28
Replacement of multi-high compartment standard tenant lock 30
Replacement of combination tenant lock 32
Reset combination for combination tenant lock 34
Replacement of trash / recycling bin access door lock 36
Replacement of access door for front loading modules only 38
Replacement of master lock in access door for front loading modules only 40
Replacement of parcel door spring 42
Replacement of parcel door 44
Replacement of parcel master lock 46
Replacement of parcel tenant lock assembly 48
Replacement of access door latch bracket / MLD release handle for front loading modules only 50
Replacement of shelf 52
Replacement of front master loading door slide 54
Replacement of front master loading door outer hinge 56
Replacement of rear master loading door(s) and their hold open device(s) 58
Replacement of number placard and parcel key tags 60
Replacement of trash / recycling bin flap 62
Service parts list and index 64
versatile™4C mailbox suites

4 64718 REV A
This page intentionally left blank

5
64718 REV A
Surface Care and Cleaning
versatile™4C mailbox suites
The surface of all Florence powder coated products may be
cleaned with a soft cloth dampened with any mild detergent
or properly diluted biodegradable, water-based cleaner, such
as Simple Green™.
The use of petroleum-based solvents, ammonia, hash abrasive
cleaners, or scrubbing sponges is NOT recommended, as in
some cases it may damage the product.
Touch-up paint for powder coated products is available through
your Authorized Florence Dealer.

6 64718 REV A
Open Master Loading Door(s) of a Front
Loading Tenant or Tenant w/ Parcel Module
versatile™4C mailbox suites
(Front Loading Tenant or Tenant w/ Parcel Modules)
4.
3.
1.
PART # DESCRIPTION
REQUIRED TOOLS
Close master loading door(s).
Lock Postal or private access door.
Note: This will require opening the
master loading door(s). For USPS serviced
modules, the local USPS will need to be
contacted to have module opened and
resecured after repairs are complete.
Unlock Postal or private access door and lift
up on master loading door release handle.
Open master loading door(s).
Complete all necessary repairs to module.
5.
2.

7
64718 REV A
Open Master Loading Door(s) of a Front Loading Tenant or Tenant w/ Parcel Module
master
loading
door release
handle
Postal or
private access
door
2&4
1&5
Model # 4CAT1-4 Shown Above

8 64718 REV A
Open Master Loading Door(s) of a Front
Loading Parcel Only Module
versatile™4C mailbox suites
(Front Loading Parcel Only Modules)
4.
3.
2.
1.
PART # DESCRIPTION
84994 #10-32 x .375” One-way screw
64256 Slide lock
REQUIRED TOOLS
One-way screw removal tool
Small allen wrench (hex key)
Slotted screwdriver / bit
Close master loading door(s).
Reinstall all of the 64256 slide lock(s) and
secure with 84994 #10-32 x .375” one-way
screw(s).
Close all parcel locker door(s).
Note: This will require opening all of the
parcel locker doors. If any of the parcel
doors are locked, they will need to be
unlocked. For USPS serviced modules, the
local USPS will need to be contacted to
have module opened and resecured after
repairs are complete.
Open all parcel locker door(s).
Remove one (1) or two (2) 84994 #10-32 x
.375” one-way screw(s) and the 64256 slide
lock(s).
To disengage master loading slide, place a
small allen wrench (hex key) in the slide
lock slot and lift the master loading slide
up. The master loading door(s) can now be
pulled open.
Complete all necessary repairs to module.
7.
6.
5.

9
64718 REV A
Open Mater Loading Door(s) of a Front Loading Parcel Only Modules
3
64256
(Rear View)
1&7
84994
2&6
slide
lock
slot
Model # 4CAT10 Shown Above

10 64718 REV A
Open Master Loading Door of a Trash /
Recycling Bin Module
versatile™4C mailbox suites
(Trash / Recycling Bin Modules)
4.
3.
2.
1.
PART # DESCRIPTION
REQUIRED TOOLS
Slotted screwdriver / bit
Close master loading door.
Lock master loading door.
Unlock master loading door.
Use the key for standard cam lock•
Use the combination for combination•
lock
Use a slotted screwdriver for slotted no•
key lock
Open master loading door.
Complete all necessary repairs to module.
5.

11
64718 REV A
Open Mater Loading Door(s) of a Front Loading Parcel Only Modules
standard cam lock
combination lock
slotted no key lock

12 64718 REV A
Removal of Module from Wall
versatile™4C mailbox suites
4.
3.
2.
1.
PART # DESCRIPTION
64225 #8 x 2” Torx head wood screw (T20)
91123 #8-32 x .5” Torx head screw (T15)
64635 #8-32 x 1” Torx head screw (T15)
65734 #8-18 x 1.25” Torx head screw (T20)
Varies Multi-module connector w /hardware*
REQUIRED TOOLS
T15 Torx screwdriver / bit
T20 Torx screwdriver / bit
Tools from other steps
Slide the 4C mailbox module out of wall,
collar, vario™ Shelter, vario™ Express, or
vario™ Depot and lay flat on its back on
non-abrasive surface to make repairs.
WARNING: A pinch hazard exists when
placing the module in rough opening. Keep
fingers and hands clear to avoid an injury.
After all necessary repairs are complete,
reinstall module in wall, collar, vario™
Shelter, vario™ Express, or vario™ Depot
(pay close attention to earlier warnings.).
Reuse existing hardware, if applicable,
along the top, bottom and outer side
frame members to the point at which they
just make contact with frame. Pay close
attention to use the different fasteners in
original locations.
Note: Be sure to not overtighten screws
beyond initial contact with frame. This
could hinder functionality.
Close front master loading door(s) and
lock Postal or private access door (for front
loading parcel only, see instructions on
page 8, steps 6 & 7).
*See page 64 for part numbers.
Note: This will require opening the
master loading door(s). For USPS serviced
modules, the local USPS will need to be
contacted to have the access room opened
for rear loading modules or the module
opened and resecured after repairs are
complete for front loading modules.
WARNING: Florence 4C modules are
front-heavy with or without master loading
doors open. Do not stand on end without
support to prevent tipping. Modules must
be braced or held in place until secured to
framing. Maintenance personnel should
support module or have assistance holding
the module in place before opening the
master loading doors. Failure to do so could
result in serious injury.
Open front master loading door(s).
For front loading tenant or tenant•
w/ parcel modules see page 6
For front loading parcel only modules•
see page 8
For trash/recycling bin modules see•
page 10
For rear loading modules contact•
Florence customer service at
(800)-275-1747
For installations that used our supplier
hardware, remove 64225 #8 x 2” Torx head
wood screws and 91123 #8-32 x .5” Torx
head screws or 64635 #8-32 x 1” Torx head
screws or 65734 #8-18 x 1.25” Torx head
screws along the top, bottom and outer
side vertical frame members. Notate where
different fasteners were used and save for
reuse.
6.
5.

13
64718 REV A
Removal of Module from Wall
91123
(multi-module connector)
or
64635
(4C collar, vario™ Shelter
or vario™ Express)
or
65734
(vario™ Depot)
64225
(wood)
typical wall
mounting
2&5
1&6
Model #s 4CAT1-4 & 4CAT2-15 Shown Above
3

14 64718 REV A
4.
3.
2.
1.
Replacement of Front Master Loading Door
Hold Open Device
PART # DESCRIPTION
86098 1/8˝ x .328˝ SS Pop rivet
86231 #6-32 x .187” Torx head shoulder screw
86265 Latch hold open bracket - right side
86267 Latch hold open bracket - left side
86279 Hold open guard
91067 Hold open arm
PART # STANDARD SERVICE PARTS
K91067 Hold open arm w/ shoulder screw
REQUIRED TOOLS
T15 Torx screwdriver / bit
Cordless drill
1/8˝ Drill bit
Portable pop rivet gun
Tools from other steps
Remove / replace one (1) 91067 hold open
arm.
Replace hold open guard and hold open
bracket, securing with seven (7) 86098 1/8”
x .328” SS pop rivets.
Reinstall module in wall, collar, vario™
Shelter, vario™ Express, or vario™ Depot (see
instructions on page 12).
Put master loading door at a 90° angle and
reattach 91067 hold open arm with 86231
#6-32 x .187” Torx head shoulder screw.
Close front master loading door(s) and lock
Postal or private access door.
Note: This will require opening the
master loading door(s). For USPS serviced
modules, the local USPS will need to be
contacted to have module opened and
resecured after repairs are complete.
Open front master loading door(s).
For front loading tenant or tenant•
w/ parcel modules see page 6
To disengage hold open device:
Remove one (1) 86231 #6-32 x .187” Torx
head shoulder screw to disengage hold open
device from front gate.
To replace hold open device:
Slide the 4C mailbox module out of wall,
collar, vario™ Shelter, vario™ Express, or
vario™ Depot (see instructions on page 12),
and lay flat on back on non-abrasive surface
to make repairs.
Using an 1/8” drill bit, drill out seven (7)
86098 1/8” x .328” SS pop rivets that secure
the guard and bracket; remove the 86279
hold open guard and the 86265 right side
latch hold open bracket and / or 86267 left
side latch hold open bracket.
7.
6.
5.
8.
9.
versatile™4C mailbox suites
(Front Loading Tenant or Tenant w/ Parcel Modules)
left side shown

16 64718 REV A
REQUIRED TOOLS
T15 Torx screwdriver / bit
Tools from other steps
PART # DESCRIPTION
86229 #8-32 x .75˝ Torx head screw (T15)
91038 Bushing
varies Top or bottom trim piece
PART # STANDARD SERVICE PARTS
K64238 Top or bottom trim piece kit w/hardware*
Note: This will require opening the
master loading door(s). For USPS serviced
modules, the local USPS will need to be
contacted to have the access room opened
for rear loading modules or the master
loading door(s) opened and resecured
after repairs are complete for front loading
modules.
Open front master loading door(s).
For front loading tenant or tenant•
w/ parcel modules see page 6
For front loading parcel only modules•
see page 8
For trash/recycling bin modules see•
page 10
For rear loading modules contact•
Florence customer service at
(800)-275-1747
Slide the 4C mailbox module out of wall,
collar, vario™ Shelter, vario™ Express, or
vario™ Depot (see instructions on page 12),
and lay flat on back on non-abrasive surface
to make repairs.
Close front master loading door(s). Remove
four (4) 86229 #8-32 x .75” Torx head
screws from top trim piece or bottom trim
piece.
1.
2.
Note: be careful to not loose master loading
door 91038 bushing.
Remove and replace one (1) top and/or
bottom trim piece(s) and secure each with
four (4) 86229 #8-32 x .75” Torx head
screws.
Reinstall module in wall, collar, vario™
Shelter, vario™ Express, or vario™ Depot (see
instructions on page 12).
Close master loading doors and lock Postal
or private access door (for front loading
parcel only, see instructions on page 8, steps
6 & 7).
*Specify finish, front load or rear load and
top or bottom when ordering this part.
5.
6.
3.
4.
versatile™4C mailbox suites
Replacement of Top and / or Bottom Trim

17
64718 REV A
Replacement of Top and / or Bottom Trim
K64238
(top trim piece )
Model # 4CCT2-16 Shown Above
1
K64238
(bottom trim piece)
86229
86229
91038
3&4
3&4

18 64718 REV A
Note: This will require opening the
master loading door(s). For USPS serviced
modules, the local USPS will need to be
contacted to have the access room opened
for rear loading modules or the master
loading door(s) opened and resecured
after repairs are complete for front loading
modules.
Open front master loading door(s).
For front loading tenant or tenant•
w/ parcel modules see page 6
For front loading parcel only modules•
see page 8
For trash/recycling bin modules see•
page 10
For rear loading modules contact•
Florence customer service at
(800)-275-1747
For front load modules, disengage hold
open device from top of master loading
door, (see instructions page 14 step 2).
Slide the 4C mailbox module out of wall,
collar, vario™ Shelter, vario™ Express, or
vario™ Depot (see instructions on page 12),
and lay flat on back on non-abrasive surface
to make repairs.
Remove one (1) top trim piece exposing
master loading door hinges (see
instructions on page 16).
Remove / replace master loading door by
sliding up through top of insert assembly.
Replace one (1) top trim piece (see
instructions on page 16).
Reinstall module in wall, collar, vario™
Shelter, vario™ Express, or vario™ Depot (see
instructions on page 12).
For front load modules, put master loading
door at a 90° angle and reattach hold open
arm (see instructions page 14).
Close master loading doors and lock Postal
or private access door (for front loading
parcel only, see instructions on page 8, steps
6 & 7).
*Specify finish, 4C module, standard or
configured,(provide drawing for configured)
lock type, identification method and left or
right for two wide modules.
REQUIRED TOOLS
Tools from other steps
PART # DESCRIPTION
varies Front master loading door
PART # STANDARD SERVICE PARTS
K65274 Master Loading Door kit w/ doors*
1.
2.
3.
7.
6.
5.
4.
8.
9.
Replacement of Front Master Loading Door
versatile™4C mailbox suites

19
64718 REV A
Page 19, View 1
Page 19, View 2
Replacement of Front Master Loading Door
5
top trim piece
Model # 4CCT2-16 Shown Above
1
4&6
right side shown

20 64718 REV A
REQUIRED TOOLS
Cordless drill
1/8” Drill bit
Portable pop rivet gun
Tools from other steps
PART # DESCRIPTION
86098 1/8˝ x .328˝ SS Pop rivet
91038 Bushing
varies Left or right front trim
PART # STANDARD SERVICE PARTS
K64251 Left or right front trim*
versatile™4C mailbox suites
Replacement of Left or Right Front Trim
Slide master loading door up through top
of insert assembly.
Drill out all 86098 1/8˝ x .328˝ SS pop
rivets along sides that hold the left or
right front trim.
Remove or replace left and / or right front
trim, securing with 86098 1/8” x .328” SS
pop rivets.
Replace master loading door (see
instructions on page 16).
Replace one (1) top trim piece and
2 fasteners in bottom trim piece (see
instructions on page 16).
Reinstall module in wall, collar, vario™
Shelter, vario™ Express, or vario™ Depot
(see instructions on page 12).
For front load modules, put master
loading door at a 90° angle and reattach
hold open arm (see instructions page 14).
Close master loading doors and lock
Postal or private access door (for front
loading parcel only, see instructions on
page 8, steps 6 & 7).
*Specify finish, 4C module, and left or
right.
Note: This will require opening the
master loading door(s). For USPS serviced
modules, the local USPS will need to be
contacted to have the access room opened
for rear loading modules or the master
loading door(s) opened and resecured
after repairs are complete for front
loading modules.
Open front master loading door(s).
For front loading tenant or tenant•
w/ parcel modules see page 6
For front loading parcel only modules•
see page 8
For trash/recycling bin modules see•
page 10
For rear loading modules contact•
Florence customer service at
(800)-275-1747
For front load modules, disengage hold
open device from top of master loading
door, (see instructions page 14 step 2).
Slide the 4C mailbox module out of wall,
collar, vario™ Shelter, vario™ Express, or
vario™ Depot (see instructions on page
12), and lay flat on back on non-abrasive
surface to make repairs.
Remove one (1) top trim piece and 2
fasteners per affected side(s) from bottom
trim piece (see instructions on page 16).
Note: be careful to not loose master
loading door 91038 bushing.
1.
2.
3.
4.
7.
5.
8.
9.
6.
10.
11.
12.
Model # 4CCT2-16 Shown Above
right side shown

21
64718 REV A
Replacement of Left or Right Front Trim
top trim piece 4&9
bottom trim piece
4&9
86098
6&7 7
left or
right
front
trim
5&8
Model # 4CCT2-16 Shown Above
right side shown
91038
Table of contents