Flux ador User manual


1F., No.79-3, Ln.209, Sec.2, Xinnong St.,
Yangmei Dist., Taoyuan City 326015, Taiwan
FLUX Inc.
Quick Start Guide

Bring Your Designs to Life

Quick Start Guide (English)004
FLUX Ador Quick Start Guide
What’s in the box?
Accessories Tool
Thank you for choosing FLUX products.
This quick start guide will help you set up your FLUX Ador for first use.
Meet FLUX Ador, the world’s first color-printing laser cutter. Boasting three high-
quality, interchangeable laser module—diode laser, infrared laser, and printing
module. Ador enables you to both engrave and cut through a wide range of
materials while enhancing your projects with a pop of color. Designed with a
user-friendly interface, Ador is the ideal laser creation tool for professionals and
an excellent starting point for beginners venturing into their artistic exploration.
With unlimited possibilities at your fingertips, begin your journey into laser
crafting with Ador now.
The infrared laser and printing modules are optional add-ons.
Please retain all packages for warranty purposes.
The latest version of the Quick Start Guide is available at the following URL:
https://support.flux3dp.com/ador
Laser module
Vent hose
Clamp
Power adapter
Power cord
USB cable
Prism Lift x6
Lubricating oil
Wood piece
Hex wrench
Consumables

Quick Start Guide (English) 005
A
B
B
A
C
E
D
C
D
E
Product & Warning labels

Quick Start Guide (English)006
⚠Do not let minors operate alone.
⚠Confirm that the person who intends to operate the machine has read the
safety precautions carefully and followed the instructions in the manual.
⚠ Make sure to install the vent hose properly. An exhaust hose missing or not
installed properly will increase the risk of laser, fumes, and dust hazards.
⚠ Do not modify the machine without FLUX authorization.
⚠ Do not try to modify, defeat or disassemble safety interlocks.
⚠ Do not place the machine in a humid, splashing rain or direct sunlight space.
In case of rain or extreme weather, please stop using the machine and put the
vent hose inside.
⚠ Do not place liquid, flammable, or explosive objects near the machine.
⚠ Do not place any living beings in the machine. It is strictly prohibited.
⚠ There are no noise hazard concerns as the Ador's working level is below 70 dB.
Safety Precautions
Safety Precautions
Fire Hazard
⚠ Do not leave the machine unattended while in use.
⚠ Regularly clean the debris inside the Ador.
⚠ In case of fire, turn off the power immediately and unplug the power cord.
⚠ Always have an accessible, functioning fire extinguisher in the workplace.
⚠ Confirm that the engraving material does not pose any higher risk when
burned at high temperatures.
The Ador weighs
19 kilograms. It is
recommended to
have two people lift
it cooperatively to
avoid injury.
Machine Handling

Quick Start Guide (English) 007
Laser Safety
Work Position of Operator
Operator
FLUX Ador is a Class 1 Laser Product and a Consumer Laser Product, complying
with the IEC 60825-1:2014 and EN 50689:2021 certifications. The IEC 60825-1:2014
standard categorizes laser systems into eight safety classes: 1, 1C, 1M, 2, 2M, 3R,
3B, and 4. FLUX Ador is the Class 1 Laser Product, the safest among all classes,
and aligns with the laser safety standards set by the International Electrotechnical
Commission (IEC). EN 50689:2021 is a laser safety standard designed explicitly
for consumer laser products. It guarantees that lasers with this certification meet
the highest safety standards for consumer use. These assurances are provided
through the laser's enclosed protective housing and interlocks safety devices.
For further information, please refer to the safety precautions on the ''Ador Help
Center''.

Quick Start Guide (English)008
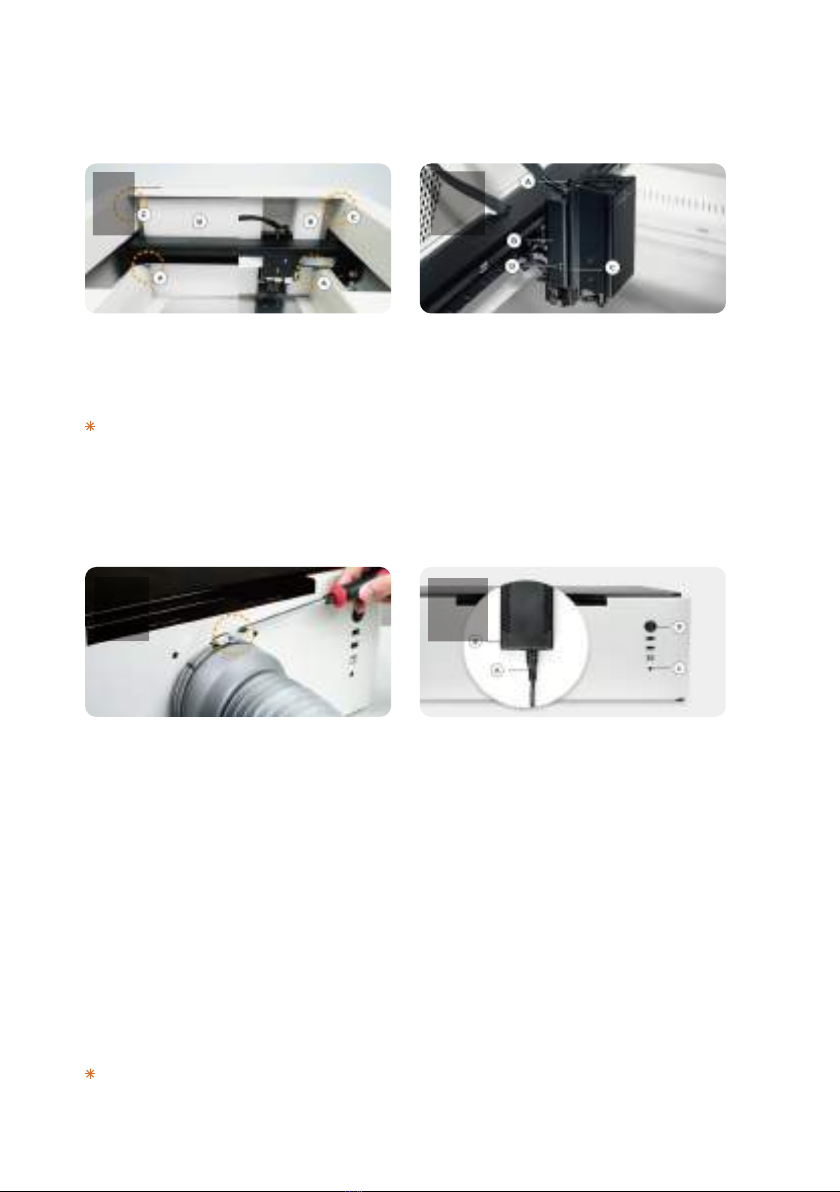
Install the Laser Module.
1. Loosen the hand screw Ⓐon the module
adapter Ⓑ.
2. Aim the dot Ⓒon the laser module to the
unlock icon Ⓓon the module adapter and
insert it down to the lock icon.
3. Press the module with your hand and ensure
it’s tightly attached to the module adapter
before fastening the hand screw Ⓐback.
Assembly
Take out the Accessories Box and remove
two fastened hand screws Ⓐon both sides
of the X-rails and cushioning materials Ⓑin
the machine.
You can place two hand screws in the
Ⓒscrew holes. (Optional)
Install the vent hose.
1. Loosen the clamp on the exhaust fan cover
using a Phillips screwdriver and remove
the cover.
2. Remove the cushioning material in the vent
hose.
3. Insert the clamp on the large end of the
vent hose hole, and attach it to the exhaust
fan outlet at the rear of the machine.
4. Adjust the clamp tightness and fasten it
onto the exhaust fan outlet.
5. Direct the open end of the vent hose
outside the window or connect it to an
air purifier.
For more information please refer to the “Start” chapter on the “Ador Help Center.”
Connect the power cord Ⓐand the power
adapter Ⓑ. Connect both ends of the
power adapter to the power port Ⓒat the
rear side of the machine and insert the plug
into the socket. Switch on the main switch
Ⓓlocated at the rear of the machine to
turn on the machine.
13
4
2

Quick Start Guide (English) 009
Setup for the First Use
1. Follow the guide on the machine
display to select your language.
2. Read the Safety Precautions carefully.
3. Follow the instruction and run the
Start-up Test.
Do not skip the Start-up Test if this
is the first time using the machine.
4. Following the step-by-step instruc-
tions, the Start-up Test will guide
you through installing the laser
module and checking the door in-
terlocks, autofocus, motors, limit
switches, and module connection.

Quick Start Guide (English)010
5. Follow the guide on the machine
display to set the Wi-Fi connection
(2.4 GHz), or connect with an
ethernet cable to your router and
select connect later.
6. Download the latest stable version
of Beam Studio on your computer.
https://flux3dp.com/downloads
Select the language on Beam Studio
and follow the Connection Setup.
Check the ''Ador Help Center'' if you encountered any issues running the Start-up
Test.
Beam Studio for mobile devices: http://studio.flux3dp.com
7. Follow the software tutorial. You can initiate it by accessing the tutorial in the
''Help'' menu if you accidentally skip it.

Quick Start Guide (English)012
Warranty
The latest version of the warranty will be uploaded at the following URL:
https://support.flux3dp.com/hc/en-us/categories/202672617
As a FLUX consumer, you benefit under certain conditions from additional
warranties. FLUX offers specific consumer warranty benefits which are in
addition to, and not instead of, any legal warranties provided by your national
consumer law. The duration and conditions related to the legal warranties are
provided by respective local laws.
1. FLUX Inc. warrants only the hardware (excluding accessories and consumable
parts*) against defects in materials and workmanship when used as instructed
in the manual for the warranty period.
2. The limited warranty covers products purchased from authorized FLUX retailers
against defects in materials or workmanship.
3. Customers must provide the machine serial number and related information as
proof of purchase.
Prior to returning any products, customers must receive an approval of
shipping from our authorized reseller via email or phone. We will not accept
any unapproved returned goods.
4. During the product’s warranty period, FLUX may, at its discretion, take one or
more of the following actions: (1) send parts to customer along with tutorials
for repair, (2) approved return of the product to an authorized local reseller
for (a) repair with new or refurbished parts or (b) replacement with a new or
refurbished product provided that:
- The product was properly used according to the manufacturer’s intended
purposes and instructions.
- The product was not damaged due to acts of nature such as lightning, flood,
or fire.
- The product’s casing was never disassembled without permission.
Note: Particles, scratches, unevenness, or other appearance issues which do
not affect the function of the machine are not covered under the warranty.
Hardware Warranty

Quick Start Guide (English) 013
5. Original packaging is required to claim warranty; shipping in any other packaging
will not be accepted. We advise you to keep the original packaging for
possible return. If there is a need for an original package, please contact our
authorized local reseller for detailed purchase information.
Warranty period starts at the time of customer receives the product.
Please see the chart below for the warranty periods:
1. FLUX will continue to provide tech support via phone, email, and other online
methods even after the product warranty period.
2. After the warranty period, all costs—including but not limited to replacement
parts, shipping charges, and testing fees—are the sole responsibility of the
customer.
3. Our authorized resellers may provide a quote for repairs.
Warranty Period
Post Warranty Support and Repair
Ador
10W/20W Diode Laser Module
2W Infrared Laser Module
Printing Module
Ink Cartridges
Rotary & Extension Base
Extension Base
12 months
12 months
12 months
12 months
The warranty is not applicable under
the regular use of consumables.
12 months
12 months

Quick Start Guide (English)014
Disclaimer
Collection and Treatment
The latest version of the Disclaimer will be uploaded at the following URL:
https://support.flux3dp.com/hc/en-us/categories/202672617
1. FLUX Inc. does not warrant against normal wear and tear, items consumed or
expended by their normal use, product misuse, or accidental damage.
2. FLUX is not liable under this warranty for any damages or defects caused by :
(1) Improper (contrary to the stated purpose and scope of use described in
relevant documentation) use of Products or Add-ons;
(2) External force;
(3) External or internal moisture;
(4) Lightning strike, overvoltage, power surge, or electromagnetic field.
(5) Unauthorized change, correction, or modification. Modification of the
hardware or accessories, including but not limited to replacing parts, making
permanent cosmetic changes to the machine, replacing the software or
firmware, or other unauthorized changes voids this warranty policy.
(6) Natural or human-caused calamities such as earthquake, war, fire, and flood.
(7) Improper storage, operation, application, or transportation.
Valid in the EU member states and in any country with
corresponding legislation.
This symbol indicates that this product should not be
disposed of with household waste. It has to be returned
to a local authorized collection system. By following this
procedure, you will contribute to the protection of the
environment and human health. The recycling of the materials
will help to conserve natural resources.


Table of contents