FONESTAR TPI-817 User manual

TMRI-806, TPRI-807
WIRELESS PERSONAL MONITOR SYSTEM
16 PLL UHF 863-865 MHz CHANNELS
INSTRUCTION MANUAL
RI-800 TPI-817
TMI-816

EN
- 2-
We take this opportunity to thank you for buying this product.
We recommend you read the instruction manual before switching on the machine and follow the instructions
that are given. eep the manual for future reference.
SECU ITY AND THE ENVI ONMENT
ELECTRICAL SECURITY
Check that the current in the mains connection where the machine is to be installed corresponds to the
power supply of the machine.
To avoid damaging the equipment, electrical shocks, fire or physical injury when you connect or disconnect
the equipment from the power supply, pull the plug firmly out of the mains socket holding the plug, never the
cable.
Always do this with dry hands.
eep the power supply cable far from sources of heat. Do not put heavy objects on top of it or change it.
Clean dust and dirt off the power supply cable regularly.
Do not open the machine; you could get an electric shock.
CAUTION
While installing the machine, make sure it is switched off and unplugged.
Do not open the machine. Touching the internal parts is dangerous and you could receive an electric shock.
The machine must not be splashed or dripped on. Never place recipients with liquid inside on the machine.
Do not place anything inside the machine.
LOCATION
Place the equipment on a horizontal surface with enough space around it to allow ventilation.
Avoid direct sunlight, heat sources and excessive dust.
Do not place the machine near magnetic fields or static electricity.
Do not use surfaces which vibrate or receive impact.
Do not pile machines on top of one another.
VENTILATION
Never block or cover the ventilation slits on the machine.
Do not expose it to direct sunlight or place it near sources of heat.
PERIODS OF INACTIVITY
When the machine is not going to be used for a long period of time, disconnect it from the mains.
If you are using an adapter, take into account that it will continue using electricity even if the machine is
switched off. If it is not going to be used for a long period of time, disconnect it from the mains.
THE ENVIRONMENT
To save energy, switch the machine off when you are not going to use it for a long time. The machine could
contain substances that are harmful to the environment or human health. To minimize the effect of these
substances the machine must be correctly managed and recycled when you decide to dispose of it.
When you dispose of it remember: it cannot be thrown into a conventional rubbish bin.
If it contains or uses batteries, these must be disposed of separately.
The machine (without batteries) must be disposed of correctly. Put it in a container specially intended for the
collection of electronic and electrical appliances, at the dump or hand it over to the dealer when you purchase
similar equipment, so that the dealer can dispose of it correctly (at no added cost).

SIGNIFICANCE OF THE SYMBOLS ON THE MACHINE*
The symbol formed by the expression “Class 1 laser product” written in a rectangle
indicates that visible or invisible laser radiation could be produced. Avoid direct exposure
to the laser.
The symbol formed by a ray of lightening inside a triangle shows that the machine has
connection terminals or a circuit with areas with a current which could cause an electric
shock, even in normal working conditions.
The symbol formed by an exclamation mark in a triangle shows that the instruction manual
must be referred to for information on how the machine works and its use.
The symbol formed by one square inside another square shows that the machine has
double electrical insulation.
The European Community symbol shows that the machine complies with the current
European Union legislation, as well as its transposition to local legislation.
The symbol of a rubbish bin crossed out and over a horizontal line shows that when the
product is disposed of it must be done properly, placing it in a special selective electronic
and electrical equipment container or through a dealer when purchasing a similar product,
at no additional cost. It also shows that the machine was put on the market after 13th
August 2005 (European Community Directive 2002/96/CE of Electrical and Electronic
recycling, and its Spanish equivalent R.D.208/2005).
In accordance with what is set out in the aforementioned decree, FONESTAR is registered
in the RAEE (Registro de Aparatos Eléctricos y Electrónicos) in a special section REI
(Registro de establecimientos Industriales), with the entry number 001851.
The symbol RoHS (Restriction of Hazardous Substances) shows that the product has been
designed and manufactured restricting the use of certain dangerous material(Directive
2009/95/CE on the restriction of certain dangerous substances in electrical and electronic
appliances, and its transferal to the Spanish regulations, R.D. 208/2005).
*It is possible that some of these symbols do not appear on the machine.
EXEMPTION OF LIABILITY
The characteristics of the equipment and the content of the manual can change without forewarning.
FONESTA , S.A. does not assume responsibilities regarding the inappropriate use of the equipment or the
information supplied in this instruction manual, and specifically disclaims any implied liability for marketability
or fitness for any other use.
All rights reserved by FONESTA , S.A.
- 3-
EN

DESC IPTION
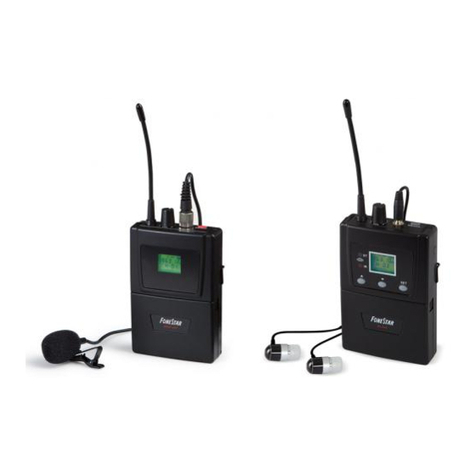
Wireless personal diversity monitor system for audio signal transmission on the band UHF 863-865 MHz.
The system is composed of a wireless belt-pack in-ear monitor receiver (mod. I-800) with silicone rubber
earphones and a wirleless hand-held transmitter microphone (mod. TMI-816) or a tieclip microphone (mod.
TPI-817) with wireless belt-pack transmitter, depending on the model chosen.
The system has 16 transmission channels on the band UHF 863-865 MHz, with PLL frequency control that
allows an interference-free channel to be easily selected.
Moreover, as many receivers as required can be used with each transmitter (mod. I-800) on the same
channel.
The wireless personal diversity monitor system receiver has 2 antennas and diversity reception system with
unique channel, that automatically switches between the antennas to obtain the best RF signal and avoid
signal fading.
CONT OLS AND FUNCTIONS
I-800 Wireless UHF in ear diversity belt-pack monitor receiver with earphones.
1.- ON/OFF: receiver on/off switch.
2.- LED indicator:
- When the receiver is turned on, it will light up red once and then it will switch off.
- While a signal is being received it will remain lit in green.
- If the batteries are low, it will remain lit in red.
- While the batteries are being recharged, it will flash in red.
3.- VOLUME: volume control.
4.- Antenna receiver.
5.- EC: audio output for recording, 3.5 mm stereo jack.
6.- Earphone output, 3.5 mm stereo jack.
7.- Button to open battery holder compartment.
8.- CHA GING INPUT: power supply connector for recharging the rechargeable batteries.
Warning: do not connect the adapter when there are alkaline batteries in the battery compartment, it
could seriously damage the equipment.
9.- Belt clip.
10.- CHANNEL: RF channel selector. Use the metal part which is included to choose the required
transmission channel.
11.- Battery compartment. Use 2 LR6-AA 1.5V batteries, respecting the polarity indicated.
12.- Earphones to listen to the signal received. Connect them to the earphone output.
- 4-
EN

TMI-816 Wireless hand-held microphone transmitter
1.- Grille: protects the microphone capsule and helps to reduce noise from breathing and gusts of wind.
2.- Display: shows information on the tuned frequency, channel number, battery level, RF signal level and
audio signal level. If the battery level is low, the display lights up red.
3.- Battery compartment lid: unscrew this lid to access the battery compartment.
4.- GAIN: audio input sensitivity adjustment.
5.- q: hand-held microphone on/off switch.
6.- Battery compartment: use two 1.5 V type LR6-AA batteries, alkaline or rechargeable. When you insert
the batteries, make sure that the polarity is correct.
7.- SET: allows selection among the following configuration options: channel number and frequency, RF
transmission level (high/low), battery type selection (1.2 V - rechargeable/1.5 V - alkaline) to show the
battery level correctly and transmitter microphone lock. For this, press the SET button repeatedly and
use the w/sbuttons to select the options.
8.- w/s: allows the menu options to be selected to set the wireless hand-held microphone.
9.- Contacts for recharging the rechargeable batteries in the wireless microphone in the recharge docking
station mod. MSC-2 .
Note: when the SET button is pressed to configure the different microphone parameters, a MUTE indicator
appears on the display and the microphone does not transmit audio while the parameters are being
configured.
- 5-
EN

EN
- 6-
TPI-817 Tie-clip microphone with wireless belt-pack transmitter
1.- Display: shows information on the tuned frequency, channel number, battery level, RF signal level and
audio signal level. If the battery level is low, the display will light up red.
2.- w/s: for selecting the required options for setting the wireless belt-pack microphone.
3.- SET: allows selection among the following configuration options: channel and frequency number, RF
transmission number (high/low), battery power selection (1.2 V/1.5 V) to show the battery level correctly
and the transmitter microphone lock. For this, press the SET button repeatedly and use the w/sbuttons
to select the options.
4.- Battery compartment: use two 1.5 V type LR6-AA batteries, alkaline or rechargeable. When you insert
the batteries, make sure that the polarity is correct.
5.- Antenna.
6.- VOL: volume control for the wireless belt-pack transmitter.
7.- 3.5 mm mono jack connector to connect to the microphone or the required audio source.
8.- ON/OFF: transmitter on/off switch.
9.- GUITA LINE/MIC: input sensitivity selector.
10.- Contacts for recharging the rechargeable batteries in the wireless microphone in the mod. MSC-2
recharge docking station.
Note: when the SET button is pressed to set the different microphone parameters, a MUTE indicator appears
on the display and the microphone does not transmit audio while the parameters are being set.

INSTALLATION AND CONNECTION
I-800 UHF Diversity in ear monitor belt-pack receiver with earphones
1.- Insert the batteries in the battery compartment respecting the polarity shown in it. If you have used
rechargeable batteries, you can recharge them following the indications in the Rechargeable batteries
section.
2.- If you wish, connect the REC recording output to a recorder or an amplifier.
3.- Connect the earphones to the earphone output.
TMI-816 Wireless hand-held microphone transmitter
1.- Insert the batteries in the battery compartment respecting the polarity shown in it. If you have used
rechargeable batteries, you can recharge them following the indications in the Rechargeable batteries
section.
EN
- 7-

EN
- 8-
TPI-817 Tie-clip microphone with wireless belt-pack transmitter
1.- Insert the batteries in the battery compartment respecting the polarity shown in it. If you have used
rechargeable batteries, you can recharge them following the indications in the Rechargeable batteries
section.
2.- Connect the tie-clip microphone or the required audio source.
3.- Move the switch on the rear part of the microphone belt-pack to the GUITAR LINE or MIC position
depending on the connection.

EN
- 9-
INST UCTIONS FO USE
TRANSMISSION/RECEPTION RF CHANNEL SELECTION
The transmitter (hand-held microphone or belt-pack microphone) and the receiver (in ear monitor belt-pack)
must be tuned into the same channel. Select an interference-free channel in the receiver and select the same
channel in the transmitter. If you want to use 2 or more transmitter/receiver monitor systems simultaneously,
see the following indications to avoid interference:
- Use radio frequency channels with the maximum separation between them. Take into account the
carrier frequencies in each channel, as shown in the table below:
- Moreover, each transmitter can use as many receivers as it required, on the same channel.
RECHARGEABLE BATTERIES
Insert the batteries in the battery compartment respecting the polarity shown. To recharge the batteries, an
AC/DC 12 V DC adapter can be used, or the recharge docking station mod. MSC-2, depending on the model.
I-800 UHF in ear diversity belt-pack monitor receiver with earphones
Switch on the receiver by moving the power switch to the on position. The LED indicator will light up once
in red. This means that it is working correctly and the batteries are charged enough. If the red light stays on,
it means that the batteries are low and should be changed.
If the receiver gets an RF signal, the LED indicator will remain lit in green
TMI-816 Wireless hand-held microphone transmitter
Place the microphone in the corresponding compartment in the MSC-2 recharge docking station. During
the charging process, the LED CHARGE indicator will light up in red. When the charging process has finished,
the LED FULL indicator will light up green.
TPI-817 Tie-clip microphone with wireless belt-pack transmitter
Place the microphone in the corresponding compartment in the MSC-2 recharge docking station. In order
to insert the wireless belt-pack transmitter, remove the plastic adapter first. During the charging process, the
LED CHARGE indicator will light up in red. When the charging process has finished, the LED FULL indicator
will light up green.

T OUBLESHOOTING
TECHNICAL SPECIFICATIONS
P OBLEM SOLUTION
No sound Check the transmitter and receiver power supply.
Check that the transmitter and receiver are tuned in to the same channel.
Check that the amplifier is switched on and that receiver audio output is connected to an
input on the amplifier
Check if the transmitter is too far from the receiver.
Check if the receiver is placed near metal objects or there are obstacles between the
receiver and the transmitter.
Interference When using 2 or more transmitters at once, check that the channels selected do not
interfere with one another.
Check if the interference comes from another wireless microphone system, TV, radio, etc
Distortion Check if the receiver volume is either too low or too high.
Check if the interference comes from another wireless microphone system, TV, radio, etc.
I-800
CHA ACTE ISTICS Wireless UHF in ear diversity belt-pack monitor receiver with earphones.
For use with the FONESTAR wireless in ear monitor system. Possibility to use
various receivers (RI-800) with a hand-held transmitter (TMI-816) or belt-pack
(TPI-817) in the same channel
ESPONSE Earphones: 100-10,000 Hz (±3 dB)
Line (recording): 40-15,000 Hz (±3 dB)
S/N ATIO > 94 dB
DYNAMIC ANGE > 96 dB
SENSITIVITY 5 dB μV (s/n ratio 80 dB)
CONT OLS/INDICATO S On/off switch
LED indicator
Volume control
Charger input
RF channel selector
POWE SUPPLY 3 V DC: 2 x 1.5 V LR6-AA batteries
Accepts rechargeable batteries; integrated recharge function
DIMENSIONS 76 x 106 x 29 mm depth
ACCESSO IES Silicone earphones, belt clip, 1 m cable with 3.5 mm stereo jack
connectors and cable for recharging the belt-pack batteries
OPTIONAL AD-1010E: AC/DC adapter for recharging rechargeable batteries in the
receiver
- 10 -
EN

TM I-806 (transmitter: TMI-816 + receiver: I-800)
Wireless personal diversity monitor system for transmitting the audio signal in the UHF 863-865 MHz band.
Composed of a wireless hand-held transmitter microphone (TMI-816) and a wireless belt-pack in ear monitor
receiver (RI-800) with earphones with silicone ear-tips.
16 selectable PLL UHF 863-865 MHz channels. Simultaneous use of 8 transmitter/receiver systems in 8
different channels without interference.
Possibility of using as many receivers (RI-800) as required in one channel with each transmitter.
TP I-807 (transmitter: TPI-817 + receiver: I-800)
Wireless personal in-ear monitor system for transmitting the audio signal in the UHF 863-865 MHz band.
Composed of a tie-clip microphone with wireless belt-pack transmitter (TPI-817) and a wireless belt-pack in-
ear monitor receiver ( I-800) with earphones with silicone ear-tips.16 selectable UHF 863-865 MHz channels.
Simultaneous use of 8 transmitter/receiver systems in 8 different channels without interference.
Possibility of using as many receivers (RI-800) as required in one channel with each transmitter.
TMI-816
CHA ACTE ISTICS UHF wireless hand-held microphone transmitter.
CONT OLS On/off
Gain control
Display, configuration buttons and RF channel selection
F POWE 10 mW maximum
POWE SUPPLY 2 x LR6-AA batteries. Accepts rechargeable batteries; recharge
function incorporated
DIMENSIONS 257 x 52 mm Ø
OPTIONAL MSC-2: wireless microphone recharge docking station
TPI-817
CHA ACTE ISTICS Tie-clip microphone with wireless UHF belt-pack transmitter.
CONT OLS On/off
Volume control
Input sensitivity selector: mic./line
Display, configuration buttons and RF channel selection
F POWE 10 mW maximum
POWE SUPPLY 2 x LR6-AA batteries. Accepts rechargeable batteries; recharge
function incorporated
DIMENSIONS 64 x 108 x 24 mm depth
ACCESSO IES Belt clip, windshield, tie clip and rechargeable batteries
OPTIONAL MSC-2: wireless microphone recharge docking station
- 11 -
EN

DECLA ACIÓN DE CONFO MIDAD
FONESTA SISTEMAS S.A.
Polígono de Trascueto s/n
39600 Revilla de Camargo, Cantabria (España)
Declara, bajo su responsabilidad, que los siguientes equipos:
Descripción: Sistemas inalámbricos de monitor personal in ear diversity en UHF
Marca: FONESTAR
Modelo: TMRI-806, TPRI-807
cumplen con lo dispuesto en la Directiva 1999/5/CE del Parlamento Europeo y del Consejo de 9 de Marzo de
1999, transpuesta a la legislación española mediante el Real Decreto 1890/2000, de 20 de Noviembre.
Este equipo es de clase 1 y no presenta restricciones de uso.
elación de normas de ensayo aplicadas
Normas Ámbito Cumplimiento con el requisito Esencial
Directiva 1999/5/CE
EN 300 422-2 RADIO Apartado 3.2 Directiva 1999/5/CE
Revilla de Camargo, 7 Junio 2013
Juan Vallejo
Ing. Tec. Dpto. Comercial
WA ANTY
This product has been tested and has passed the corresponding quality control prior to being put on the market.
FONESTA guarantees the suitability of the product for its specified use during a period of 2 years from the delivery
date and commits itself to repair or substitute the goods as expressed in the Spanish law ‘La Ley General para la
Defensa de los Consumidores y Usuarios, Real Decreto Legislativo 1/2007 16 Noviembre.
The lack of conformity in the first six months after purchase, due to a manufacturing defect, will be rectified with no
more than showing the proof of purchase. After six months FONESTA reserves the right to demand proof of the
product being sold with that problem.
This warranty does not include damage produced by: inappropriate use or negligence, accidents, worn out parts
due to use, breakages, burns, spilt liquids or other substances, excessive humidity, battery deterioration and internal
manipulation of the device, the software or its components by unauthorized persons, and in general any use that
is unrelated to the nature and purpose of the product.
If any service is needed during the warranty period because of lack of conformity, please contact the business or
distributor where the product was purchased in no more than 2 months after being conscious of the problem. It is
only necessary to contact FONESTA if it is impossible or imposes an undue burden for them to solve it.
To benefit from this warranty it is necessary to show the proof of purchase with the date clearly visible, with no
corrections or crossing out.
This document adds information, and never decreases the consumers’ rights, which in all cases are protected by
the Spanish law ‘La Ley General para la Defensa de los Consumidores y Usuarios, Real Decreto Legislativo 1/2007
16 Noviembre.
FONESTA is a member of ECOEMBALAJES ESPAÑA, S.A. “ECOEMBES”, with number 03497 and all our products carry the symbol,
backed by our membership and subscription to the above mentioned organization with the recycling and subsequent management of
our packaging.
FONESTAR, S.A. - NIF A28780443 - Poligono Trascueto - 39600 Revilla de Camargo, Cantabria (Spain)
www.fonestar.com
This manual suits for next models
4
Table of contents
Other FONESTAR Microphone System manuals