FONRI NAS-AB02W0 User manual

SMART INDOOR SIREN
USER GUIDE

INDEX
EN
RU
FR
ES
TR
IT
AR
DE
NL
SV
SMART INDOOR SIREN
УМНАЯ ВНУТРЕННЯЯ СИРЕНА
SMARTE INNENSIRENE
SIRENA INTELLIGENTE DA INTERNO
3
15
9
21
45
33
57
27
51
39
ALARMA INTELIGENTE INTERNO
AKILLI İÇ SİREN
SIRÈNE INTÉRIEURE INTELLIGENTE
SLIMME BINNENSIRENE
SMART INOMHUSSIREN
3
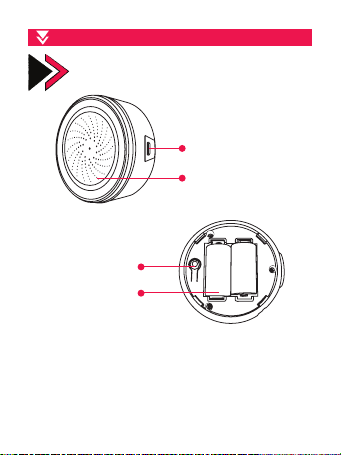
Overview
Warning: Please use the USB power input. Batteries
can only work for 2 days. Plug in the USB cable and
batteries at the same time, the sensor will work us-
ing the USB power supply in priority.
USB
Power Input
Reset Button
Batteries
Siren
EN

4
Specications
Siren alarm with humidity and temperature sensor
has also audible and visual alarm feature.
Power Supply: USB 5V/1A
Backup Battery: CR123A-3V x 2
Sound Intensity: 85dB-105dB
Wireless Network Type: 2.4GHz
Wireless Network Standard: IEEE802.11b/g/n
Wireless Network Detection Distance: 45m
Dimensiones: Ø68 x 33 mm
Operating Temperature: 0°C ~ 40°C (32°F ~ 104°F)
Operating Humidity: 20% ~ 85% RH
Storage Temperature: 0°C ~ 60°C (32°F ~ 140°F)
Storage Humidity: 0% ~ 90% RH

5
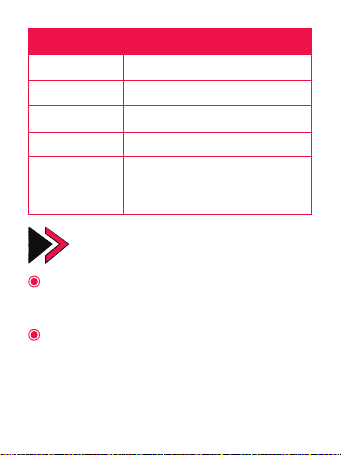
Device Status
Pairing with Wi-Fi The light ashes quickly
Triggered The light turns on
AP mode The light ashes slowly
Closed The light turns off
Reset
The light turns on for 4 seconds and 2
seconds after it turns off, the device
goes into setup mode.
LED Status
Factory Reset (Reset)
Press and hold the “Reset” button for 6 seconds
until the light starts to ash fast. Then the device
will go into the Wi-Fi pairing mode.
Press and hold the “Reset” button for another 6
seconds until the light starts to ash slowly. Then
the device will go into the AP pairing mode.
Warning: The device has a memory function. It will return to
its original state after turning it on and off. Users can delete
the records by clicking the reset button on the application.

6
Installation
• Activate the smart sensor. It will automatically
switch to “pairing with WiFi” mode.
• Click the “+” symbol in the upper right corner.
Select the device type and follow the instructions in
the app.
You can start using your device
Download the “Fonri WiFi”
app to your phone through
App Store or Google Play.
Create your account in “Fonri WiFi” app. Enter your
phone number or email and create a password.
Then log in. If you already have an account, log in.
Download the App
Sign Up and Log In
Add Device

7
App Interface

8
Using Advanced Features
You can explore the advanced features of your de-
vice using the app.
1. Basic Functions
2. Scenario Creation
3. Inter-Device Communication
4. Notifications
• Timer alarm: Has a deviation of about 30 seconds.
• Settings: Change the temperature and humidity
range. Change the alarm duration and alarm sound.
• Alarm history: See the alarm history of registered
devices in the notication center.
• Connect multiple devices together by creating
scenarios
• Allow others to control the device.
• Turn notifications on/off.

9
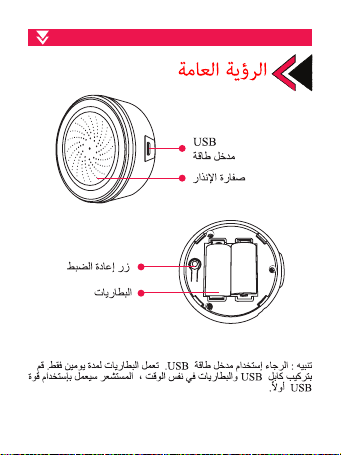
Vista General
Advertencia: Por favor utilice la entrada de alimen-
tación USB. Las baterías solo pueden funcionar por
2 días. Conecte el cable USB y las baterías al mismo
tiempo, el sensor funcionará usando la fuente de
alimentación USB en prioridad.
Entrada de
alimentación
USB
Botón de
Restablecimiento
Baterías
Sirena
ES

10
Especicaciones
La alarma de sirena con sensor de humedad y tem-
peratura también tiene una función de alarma au-
dible y visual.
Fuente de Alimentación: USB 5V/1A
Batería de Respaldo: CR123A-3V x 2
Intensidad de Sonido: 85dB-105dB
Tipo de Red Inalámbrica: 2.4GHz
Norma de Red Inalámbrica: IEEE802.11b/g/n
Distancia de Detección de Red Inalámbrica: 45m
Dimensiones: Ø68 x 33 mm
Temperatura de Funcionamiento: 0°C ~ 40°C (32°F ~ 104°F)
Temperatura de Humedad: 20% ~ 85% RH
Temperatura de Almacenamiento: 0°C ~ 60°C (32°F ~ 140°F)
Humedad de Almacenamiento: 0% ~ 90% RH
11
Estado de
Dispositivo
Emparejamiento
con Wi-Fi La luz parpadea rápidamente
Activado La luz se enciende
Modo AP La luz parpadea lentamente
Desactivado La luz se apaga
Restablecimiento
La luz se enciende durante 4 segundos
y 2 segundos después de que se apa-
ga, el dispositivo entra en modo de
conguración.
Estado de LED
Restablecimiento de
Fábrica
Mantenga presionado el botón “Restablecimien-
to” durante 6 segundos hasta que la luz comien-
ce a parpadear rápidamente. Luego, el dispositi-
vo entrará en el modo de emparejamiento Wi-Fi.
Mantenga presionado el botón “Restablecimien-
to” durante otros 6 segundos hasta que la luz co-
mience a parpadear lentamente. Luego, el dispo-
sitivo entrará en el modo de emparejamiento AP.
Advertencia: El dispositivo tiene una función de memoria.
Volverá a su estado original después de encenderlo y apa-
garlo. Los usuarios pueden eliminar los registros haciendo
clic en el botón de restablecimiento en la aplicación.

12
Instalación
• Active el sensor inteligente. Cambiará automáti-
camente al modo de “emparejamiento con WiFi”.
• Haga clic en el símbolo “+” en la esquina superior
derecha. Seleccione el tipo de dispositivo y siga las
instrucciones de la aplicación.
Puede empezar a usar su dispositivo.
Descargue la aplicación de
“Fonri WiFi” a su teléfono
a través de App Store o
Google Play.
Cree una cuenta en la aplicación de “Fonri WiFi”.
Introduzca su número de teléfono o correo electró-
nico y cree una contraseña.Luego inicie sesión. Si ya
tiene una cuenta, inicie sesión.
Descargue la Aplicación
Regístrese e Inicie Sesión
Agregue Dispositivo

13
Interfaz de Aplicación

14
Uso de Funciones
Avanzadas
Puede explorar las funciones avanzadas de su dis-
positivo usando la aplicación.
1. Funciones Básicas
2. Creación de Escenarios
3 Comunicación entre Dispositivos
4. Notificaciones
• Temporizador de alarma: Tiene una desviación de
unos 30 segundos.
• Ajustes: Se puede cambiar el rango de tempera-
tura y humedad junto con la duración y el sonido
de la alarma.
• Historial de alarma: consulte el historial de alar-
ma de los dispositivos registrados en el centro de
noticaciones.
• Conecte varios dispositivos juntos creando esce-
narios.
• Permita que otros controlen el dispositivo.
• Activar/desactivar notificaciones.
15
AR

16

17

18
•
•

19

20
Table of contents


