Fontana Forni MAESTRO 60 User manual

MAESTRO 60
MAESTRO 40
FORNI PER USO
DOMESTICO
MODELLI MAESTRO
40 / 60
GP21-0070245-01-MI01 REV 1.1
OVENS FOR
DOMESTIC USE
MAESTRO MODELS
40 / 60
FOURS À USAGE
DOMESTIQUE
MODÈLES
MAESTRO
40 / 60
HORNOS PARA
USO DOMÉSTICO
MODELOS MAESTRO
40 / 60
BACKÖFEN FÜR
DEN HAUSGEBRAUCH
MODELLE
MAESTRO
40 / 60
MANUALE D’USO
USER MANUAL
MANUEL DE L’UTILISATAEUR
MANUAL DE USO
BENUTZERHANDBUCH

3
ITAS PA DEU ENG
ITALIANO P. 5-25
ENGLISH P. 5-25
FRANCESE P. 5-25
TEDESCO P. 5-25
SPAGNOLO P. 5-25
ITAFRA

MANUTENZIONE ORDINARIA E STRAORDINARIA
Gentile cliente
vogliamo ringraziarla per la preferenza che ha voluto accordare ai nostri prodotti.
Questo manuale le permetterà di installare e utilizzare al meglio e in sicurezza il for-
no da lei acquistato. Le consigliamo di leggere attentamente il seguente manuale prima
di effettuare la prima accensione, qualora dovessero sorgere dei dubbi o problemi La invi-
tiamo a rivolgersi al rivenditore che le assicurerà la massima collaborazione e assistenza
INDICE
AVVERTENZE GENERALI 4
AVVERTENZE SICUREZZA 6
GARANZIA 7
INSTALLAZIONE 9
COLLEGAMENTI 11
STOCCAGGIO, ASSISTENZA, MANUTENZIONE 14
INDICAZIONI D’USO E CARATTERISTICHE TECNICHE 15
PRIMA ACCENSIONE 18
RISOLUZIONE PROBLEMI 20
NOTE TECNICHE E DI SICUREZZA 22
54
ITA
ITA

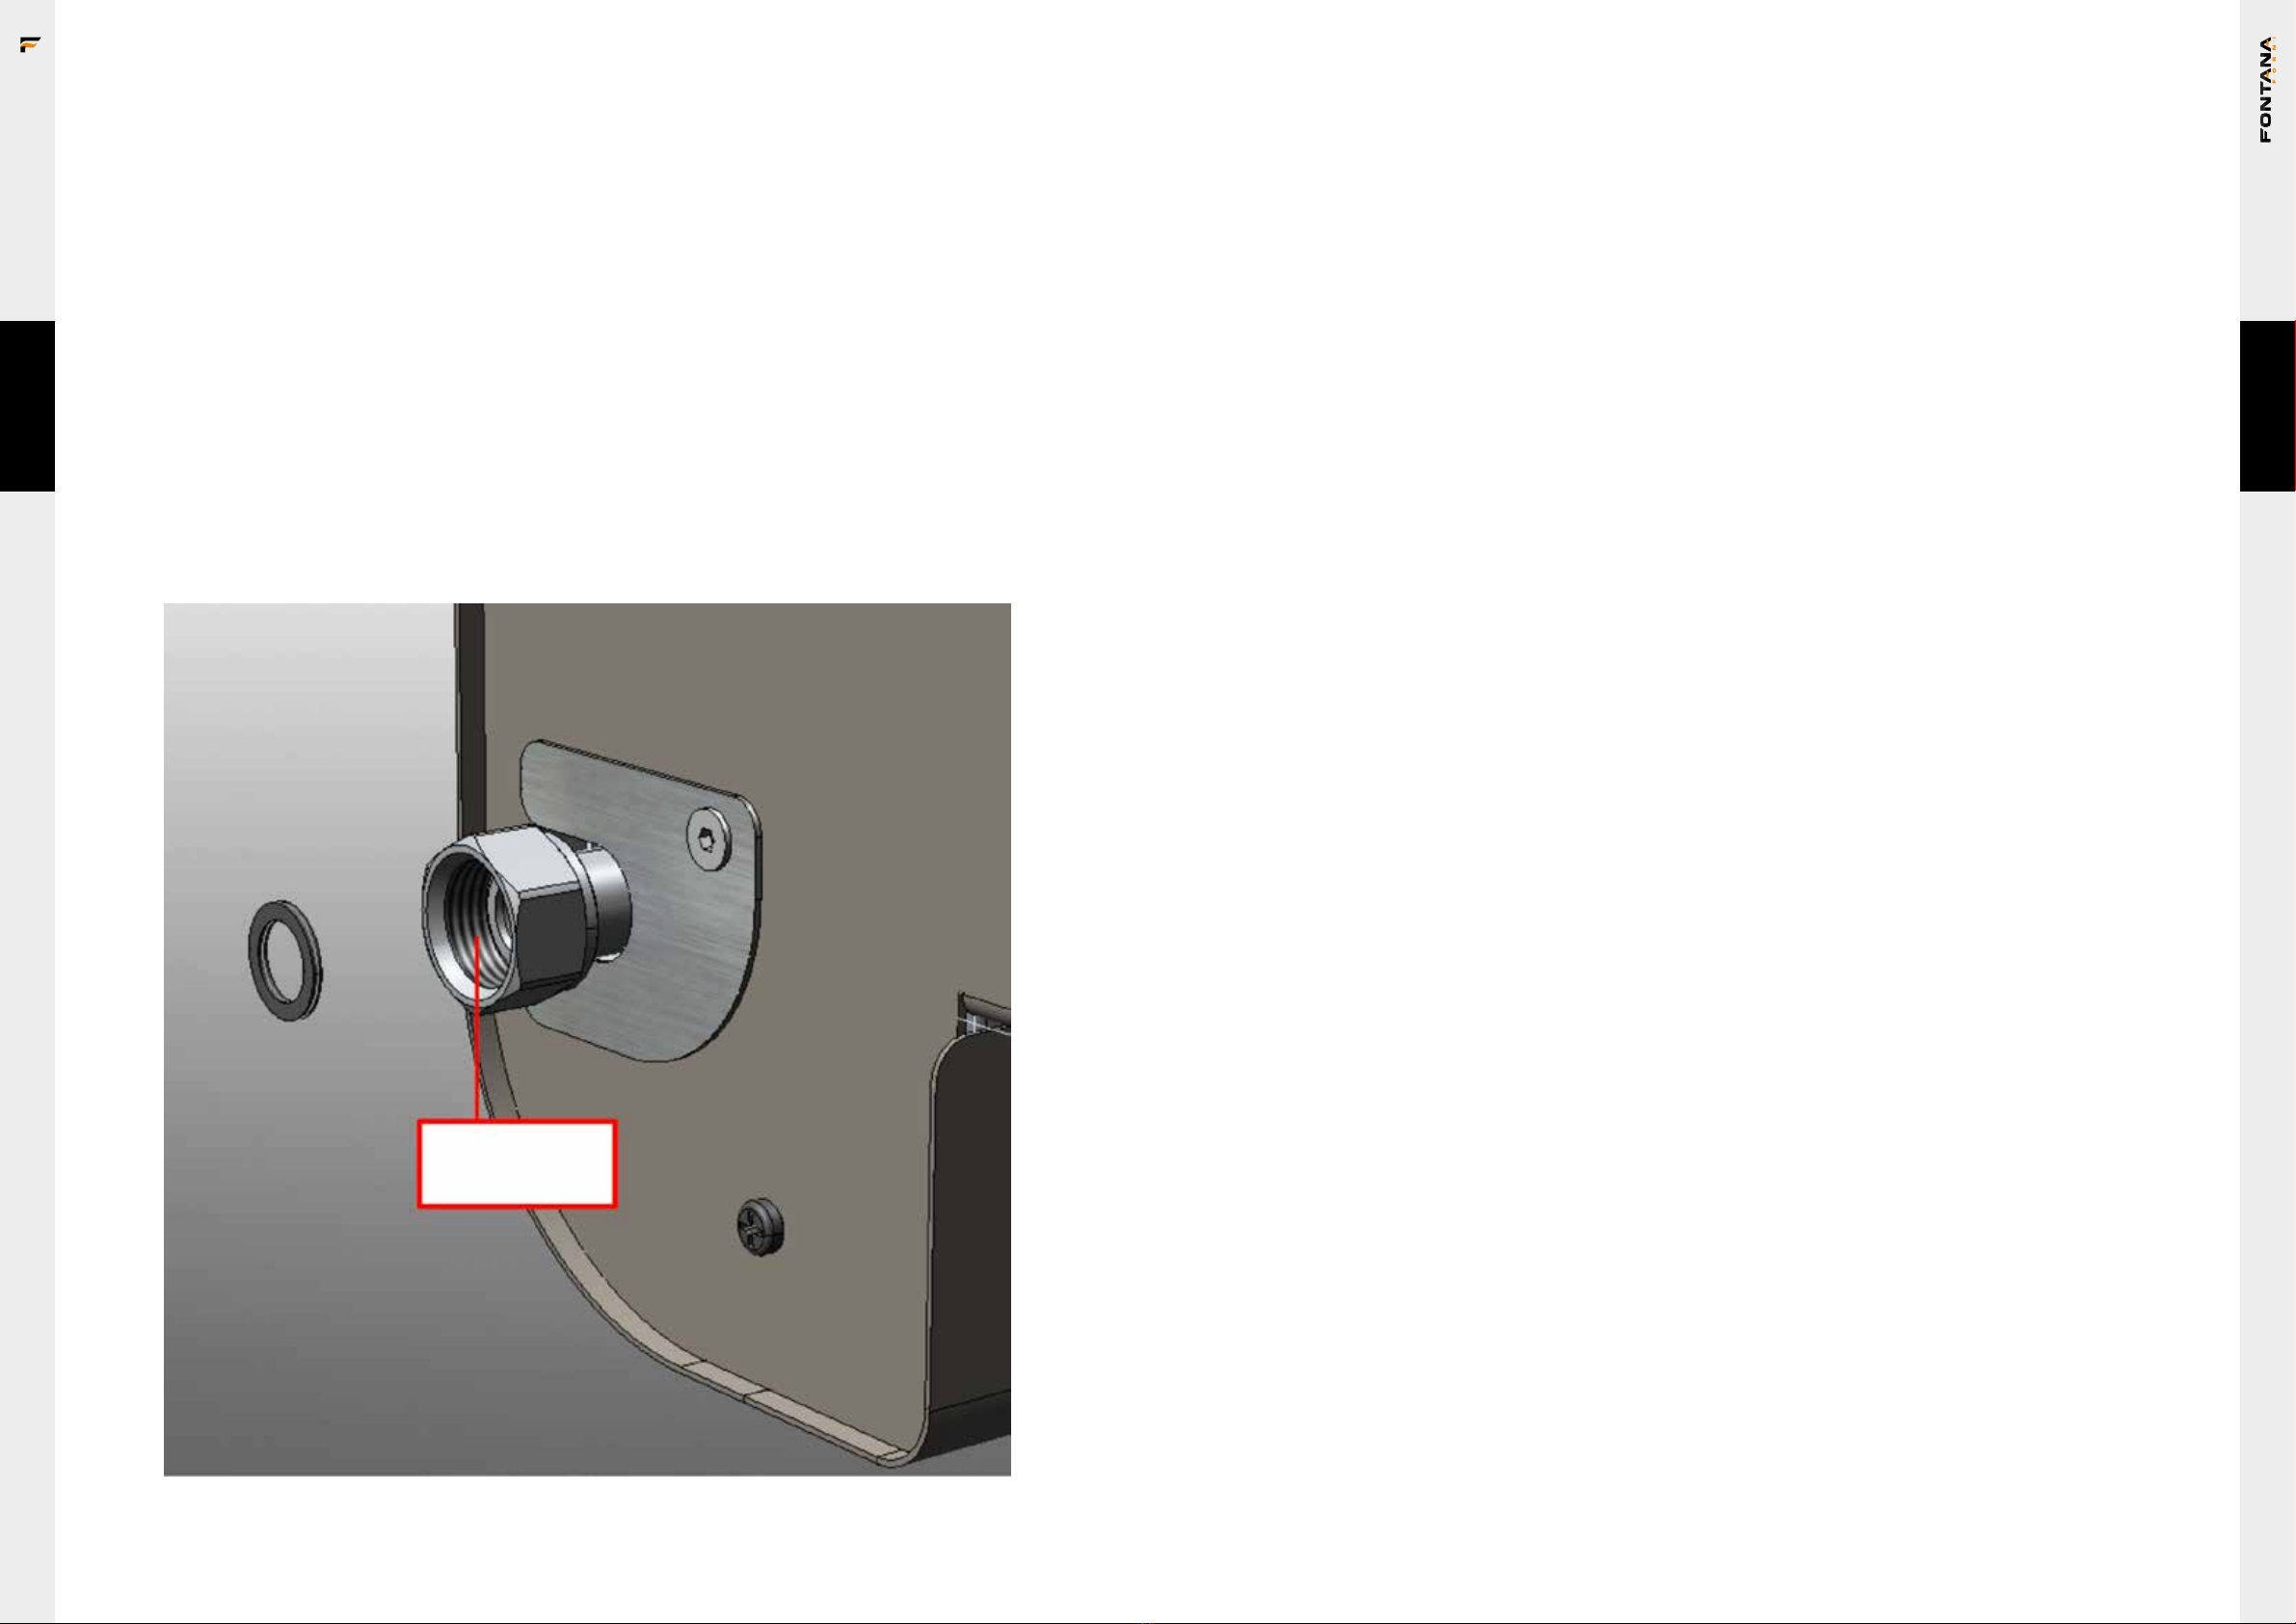
Tutti gli interventi devono essere eseguiti in condizioni
di sicurezza e con la linea gas chiusa e/o disconnessa
AVVERTENZE GENERALI
CONSERVARE QUESTO MANUALE PER FUTURE CONSULTAZIONI
ATTENZIONE: Un allacciamento improprio nonché eventuali alterazioni o una manutenzio-
ne inadatta possono causare danni materiali a cose o persone e persino la morte nei casi
estremi. Leggere attentamente le istruzioni prima di installare ed usare l’apparecchio
LEGGERE ATTENTAMENTE LE SEGUENTI INFORMAZIONI PER UNA CORRETTA
INSTALLAZIONE ED UN FUNZIONAMENTO OTTIMALE DEL FORNO.
- La targhetta di identificazione, con i dati tecnici, il numero di matricola e la marcatura è
visibilmente applicata all’apparecchio. La targhetta non deve mai essere rimossa.
- Prima di mettere in funzione l’apparecchio, è obbligatorio rimuovere tutti i film protettivi
presenti.
- Evitare nel modo più assoluto l’uso di spugne in acciaio e raschietti taglienti per non
danneggiare le superfici. Usare i normali prodotti, non abrasivi, servendosi eventualmente
di utensili in legno o materiale plastico. Risciacquare accuratamente e asciugare con uno
straccio morbido o con un panno in microfibra.
- Non utilizzare stoviglie o contenitori costruiti con materiale plastico. Le temperature ele-
vate raggiunte all’interno del forno potrebbero fondere questo materiale recando danni
all’apparecchio.
- Usare posate ed attrezzi resistenti ad alte temperature.
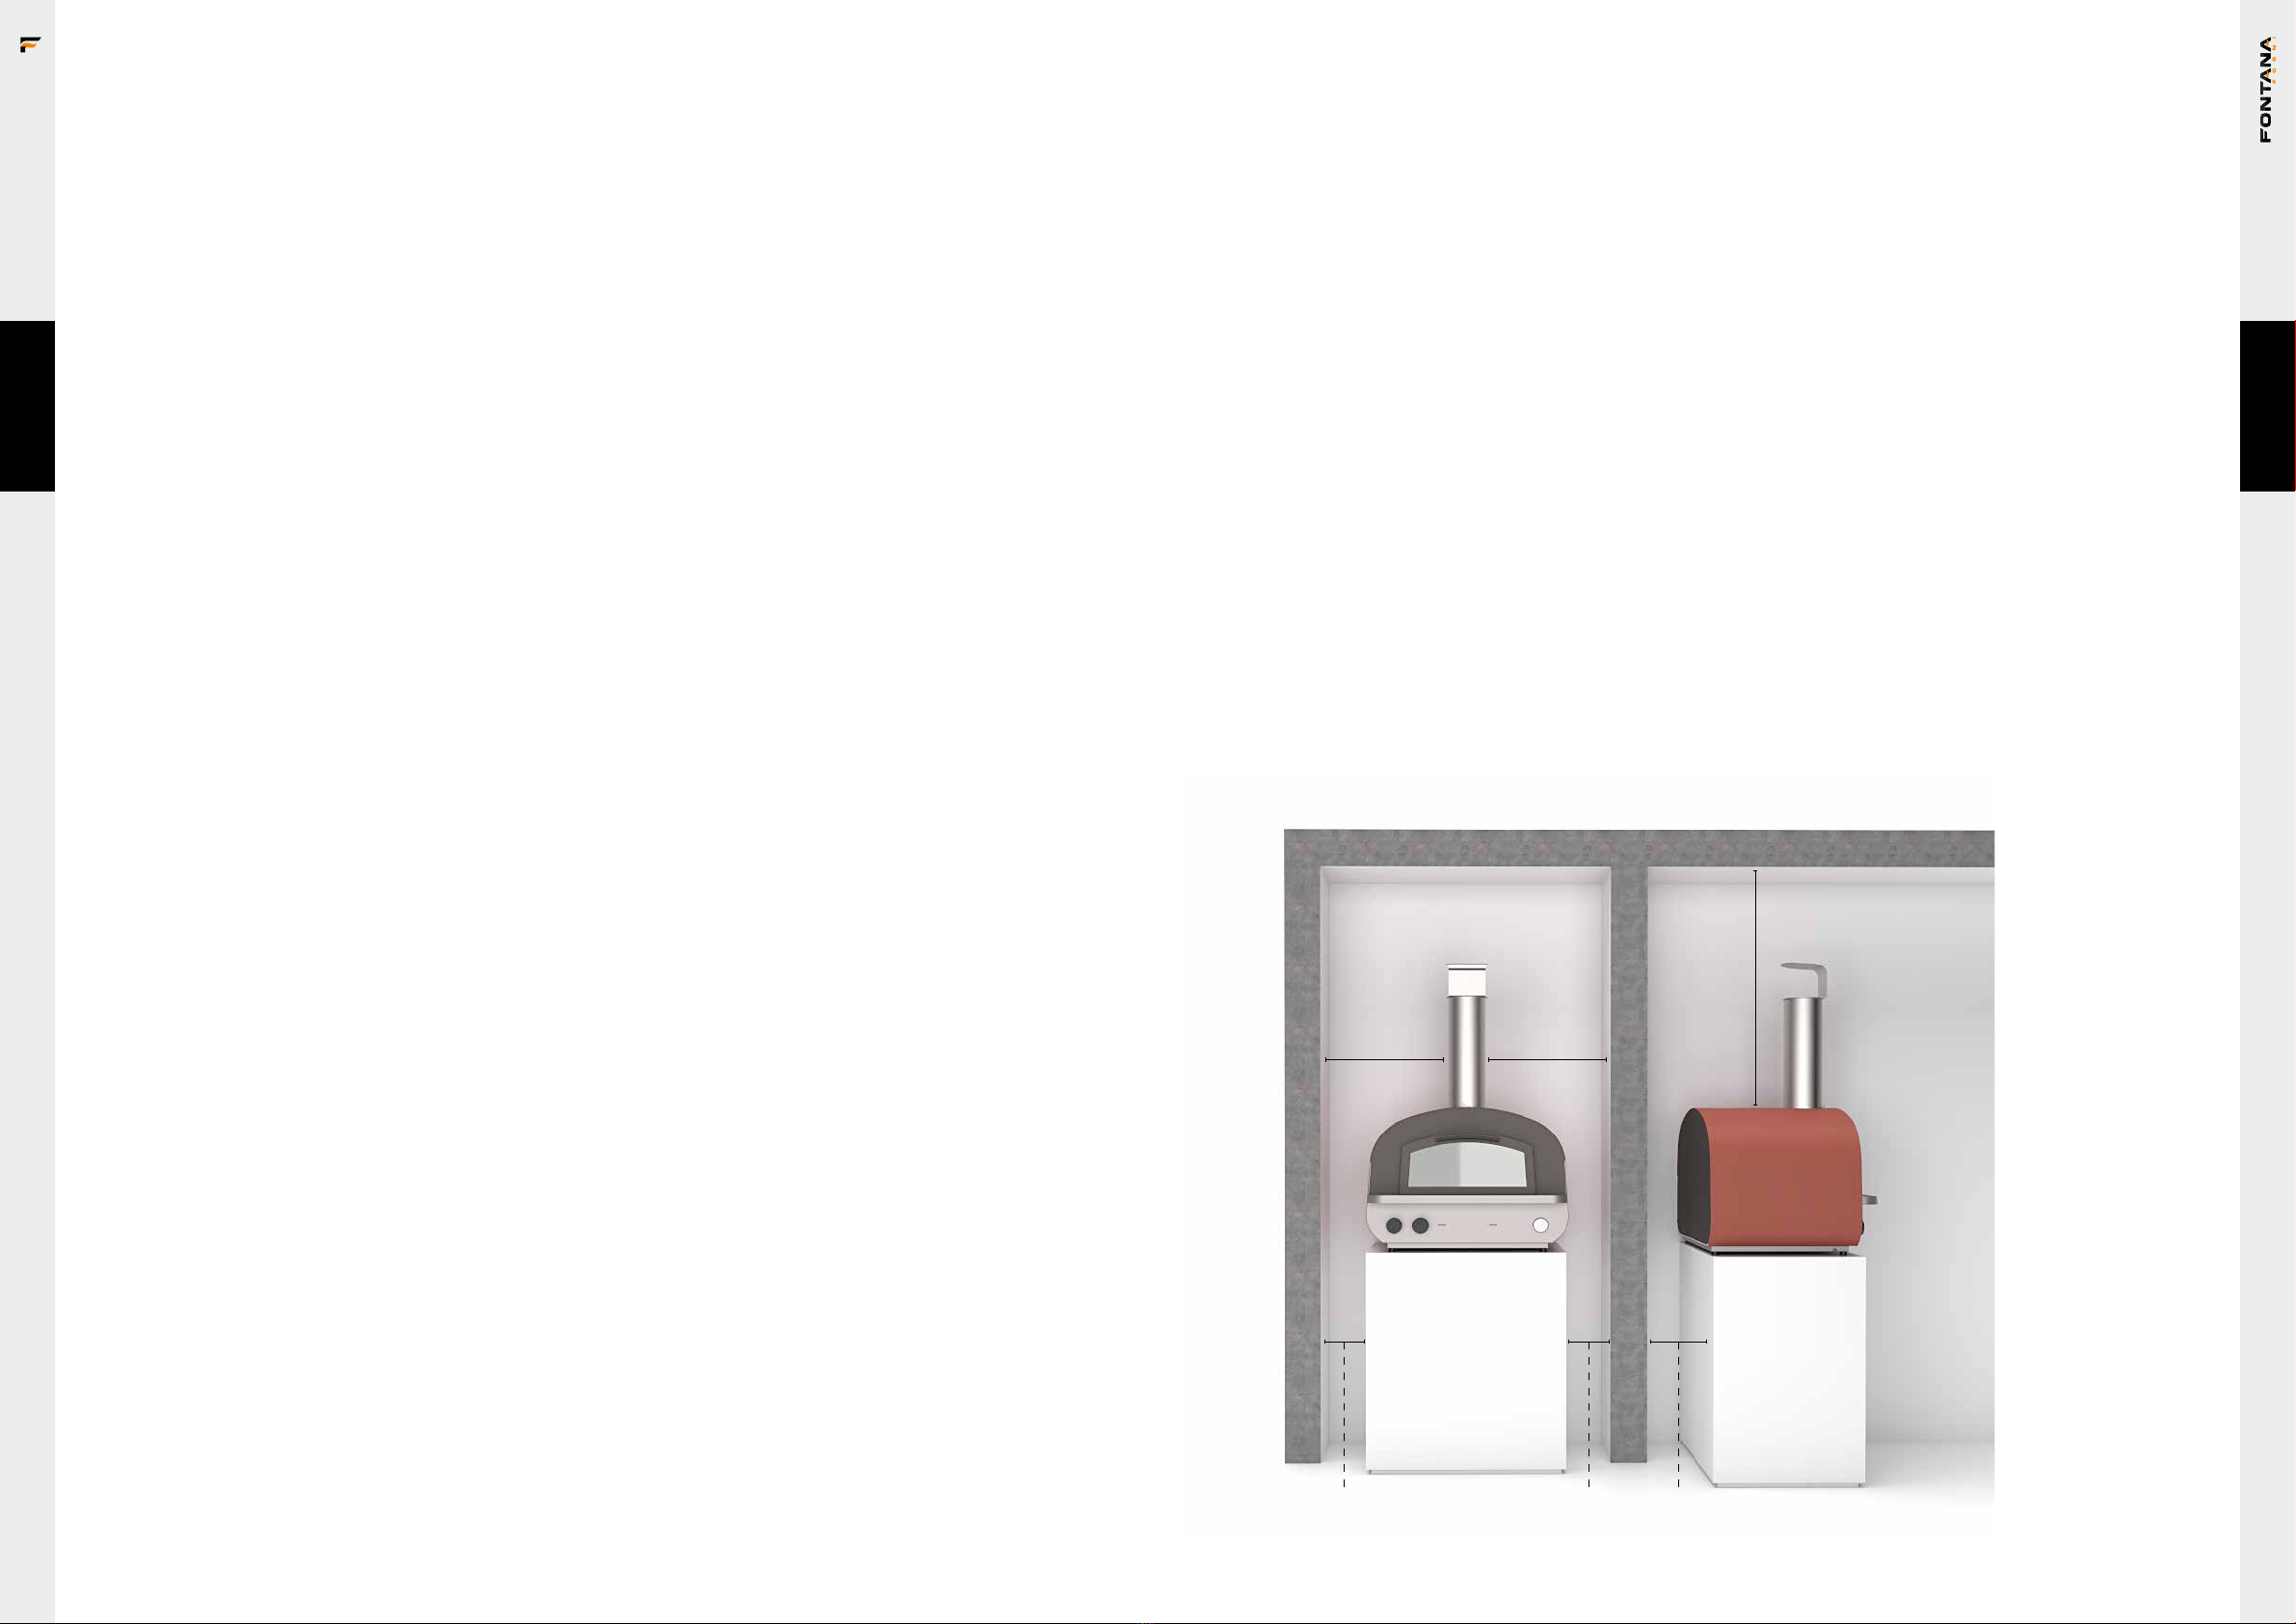
- Posizionare il forno su una superficie piana.
- Per effetto della temperatura il colore delle superfici può variare.
- L’installazione del prodotto deve garantire facile accesso per la pulizia.
- Mai immettere oggetti infiammabili nel forno: qualora venisse incidentalmente acceso
potrebbe innescarsi un incendio.
- Non permettere ai bambini di avvicinarsi all’apparecchio durante il funzionamento, PERI-
COLO DI USTIONI o di farne oggetto di gioco anche da spento.
Non inserire oggetti metallici appuntiti (posate o utensili) nelle feritoie dell’apparecchio.
- I forni pur avendo del materiale isolante tra i due strati d’acciaio, potrebbero surriscal-
darsi all’esterno.
- Assicurarsi che il forno sia posizionato distante da oggetti e materiali che possono esse-
re danneggiati dal calore. Non posizionare materiali infiammabili nella zona del pavimento
antistante il forno, proteggere con materiale ignifugo il pavimento se è costituito da ma-
teriale infiammabile.
- Non riporre materiale infiammabile nel ripiano del carrello (se presente) sotto il forno.
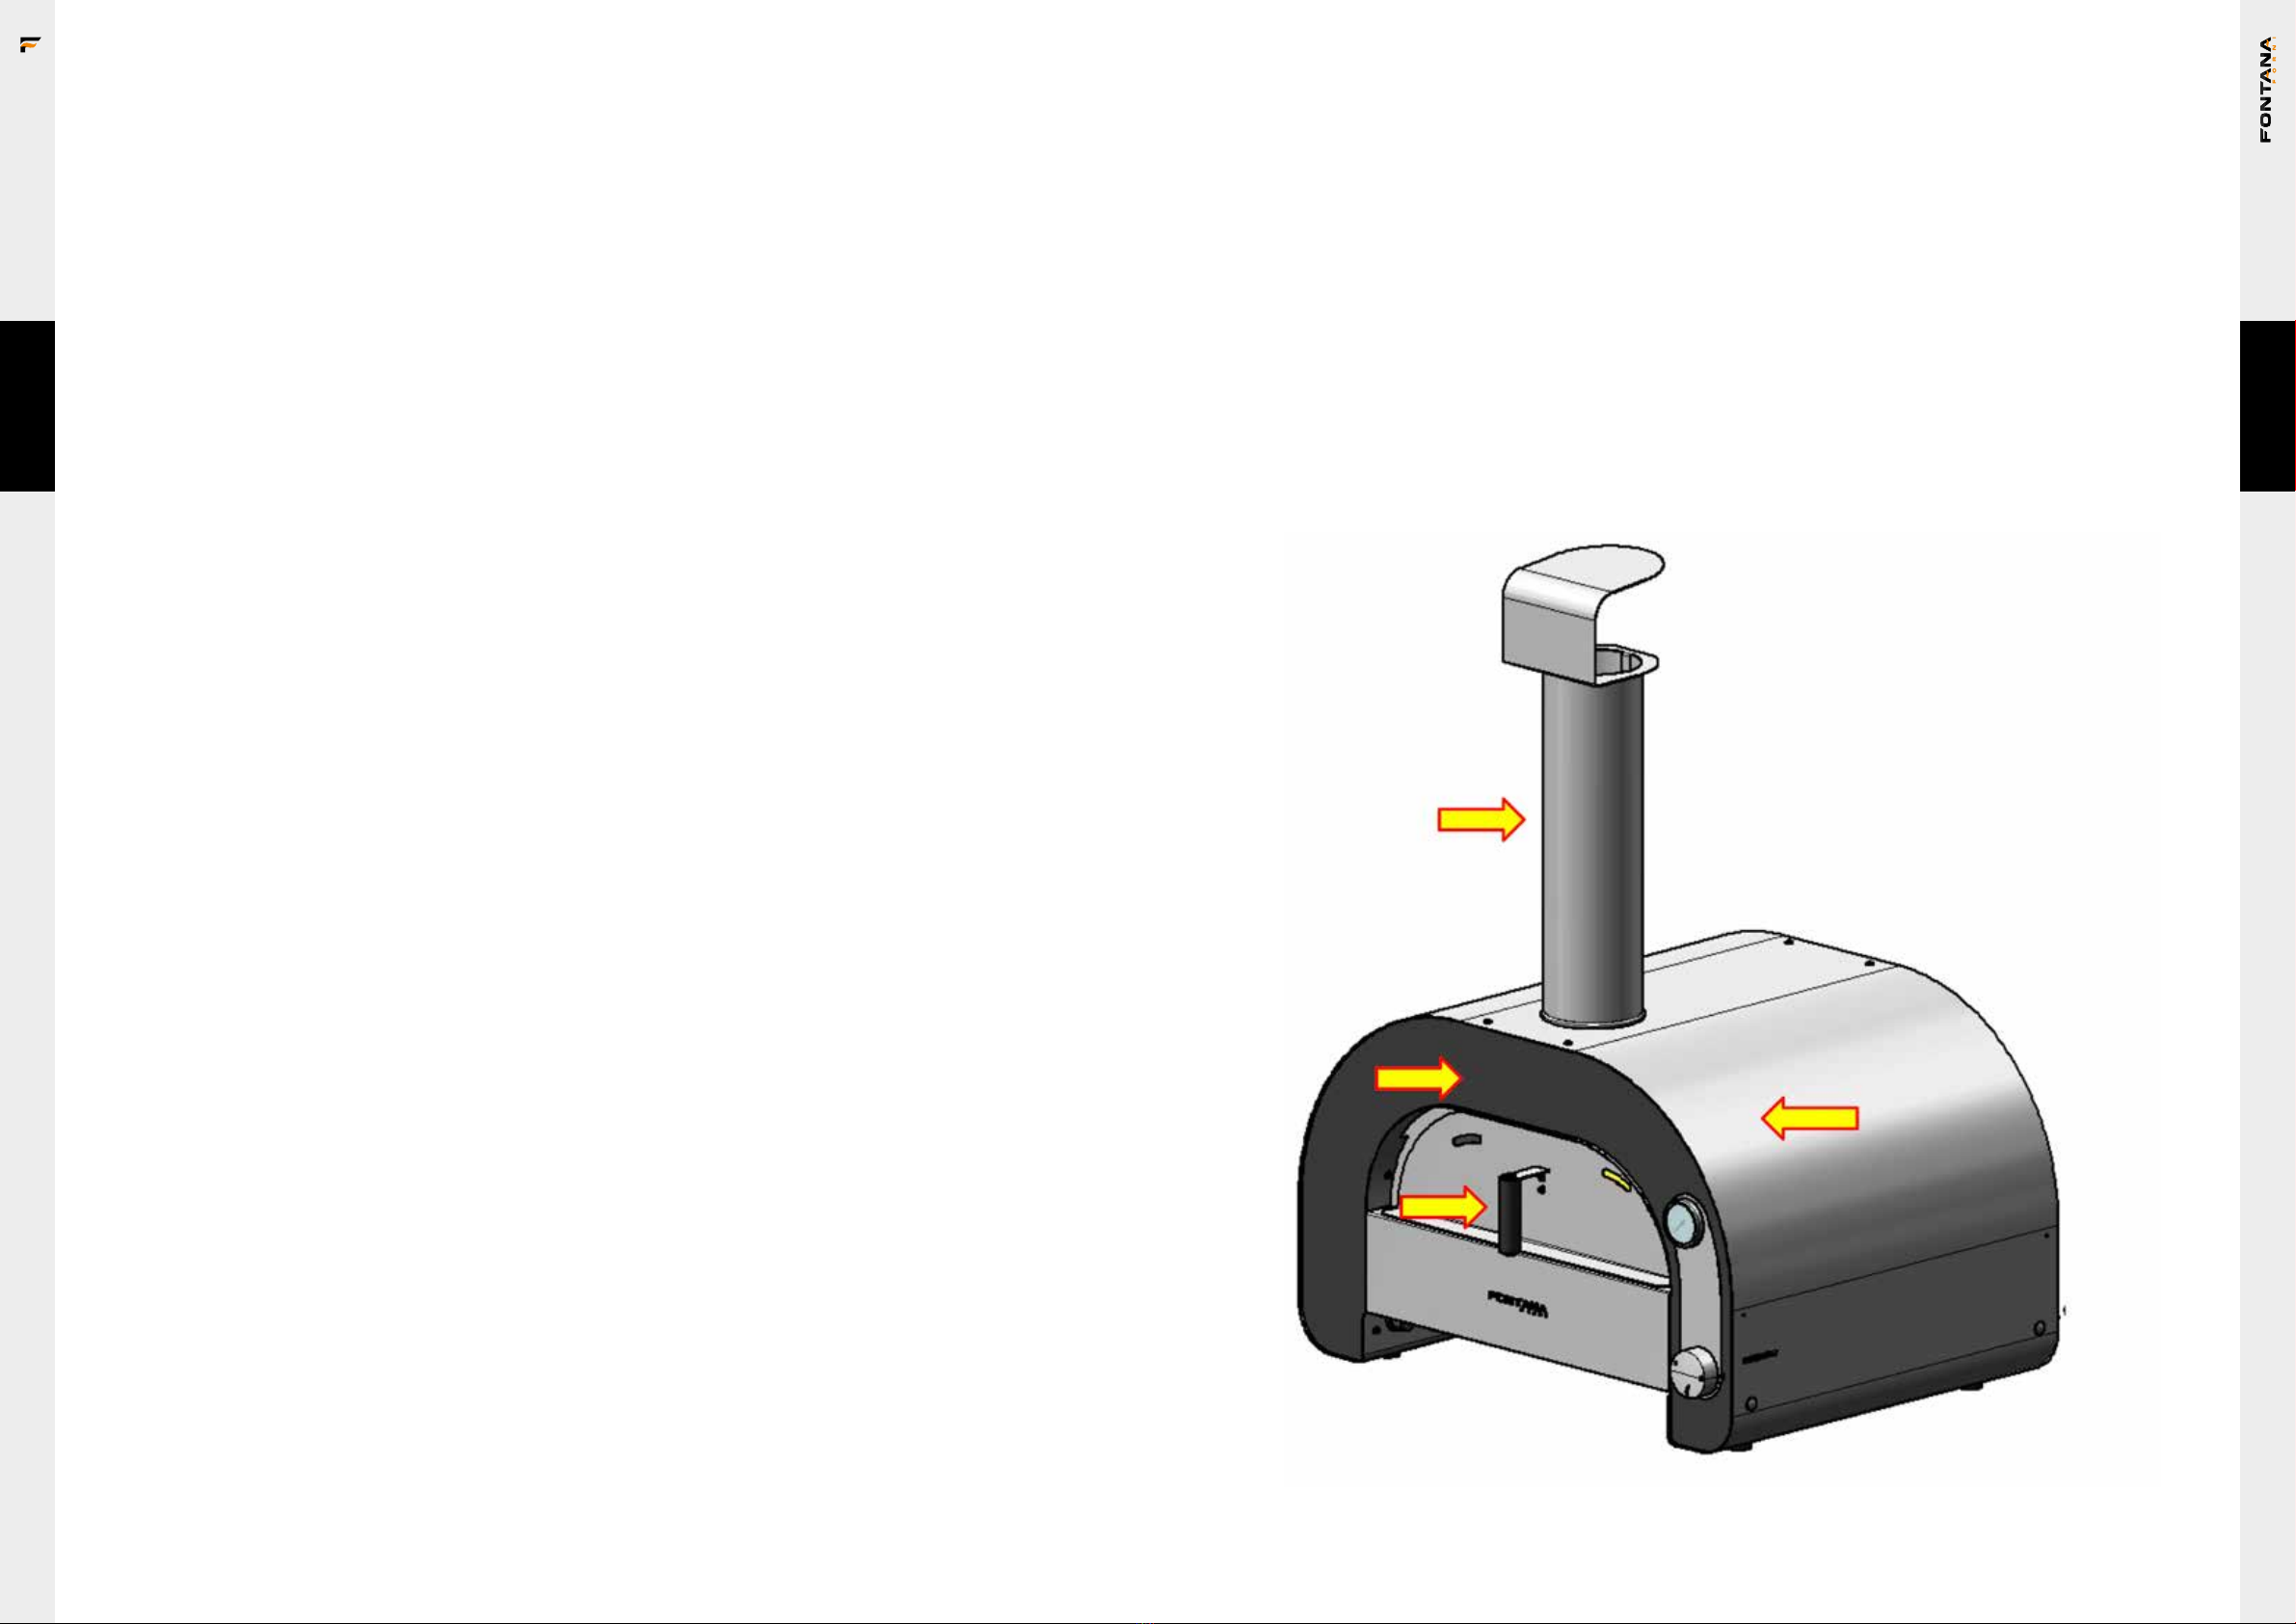
- Manovrare lo sportello impugnando il manico. - Non toccare le superfici esterne e la can-
na fumaria durante l’uso.
- Non usare liquidi infiammabili vicino al forno.
-Tenereeventualicavielettricietubidialimentazionecarburantelontanodallesuperficicalde.
- Non utilizzare il forno in caso di funzionamento anomalo o sospetto di rottura.
- Non spostare il forno durante l’utilizzo o quando è caldo.
- Non appoggiarsi né appoggiare oggetti al forno, potrebbe esserne compromessa la sta-
bilità.
- Non usare fiamme libere vicino al forno.
- Nel caso in cui il grasso prendesse fuoco, interrompere l’alimentazione e lasciare lo spor-
tello chiuso fino a quando il fuoco si estingue.
- Durante l’utilizzo del forno indossare guanti da cucina resistenti al calore.
- Le parti sigillate dal costruttore non devono essere modificate dall’utilizzatore.
- Non lasciare incustodito l’apparecchio durante le cotture che possono liberare grassi od
oli. I grassi e gli oli possono incendiarsi.
- Non ostruire le aperture, le fessure di ventilazione e di smaltimento del calore ove pre-
senti.
- Durante l’uso, per i forni con base integrata(carrello), ricordare di bloccare le ruote con
l’apposito freno.
AVVERTENZE SICUREZZA
LEGGERE TUTTE LE ISTRUZIONI PRIMA DI INSTALLARE E UTILIZZARE IL PRODOTTO
Leggere l’intero manuale prima di procedere con l’installazione. La mancata osservanza
di queste procedure potrebbe causare danni a cose e persone ed eventualmente morte.
Contattare le autorità competenti in merito a eventuali restrizioni sull’installazione.
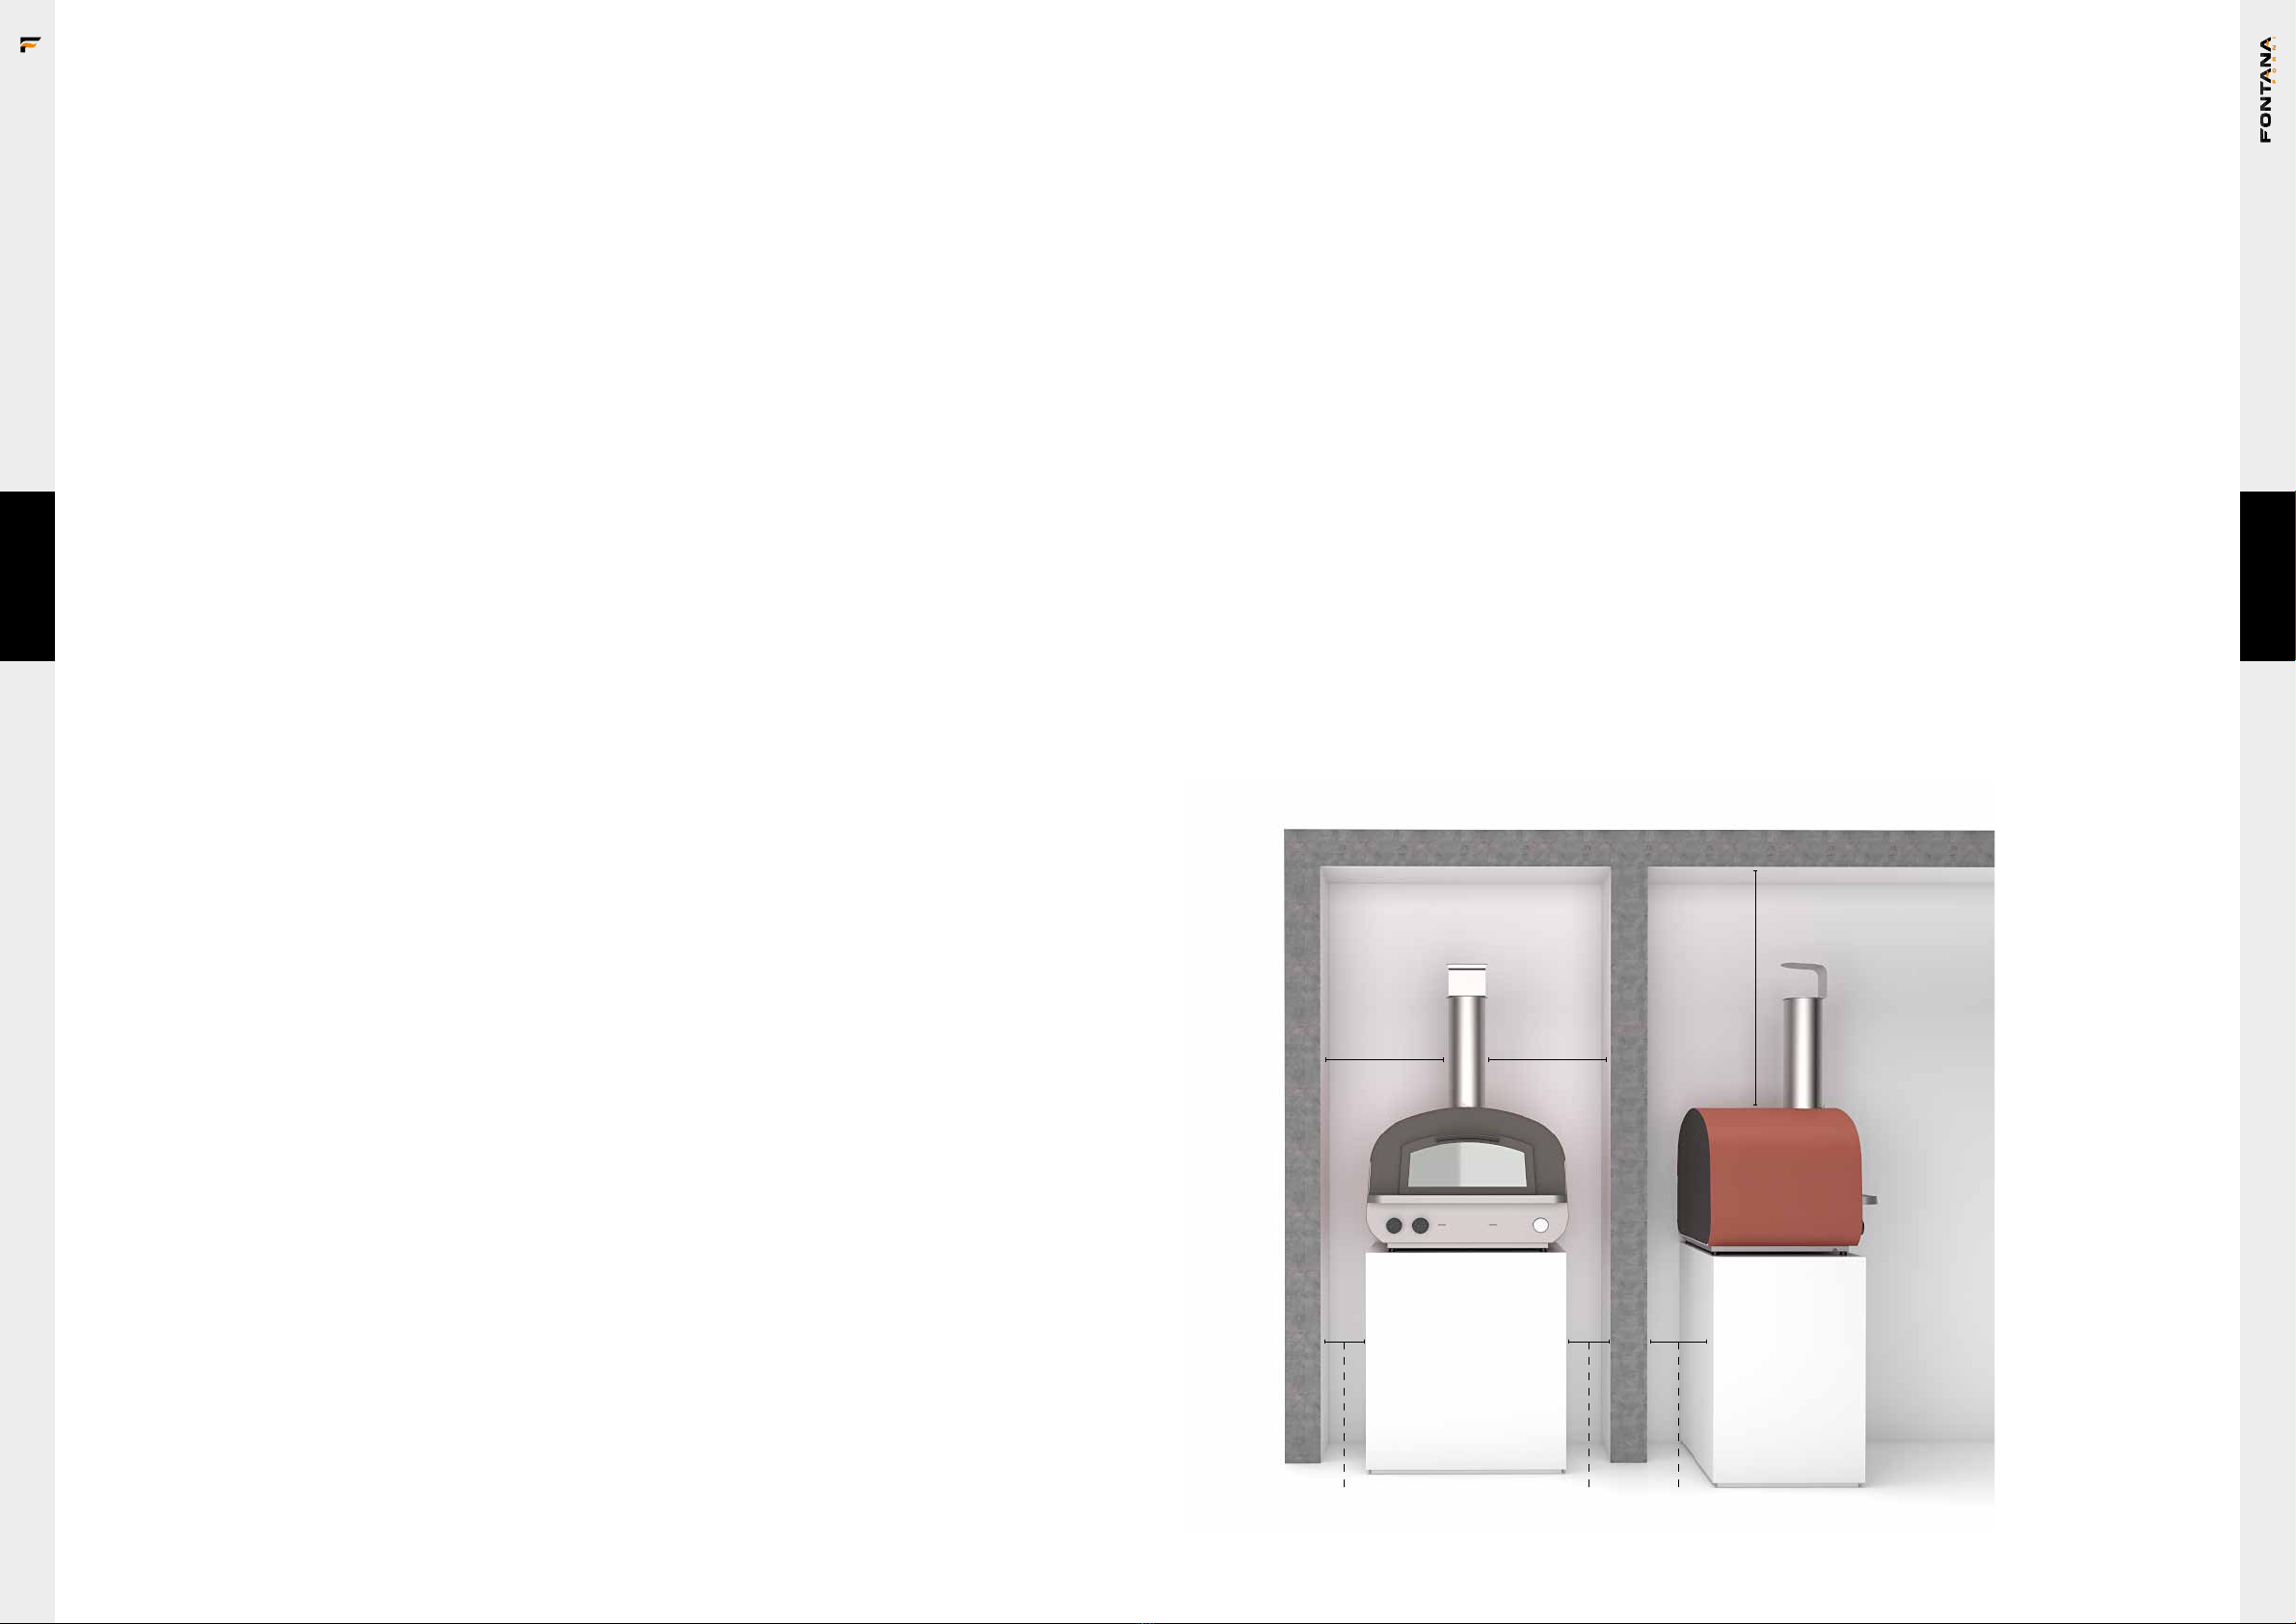
UNA DELLE MAGGIORI CAUSE DI INCENDIO RELATIVE AL FORNO E’ DOVUTA AL MANCATO
RISPETTO DELLE DISTANZE MINIME DA MATERIALI COMBUSTIBILI O DA ERRATA INSTALLA-
ZIONE. È OLTREMODO IMPORTANTE CHE QUESTO FORNO SIA INSTALLATO IN ACCORDO CON
QUESTE ISTRUZIONI.
PER LA VOSTRA SICUREZZA: Non depositare o usare benzina o altri vapori o liquidi in-
fiammabili nelle vicinanze di questo o altri apparecchi. Mantenere l’area sottostante e cir-
costante l’apparecchio libera da materiali combustibili..
ATTENZIONE: Un allacciamento improprio nonché eventuali alterazioni o una manutenzio-
ne inadatta possono causare danni materiali a cose o persone e persino la morte nei casi
estremi.
LE FUGHE DI GAS POSSONO PROVOCARE INCENDI O ESPLOSIONI E CAUSARE LESIONI
PERSONALI GRAVI O MORTALI, O DANNI ALLE COSE.
ATTENZIONE SE SI AVVERTE ODORE DI GAS:
1. Chiudere immediatamente l’alimentazione del gas.
2. Spegnere eventuali fiamme libere.
3. Aprire lo sportello del forno.
4. Consultare un tecnico specializzato
ATTENZIONE: Se il forno a gas non viene utilizzato chiudere la valvola di alimentazione del
gas. Non riporre nelle vicinanze bombole di gas non utilizzate anche se vuote
76
ITA
ITA

GARANZIA
In ottemperanza alle normative italiane ed europee i forni sono coperti dalla garanzia lega-
le, a carico del rivenditore, di 24 mesi dalla data di acquisto. Trascorso il periodo di 24 mesi
di garanzia ogni intervento di riparazione sarà a carico del consumatore.
SI RICHIEDE DI CONSERVARE LO SCONTRINO O LA FATTURA D’ACQUISTO DA MOSTRARE
AL RIVENDITORE. VI CONSIGLIAMO DI ANNOTARE QUI SOTTO IL NUMERO SERIALE PRE-
SENTE SULLA TARGHETTA IDENTIFICATIVA DEL PRODOTTO
Una buona manutenzione ed un uso corretto possono aiutare a prolungare la conservabili-
tà del prodotto. Si consiglia di riporre il forno al coperto nei mesi invernali per proteggerlo
dagli agenti atmosferici. Altrimenti si consiglia di proteggere il forno con un telo imperme-
abile traspirante
La garanzia NON viene applicata nei seguenti casi:
• Nel caso in cui il forno sia NON propriamente utilizzato e installato come descritto nel
presente manuale.
• Nel caso in cui il forno sia stato manomesso in qualsiasi modo, volontariamente o invo-
lontariamente.
• Nel caso in cui non sia stata effettuata adeguata manutenzione. Danni al bruciatore do-
vuti a residui di cottura o all’utilizzo di altri combustibili non sono coperti dalla garanzia.
• Nel caso in cui il forno, per qualsiasi causa, sia stato alterato e non sia più nella condizio-
ne riscontrata alla consegna del prodotto.
• Nel caso in cui NON si sia usato il solo combustibile raccomandato. Non usare carbone
liquido per barbecue, prodotti chimici o altro combustibile.
• Nel caso in cui il danno sia il risultato dell’uso di prodotti chimici all’interno o all’esterno
del forno.
• Lo sportello non è in garanzia.
• Danni dovuti al superamento della temperatura indicata del pirometro in dotazione. Ol-
tre i 450°/500°C (840°/1000° F).
• Nel caso in cui si utilizzino componenti non prodotte o consigliate dal costruttore.
• Danni a parti non funzionali e decorative che non influiscono sul normale uso del forno,
inclusi graffi e differenze di colore.
• Nel caso in cui la targhetta venga rimossa, alterata o cancellata
• Le tavelle non sono coperte da garanzia, ulteriori ricambi possono essere acquistati su
richiesta.
~50 CM
~100 CM
~50 CM
~20 CM ~20 CM ~20 CM
INSTALLAZIONE
ATTENZIONE. Le pareti esterne del forno possono raggiungere temperature superiori ai
50°C (120°F) eventuali materiali infiammabili non devono trovarsi nel raggio di 1 metro dal
forno. Si raccomanda di posizionare il forno durante l’utilizzo a sufficiente distanza da
materiali infiammabili o che possano danneggiarsi con il calore.
IMPORTANTE. L’esposizione a forte vento o correnti d’aria potrebbe alterare le prestazioni
del forno
IMPORTANTE. Posizionare il forno su una superficie pianeggiante e assicurarsi che sia
perfettamente stabile. Movimenti involontari durante l’utilizzo possono risultare molto pe-
ricolosi per cose e persone
IMPORTANTE: Posizionare il forno ad una distanza minima di 20 cm dalle pareti e da even-
tuali altre apparecchiature. Aumentare la distanza minima a 50 cm attorno alla canna fu-
maria e a 1 m dalla parte superiore del forno.
I FORNI IN VERSIONE DA APPOGGIO VANNO POSIZIONATI SU TAVOLI O ALTRE SUPERFICI
IGNIFUGHE DI ADEGUATA CAPACITÀ PORTANTE (per il peso fare riferimento alla scheda tec-
nica del prodotto), SE PRESENTI, REGOLARE I PIEDINI PER LIVELLARE IL FORNO SUL PIANO
DI APPOGGIO.
Per agevolare la movimentazione e il posizionamento è consigliato rimuovere il camino, la
porta e le tavelle poste all’interno della camera di combustione.
98
ITA
ITA

COLLEGAMENTO
SOLO PER MODELLI GPL
COLLEGARE LA BOMBOLA DI GPL AL FORNO
La bombola, sempre dotata di regolatore di pressione (non fornito), deve essere collegata
al forno tramite un tubo in gomma flessibile (non fornito) adatto all’utilizzo e della lun-
ghezza compresa tra 60 e 150 cm. L’attacco in ingresso del forno presenta una filettatura
G1/2” F su cui fissare un adattatore specifico per allacciarsi alla bombola gpl secondo le
norme del paese di destinazione.
Nell’esempio vediamo un portagomma (non applicabile universalmente) dove inserire il
tubo che deve essere stretto con una fascetta in modo da evitare perdite o scollegamenti
accidentali. La bombola deve essere sempre dotata di regolatore di pressione a taratura
fissa (non fornito) per il tipo di gas utilizzato e a seconda del paese di destinazione. Evitare
di attorcigliare, piegare o schiacciare il tubo flessibile. Se ci sono segni evidenti di usura o
la data di utilizzo impressa sul tubo è scaduta sostituirlo immediatamente.
PORTAGOMMA
G1/2” M
24 MM
G1/2” F
ADATTATORE G1/4” M LH
CON CONO DI TENUTA
(NON INCLUSO)
REGOLATORE DI PRESSIONE(non fornito in dotazione):
Questo apparecchio deve essere dotato di un regolatore di pressione in
osservanza degli standard e/o delle norme locali/nazionali con uscita
nominale di pressione di:
CATEGORIA I3+(28-30/37) Propano 37 mbar. Butano 28-30 mbar.
CATEGORIA I3B/P (30) Propano/Butano 30 mbar
CATEGORIA I3B/P (37) Propano/Butano 37 mbar
CATEGORIA I3B/P (50) Propano/Butano 50 mbar
MAI USARE UNA FONTE DI GAS NON REGOLATA.
TUBO FLESSIBILE (non fornito in dotazione):
Il tubo in ingresso della vs utenza NON dove essere inferiore a:
ؽ” = Ø14 mm per Metano
ؼ” = Ø 8 mm per GPL (Lunghezza max 1,5 metri)
BOMBOLA
• Consigliamo di usare bombole di peso non superiore a 10 Kg se alloggiate in un carrello
sotto forno.
• Lunghezza max del tubo gas consentita 1.5 mt.
• Maneggiare sempre la bombola con cura. Non riporla mai in posizione orizzontale poiché
la valvola potrebbe rovinarsi.
Ciò potrebbe causare seri problemi di sicurezza. Utilizzate sempre la bombola in posizio-
ne verticale. Se posizionata orizzontalmente la bombola potrebbe permettere al liquido
combustibile di raggiungere i tubi creando danni con pericolo di scoppio.
• Posizionare sempre la bombola in un luogo accessibile per facilitare l’apertura e la chiu-
sura in caso di emergenza.
• Non sottoporre mai le bombole al calore. La pressione interna potrebbe aumentare e
superare i suoi limiti di sicurezza.
• Mai conservare in casa, negli scantinati o seminterrati bombole di gas Butano o Propano
(anche se vuote). Il gas propano è più pesante dell’aria, se c’è una perdita il gas si accu-
mulerà al livello più basso e diventerà pericoloso nel caso della presenza di una scintilla
o fiamma.
• Mai conservare bombole di gas Butano o Propano di ricambio o anche vuote vicino all’ap-
parecchio in uso “pericolo di incendio e/o scoppio”.
1110
ITA
ITA

COLLEGAMENTO NG (METANO)
Su richiesta in fase di ordine il forno può essere predisposto per il funzionamento a
metano, la conversione consiste nel montaggio di ugelli calibrati adatti e alla rego-
lazione del minimo specifiche per la categoria di gas. Paesi e pressioni omologate
sono indicate nelle pagine successive. L’allaccio alla linea Metano domestica deve
essere fatta in rispetto delle norme locali e solo da personale qualificato. La linea
gas a monte del forno deve avere una valvola di intercettazione on/off obbligatoria.
Il collegamento al forno può essere fatto con tubazione rigida(sconsigliato) o fles-
sibile, il diametro della filettatura in ingresso è G½” F con guarnizione di tenuta. La
guarnizione va sostituita ad ogni sostituzione del tubo in ingresso o dopo lunghi
periodi di inutilizzo.
Eseguire sempre un test di tenuta su nuovi allacci o dopo sostituzioni tubo o guar-
nizioni.
G1/2” F
STOCCAGGIO E CONSERVAZIONE
Quando si deve conservare l’apparecchio per lunghi periodi di tempo inutilizzato,
rimuovere la bombola e coprirlo in modo che possa essere garantita una buona
ventilazione per ridurre la condensa.
Conservare la Bombola all’aperto in una zona ben ventilata.
ASSISTENZA
Questo apparecchio a gas non deve essere alterato o manipolato.
Ogni sistemazione o assistenza deve essere eseguita da un tecnico.
E’ consigliabile una regolare manutenzione.
Consultare istruzioni di manutenzione.
MANUTENZIONE REGOLARE
A forno freddo o prima di ogni utilizzo rimuovere eventuali residui di cibo dal piano
cottura dovuti a precedenti preparazioni. Con un aspiratore pulire e liberare la zona
circostante il bruciatore per evitare malfunzionamenti dello stesso dovuti a cenere
o residui di cibo. Le parti esterne vanno tenute pulite regolarmente per prevenire
fenomeni di ossidazione specialmente le parti in acciaio. Usare prodotti specifici
per inox dove presente. Anche se l’acciaio è di buona qualità nel tempo e se non
trattato regolarmente potrebbe presentare macchie superficiali che in alcun modo
compromettono la sicurezza e la funzionalità del vostro forno. Fenomeni di ossida-
zione possono verificarsi in presenza di salsedine e/o umidità. Dopo la pulizia per
una miglior protezione applicare un leggero strato di olio di vasellina. Se non utiliz-
zato per molto tempo mettere il forno al riparo in un ambiente asciutto e ventilato
o proteggerlo con un telo di copertura adatto che garantisca areazione e prevenga
fenomeni di condensa.
Nota: se le occasioni di utilizzo sono intervallate da lunghi periodi di inutilizzo cer-
care di pulire il forno subito dopo e appena si è freddato perché imbrattamenti da
residui grassi e/o cibi acidi potrebbero intaccare e macchiare le parti in acciaio
rendendone difficile la pulizia dopo molto tempo.
INDICAZIONI D’USO E CARATTERISTICHE TECNICHE.
Seguire le precauzioni e i consigli elencati nel paragrafo “installazione” per posi-
zionare nel modo corretto e sicuro il forno. Nei modelli dotati di carrello dopo il po-
sizionamento assicurare la stabilità del forno per evitare spostamenti accidentali
durante l’utilizzo, preferire superfici dure o compatte per non alterare l’assetto del
forno durante l’uso. Nei modelli free standing (appoggio) accertarsi che il piano di
appoggio sia ignifugo. Se il forno viene appoggiato su un mobile assicurarsi che
quest’ultimo sia abbastanza robusto da sostenerne il peso. Lasciare sempre un
lato aperto nel caso la bombola venga collocata all’interno del mobile o prevedere
adeguate prese d’aria per evitare accumuli di gas che potrebbero dare seguito ad
incendi o esplosioni. Un adeguata aereazione serve anche per evitare il surriscal-
damento della bombola.
In caso di malfunzionamento e/o principio di incendio deve essere possibile in-
tervenire tempestivamente per chiudere la valvola della bombola e mettere in si-
1312
ITA
ITA

curezza la stessa. Mai stoccare bombole di riserva (anche vuote) vicino al forno,
vanno conservate in sicurezza.
N.B. è consentito movimentare il forno solo se freddo e dopo aver chiuso la valvola
della bombola nel caso questa sia alloggiata sotto carrello. Se la bombola è fuori
dal carrello si consiglia di chiudere la valvola e disconnettere la stessa prima di mo-
vimentare il forno per evitare ribaltamenti e/o danneggiamenti della bombola che
potrebbero comprometterne l’utilizzo e la funzionalità con il rischio di provocare
incendi e/o esplosioni.
Queste indicazioni sono valide per tutta la serie MAESTRO, di seguito le caratteri-
stiche tecniche dei modelli MAESTRO 40 e 60 che hanno le componenti in comune
ma differiscono per potenza nominale.
Modello : MAESTRO 60
La potenzialità max dell’impianto per ogni categoria di gas
(GPL+METANO) si aggira intorno a: 9 kW/h
GPL (G30-G31)
28-30 mbar (butano G30) -37mbar (propano G31)
CATEGORIA I3+(28-30/37 mbar ) iniettore Ø 1,50mm
(BE , CH , CY , CZ , ES , FR , GB , GR , IE , IT , LT , PT , SI , SK )
28-30 mbar (butano G30, propano G31 o miscele G30/G31)
CATEGORIA I3 B/P (30 mbar ) iniettore Ø 1,50mm
(BG , CY , DK , EE , FI , GR , HU , IS , LT , LV , MT , NO , NL , RO , SE , SI )
37 mbar (butano G30, propano G31 o miscele G30/G31)
CATEGORIA I3 B/P (37 mbar ) iniettore Ø 1,40mm
(PL )
50 mbar (butano G30, propano G31 o miscele G30/G31)
CATEGORIA I3 B/P (50 mbar ) iniettore Ø 1,30mm
(DE , AT , CH , SK )
METANO (G20-G25)
CATEGORIA 2H , 2E , (20 mbar ) iniettore Ø 2,25mm
(all countrys eccept BE,FR)
CATEGORIA 2E+ (20/25 mbar ) iniettore Ø 2,25mm
(BE , FR )
Modello : MAESTRO 40
La potenzialità max dell’impianto per ogni categoria di gas
(GPL+METANO) si aggira intorno a: 7 kW/h
GPL (G30-G31)
28-30 mbar (butano G30) -37mbar (propano G31)
CATEGORIA I3+(28-30/37 mbar ) iniettore Ø 1,30mm
(BE , CH , CY , CZ , ES , FR , GB , GR , IE , IT , LT , PT , SI , SK )
28-30 mbar (butano G30, propano G31 o miscele G30/G31)
CATEGORIA I3 B/P (30 mbar ) iniettore Ø 1,30mm
(BG , CY , DK , EE , FI , GR , HU , IS , LT , LV , MT , NO , NL , RO , SE , SI )
37 mbar (butano G30, propano G31 o miscele G30/G31)
CATEGORIA I3 B/P (37 mbar ) iniettore(Y) Ø 1,20mm
(PL )
50 mbar (butano G30, propano G31 o miscele G30/G31)
CATEGORIA I3 B/P (50 mbar ) iniettore(Y) Ø 1,10mm
(DE , AT , CH , SK )
METANO (G20-G25)
CATEGORIA 2H , 2E , (20 mbar ) iniettore Ø 2,00mm
(all countrys eccept BE,FR)
CATEGORIA 2E+ (20/25 mbar ) iniettore Ø 2,00mm
(BE , FR )
1514
ITA
ITA

PRIMA ACCENSIONE
IMPORTANTE
Prima di accendere il forno controllare tutte le connessioni e gli
allacci al gas.Non chinarsi sul forno e mantenersi distanti dalla porta con il viso
Al momento dell’accensione la bocca del forno deve essere aperta
Non movimentare il forno durante l’uso.
Dopo aver collegato la linea gas al forno verificare la tenuta dei collegamenti ed eventual-
mente risolvere eventuali perdite. Con la manopola in posizione spento premere e verifi-
care se l’accenditore funziona. Se tutto funziona aprire il rubinetto sulla bombola e proce-
dere all’accensione come sotto descritto
A forno aperto ruotare la manopola fino alla posizione di potenza massima e premere.
L’accenditore elettronico è collegato alla manopola e viene attivato quando quest’ultima
viene premuta.
Tenere premuta la manopola qualche secondo anche dopo l’accensione in modo che la
termocopia possa entrare in funzione e mantenere il flusso di gas aperto sulla valvola
Nelle prime fasi dopo il cambio bombola e riapertura della volvola potrebbe non accender-
si subito perché il circuito risulta vuoto. Insistere qualche secondo. Se l’accensione non
avvieno dopo un paio di tentativi attendere qualche minuto per permettere all’eventuale
gas incombusto di disperdersi e poi riprovare l’accensione.
Eventuali accumuli di gas potrebbere dare origine a fiammate e/o detonazioni potenzial-
mente pericolose causando danni , ustioni o morte in casi estremi.
Una volta acceso è possibile regolare la fiamma ruotando la manopola tra le posizioni di
min<max
ATTENZIONE: CONTROLLARE LA FIAMMA DOPO L’ACCENSIONE.
Tutti i fori del bruciatore dovrebbero mostrare una fiamma di circa 2.5cm su posizione max
della manopola. Se sentite odore di gas, se si verificano ritorni di fiamma , se il bruciatore
emette rumori tipo piccoli scoppi o le fiamme sono irregolari sulla lunghezza del bruciato-
re potrebbe esserci un problema al tubo venturi.
SPEGNERE IMMEDIATAMENTE.
Una volta terminata la cottura o a fine utilizzo seguire correttamente la procedura di spe-
gnimento che segue. Quando la fiamma è ancora accesa chiudere il rubinetto sulla bom-
bola e attendere che il bruciatore si spenga, solo dopo ruotare la manopola in posizione
“chiuso”. Così facendo si assicura il completo svuotamento del circuito dal gas.
MANCATA ACCENSIONE
O MALFUNZIONAMETI CAUSE E RIMEDI:
ACCENDITORE: se non funziona, la miscela aria/gas non riesce ad accendersi.
Controllare lo stato delle batterie dell’accenditore (1.5v AA), se scariche o con segni di os-
sidazione sostituirle. Per lunghi periodi di inutilizzo è consigliabile rimuovere la batteria
per evitare malfunzionamenti o danneggiamenti all’accenditore stesso. Se la batteria è
buona controllare il cavo e la candeletta se sono danneggiati e/o scollegati, sostituire se
danneggiati. Controllare se il circuito funziona correttamente azionando il pulsante con il
gas chiuso, se si vede la scintilla scoccare sul bruciatore vuol dire che il circuito funziona
altrimenti ricontrollare le connessioni. Se batteria, cavi e candeletta sono collegati cor-
rettamente ma l’impianto non funziona probabilmente bisogna sostituire il generatore di
scintille. (Vedi sezione dedicata per sostituzione parti)
VALVOLA: se danneggiata può non far passare il gas o interrompere il flusso.
Se mettendo la manopola in posizione “max fiamma” il flusso di gas non passa assicurarsi
di aver prima aperto la valvola sulla bombola (e che sia piena) o il rubinetto del gas. Nelle
prime fasi di accensione bisogna tener premuta la manopola per bypassare la sicurez-
za della termocoppia e riuscire ad accendere la fiamma. Se riusciamo ad accendere la
fiamma ma nel momento del rilascio della manopola la stessa si spegne vuol dire che la
termocoppia non è ancora entrata in temperatura per tenere aperto il circuito, ripetere
la procedura di accensione e tener premuta la manopola per più tempo. Se dopo questa
operazione la fiamma si spegne controlla che la termocoppia sia collegata e in posizione e
che non sia danneggiata, in questo caso sostituirla. Se la termocoppia viene sostituita ma
il problema non si risolve probabilmente bisogna sostituire la valvola. (Vedi sezione dedi-
cata per sostituzione parti). Potrebbe succedere anche che l’accensione avvenga in modo
corretto ma mettendo la manopola della valvola in posizione minimo la fiamma non riesca
a stare accesa in autonomia; In questo caso bisogna agire sul registro del minimo alzando
l’apporto di gas (la regolazione è fissa e impostata di fabbrica e non va modificata, ma in
caso di sostituzione parti potrebbe essere necessario una nuova regolazione).
1716
ITA
ITA

BRUCIATORE: potrebbe avere ritorni di fiamma e accendersi parzialmente.
Se ci sono ritorni di fiamma chiudere subito l’alimentazione del gas (bombola o linea do-
mestica) e spegnere il fuoco. Probabilmente il tubo venturi presenta ostruzioni che vanno
rimosse, anche semplici ragnatele possono comprometterne il funzionamento. Se il fronte
fiamma non brucia completamente su tutta la lunghezza del bruciatore oltre a non scal-
dare bene potrebbero verificarsi scoppiettii o ritorni di fiamma, in questo caso assicurarsi
che tutti i fori del bruciatore siano liberi e non ostruiti da residui di cibo di precedenti uti-
lizzi. Nel caso si siano fatte regolazioni precedenti o sostituzioni di iniettori assicurarsi che
la carburazione aria/gas sia corretta per un funzionamento ottimale. Potrebbe dipendere
anche dal montaggio di un iniettore con foro calibrato di dimensioni errate rispetto al gas
utilizzato. Se non ci sono ostruzioni evidenti, i fori sono regolarmente aperti e la carbu-
razione risulta regolare ma i problemi sussistono potrebbe essere necessario sostituire
l’intero bruciatore in quando difettoso o usurato. (Vedi sezione dedicata per sostituzione
parti). Se regolarmente manutenuto, pulito e utilizzato in modo corretto la sua durata nel
tempo è notevole.
Far eseguire da un tecnico le operazioni di controllo e manutenzione. Alcuni malfun-
zionamenti potrebbero dipendere anche da un errato posizionamento dei sensori sul bru-
ciatore. Se la termocoppia non è alla giusta distanza dal supporto sul bruciatore questa
potrebbe leggere male la temperatura e non entrare in funzione correttamente oppure
logorarsi velocemente ed avere un ciclo di vita breve. Stesso discorso vale per la cande-
letta di accensione, se troppo lontana potrebbe non riuscire a scoccare la scintilla per
accendere il bruciatore oppure se viene messa a contatto con il bruciatore l’impulso viene
scaricato senza generare la scintilla.
ATTENZIONE. PERICOLO DI USTIONE.
PARTI MOLTO CALDE DURANTE
IL FUNZIONAMENTO DELL’APPARECCHIO.
USARE DPI (guanti o simili) PER EVITARE INCIDENTI E SCOTTATURE.
Anche la maniglia della porta nonostante sia in silicone dopo un uso prolungato del forno
potrebbe ustionare se non maneggiata con guanti
1918
ITA
ITA

CAT GAS G30 G31
I3+ p (mbar) 28-30 37 AL BE CY FR GR
I3+ p (mbar) 28-30 37 IE IT LT PT GB
I3+ p (mbar) 28-30 37 CZ MK SK SI ES
I3+ p (mbar) 28-30 37 CH TR
I3B/P p (mbar) 30 30 AL BG CY HR DK
I3B/P p (mbar) 30 30 EE FI GR IS LV
I3B/P p (mbar) 30 30 LT MT NO NL PT
I3B/P p (mbar) 30 30 MK RO SK SI SE
I3B/P p (mbar) 30 30 TR HU
I3B/P p (mbar) 37 37 PL
I3B/P p (mbar) 50 50 AT DE SK CH
CAT GAS G20 G25 G25.1 G2.350 G27
I2H p (mbar) 20 - - - - AL AT BG CY HR
I2H p (mbar) 20 - - - -DK EE FI GR IE
I2H p (mbar) 20 - - - -IT LV LT NO PT
I2H p (mbar) 20 - - - -GB CZ MK RO SK
I2H p (mbar) 20 - - - -SI ES SE CH TR
I2E p (mbar) 20 - - - - LU RO
I2L p (mbar) - 25 - - - NL
I2L p (mbar) - 20 - - - RO
I2HS p (mbar) 25 - 25 - - HU
I2E+ p (mbar) 20 25 - - - BE FR
I2ELL p (mbar) 20 20 - - - DE
I2ELwLs p (mbar) 20 - - 13 20 PL
MAESTRO 40
POTENZA MAX 7Kw (509 g/h LPG --- 667dm³/h NG)
LPG Ø INIETTORE
CATEGORIA I3+(28-30/37) 1.30 mm
CATEGORIA I3B/P(30) 1.30 mm
CATEGORIA I3B/P(37) 1.20 mm
CATEGORIA I3B/P(50) (model Y) 1.10 mm
MAESTRO 60
POTENZA MAX 9Kw (655 g/h LPG --- 858dm³/h NG)
LPG Ø INIETTORE
CATEGORIA I3+(28-30/37) 1.50 mm
CATEGORIA I3B/P(30) 1.50 mm
CATEGORIA I3B/P(37) 1.40 mm
CATEGORIA I3B/P(50) 1.30 mm
NG Ø INIETTORE
CATEGORIA 2H , 2E (20 mbar ) 2.00 mm
CATEGORIA 2E+ (20/25 mbar ) 2.00 mm
LE ZONE IN GRIGIO NON SONO COPERTE DA OMOLOGAZIONE LE ZONE IN GRIGIO NON SONO COPERTE DA OMOLOGAZIONE
NG Ø INIETTORE
CATEGORIA 2H , 2E (20 mbar ) 2.25 mm
CATEGORIA 2E+ (20/25 mbar ) 2.25 mm
2120
ITA
ITA

ESEMPIO TARGA DATI (la forma potrebbe variare pur mantenendo lo stesso schema
delle informazioni)
INFORMAZIONI SULLO SMALTIMENTO:
IL PRODOTTO A FINE VITA DEVE ESSERE CONFERITO AGLI IDONEI CENTRI DI RACCOLTA
per RIFIUTI INGOMBRANTI FERROSI ,ELETTRICI O ELETTRONICI
NOTE
2322
ITA
ITA

ORDINARY AND EXTRAORDINARY MAINTENANCE
Dear customer,
we would like to thank you for the preference you have given to our products. This manual
will allow you to install and use the oven you purchased in the best possible way and
safely. We advise you to carefully read the following manual before carrying out the
first ignition, if you have any doubts or problems, please contact the dealer who will en-
sure the utmost collaboration and assistance
CONTENTS
GENERAL WARNINGS 4
SAFETY WARNINGS 6
WARRANTY 7
INSTALLATION 9
LINKS 11
STORAGE, SERVICE, MAINTENANCE 13
INDICATIONS FOR USE and technical characteristics 14
FIRST IGNITION 17
TROUBLESHOOTING 19
TECHNICAL AND SAFETY NOTES 21
2524
ENG
ENG

All interventions must be carried out in safe conditions and with
the gas line closed and/or disconnected
GENERAL WARNINGS
KEEP THIS MANUAL FOR FUTURE REFERENCE
WARNING: Improper connection as well as any alterations or improper maintenance can
cause material damage to property or persons and even death in extreme cases. Read the
instructions carefully before installing and using the appliance
READ CAREFULLY THE FOLLOWING INFORMATION FOR A CORRECT INSTALLA-
TION AND OPTIMAL OPERATION OF THE OVEN.
- The identification plate, with technical data, serial number and marking is visibly applied
to the appliance. The plate must never be removed.
- Before operating the appliance, it is mandatory to remove all protective films present.
- Absolutely avoid the use of steel sponges and sharp scrapers to avoid damaging the sur-
faces. Use normal, non-abrasive products, possibly using wooden or plastic tools. Rinse
thoroughly and dry with a soft cloth or microfibre cloth.
- Do not use tableware or containers made of plastic material. The high temperatures rea-
ched inside the oven could melt this material, causing damage to the appliance.
- Use cutlery and tools that are resistant to high temperatures.
- Place the oven on a flat surface.
- Due to the temperature, the colour of the surfaces may vary.
- The installation of the product must ensure easy access for cleaning.
- Never put flammable objects in the oven: if it is accidentally switched on, a fire could
start.
- Do not allow children to approach the appliance during operation, DANGER OF BURNS or
to play with it even when off.
Do not insert sharp metal objects (cutlery or tools) into the slits of the appliance.
- The furnaces, although they have insulating material between the two layers of steel,
may overheat outside.
- Make sure the oven is positioned away from objects and materials that may be damaged
by heat. Do not place flammable materials in the area of the floor in front of the oven, pro-
tect the floor with fireproof material if it is made of flammable material.
- Do not store flammable material on the trolley shelf (if present) under the oven.
- Manoeuvre the door by holding the handle. - Do not touch the external surfaces and flue
while in use.
- Do not use flammable liquids near the oven.
- Keep any electrical cables and fuel supply pipes away from hot surfaces.
- Do not use the oven in case of abnormal operation or suspected breakage.
- Do not move the oven during use or when it is hot.
- Do not lean or place objects in the oven, their stability may be compromised.
- Do not use naked flames near the oven.
- In case grease catches fire, stop the power supply and leave the oven door closed until
the fire extinguishes.
- Wear heat-resistant kitchen gloves when using the oven.
- The parts sealed by the manufacturer must not be modified by the user.
- Do not leave the appliance unattended during cooking, which may release grease or oils.
Fats and oils may catch fire.
- Do not obstruct the openings, ventilation and heat disposal slots where present.
- During use, for ovens with integrated base (trolley), remember to lock the wheels with the
appropriate brake.
SAFETY WARNINGS
READ ALL INSTRUCTIONS BEFORE INSTALLING AND USING THE PRODUCT
Read the entire manual before proceeding with installation. Failure to follow these pro-
cedures could result in damage to property and persons and possibly death. Contact the
competent authorities regarding any installation restrictions.
ONE OF THE MAIN CAUSES OF FIRE RELATED TO THE OVEN IS DUE TO FAILURE TO COMPLY
WITH THE MINIMUM DISTANCES FROM COMBUSTIBLE MATERIALS OR INCORRECT INSTAL-
LATION. IT IS VERY IMPORTANT THAT THIS OVEN IS INSTALLED IN ACCORDANCE WITH THESE
INSTRUCTIONS
FOR YOUR SAFETY: Do not deposit or use gasoline or other flammable vapours or liquids
in the vicinity of this or other appliances. Keep the area below and around the appliance
free of combustible materials.
CAUTION: Improper connection as well as any alterations or improper maintenance can
cause material damage to property or persons and even death in extreme cases.
GAS LEAKS MAY CAUSE FIRE OR EXPLOSION AND CAUSE SERIOUS OR FATAL PERSONAL
INJURY, OR PROPERTY DAMAGE.
CAUTION IF YOU SMELL GAS:
1. Immediately shut off the gas supply.
2. Extinguish any open flames.
3. Open the oven door.
4. Consult a specialist technician
CAUTION: If the gas oven is not used, close the gas supply valve
Do not store unused gas cylinders in the vicinity, even if empty.
2726
ENG
ENG

WARRANTY
In compliance with Italian and European regulations, ovens are covered by the legal gua-
rantee, payable by the retailer, 24 months from the date of purchase. After the 24-month
warranty period, all repairs will be borne by the consumer.
YOU ARE REQUIRED TO KEEP THE RECEIPT OR PURCHASE INVOICE TO BE SHOWN TO
THE RETAILER. PLEASE NOTE THE SERIAL NUMBER ON THE PRODUCT IDENTIFICATION
PLATE BELOW
Good maintenance and proper use can help prolong the shelf life of the product. It is ad-
visable to store the oven indoors in the winter months to protect it from the elements.
Otherwise it is advisable to protect the oven with a breathable waterproof sheet
The warranty DOES NOT apply in the following cases:
• If the oven is NOT properly used and installed as described in this manual.
• In the event that the oven has been tampered with in any way, voluntarily or involuntarily.
• In the event that adequate maintenance has not been carried out. Damage to the burner
due to cooking residues or the use of other fuels is not covered by the warranty.
• In the event that the oven, for any reason, has been altered and is no longer in the condi-
tion found when the product is delivered.
• If you HAVE NOT used only the recommended fuel. Do not use liquid charcoal for barbe-
cue, chemicals or other fuel.
• In the event that the damage is the result of the use of chemicals inside or outside the
oven.
• The door is not under warranty.
• Damage due to exceeding the indicated temperature of the pyrometer supplied. Above
450°/500°C (840°/1000°F).
• If components not produced or recommended by the manufacturer are used.
• Damage to non-functional and decorative parts that do not affect normal oven use, in-
cluding scratches and colour differences.
• In the event that the plate is removed, altered or deleted
• Tables are not covered by warranty, additional spare parts can be purchased on request.
~50 CM
~100 CM
~50 CM
~20 CM ~20 CM ~20 CM
INSTALLATION
WARNING. Oven exterior walls may reach temperatures above 50°C (120°F) any flammable
materials must not be within 1 meter of the oven. It is recommended to place the oven
during use at a sufficient distance from flammable materials or materials that may be da-
maged by heat.
IMPORTANT. Exposure to strong wind or draughts could alter the performance of the oven
IMPORTANT. Place the oven on a flat surface and make sure it is perfectly stable. Uninten-
tional movements during use can be very dangerous for things and people
IMPORTANT: Place the oven at a minimum distance of 20 cm from the walls and any other
equipment. Increase the minimum distance to 50 cm around the flue and 1 m from the top
of the oven.
FREE-STANDING OVENS MUST BE POSITIONED ON TABLES OR OTHER FIRE-RESISTANT SUR-
FACES OF ADEQUATE BEARING CAPACITY (for weight refer to the product data sheet), IF
PRESENT, ADJUST THE FEET TO LEVEL THE FURNACE ON THE SUPPORT SURFACE.
To facilitate handling and positioning, we recommend to remove the chimney, the door and
the tables placed inside the combustion chamber.
2928
ENG
ENG

CONNECTION
ONLY FOR LPG MODELS
CONNECT THE LPG CYLINDER TO THE OVEN
The cylinder, always equipped with a pressure regulator (not supplied), must be connected
to the oven via a flexible rubber tube (not supplied) suitable for use and between 60 and
150 cm in length. The oven inlet connection has a G1/2” F thread on which to attach a spe-
cific adapter to connect to the LPG cylinder according to the regulations of the destination
country.
In the example, we see a hose connection (not universally applicable) where the hose must
be tightened with a clamp in order to avoid accidental losses or disconnections. The cylin-
der must always be equipped with a fixed calibration pressure regulator (not supplied) for
the type of gas used and depending on the country of destination. Avoid twisting, bending
or crushing the hose. If there are obvious signs of wear or the date of use imprinted on the
tube has expired, replace it immediately.
HOSE
CONNECTOR
G1/2” M
24 MM
G1/2” F
G1/4” M LH ADAPTER
WITH SEALING CONE
(NOT INCLUDED)
Pressure REGULATOR (not supplied):
This appliance must be equipped with a pressure regulator in compliance with local/natio-
nal standards and/or regulations with a nominal pressure output of:
CATEGORY I3+(28-30/37) Propane 37 mbar. Butane 28-30 mbar.
CATEGORY I3B/P (30) Propane/Butane 30 mbar
CATEGORY I3B/P (50) Propane/Butane 50 mbar
NEVER USE AN UNREGULATED GAS SOURCE.
HOSE (not supplied):
The inlet pipe of the user must NOT be less than:
ؽ” = Ø14 mm for Methane
ؼ” = Ø 8 mm for LPG (Max length 1.5 meters)
CYLINDER
• We recommend using cylinders weighing no more than 10 kg if you want to place a trolley
under the oven.
• Maximum length of the gas pipe allowed 1.5 m.
• Always handle the cylinder with care. Never place it in a horizontal position as the valve
may become damaged.
This could cause serious safety issues. Always use the cylinder upright. If positioned
horizontally, the cylinder could allow the combustible liquid to reach the pipes, creating
damage with risk of explosion.
• Always place the cylinder in an accessible place to facilitate opening and closing in case
of emergency.
• Never subject cylinders to heat. The internal pressure could increase and exceed its sa-
fety limits.
• Never store butane or propane gas cylinders (even if empty) in the house, cellar or ba-
sement. Propane gas is heavier than air, if there is a leak the gas will accumulate at the
lowest level and become dangerous in the presence of a spark or flame.
• Never store replacement or even empty Butane or Propane gas cylinders near the ap-
pliance in use “danger of fire and/or explosion”.
3130
ENG
ENG

COLLEGAMENTO NG (METANO)
Su richiesta in fase di ordine il forno può essere predisposto per il funzionamento a
metano, la conversione consiste nel montaggio di ugelli calibrati adatti e alla rego-
lazione del minimo specifiche per la categoria di gas. Paesi e pressioni omologate
sono indicate nelle pagine successive. L’allaccio alla linea Metano domestica deve
essere fatta in rispetto delle norme locali e solo da personale qualificato. La linea
gas a monte del forno deve avere una valvola di intercettazione on/off obbligatoria.
Il collegamento al forno può essere fatto con tubazione rigida(sconsigliato) o fles-
sibile, il diametro della filettatura in ingresso è G½” F con guarnizione di tenuta. La
guarnizione va sostituita ad ogni sostituzione del tubo in ingresso o dopo lunghi
periodi di inutilizzo.
Eseguire sempre un test di tenuta su nuovi allacci o dopo sostituzioni tubo o guar-
nizioni.
G1/2” F
STORAGE AND PRESERVATION
When storing the appliance for long periods of unused time, remove the cylinder
and cover it so that good ventilation can be guaranteed to reduce condensation.
Store the Cylinder outdoors in a well-ventilated area.
SERVICE
This gas appliance must not be altered or tampered with.
Any accommodation or assistance must be carried out by a technician.
Regular maintenance is advisable.
See maintenance instructions.
REGULAR MAINTENANCE
When the oven is cold or before each use, remove any food residue from the hob
due to previous preparations. With a vacuum cleaner clean and release the area
around the burner to avoid malfunctions due to ash or food residues. The external
parts must be kept clean regularly to prevent oxidation phenomena, especially ste-
el parts. Use specific products for stainless steel where present. Even if the steel is
of good quality over time and if not treated regularly it could present surface stains
that in no way compromise the safety and functionality of your oven. Oxidation
phenomena can occur in the presence of salt and/or moisture. After cleaning for
better protection apply a light layer of vaseline oil. If not used for a long time, place
the oven in a dry and ventilated environment or protect it with a suitable cover that
guarantees ventilation and prevents condensation phenomena.
Note: if the occasions of use are interspersed with long periods of unuse, try to
clean the oven immediately afterwards and as soon as it has cooled down because
dirt from greasy residues and/or acidic foods could damage and stain the steel
parts making it difficult to clean them after a long time.
INDICATIONS FOR USE AND TECHNICAL CHARACTERISTICS.
Follow the precautions and advice listed in the “installation” paragraph to position
the oven correctly and safely. In models equipped with a trolley after positioning,
ensure the stability of the oven to avoid accidental movement during use, prefer
hard or compact surfaces so as not to alter the oven’s structure during use. In the
free standing models (support) make sure that the support surface is fireproof.
If the oven is placed on a piece of furniture, make sure that it is strong enough to
support its weight. Always leave one side open if the cylinder is placed inside the
cabinet or provide adequate air intakes to avoid gas accumulations that could re-
sult in fires or explosions. Adequate ventilation is also used to prevent the cylinder
from overheating.
In the event of malfunction and/or fire, it must be possible to intervene promptly
to close the cylinder valve and secure it. Never store spare (even empty) cylinders
near the oven, they must be stored safely.
3332
ENG
ENG

N.B. moving the oven is allowed only if it is cold and after closing the cylinder valve
if it is housed under a trolley. If the cylinder is outside the trolley, it is advisable to
close the valve and disconnect it before moving the oven to avoid tipping over and/
or damage to the cylinder that could compromise its use and functionality with the
risk of causing fires and/or explosions.
These indications are valid for the entire MAESTRO series, below the technical cha-
racteristics of the MAESTRO 40 and 60 models that have the components in com-
mon but differ in nominal power.
Model: MAESTRO 60
The maximum potential of the system for each gas category
(LPG+METHANE) is around: 9 kW/h
LPG (G30-G31)
28-30 mbar (butane G30) -37mbar (propane G31)
CATEGORY I3+(28-30/37 mbar ) injector Ø 1.50mm
(BE , CH , CY , CZ , ES , FR , GB , GR , IE , IT , LT , PT , SI , SK )
28-30 mbar (butane G30, propane G31 or mixtures G30/G31)
CATEGORY I3 B/P (30 mbar ) injector Ø 1.50mm
(BG , CY , DK , EE , FI , GR , HU , IS , LT , LV , MT , NO , NL , RO , SE , SI )
50 mbar (butane G30, propane G31 or mixtures G30/G31)
CATEGORY I3 B/P (50 mbar ) injector Ø 1.30mm
(DE , AT , CH , SK )
METHANE (G20-G25)
CATEGORY 2H , 2E , (20 mbar ) injector Ø 2.25mm
(all countries exception BE,FR)
CATEGORY 2E+ (20/25 mbar ) injector Ø 2.25mm
(BE , FR )
Model: MAESTRO 40
The maximum potential of the system for each gas category
(LPG+METHANE) is around: 7 kW/h
LPG (G30-G31)
28-30 mbar (butane G30) -37mbar (propane G31)
CATEGORY I3+(28-30/37 mbar ) injector Ø 1.30mm
(BE , CH , CY , CZ , ES , FR , GB , GR , IE , IT , LT , PT , SI , SK )
28-30 mbar (butane G30, propane G31 or mixtures G30/G31)
CATEGORY I3 B/P (30 mbar ) injector Ø 1.30mm
(BG , CY , DK , EE , FI , GR , HU , IS , LT , LV , MT , NO , NL , RO , SE , SI )
50 mbar (butane G30, propane G31 or mixtures G30/G31)
CATEGORY I3 B/P (50 mbar ) injector(Y) Ø 1.10mm
(DE , AT , CH , SK )
METANO (G20-G25)
CATEGORY 2H , 2E , (20 mbar ) injector Ø 2.00mm
(all countries exception BE,FR)
CATEGORY 2E+ (20/25 mbar ) injector Ø 2.00mm
(BE , FR )
3534
ENG
ENG

FIRST IGNITION
IMPORTANT
Before turning on the oven, check all connections and gas connections. Do not lean
over the oven and stay away from the door with your face.
When the oven is switched on, the mouth of the oven must be open.
Do not move the oven during use.
After connecting the gas line to the oven, check the tightness of the connections and pos-
sibly resolve any leaks. With the knob in the off position, press and check if the igniter is
working. If everything works, open the tap on the cylinder and proceed with the ignition as
described below
When the oven is open, turn the knob to the maximum power position and press. The
electronic igniter is connected to the knob and is activated when the knob is pressed.
Press and hold the knob for a few seconds even after switching on so that the thermocou-
ple can come into operation and keep the gas flow open on the valve
In the first phases after changing the cylinder and reopening the valve, it may not turn on
immediately because the circuit is empty. Insist for a few seconds. If the ignition does not
start after a couple of attempts, wait a few minutes to allow any unburned gas to disperse
and then try the ignition again.
Any accumulation of gas could give rise to flames and/or potentially dangerous detona-
tions causing damage, burns or death in extreme cases.
Once lit it is possible to adjust the flame by turning the knob between the min<max posi-
tions
CAUTION: CHECK FLAME AFTER IGNITION.
All burner holes should show a flame of about 2.5cm on max knob position. If you smell
gas, if backfire occurs, if the burner makes small bursts or the flames are uneven along the
length of the burner there may be a problem with the venturi tube.
SWITCH THE OVEN OFF IMMEDIATELY.
Once the cooking is finished or at the end of use, correctly follow the shutdown procedure
below. When the flame is still on, close the tap on the cylinder and wait for the burner to
turn off, only after turning the knob to the “closed” position.
This ensures the complete emptying of the circuit from the gas.
FAILURE TO SWITCH ON OR MALFUNCTIONS
CAUSES AND REMEDIES:
IGNITER: If it does not work, the air/gas mixture fails to ignite, check the status of the
igniter batteries (1.5v AA), if discharged or with signs of oxidation replace them. For long
periods of non-use it is advisable to remove the battery to avoid malfunctions or damage
to the igniter itself. If the battery is good, check the cable and spark plug if they are dama-
ged and/or disconnected, replace if they are damaged. Check if the circuit works correctly
by pressing the button with the gas closed, if you see the spark pop on the burner it means
that the circuit works otherwise check the connections again. If the battery, cables and
spark plug are connected correctly but the system is not working, the spark generator
must probably be replaced. (See dedicated section for parts replacement)
VALVE: if damaged, it may not allow gas to pass or interrupt the flow.
If the knob is in the “max flame” position, the gas flow does not pass, make sure that you
have first opened the valve on the cylinder (and that it is full) or the gas tap. In the first
phases of ignition, keep the knob pressed to bypass the safety of the thermocouple and be
able to ignite the flame. If YOU manage to ignite the flame but when the knob is released
it goes out, it means that the thermocouple has not yet reached the temperature to keep
the circuit open, repeat the ignition procedure and keep the knob pressed for longer. If
after this operation the flame goes out, check that the thermocouple is connected and in
position and that it is not damaged, in this case replace it. If the thermocouple is replaced
but the problem is not solved, the valve must probably be replaced. (See dedicated section
for part replacement). It could also happen that the ignition takes place correctly but by
putting the valve knob in the minimum position the flame cannot be switched on indepen-
dently; in this case it is necessary to act on the minimum register by raising the gas supply
(the adjustment is fixed and set at the factory and must not be modified, but in case of
replacement of parts a new adjustment may be necessary).
3736
ENG
ENG

BURNER: may backfire and partially ignite.
If there are flame returns, immediately close the gas supply (cylinder or domestic line) and
turn off the fire. Probably the venturi tube has obstructions that must be removed, even
simple cobwebs can compromise its operation. If the flame front does not burn completely
over the entire length of the burner in addition to not heating well, crackles or flame returns
may occur; in this case make sure that all the burner holes are free and not obstructed by
food residues from previous uses. If previous adjustments or injector replacements have
been made, make sure that the air/gas carburation is correct for optimal operation. It may
also depend on fitting an incorrectly sized calibrated hole injector to the gas used. If there
are no obvious obstructions, the holes are regularly opened and the carburation is regular
but the problems still exist, it may be necessary to replace the entire burner as it is defecti-
ve or worn. (See dedicated section for part replacement). If regularly maintained, cleaned
and used correctly, its duration over time is considerable.
Have a technician perform the control and maintenance operations. Some malfun-
ctions may also depend on the incorrect positioning of the sensors on the burner. If the
thermocouple is not at the correct distance from the support on the burner, it could misre-
ad the temperature and not work properly or wear out quickly and have a short life cycle.
The same applies to the ignition spark plug, if it is too far away it may not be able to release
the spark to ignite the burner or if it is brought into contact with the burner the pulse is
discharged without generating the spark.
WARNING. DANGER OF BURNS. VERY HOT PAR-
TS DURING OPERATION OF THE APPLIANCE.
WEAR PPE (gloves or similar) TO AVOID ACCIDENTS AND BURNS.
Even the door handle, despite being made of silicone, after prolonged use of the oven
could burn if not handled with gloves
3938
ENG
ENG
Other manuals for MAESTRO 60
1
This manual suits for next models
3
Table of contents
Languages:
Other Fontana Forni Kitchen Appliance manuals
Popular Kitchen Appliance manuals by other brands

Clatronic
Clatronic HDM 2552N Instruction manual & guarantee

Beper
Beper BB.210 use instructions

diversey
diversey TASKI SV4 Translation of the original instructions

Commercial CHEF
Commercial CHEF CHGSPZOV manual

Black & Decker
Black & Decker TS70 instruction manual

inventum
inventum MX350B instruction manual