manuals.online logo
Brands
  1. Home
  2. •
  3. Brands
  4. •
  5. fontastic
  6. •
  7. Batteries Charger
  8. •
  9. fontastic Virtue User manual

fontastic Virtue User manual

D Bedienungsanleitung „Virtue“
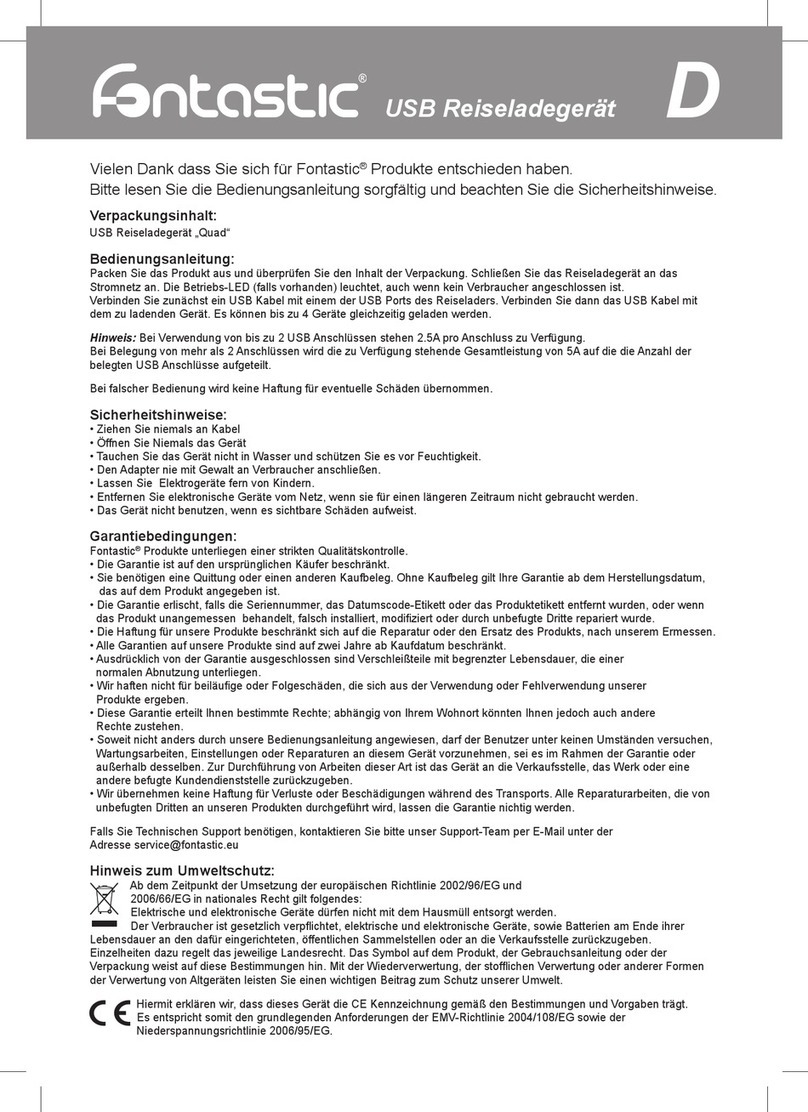
Vielen Dank, dass Sie sich für das Fontastic®Virtue Ladegerät entschieden haben.
Bitte lesen Sie die Bedienungsanleitung sorgfältig und beachten Sie die Sicherheitshinweise.
Der „Virtue“ ist weit mehr als ein gewöhnliches Reiseladegerät. Der kompakte Reiselader ist
auch eine vollwertige Powerbank und bietet die Möglichkeit Geräte unabhängig vom Stromnetz
aufzuladen.
Lieferumfang
Fontastic „Virtue“
Bedienungsanleitung
Funktionsübersicht
1. Schwenkbarer Euro C PIN
2. Micro-USB Kabel
3. Akkustand-Anzeige-LED
(Rot 0-35% | Orange 36-60% | Blau 61-55% | Grün 86-100%)
4. Akkustand-Taste
5. USB Ausgang (Smart Out)
Geräte aufladen
Über das Stromnetz
Packen Sie das Produkt aus und überprüfen Sie den Inhalt der Verpackung. Klappen Sie den
Euro C PIN nach oben bis er im 90 Grad Winkel zum Gehäuse steht und einrastet. Schließen Sie
das Reiseladegerät an das Stromnetz an. Die Akkustand LED leuchtet, auch wenn kein Gerät
angeschlossen ist. Verbinden Sie nun das zu ladende Gerät mittels USB Kabel mit dem USB
Ausgang (Smart Out), oder mit dem integrierten Micro USB Kabel des Virtue. Der Ladevorgang
startet.
Hinweis: Bitte beachten Sie dass während des Netzbetriebs der intergierte Akku aufgeladen,
und ein Teil der Leistung bis zur vollständigen Aufladung hierfür verwendet wird.
Über die integrierte Powerbank
Verbinden Sie das zu ladende Gerät mittels USB Kabel mit dem USB Ausgang (Smart Out),
oder mit dem integrierten Micro USB Kabel des Virtue. Drücken Sie die Akkustand-Taste, der
Ladevorgang startet.
Hinweis: Der Virtue verfügt über einen Smart IC, welcher die optimale Leistung für das zu laden-
de Gerät erkennt und an den USB Ausgang (Smart Out) liefert.
Wenn Sie beide Ladeanschlüsse gleichzeitig nutzen, wird die verfügbare Stromstärke von 2.1A
auf beide Anschlüsse aufgeteilt.
Akkustand der Power Bank überprüfen
Um den Akkustand zu überprüfen, drücken Sie die Akkustand-Taste. Verschiedenfarbige LED‘s
zeigen den aktuellen Ladezustand der Power Bank an.
Rot 0-35% | Orange 36-60% | Blau 61-85% | Grün 86-100%
Powerbank Aufladen
Klappen Sie den Euro C PIN nach oben, bis er im 90 Grad Winkel zum Gehäuse steht und
einrastet. Schließen Sie das Reiseladegerät an das Stromnetz an. Die Akkustand-Anzeige-LED
zeigt den Status während des Ladevorgangs. Die güne LED erlischt nach vollständiger
Aufladung. Die übliche Ladedauer beträgt 5-6 Stunden.
Hinweis: Laden Sie den Akku des Virtue für mindestens 4-5 Stunden vor der ersten
Inbetriebnahme.
Technische Daten
• Eingang: 100-240V AC
• Eingangsfrequenz: 47-63 Hz
• Ausgang gesamt: 5V DC 2.1A, 10,5W
• Standby Power: 0,3W
• Akku Kapazität: 5200mAh
• USB- & Micro-USB Anschluss
• Lagertemperatur: -10° bis +60° C
• Betriebsfeuchtigkeit: 20% bis 90% R.H.
• Betriebstemperatur: 0° bis +40 °C
• Lagerfeuchtigkeit: 0% bis 90% R.H.
• Schutz gegen Überladung, Überspannung, Kurzschluss
• Abmessungen: 79,6 x 52,9 x 42,1 mm
• Gewicht: 172g
GB „Virtue“ user‘s guide
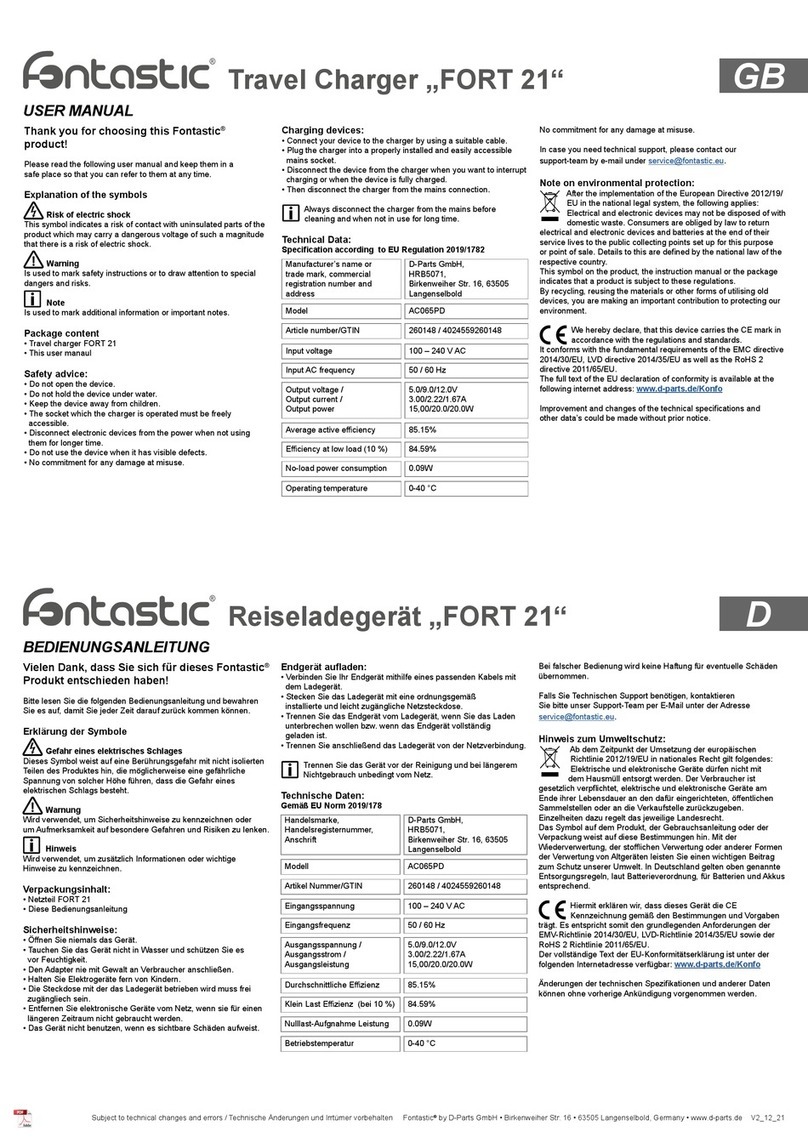
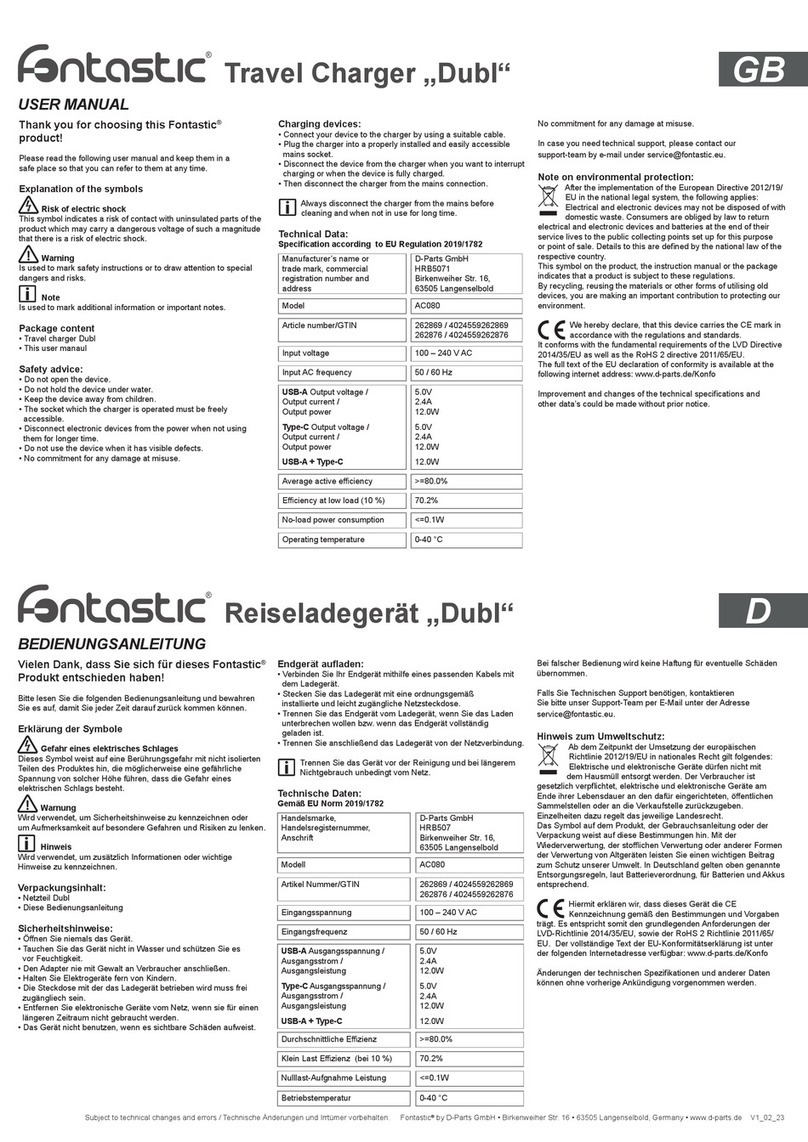
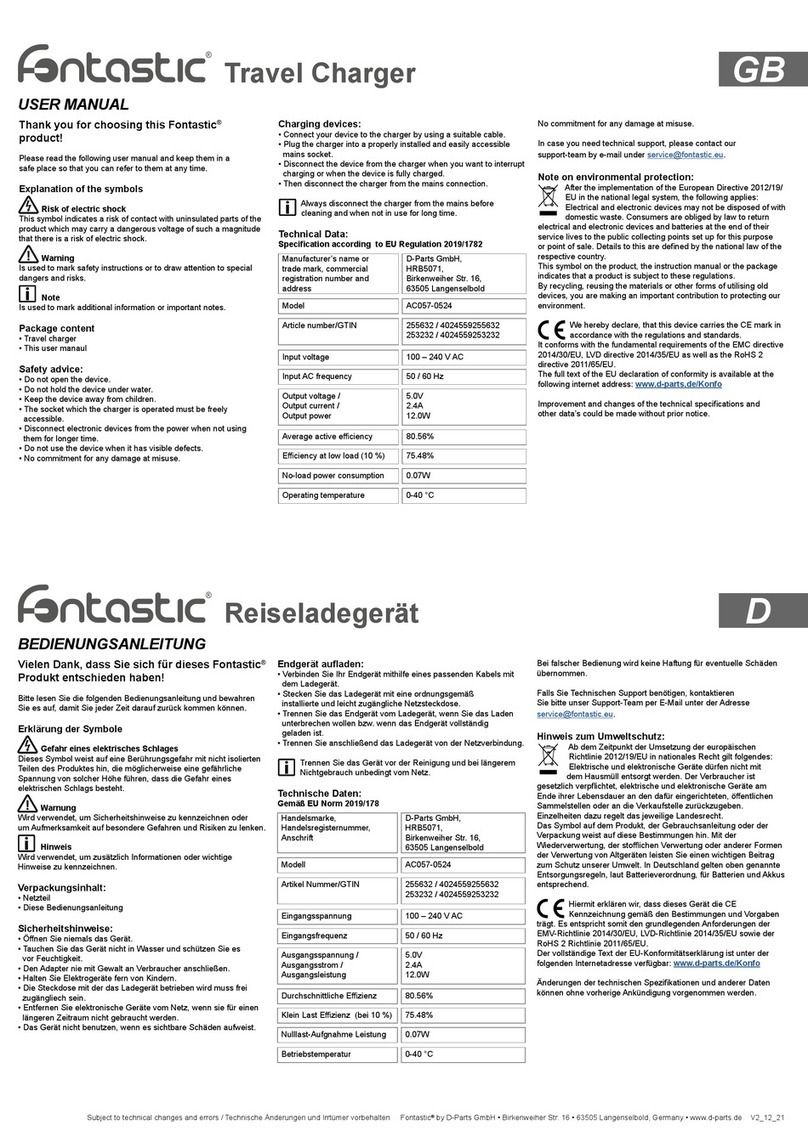
Thanks for choosing the Fontastic „Virtue“ charger.
Please read the user‘s guide carefully and follow the safety instructions.
The „Virtue“ is much more than an ordinary mobile charger. The compact mobile charger is
also a full-blown power bank and is able to charge devices even when it is not
connected to the mains.
Package contents
Fontastic „Virtue“
User‘s guide
Functional overview
1. Swivel Euro C PIN plug
2. Micro-USB cable
3. Battery status LED
(Red 0-35% | Orange 36-60% | Blue 61-85% | Green 86-100%)
4. Battery status button
5. USB output (Smart Out)
Charging a device
Using the mains
Unpack the product and check the contents of the packaging. Lift the Euro C PIN plug upwards
until it is at right angles to the enclosure and clicks into place. Connect the mobile charger to the
mains. The battery status LED lights up even if no device is connected. Connect the device to
be charged using the USB cable with the USB output (Smart out) or with the Virtue‘s integrated
Micro USB cable. Charging then starts.
Note: Please be aware that during operation when connected to the mains, the integrated
battery is charged and that this used some power until it is completely charged.
Using the integrated power bank
Connect the device to be charged using the USB cable with the USB output (Smart out) or using
the Virtue‘s integrated Micro USB cable. Press the battery status button, charging then starts.
Note: The virtue is equipped with a smart IC that detects the optimum power for the device under
charge and delivers this to the USB output (Smart Out).
When you use two charge connectors at the same time, the available 2.1 A current is divided
between both connectors.
Checking the battery level of the power bank
To check the battery level, press the battery status button. Different colored LEDs display the
current charge status of the power bank.
Red 0-35% | Orange 36-60% | Blue 61-85% | Green 86-100%
Charging the power bank
Lift the Euro C PIN plug upwards until it is at right angles to the enclosure and clicks into place.
Connect the mobile charger to the mains. The battery status display LED shows the status during
the charging process. The green LED goes off when charging is complete. The normal charging
duration is 5-6 hours.
Note: Load the Virtue‘s battery for at least 4-5 hours before using it for the first time.
Technical data
• Input: 100-240V AC
• Input frequency: 47-63 Hz
• Total output: 5V DC 2.1A, 10.5W
• Standby power: 0.3W
• Battery capacity: 5200mAh
• USB- & Micro-USB Interface
• Storage temperature: -10° bis +60° C
• Operating humidity: 20% to 90% R.H.
• Operating temperature: 0° to +40 °C
• Storage humidity: 0% to 90% R.H.
• Protection against overcharging, overvoltage, short-circuits
• Dimensions: 79,6 x 52,9 x 42,1 mm
• Weight: 172g
F Guide d‘utilisation du « Virtue »
Merci d‘avoir acheté le chargeur « Virtue » de Fontastic
Veuillez lire le guide attentivement et vous conformer aux instructions de sécurité.
Le « Virtue » est bien plus qu‘un simple chargeur mobile. Ce chargeur mobile compact est égale-
ment une alimentation de secours capable de recharger des appareils même sans être connecté
au réseau électrique.
Contenu
« Virtue » Fontastic
Guide d‘utilisation
Caractéristiques
1. Prise mâle pivotante de type C
2. Câble micro-USB
3. Voyant d‘état de la batterie
(rouge 0-35 % | orange 36-60 % | bleu 61-85 % | vert 86-100 %)
4. Bouton d‘état de batterie
5. Port de sortie USB (Smart)
Charger un appareil
Utilisation du réseau électrique
Déballez le produit et vérifiez le contenu. Faites pivoter la prise mâle de type C jusqu‘à ce qu‘elle
atteigne un angle droit par rapport au boîtier et enclenchez-la en position. Connectez le chargeur
mobile au réseau électrique. Le voyant d‘état de la batterie s‘allume même si aucun appareil
n‘est connecté. Branchez l‘appareil à charger au moyen du câble USB et de la sortie USB
(Smart) ou avec le câble micro-USB intégré du Virtue. Le processus de charge commence alors.
Remarque : Veuillez noter qu‘un fonctionnement sur secteur permet de charger la batterie
intégrée.
Utilisation de l‘alimentation de secours intégrée
Branchez l‘appareil à charger au moyen du câble USB et de la sortie USB (Smart) ou avec le
câble micro-USB intégré du Virtue. Appuyez sur le bouton d‘état de la batterie pour lancer le
processus de charge.
Remarque : Le Virtue est équipé d‘une puce IC qui détecte la puissance optimale pour l‘appareil
à charger et fournit celle-ci via la sortie USB (Smart).
Lorsque vous utilisez deux connecteurs de charge simultanément, le courant disponible de 2,1 A
est réparti entre les deux.
Contrôle du niveau de charge de la batterie de l‘alimentation de secours
Pour vérifier le niveau de charge de la batterie, appuyez sur le bouton d‘état de la batterie. Diffé-
rentes couleurs de DEL indiquent l‘état de charge actuel de l‘alimentation de secours.
Rouge 0-35 % | Orange 36-60 % | Bleu 61-85 % | Vert 86-100 %
Recharge de l‘alimentation de secours :
Tirez vers le haut la prise mâle de type C jusqu‘à ce qu‘elle atteigne un angle correspondant au
boîtier et enclenchez-la. Connectez le chargeur mobile au réseau électrique. Le témoin à DEL
d‘état de charge de la batterie indique la progression du processus de recharge. La DEL verte
s‘éteint lorsque la charge est terminée. La durée normale de charge est de 5 à 6 heures.
Remarque : Chargez la batterie du Virtue pendant au moins 4 à 5 heures avant de l‘utiliser pour
la première fois.
Données techniques
• Tension d‘entrée : 100-240V CA
• Fréquence d‘entrée : 47-63 Hz
• Total en sortie : 5 V CC, 2,1 A, 10,5 W
• Alimentation de veille : 0,3 W
• Capacité de la batterie : 5 200 mAh
• Interface USB et micro-USB
• Température de stockage : -10° à +60 ° C
• Humidité de fonctionnement : 20 % à 90 % d‘HR
• Température de fonctionnement : 0° à +40 °C
• Humidité de stockage : 0 % à 90 % d‘HR
• Protection contre les surcharges, les surtensions, les courts-circuits
• Dimensions : 79,6 x 52,9 x 42,1 mm
• Poids : 172 g
1
2
3
4
51
2
3
4
51
2
3
4
5
Technical specifications are subject to change without notice. / Technische Änderungen vorbehalten. 11/2015
E Guía del usuario de „Virtue“
Gracias por elegir el cargador „Virtue“ de Fontastic.
Por favor, lea la guía de usuario cuidadosamente y siga las advertencias de seguridad.
El „Virtue“ es mucho más que un cargador de móvil ordinario. El cargador móvil compacto
también funciona también como una batería externa power bank y puede cargar
dispositivos incluso cuando no está conectado a la corriente.
Contenido de la caja
„Virtue“ de Fontastic
Guía del usuario
Vista general funcional
1. Conexión Euro C PIN giratoria
2. Cable Micro-USB
3. LED con el estado de la batería
(Rojo 0-35 % | Naranja 36-60 % | Azul 61-85 % | Verde 86-100 %)
4. Botón del estado de la batería
5. Salida USB (Smart Out)
Cargar un dispositivo
Utilizar la toma de corriente
Desenvuelva el producto y compruebe el contenido del paquete. Ponga la conexión Euro C PIN
hacia arriba en el ángulo correcto de la carcasa y conéctela. Conecte el cargador móvil a la red
eléctrica. La luz LED de estado de la batería se ilumina incluso aunque el dispositivo no esté
conectado. Conecte el dispositivo que va a cargar utilizando el cable USB con la salida USB
(Smart Out) o con el cable micro-USB integrado de Virtue. Comienza la carga.
Nota: Por favor, tenga en cuenta que durante el funcionamiento mientras está conectado a la
red eléctrica, se carga la batería integrada y usa algo de energía hasta que queda completamen-
te cargada.
Utilizar el power bank integrado
Conecte el dispositivo que va a cargar utilizando el cable USB con la salida USB (Smart out) o
usando el cable micro-USB integrado de Virtue. Pulse el botón de estado de la batería para que
comience la carga.
Nota: El cargador Virtue está equipado con un JC inteligente que detecta la energía óptima del
dispositivo que se está cargando y la proporciona a la salida USB (Smart Out).
Cuando utiliza dos conectores de carga al mismo tiempo, la corriente disponible 2.1 A se divide
entre ambos conectores.
Comprobar el nivel de batería del power bank
Para comprobar el nivel de batería, pulse el botón del estado de la batería. Las luces LED de
diversos colores muestran el estado actual de carga del power bank.
(Rojo 0-35 % | Naranja 36-60 % | Azul 61-85 % | Verde 86-100 %)
Cargar el power bank
Ponga la conexión Euro C PIN hacia arriba en el ángulo correcto de la carcasa y conéctela.
Conecte el cargador móvil a la red eléctrica. La luz LED del estado de la batería muestra su
estado durante el proceso de carga. La luz LED verde se apaga cuando la carga se ha com-
pletado. La duración normal de la carga es 5-6 horas.
Nota: Cargue la batería de Virtue durante unas 4-5 horas antes de utilizarla por primera vez.
Detalles técnicos
• Entrada: 100-240V AC
• Frecuencia de entrada: 47-63 Hz
• Salida total: 5 V DC, 10,5 W
• Energía en espera: 0,3 W
• Capacidad de la batería: 5200 mAh
• Interfaz USB y Micro-USB
• Temperatura de almacenamiento: -10° a +60° C
• Humedad de funcionamiento: 20 % a 90 % R.H.
• Temperatura de funcionamiento: 0° a +40 °C
• Humedad de almacenamiento: 0 % a 90 % R.H.
• Protección ante sobrecargas, subidas de voltaje, cortocircuitos
• Dimensiones: 79,6 x 52,9 x 42,1 mm
• Peso: 172 g
I Guida per l’utente di „Virtue“
Grazie per aver scelto il caricabatterie Fontastic „Virtue“.
Si prega di leggere attentamente il manuale utente e di seguire le istruzioni di sicurezza.
Il „Virtue“ è molto più di un normale caricatore per dispositivi mobili. Il caricabatterie per dispo-
sitivi mobili è anche una power-bank in piena regola ed è in grado di caricare i dispositivi anche
quando non ècollegato alla rete elettrica.
Contenuti nella confezione
Fontastic „Virtue“
Guida per l’utente
Panoramica sulle funzioni
1. Spina Euro C PIN
2. Cavo Micro-USB
3. Misuratore a LED dello stato della batteria
(Rosso 0-35% | Arancione 36-60% | Blu 61-85% | Verde 86-100%)
4. Pulsante per lo stato della batteria
5. Porta USB (Smart Out)
Per caricare un dispositivo
Usando la rete elettrica
Togli il prodotto dalla confezione e controllane il contenuto. Solleva verso l‘alto la spina Euro C
PIN fino a quando non è ad angolo retto rispetto al contenitore e scatta in posizione. Collega il
caricabatterie per dispositivi mobili alla rete elettrica. Il misuratore a LED dello stato della batteria
si accenderà, anche se nessun dispositivo è collegato. Collega il dispositivo da caricare tramite
il cavo USB con l‘uscita USB (Smart out) o con il cavo Micro USB integrato di Virtue. La carica
quindi inizia.
Nota: Considera che durante il funzionamento, quando è collegato alla rete elettrica, la batteria
integrata viene caricata e ciò utilizza un pò di energia, fino a quando non è completamente carica.
Usando la power bank integrata
Collega il dispositivo da caricare tramite il cavo USB con l‘uscita USB (Smart out) o tramite il
cavo micro USB integrato di Virtue. Premi il pulsante che segnala lo stato della batteria, quindi
inizia il caricamento.
Nota: il Virtue è dotato di un circuito integrato intelligente che rileva la potenza ottimale per il
dispositivo sotto carica e fornisce tale dato all‘uscita USB (Smart Out).
Quando si utilizzano due connettori di carica allo stesso tempo, la corrente disponibile 2.1 A si
divide tra i due connettori.
Controllare il livello della batteria della power bank
Per controllare il livello della batteria, premi il pulsante dello stato della batteria. Diversi LED
colorati indicano lo stato di carica attuale della power bank.
Rosso 0-35% | Arancione 36-60% | Blu 61-85% | Verde 86-100%
Per caricare la power bank
Solleva verso l‘alto la spina Euro C PIN fino a quando non è ad angolo retto rispetto al conte-
nitore e scatta in posizione. Collega il caricabatterie per dispositivi mobili alla rete elettrica. Il
misuratore a LED dello stato della batteria indica lo stato durante il processo di ricarica. Il LED
verde si spegne quando la carica è completa. La durata di carica normale è di 5-6 ore.
Nota: Carica la batteria del Virtue per almeno 4 - 5 ore prima di usarlo per la prima volta.
Dati tecnici
• Ingresso: 100-240V AC
• Frequenza di ingresso: 47-63 Hz
• Uscita totale: 5V DC 2.1A, 10.5W
• Alimentazione in standby: 0.3W
• Capacità della batteria: 5200mAh
• Interfaccia USB- e Micro-USB
• Temperatura di conservazione: -10° bis +60° C
• Umidità nel funzionamento: 20% to 90% R.H.
• Temperatura nel funzionamento: 0° to +40 °C
• Umidità di conservazione: 0% to 90% R.H.
• Protezione contro sovraccarico, sovratensione, corto circuiti
• Dimensioni: 79,6 x 52,9 x 42,1 mm
• Peso: 172g
DK Brugervejledning til Virtue
Tak for at vælge Fontastic Virtue-opladeren.
Læs brugervejledningen grundigt og følg sikkerhedsinstruktionerne.
Virtue er meget mere end en almindelig mobil oplader. Den kompakte mobile oplader er
også en regulær strømforsyning og kan oplade enheder, selv når den ikke er
tilsluttet lysnettet.
Pakkens indhold
Fontastic Virtue
Brugervejledning
Funktioner
1. Swivel Euro C PIN-stik
2. Mikro-USB-kabel
3. LED‘er for batteristatus
(Rød 0-35 % | Orange 36-60 % | Blå 61-85 % | Grøn 86-100 %)
4. Knap for batteristatus
5. USB-udgang (Smart Out)
Oplad en enhed
via lysnettet
Udpak produktet og kontroller pakkens indhold. Placer Euro C PIN-stikket , så det er vinkelret på
isættelsesstedet og sæt stikket i. Forbind den mobile oplader til lysnettet. Batteristatus-LED‘erne
lyser op, selv hvis der ikke er forbundet nogen enhed. Forbind enheden, der skal oplades, ved
hjælp af USB-kablet til USB-udgangen (Smart Out) eller med Virtues indbyggede mikro-USB-
kabel. Herefter begynder opladningen.
Bemærk: Vær opmærksom på, at når opladeren bruges og er tilsluttet lysnettet, så vil det ind-
byggede batteri blive opladet, og det vil forbruge en vis mængde strøm, indtil det er fuldt opladet.
Brug af den indbyggede strømforsyning
Forbind enheden, der skal oplades, ved hjælp af USB-kablet til USB-udgangen (Smart Out)
eller ved hjælp af Virtues indbyggede mikro-USB-kabel. Tryk på batteristatusknappen, hvorefter
opladning begynder.
Bemærk: Virtue er udstyret med en kontrol, der detekterer den optimale ladestrøm til enheden,
der oplades, og leverer denne strøm via USB-udgangen. (Smart Out).
Når du bruger to opladerudgange samtidigt, vil begge udgange levere en strømstyrke på 2,1 A.
Kontrol af strømforsyningens batteriniveau
Tryk på batteristatusknappen for at kontrollere batteriniveauet. Forskelligt farvede LED‘er viser
strømforsyningens opladningsniveau.
Rød 0-35 % | Orange 36-60 % | Blå 61-85 % | Grøn 86-100 %
Opladning af strømforsyningen
Placer Euro C PIN-stikket, så det er vinkelret på isættelsesstedet og sæt stikket i. Forbind den
mobile oplader til lysnettet. Batteristatus-LED‘erne viser løbende status for opladningen. Den
grønne LED slukker, når opladningen er færdig. Normalt tager opladningen 5-6 timer.
Bemærk: Oplad Virtues batteri i mindst 4-5 timer, inden du bruger opladeren første gang.
Tekniske data
• Input: 100-240V AC
• Input-frekvens: 47-63 Hz
• Samlet udgangseffekt: 5 V DC 2,1 A, 10,5 W
• Effektforbrug i standby: 0,3 W
• Batterikapacitet: 5.200 mAh
• USB- og mikro-USB-interface
• Opbevaringstemperatur: -10 °C til +60 °C
• Luftfugtighed under brug: 20 % til 90 % RF
• Temperatur under brug: 0 °C til +40 °C
• Fugtighed ved opbevaring: 0 % til 90 % RF
• Beskyttelse mod overopladning, for høj spænding, kortslutning
• Dimensioner: 79,6 x 52,9 x 42,1 mm
• Vægt: 172 g
1
2
3
4
51
2
3
4
51
2
3
4
5
Technical specifications are subject to change without notice. / Technische Änderungen vorbehalten. 11/2015

Other fontastic Batteries Charger manuals

fontastic AC057-0524 User manual

fontastic

fontastic AC057-0524 User manual

fontastic Dubl User manual

fontastic

fontastic Dubl User manual

fontastic GaNto35 User manual

fontastic

fontastic GaNto35 User manual

fontastic FORT User manual

fontastic

fontastic FORT User manual

fontastic SAMA AC067PD User manual

fontastic

fontastic SAMA AC067PD User manual

fontastic Quad User manual

fontastic

fontastic Quad User manual

fontastic NIVO User manual

fontastic

fontastic NIVO User manual

fontastic Wi-Tres User manual

fontastic

fontastic Wi-Tres User manual

fontastic Widu User manual

fontastic

fontastic Widu User manual

fontastic Travel Charger User manual

fontastic

fontastic Travel Charger User manual

fontastic Mini GaNto65 User manual

fontastic

fontastic Mini GaNto65 User manual

fontastic Move User manual

fontastic

fontastic Move User manual

fontastic Mini GaNto45 User manual

fontastic

fontastic Mini GaNto45 User manual

fontastic OVIN User manual

fontastic

fontastic OVIN User manual

fontastic FORT 21 User manual

fontastic

fontastic FORT 21 User manual

fontastic Fold User manual

fontastic

fontastic Fold User manual

fontastic SAMA User manual

fontastic

fontastic SAMA User manual

fontastic FORT 22 User manual

fontastic

fontastic FORT 22 User manual

fontastic Compact 3.0 User manual

fontastic

fontastic Compact 3.0 User manual

fontastic Mini GaNto20 User manual

fontastic

fontastic Mini GaNto20 User manual

fontastic AC057-0524 User manual

fontastic

fontastic AC057-0524 User manual

fontastic WMag User manual

fontastic

fontastic WMag User manual

fontastic FORT 21 User manual

fontastic

fontastic FORT 21 User manual

fontastic AC076PD User manual

fontastic

fontastic AC076PD User manual

Popular Batteries Charger manuals by other brands

Schloder SESD 200 Operation manual

Schloder

Schloder SESD 200 Operation manual

ToughTested TT-PBLL26 user manual

ToughTested

ToughTested TT-PBLL26 user manual

Schumacher SC1301 user manual

Schumacher

Schumacher SC1301 user manual

Radio Shack 23-043 owner's manual

Radio Shack

Radio Shack 23-043 owner's manual

GE WattStation Wall Mount user manual

GE

GE WattStation Wall Mount user manual

Fusion VECTOR NX81 operating instructions

Fusion

Fusion VECTOR NX81 operating instructions

Applied Energy Solutions Maverick Installation and operating instructions

Applied Energy Solutions

Applied Energy Solutions Maverick Installation and operating instructions

NOCO Genius G7200EU User guide & warranty

NOCO Genius

NOCO Genius G7200EU User guide & warranty

Dometic DEL90 quick start guide

Dometic

Dometic DEL90 quick start guide

Lester 18330-48 instructions

Lester

Lester 18330-48 instructions

GYS GYSFLASH 8.48 PL-E manual

GYS

GYS GYSFLASH 8.48 PL-E manual

Hitachi UC 18YFL Safety and instruction manual

Hitachi

Hitachi UC 18YFL Safety and instruction manual

Compleo SOLO N+ operating instructions

Compleo

Compleo SOLO N+ operating instructions

Delta-q IC650 troubleshooting guide

Delta-q

Delta-q IC650 troubleshooting guide

Pro-Peak Sigma EQ Hyper operating manual

Pro-Peak

Pro-Peak Sigma EQ Hyper operating manual

Parkside PLG 20 C3 Translation of the original instructions

Parkside

Parkside PLG 20 C3 Translation of the original instructions

GYS DIAG-STARTIUM 60-12 manual

GYS

GYS DIAG-STARTIUM 60-12 manual

Schumacher SpeedCharge 7000A owner's manual

Schumacher

Schumacher SpeedCharge 7000A owner's manual

manuals.online logo
manuals.online logoBrands
  • About & Mission
  • Contact us
  • Privacy Policy
  • Terms and Conditions

Copyright 2025 Manuals.Online. All Rights Reserved.