9US: www.FoodSaver.com | CA: www.FoodSaver.ca | MX: www.oster.com.mx/foodsaver
3. Vacuum Seal a FoodSaver®Bag
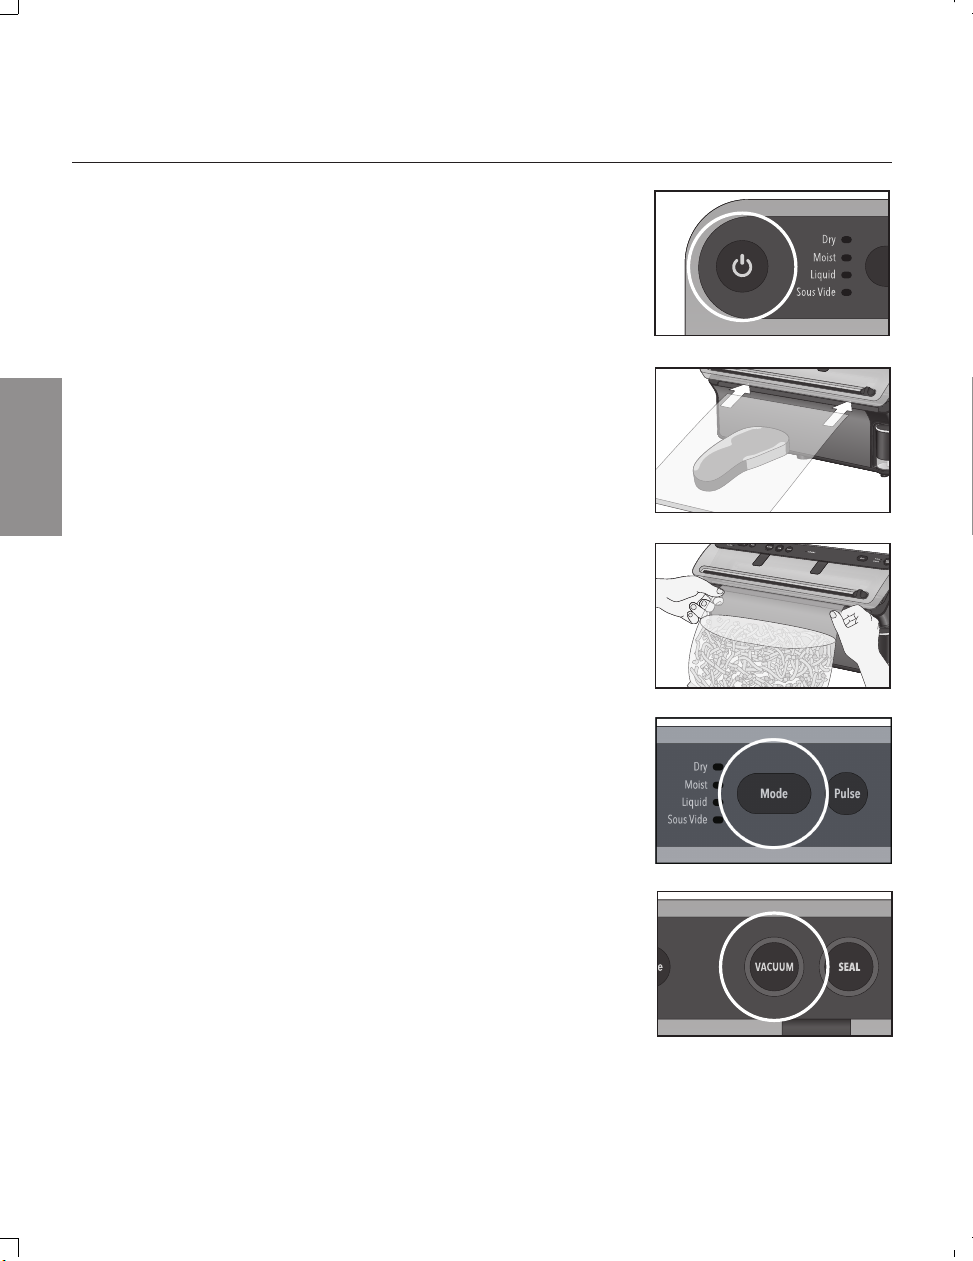
1. Press Power Button to turn appliance on. Power button and
default mode selection will illuminate.
2. With both hands, slowly insert the open end of filled bag
through the bottom of the Vacuum View Window into Drip
Tray.
NOTE: The appliance lid should Not be completely open
HINT: If having trouble getting bag inside appliance, wiggle it
from side to side while inserting.
IMPORTANT TIP: When inserting open end of filled bag, center
the bag in the middle of the appliance for best results. The
Vacuum View Window allows you to easily see where the end
of the bag is when inserting. Continue to insert and hold
bag until appliance automatically detects and lid closes and
locks.
3. The appliance will automatically detect bag insertion &
Appliance Lid will close and lock. Bag Detected indicator
light will blink then become steady to confirm the bag has
automatically been sensed. Vacuum and Seal Button Lights
will blink.
CAUTION: Lid closes down automatically. Remove hands or
any other objects that may be obstructing the lid before
closing. Do not manually force the lid to close.
4. Select desired Vacuum Mode (Dry, Moist, Liquid, or Sous
Vide) depending on the food that is being vacuum sealed by
pressing Mode Button. Indicator light will illuminate next to
selected mode.
5. Once desired mode is selected, press Vacuum Button to
begin vacuum sealing process. Vacuum Button light will
pulse until complete.
6. After vacuum is complete, Vacuum button light will go steady
and appliance will automatically begin sealing. Seal Button
light will pulse until complete.
7. Once vacuumed and sealed, vacuum and seal button lights
will go steady then turn off. Appliance lid will automatically
open and release the bag.
8. Refrigerate, freeze or store as needed. (See “Guidelines” for
food storage safety tips on pg 15.)
IMPORTANT TIP: At any time during vacuum sealing, the
Cancel Button can be pressed and the appliance lid will open
automatically. When Dry and Moist lights flash, the drip tray is
full. Please empty it. Vacuum and Seal function will function
normally after drip tray is emptied.
HOW TO
OPEN END
VS5900 Series_23EFSM1.indd 9-10
9US: www.FoodSaver.com | CA: www.FoodSaver.ca | MX: www.oster.com.mx/foodsaver
3. Vacuum Seal a FoodSaver®Bag
1. Press Power Button to turn appliance on. Power button and
default mode selection will illuminate.
2. With both hands, slowly insert the open end of filled bag
through the bottom of the Vacuum View Window into Drip
Tray.
NOTE: The appliance lid should Not be completely open
HINT: If having trouble getting bag inside appliance, wiggle it
from side to side while inserting.
IMPORTANT TIP: When inserting open end of filled bag, center
the bag in the middle of the appliance for best results. The
Vacuum View Window allows you to easily see where the end
of the bag is when inserting. Continue to insert and hold
bag until appliance automatically detects and lid closes and
locks.
3. The appliance will automatically detect bag insertion &
Appliance Lid will close and lock. Bag Detected indicator
light will blink then become steady to confirm the bag has
automatically been sensed. Vacuum and Seal Button Lights
will blink.
CAUTION: Lid closes down automatically. Remove hands or
any other objects that may be obstructing the lid before
closing. Do not manually force the lid to close.
4. Select desired Vacuum Mode (Dry, Moist, Liquid, or Sous
Vide) depending on the food that is being vacuum sealed by
pressing Mode Button. Indicator light will illuminate next to
selected mode.
5. Once desired mode is selected, press Vacuum Button to
begin vacuum sealing process. Vacuum Button light will
pulse until complete.
6. After vacuum is complete, Vacuum button light will go steady
and appliance will automatically begin sealing. Seal Button
light will pulse until complete.
7. Once vacuumed and sealed, vacuum and seal button lights
will go steady then turn off. Appliance lid will automatically
open and release the bag.
8. Refrigerate, freeze or store as needed. (See “Guidelines” for
food storage safety tips on pg 15.)
IMPORTANT TIP: At any time during vacuum sealing, the
Cancel Button can be pressed and the appliance lid will open
automatically. When Dry and Moist lights flash, the drip tray is
full. Please empty it. Vacuum and Seal function will function
normally after drip tray is emptied.
OPEN END
VS5900 Series_23EFSM1.indd 9-10
automatically. When all lights ash, the drip tray is full. Please
empty it. Vacuum and Seal function will function normally after
drip tray is emptied.
When using liquid mode, if vacuum sealing
thicker sauces, soups, or creams (i.e. cream of mushroom)
keep inside walls of bag above liquid clear from food debris or
drips as much as possible.
IMPORTANT TIP: