Forelite FO-LM200C User manual
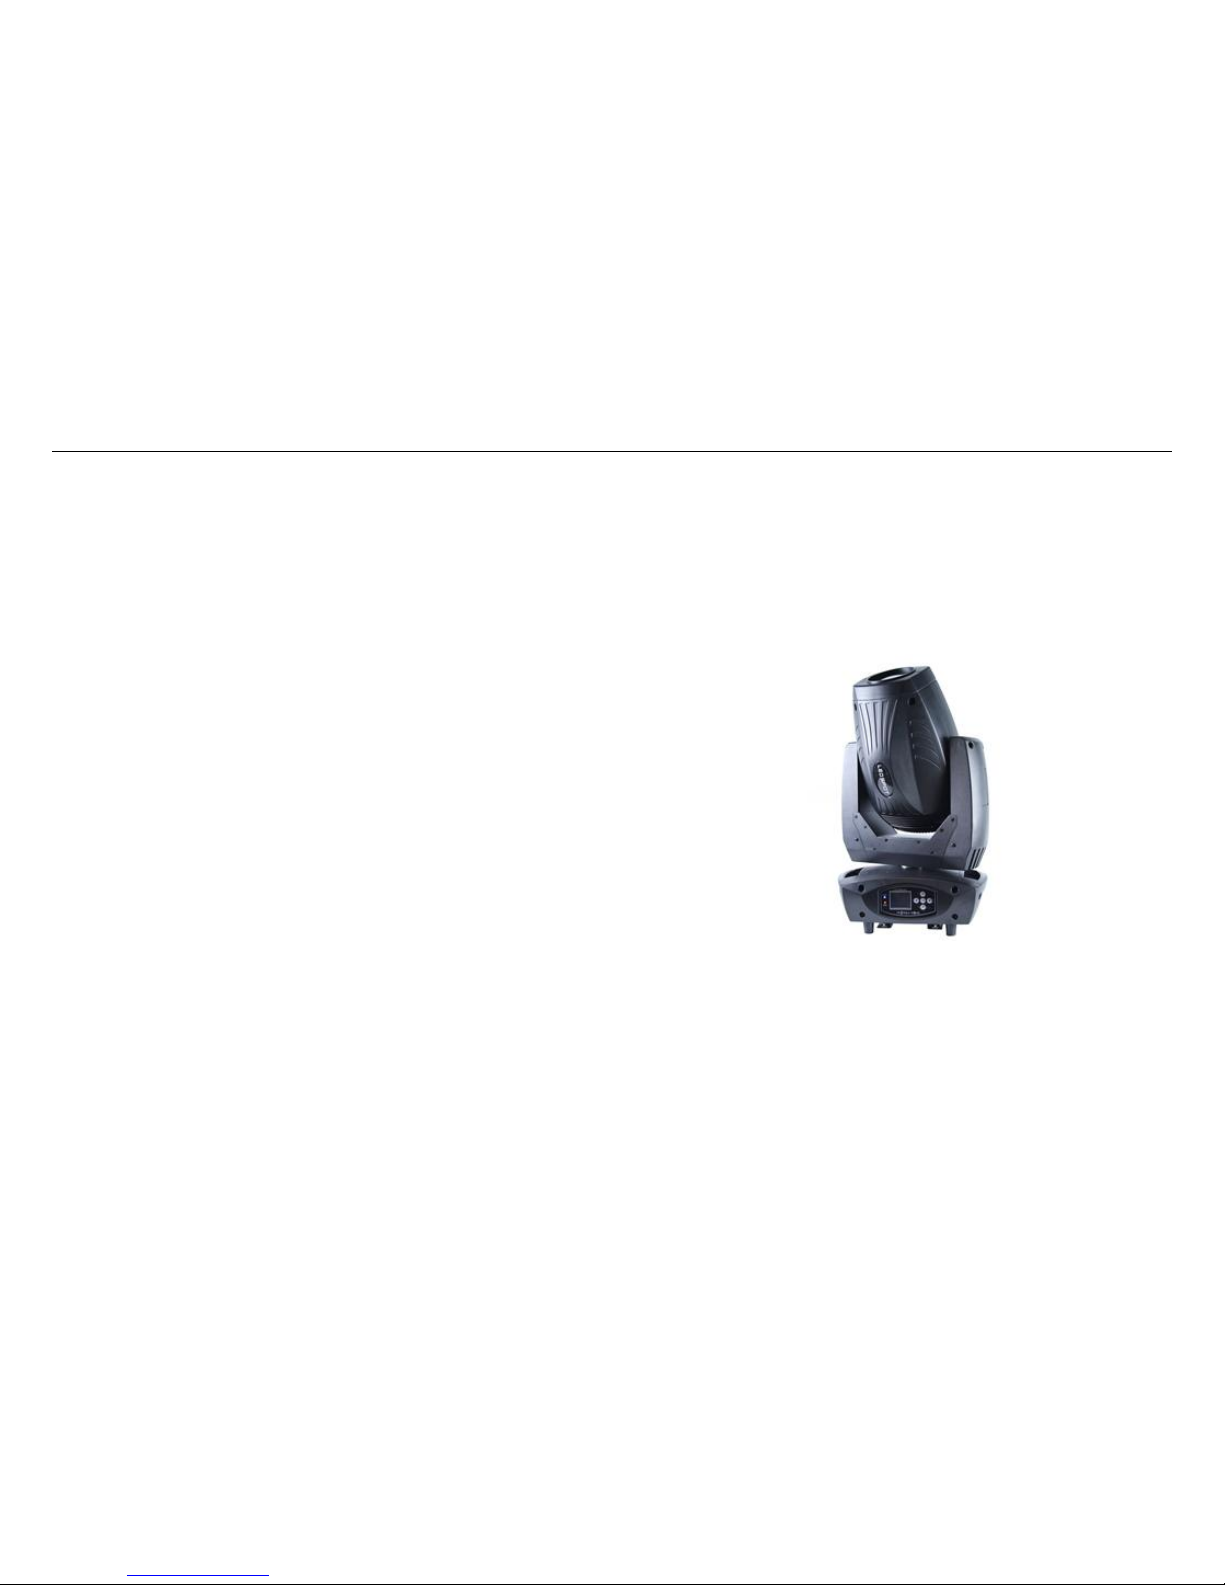
USER MANUAL
200W LED MOVING HEAD SPOT BEAM WASH LIGHT
200W LED MOVING
HEAD SPOT BEAM WASH LIGHT
FO-LM200C
USER MANUAL
Caution: please read this user manual carefully before you initially start-up.
http://www.forelite.cn
USER MANUAL
200W LED MOVING HEAD SPOT BEAM WASH LIGHT
INDEX
ⅠGENERAL ......................................................................................................01
ⅡSAFETY INFORMATION............................................................................02
ⅢOPERATION INSTRUCTIONS ..................................................................03
ⅣFEATURES AND SPECIFICATION ...........................................................04
ⅤDIMENSION..................................................................................................05
ⅥINSTALLATION AND CONNECTION.......................................................06
ⅦOPERATION AND CONTROL ...................................................................08
ⅧADDRESS SETTING AND DMX CHANNEL OPERATION...................10
ⅨTECHNICAL SPECIFICATION...................................................................13
ⅩPHOTOMETRIC DATA................................................................................14
ⅪTROUBLE SHOOTING................................................................................15
ⅫMATIANMENT AND CLEARNING..........................................................16
ⅠGENERAL
Thank you for using our product! Please read this manual carefully and completely. For
technical reference in future, please keep this user manual well. This user manual contains
all installation and operation information of this Aura LED Moving Head Wash Light, it’s very
useful for user to install and operate the light. Please strictly abide by the relevant
instruction for the installation and operation.
This 150W LED Beam Light is made of a new type of high temperature strength of
engineering plastics and case aluminum casting with nice outlook. The fixture is designed
manufactured strictly following CE standards, complying with international standard
DMX512 protocol. It's available independently controlled and linkable with each other for
operation. And it is applicable for large-scale live performances, theater, studio, nightclubs
and discos.
This light meets the following criteria:
GB7000.1-2007/IEC60598-1:2003
GB7000.217-2008/IEC60598-2-17:1984+A2:1990
Once receiving a fixture, carefully unpack the carton, check the contents to ensure that all
parts are presented, and have been received in a good condition. Notify the shipper
immediately and retain packing material for inspection if any parts appear damaged from
shipping or the carton itself shows, sign of mishandling. Save the carton and all packing
materials. In the event that a fixture must be returned to the factory, it is important that the
fixture be returned in the original factory box and packing.
FO-SBW200----------1pc
Signal Cable---------1pc
Power Cable --------1pc
01

USER MANUAL
200W LED MOVING HEAD SPOT BEAM WASH LIGHT
User Manual---------1pc
ⅡSAFETY INFORMATION
※Important
Every person involved with the installation, operation and maintenance of this device has to
be qualified and follow the instructions of this manual. Manufacturer will not with
responsibility for those operations which are not according to this Instruction.
Verify that the voltage matches the rated voltage.
When the voltage is 110V , Do not connect more than 10 lightings in total to AC mains
power in one interconnected daisy chain
When the voltage is 220V , Do not connect more than 20 lightings in total to AC mains
power in one interconnected daisy chain
Before using the fixture, check that all power distribution equipment and cables are in
perfect condition and rated for the current requirements of all connected devices.
Always ground (earth) the fixture electrically.
Avoiding hit the Light when you are move or install the light.
The minimum distance between light-output and the illuminated surface must be more
than 0.5 meters. Keep all combustible materials (for example fabric, wood, paper) at least
0.2 meters away from the fixture.
Do not expose the fixture to rain or moisture.
Avoid looking directly into the light source (especially those who suffer from epileptic fits)
Maximum ambient temperature (Ta) is 40°C. Do not operate fixture at temperatures higher
than this.
The Maximum surface temperature is 50°C
When suspending the fixture above ground level, verify that the structure can hold at least
10 times the weight of all installed devices.
Verify that all external covers and rigging hardware are securely fastened and use an
approved means of secondary attachment such as a safety cable.
To determine the power requirements for a particular fixture, see the label affixed
to the back plate of the fixture or refer to the fixtures specifications chart. A fixture listed
current rating is its average current draw under normal conditions. All fixtures must be
directly powered off a switched circuit and cannot be run off a rheostat(variable resistor) or
dimmer circuit, even if the rheostat or dimmer source voltage matches the fixtures
requirement. Check the fixture or device carefully to make sure that if a voltage selection
switch exists that it sets to the correct line voltage you will use.
Warning! Verify that the voltage select switch on your unit matches the line voltage
applied. Damage to your fixture may result if the line voltage applied does not match the
voltage indicated on the voltage selector switch. All fixtures must be connected to circuits
with a suitable Earth ground.
ⅢOPERATION INSTRUCTIONS
The moving head is an LED wash light for onsite decoration purpose.
Don’t turn on the fixture if it’s been through severe temperature difference like after
transportation because it might damage the light due to the environment changes. So
make sure to operate the fixture until it is in normal temperature.
This light should be keep away from strong shaking during any transportation or
movement.
Don’t pull up the light by only the head, or it might cause damages to the mechanical
parts.
Don’t expose the fixture in overheat, moisture or environment with too much dust
when installing it. And don’t lay any power cables on the floor. Or it might cause
electronic shock to the people.
Make sure the installation place is in good safety condition before installing the
-02-
03
02

USER MANUAL
200W LED MOVING HEAD SPOT BEAM WASH LIGHT
fixture.
Make sure to put the safety chain and check whether the screws are screwed properly
when installing the fixture.
Make sure the lens are in good condition. It’s recommended to replace the units if
there are any damages or severe scratch.
Make sure the fixture is operated by qualified personnel who knows the fixture before
using.
Keep the original packages if any second shipment is needed.
Don’t try to change the fixtures without any instruction by the manufacturer or the
appointed repairing agencies.
It is not in warranty range if there are any malfunctions from not following the user
manual to operate or any illegal operation, like shock short circuit, electronic shock,
lamp broke, etc.
ⅣFEATURES AND SPECIFICATION
Voltage: AC100-240V,50-60Hz
Power: 300W
Led source: 200W White LED
Color Temperature: 7500K
Led Life Time: Average 50000 Hours
Channel: 18 DMX channel
Control: DMX/Master-slave/Auto/Sound activated
Pan: 540 degree + fine Tilt: 270 degree + fine
Zoom range: 7-21°
Dimmer: 0-100% smooth linear dimmer
Strobe: 1-25 Hz with pulse effect
Color Wheel: 9 colors + open, with half color effect
Static Gobo Wheel: 9 gobos + open, with rotation and running water effect
Rotation gobo wheel: 7 gobos + open
Prism: 4 facet prism with bi-direction rotating
Frost: With frost effect
Screen: LCD screen with Chinese and English, can adjust 180 degree to fit different
installation position
Size of Dimension: 343*239*537 mm
Packing Dimension: 46*46*58cm
Net Weight: 14.5kg
Gross Weight: 23kg
ⅤDIMENSION
05
04
USER MANUAL
200W LED MOVING HEAD SPOT BEAM WASH LIGHT
1
23
PIN 3
PIN 2
120
Ω
Unit: mm
ⅥINSTALLATION AND CONNECTION
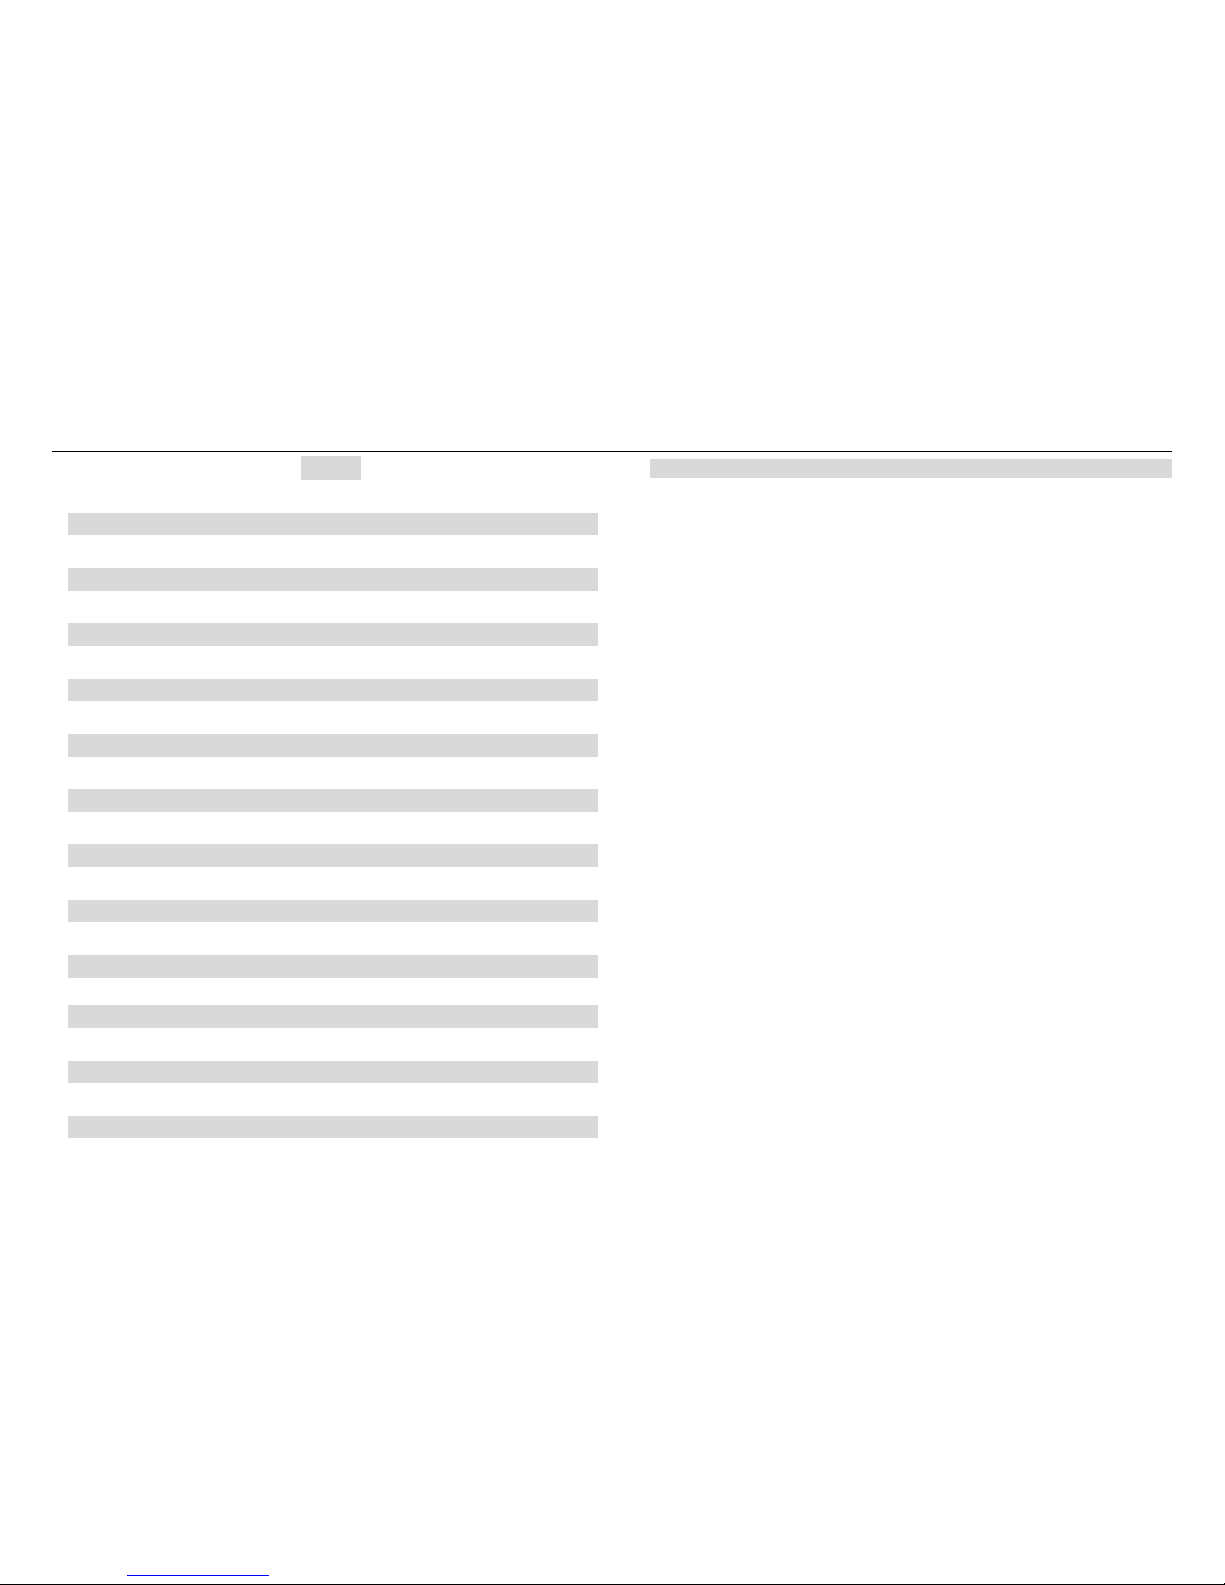
1. Installation
Be sure to install this product should be at least 0.5 m from the flammable materials
Screw one clamp each via a M12 screw and nut onto the Omega holders.
Insert the quick-lock fasteners of the first Omega holder into the respective holes on the
bottom of the device. Tighten the quick-lock fasteners fully clockwise. Install the second
Omega holder.
Pull the safety-rope through the holes on the bottom of the base and over the trussing
system or a safe fixation spot. Insert the end in the cabinet and tighten the safety screw.
Please refer to the picture below:
2. DMX connection
Connect the provided XLR cable to the female 3-pin XLR output of your controller and the
other side to the male 3-pin XLR input of the moving head. You can chain multiple Moving
head together through serial linking. The cable needed should be two core, screened cable
with XLR input and output connectors. Please refer to the diagram below.
DMX-512 CONNECTION WITH DMX TERMINATOR
For installations where the DMX cable has to run a long distance or is in an electrically noisy
environment, such as in a discotheque, it is recommended to use a DMX terminator. This
helps in preventing corruption of the digital control signal by electrical noise. The DMX
terminator is simply an XLR plug with a 120 Ω resistor connected between pins 2 and
3,which is then plugged into the output XLR socket of the last fixture in the chain. Please
see illustrations below:
07
06
07

USER MANUAL
200W LED MOVING HEAD SPOT BEAM WASH LIGHT
ⅦOPERATION AND CONTROL
1. Control panel
Button:
MENU
To select the programming functions
DOWN
To go backward in the selected functions
UP
To go forward in the selected functions
ENTER
To confirm the selected functions
DMX input:
For DMX512 link, use 3/5-pin XLR cable to link the unit together.
DMX output:
For DMX512 link, use 3/5-pin XLR cable to link the unit together.
Mains input:
Connect to power supply.
Mains output:
Connect to supply power to the next unit.
Fuse (T 6.3A):
Protect the unit from damage of the over-current.
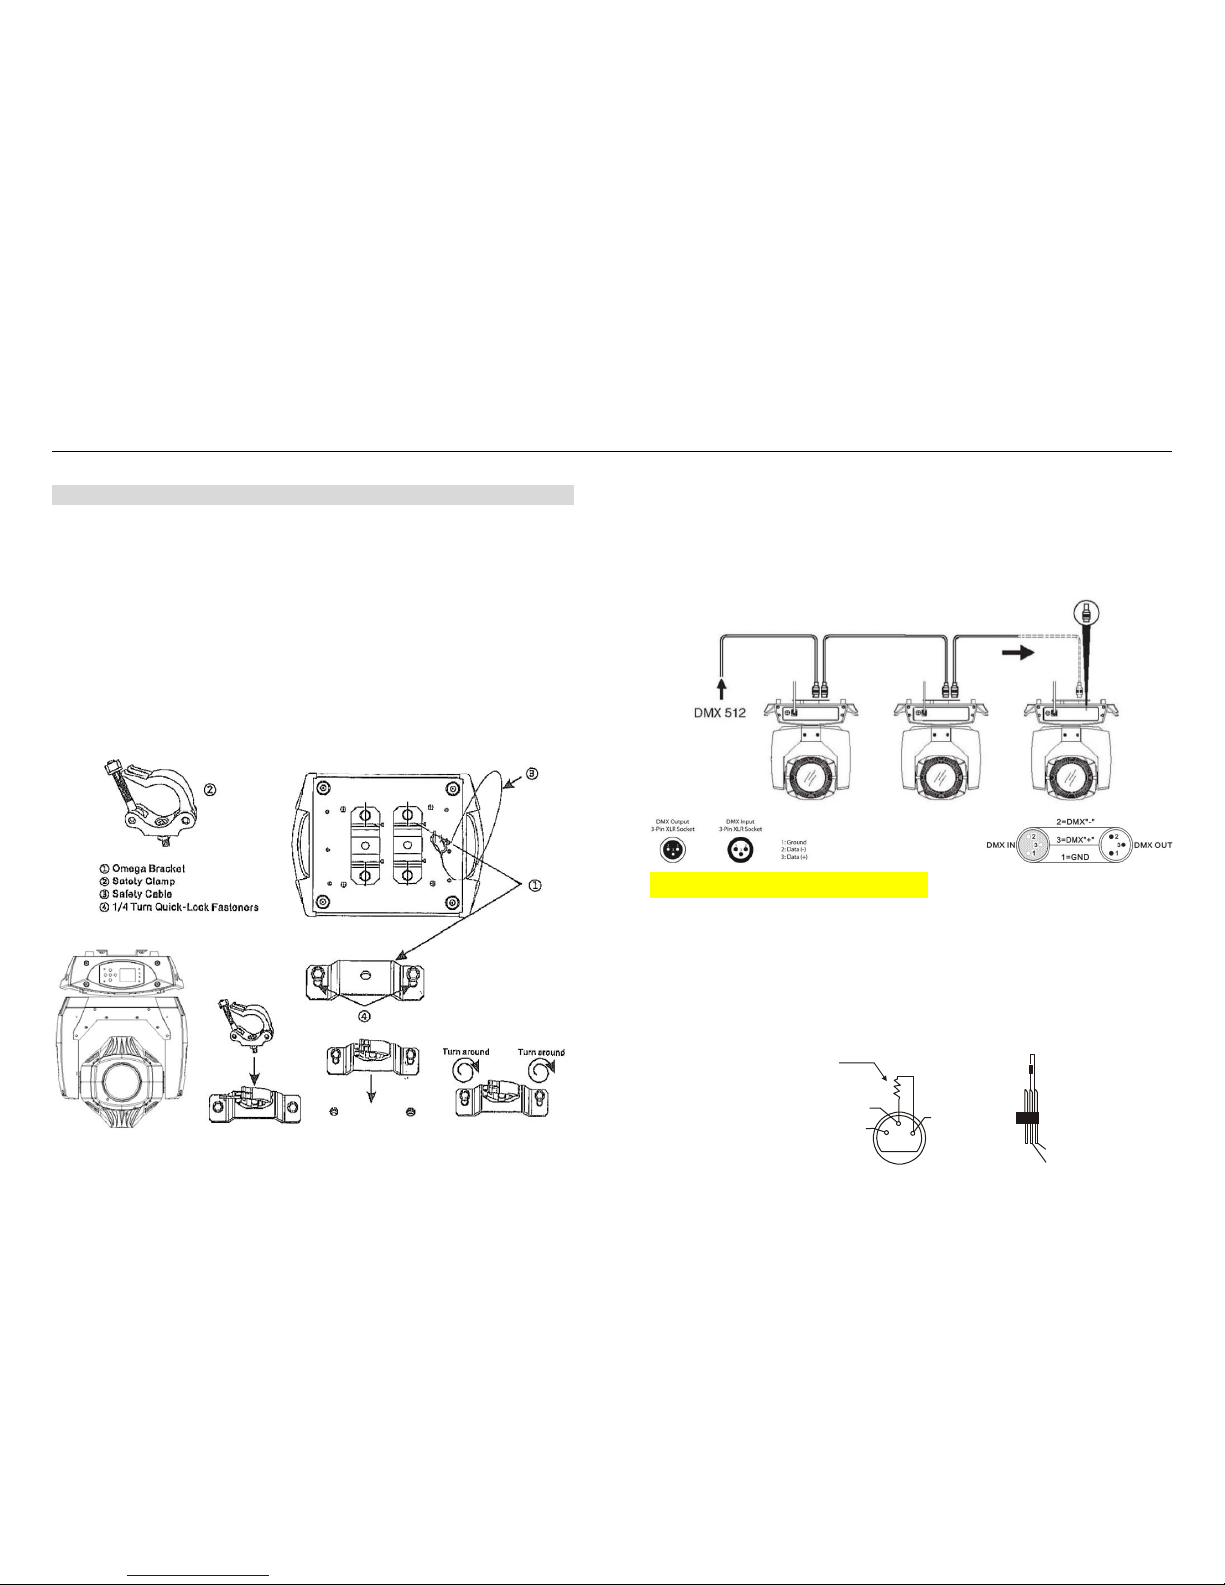
2. Main Functions
To select any of the given functions, press the MENU button up to when the required one is
showing on the display. Select the function by ENTER button and the display will blink. Use
DOWN and UP button to change the mode. Once the required mode has been selected,
press the ENTER button to setup, to go back to the functions without any change press the
MENU button again. Hold and press the MENU button about one second or wait for one
minute to exit the menu mode.
menu map:
08
09
USER MANUAL
200W LED MOVING HEAD SPOT BEAM WASH LIGHT
ⅧADDRESS SETTING AND DMX CHANNEL OPERATION
If you use a universal DMX controller to control the units, you have to set DMX address
from 1 to 512 so that the units can receive DMX signal.
Please refer to the following diagram to address your DMX512 channel for the first 4 units:
Channel mode
Unit 1 address
Unit 2 address
Unit 3 address
Unit 4 address
18 channels
1
19
37
55
18 DMX Channels mode
DMX CH
DMX Value
Function
CH1
000--255
Pan 0~540degree
CH2
000--255
Pan fine 1.8 degree, 16bit
CH3
000--255
Tilt 0~270degree
CH4
000--255
Tilt fine 1.8 degree, 16bit
CH5
000--255
Pan/tilt speed from fast to slow
CH6
000--255
Dimmer, 0-100% linear
CH7
000--003
004--099
100--149
150--199
200--249
250--255
Strobe
No function
Strobe from slow to fast
Pulse strobe from slow to fast
Thunder strobe from slow to fast
Random strobe from fast to slow
Light on
CH8
000--019
020--039
……
160--179
180--199
200--226
227--278
229--255
Color wheel
Color 1 linear control
Color 2 linear control
………
Color 9 linear control
Open linear control
Color wheel colockwise rotation from fast to slow
No function
Color wheel anti-clockwise rotation from slow to fast
CH9
000--004
005--054
055--154
155--204
205--205
206--255
Static Gobo Wheel
Open
10 Static gobo(Each 5 DMX value is a gobo)
10 static gobo shake effect(Each 10 DMX value is a gobo)
Static Gobo wheel colockwise rotation from fast to slow
Stop
Static Gobo wheel anti-clockwise rotation from slow to fast
CH10
Rotation Gobo Wheel
10
11

USER MANUAL
200W LED MOVING HEAD SPOT BEAM WASH LIGHT
000--009
010--079
080--159
160--206
207--208
209--255
Open
7 Rotation gobo(Each 10DMX value is a gobo)
7 Gobo+open shake effect (Each 10 DMX value is a gobo)
Gobo wheel clockwise rotation from fast to slow
Stop
Gobo wheel anti-clockwise rotation from slow to fast
CH11
000--127
128--191
192--255
Rotation gobo rotates
Change position
Clockwise continuous rotation from fast to slow
Anti-Clockwise continuous rotation from slow to fast
CH12
000--127
128--255
Prism
No prism
Prism
CH13
000--127
128--190
191--192
193--255
4 Facet prism rotation
Change position
Clockwise continuous rotation from fast to slow
Stop
Anti-colokwise continuous rotation from slow to fast
CH14
000--127
128--255
Frost
No frost
Frost effect
CH15
000--255
Focus
Focus effect
CH16
000--255
Zoom
Zoom effect
CH17
000--050
Macro effect
No function
051--100
101--150
151--200
201--255
System detection
Auto 1
Auto 2
Sound activated
CH18
000--250
251--255
Reset & Macro
No function
Reset within 5 seconds
ⅨTECHNICAL SPECIFICATION
Light Source
LEDs: 1pc white 200W LED lamp
Color: pure white
Service life: 500000h
Color temperature: 6800K
Optical System
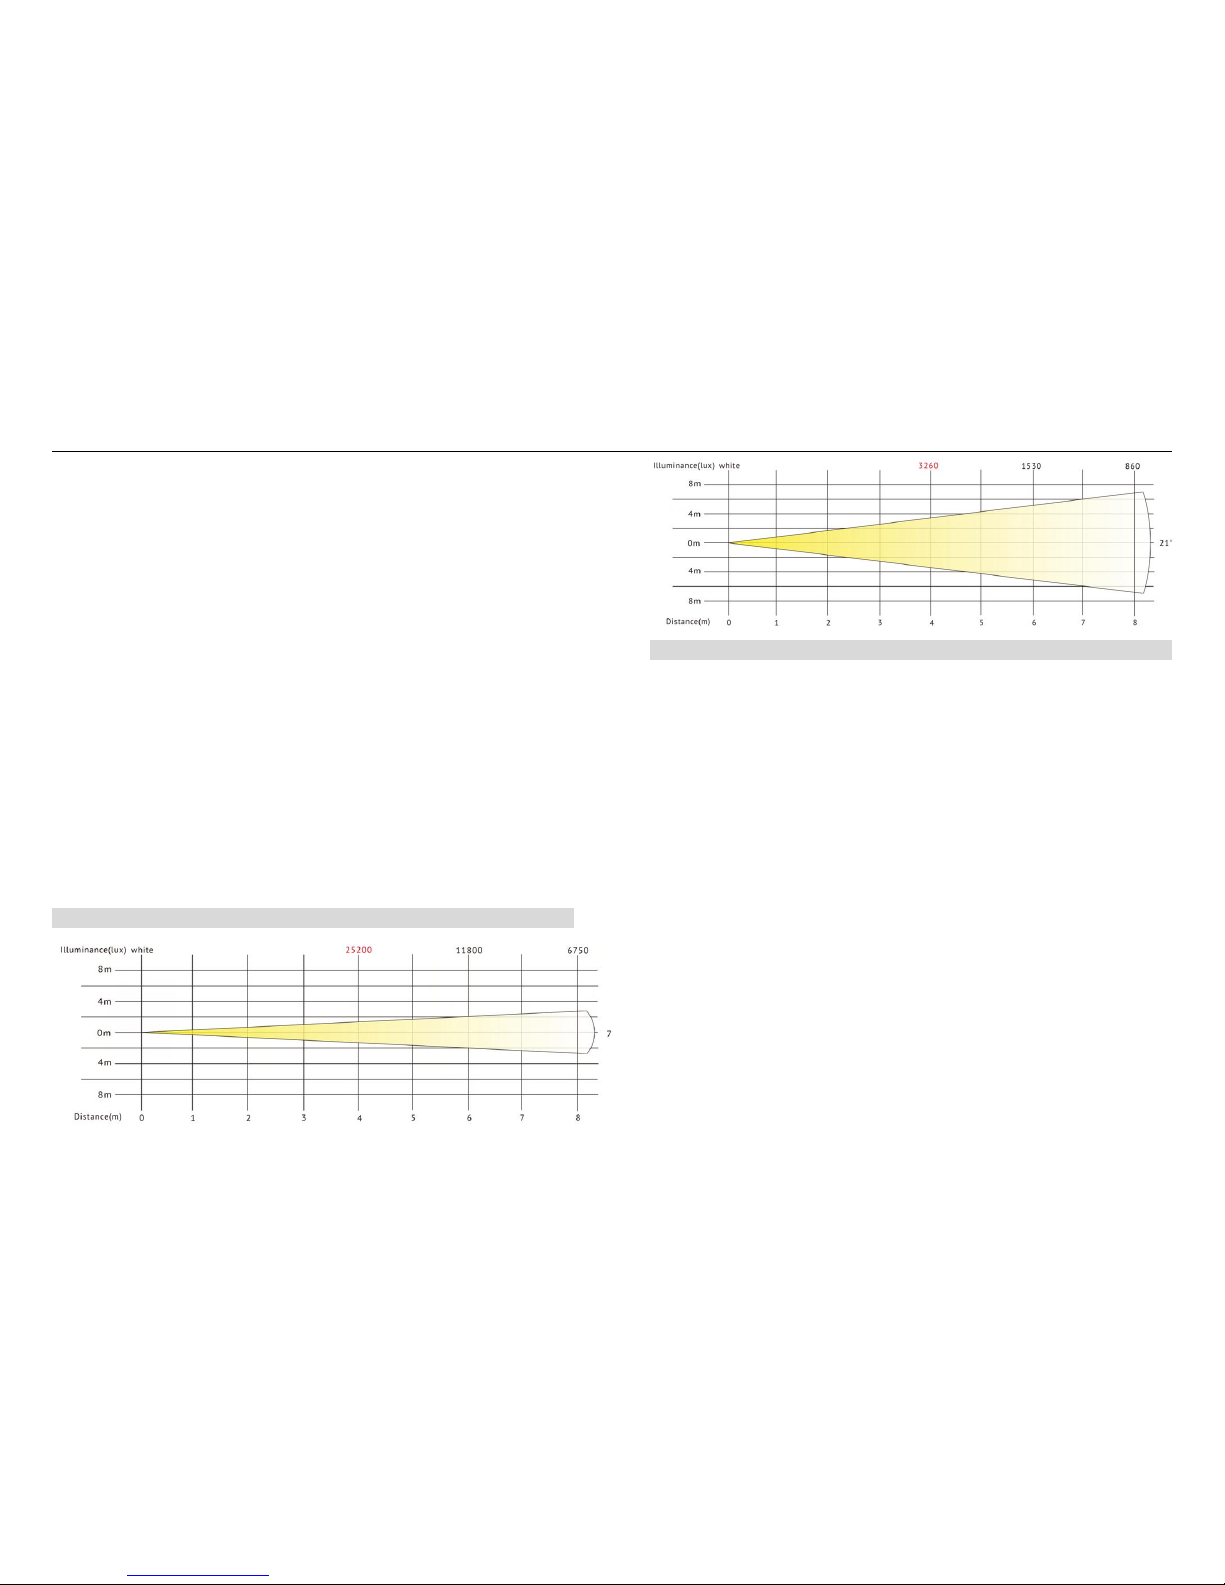
Beam angle: 7-21°
Dimmer: 0-100 linear dimmer
Strobe: 1-25time/s, random pulse strobe
Light Output
Optimal projection distance: 3-50m
Illuminance: 25200lux@4m
Electromechanical Effects
Color wheel: 9 colors + white
Gobo wheel: 9 gobos + white
Prism: 4 face prism
Focus: electric focus
Movement
Pan: 540°, pan fine function
Tilt: 270°, tilt fine function
Control and Programming
13
12
USER MANUAL
200W LED MOVING HEAD SPOT BEAM WASH LIGHT
Control mode: DMX-512; Master/slave mode; Demo mode
DMX channel: 18CH
Control panel: LCD display + 4 buttons
Thermal Specification
Maximum ambient temperature: 45 °C (113 °F)
Maximum surface temperature: 170 °C (338 °F)
Electrical Specification
Power supply: Electronic auto-ranging
Input voltage range: AC90-240V, 50/60Hz
Power consumption: 300W
Mechanical Specification
Light size: 343Dx239Wx537Hmm
Weight: 15.4kg
Material: ABS
Appearance color: black/white
Using Environment
IP rating: IP20
Working temperature: -25-40℃
Cool system: Fan
ⅩPHOTOMETRIC DATA
ⅪTROUBLE SHOOTING
Following are a few common problems that may occur during operation. Here are some
suggestions for easy troubleshooting:
A. The unit does not work, no light and the fan does not work
1. Check the connection of power and main fuse.
2. Measure the mains voltage on the main connector.
3. Check the power on LED.
B. Not responding to DMX controller
1. DMX LED should be on. If not, check DMX connectors, cables to see if link properly.
2. If the DMX LED is on and no response to the channel, check the address settings and
DMX polarity.
3. If you have intermittent DMX signal problems, check the pins on connectors or on PCB
of the unit or the previous one.
4. Try to use another DMX controller.
5. Check if the DMX cables run near or run alongside to high voltage cables that may
cause damage or interference to DMX interface circuit.
C. One of the channels is not working well
1. The stepper motor might be damaged or the cable connected to the PCB is broken.
2. The motor’s drive IC on the PCB might be out of condition.
14
15

USER MANUAL
200W LED MOVING HEAD SPOT BEAM WASH LIGHT
ⅫMAINTENANCE AND CLEANING
The cleaning of internal and external optical lenses and/or mirrors must be carried out
periodically to optimize light output. Cleaning frequency depends on the environment in
which the fixture operates: damp, smoky or particularly dirty surrounding can cause greater
accumulation of dirt on the unit’s optics.
�Clean with soft cloth using normal glass cleaning fluid.
�Always dry the parts carefully.
�Clean the external optics at least every 20 days. Clean the internal optics at least every
30/60 days.
The following points have to be considered during the inspection:
1) All screws for installing the devices or parts of the device have to be tightly connected
and must not be corroded.
2) There must not be any deformations on the housing, color lenses, fixations and
installation spots (ceiling, suspension, trussing).
3) Mechanically moved parts must not show any traces of wearing and must not rotate with
unbalances.
4) The electric power supply cables must not show any damage, material fatigue or
sediments.
Further instructions depending on the installation spot and usage have to be adhered by a
skilled installer and any safety problems have to be removed.
In order to make the lights in good condition and extend the life time, we suggest a regular
cleaning to the lights.
1) Clean the inside and outside lens each week to avoid the weakness of the lights due to
accumulation of dust.
2) Clean the fan each week.
3) A detailed electric check by approved electrical engineer each three month, make sure
that the circuit contacts are in good condition, prevent the poor contact of circuit from
overheating.
We recommend a frequent cleaning of the device. Please use a moist, lint- free cloth. Never
use alcohol or solvents.
There are no serviceable parts inside the device. Please refer to the instructions under
“Installation instructions”.
Should you need any spare parts, please order genuine parts from your local dealer.
Technology, Innovate, Service, Create Max. Value for Clients!
Forelite, working for your lights!
17
16
Table of contents


