FORWODE DB-HMS12 User manual
WARNING: Bikes or rack falling in road can cause serious accidents resulting in bodily injury-do not use rack on any vehicle
on which it can not be properly mounted as described in this instruction sheet.
•Rack should only be used on vehicles with 2" receiver hitches.
•NEVER use on trailers or front of vehicles.
•Bikes must be tied to rack using tie-downs, or additional straps if necessary.
•Check periodically during use that all bolts and pins are tight, and that rack and bicycles are secure.
•Never carry more than 2 bikes (max capacity 70 LB)
FORWODE
- no tandems, mopeds, or recumbent. Car tail lights must remain visible.
•The presence of the cushion in the upper assembly of the functional model vertical tube requires it to be squeezed
deformation, the holes can be aligned.
•Drive conservatively, especially over bumps. Never use off-road.
•
Do not use if any part of the rack is damaged, worn, or missing. Contact for replacement parts.
CAUTION: Use Forwode only in accordance with local motor vehicle and
IMPORTANT:
Because of the presence of the
cushion pad, so it needs to be
made to squeeze deformation,
the holes could be aligned.
CAUTION:
In order to protect the product, increase
durability and reduce noise, a buffer pad
is added here. When the U-shaped crossbar
is folded, it is necessary to squeeze the
buffer pad hard, and then pull the pin.
IMPORTANT:
WHEN RACK IS IN AN UPRIGHT POSITRION.
WIRE RETAINER ON CLIP SHOULD
ALWAYS BE IN A CLOSED POSITION
TO KEEP RACK FROM FALLING OVER
DURING USE.
traffic regulations.
• Install rack and load bicycles only at a safe distance away from moving
traffic.
• Make sure that all of rack and bicycles are kept at a safe distance from road
and hot exhaust.
• Only operate vehicle with rack in an upright, locked position.
• Bicycles should never extend beyond sides of vehicle.
• Remove rack from car, or fold carry arms down when not in use.
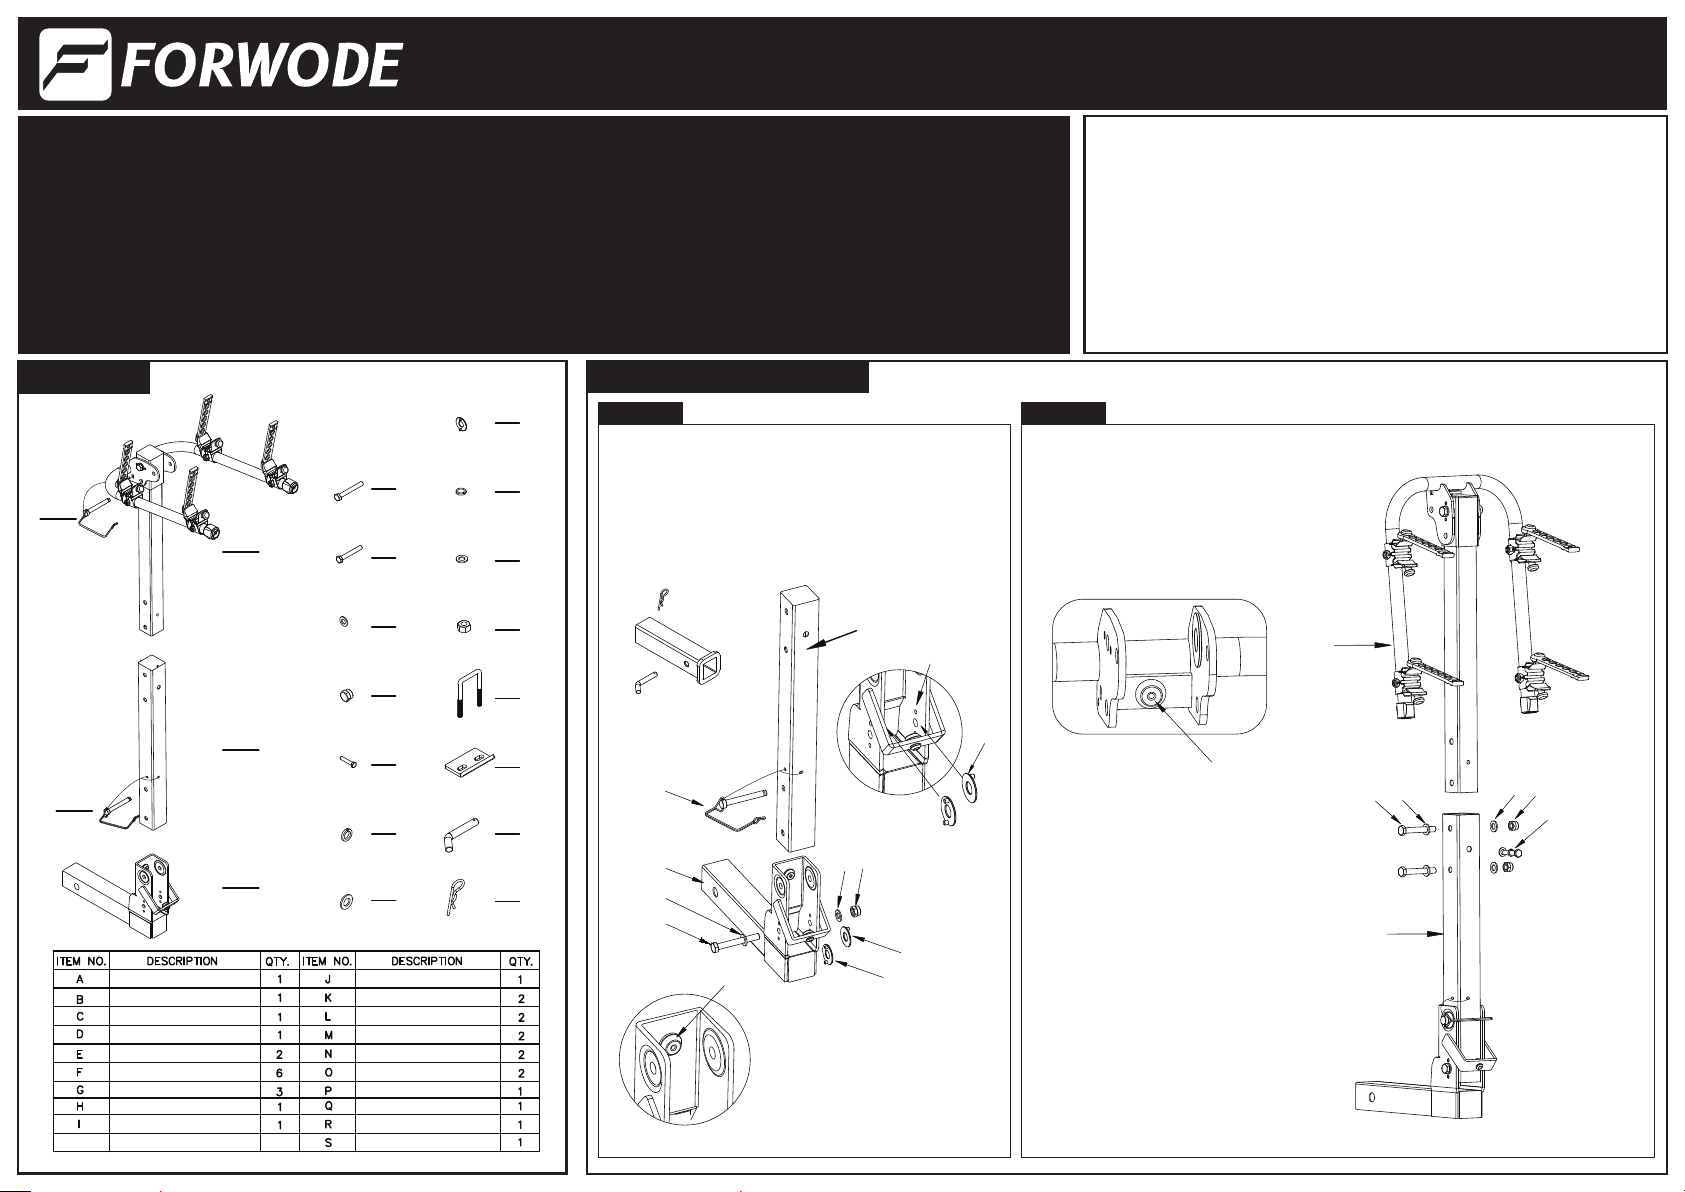
•Put two pieces of Kinto the interior of Cin advance.
(The two cylinders of K are inserted into the two
small holes).
•Insert Binto the inside of C, then connect them
in order with D-F-F-Gfasteners.
•After connecting Band C, align the square tube with
the hole in the base and use L to connect it to fix it.
•Plug Aand Btogether, and connect the two holes on the side with two
sets of standard parts E-F-F-Glocking.
•Connect one hole on the front side with H-I-J
locking.
•TIGHTEN NUT AND BOLT FIRRRRRMLY
USING TRWO WRENCHES.
UPON COMPLETION, BOTH PARTS
SHOULD BE FIRMLY JOINED TOGETHER.
NOTE:
TOOLS REQUIRED:2--5/8" WRENCH & 2--11/16" WRENCH;
OR 2--ADJUSTALE WRENCHES
PARTES:BOX SHOULD CONTAIN THE
FOLLOEING ITEMS:
A. ASSEMBLING RACK:
B.
STEP 1 STEP 2
INSTRUCTIONS
MODEL: DB-HMS12 PAGE 1
A
B
C
L
L
L
B
C
C
D
F
K
K
K
FG
B
A
EFG
F
H、I、J
D
E
F
G
K
H
I
J
M
N
O
P
Q
R
S
Base Assembly
Vertical Tube
Vertical tube upper assembly
External hexagon bolts M10*80
External hexagon bolts M10*65
Flat pad Θ10
Self-locking nuts
External hexagon bolts M8*20
Bouncing Pad Θ8
Flat pad Θ8
Round shims with positioning
Square pins
Heavy Duty Bullet Pads Θ10
Big Flat pad Θ10
Hexagonal nuts M10
U-connector
Fixed plate
3" Pins
R pins

INSTRUCTIONS
PAGE 2
INSTALLING RACK ONTO VEHICLE:
2” HITCH SIZE:
FILLER PLATE AND RETAINING SCREW SHOULD BE INSTALLED/
REMOVED DEPENDING ON THE SIZE OF YOUR RECEIVER HITCH IN
WHITCH THE RACK IS BEING USED.
FOR 2" RECEIVER HITCHES, FILLER PLATE SHOULD BE INSTALLED
ON HITCH INSERT WITH THE INCLUDED RETAINER SCREW.
NO-WOBBLE BOLT:
PROPERLY INSTALLING THE NO-WOBBLE BOLT IS CRITICAL FOR
PROPER PERFORMANCE OF THE RACK IN YOUR RRECEIVER HITCH.
INSTALLING THE RRACK ON YOUR VEHICLE:
•WITH ARMS IN FOLDED POSITION, INSERT RACK INTO RECEIVER
HITCH. LINE UP HOLE IN THE BASE WITH HOLE OF RECEIVER HITCH.
• INSERT NO-WOBBLE BOLT INTO HOLE, MAKING SURE THAT THE
SHOULDER OF THE BOLT COMES AGAINST RECEIVER RACK INSIDE OF
HITCH.
•TIGHTEN FIRMLY USING TWO - 3/4" OR 9/16" WRENCHES (DEPENDING
ON HITCH SIZE).THERE SHOULD NOT BE ANY MOVEMENT OF THE
RACK INSIDE OF THE HITCH WHEN DONE.
C.
MODEL HMS12 SHOULD ONLY BE USED ON 2" RECEIVER HITCHES,
INSTALLED ON AUTOMOBILES. NEVER USE THIS RACK ON A TRAILER.
D. FOLDING UP CARRY ARMS:
•TO FOLD UP CARRY ARMS,
REMOVE THE L CLIP FROM
THE CARRY ARM ASSEMBLY,
AND SWING CARRY ARMS
INTO UPRIGHT POSITION.
•RE-INSTALL THE L CLIP, MAKING
SURE TO PROPERLY CLOSE THE
WIRE RETAINER ON THE L CLIP.
•IMPORTNANT: WIRRRE RETAINER
MUST BRR FULLY CLOSEDTO KEEP
THE CARRY ARMS IN AN UPRIGHT
POSITION DURRING USE . PLEASE
SEE DRAWING IN STEP 2 ON PAGE 1.
A
L
LOADING BICYCLES ON RACK:
E.
1. REMOVE ALL LOSE ITREMS FRROM BICYCLES (PUMPS, BAGS, ETC.), AND CHECK THAT ALL QUICK RELEASE HUBS ARE TIGHT.
2. LOAD FIRST BICYCLE WITH ITS CHAIN AND GEARS FACING AWAY FROM RACK, MAKE SURE TRHART BICYCLES DO NOT COME IN CONTACT
WITH VEHICLE.
3. LOAD SUBSEQUENT BICYCLERS IN ALTERNATING DIRECTIONS.FOR BEST WEIGHT DISTRRIBUTION. LOAD HEAVIEST BICYCLERS FIRST,
WITH LIGHTER BICYCLES ON THE OUTSIDE, ADD PADDING BETWEEN BICYCLE CONTACT POINTS, IF NECESSARY.
4. AFTRER BICYCLES ARRE LOADED, CHECK THAT ENTIRE RACK IS SRCURE AND THAT NO-WOBBLE BOLTS IS TIGHT, AND THAT THE RACK IS
STILL FIRMLY IN PLACE. VISION OUT OF REARR WINDOW MAY BE RESTRICTED-USE SIDE MIRRORS ACCOEDINGLY WHEN BACKING UP.
SPECIAL NOTE ON INSTALLING WOMEN’S STYLE FRAMES:
PLACE ONE CARRY ARM UNDER FRONT TOP TUBE. WIT THE OTHER CARRY ARM, ROTATRE TIE-DOWN CRADLE,AND PLACE CARRY IN SPACE
REAR DOWN-STAY.FORWODE IS ALSO RECOMMEDED FOR THIS APPLICATION.
SECURE INSTALLATION BIKE RACK:
F.
1. INSERT THE ASSEMBLED BIKE FRAME INTO THE
SQUARE OPENING OF THE TRAILER, AND USE RTO
CONNECT THE BIKE FRAME TO THE TRAILER BAR.
2. QAT THE BOTTOM AND PAT THE TOP, FASTEN
WITH M-N-O.
FORWODE LIFETIME WARRANTY:
IF AN FORWODE BIKE RACK IS FOUND TO HAVE A DEFECT
IN WORKMANSHIP OR MATERIAL OVER TRHE LIFETIME OF THE
ORIGINAL PURCHASE,FORWODE WILL REPAIR OR REPLACE THE
RACK FREE OF CHAGER.THE WARRANTY DOED NOT COVER
DAMAGE OR WEAR WHICH OCCURS AS A RESULT OF DAY TO
DAY USE OR GENERAL WEAR AND TEAR.
SERVICE@FORWODEBIKE.COM
M、N、O
Q
P
Forwode BikeForwode Bike FORWODEBIKE
MODEL: DB-HMS12
R
S
Other FORWODE Automobile Accessories manuals


