Forza FIA-WFM2GR User manual
2-
year
warranty
User Manual
Wi-Fi Module and WatchPower App
FIA-WFM2GR

Table of content
1. Introduction 3
2. Unpack and overview 3
2.1 Package content 4
2.2 Product overview 4
3. Wi-Fi module installation 4
4. WatchPower app 4
4.1 Download and install WatchPower 4
4.2 Initial setup 5
4.3 Login 8
4.4 Application menu 8
4.5 Device mode 11
1. Introduction
Thank you for the purchase of Forza’s Wi-Fi module FIA-WFM2GR. This device enables wireless communication between
Forza’s off-grid inverters and our mobile monitoring app WatchPower. This mobile platform (available on iOS and Android)
allows users to look into the information and performance of an inverter at any time, from anywhere. These are its main
functions:
• Delivers device status during normal operation.
• Allows to configure basic device setting after installation.
Note: For in-depth inverter settings, please refer to the Inverter User Manual and do the settings locally.
• Notifies users when a warning or alarm occurs.
• Allows users to query inverter history data.
2. Unpack and Overview
2.1 Package content
Please inspect the unit before you start the installation. Make sure nothing inside the
package is missing or damaged. You should find the following items in the package:
• Wi-Fi module
• User’s manual
• RS-232 cable
2.2 Product overview
LED light Description
OFF
ON
PWR
COM
NET
SRV
Indicates the inverter does not provide power to the Wi-Fi module.
Indicates the Inverter provides power to Wi-Fi module successfully.
Indicates power is on.
Indicates communication between module and Inverter is normal.
Indicates the module is connected to router.
Indicate Wi-Fi module is connected to the internet.
2 3
4 5
3. Wi-Fi module installation
Please follow the steps below to install the Wi-Fi module:
Step 1: The module contains four strong magnetics dots in its back side to be easily placed on the side of the inverter.
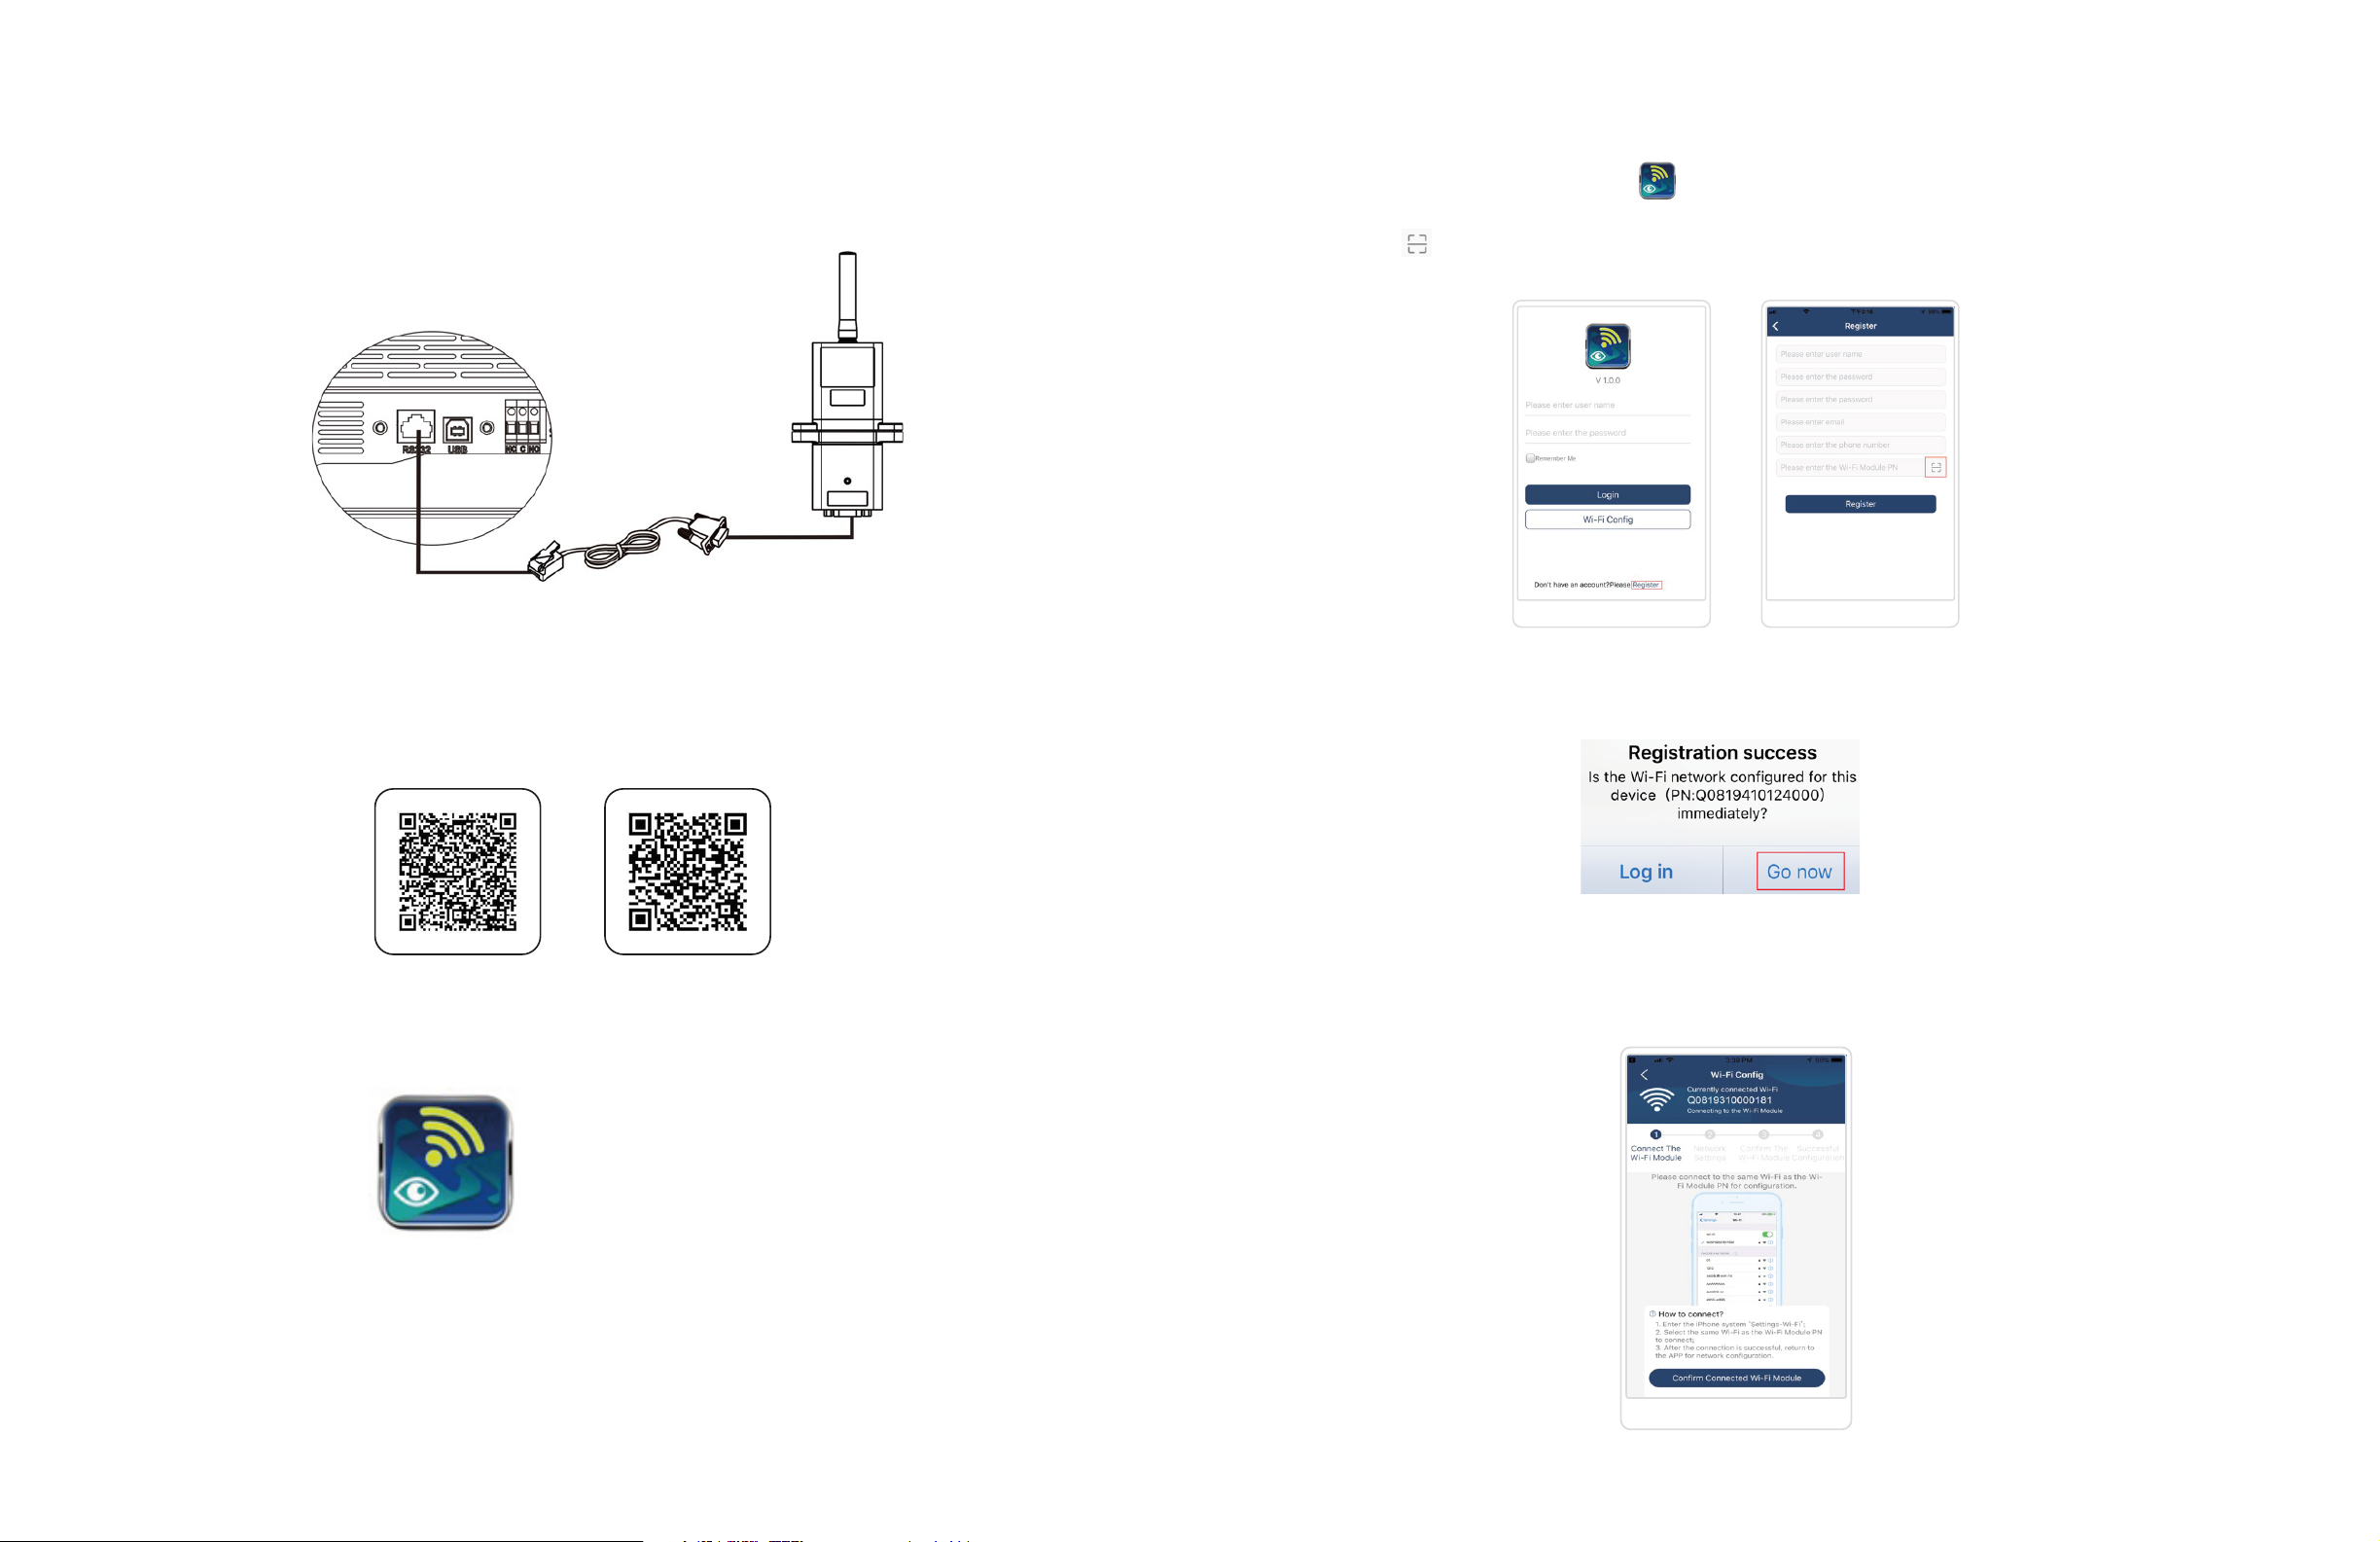
Step 2: Please use the provided RS-232 communication cable to connect the Wi-Fi module to an inverter, as shown below.
Then, a “Registration success” window will pop up. Tap “Go now” to continue setting up your local Wi-Fi network
connection.
4. WatchPower application
4.1 How to download and install the app*
Please scan the following QR code with your smart phone and download the WatchPower app.
4.2 Initial setup
Step 1: Registration at first time
After installation, tap on the WatchPower icon to access the app on your mobile screen.
Then, press “Register” to get to the “User Registration” page. Fill in all required information and scan the Wi-Fi module PN
by tapping on the icon. Otherwise, you can simply enter the Wi-Fi Module PN directly and then, tap on the
“Register” button.
Step 2: Local Wi-Fi module configuration
Next, you’ll find the “Wi-Fi Config” page. You’ll see the steps to follow under “How to connect?” Follow them to connect to
the Wi-Fi network.
Also, you can find the “WatchPower” application in the Apple®Store or “WatchPower Wi-Fi” in Google®Play Store.
*This application works with iOS 9.0 and higher, or
Android 5.0 and higher.
Android iOS
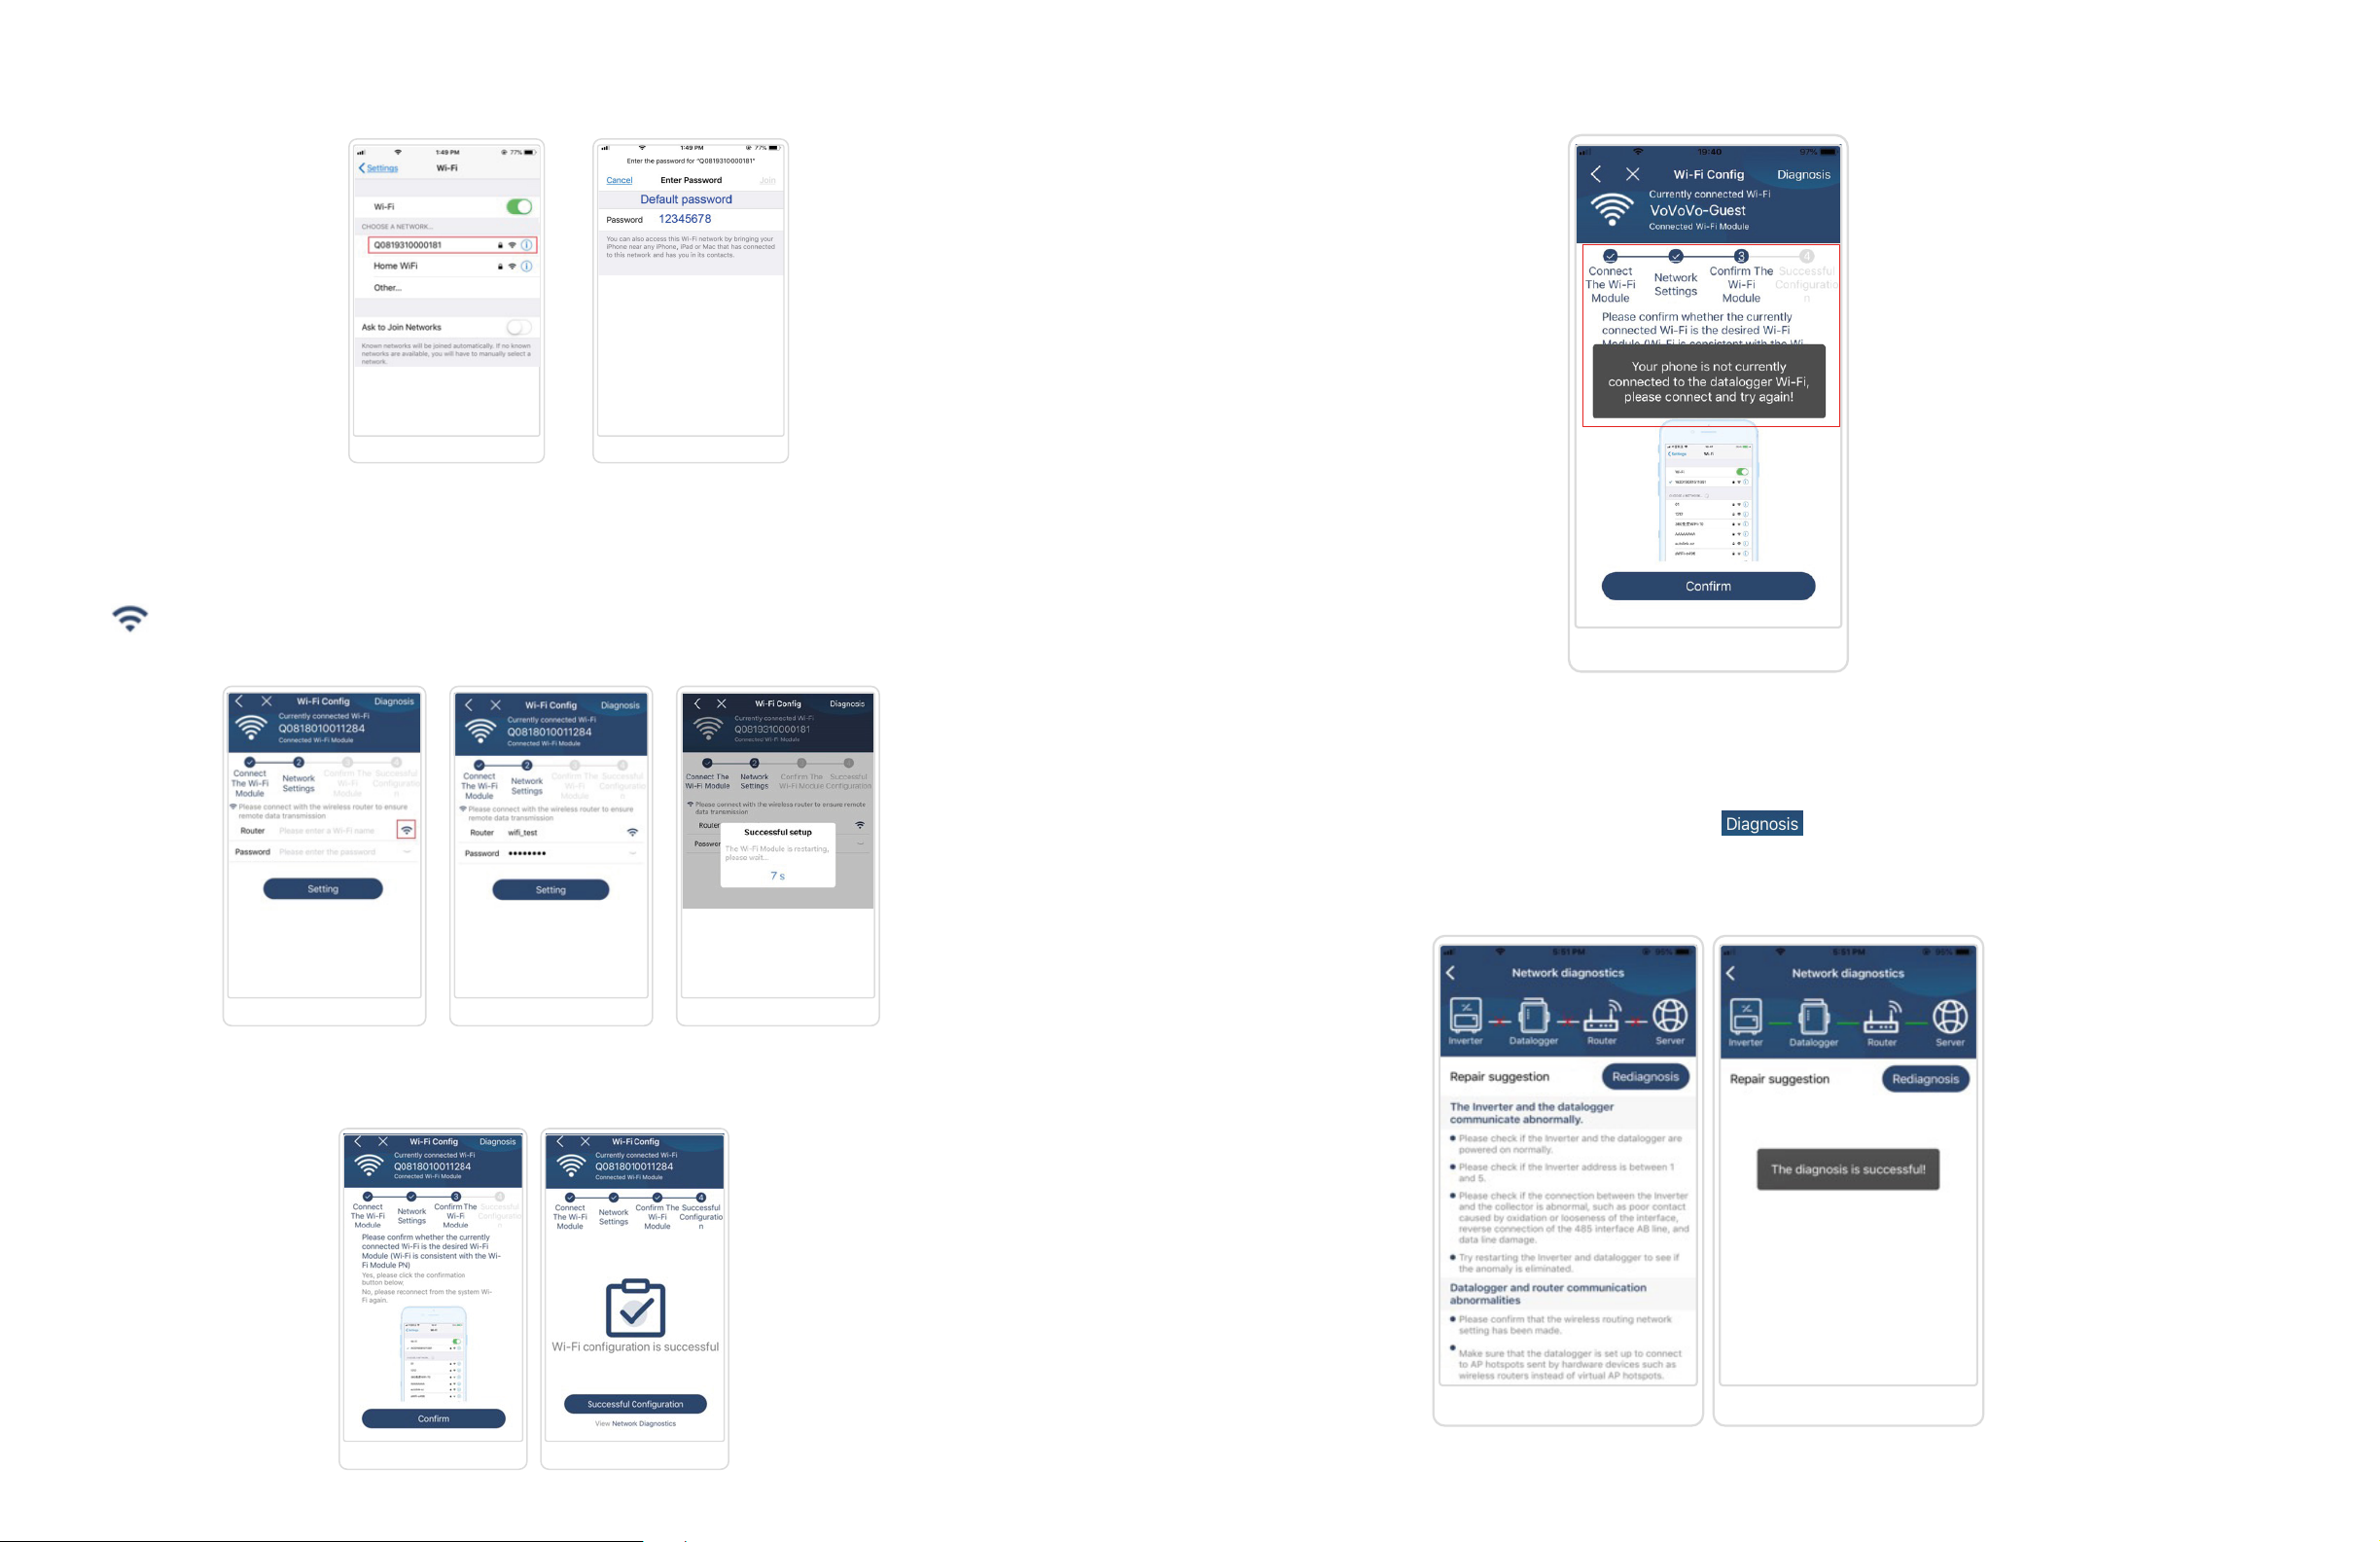
On your phone, go to Settings →Wi-Fi. Then, select the Wi-Fi name, which is the same as your Wi-Fi module PN number.
The default password is “12345678”.
If the module is not monitoring properly, please tap on “ ” on the top right corner of the screen. It will show
repair suggestions. Please follow them to fix the problem. Then, repeat the steps in chapter 4.2 to re-set network setting.
After all setting, tap “Rediagnosis” to re-connect.
Then, return to the WatchPower app and tap on the “Confirm connected Wi-Fi module” button.
Note: Please make sure your phone is connected to the Wi-Fi module throughout all the process.
Step 3: Wi-Fi Network settings
Tap icon to select your local Wi-Fi router name (to access the internet) and enter password.
Step 4: Confirmation
Tap on the “Confirm” button to complete the Wi-Fi configuration.
If the connection fails, please repeat steps 2 and 3.
Diagnose function
6 7
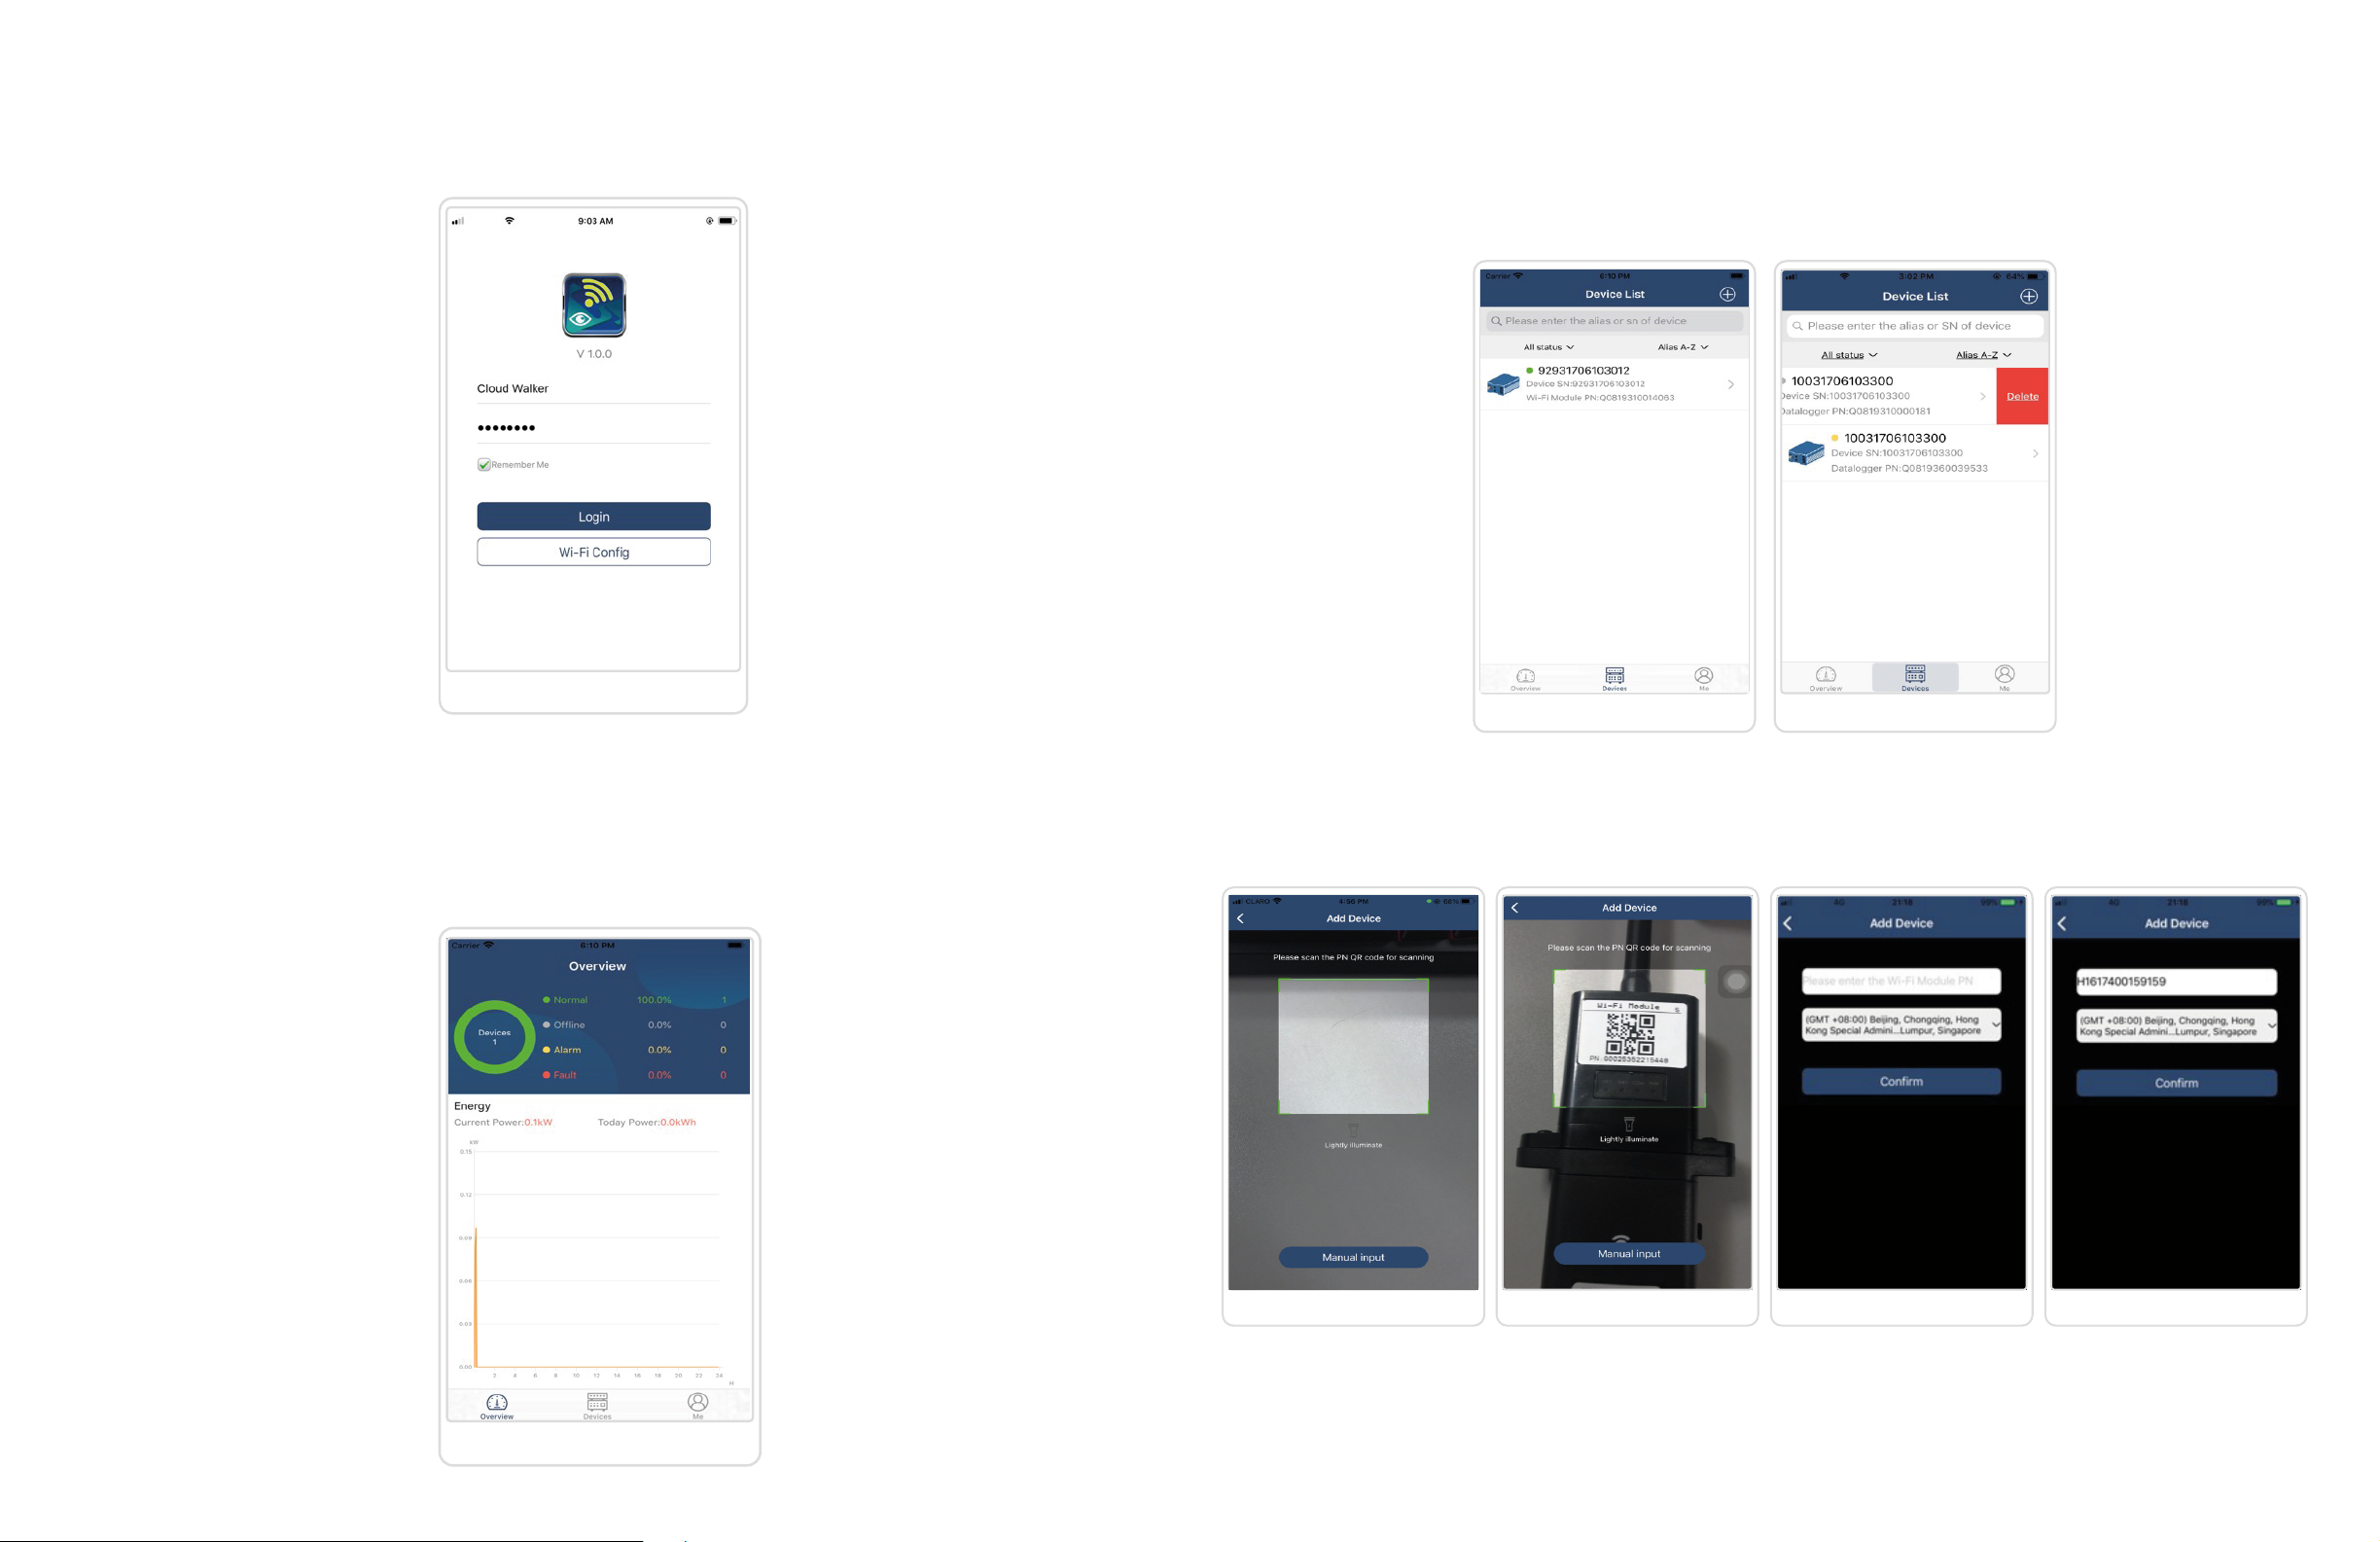
4.3 Login
After finishing the registration and local Wi-Fi configuration, enter the registered name and password to login.
Note: Click on “Remember me” for your login convenience in future sessions.
4.4 App menu
4.4.1 Overview
Once you log in successfully, you’ll find the “Overview” section at the bottom menu. Click on it to see the amount of
monitored devices, overall operation, energy data for Current Power and Today Power, as shown below.
4.4.2 Devices
Click on “Devices” to see a list of monitored inverters. You can review all of them, or add and delete one in the list.
To add a Wi-Fi module, tap the plus (+) icon on the top right corner and enter the module’s part number by scanning its bar
code. Otherwise, you can enter it manually. Then, tap “Confirm” to add it to the device list.
Add device Delete device
8 9
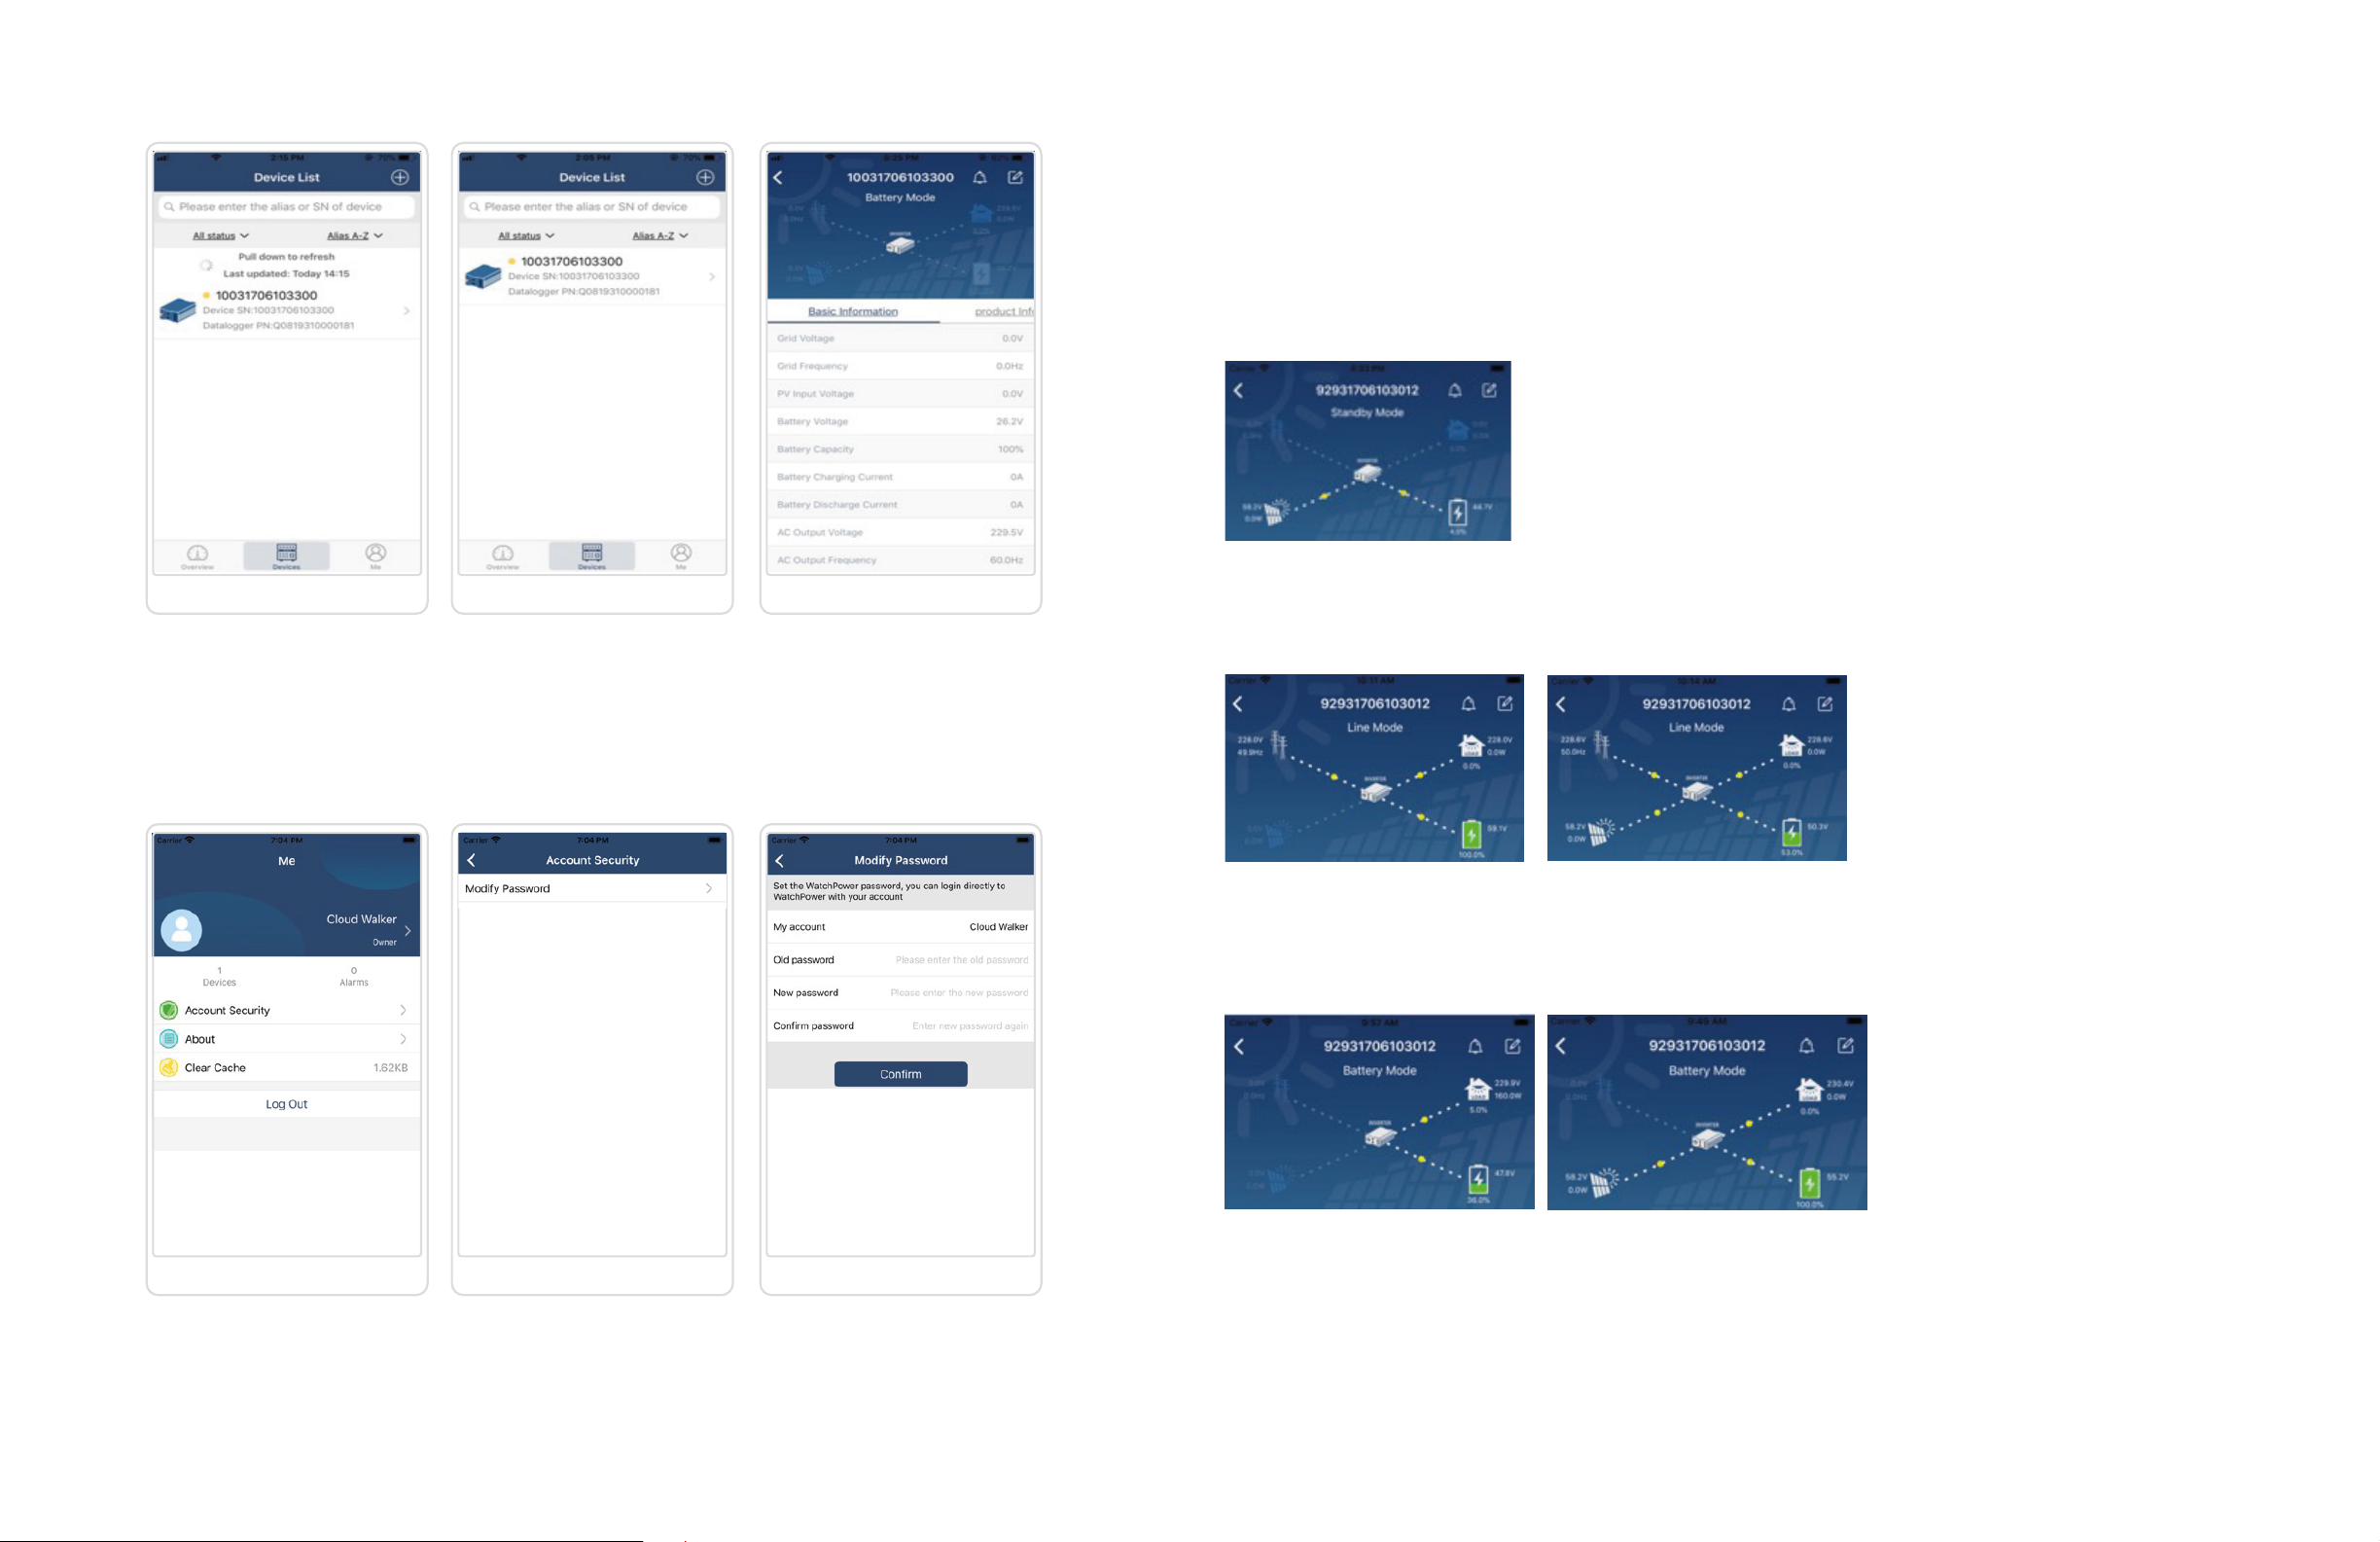
4.4.3 Me
In the Me section, users can modify their information, including user’s photo, account security settings, password, clear
cache, and log-out, as shown in the diagrams below.
4.5 Device Mode
On the top of screen, there is a dynamic power flow chart to show the inverter’s live operation. It contains five icons: PV
power, inverter, load, utility and battery. Based on your inverter model status, there will be Standby mode, Line mode and
Battery mode.
Standby Mode
The inverter will not power the load until the “ON” switch is pressed. Qualified utility or PV source can charge battery in
standby mode.
Line Mode
The inverter will power the load from the utility with or without PV charging. Qualified utility or PV source can charge battery.
Battery Mode
The inverter will power the load from the battery with or without PV charging. Only PV source can charge battery.
To refresh the device information, pull down the page and then tap any device you want to check up for its real-time status
and related information, as well as to change parameter settings. Please refer to the parameter settings list.
Note: Under the “Me” section, please select Account Security to access “Account Safe”. Here, select the “Bind Mailbox” to
add the email you will link to the account you created. This will allow you to reset the password in the future in case you
forget it.
10 11

Device alarm and name modification
In this page, tap the bell icon on the top right corner to enter the device alarm page. Then, you can review alarm history and
detailed information. Tap the pencil icon on the top right corner, and a blank input box will pop out. Then, you can edit the
name for your device and tap “Confirm” to complete the modification.
Device information data
By swiping the screen left, you can check up basic Information, product Information, rated information, history, and Wi-Fi
module Information.
There are three ways to modify setting and they vary according to each parameter.
a) Listing options to change values by tapping one of them.
b) Activate/Shut down functions by clicking “Enable” or “Disable” button.
c) Changing values by clicking arrows or entering the numbers directly in the column.
d) Each function setting is saved by clicking the “Set” button.
Please refer to the parameter setting list below for an overall description. Note that the available parameters may vary
depending on the inverter model. Please always see the original product manual for detailed setting instructions.
• Basic Information displays basic information of the inverter, including AC voltage, AC frequency, PV input voltage,
battery voltage, battery capacity, charging current, output voltage, output frequency, output apparent power, output
active power and load percent. Please slide up to see more basic information.
• Production information displays inverter model type, main CPU version, Bluetooth CPU version and secondary
CPU version.
• Rated Information displays information of nominal AC voltage, nominal AC current, rated battery voltage, nominal
output voltage, nominal output frequency, nominal output current, nominal output apparent power and nominal
output active power.
• History displays the unit data record and current settings.
• Wi-Fi Module Information displays the Wi-Fi module PN, status and firmware version.
Parameter settings
Here you can activate some features and set up parameters for inverters. Please note that the list in the diagram below may
differ from the models of monitored inverters. For instructional purposes, here we briefly highlight some of the listed items:
output setting, battery parameter setting, enable/disable items, restore to the defaults, time zone setting, Wi-Fi module
configuration.
Swipe left
12 13
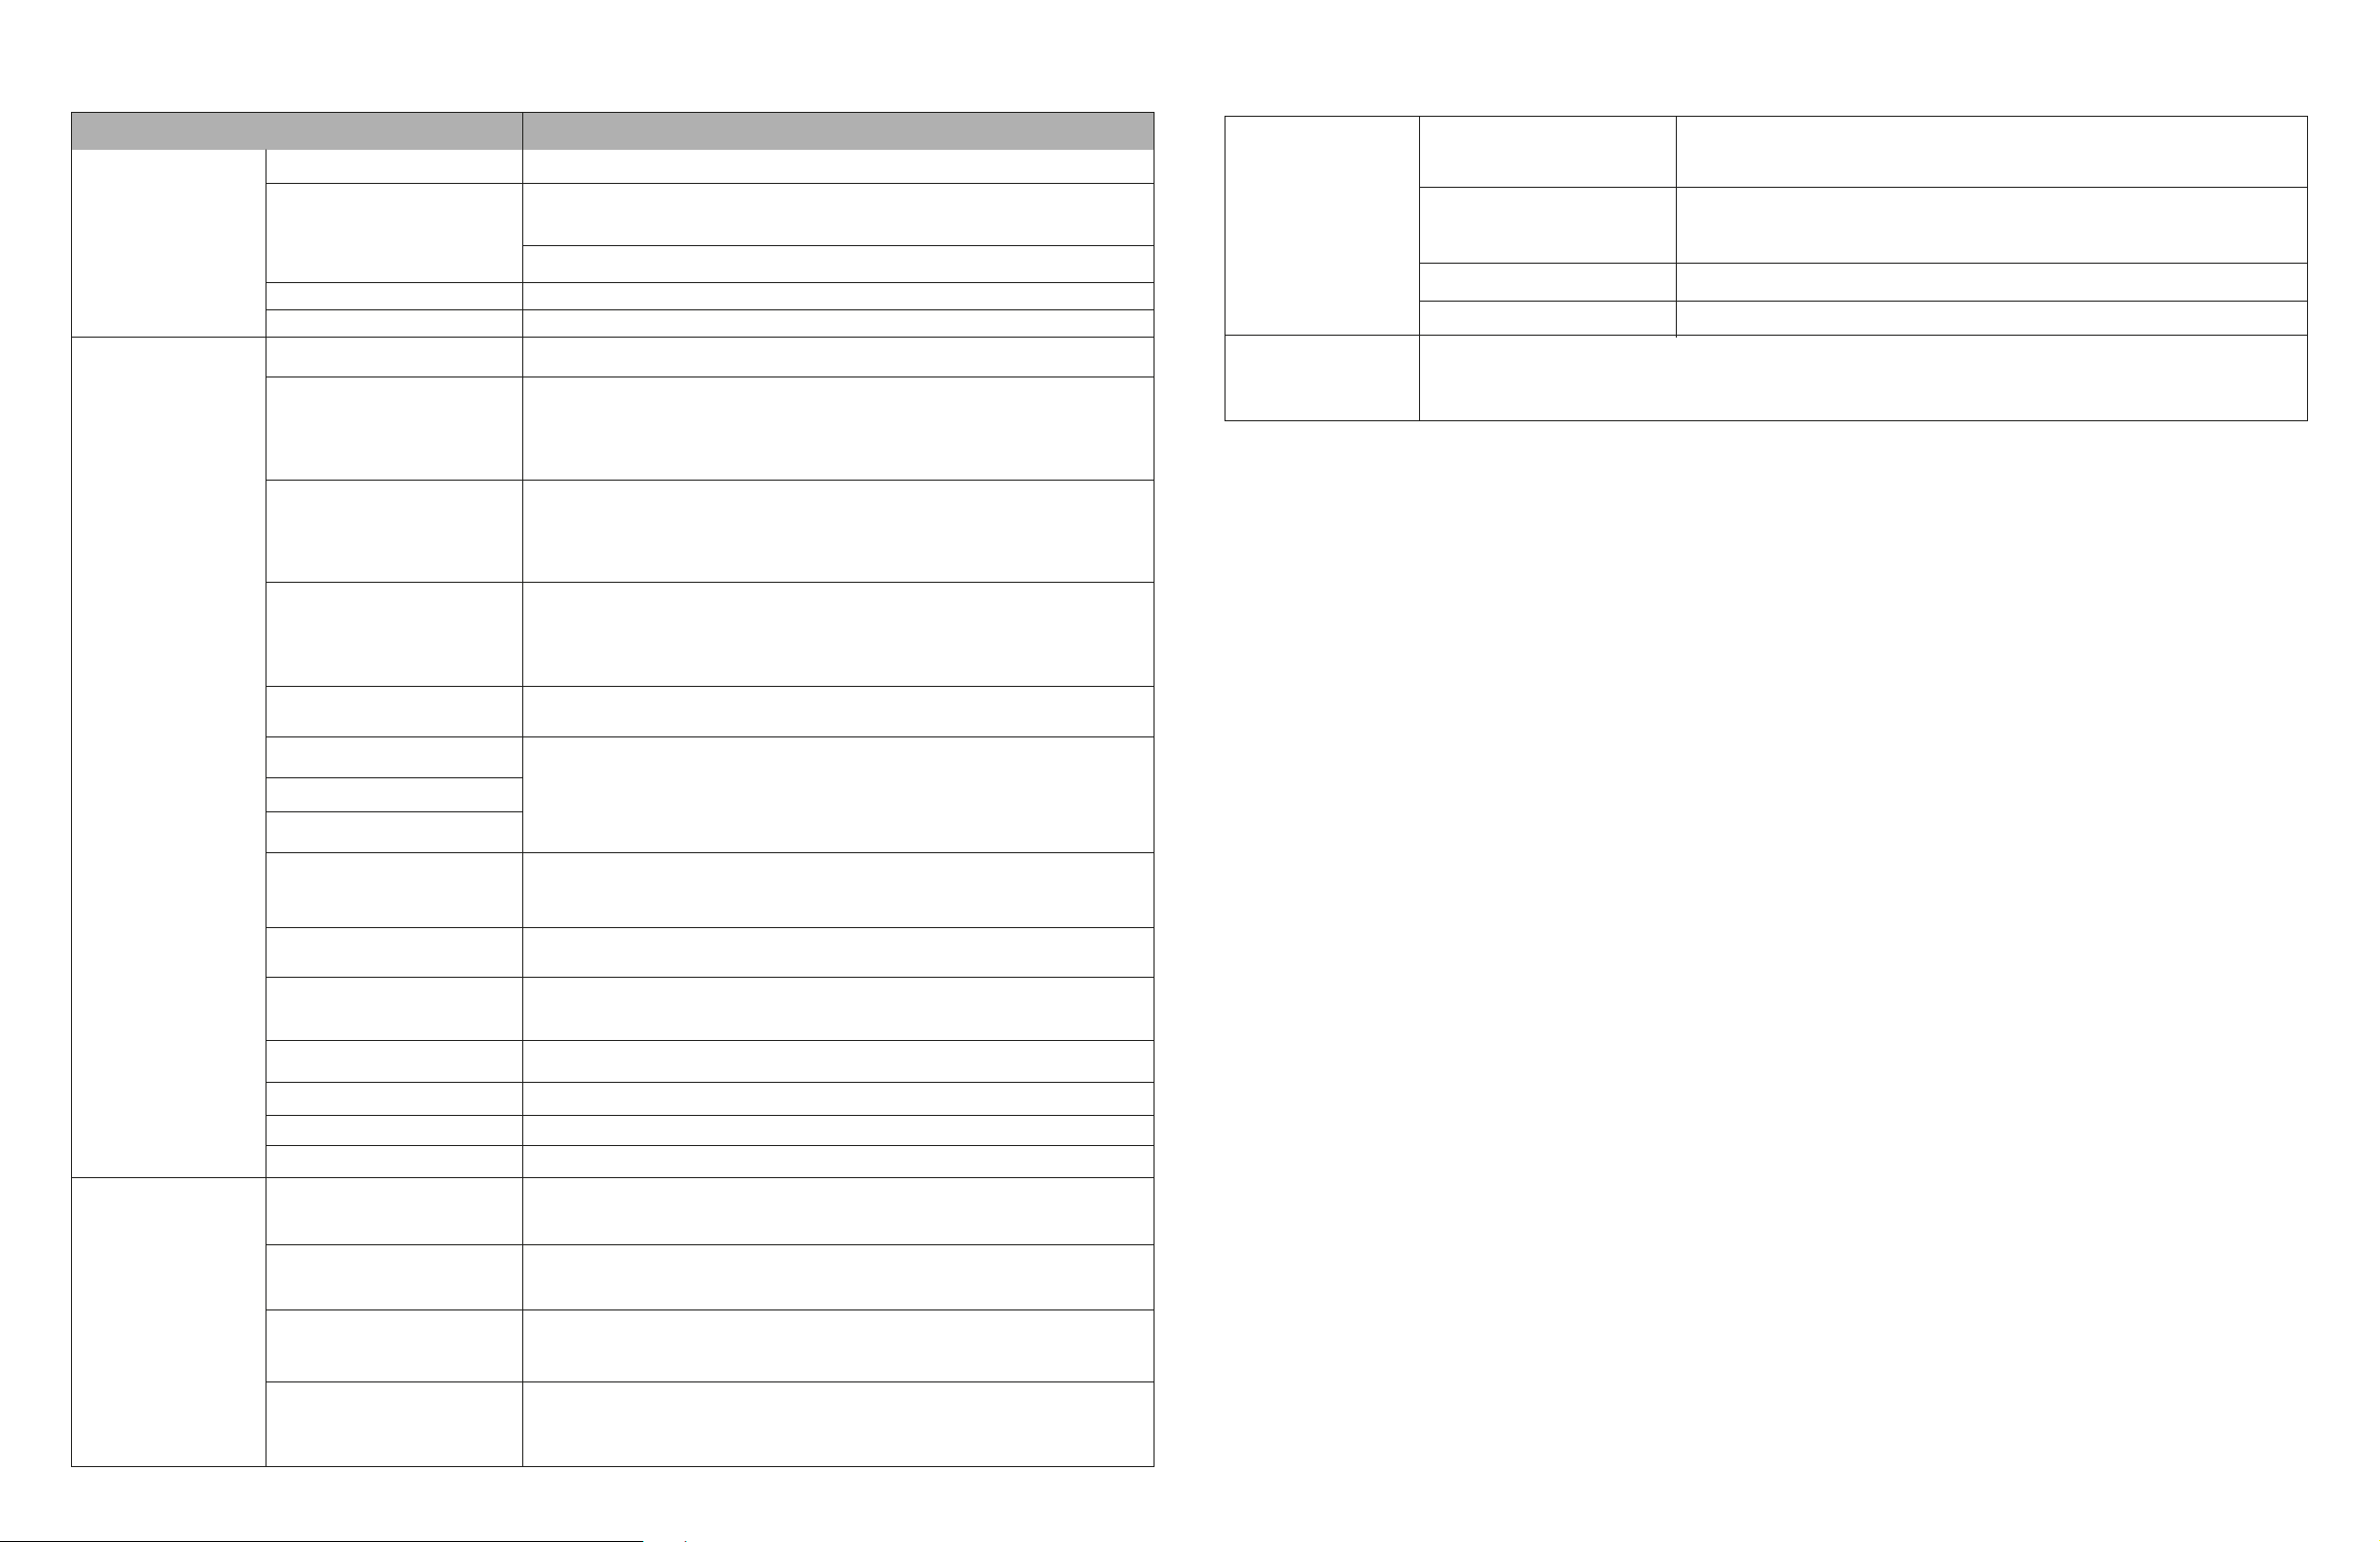
Item Description
To configure load power source priority.
When selecting "UPS", it is allowed to connect a personal computer.
Please check product manual for details.
When selecting "Appliance", it is allowed to connect home appliances.
To set output voltage.
To set output frequency.
Output source priority
AC input range
Output voltage
Battery type:
Battery cut-off voltage
Back to grid voltage
Back to discharge voltage
Charger source priority
Max. charging current
Max. AC charging current
Float charging voltage
Bulk charging voltage
Battery equalization
Real-time Activate
Battery Equalization
Equalized Time Out
Equalized Time
Equalization Period
Equalization Voltage
AC output range
Output settings
Battery
parameter
settings
Enable/Disable
Functions
Restore
to default
Parameter settings list
To set connected battery type.
To set the battery, stop discharging voltage.
Please see product manual for the recommended voltage range based
on connected battery type.
When “SBU” or “SOL” is set as output source priority and battery
voltage is lower than this voltage, unit will transfer to line mode and
the grid will provide power to load.
When “SBU” or “SOL” is set as output source priority and battery
voltage is higher than this setting voltage, battery will be allowed to
discharge.
To configure charger source priority.
It’s to set up battery charging parameters. The selectable values in
different inverter model may vary.
Please see product manual for the details.
It’s to set up battery charging parameters. The selectable values in
different inverter model may vary. Please see product manual for the details.
Enable or disable battery equalization function.
Real-time action action to activate battery equalization.
To set up the duration time for battery equalization.
To set up the extended time to continue battery equalization.
To set up the frequency for battery equalization.
To set up the battery equalization voltage.
LCD Auto-return to
Main screen
Fault Code Record
Backlight
Bypass Function
Beeps while primary
source is interrupted
Over Temperature Auto
Restart
Overload Auto Restart
Buzzer
If enabled, LCD screen will return to its main screen automatically
after one minute.
If enabled, fault code will be recorded in the inverter when any fault
happens.
If disabled, LCD backlight will be off when panel button is not opera-
ted for 1 minute.
If enabled, unit will transfer to line mode when overload happened in
battery mode.
If enabled, buzzer will alarm when primary source is abnormal.
If disabled, the unit won't be restarted after over-temperature fault
is solved.
If disabled, the unit won’t be restarted after overload occurs.
If disabled, buzzer won’t be on when alarm/fault occurs.
This function is to restore all settings back to default settings.
14 15

16 17
Tabla de contenido
1. Introducción 17
2. Desembalaje y descripción general 17
2.1 Contenido del empaque 17
2.2 Descripción del producto 17
3. Instalación del módulo Wi-Fi 18
4. Aplicación WatchPower 18
4.1 Descargar e instalar WatchPower 18
4.2 Configuración inicial 19
4.3 Iniciar sesión 22
4.4 Menú de la aplicación 22
4.5 Lista de dispositivos 25
1. Introducción
Gracias por adquirir el módulo Wi-Fi de Forza FIA-WFM2GR. Este dispositivo permite la comunicación inalámbrica entre los
inversores fuera de la red de Forza y nuestra aplicación de monitoreo móvil WatchPower. Esta plataforma móvil (disponible
en iOS y Android) permite a los usuarios consultar la información y el rendimiento de un inversor en cualquier momento y
desde cualquier lugar. Estas son sus principales funciones:
• Proporciona el estado del dispositivo durante el funcionamiento normal.
• Permite configurar los ajustes básicos del dispositivo después de la instalación.
Nota: Para obtener información detallada sobre la configuración del inversor, consulte el Manual del usuario del inversor
y realice la configuración localmente.
• Notifica a los usuarios cuando ocurre una advertencia o alarma.
• Permite a los usuarios consultar los datos del historial del inversor.
2. Desembalaje y descripción general
2.1 Contenido del empaque
Inspeccione la unidad antes de comenzar la instalación. Asegúrese de que no falte nada dentro del
empaque o de que ningún elemento esté dañado. Debe encontrar los siguientes elementos en el empaque:
• Módulo Wi-Fi
• Manual de uso
• Cable RS-232
2.2 Descripción del producto
Luz LED Descripción
OFF
ON
PWR
COM
NET
SRV
Indica que el inversor no proporciona energía al módulo Wi-Fi.
Indica que el inversor proporciona energía al módulo Wi-Fi con éxito.
Indica que la alimentación está encendida.
Indica que la comunicación entre el módulo y el inversor es normal.
Indica que el módulo está conectado al enrutador.
Indica que el módulo Wi-Fi está conectado a Internet.
Inversor

18 19
3. Instalación del módulo Wi-Fi
Siga los pasos a continuación para instalar el módulo Wi-Fi:
Paso 1: El módulo contiene cuatro puntos magnéticos fuertes en su parte posterior para colocarse fácilmente en el
costado del inversor.
Paso 2: Utilice el cable de comunicación RS-232 incluido en el empaque para conectar el módulo Wi-Fi a un inversor,
como se muestra a continuación.
4. Aplicación WatchPower
4.1 Cómo descargar e instalar la aplicación*
Escanee el siguiente código QR con su teléfono inteligente y descargue la aplicación WatchPower.
También puede encontrar la aplicación “WatchPower” en Apple® Store o “WatchPower Wi-Fi” en Google®Play Store.
* Esta aplicación funciona con iOS 9.0 o superior, o
Android 5.0 o superior.
Android iOS
Luego, aparecerá una ventana de "Registro exitoso". Toque "Ir ahora" para continuar configurando su conexión de red
Wi-Fi local.
4.2 Configuración inicial
Paso 1: Registro por primera vez
Después de la instalación, presione el ícono de WatchPower para acceder a la aplicación en su teléfono móvil.
Luego, presione “Registrarse” para acceder a la página “Registro de usuario”. Llene toda la información requerida y
escanee el PN del módulo Wi-Fi presionando el ícono . De lo contrario, simplemente puede ingresar el PN del módulo
Wi-Fi directamente y luego, toque el botón “Registrarse”.
Paso 2: Configuración del módulo Wi-Fi local
A continuación, encontrará la página "Configuración de Wi-Fi". Verá los próximos pasos en "Cómo conectarse". Sígalos
para conectarse a la red Wi-Fi.
Table of contents
Languages:
Other Forza Control Unit manuals

Popular Control Unit manuals by other brands

Festo
Festo Compact Performance CP-FB6-E Brief description

Elo TouchSystems
Elo TouchSystems DMS-SA19P-EXTME Quick installation guide

JS Automation
JS Automation MPC3034A user manual

JAUDT
JAUDT SW GII 6406 Series Translation of the original operating instructions

Spektrum
Spektrum Air Module System manual

BOC Edwards
BOC Edwards Q Series instruction manual

KHADAS
KHADAS BT Magic quick start

Etherma
Etherma eNEXHO-IL Assembly and operating instructions

PMFoundations
PMFoundations Attenuverter Assembly guide

GEA
GEA VARIVENT Operating instruction

Walther Systemtechnik
Walther Systemtechnik VMS-05 Assembly instructions

Altronix
Altronix LINQ8PD Installation and programming manual


