Foscam FI8905E User manual

U
Us
se
er
r
M
Ma
an
nu
ua
al
l
Model: FI8905E
Ourdoor POE Network Camera

1
w
w
w
ww
ww
w.
.f
fo
os
sc
ca
am
m.
.c
co
om
m
S
Sh
he
en
nz
zh
he
en
n
F
Fo
os
sc
ca
am
m
I
In
nt
te
el
ll
li
ig
ge
en
nt
t
T
Te
ec
ch
hn
no
ol
lo
og
gy
y
C
Co
o.
.,
,
L
Li
im
mi
it
te
ed
d
T
Te
el
l:
:
8
86
6
7
75
55
5
2
26
67
74
4
5
56
66
68
8
F
Fa
ax
x:
:
8
86
6
7
75
55
5
2
26
67
74
4
5
51
16
68
8
1
Table of Contents
1 Overviews..........................................................................................................................................................2
1.1 Key Features..............................................................................................................................................3
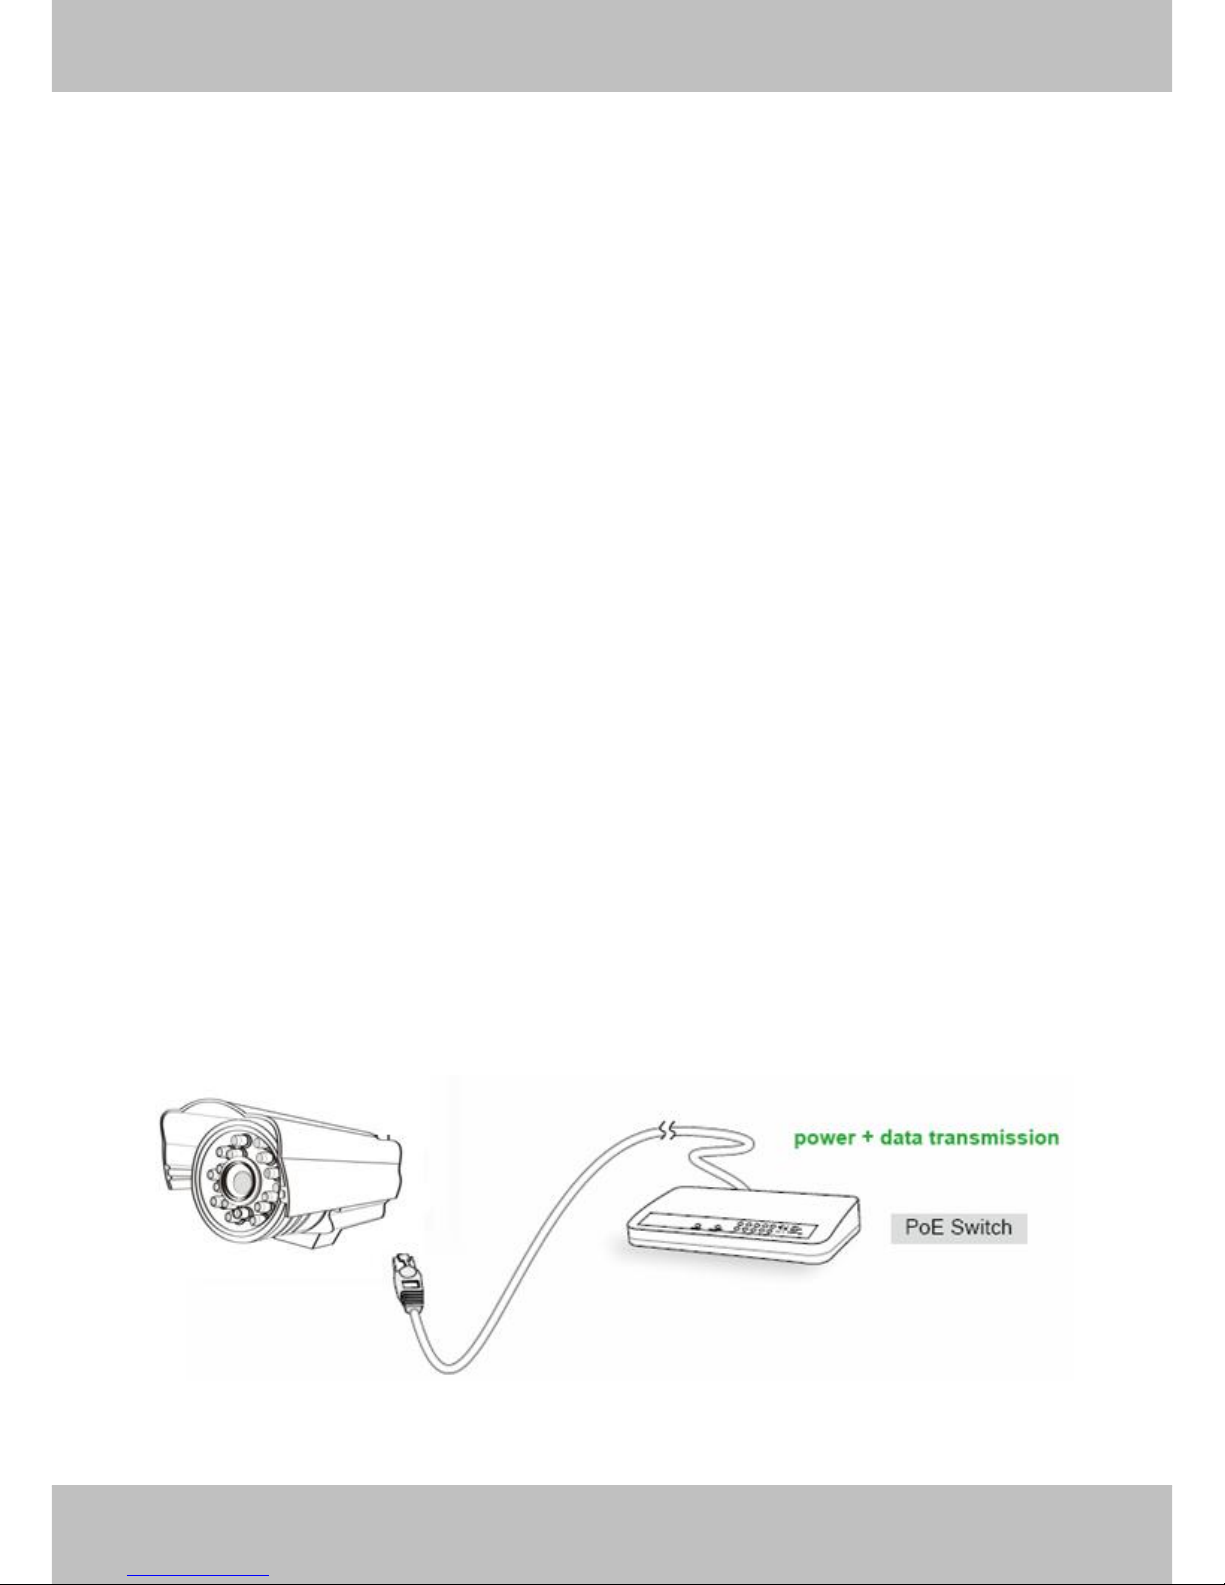
1.2 POE (Power over Ethernet)........................................................................................................................ 3
1.3 Read Before Use........................................................................................................................................4
1.4 Packing Contents .......................................................................................................................................4
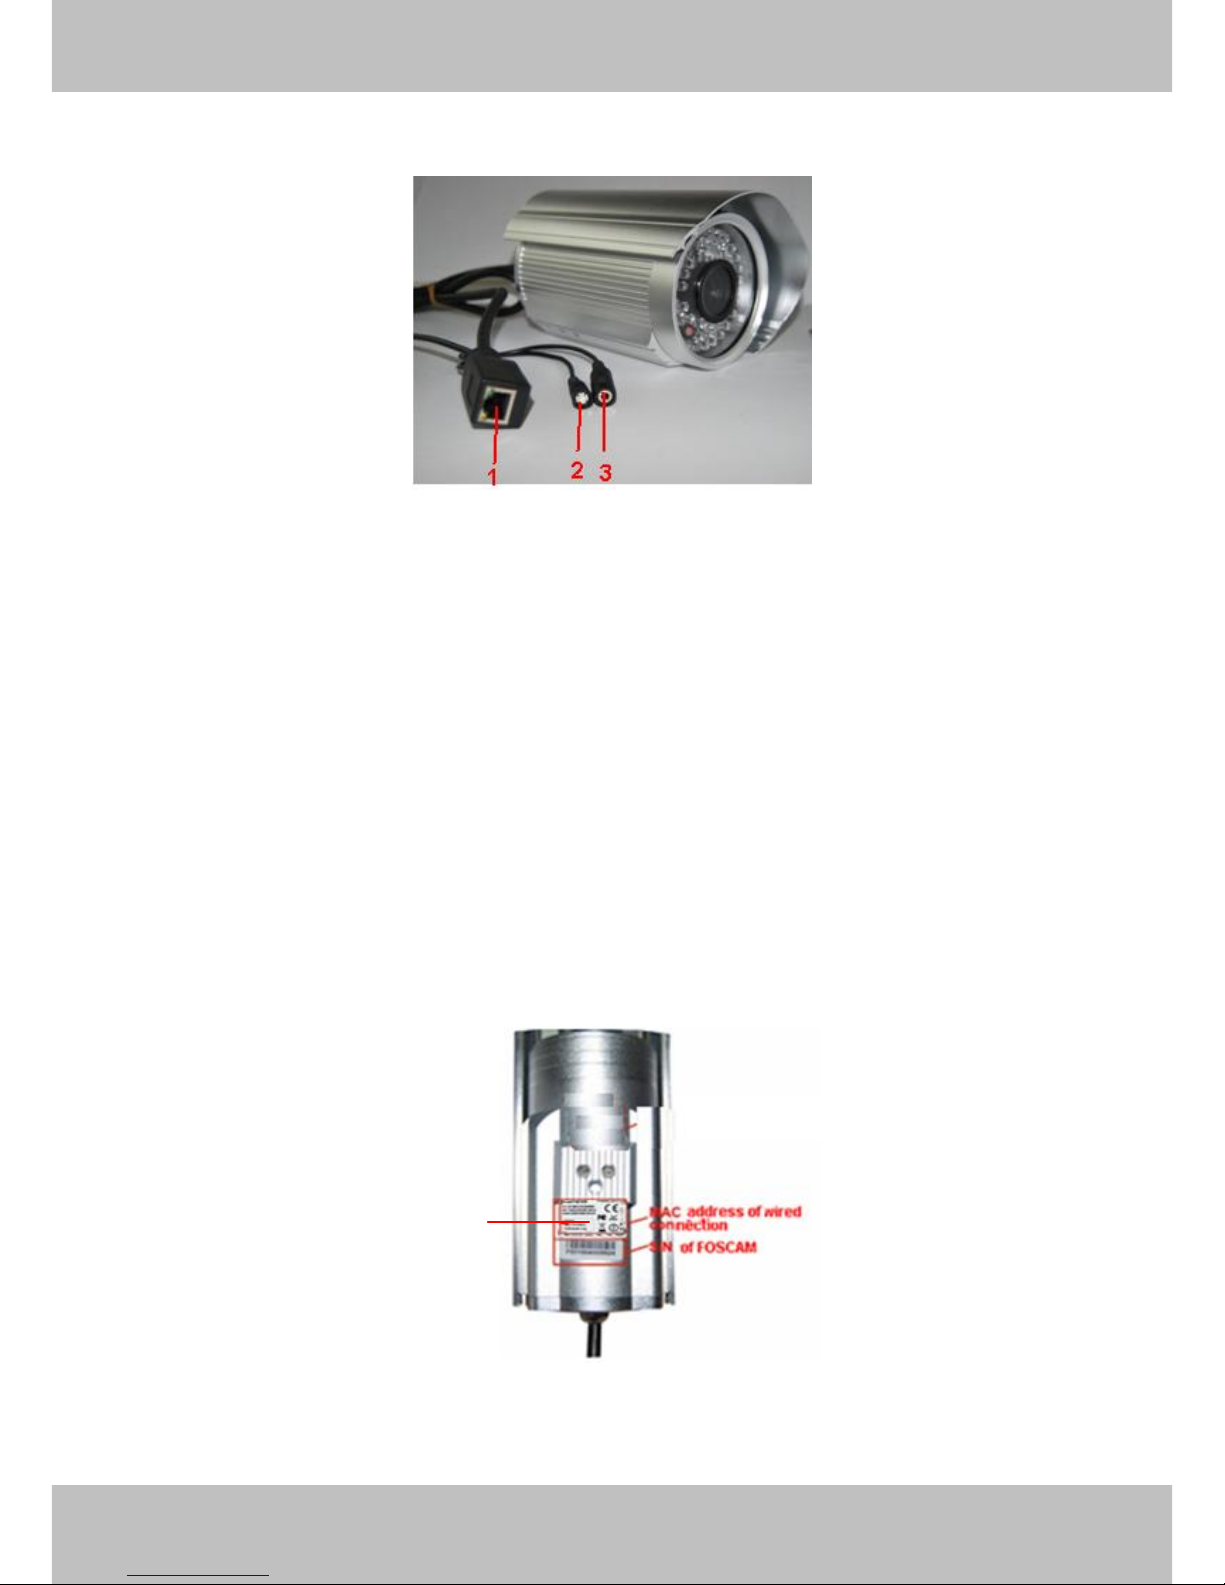
1.5 Physical Description...................................................................................................................................4
2 Surveillance Software GUI................................................................................................................................6
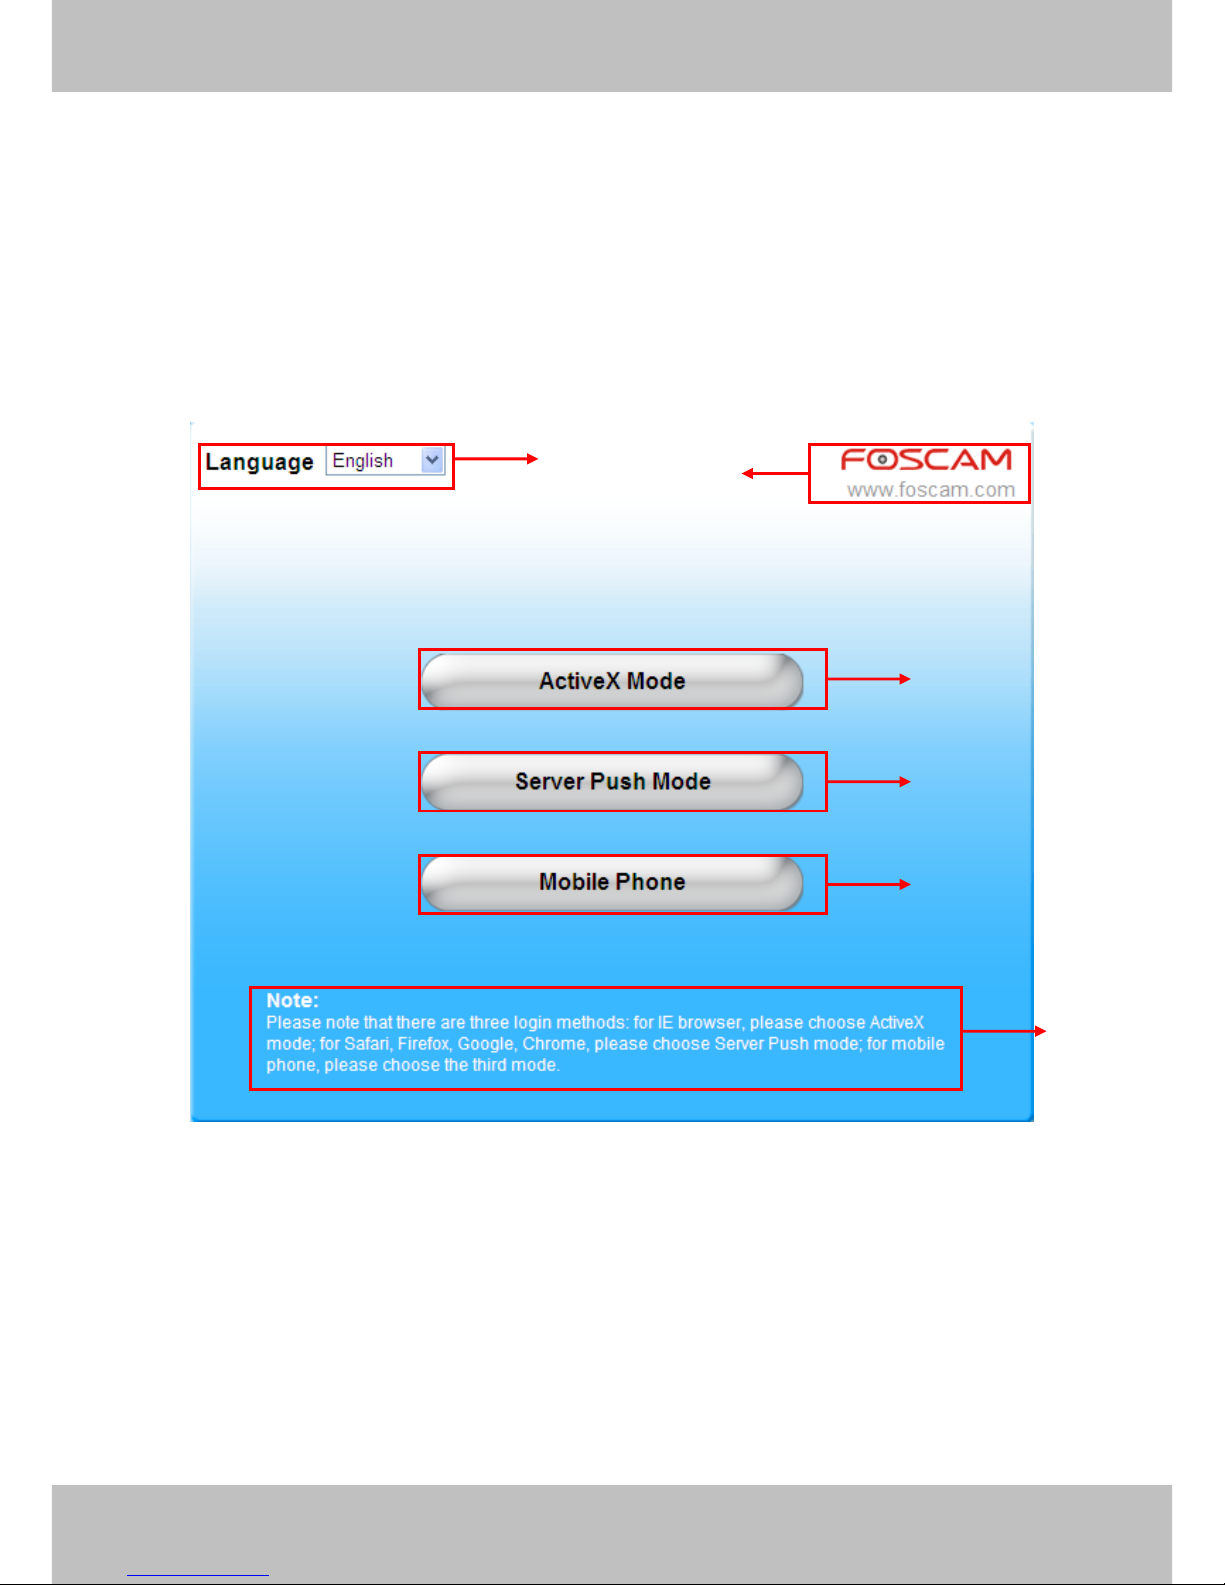
2.1 Login Window.............................................................................................................................................6
2.2 Surveillance Window..................................................................................................................................8
3 Advanced Camera Settings............................................................................................................................ 13
3.1 Device Status............................................................................................................................................13
3.2 Alias Settings............................................................................................................................................15
3.3 Date & Time Settings................................................................................................................................15
3.4User Settings.............................................................................................................................................16
3.5 Multi-Device Settings................................................................................................................................ 17
3.6 Basic Network Settings ............................................................................................................................23
3.7 Wireless Settings......................................................................................................................................26
3.8 ADSL.........................................................................................................................................................26
3.9 UPnP Settings ..........................................................................................................................................27
3.10 DDNS Service Settings..........................................................................................................................28
3.11 Mail Service Settings.............................................................................................................................. 33
3.12 MSN Setting ...........................................................................................................................................35
3.13 FTP Service Settings..............................................................................................................................37
3.14 Alarm Service Settings ...........................................................................................................................39
3.15 Upgrade Device Firmware......................................................................................................................45
3.16 Backup & Restore Settings ....................................................................................................................47
3.17 Restore Factory Settings........................................................................................................................47
3.18 Reboot Device........................................................................................................................................48
3.19 Log..........................................................................................................................................................48
3.20 Back........................................................................................................................................................48

2
w
w
w
ww
ww
w.
.f
fo
os
sc
ca
am
m.
.c
co
om
m
S
Sh
he
en
nz
zh
he
en
n
F
Fo
os
sc
ca
am
m
I
In
nt
te
el
ll
li
ig
ge
en
nt
t
T
Te
ec
ch
hn
no
ol
lo
og
gy
y
C
Co
o.
.,
,
L
Li
im
mi
it
te
ed
d
T
Te
el
l:
:
8
86
6
7
75
55
5
2
26
67
74
4
5
56
66
68
8
F
Fa
ax
x:
:
8
86
6
7
75
55
5
2
26
67
74
4
5
51
16
68
8
2
4 APPENDIX......................................................................................................................................................49
4.1 FrequentlyAsked Questions ....................................................................................................................49
4.2 Default Parameters................................................................................................................................... 52
4.3 Specifications............................................................................................................................................ 53
5 OBTAINING TECHNICAL SUPPORT............................................................................................................54
1
1
O
Ov
ve
er
rv
vi
ie
ew
ws
s
IPCAM is an integrated POE Network Camera solution. It combines a high quality digital video
Camera with network connectivity and a powerful web server to bring clear to your desktop from
anywhere on your local network or over the Internet.
The basic function of IPCAM is transmitting remote video on the IP network. The high quality
video image can be transmitted with 30fps speed on the LAN/WAN by using MJPEG hardware
compression technology.
The IPCAM is based on the TCP/IP standard. There is a WEB server inside which could support
Internet Explore. Therefore the management and maintenance of your device is simplified by
using the network to achieve the remote configuration, start-up and to upgrade the firmware.
You can use this IPCAM to monitor special places such as your home and your office. Also
controlling the IPCAM and managing image are simple by clicking the website through the
network.

3
w
w
w
ww
ww
w.
.f
fo
os
sc
ca
am
m.
.c
co
om
m
S
Sh
he
en
nz
zh
he
en
n
F
Fo
os
sc
ca
am
m
I
In
nt
te
el
ll
li
ig
ge
en
nt
t
T
Te
ec
ch
hn
no
ol
lo
og
gy
y
C
Co
o.
.,
,
L
Li
im
mi
it
te
ed
d
T
Te
el
l:
:
8
86
6
7
75
55
5
2
26
67
74
4
5
56
66
68
8
F
Fa
ax
x:
:
8
86
6
7
75
55
5
2
26
67
74
4
5
51
16
68
8
3
1
1.
.1
1
K
Ke
ey
y
F
Fe
ea
at
tu
ur
re
es
s
●Powerful high-speed video protocol processor
●High Definition Color CMOS Sensor
●300K Pixels
●IR night vision ( Range:30m;)
●Optimized MJPEG video compression for transmission
●Multi-level users’ management and passwords definition
●Embedded Web Server for users to visit by IE
●Supports Dynamic IP (DDNS) and UPnP LAN and Internet (ADSL,Cable Modem)
●Motion detection activates alarm
● Supports IR_CUT and the filter change automatically
● POE compliant with POE standards IEEE 802.3af
● Embedded FOSCAM DDNS(dynamic domain name) Service
●Supports image snapshot
●Support multiple network protocols: HTTP/TCP/IP/UDP/STMP/DDNS/SNTP/DHCP/FTP
● Supports Daylight Saving Time
● Supports MSN
● Supports Gmail as sender on mail service settings
●Providing Central Management Software to manage or monitor multi-cameras
1
1.
.2
2
P
PO
OE
E
(
(P
Po
ow
we
er
r
o
ov
ve
er
r
E
Et
th
he
er
rn
ne
et
t)
)
The Network Camera is POE-compliant, allowing transmission of power and data via a single
Ethernet cable. Such as the following picture: connect the Network Camera to a PoE-enabled
router/ switch via Ethernet cable.

4
w
w
w
ww
ww
w.
.f
fo
os
sc
ca
am
m.
.c
co
om
m
S
Sh
he
en
nz
zh
he
en
n
F
Fo
os
sc
ca
am
m
I
In
nt
te
el
ll
li
ig
ge
en
nt
t
T
Te
ec
ch
hn
no
ol
lo
og
gy
y
C
Co
o.
.,
,
L
Li
im
mi
it
te
ed
d
T
Te
el
l:
:
8
86
6
7
75
55
5
2
26
67
74
4
5
56
66
68
8
F
Fa
ax
x:
:
8
86
6
7
75
55
5
2
26
67
74
4
5
51
16
68
8
4
1
1.
.3
3
R
Re
ea
ad
d
B
Be
ef
fo
or
re
e
U
Us
se
e
Please first verify that all contents received are complete according to the Package Contents
listed below. Before the Network Camera is installed, please carefully read and follow the
instructions in the Quick Installation Guide to avoid damage due to faulty assembly and
installation. This also ensures the product is used properly as intended.
1
1.
.4
4
P
Pa
ac
ck
ki
in
ng
g
C
Co
on
nt
te
en
nt
ts
s
● IPCAM×1
● CD×1
● DC Power Supply×1
● Quick Installation Guide×1
● Mounting bracket×1(option)
●Warranty Card×1
●Network Cable×1
1
1.
.5
5
P
Ph
hy
ys
si
ic
ca
al
l
D
De
es
sc
cr
ri
ip
pt
ti
io
on
n
Front Panel
Figure 1.1
1 LENS: CMOS sensor with fixed focus lens
2 Infrared LED: 60 IR LEDs

5
w
w
w
ww
ww
w.
.f
fo
os
sc
ca
am
m.
.c
co
om
m
S
Sh
he
en
nz
zh
he
en
n
F
Fo
os
sc
ca
am
m
I
In
nt
te
el
ll
li
ig
ge
en
nt
t
T
Te
ec
ch
hn
no
ol
lo
og
gy
y
C
Co
o.
.,
,
L
Li
im
mi
it
te
ed
d
T
Te
el
l:
:
8
86
6
7
75
55
5
2
26
67
74
4
5
56
66
68
8
F
Fa
ax
x:
:
8
86
6
7
75
55
5
2
26
67
74
4
5
51
16
68
8
5
Back View
Figure 1.2
1 LAN: RJ-45/10-100 Base T
2 RESET BUTTON: Press and hold down the RESET BUTTON for 10 seconds. Release the
power button and IP camera will be reset back to the factory default parameter.
3 Power: DC 5V/2A Power supply
Bottom View
There are up to three labels located on the body of the camera; this is an important feature of
original Foscam cameras. If your camera does not have labels as shown in Figure 1.3 ,it may be
a clone one. Cloned Foscam cameras can not use original firmware and are not eligible for
warranty or technical services.
Figure 1.3
FOSCAM domain name

6
w
w
w
ww
ww
w.
.f
fo
os
sc
ca
am
m.
.c
co
om
m
S
Sh
he
en
nz
zh
he
en
n
F
Fo
os
sc
ca
am
m
I
In
nt
te
el
ll
li
ig
ge
en
nt
t
T
Te
ec
ch
hn
no
ol
lo
og
gy
y
C
Co
o.
.,
,
L
Li
im
mi
it
te
ed
d
T
Te
el
l:
:
8
86
6
7
75
55
5
2
26
67
74
4
5
56
66
68
8
F
Fa
ax
x:
:
8
86
6
7
75
55
5
2
26
67
74
4
5
51
16
68
8
6
2
2
S
Su
ur
rv
ve
ei
il
ll
la
an
nc
ce
e
S
So
of
ft
tw
wa
ar
re
e
G
GU
UI
I
Please refer to the Quick Installation Guide if you install the camera at first time. After finishing
quick installation, you can take time to learn the operation of the software.
2
2.
.1
1
L
Lo
og
gi
in
n
W
Wi
in
nd
do
ow
w
Figure 2.1
Please check the login window above, it was divided to 6 sections from no. 1 to 6.
Section1 Select Language
FOSCAM camera supports up to multi-languages, such as English, Spanish, Deutsch and so on.
You can select the language you need via pull down the dropdown toolbar and click on the
language to switch.
1
2
3
4
5
6

7
w
w
w
ww
ww
w.
.f
fo
os
sc
ca
am
m.
.c
co
om
m
S
Sh
he
en
nz
zh
he
en
n
F
Fo
os
sc
ca
am
m
I
In
nt
te
el
ll
li
ig
ge
en
nt
t
T
Te
ec
ch
hn
no
ol
lo
og
gy
y
C
Co
o.
.,
,
L
Li
im
mi
it
te
ed
d
T
Te
el
l:
:
8
86
6
7
75
55
5
2
26
67
74
4
5
56
66
68
8
F
Fa
ax
x:
:
8
86
6
7
75
55
5
2
26
67
74
4
5
51
16
68
8
7
Section2 FOSCAM Website Link
There is an access link to Foscam website homepage, if you need tech support you can contact
Foscam directly.
Section3 ActiveX Mode
If your PC is windows based OS, such as Windows XP, Windows7, Windows Vista and you are
using IE-based browsers like IE6, IE7, IE8, please choose IEActiveX Mode login mode.
.
Section4 Server Push Mode
If you are using non-IE based browser, like Firefox, Safari, Google Chrome please choose
Server Push Mode mode.
Section5 Mobile Phone
If you are using the Mobile to access the camera, here you need to select Mobile Phone login
mode.
Section6 Note
Note that when you login the camera, please select the corresponding login mode.

8
w
w
w
ww
ww
w.
.f
fo
os
sc
ca
am
m.
.c
co
om
m
S
Sh
he
en
nz
zh
he
en
n
F
Fo
os
sc
ca
am
m
I
In
nt
te
el
ll
li
ig
ge
en
nt
t
T
Te
ec
ch
hn
no
ol
lo
og
gy
y
C
Co
o.
.,
,
L
Li
im
mi
it
te
ed
d
T
Te
el
l:
:
8
86
6
7
75
55
5
2
26
67
74
4
5
56
66
68
8
F
Fa
ax
x:
:
8
86
6
7
75
55
5
2
26
67
74
4
5
51
16
68
8
8
2.2 Surveillance Window
Select the ActiveX mode and you will enter the surveillance window.
Figure 2.2
Section1 Device Name
Default device name is Anonymous. You can define a name for your camera as you like (Please
go to chapter 3.1 and read how to set it)
Section2 Multi-Device Window
The firmware inside the camera supports up to maximum of 9 cameras being monitoring at the
same time. You can add other cameras in multi-device setting (read chapter 3.5).
1
2
3
6
4
7
5

9
w
w
w
ww
ww
w.
.f
fo
os
sc
ca
am
m.
.c
co
om
m
S
Sh
he
en
nz
zh
he
en
n
F
Fo
os
sc
ca
am
m
I
In
nt
te
el
ll
li
ig
ge
en
nt
t
T
Te
ec
ch
hn
no
ol
lo
og
gy
y
C
Co
o.
.,
,
L
Li
im
mi
it
te
ed
d
T
Te
el
l:
:
8
86
6
7
75
55
5
2
26
67
74
4
5
56
66
68
8
F
Fa
ax
x:
:
8
86
6
7
75
55
5
2
26
67
74
4
5
51
16
68
8
9
.Figure 2.3
Section3 Image Parameters Settings
OSD
OSD is used to add timestamp on the video. There are five text colors to choose from: Black, red,
yellow, white, blue.
Add OSD on record

10
w
w
w
ww
ww
w.
.f
fo
os
sc
ca
am
m.
.c
co
om
m
S
Sh
he
en
nz
zh
he
en
n
F
Fo
os
sc
ca
am
m
I
In
nt
te
el
ll
li
ig
ge
en
nt
t
T
Te
ec
ch
hn
no
ol
lo
og
gy
y
C
Co
o.
.,
,
L
Li
im
mi
it
te
ed
d
T
Te
el
l:
:
8
86
6
7
75
55
5
2
26
67
74
4
5
56
66
68
8
F
Fa
ax
x:
:
8
86
6
7
75
55
5
2
26
67
74
4
5
51
16
68
8
10
Select this option if you want to add a timestamp to recordings.
Resolution
1) 320x240-------QVGA
2) 640x480-------VGA
There are two resolutions, the bigger one (VGA) is 640x480 pixels, and the smaller one (QVGA)
is 320x240 pixels. The bigger the resolution, the better of the image quality is, but the lower the
frame rate is. If you are accessing the camera via internet and want to get more fluent video
streaming, please select resolution QVGA 320x240.
Mode
1) 50HZ ---------Indoor surveillance (Region: Europe, China)
2) 60HZ ---------Indoor surveillance (Region: USA, Canada)
3) Outdoor-------Outdoor surveillance (Region: All over the world)
There are three options within the menu of Mode: 50HZ, 60HZ and Outdoor. It depends on the
frequency of the electricity and surveillance model (indoors & outdoor). Please choose outdoor
mode, when the camera was installed outside.
Fps
1) Max---------- Maximum frame rate
2) 20fps, 15fps, 10fps, 5fps,4fps,3fps,2fps,1fps, 5fps, 1fps ,1/2fps,1/3fps,1/4fps,1/5fps-------
customized frame rate
You can choose option within the menu of Fps to adjust the frame rate. It is often used in LAN
network when you want to lower the frame rate, so that you can save more bandwidth.
Brightness
Default parameter is 6, you can adjust the brightness of the image by clicking plus or minus
button.
Contrast
Default parameter is 4, you can adjust the contrast of the image by clicking plus or minus button.
Flip & Mirror
You can flip the image by enabling Flip button, or mirror the image by enabling Mirror button.

11
w
w
w
ww
ww
w.
.f
fo
os
sc
ca
am
m.
.c
co
om
m
S
Sh
he
en
nz
zh
he
en
n
F
Fo
os
sc
ca
am
m
I
In
nt
te
el
ll
li
ig
ge
en
nt
t
T
Te
ec
ch
hn
no
ol
lo
og
gy
y
C
Co
o.
.,
,
L
Li
im
mi
it
te
ed
d
T
Te
el
l:
:
8
86
6
7
75
55
5
2
26
67
74
4
5
56
66
68
8
F
Fa
ax
x:
:
8
86
6
7
75
55
5
2
26
67
74
4
5
51
16
68
8
11
Section4 IR Lights Buttons
: Click this icon, all the IR lights will turn on.
: Click this icon to turn off IR lights.
Section5 Device Management
Device Management ------Path to Administrator Control Panel, Click it, and it will lead to
Administrator Control Panel.
Section6 Record & Snapshot & Full Screen Buttons
1------Record Button Click it and it pop-up a path-setting window, you can select the storage
path and the record file name. At the same time the record icon changes to ,, Click it again
and stop recording.
2------Snapshot Click it to make snapshot and it pop-up a window which picture you snapshot,
right click in the window and save the picture to anywhere you want.
3------Full Screen Click it to make full-screen, or you can double click the surveillance screen
to make full-screen.
Section7 Play/Stop Buttons
1------Play Click it to play the video of the camera
2------Stop Click it to stop the video of the camera
1
2
3
1
2

12
w
w
w
ww
ww
w.
.f
fo
os
sc
ca
am
m.
.c
co
om
m
S
Sh
he
en
nz
zh
he
en
n
F
Fo
os
sc
ca
am
m
I
In
nt
te
el
ll
li
ig
ge
en
nt
t
T
Te
ec
ch
hn
no
ol
lo
og
gy
y
C
Co
o.
.,
,
L
Li
im
mi
it
te
ed
d
T
Te
el
l:
:
8
86
6
7
75
55
5
2
26
67
74
4
5
56
66
68
8
F
Fa
ax
x:
:
8
86
6
7
75
55
5
2
26
67
74
4
5
51
16
68
8
12
Record and multi-device function are controlled by ActiveX controller, therefore Firefox or
Google Chrome, Safari browsers will not allow these functions.
For Firefox, Google Chrome, Safari, you should select the Server Push Mode and you can see
the following screen:
Figure 2.4

13
w
w
w
ww
ww
w.
.f
fo
os
sc
ca
am
m.
.c
co
om
m
S
Sh
he
en
nz
zh
he
en
n
F
Fo
os
sc
ca
am
m
I
In
nt
te
el
ll
li
ig
ge
en
nt
t
T
Te
ec
ch
hn
no
ol
lo
og
gy
y
C
Co
o.
.,
,
L
Li
im
mi
it
te
ed
d
T
Te
el
l:
:
8
86
6
7
75
55
5
2
26
67
74
4
5
56
66
68
8
F
Fa
ax
x:
:
8
86
6
7
75
55
5
2
26
67
74
4
5
51
16
68
8
13
3
3
A
Ad
dv
va
an
nc
ce
ed
d
C
Ca
am
me
er
ra
a
S
Se
et
tt
ti
in
ng
gs
s
Click the bar “Device Management”, goes to Administrator Control Panel to make advanced
camera settings.
3.1 Device Status
Figure 3.1
1------Device ID MAC ID of the camera by wired connection
2-----Device Firmware Version System Firmware version of the camera
3-----Device Web UI Version Web UI firmware version of the camera
4-----Alias Name of the camera
5-----Alarm Status The status of Alarm Service Setting
6-----DDNS Status The status of DDNS Setting
7-----UPnP Status The status of UPnP Setting
8-----MSN Status The status of MSN Setting

14
w
w
w
ww
ww
w.
.f
fo
os
sc
ca
am
m.
.c
co
om
m
S
Sh
he
en
nz
zh
he
en
n
F
Fo
os
sc
ca
am
m
I
In
nt
te
el
ll
li
ig
ge
en
nt
t
T
Te
ec
ch
hn
no
ol
lo
og
gy
y
C
Co
o.
.,
,
L
Li
im
mi
it
te
ed
d
T
Te
el
l:
:
8
86
6
7
75
55
5
2
26
67
74
4
5
56
66
68
8
F
Fa
ax
x:
:
8
86
6
7
75
55
5
2
26
67
74
4
5
51
16
68
8
14
Another Way:
Double click the the icon “IP Camera.exe”, select the camera IP, right click and select
the Basic Properties, you can also see the Firmware Version and MAC Address, such as the
following screen:
Figure 3.2
Figure 3.3

15
w
w
w
ww
ww
w.
.f
fo
os
sc
ca
am
m.
.c
co
om
m
S
Sh
he
en
nz
zh
he
en
n
F
Fo
os
sc
ca
am
m
I
In
nt
te
el
ll
li
ig
ge
en
nt
t
T
Te
ec
ch
hn
no
ol
lo
og
gy
y
C
Co
o.
.,
,
L
Li
im
mi
it
te
ed
d
T
Te
el
l:
:
8
86
6
7
75
55
5
2
26
67
74
4
5
56
66
68
8
F
Fa
ax
x:
:
8
86
6
7
75
55
5
2
26
67
74
4
5
51
16
68
8
15
3
3.
.2
2
Alias Settings
Default alias is Anonymous. You can define a name for your camera here such as apple. Click
Submit to save your changes. The alias name supports special characters.
Figure 3.4
3
3.
.3
3
Date & Time Settings
Choose the time zone of your country. You can choose Sync with NTP Server or Sync with PC
Time. If your country implements the Daylight Saving Time, that option can also be selected.
Figure 3.5
Click the option here to
modify the device name
Enter the device name as you
like. Use different names to
identify multi-cameras
Go to Data &Time Settings
Select the time zone belong
to your region

16
w
w
w
ww
ww
w.
.f
fo
os
sc
ca
am
m.
.c
co
om
m
S
Sh
he
en
nz
zh
he
en
n
F
Fo
os
sc
ca
am
m
I
In
nt
te
el
ll
li
ig
ge
en
nt
t
T
Te
ec
ch
hn
no
ol
lo
og
gy
y
C
Co
o.
.,
,
L
Li
im
mi
it
te
ed
d
T
Te
el
l:
:
8
86
6
7
75
55
5
2
26
67
74
4
5
56
66
68
8
F
Fa
ax
x:
:
8
86
6
7
75
55
5
2
26
67
74
4
5
51
16
68
8
16
3
3.
.4
4
U
Us
se
er
r
S
Se
et
tt
ti
in
ng
gs
s
Here you can create users and set permission levels, visitor, operator or administrator.
Click Submit to save these settings. The camera will reboot.
Figure 3.6
Here you can also set one important file locations for the camera, the Alarm Record Path.
Simply click Browse and choose the path to the required folder.
The Alarm Record Path location is used to store automatically recorded files when the camera
is activated by motion. (See set motion alarm. Figure 3.35) The default path for Alarm Record
Path is C:\Documents and Settings\All Users\Documents.
NOTE: In Windows7 or Vista, if you cannot set the paths.:
Windows7 or Vista's security level is higher than Windows XP/2000.For "set record path"
function, user should add the Device IP address to the Internet Explorer's 'Trusted sites' first. The
step is: IE browserToolInternet ProperSecurityTrusted sitesSitesAdd
You can set different
permission levels, but at
least one administrator

17
w
w
w
ww
ww
w.
.f
fo
os
sc
ca
am
m.
.c
co
om
m
S
Sh
he
en
nz
zh
he
en
n
F
Fo
os
sc
ca
am
m
I
In
nt
te
el
ll
li
ig
ge
en
nt
t
T
Te
ec
ch
hn
no
ol
lo
og
gy
y
C
Co
o.
.,
,
L
Li
im
mi
it
te
ed
d
T
Te
el
l:
:
8
86
6
7
75
55
5
2
26
67
74
4
5
56
66
68
8
F
Fa
ax
x:
:
8
86
6
7
75
55
5
2
26
67
74
4
5
51
16
68
8
17
3.5 Multi-Device Settings
If you want to view multi-surveillance screens on one window, you need to login one camera, and
set it as the main device, and do Multi-Device Settings, add other cameras to the first one
camera. Before you do multi-cams settings, you need to assign different port such as 81, 82, 83,
84, 85, 86, 87, 88 to the cameras if there is 8 cams installed.
The firmware within the camera can support a maximum of 9 devices monitoring all at the same
time.
3.5.1 Add cameras in LAN
In Multi-Device Settings page, you can see all devices searched in LAN. The 1st Device is the
default one. You can add more cameras in the list in LAN for monitoring. The camera’s software
supports up to 9 IP Cameras online simultaneously. Click The 2nd Device and click the item in
the Device List in LAN, the Alias, Host and Http Port will be filled in the boxes below
automatically. Enter the correct username and password then click Add. Add more cameras in
the same way. After all cameras have been added, choose Submit.
Figure 3.7a
1 Click it, alias, host and HTTP
Port will be filled in the following
boxes automatically
2 Enter the User name and
password of the 2ndcamera
3 Click Add to take effect

18
w
w
w
ww
ww
w.
.f
fo
os
sc
ca
am
m.
.c
co
om
m
S
Sh
he
en
nz
zh
he
en
n
F
Fo
os
sc
ca
am
m
I
In
nt
te
el
ll
li
ig
ge
en
nt
t
T
Te
ec
ch
hn
no
ol
lo
og
gy
y
C
Co
o.
.,
,
L
Li
im
mi
it
te
ed
d
T
Te
el
l:
:
8
86
6
7
75
55
5
2
26
67
74
4
5
56
66
68
8
F
Fa
ax
x:
:
8
86
6
7
75
55
5
2
26
67
74
4
5
51
16
68
8
18
Figure 3.7b
Back to Surveillance Windows, and click Four Windows option, you will see four cameras you
added.
Figure 3.8
Click Submit after add all cameras

19
w
w
w
ww
ww
w.
.f
fo
os
sc
ca
am
m.
.c
co
om
m
S
Sh
he
en
nz
zh
he
en
n
F
Fo
os
sc
ca
am
m
I
In
nt
te
el
ll
li
ig
ge
en
nt
t
T
Te
ec
ch
hn
no
ol
lo
og
gy
y
C
Co
o.
.,
,
L
Li
im
mi
it
te
ed
d
T
Te
el
l:
:
8
86
6
7
75
55
5
2
26
67
74
4
5
56
66
68
8
F
Fa
ax
x:
:
8
86
6
7
75
55
5
2
26
67
74
4
5
51
16
68
8
19
Figure 3.9
3.5.2 Add cameras in WAN
If you want to view all cameras via the internet(remote computer), you will need to add them
using DDNS domain name. Firstly, make sure all of the cameras you added can be accessed
through the internet. (Read How to configure DDNS settings in chapter 3.10)
Login to the first camera using a DDNS domain name and port.
Other manuals for FI8905E
2
Table of contents
Other Foscam Security Camera manuals

Foscam
Foscam R2 User manual

Foscam
Foscam FI9853EP User manual

Foscam
Foscam FI9805W User manual

Foscam
Foscam D2EP User manual

Foscam
Foscam FLC/F41 User manual

Foscam
Foscam V5P User manual

Foscam
Foscam X5 User manual

Foscam
Foscam FI8918 User manual

Foscam
Foscam HUNTVISION P2 User manual

Foscam
Foscam FI8910W User manual

Foscam
Foscam FI9902P User manual

Foscam
Foscam FI9900P User manual

Foscam
Foscam FI8905E User manual

Foscam
Foscam FN3108XE-B4-1T User manual

Foscam
Foscam FI8620 User manual

Foscam
Foscam R2 User manual

Foscam
Foscam FI8910W User manual

Foscam
Foscam G2EP User manual

Foscam
Foscam FI8910W User manual

Foscam
Foscam FI8918W Operating and maintenance instructions